Cluster Setup & Management#
Cloud Functions admins can install the NVIDIA Cluster Agent to enable existing GPU Clusters to act as deployment targets for NVCF functions. The NVIDIA Cluster Agent is a function deployment orchestrator that communicates with the NVCF control plane. This page describes how to do the following:
Register a cluster with NVCF using the NVIDIA Cluster Agent.
Configure the cluster by defining GPU instance types, configurations, regions, and authorized NCA (NVIDIA Cloud Account) IDs.
Verify the cluster setup was successful.
After installing the NVIDIA Cluster Agent on a cluster:
The registered cluster will show as a deployment option in the
GET /v2/nvcf/clusterGroupsAPI response, and Cloud Functions deployment menu.Any functions under the cluster’s authorized NCA IDs can now deploy on the cluster.
Prerequisites#
Access to a Kubernetes cluster including GPU-enabled nodes (“GPU cluster”)
The cluster must have a compatible version of Kubernetes.
The cluster must have the NVIDIA GPU Operator installed.
If your cloud provider does not support the NVIDIA GPU Operator, Manual Instance Configuration is possible, but not recommended due to lack of maintainability.
To get the most out of clusters with multi-node NVLink (MNNVL) GPUs like GB200, the NVIDIA GPU DRA driver must be installed. See the NVLink-optimized Clusters for details.
Registering the cluster requires
kubectlandhelminstalled.The user registering the cluster must have the
cluster-adminrole privileges to install the NVIDIA Cluster Agent Operator (nvca-operator).The user registering the cluster must have the Cloud Functions Admin role within their NGC organization.
Supported Kubernetes Versions#
Minimum Kubernetes Supported Version:
v1.25.0Maximum Kubernetes Supported Version
v1.32.x
Considerations#
The NVIDIA Cluster Agent currently only supports caching if the cluster is enabled with
StorageClassconfigurations. If the “Caching Support” capability is enabled, the agent will make the best effort by attempting to detect storage during deployments and fall back on non-cached workflows.All NVIDIA-managed clusters support autoscaling functionality fully for all heuristics. However, clusters registered to NVCF via the agent only support autoscaling via the function queue depth heuristic.
Each function and task requires several infrastructure containers be deployed alongside workload containers. These infrastructure containers collectively need 6 CPU cores and 8 Gi of system memory to execute. Each GPU node must have at least this many resources, ideally significantly more for workload resource usage.
Register the Cluster#
Reach the cluster registration page by navigating to Cloud Functions in the NGC product dropdown, and choosing “Settings” on the left-hand menu. You must be a Cloud Functions Admin to see this page. Choose “Register Cluster” to begin the registration process.

Configuration#
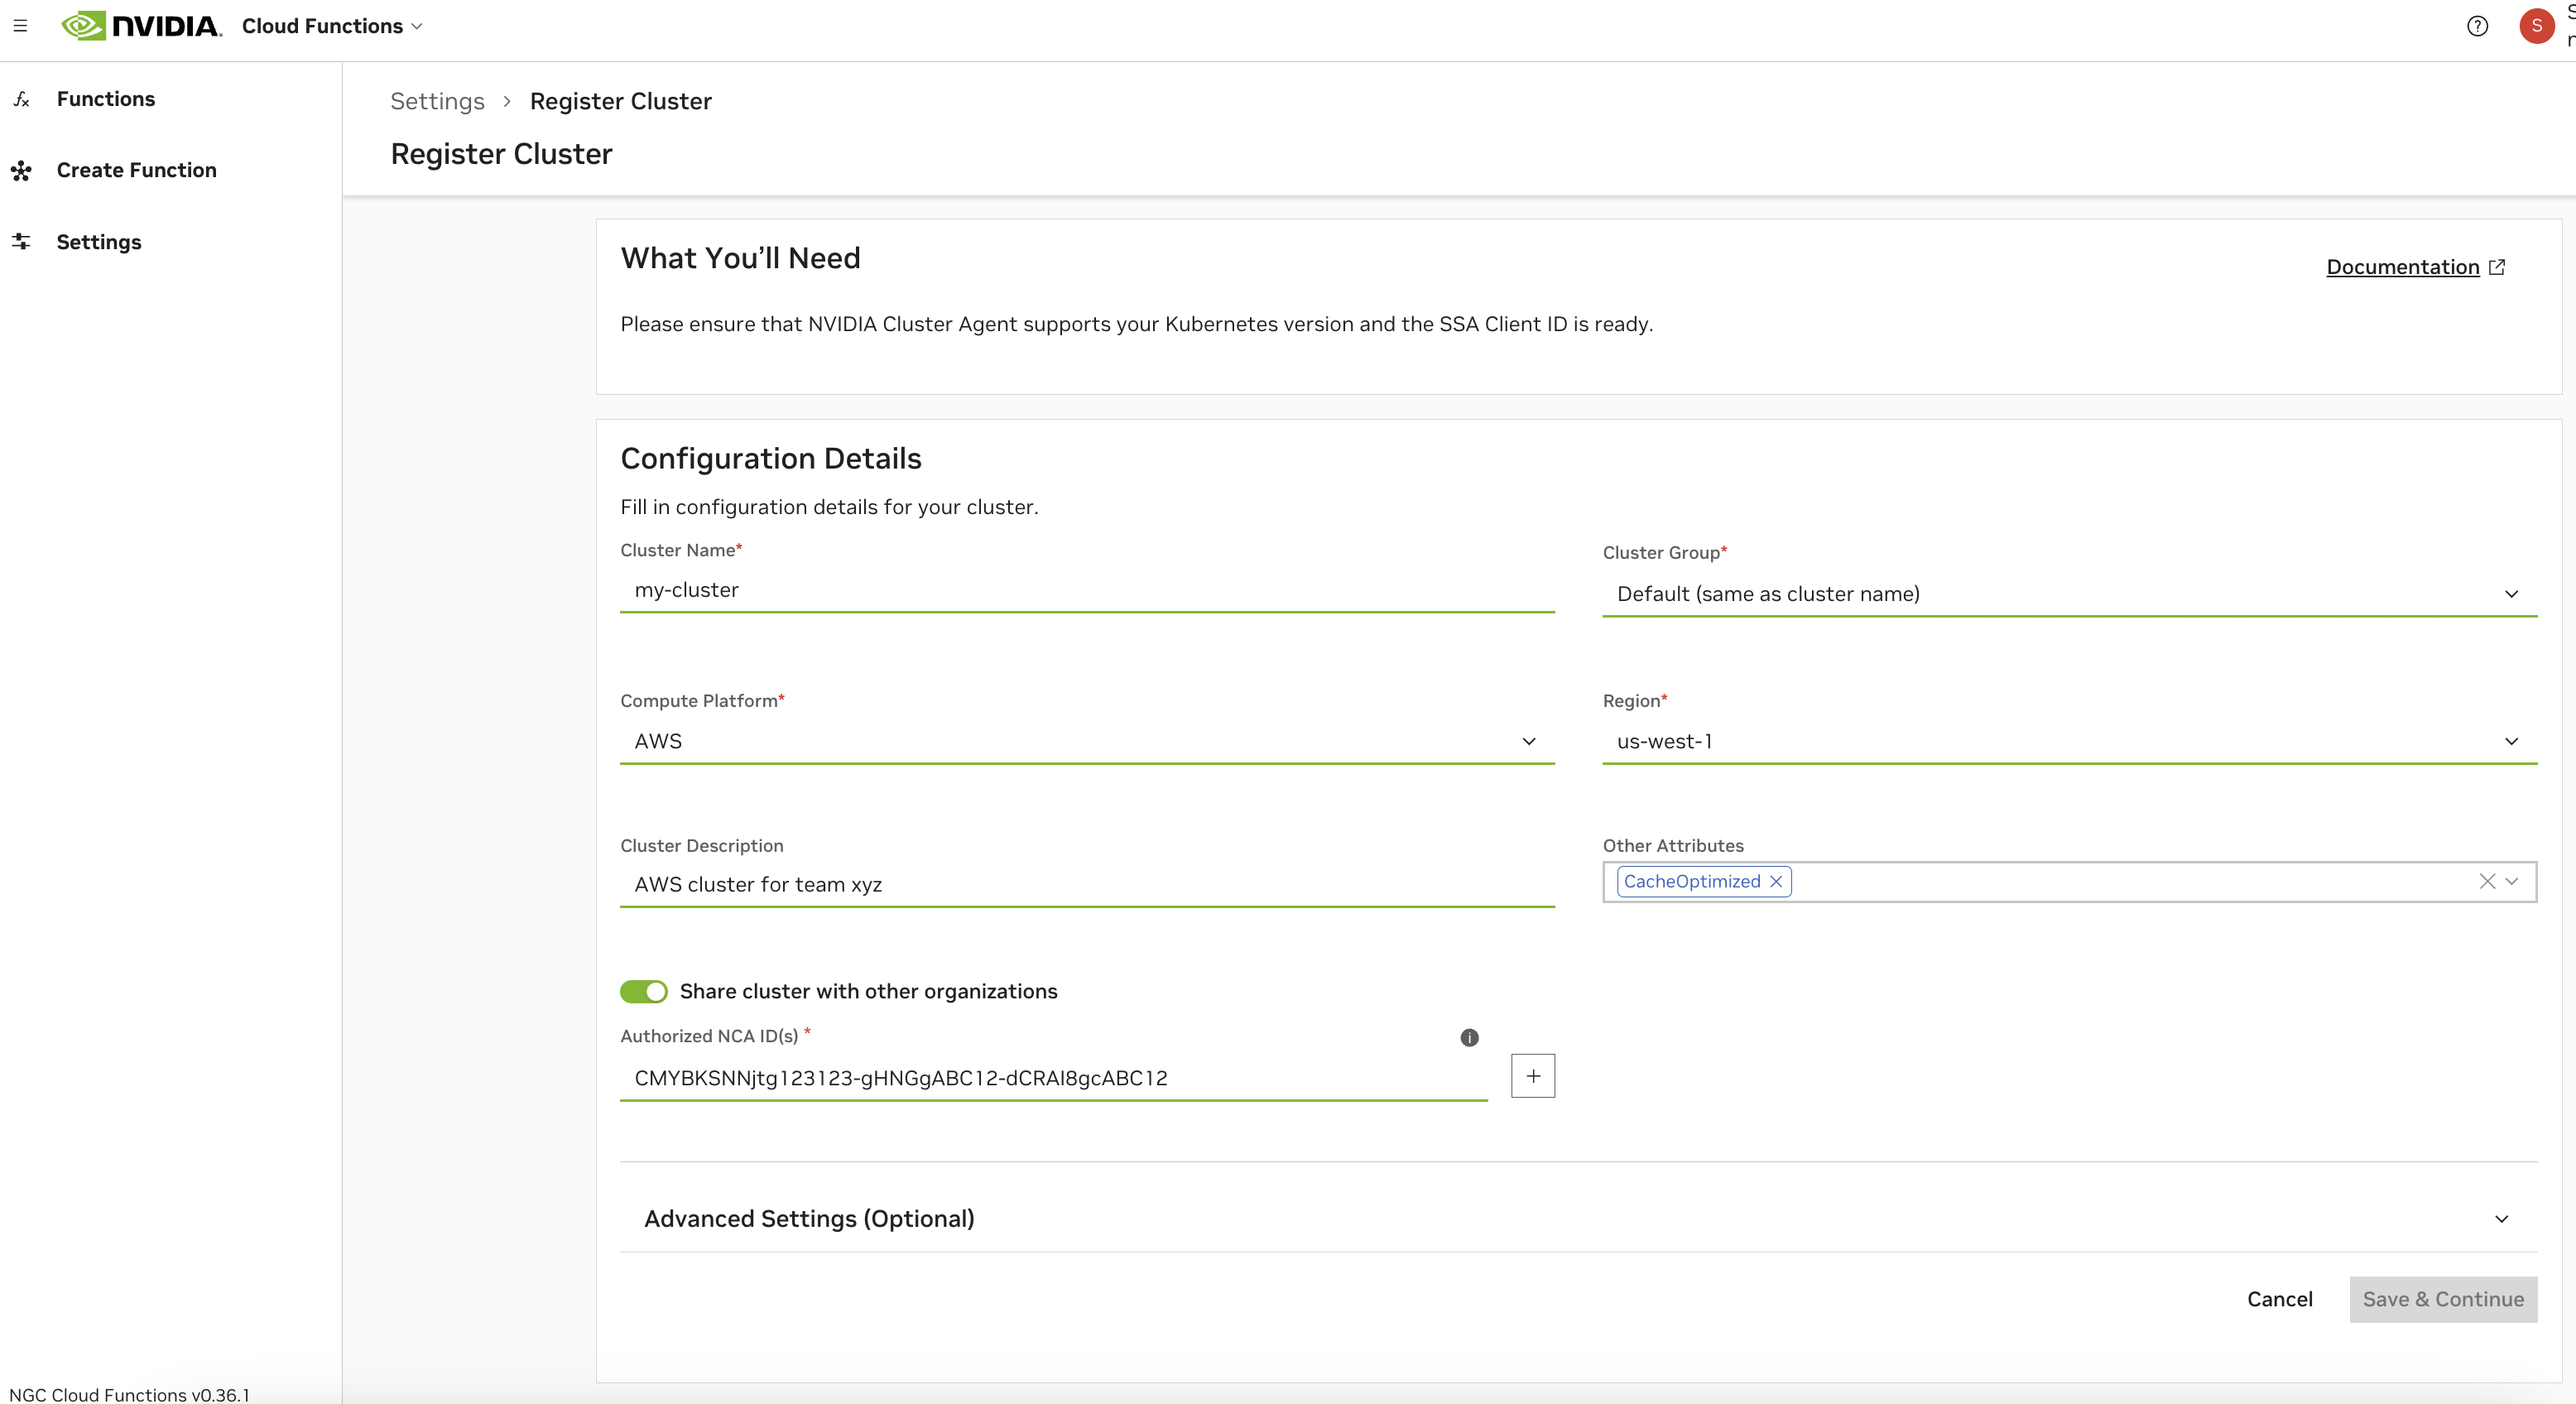
See below for descriptions of all cluster configuration options.
Field |
Description |
|---|---|
Cluster Name |
The name for the cluster. This field is not changeable once configured. |
Cluster Group |
The name of the cluster group. This is usually identical to the cluster name, except in cases when there are multiple clusters you’d like to group. This would be done to enable a function to deploy on any of the clusters when the group is selected (for example, due to identical hardware support). |
Compute Platform |
The cloud platform the cluster is deployed on. This field is a standard part of the node name label format that the cluster agent uses: <Platform>.GPU.<GPUName> |
Region |
The region the cluster is deployed in. This field is required for enabling future optimization and configuration when deploying functions. |
Cluster Description |
Optional description for the cluster, this provides additional context about the cluster and will be returned in the cluster list under the Settings page, and the |
Cluster Management Mode |
NGC (Managed through UI) or Helm-Managed (Managed through Gitops workflow. See Helm-Managed Mode for details) |
Other Attributes |
Tag your cluster with additional properties. CacheOptimized: Enables rapid instance spin-up, requires extra storage configuration and caching support attributed in the Advanced Cluster Setup - See Advanced Settings. KataRuntimeIsolation: Cluster is equipped with enhanced setup to ensure superior workload isolation using Kata Containers. See Kata Container-Isolated Workloads. NVLinkOptimized: Workloads targeting NVIDIA Multi-Node NVLink GPUs in the cluster like GB200 will have improved inter-node performance. See NVLink-optimized Clusters for details. |
Elevating efficiency for rapid instance spin-up, mandating extra storage configuration and caching support attribute in Advanced cluster setup.
By default, the cluster will be authorized to the NCA ID of the current NGC organization being used during cluster configuration. If you choose to share the cluster with other NGC organizations, you will need to retrieve their corresponding NCA IDs. Sharing the cluster will allow other NVCF accounts to deploy cloud functions on it, with no limitations on how many GPUs within the cluster they deploy on.
Note
NVCF “accounts” are directly tied to, and defined by, NCA IDs (“NVIDIA Cloud Account”). Each NGC organization, with access to the Cloud Functions UI, has a corresponding NGC Organization Name and NCA ID. Please see the NGC Organization Profile Page to find these details.
Warning
Once functions from other NGC organizations have been deployed on the cluster, removing them from the authorized NCA IDs list, or removing sharing completely from the cluster, can cause disruption of service. Ideally, any functions tied to other NCA IDs should be undeployed before the NCA ID is removed from the authorized NCA IDs list.
Advanced Settings#
Note
Some of the options below are supported only on Cluster Agent Versions 2.50.0 or higher. If you are upgrading from an older version,
you must Edit Cluster Configuration from Settings page and enter the cluster specific configuration and hit Save and continue
as soon as the version 2.50.0 or higher is selected from View Update Instructions

See below for descriptions of all capability options in the “Advanced Settings” section of the cluster configuration.
Configuration |
Description |
|---|---|
Cluster Agent Version |
Version of the cluster agent to be installed on the cluster. Defaults to the latest available. Recommended to use the latest version available at the time of registration unless there are business reasons to pick another version. |
Node Selector Key and Node Selector Value |
This Key-Value pair is the label selector key to control the placement of the cluster agent and the cluster agent operator pods to specic nodes
on the cluster. Not providing a value will allow these infrastructure components to be placed anywhere on the cluster. Ensure there are matching nodes in the
cluster using |
Priority Class |
Set appropriate kubernetes priority class name for cluster agent and the operator pod. Additional details: Priority Class |
Model Cache Volume Mount Options |
Configure the model cache volume mount options based on the CSI Driver capabilities on the cluster. Refer to the CSI Driver documentation.
Defaults to Additional details: Mount options |
Network CIDR Range |
Quoted & comma separated list of CIDR range for outbound network access for the infrastructure components & workloads on the cluster. |
Worker Degradation Period |
Stabilization time (in minutes) before cluster agent fails to consider a worker as healthy and initiates a purge. |
Cluster Features#
Cluster Features allow enabling specific features on the cluster. Note that for customer-managed clusters (registered via the Cluster Agent) Dynamic GPU Discovery is enabled by default. For NVIDIA managed clusters, Collect Function Logs is also enabled by default.
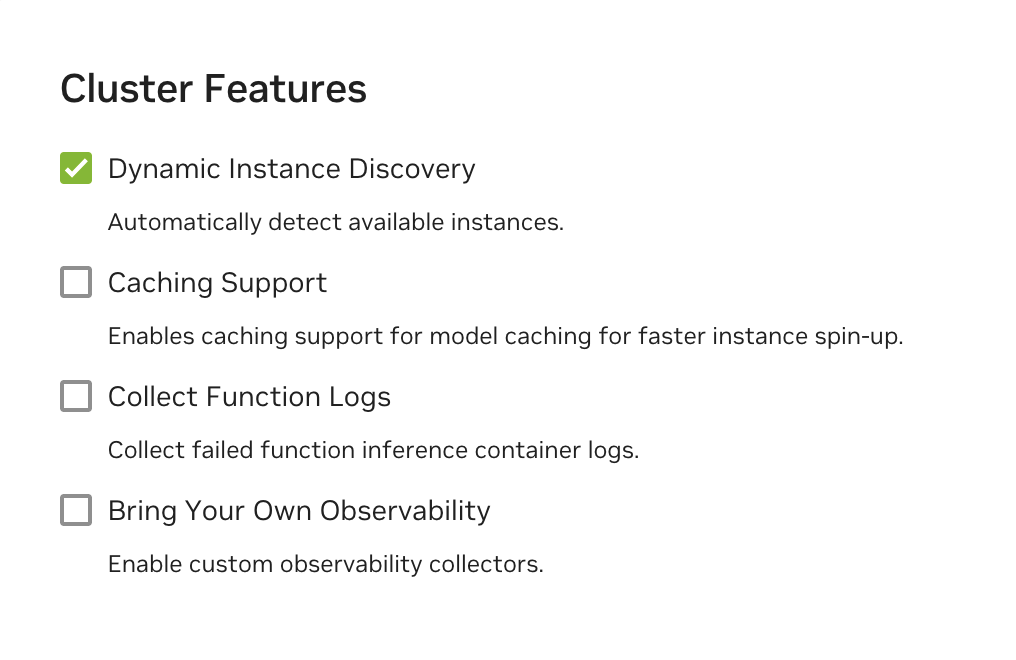
See below for descriptions of all cluster features in the cluster configuration.
Capability |
Description |
|---|---|
Dynamic GP Discovery |
Enables automatic detection and management of allocatable GPU capacity within the cluster via the NVIDIA GPU Operator. This capability is strongly recommended and would only be disabled in cases where Manual Instance Configuration is required. |
Collect Function Logs |
This capability enables the emission of comprehensive Cluster Agent logs, which are then forwarded to the NVIDIA internal team, aiding in diagnosing and resolving issues effectively. When enabled these will not be visible in the UI, but are always available by running commands to retrieve logs directly on the cluster. |
Caching Support |
Enhances application performance by storing frequently accessed data (models, resources and containers) in a cache. See Caching Support. |
Bring Your Own Observability |
Enable support for custom observability selectors in the cluster. Additional setup details: BYOObservability |
Optimized AI Workload Scheduling |
Enable support for optimized AI workload scheduling using NVIDIA KAI Scheduler. Additional setup details: KAIScheduler |
Note
Removing the Dynamic GPU Discovery will require manual instance configuration. See Manual Instance Configuration.
Caching Support#
Enabling caching for models, resources and containers is recommended for optimal performance. You must create StorageClass configurations for caching within your cluster to fully enable “Caching Support” with the Cluster Agent. See examples below.
Note
Caching is currently not supported for AWS EKS.
StorageClass Configurations in GCP
 1kind: StorageClass
 2apiVersion: storage.k8s.io/v1
 3metadata:
 4    name: nvcf-sc
 5provisioner: pd.csi.storage.gke.io
 6allowVolumeExpansion: true
 7volumeBindingMode: Immediate
 8reclaimPolicy: Retain
 9parameters:
10    type: pd-ssd
11    csi.storage.k8s.io/fstype: xfs
 1kind: StorageClass
 2apiVersion: storage.k8s.io/v1
 3metadata:
 4    name: nvcf-cc-sc
 5provisioner: pd.csi.storage.gke.io
 6allowVolumeExpansion: true
 7volumeBindingMode: Immediate
 8reclaimPolicy: Retain
 9parameters:
10    type: pd-ssd
11    csi.storage.k8s.io/fstype: xfs
Note
GCP currently allows only 10 VM’s to mount a Persistent Volume in Read-Only mode.
StorageClass Configurations in Azure
 1kind: StorageClass
 2apiVersion: storage.k8s.io/v1
 3metadata:
 4    name: nvcf-sc
 5provisioner: file.csi.azure.com
 6allowVolumeExpansion: true
 7volumeBindingMode: Immediate
 8reclaimPolicy: Retain
 9parameters:
10    skuName: Standard_LRS
11    csi.storage.k8s.io/fstype: xfs
 1kind: StorageClass
 2apiVersion: storage.k8s.io/v1
 3metadata:
 4    name: nvcf-cc-sc
 5provisioner: file.csi.azure.com
 6allowVolumeExpansion: true
 7volumeBindingMode: Immediate
 8reclaimPolicy: Retain
 9parameters:
10    skuName: Standard_LRS
11    csi.storage.k8s.io/fstype: xfs
StorageClass Configurations in Oracle Cloud
 1kind: StorageClass
 2apiVersion: storage.k8s.io/v1
 3metadata:
 4  name: nvcf-sc
 5provisioner: blockvolume.csi.oraclecloud.com
 6allowVolumeExpansion: true
 7volumeBindingMode: Immediate
 8reclaimPolicy: Retain
 9parameters:
10  csi.storage.k8s.io/fstype: xfs
 1kind: StorageClass
 2apiVersion: storage.k8s.io/v1
 3metadata:
 4  name: nvcf-cc-sc
 5provisioner: blockvolume.csi.oraclecloud.com
 6allowVolumeExpansion: true
 7volumeBindingMode: Immediate
 8reclaimPolicy: Retain
 9parameters:
10  csi.storage.k8s.io/fstype: xfs
Apply the StorageClass Configurations
Save the StorageClass template to files nvcf-sc.yaml and nvcf-cc-sc.yaml and apply them as:
1kubectl create -f nvcf-sc.yaml
2kubectl create -f nvcf-cc-sc.yaml
Override the Default Mount Options for Cache Volumes
Note
Supported in Cluster Agent Versions 2.45.21 or higher
Warning
Please note this is a Post NVCA Install Operation and needs careful consideration to ensure there are no volume corruptions. Use with caution.
Cluster Agent with caching support by default will enable linux mount-options with ro,norecovery,nouuid.
If the CSI Driver in the cluster doesn’t support mount options then you may apply the following command on the cluster to disable the mount options
1nvcf_cluster_name="$(kubectl get nvcfbackends -n nvca-operator -o name | cut -d'/' -f2)"
2kubectl patch nvcfbackend -n nvca-operator "$nvcf_cluster_name" --type=merge -p '{"spec":{"overrides":{"featureGate":{"cacheCSIVolumeMountOptionsConfig":{"disabled":true}}}}}'
If you want to update the mount-options to a different value for example: ro,norecovery. You may use the following command. Replace these options with desired value as dictated by CSI Driver Volume Mount Options.
1nvcf_cluster_name="$(kubectl get nvcfbackends -n nvca-operator -o name | cut -d'/' -f2)"
2kubectl patch nvcfbackend -n nvca-operator "$nvcf_cluster_name" --type=merge -p '{"spec":{"overrides":{"featureGate":{"cacheCSIVolumeMountOptionsConfig":{"disabled":false}}}}}'
3kubectl patch nvcfbackend -n nvca-operator "$nvcf_cluster_name" --type=merge -p '{"spec":{"overrides":{"featureGate":{"cacheCSIVolumeMountOptionsConfig":{"mountOptions":"ro,norecovery"}}}}}'
NVLink-optimized Clusters#
Clusters with MNNVL GPUs like GB200 can run multi-node workloads that require inter-GPU data transfer with large performance improvements when properly configured. The Cluster Agent can be directed to configure multi-node workloads with their own ComputeDomains automatically to optimize inter-GPU connections.
Additional prerequisites: - The NVIDIA GPU DRA driver must be installed. - The NVLinkOptimized cluster attribute must be added during cluster registration.
Warning
In NVLink-optimized mode, the NVIDIA GPU DRA driver currently limits one GPU-enabled Pod to a node. To optimally utilize these clusters, GPU-enabled Pods _should_ request a full Node’s worth of GPUs. For example, Nodes in GB200 clusters have 4 GPUs each so all containers and all GPU-enabled Pods in a workload must request nvidia.com/gpu’s that sum to 4.
Kata Container-Isolated Workloads#
Clusters that have this attribute run all function/task Pods in Kata Containers without exception.
Additional cluster restrictions to be aware of:
Pod containers _must_ at least have resource limits defined for cpu and memory. If unset, runtime behavior is undefined.
Object count limits are configured for resource fairness in these clusters:
ConfigMaps: 20
Secrets: 20
Services: 20
Pods: 100
Jobs: 10
CronJobs: 10
Deployments: 10
ReplicaSets: 10
StatefulSets: 10
Cluster Maintenance Mode#
Note
Supported in Cluster Agent Versions 2.47.7 or higher
Cluster Agent can be optionally configured to run in maintenance mode if needed using the following capabilities from the Advanced Settings. Clusters configured in maintenance will not be listed as targets for workload deployments.

Cordon Maintenance#
In this mode existing workloads will continue to run uninterrupted on the cluster.
Cordon And Drain Maintenance#
In this mode all existing workloads in the cluster will be terminated. No update to the state of the workload will be effective at this time.
Warning
If using feature flags overrides on the cluster, the configuration for maintenance mode needs to be via feature flags CordonMaintenance or CordonAndDrainMaintenance respectively.
Once the maintenance mode is configured, it can take upto 10 minutes for the agent reconfiguration. Cluster that has successfully applied the maintenance mode capability will be shown with a MAINTENANCE mode label on cluster listing and on cluster overview page as below.
Cluster Listing

Cluster Overview

Install the Cluster Agent#
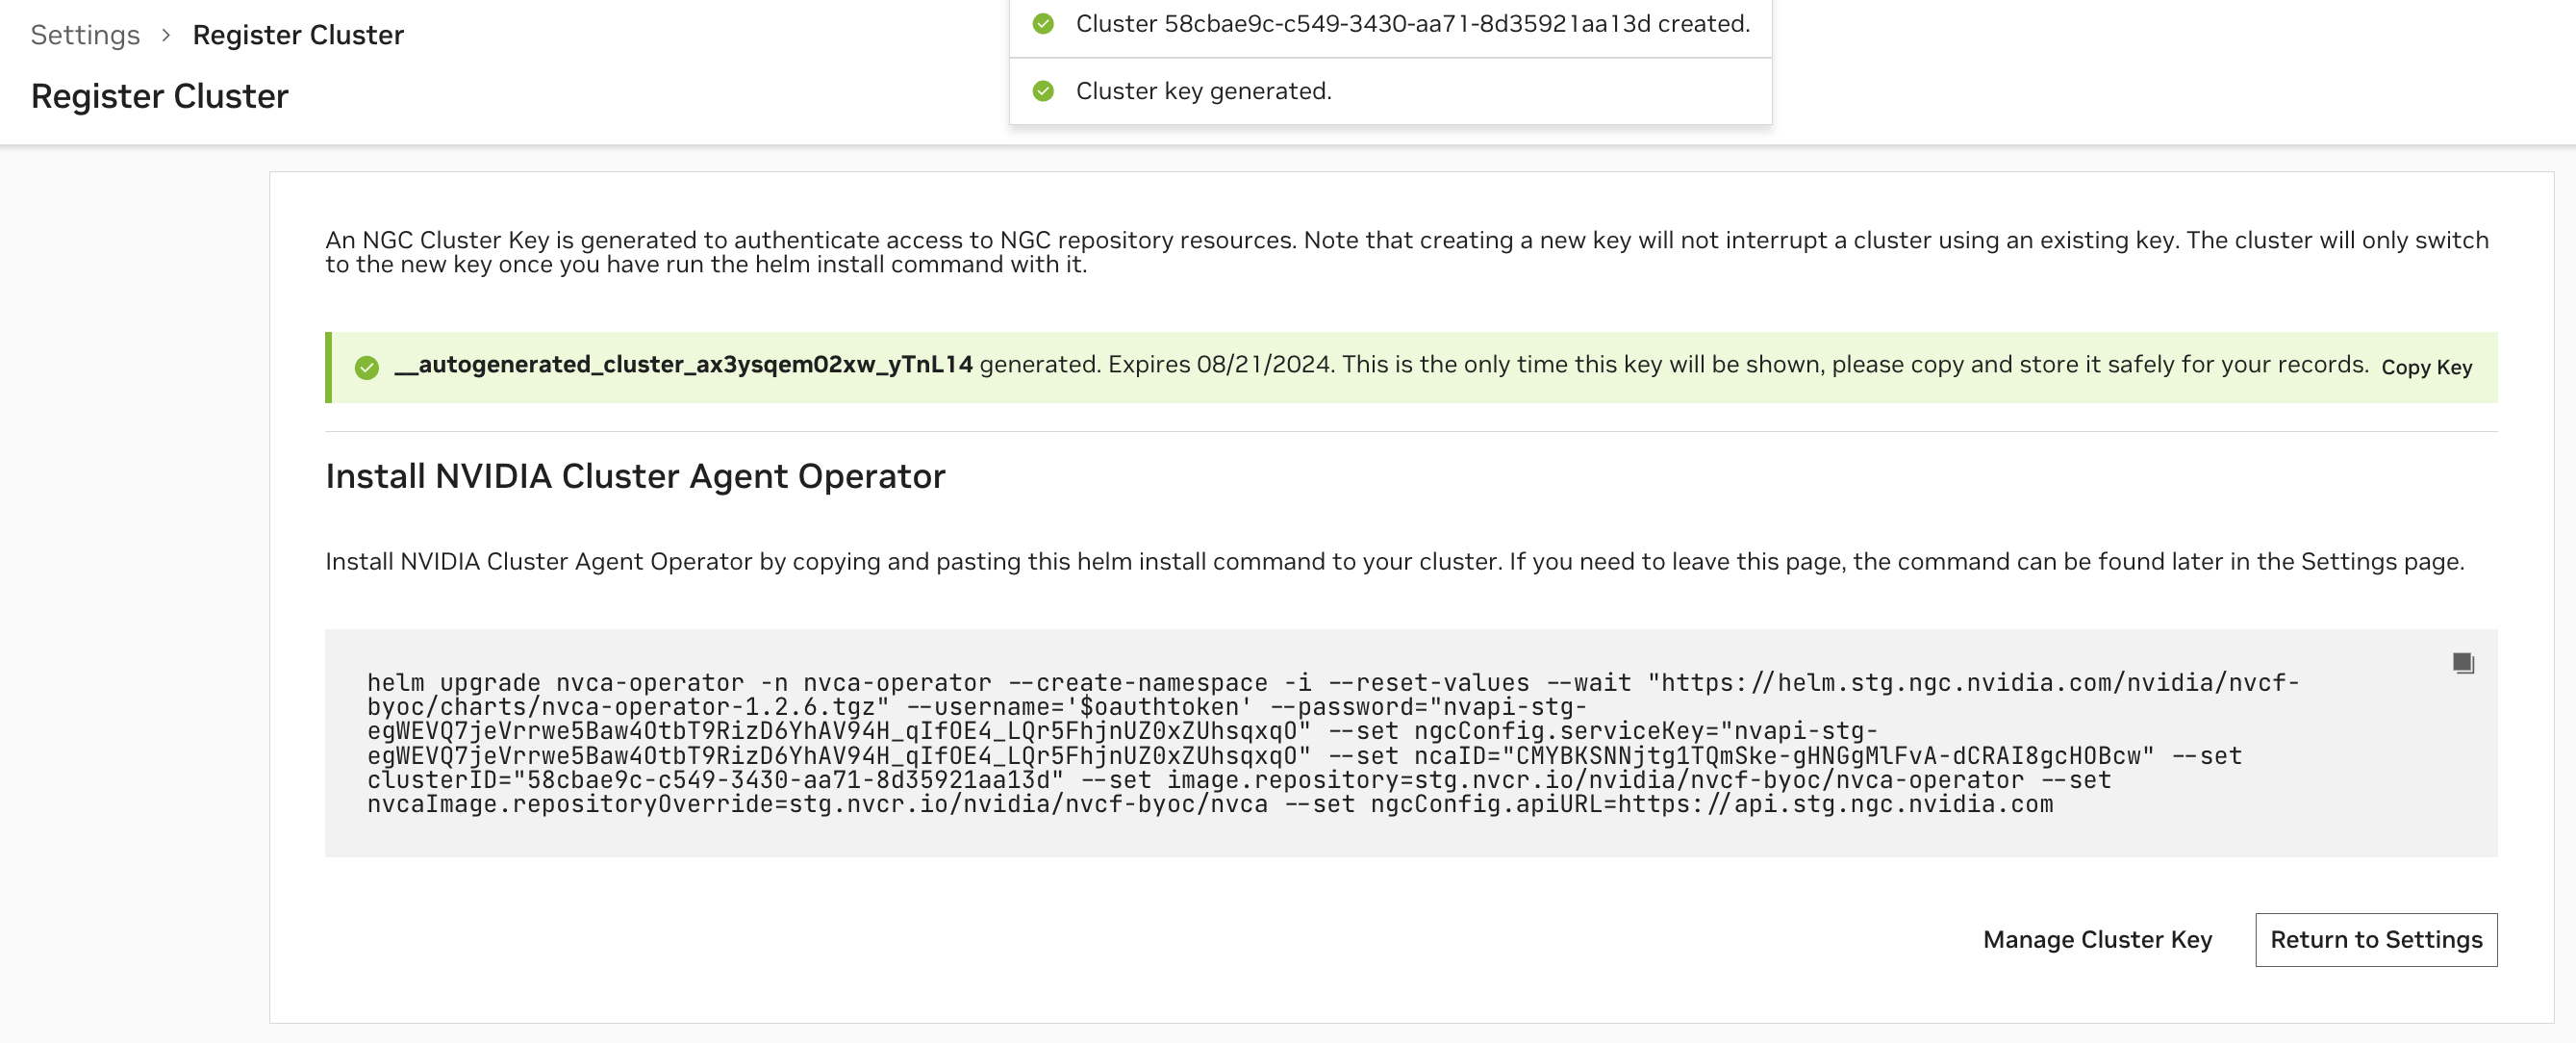
After configuring the cluster, an NGC Cluster Key will be generated for authenticating to NGC, and you will be presented with a command snippet for installing the NVIDIA Cluster Agent Operator. Please refer to this command snippet for the most up-to-date installation instructions.
Note
The NGC Cluster Key has a default expiration of 90 days. Either on a regular cadence or when nearing expiration, you must rotate your NGC Cluster Key.
Once the Cluster Agent Operator installation is complete, the operator will automatically install the desired NVIDIA Cluster Agent version and the Status of the cluster in the Cluster Page will become “Ready”.
Afterward, you will be able to modify the configuration at any time. The cluster name and SSA client ID (only available for NVIDIA managed clusters) are not reconfigurable. Please refer to any additional installation instructions for reconfiguration in the UI. Once the configuration is updated, the Cluster Agent Operator, which polls for changes every 15 minutes, will apply the new configuration.
View & Validate Cluster Setup#
Verify Cluster Agent Installation via UI#
At any time, you can view the clusters you have begun registering, or registered, along with their status, on the Settings page.

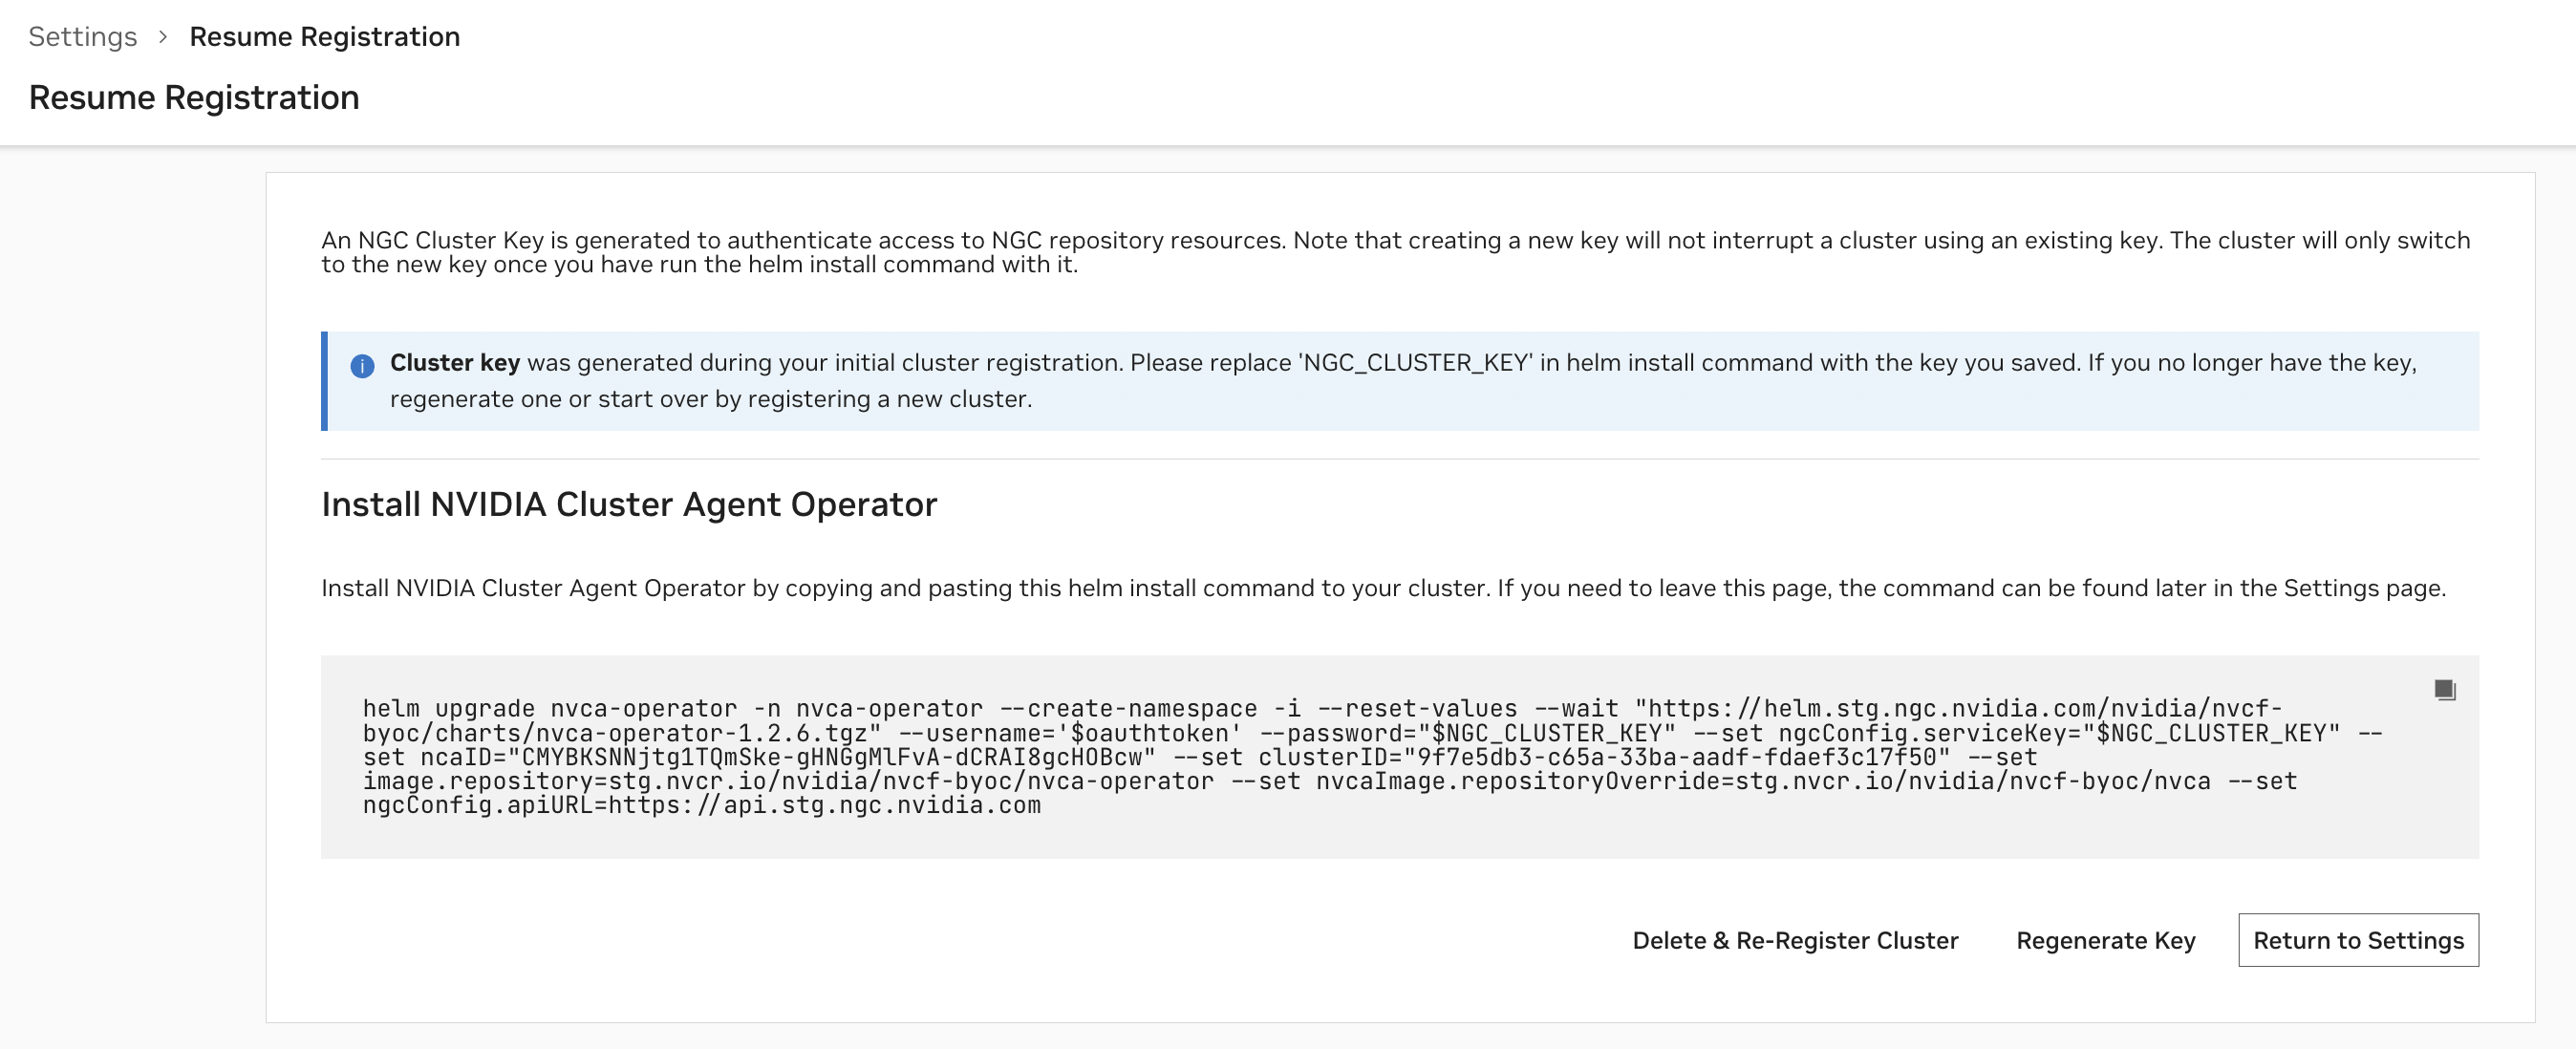
A status of
Readyindicates the Cluster Agent has registered the cluster with NVCF successfully.A status of
Not Readyindicates the registration command has either just been applied and is in progress, or that registration is failing.
Note
While your cluster status may show as Ready, there may be a delay of up to 5 minutes before the “Cluster Agent Version” column updates from “Update in Progress”. You can verify the actual cluster health and version immediately using the terminal commands described in the next section.
In cases when registration is failing, please use the following command to retrieve additional details:
1kubectl get nvcfbackend -n nvca-operator
When a cluster is Not Ready, you can resume registration at any time to finish the installation.
The “GPU Utilization” column is based on the number of GPUs occupied over the number of GPUs available within the cluster. The “Last Connected” column indicates when the last status update was received from the Cluster Agent to the NVCF control plane.
Verify Cluster Agent Installation via Terminal#
Verify the installation was successful via the following command, you should see a “healthy” response, as in this example:
1> kubectl get nvcfbackend -n nvca-operator
2NAME AGE VERSION HEALTH
3nvcf-trt-mgpu-cluster 3d16h 2.30.4 healthy
Upgrade the Cluster Agent#
NVCA upgrades available are indicated in the UI by status icons next to the cluster’s NVCA version.
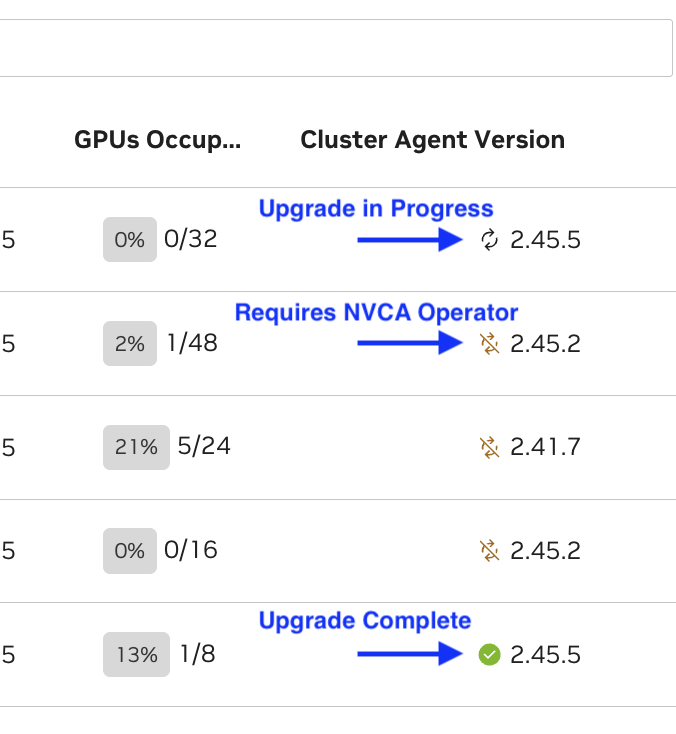
Note
When triggering the update through the UI, it may take up to 1 minute for the status icon to change to the “updating” status. This delay is expected.
Operator Upgrade Required#
When an Operator upgrade is required, a helm install instruction will be generated in the UI. You must run this first in order to enable the NVCA upgrade.
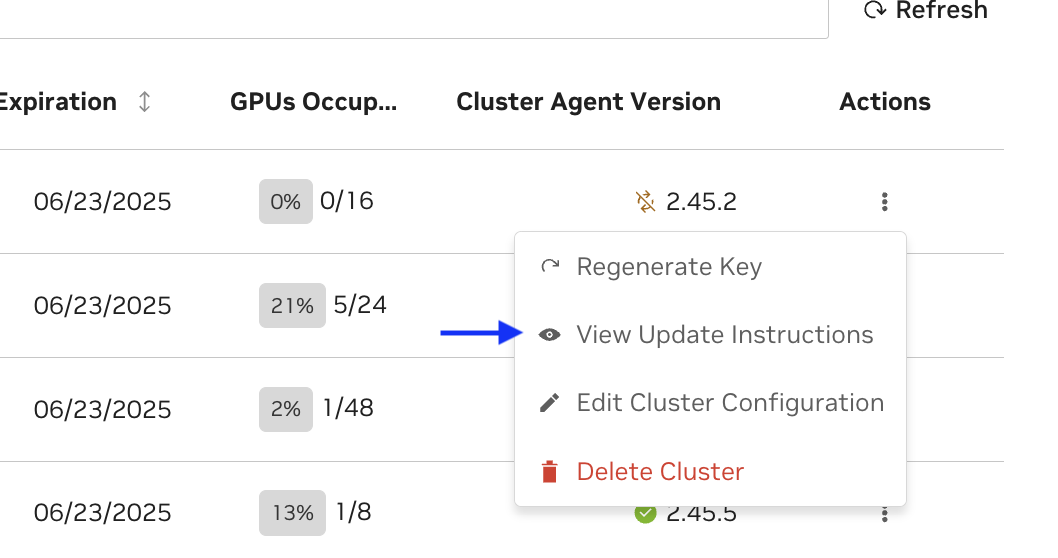
Example:
1helm upgrade nvca-operator -n nvca-operator --create-namespace -i --reuse-values --wait \
2    "https://helm.stg.ngc.nvidia.com/nvidia/nvcf-byoc/charts/nvca-operator-1.13.2.tgz" \
3    --username='$oauthtoken' \
4    --password=$(helm get values -n nvca-operator nvca-operator -o json | jq -r '.ngcConfig.serviceKey')
You can verify that the upgrade is successful by running the following command and noting the “Image” field:
1kubectl get pods -n nvca-operator -o yaml | grep -i image
After the NVCA operator upgrade succeeds:
Press “Update” in the UI to proceed with the NVCA upgrade
The NVCA operator will periodically check for the new version of NVCA and apply it when available
This may take up to 10 minutes to fully complete
NVCA-Only Upgrade#
When an upgrade to the NVCA Operator is not required:
Simply trigger the update of NVCA through the UI
The operator will check for the new desired version of NVCA and apply it
Verify that the operator has rolled out a successful upgrade by running the below command and looking for the spec version and status version to confirm the version of the CRD:
1kubectl get nvcfbackends -n nvca-operator -o yaml
Verify NVCA is healthy and version matches the desired version:
1kubectl get nvcfbackend -n nvca-operator
Force NVCA Rollout#
In some cases, you may need to force NVCA to rollout immediately rather than waiting for the operator’s periodic reconciliation. This can be useful after configuration changes or when troubleshooting upgrade issues.
To force an immediate rollout:
1kubectl annotate -n nvca-operator --overwrite --all nvcfbackends nvca.nvcf.nvidia.io/forcedRolloutAt="$(date)"
This command updates the forcedRolloutAt annotation on all NVCFBackend resources, triggering the operator to immediately reconcile and apply any pending changes.
After forcing the rollout, you can monitor the progress:
1# Watch NVCA pods restart
2kubectl get pods -n nvca-system -w
3
4# Check operator logs
5kubectl logs -l app.kubernetes.io/instance=nvca-operator -n nvca-operator --tail 50 -f
Once the rollout is complete, verify the NVCA version has been updated:
1# Check the current NVCA version
2kubectl get nvcfbackend -n nvca-operator
The output should show the updated version in the VERSION column, and the HEALTH status should be healthy.
Deregister the Cluster#
Removing a configured cluster as a deployment target for NVCF functions is a two step process. It involves deleting the cluster from NGC followed by executing a series of commands on the cluster that remove the installed Cluster Agent and the NVCA operator.
Prerequisites#
First, ensure all functions have been undeployed from the cluster. This can be done via the UI, API or CLI.
To delete all function pods in a namespace by force, use the following command. This is not a graceful operation.
1kubectl delete pods -l FUNCTION_ID -n nvcf-backend
Verify all pods have been terminated with the following command:
1kubectl get pods -n nvcf-backend
This should return no pods if deletion was successful. Additionally, check the logs of the Cluster Agent pod in the nvca-system namespace to ensure there are no more “Pod is being terminated” messages:
1kubectl logs -n nvca-system $(kubectl get pods -n nvca-system | grep nvca | awk '{print $1}')
If pods are still hanging during termination, you can force the deletion of the namespace with the following command. This command removes the finalizers from the namespace metadata, which are hooks that prevent namespace deletion until certain cleanup tasks are complete. By removing these finalizers, you bypass the normal cleanup process and force the namespace to be deleted immediately.:
1kubectl get namespace nvcf-backend -o json | jq '.spec.finalizers=[]' | kubectl replace --raw /api/v1/namespaces/nvcf-backend/finalize -f -
Delete the Cluster via UI#
Warning
Deleting the Cluster will also delete the Cluster Key used by the cluster and is irreversible.
Next, reach the cluster registration page by navigating to Cloud Functions in the NGC product dropdown, and choosing “Settings” on the left-hand menu. You must be a Cloud Functions Admin to see this page.
Select “Delete Cluster” from the “Actions” dropdown for the cluster that you want to remove.
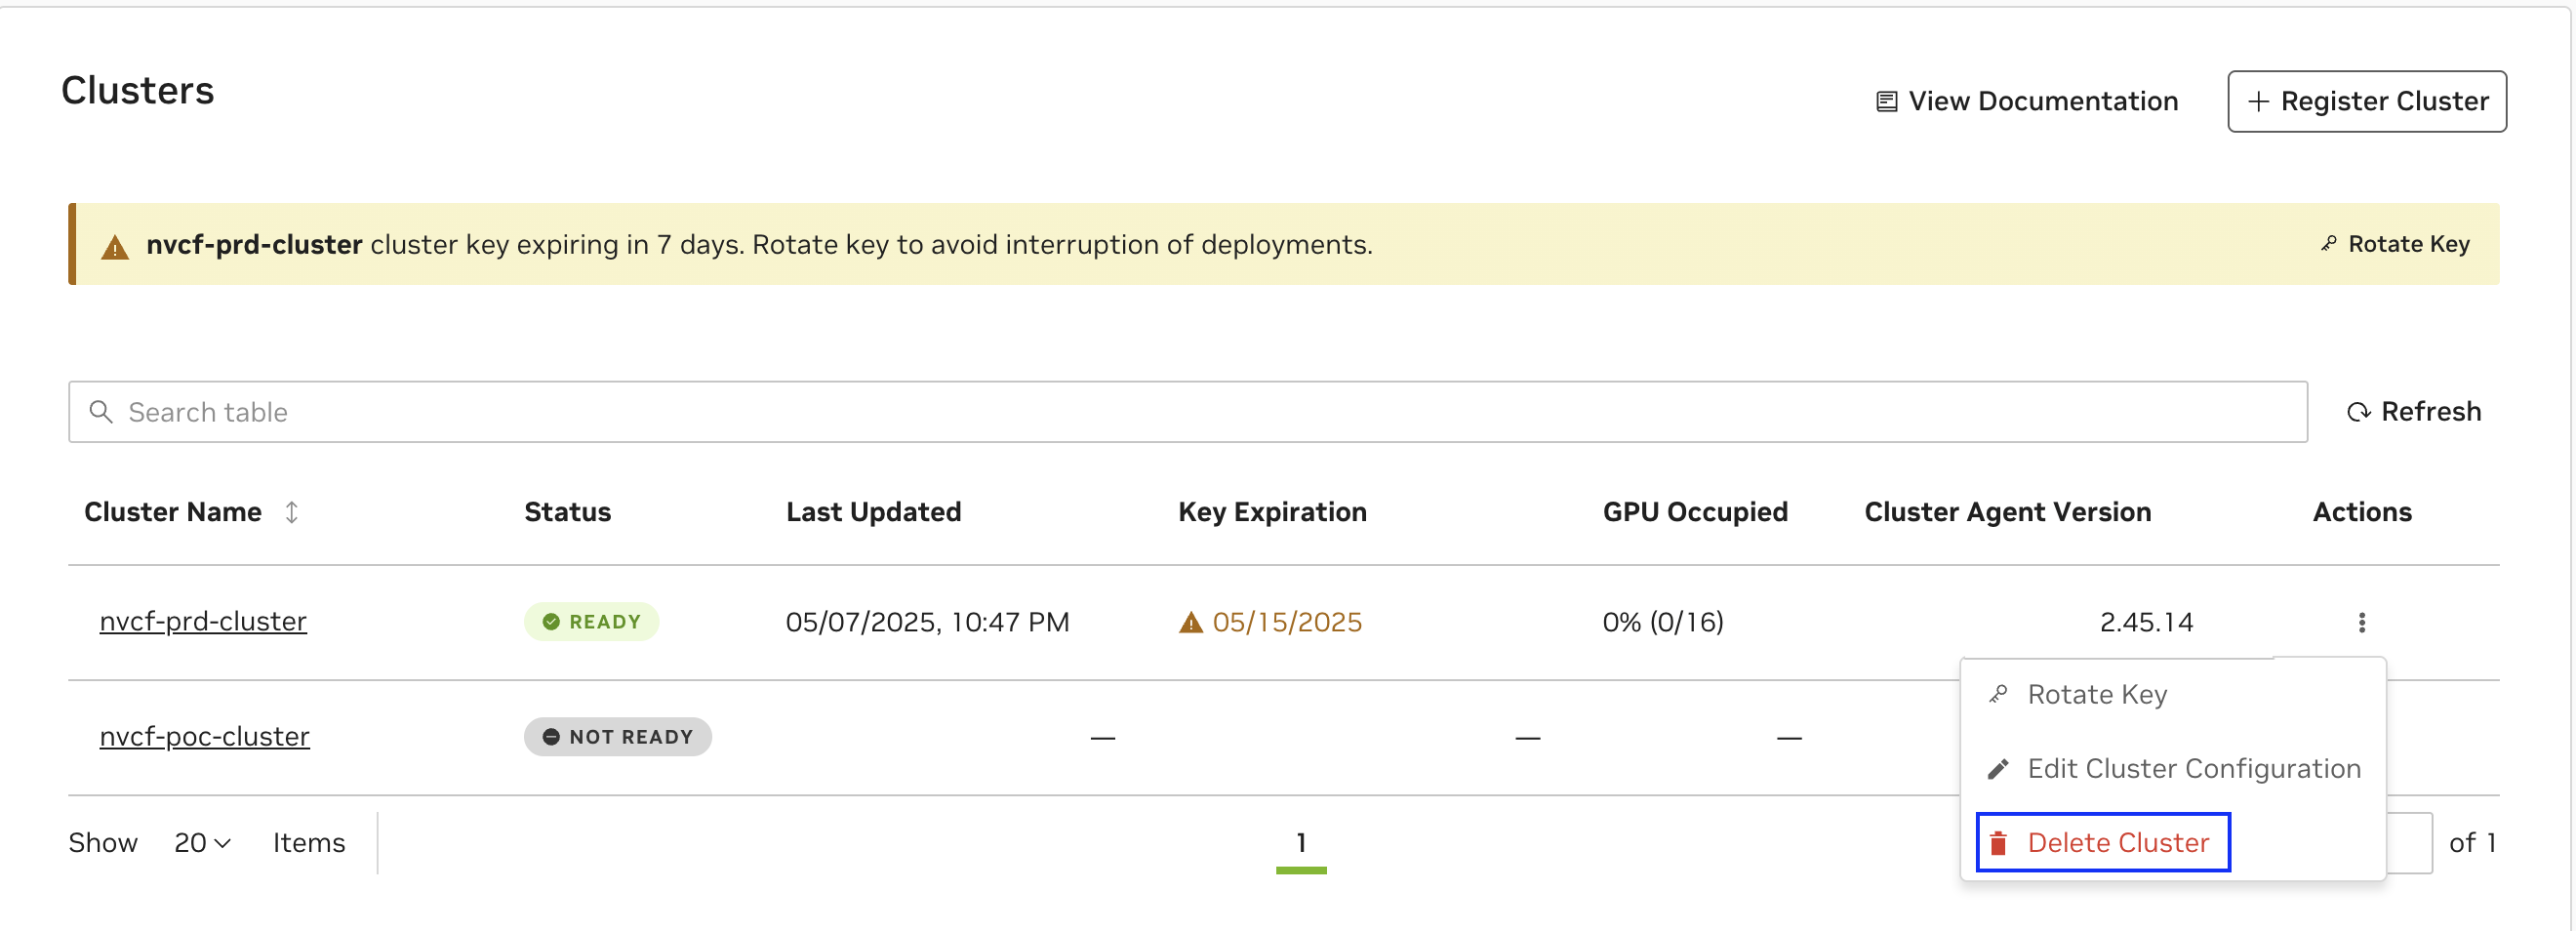
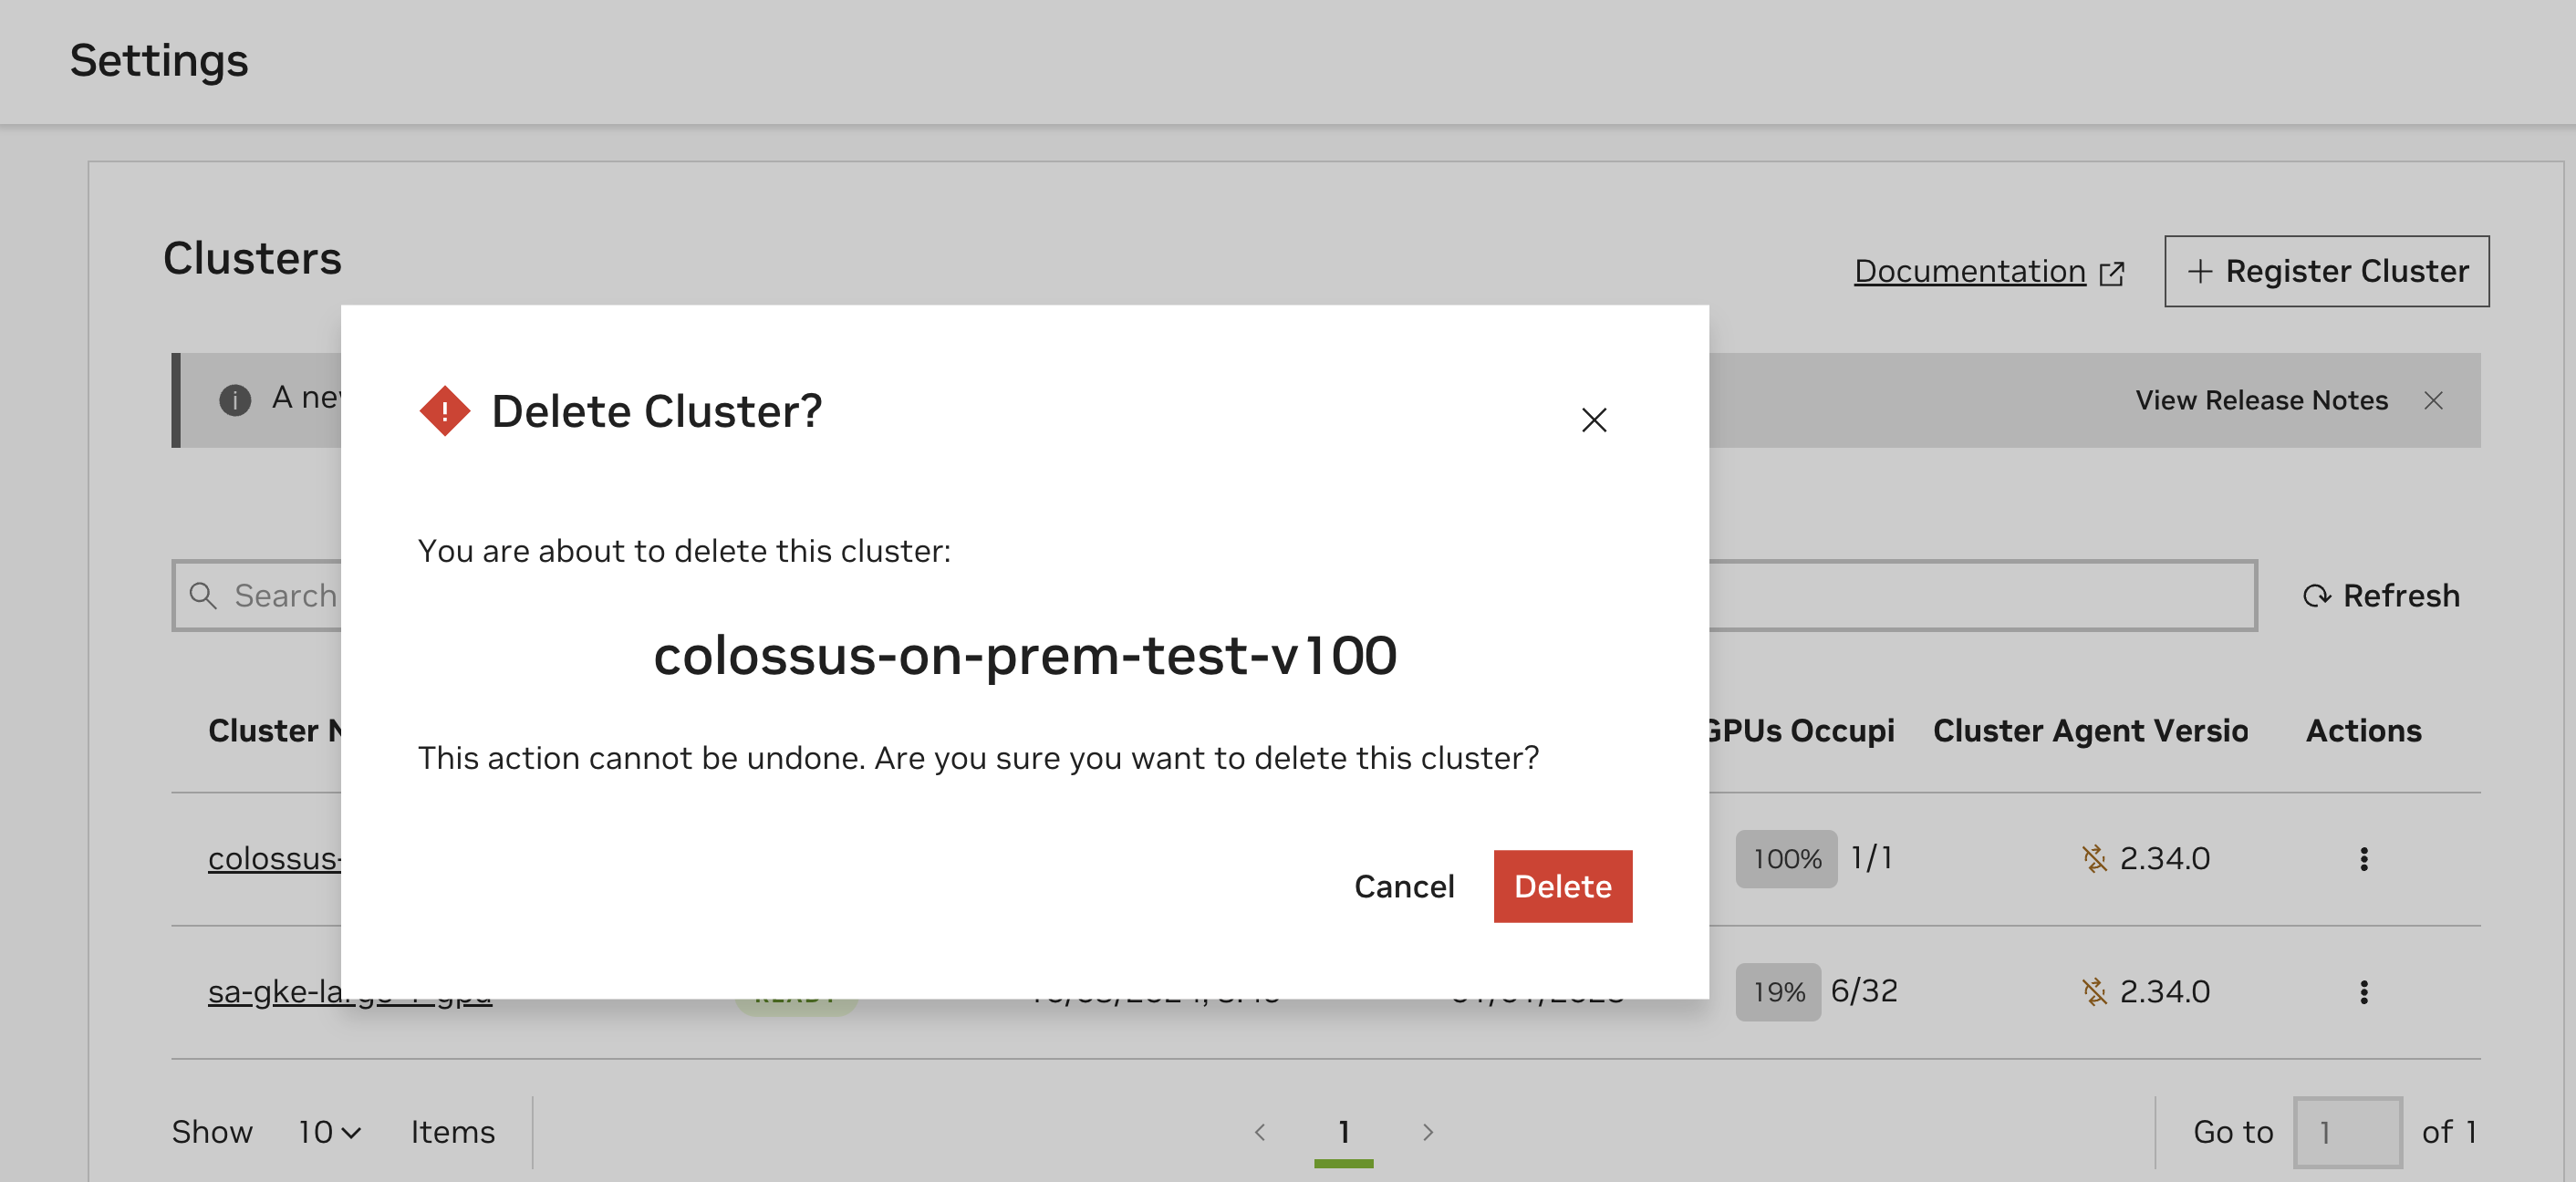
Following this, a dialog box will appear that asks to you confirm the deletion of the cluster. Click on “Delete” to remove the cluster as a deployment target.
Delete the Cluster Agent and the NVCA Operator#
Finally, on the registered cluster, execute the following commands to complete the deregisteration process.
1kubectl delete nvcfbackends -A --all
2kubectl delete ns nvca-system
3helm uninstall -n nvca-operator nvca-operator
4kubectl delete ns nvca-operator
Note
If the deletion of the Kubernetes CRD nvcfbackend blocks, then the finalizer (nvca-operator.finalizers.nvidia.io) needs to be manually deleted, for example using the following command:
1kubectl get nvcfbackend -n nvca-operator -o json | jq '.items[].metadata.finalizers = []' | kubectl replace -f -
Cluster Agent Monitoring and Reliability#
Monitoring Data#
Metrics#
Prerequisites
To use the PodMonitor and ServiceMonitor examples below, you must first install the Prometheus Operator. Follow the Prometheus Operator installation guide to set this up in your cluster.
The cluster agent and operator emit Prometheus-style metrics. The following metric labels are available by default. The full list of available metrics are updated regularly and therefore not listed.
Metric Label |
Metric Label Description |
|---|---|
nvca_event_name |
The name of the event |
nvca_nca_id |
The NCA ID of this NVCA instance |
nvca_cluster_name |
The NVCA cluster name |
nvca_cluster_group |
The NVCA cluster group |
nvca_version |
The NVCA version |
Cluster maintainers can scrape the available metrics. See a full example of how to do this with an OpenTelemetry Collector in the cluster here.
Use the following examples of a PodMonitor for NVCA Operator and ServiceMonitor for NVCA for reference:
Sample NVCA Operator PodMonitor
 1apiVersion: monitoring.coreos.com/v1
 2kind: PodMonitor
 3metadata:
 4    labels:
 5        app.kubernetes.io/component: metrics
 6        app.kubernetes.io/instance: prometheus-agent
 7        app.kubernetes.io/name: metrics-nvca-operator
 8        jobLabel: metrics-nvca-operator
 9        release: prometheus-agent
10        prometheus.agent/podmonitor-discover: "true"
11    name: metrics-nvca-operator
12    namespace: monitoring
13spec:
14    podMetricsEndpoints:
15    - port: http
16      scheme: http
17      path: /metrics
18    jobLabel: jobLabel
19    selector:
20        matchLabels:
21            app.kubernetes.io/name: nvca-operator
22    namespaceSelector:
23        matchNames:
24        - nvca-operator
Sample NVCA ServiceMonitor
 1apiVersion: monitoring.coreos.com/v1
 2kind: ServiceMonitor
 3metadata:
 4    labels:
 5        app.kubernetes.io/component: metrics
 6        app.kubernetes.io/instance: prometheus-agent
 7        app.kubernetes.io/name: metrics-nvca
 8        jobLabel: metrics-nvca
 9        release: prometheus-agent
10        prometheus.agent/servicemonitor-discover: "true"
11    name: prometheus-agent-nvca
12    namespace: monitoring
13spec:
14    endpoints:
15    - port: nvca
16    jobLabel: jobLabel
17    selector:
18        matchLabels:
19            app.kubernetes.io/name: nvca
20    namespaceSelector:
21        matchNames:
22        - nvca-system
Logs#
Both the Cluster Agent and Cluster Agent Operator emit logs locally by default.
Local logs for the NVIDIA Cluster Agent Operator can be obtained via kubectl:
1kubectl logs -l app.kubernetes.io/instance=nvca-operator -n nvca-operator --tail 20
Similarly, NVIDIA Cluster Agent logs can be obtained with the following command via kubectl:
1kubectl logs -l app.kubernetes.io/instance=nvca -n nvca-system --tail 20
Warning
Current function-level inference container logs are not supported for functions deployed on non-NVIDIA-managed clusters. Customers are encouraged to emit logs directly from their inference containers running on their own clusters to any third-party tool, there are no public egress limitations for containers.
Tracing#
The NVIDIA Cluster Agent provides OpenTelemetry integration for exporting traces and events to compatible collectors. As of agent version 2.0, the only supported collector receiver is Lightstep.
Enable Tracing with Lightstep
Get your Lightstep access token from the Lightstep UI and set to
LS_ACCESS_TOKENenvironment variable.Get the NVCF cluster name:
1nvcf_cluster_name="$(kubectl get nvcfbackends -n nvca-operator -o name | cut -d'/' -f2)"
Apply the tracing configuration:
1kubectl patch nvcfbackends.nvcf.nvidia.io -n nvca-operator "$nvcf_cluster_name" --type=merge --patch="{\"spec\":{\"overrides\":{\"featureGate\":{\"otelConfig\":{\"exporter\":\"lightstep\",\"serviceName\":\"nvcf-nvca\",\"accessToken\":\"${LS_ACCESS_TOKEN}\"}}}}}"
Cluster Key Rotation#
Note
Cluster Keys are migrating to a organization-scoped service-key resource. If your cluster is using a personal key, it is recommended to follow the UI instructions for business continuity.
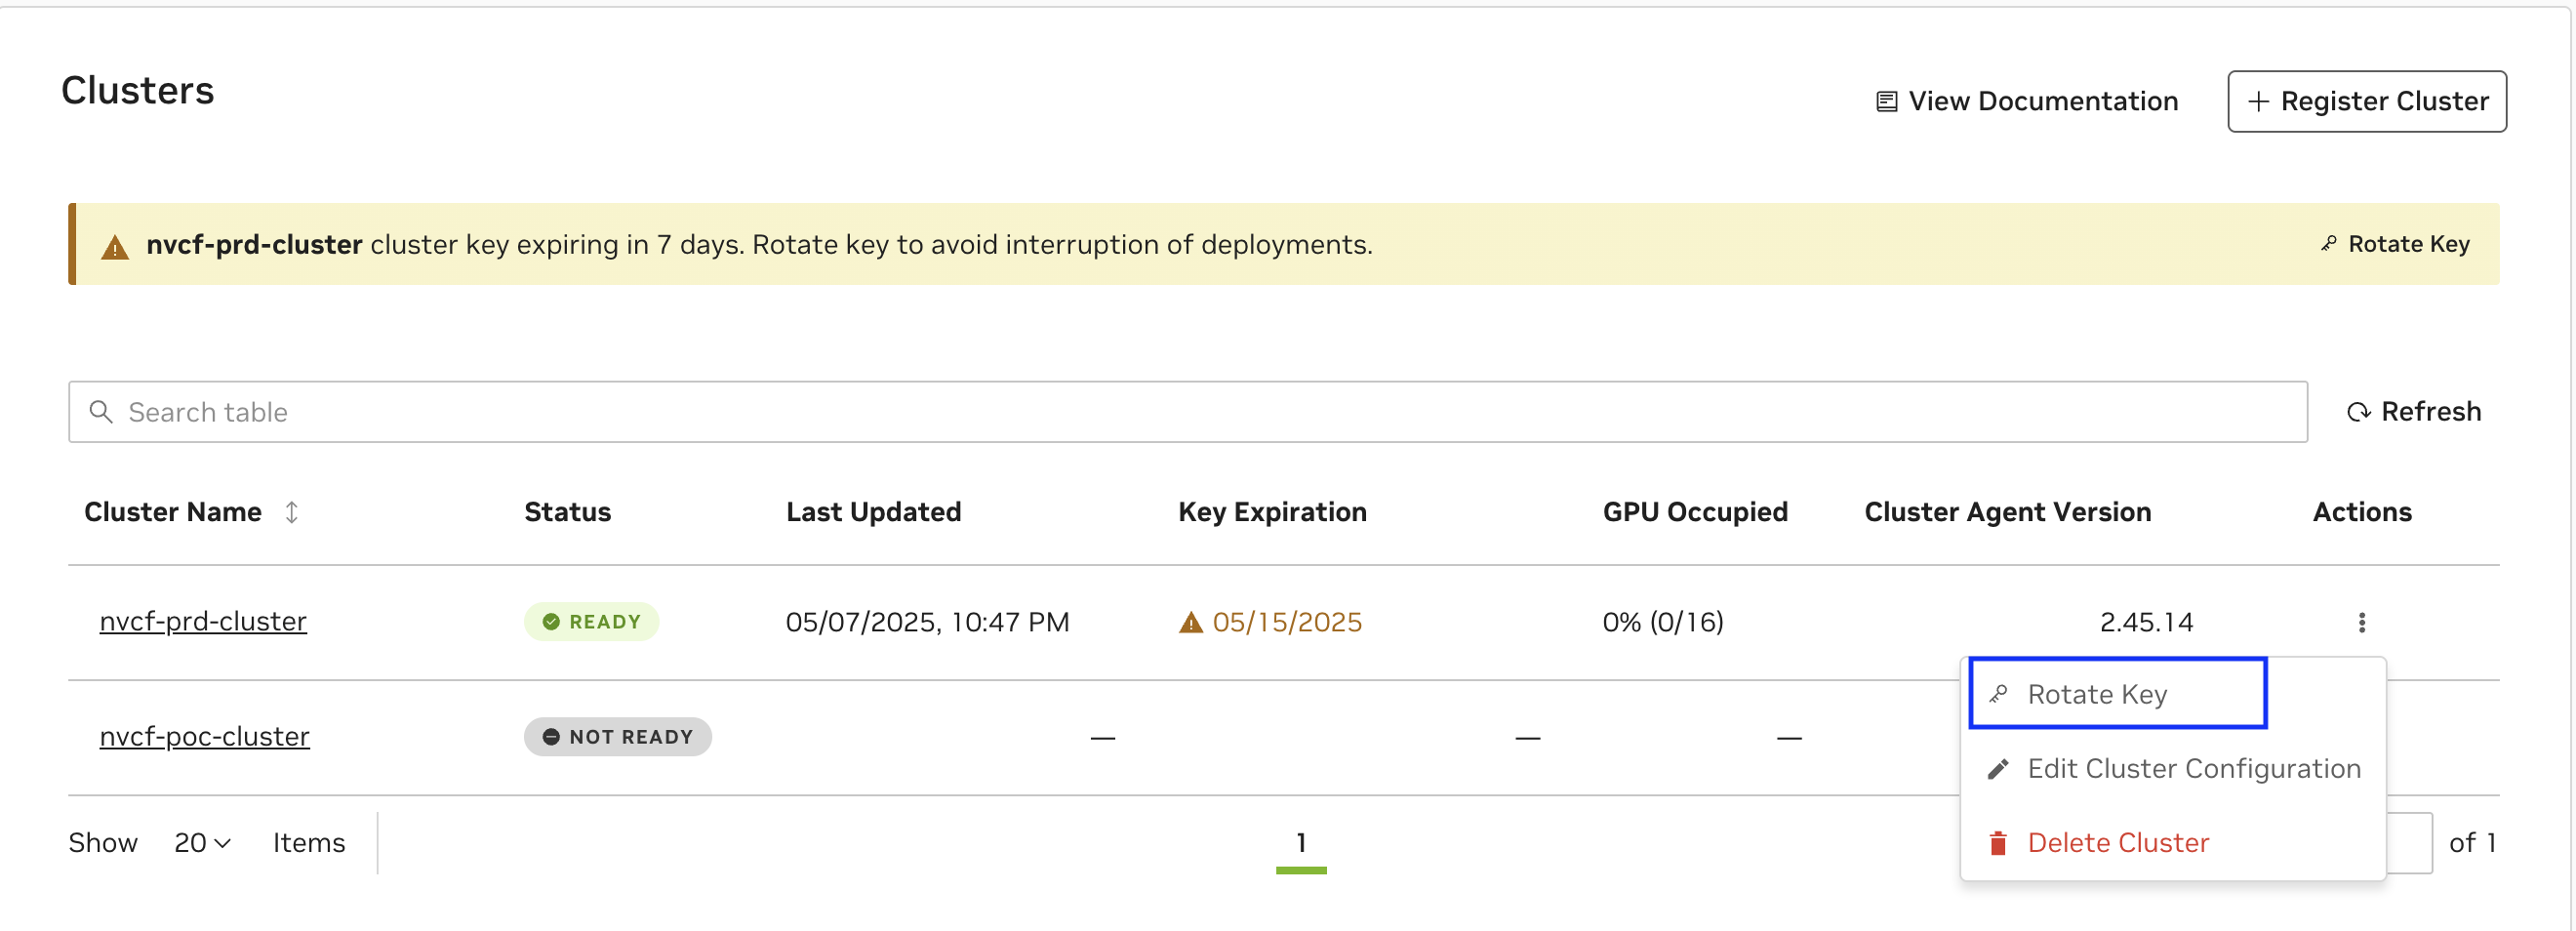
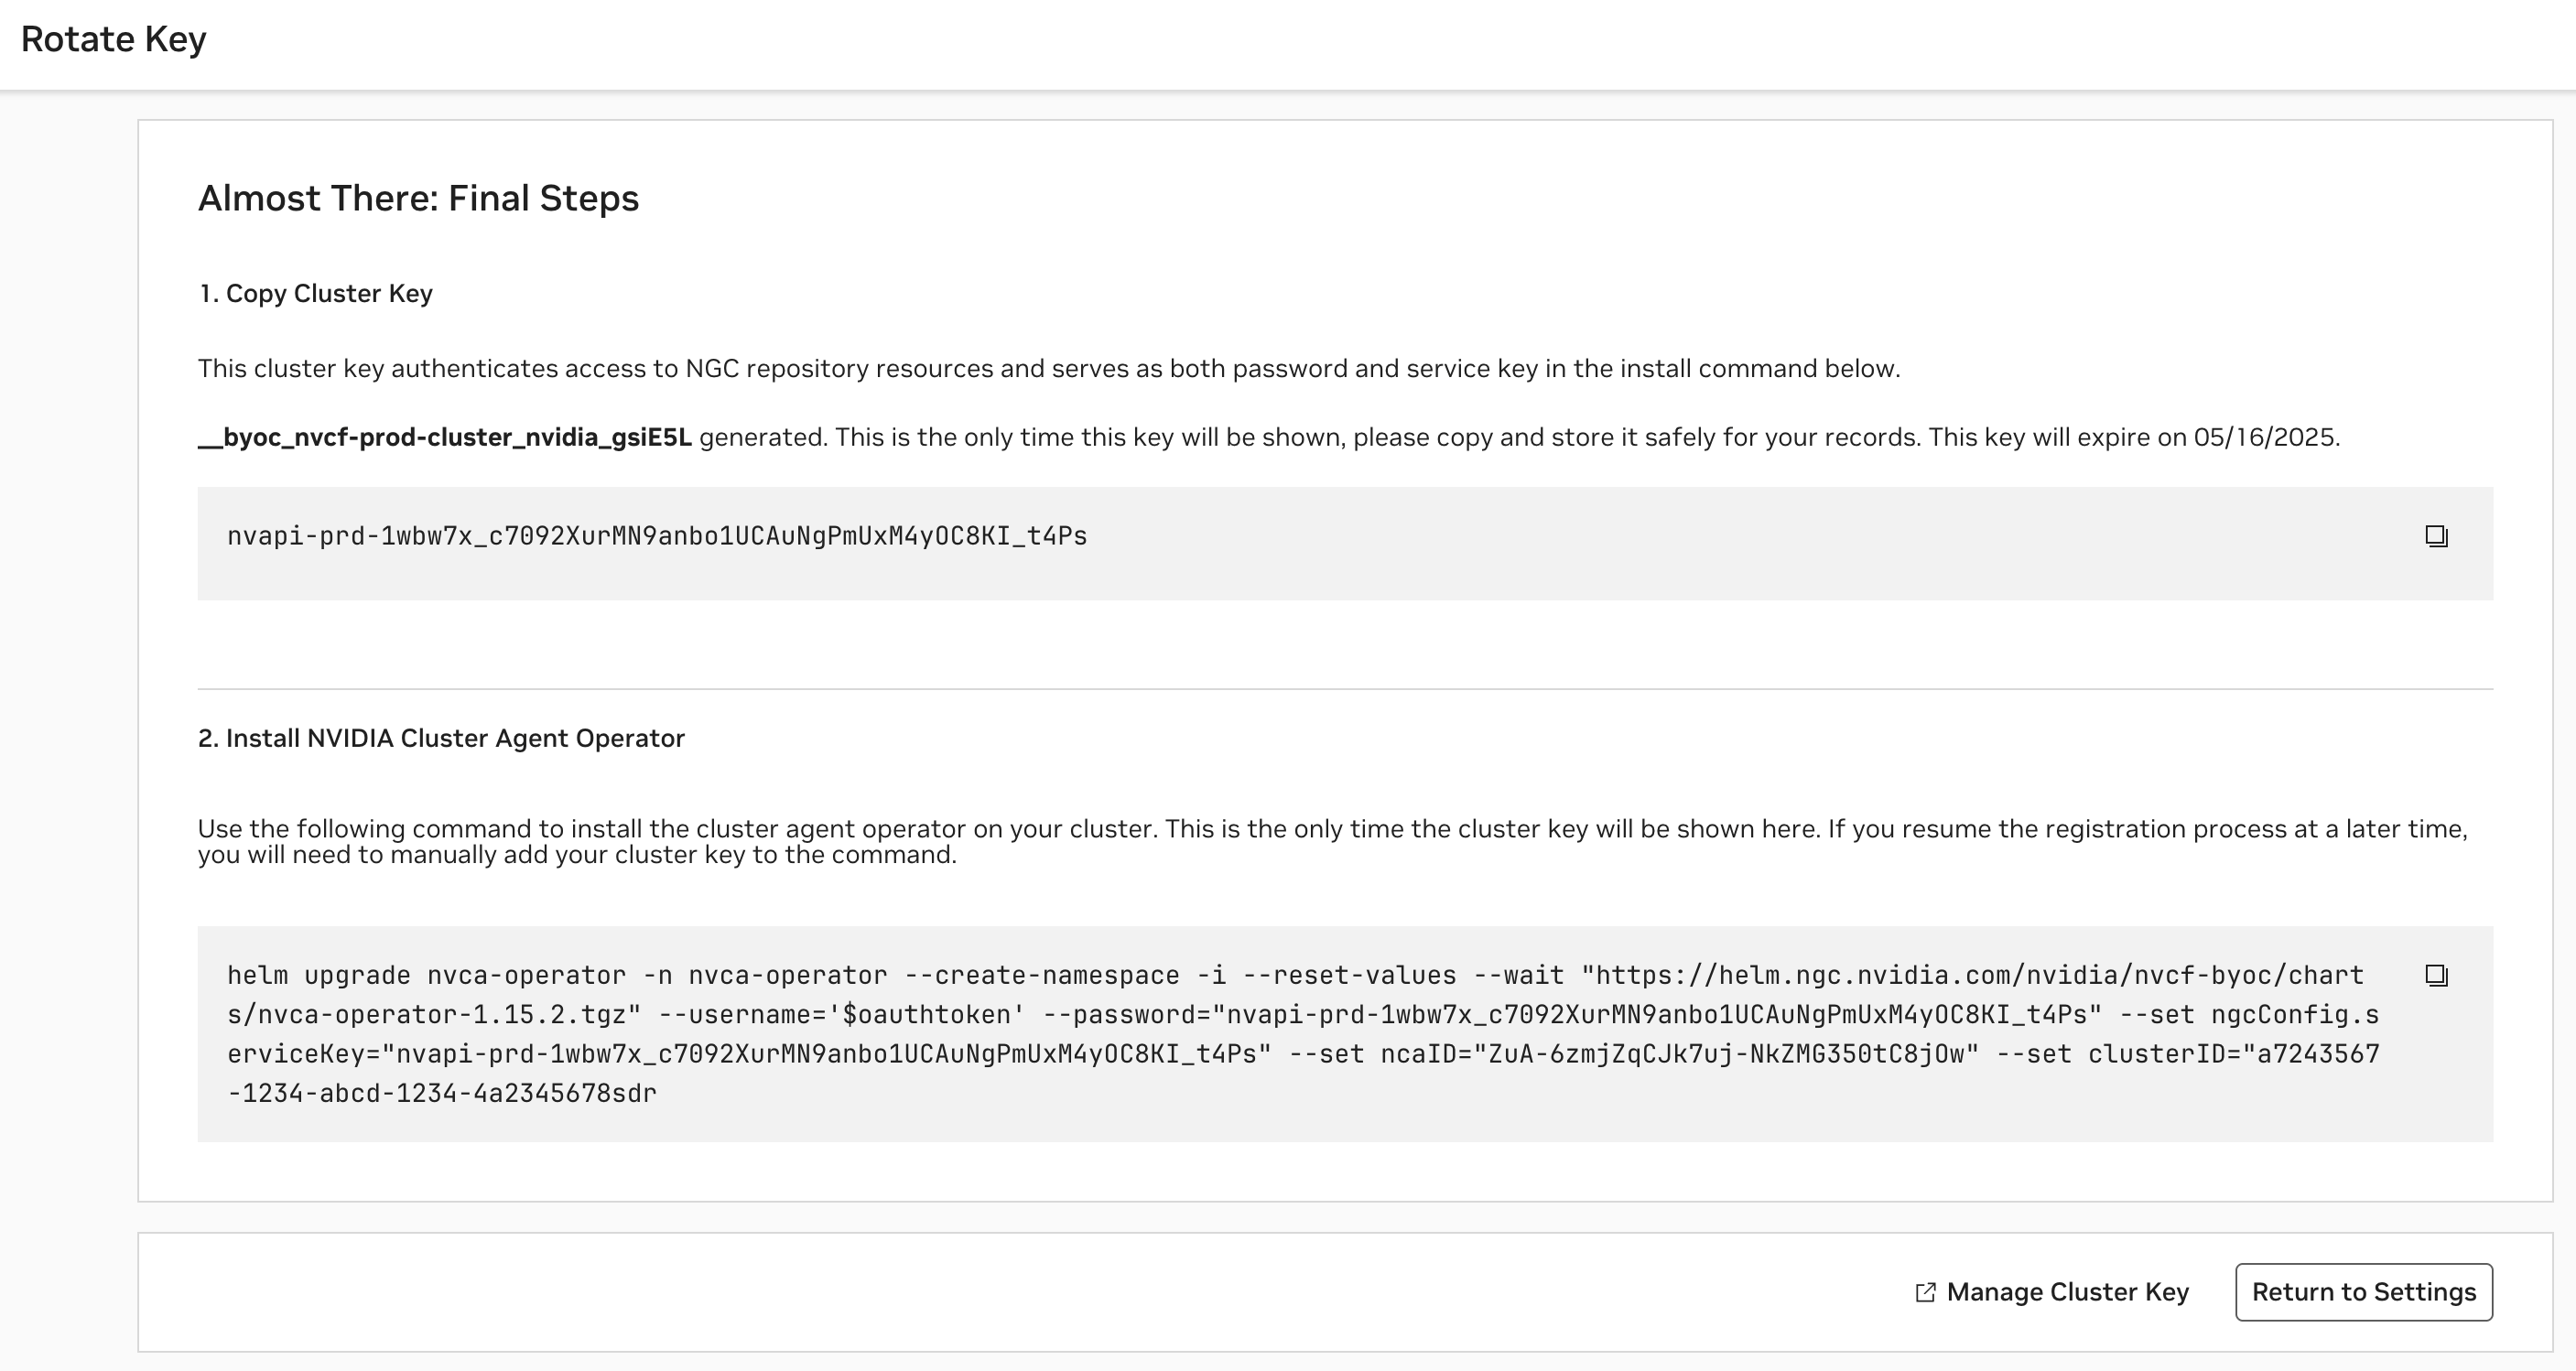
To regenerate or rotate a cluster’s key, choose the “Rotate Key” option from the Clusters listing on the Settings page. Please refer to this command snippet for the most up-to-date upgrade instructions.
Warning
Updating your Service Key may interrupt any in-progress updates or deployments to existing functions, therefore it’s important to pause deployments before upgrading.
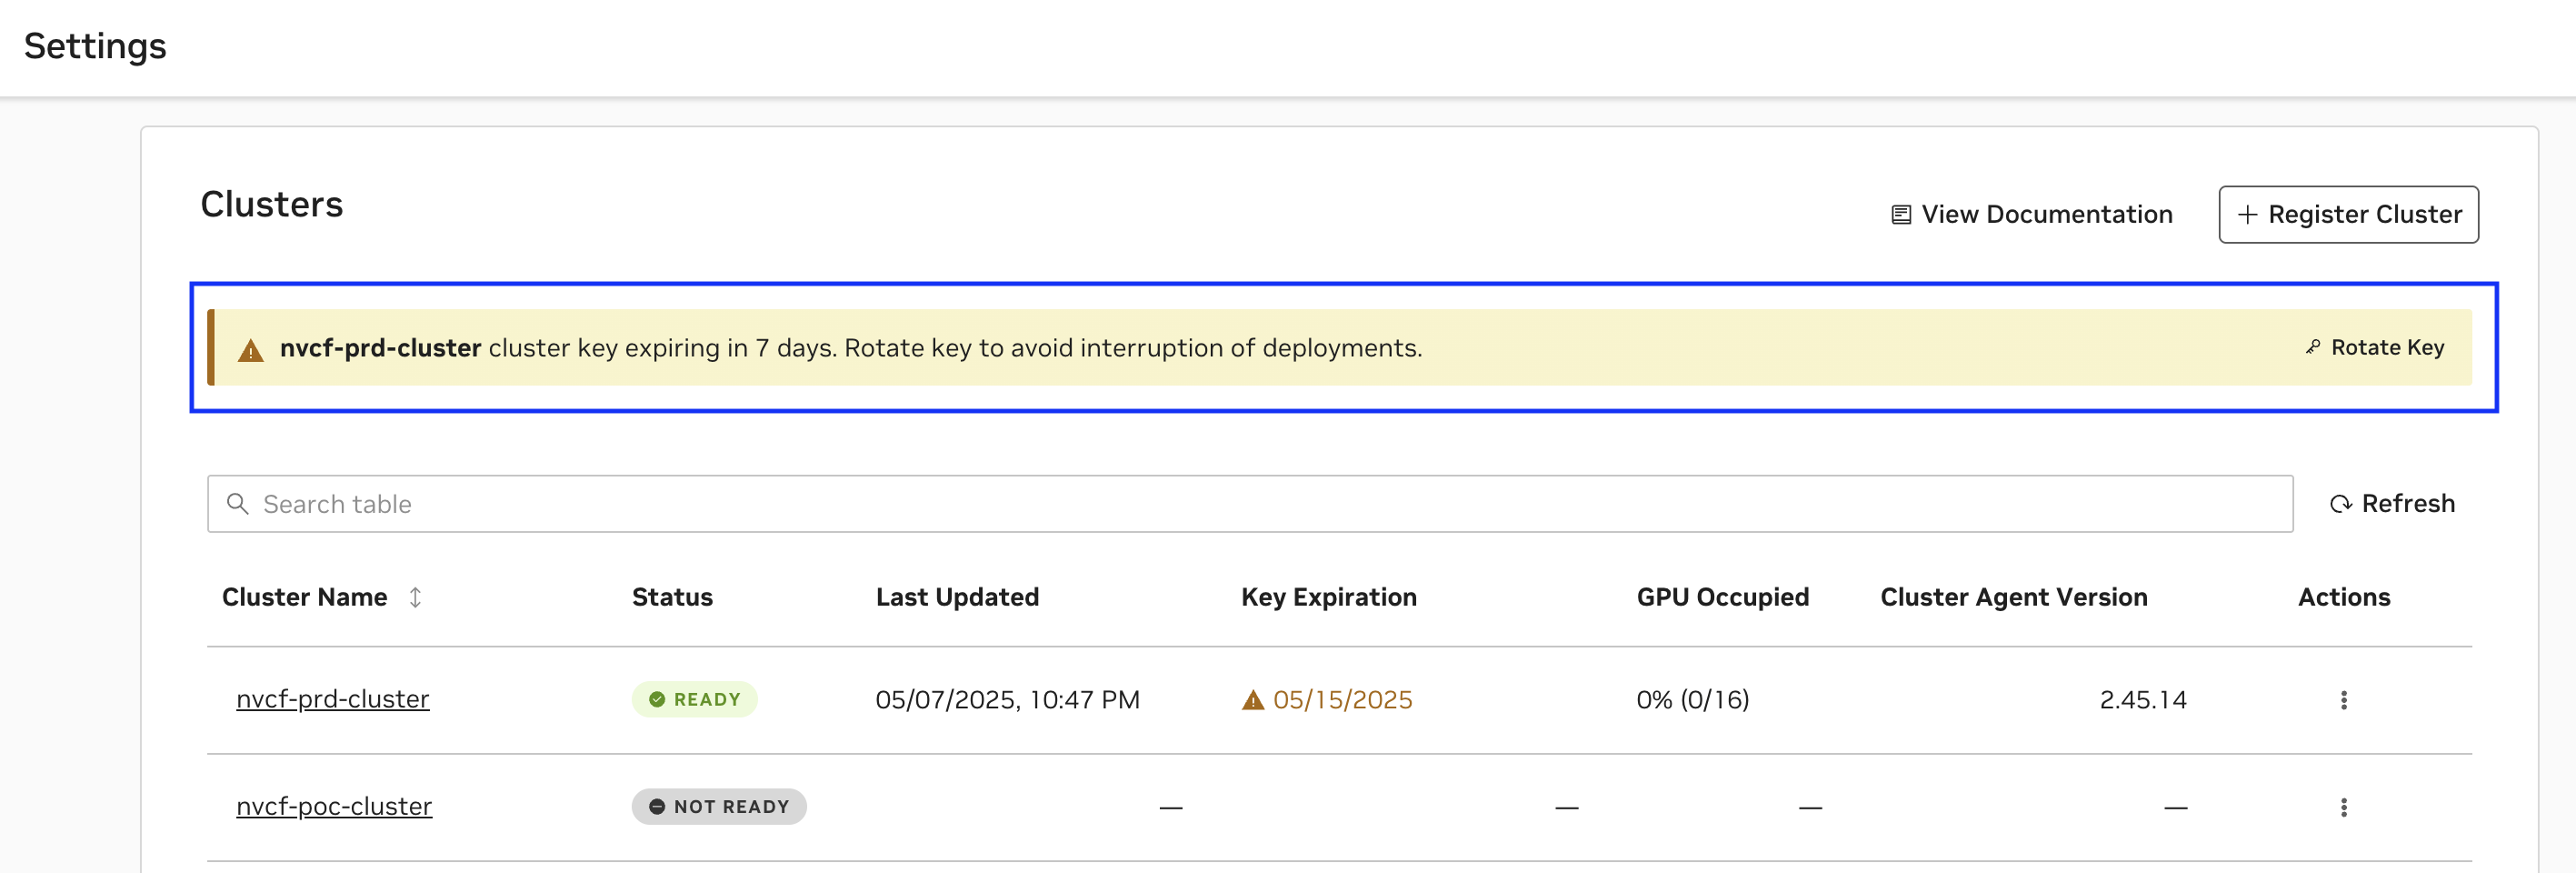
A cluster key expiring soon will have an appropriate warning displayed as below and follow the UI instructions to Rotate Key as above.
Frequently Asked Questions#
My Cluster Key is a personal key, but it is valid for long time, should I still rotate ?
While the Cluster Key may still be valid, if you observe a directive it is recommended to rotate the key for business continuity
How many clusters can be registered in the Org ?
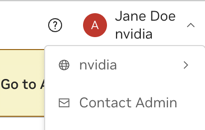
Number of cluster keys are capped at 50 per org and this includes any other service keys in use in the Org. If you observe error while registering cluster, contact the Org Admin using the Contact Admin option.
Network Configuration#
Warning
The network policies described in this section are only enforced if your cluster’s Container Network Interface (CNI) supports Kubernetes Network Policies. Common CNIs that support network policies include:
Calico
Cilium
Weave Net
Antrea
If your cluster uses a CNI that doesn’t support network policies, the security controls described below will not be enforced, and pods will be able to communicate with each other without restrictions. This could lead to security vulnerabilities.
The NVCA operator requires outbound network connectivity to pull images, charts, and report logs and metrics. During installation, the operator pre-configures the nvca-namespace-networkpolicies configmap with the following network policies:
Policy Name |
Description |
|---|---|
allow-egress-gxcache |
Allows egress traffic to the GX Cache namespace for caching operations (only relevant for NVIDIA managed clusters) |
allow-egress-internet-no- internal-no-api |
Allows egress traffic to the public internet (0.0.0.0/0) but blocks traffic to common private IP ranges. Also allows DNS resolution via kube-dns. |
allow-egress-intra-namespace |
Controls pod-to-pod communication within the same namespace. This policy is only applied to function namespaces and not to shared pod instance namespaces. |
allow-egress-nvcf-cache |
Allows egress traffic to NVCF cache services (only relevant for NVIDIA managed clusters) |
allow-egress-prometheus- nvcf-byoo |
Allows egress traffic to Prometheus monitoring endpoints (only relevant for NVIDIA managed clusters) |
allow-ingress-monitoring |
Allows ingress traffic for monitoring services |
allow-ingress-monitoring-dcgm |
Allows ingress traffic for DCGM monitoring |
allow-ingress-monitoring- gxcache |
Allows ingress traffic for GX Cache monitoring (only relevant for NVIDIA managed clusters) |
Key Network Requirements#
Kubernetes API Access
NVCA requires access to the Kubernetes API
Consult your cloud provider’s documentation (e.g., Azure, AWS, GCP) for the Kubernetes API endpoint
Container Registry and NVCF Control Plane Access
Access to
nvcr.ioandhelm.ngc.nvidia.comis required to pull container images, resources, and helm charts.NVCA requires access to NVIDIA control plane services for coordination of functions and task deployments and invocation, this includes:
connect.pnats.nvcf.nvidia.com
grpc.api.nvcf.nvidia.com
*.api.nvcf.nvidia.com
sqs.*.amazonaws.com
spot.gdn.nvidia.com
ess.ngc.nvidia.com
api.ngc.nvidia.com
Monitoring and Logging
If your environment requires advanced monitoring or logging (e.g., sending logs to external endpoints), ensure your cluster’s NetworkPolicy or firewall rules allow egress to the required monitoring/logging domains
Network Policy Customization via ConfigMap#
The NVCA operator pre-configures the nvca-namespace-networkpolicies configmap during installation. If you need to customize these policies for your cluster, you can use a configmap to override the default policies.
To customize a network policy:
Create a configmap with your custom network policy, for example:
patchcm.yaml#1apiVersion: v1 2kind: ConfigMap 3metadata: 4 name: demopatch-configmap 5 namespace: nvca-operator 6 labels: 7 nvca.nvcf.nvidia.io/operator-kustomization: enabled 8data: 9 patches: | 10 - target: 11 group: "" 12 version: v1 13 kind: ConfigMap 14 name: nvca-namespace-networkpolicies 15 patch: |- 16 - op: replace 17 path: /data/allow-egress-internet-no-internal-no-api 18 value: | 19 apiVersion: networking.k8s.io/v1 20 kind: NetworkPolicy 21 metadata: 22 name: allow-egress-internet-no-internal-no-api 23 labels: 24 app.kubernetes.io/name: nvca 25 app.kubernetes.io/instance: nvca 26 app.kubernetes.io/version: "1.0" 27 app.kubernetes.io/managed-by: nvca-operator 28 spec: 29 podSelector: {} 30 policyTypes: 31 - Egress 32 egress: 33 - to: 34 - namespaceSelector: {} 35 podSelector: 36 matchLabels: 37 k8s-app: kube-dns 38 - to: 39 - namespaceSelector: 40 matchLabels: 41 kubernetes.io/metadata.name: gxcache 42 ports: 43 - port: 8888 44 protocol: TCP 45 - port: 8889 46 protocol: TCP
Apply the configmap:
1kubectl apply -f patchcm.yaml
Verify the changes:
1kubectl logs -n nvca-operator -l app.kubernetes.io/name=nvca-operator
You should see a message indicating successful patching:
configmap patched successfully
The changes will be applied to the nvcf-backend namespace and will be used for all new namespaces’ network policies. The network policies will also be updated across all helm chart namespaces.
Network Policy Customization via clusterNetworkCIDRs Flag#
You can customize the allow-egress-internet-no-internal-no-api policy with helm, by adding on the networkPolicy.clusterNetworkCIDRs flag. For example:
1helm upgrade nvca-operator -n nvca-operator --create-namespace -i --reuse-values --wait "https://helm.stg.ngc.nvidia.com/nvidia/nvcf-byoc/charts/nvca-operator-1.14.0.tgz" --username='$oauthtoken' --password=$(helm get values -n nvca-operator nvca-operator -o json | jq -r '.ngcConfig.serviceKey') --set networkPolicy.clusterNetworkCIDRs="{10.0.0.0/8,172.16.0.0/12,192.168.0.0/16,100.64.0.0/12}"
This command will override the default k8s networking CIDRs specified in the allow-egress-internet-no-internal-no-api with your input.
Advanced: Additional Configuration Options#
CSI Volume Mount Options#
The NVIDIA Cluster Agent supports customizing CSI volume mount options for caching. This allows you to configure specific mount options for the CSI volumes used in your cluster.
Warning
CSI volume mount options configuration is an experimental feature and may be subject to change in future releases.
To configure CSI volume mount options:
Get the NVCF cluster name:
1nvcf_cluster_name="$(kubectl get nvcfbackends -n nvca-operator -o name | cut -d'/' -f2)"
View current mount options configuration:
1kubectl get nvcfbackend -n nvca-operator "$nvcf_cluster_name" -o yaml | grep -A 5 "cacheCSIVolumeMountOptionsConfig"
Set mount options (example):
1kubectl patch nvcfbackends.nvcf.nvidia.io -n nvca-operator "$nvcf_cluster_name" --type='json' -p='[{"op": "replace", "path": "/spec/overrides/featureGate/cacheCSIVolumeMountOptionsConfig", "value": {"disabled": false, "mountOptions": "ro,norecovery,nouuid"}}]'
Verify the changes:
1kubectl get nvcfbackend -n nvca-operator "$nvcf_cluster_name" -o yaml | grep -A 5 "cacheCSIVolumeMountOptionsConfig"
The default mount options are:
- ro: Read-only mount
- norecovery: Skip journal recovery
- nouuid: Ignore filesystem UUID
You can modify these options based on your specific requirements. The configuration will be applied to all CSI volumes created by the NVIDIA Cluster Agent for caching purposes.
Node Selection for Cloud Functions#
By default, the cluster agent uses all nodes discovered with GPU resources to schedule Cloud Functions and there are no additional configuration required.
In order to limit the nodes that can run Cloud Functions, you may use nvca.nvcf.nvidia.io/schedule=true label on the specific nodes.
If there are no nodes in the cluster with the nvca.nvcf.nvidia.io/schedule=true label set, the cluster agent will switch to the default behavior of using all nodes with GPUs.
For example, to mark specific nodes as schedulable in a cluster:
1kubectl label node <node-name> nvca.nvcf.nvidia.io/schedule=true
To mark a single node from the above set as unschedulable for nvcf workloads, you can unlabel using:
1kubectl label node <node-name> nvca.nvcf.nvidia.io/schedule-
GPU Product Name Override#
The NVIDIA Cluster Agent supports GPU product name override via node label. This is useful for customers who want to use a custom product name or override the default GPU product name.
For example, to set the GPU product name for a node, use the following command:
1kubectl label node <node-name> nvca.nvcf.nvidia.io/gpu.product=<product-name>
Note: The GPU Product Name Override via node labeling only takes effect when there are no pre-existing active instances in the cluster. If active instances already exist with the original GPU instance types, the override will not be applied.
Managing Feature Flags#
The NVIDIA Cluster Agent supports various feature flags that can be enabled or disabled to customize its behavior. The following are some commonly used feature flags that can be enabled or disabled:
Feature Flag |
Description |
|---|---|
DynamicGPUDiscovery |
Dynamically discover GPUs and instance types on this cluster. This is enabled by default for customer-managed clusters. |
HelmSharedStorage |
Configure Helm functions and tasks with shared read-only storage for ESS secrets. This is required for enabling Helm-based tasks in your cluster. Please note turning on this feature flag requires additional configuration, see Helm Shared Storage section below. |
LogPosting |
Post instance logs to SIS directly. This is enabled by default for NVIDIA managed clusters. |
MultiNodeWorkloads |
Instruct NVCA to report multi-node instance types to SIS during registration. |
To manage feature flags directly:
Get the NVCF cluster name:
1nvcf_cluster_name="$(kubectl get nvcfbackends -n nvca-operator -o name | cut -d'/' -f2)"
First, view current feature flags and determine which ones you want to preserve versus modify:
1kubectl get nvcfbackends -n nvca-operator -o yaml | grep -A 5 "featureGate:"
To modify feature flags, you can use the patch command. Note that this will override all feature flags.
Warning
When modifying feature flags, you must preserve any existing feature flags you want to keep. The patch command will override all feature flags, so you need to include all desired feature flags in the value array.
1kubectl patch nvcfbackends.nvcf.nvidia.io -n nvca-operator "$nvcf_cluster_name" --type=merge -p '{"spec":{"overrides":{"featureGate":{"values":["LogPosting","CachingSupport"]}}}}'
As an alternative to the patch command, you can also modify the feature flags using the edit command:
 1kubectl edit nvcfbackend -n nvca-operator
 2...
 3spec:
 4  featureGate:
 5    values:
 6    - LogPosting                # Existing feature flag
 7  overrides:
 8    featureGate:
 9      values:
10      - LogPosting              # Existing feature flag copied over
11      - -CachingSupport         # Caching support disabled
12      ...
Verify the changes:
1kubectl get pods -n nvca-system -o yaml | grep -i feature
Advanced: Helm-Managed Cluster Configuration#
By default, NVCA clusters are managed through the NGC UI (NGC-managed mode), where configuration changes are applied directly through the web interface. However, advanced users can switch to Helm-managed mode to control the NVCA backend configuration through Helm charts and GitOps practices.
Warning
When using Helm-managed mode, you must save the cluster key provided during cluster registration. This key is only shown once during the registration process and is not auto-filled in UI-generated commands. You will need to manually replace <API-KEY> placeholders with your saved key in all Helm commands.
In Helm-managed mode:
All cluster configuration is defined in Helm values
Changes are applied through
helm upgradecommandsThe NGC UI becomes read-only for cluster configuration
Switching to Helm-Managed Mode#
To switch from NGC-managed to Helm-managed mode, follow these steps:
Navigate to the Settings page in the NGC UI and click the Actions menu (⋮) for your cluster, then select “Switch Management Mode” from the dropdown menu.

Check the confirmation box: “I understand that management mode cannot be switched until the Helm command is run in the cluster” and copy the provided helm command.
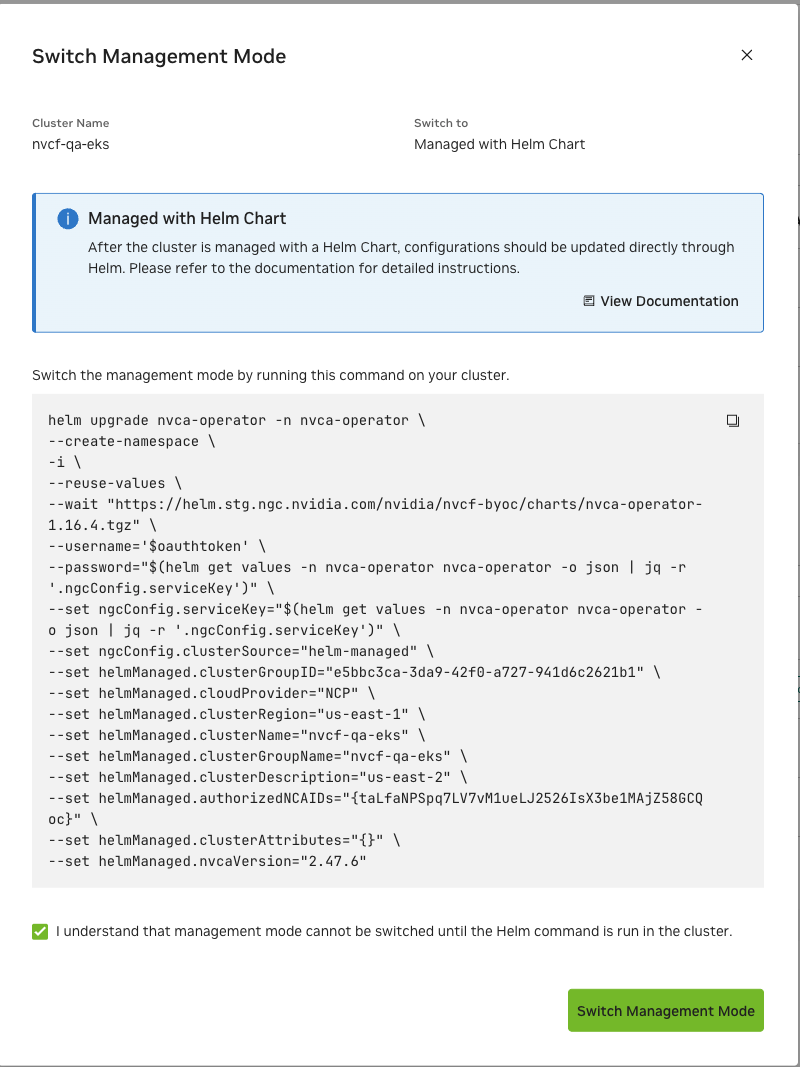
Run the helm command on your cluster’s command line.
Note
The following command is an example template. Always use the actual command provided in the NGC UI, which will have your cluster-specific values (cluster IDs, versions) automatically filled in. You must manually replace
<API-KEY>with the cluster key that was provided during cluster registration - this key is only shown once and must be saved by the user.The
ngcConfig.clusterSourceparameter decides the cluster management mode.1helm upgrade nvca-operator -n nvca-operator \ 2 --create-namespace \ 3 -i \ 4 --reset-values \ 5 --wait \ 6 "https://helm.ngc.nvidia.com/nvidia/nvcf-byoc/charts/nvca-operator-1.15.4.tgz" \ 7 --username='$oauthtoken' \ 8 --password="<API-KEY>" \ 9 --set ngcConfig.serviceKey="<API-KEY>" \ 10 --set ncaID="<NCA-ID>" \ 11 --set clusterID="<CLUSTER-ID>" \ 12 --set ngcConfig.clusterSource="helm-managed" \ 13 --set helmManaged.cloudProvider="<CLOUD-PROVIDER>" \ 14 --set helmManaged.clusterRegion="<REGION>" \ 15 --set helmManaged.clusterGroupID="<CLUSTER-GROUP-ID>" \ 16 --set helmManaged.clusterGroupName="<CLUSTER-GROUP-NAME>" \ 17 --set helmManaged.nvcaVersion="<NVCA-VERSION>"
Click “Switch Management Mode” and see the management mode switched to “Helm Chart” successfully.

Configuration Parameters#
When operating in Helm-managed mode, the following parameters control the NVCF backend configuration:
Parameter |
Description |
Required |
Immutable |
|---|---|---|---|
|
Cloud provider for the cluster (e.g., |
Yes |
Yes |
|
Region where the cluster is deployed (e.g., |
Yes |
Yes |
|
Unique identifier for the cluster group |
Yes |
Yes |
|
Human-readable name for the cluster group |
Yes |
Yes |
|
Version of NVCA to deploy (e.g., |
Yes |
No |
|
Client ID for SSA authentication (optional, can be blank) |
No |
Yes |
|
Optional description of the cluster, defaults to cluster name if not provided |
No |
No |
|
Array of NCA IDs authorized to access this cluster (e.g., |
No |
No |
|
Array of feature gates to enable (e.g., |
No |
No |
|
Array of cluster attributes (e.g., |
No |
No |
Updating Configuration#
When in Helm-managed mode, configuration changes must be applied through Helm commands. To update the cluster configuration:
Note
The command below is a template example. Always refer to the NGC UI for the correct NVCA operator chart URL and version for your environment. The service key can be retrieved from your current Helm values as shown in the command.
1helm upgrade nvca-operator -n nvca-operator \
2  --reuse-values \
3  "https://helm.ngc.nvidia.com/nvidia/nvcf-byoc/charts/nvca-operator-1.15.4.tgz" \
4  --username='$oauthtoken' \
5  --password="$(helm get values -n nvca-operator nvca-operator -o json | jq -r '.ngcConfig.serviceKey')" \
6  --set helmManaged.featureGateValues='["LogPosting","CachingSupport","NewFeature"]'
Upgrading NVCA Version#
To upgrade the NVCA version in Helm-managed mode:
Note
This command is an example template. Use the upgrade command provided in the NGC UI, which will specify the correct NVCA operator version and chart URL. The service key can be retrieved from your current Helm values as shown in the command.
1helm upgrade nvca-operator -n nvca-operator \
2  --reuse-values \
3  "https://helm.ngc.nvidia.com/nvidia/nvcf-byoc/charts/nvca-operator-1.15.4.tgz" \
4  --username='$oauthtoken' \
5  --password="$(helm get values -n nvca-operator nvca-operator -o json | jq -r '.ngcConfig.serviceKey')" \
6  --set helmManaged.nvcaVersion="2.47.0"
Switching Back to NGC-Managed Mode#
Warning
Before switching from Helm-managed to NGC-managed mode, ensure that your Helm configuration reflects the desired final state. When switching back, the NGC UI will take over cluster management, and any Helm-specific configuration may need to be replicated through the UI.
To switch back to NGC-managed mode:
Navigate to the Settings page in the NGC UI and click the Actions menu (⋮) for your cluster, then select “Switch Management Mode” from the dropdown menu.
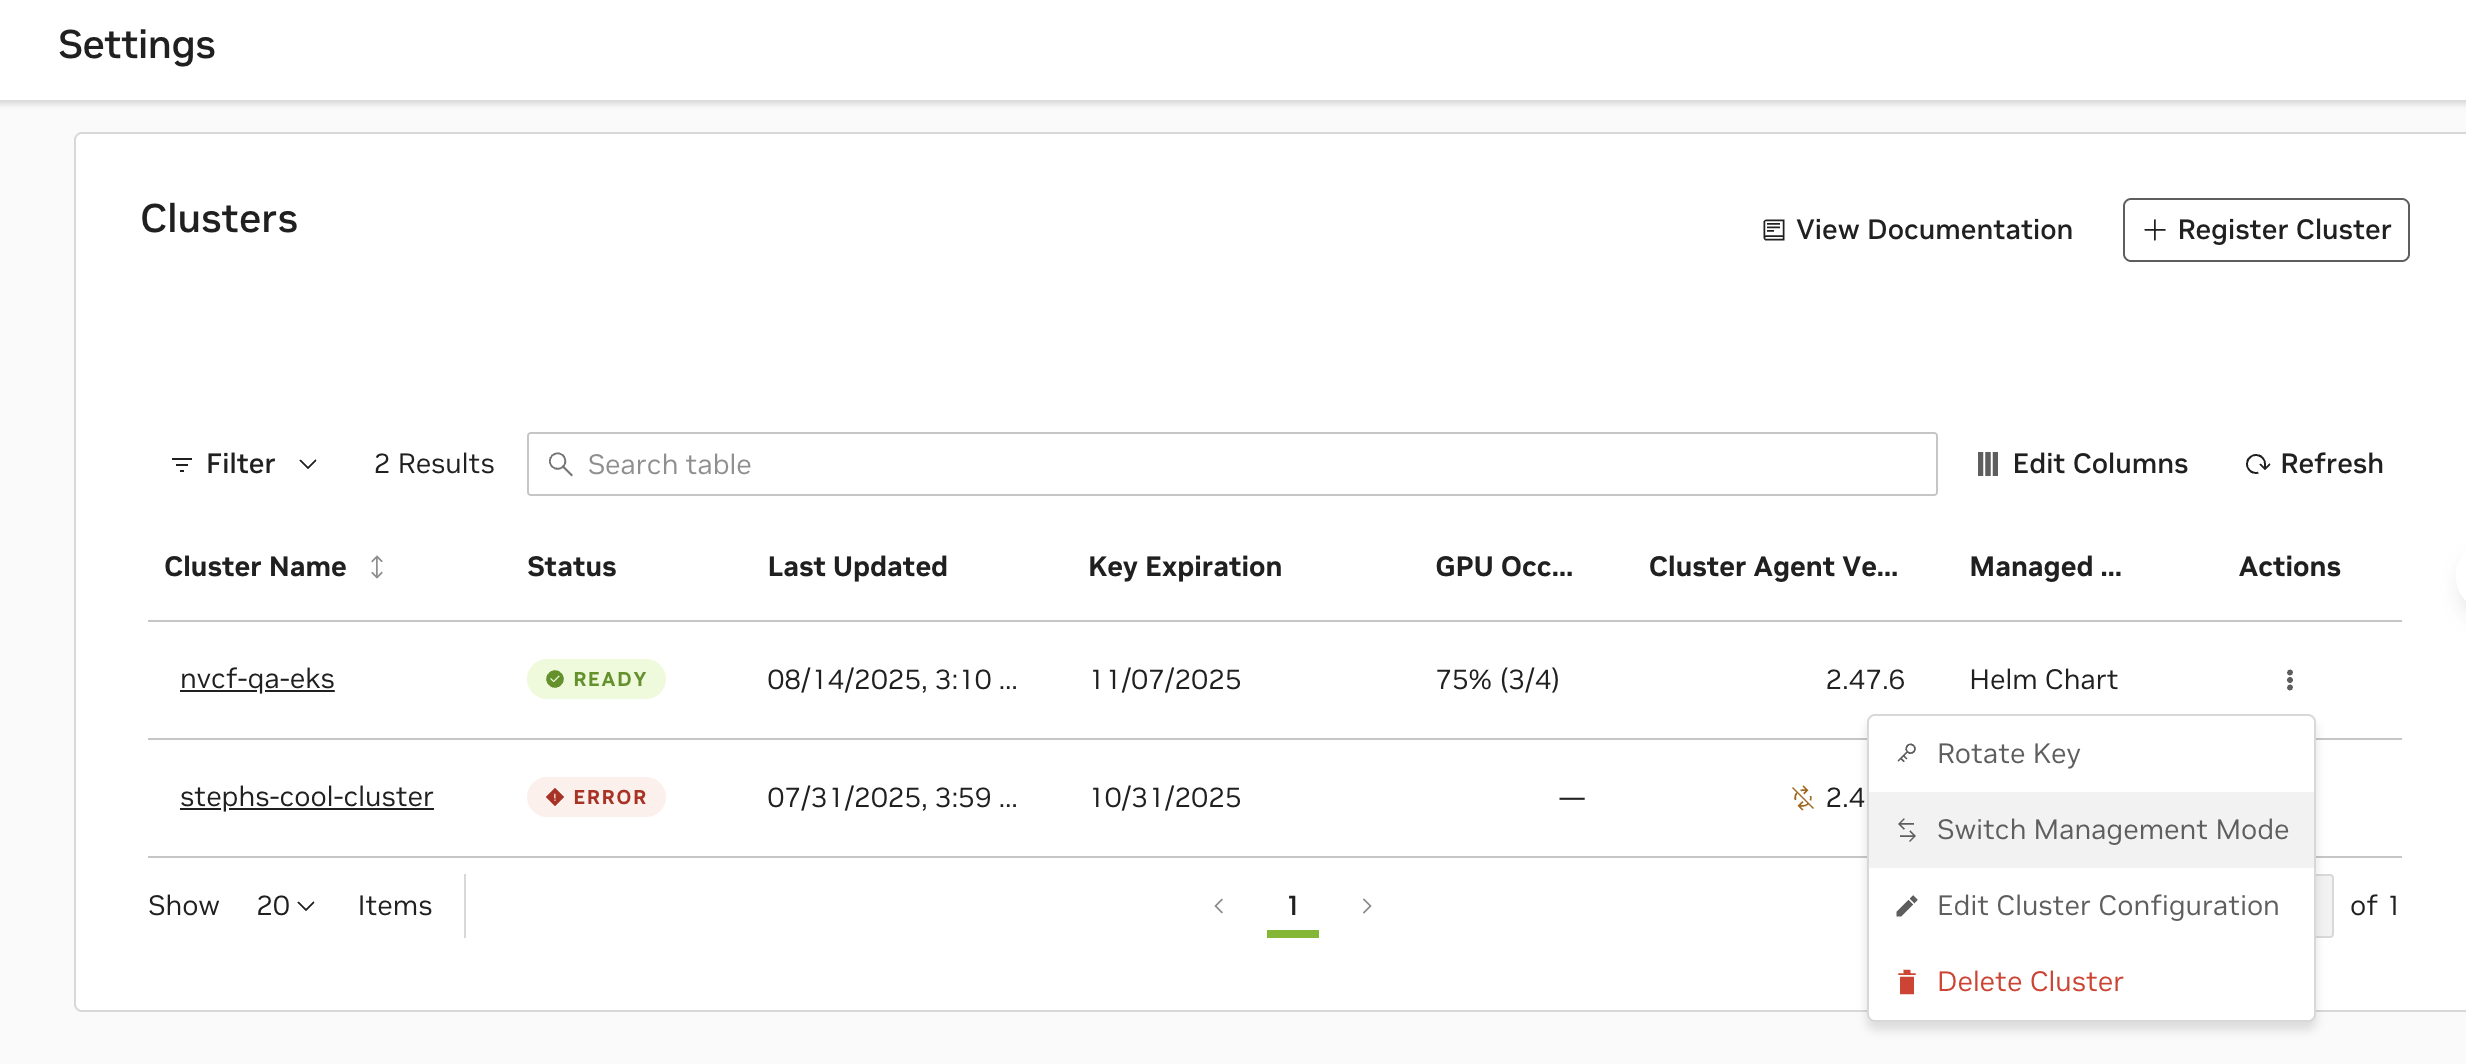
Check the confirmation box: “I understand that management mode cannot be switched until the Helm command is run in the cluster” and copy the provided helm command.
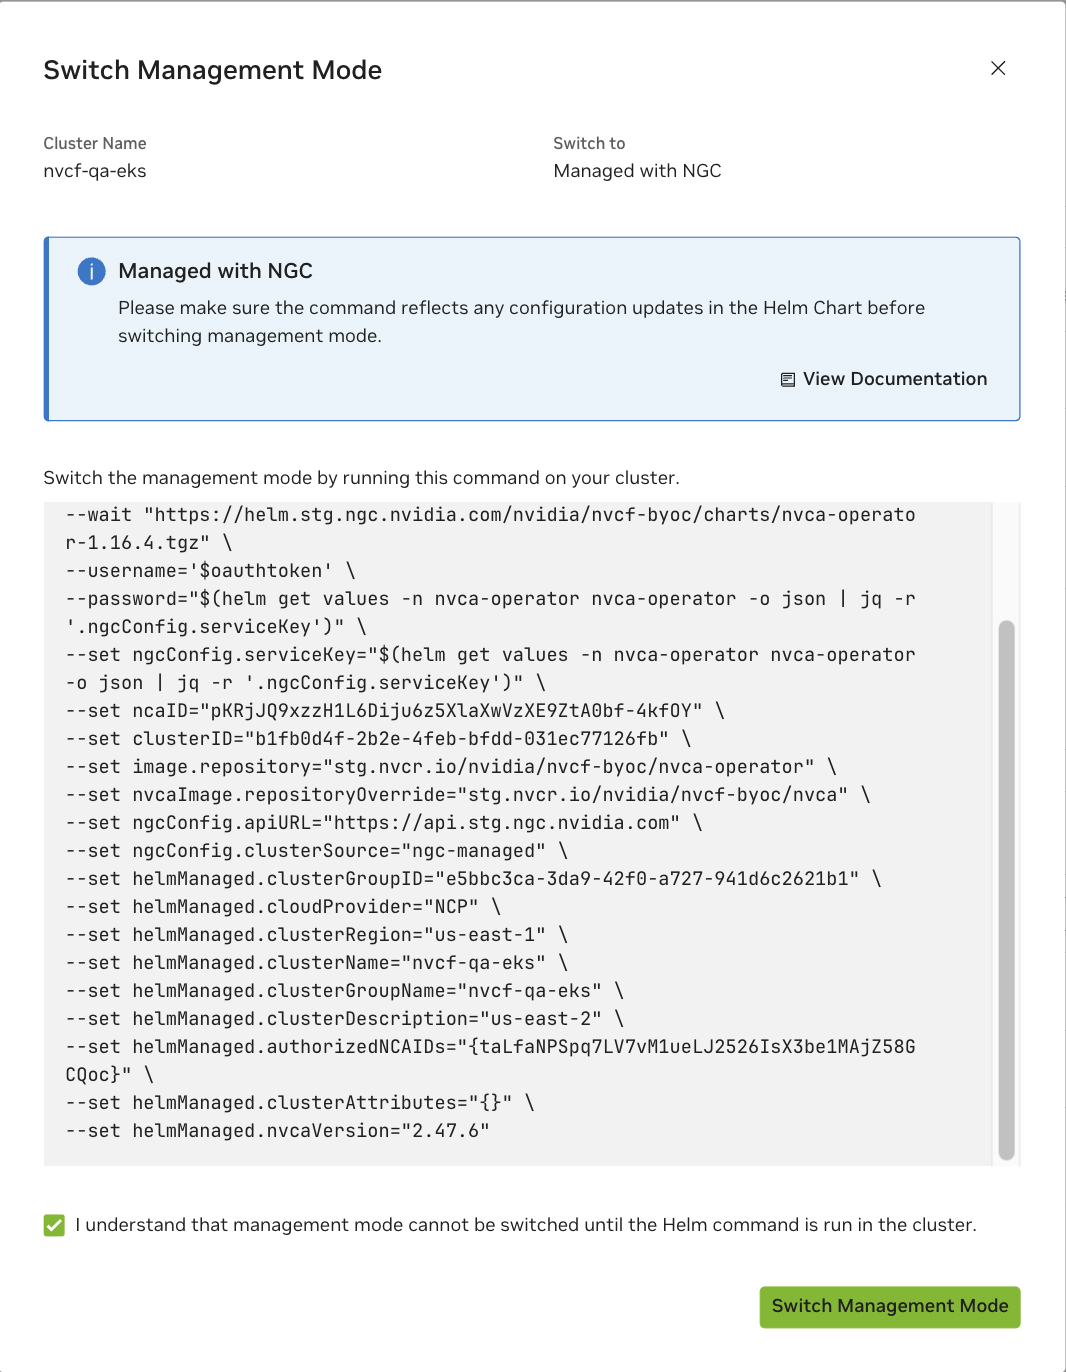
Run the helm command on your cluster’s command line.
Note
The following is an example command. Always use the command generated in the NGC UI, which will contain your specific cluster details and the appropriate NVCA operator version. You must manually replace
<API-KEY>with your saved cluster key from the original registration.1helm upgrade nvca-operator -n nvca-operator \ 2 --reset-values \ 3 --wait \ 4 "https://helm.ngc.nvidia.com/nvidia/nvcf-byoc/charts/nvca-operator-1.15.4.tgz" \ 5 --username='$oauthtoken' \ 6 --password="<API-KEY>" \ 7 --set ngcConfig.serviceKey="<API-KEY>" \ 8 --set ncaID="<NCA-ID>" \ 9 --set clusterID="<CLUSTER-ID>" \ 10 --set ngcConfig.clusterSource="ngc-managed"
Click “Switch Management Mode” and see the management mode switched to “NGC” successfully.

Note
After switching back to NGC-managed mode, verify your cluster configuration in the NGC UI to ensure all settings are correct. You may need to manually adjust settings that were previously managed through Helm.
Limitations#
When operating in Helm-managed mode:
The NGC UI becomes read-only for cluster configuration
All configuration changes must be applied through Helm commands
Feature flag and attribute changes require careful attention to preserve existing configuration
Switching between modes requires
--reset-valueswhich will reset all Helm values to defaults
Tips#
Save Your API Key: During cluster registration, immediately save the cluster key in a secure location. This key is only shown once and cannot be retrieved later from the UI.
Version Control: Store your Helm commands or values files in version control
Validation: Always verify cluster status after configuration changes using
kubectl get nvcfbackend -n nvca-operatorBackup: Before making major changes, record your current configuration using
helm get values -n nvca-operator nvca-operatorDocumentation: Document any custom configuration parameters or overrides for your team
Advanced Parameter Reference#
The following parameters are for advanced use cases only. Most users should rely on the standard helmManaged.* parameters documented above. These additional parameters allow fine-tuning of the NVCA operator and backend behavior.
NVCA Operator Parameters#
Parameter |
Description |
Default Value |
|---|---|---|
|
NVCA Operator container registry path, without tag |
|
|
NVCA Operator container image tag. Defaults to the chart version |
|
|
Kubernetes ImagePullPolicy for NVCA Operator |
|
|
(Optional) Full NVCA container registry path, without tag. Override default for staging/testing environments |
|
|
Kubernetes ImagePullPolicy for NVCA |
|
|
Use the ngcConfig.serviceKey to automatically generate an image pull secret |
|
|
Name of the image pull secret to use for NVCA pods |
|
|
Specifies whether a ServiceAccount should be created |
|
|
Additional custom annotations for the ServiceAccount |
|
|
The name of the ServiceAccount to use (auto-generated if empty) |
|
|
Replica count for the operator deployment |
|
|
Namespace in which NVCFBackend objects are created |
|
|
Logging level for the operator (debug, info, warn, error) |
|
|
Override the Kubernetes version that NVCA registers with |
|
|
Kubernetes PriorityClassName for pod scheduling preference during evictions |
|
|
Skip Flux installation if admin already has one installed |
|
|
Enables Helm repository restrictions to specific organizations/teams |
|
|
Enables GXCache support in NVCA for enhanced caching capabilities |
|
|
Comma-separated CIDR ranges for additional network access control |
|
NGC Configuration Parameters#
Parameter |
Description |
Default Value |
|---|---|---|
|
Username for NGC registry authentication |
|
|
ServiceKey (cluster key) for authentication. If unset, expects secret to exist |
|
|
Secret containing NGC ServiceKey for authentication |
|
|
Key name within the secret containing the NGC ServiceKey |
|
|
NGC API URL for requesting authentication tokens |
|
|
Source of cluster configuration ( |
|
Node Selector Configuration#
Parameter |
Description |
Default Value |
|---|---|---|
|
Node selector label key for operator pods |
|
|
Node selector label value for operator pods |
|
OpenTelemetry Configuration#
Parameter |
Description |
Default Value |
|---|---|---|
|
Enable OpenTelemetry tracing and metrics collection |
|
|
Service name for Lightstep tracing integration |
|
|
Access token for Lightstep API authentication |
|
Network Policy Configuration#
Parameter |
Description |
Default Value |
|---|---|---|
|
IPv4 CIDRs that workload pods are NOT allowed to access (cluster-internal networks) |
|
|
Array of custom network policy definitions to apply to NVCA function namespaces |
|
Example Usage#
To use these advanced parameters, include them in your Helm upgrade command:
1helm upgrade nvca-operator -n nvca-operator \
2  --reuse-values \
3  "https://helm.ngc.nvidia.com/nvidia/nvcf-byoc/charts/nvca-operator-1.15.4.tgz" \
4  --username='$oauthtoken' \
5  --password="$(helm get values -n nvca-operator nvca-operator -o json | jq -r '.ngcConfig.serviceKey')" \
6  --set logLevel="debug" \
7  --set priorityClassName="high-priority" \
8  --set otel.enabled="true" \
9  --set networkPolicy.clusterNetworkCIDRs='["10.0.0.0/8","172.16.0.0/12"]'
Warning
Modifying these advanced parameters can affect cluster stability and security. Only change these values if you understand their implications.
Advanced: Manual Instance Configuration#
Warning
It is highly recommended to rely on the Dynamic GPU Discovery, and therefore the NVIDIA GPU Operator, as manual instance configuration is error-prone.
This type of configuration is only necessary when the cluster Cloud Provider does not support the NVIDIA GPU Operator.
To enable manual instance configuration, remove the “Dynamic GPU Discovery” capability.
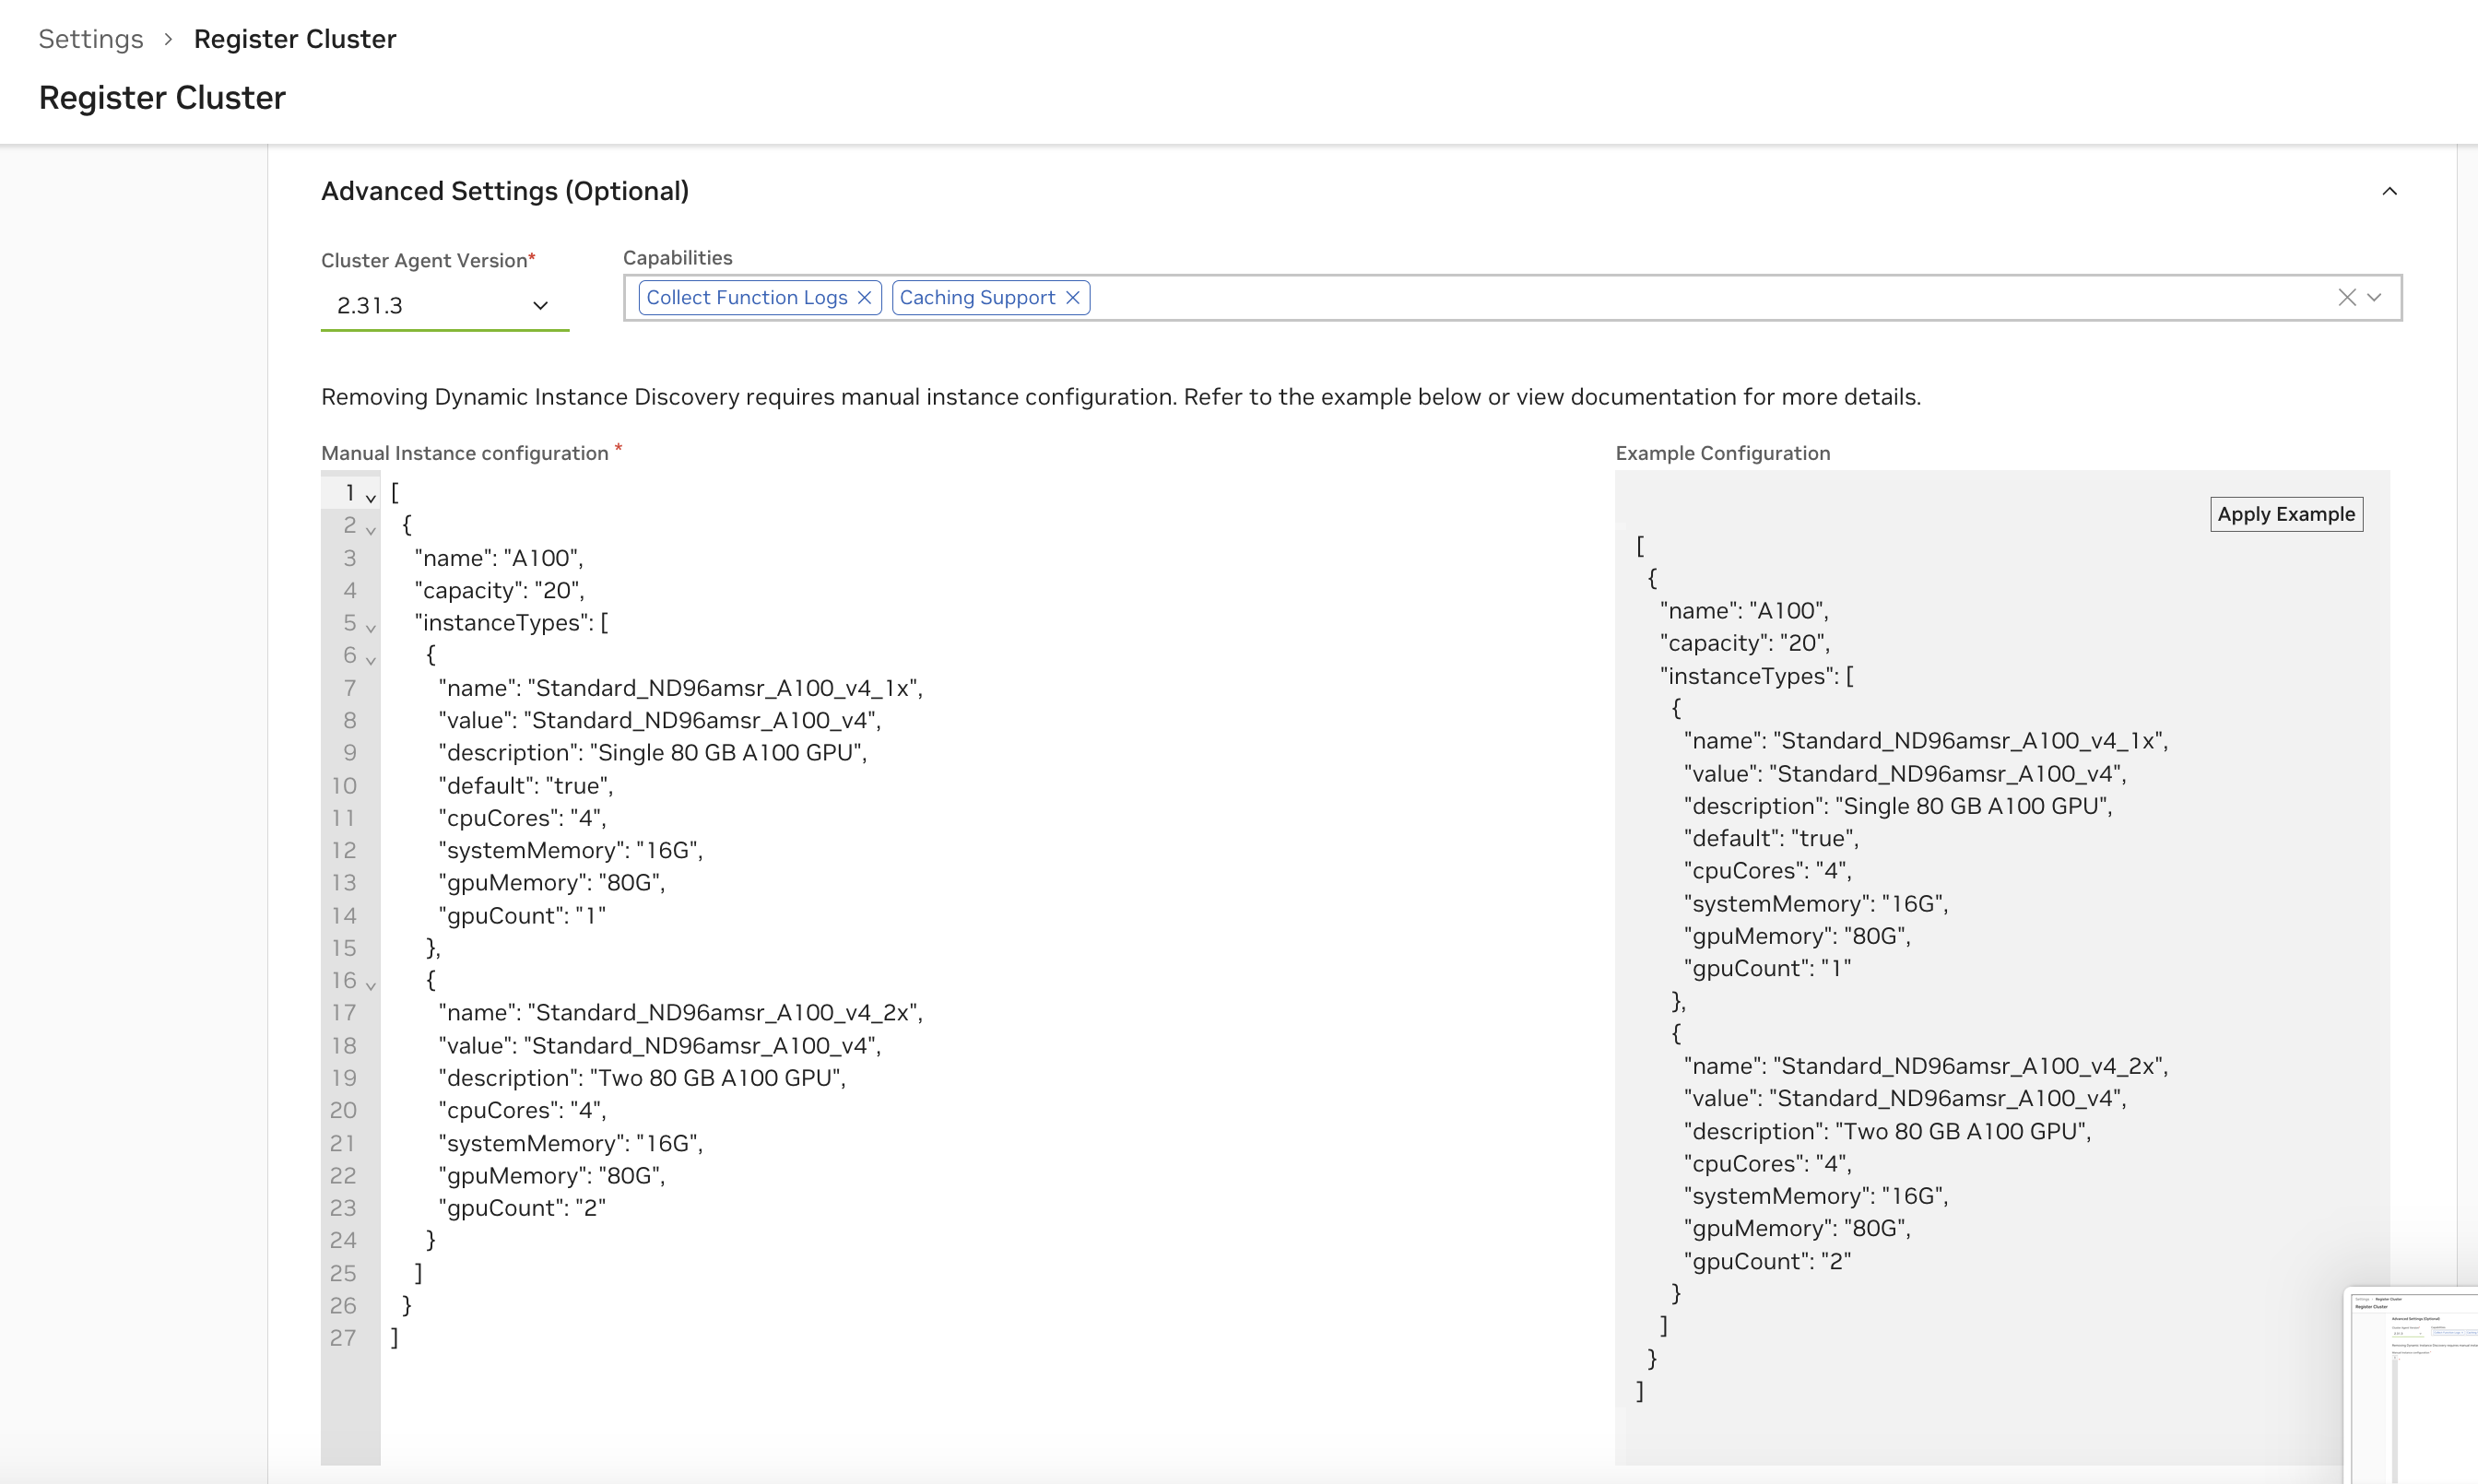
All fields in the generated example configuration in the UI are required. Start by choosing “Apply Example” to copy over the example configuration, and then modify it to your cluster’s instance specifications.
Example Configuration
 1[
 2    {
 3        "name": "A100",
 4        "capacity": "20",
 5        "instanceTypes": [
 6            {
 7                "name": "Standard_ND96amsr_A100_v4_1x",
 8                "value": "Standard_ND96amsr_A100_v4",
 9                "description": "Single 80 GB A100 GPU",
10                "default": "true",
11                "cpuCores": "4",
12                "systemMemory": "16G",
13                "gpuMemory": "80G",
14                "gpuCount": "1"
15            },
16            {
17                "name": "Standard_ND96amsr_A100_v4_2x",
18                "value": "Standard_ND96amsr_A100_v4",
19                "description": "Two 80 GB A100 GPU",
20                "cpuCores": "4",
21                "systemMemory": "16G",
22                "gpuMemory": "80G",
23                "gpuCount": "2"
24            }
25        ]
26    }
27]
Manual Instance Type Configuration#
Prerequisites#
Since you are not using the GPU Operator, you must ensure each GPU node has the instance-type label that matches the “value” field in your manual configuration:
1kubectl label nodes <node-name> nvca.nvcf.nvidia.io/instance-type=<instance-type-value>
For example, if your configuration specifies "value": "OCI.GPU.A10", you would label the node with:
1kubectl label nodes gpu-node-1 nvca.nvcf.nvidia.io/instance-type=OCI.GPU.A10
Configuration Fields#
The following fields are critical for proper cluster registration and function deployment. Incorrect values will cause NVCA installation or function deployment failures:
Field |
Description |
|---|---|
name |
The GPU model name that matches the NVIDIA GPU in your cluster nodes. This must match exactly what is reported by |
capacity |
The total number of GPUs of this type available across all nodes in your cluster. You can get this by running:
|
value |
The value that matches what you set for the |
gpuCount |
The number of GPUs allocated to each instance of this type. Must match the actual GPU count on the node, which can be verified with:
|
instanceTypes -> name |
A unique identifier for this instance type configuration. Should be descriptive of the GPU count and node type, for example: “Standard_ND96amsr_A100_v4_1x” for a single GPU configuration |
Warning
Double check these critical values against your actual cluster configuration. Mismatches will prevent the NVIDIA Cluster Agent from properly managing GPU resources.
Cloud Provider Specific Notes#
Oracle Cloud Infrastructure (OCI)#
When using Oracle Container Engine for Kubernetes (OKE), ensure that:
Your compute nodes and GPU nodes are in the same availability domain
This is required for proper network connectivity between the NVIDIA Cluster Agent and GPU nodes
Flannel CNI is the current recommended and validated CNI vs OCI native CNI for OKE cluster networking.
AWS#
When using AWS EKS, note that the following limitations exist:
Caching is currently not supported