Elastic NIM#
NVIDIA Inference Microservices (NIM) are pre-built containers that enable secure, high-performance AI model inferencing. This guide shows you how to deploy NIMs on NVIDIA Cloud Functions (NVCF), a fully managed service that simplifies NIM deployment and management.
Benefits of Running NIM on NVCF#
High Performance: Optimized for NVIDIA GPUs with automatic resource allocation and load balancing
Simplified Operations: Streamlined NIM function creation and one-click deployment - no need to manage Kubernetes clusters or configure scaling policies
Hardware Awareness: Automatically selects the best hardware resources based on workload requirements.
Cost Optimization: Built-in auto-scaling (including scale-to-zero) reduces infrastructure costs
Enterprise-Ready: Secure deployment with automatic updates, monitoring, and enterprise support. This guide uses the Llama 3 8B NIM as an example, but the instructions apply to any NIM available through NGC.
Prerequisites#
Before deploying a NIM through NVCF, ensure your Kubernetes environment meets both the software and hardware requirements:
System Requirements
Software Requirements
For detailed version compatibility information, including supported models and NVIDIA software requirements, please refer to the NIM Support Matrix: Supported Models.
Note
All NIM container images referenced in the support matrix must be uploaded to your NGC private registry before they can be deployed through NVCF.
Hardware Requirements
Each NIM model has specific hardware requirements based on its size and complexity:
Smaller models (like 8B parameter models): Generally require at least one NVIDIA GPU with sufficient VRAM
Larger models (like 70B parameter models): May require multiple GPUs or higher-end GPUs with more VRAM
Important
Always check the specific hardware requirements for your chosen NIM in the NIM Support Matrix. Requirements vary based on model size, batch size, and desired inference performance.
Network Requirements
Outbound internet access to: - NGC container registry (nvcr.io) for pulling NIM containers - NVIDIA Cloud APIs for function management and monitoring - Your organization’s private registry for storing copied NIM containers
Stable network connection with sufficient bandwidth for container operations
Any proxy or firewall must allow HTTPS (port 443) access to these services
Kubernetes Requirements
A Kubernetes cluster configured with GPU-enabled nodes
NVIDIA device plugin installed and configured
Container runtime that supports NVIDIA GPUs (e.g., containerd with NVIDIA runtime)
Note
Refer to your specific Kubernetes distribution’s documentation for detailed instructions on configuring pods with GPU access:
For vanilla Kubernetes: kubernetes.io/docs/tasks/manage-gpus/scheduling-gpus
For other distributions: Check their respective documentation for GPU support
Generate Personal API Key
A Personal API Key is required to authenticate with NVCF and invoke the function. To generate a Personal API Key:
Click “Generate Personal API Key” in the NVCF deployments interface
Fill in the key details:
Key Name: Choose a descriptive name
Expiration: Select desired expiration period (e.g., 12 months)
Services: Enable the following services:
Cloud Functions
Private Registry
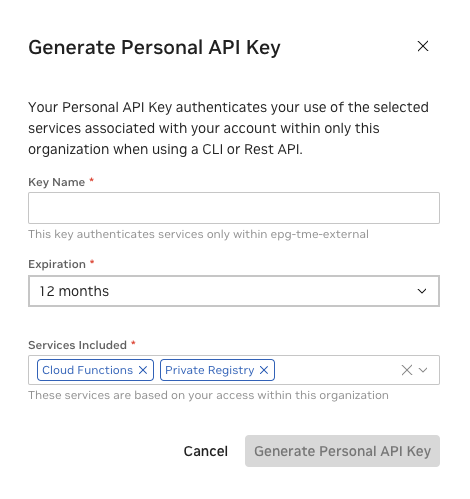
Personal API Key generation dialog showing required services#
Set the generated API key as an environment variable:
export NGC_API_KEY="your-api-key"
Replace
your-api-keywith the actual API key generated in step 2.
Register a Kubernetes Cluster with NVCF
Your Kubernetes cluster must have GPU nodes available for NIM deployments. For detailed setup instructions, see Cluster Setup and Management. To register your cluster with NVCF:
Navigate to Settings in the NVCF interface
Click “+Register Cluster”
Fill in the configuration details:
Cluster Name: A unique name for your cluster
Cluster Group: Select or create a group for organization
Compute Platform: Your cloud provider or on-premises platform
Region: The geographic region of your cluster
Description: Optional description of the cluster’s purpose
Attributes: Any additional cluster attributes
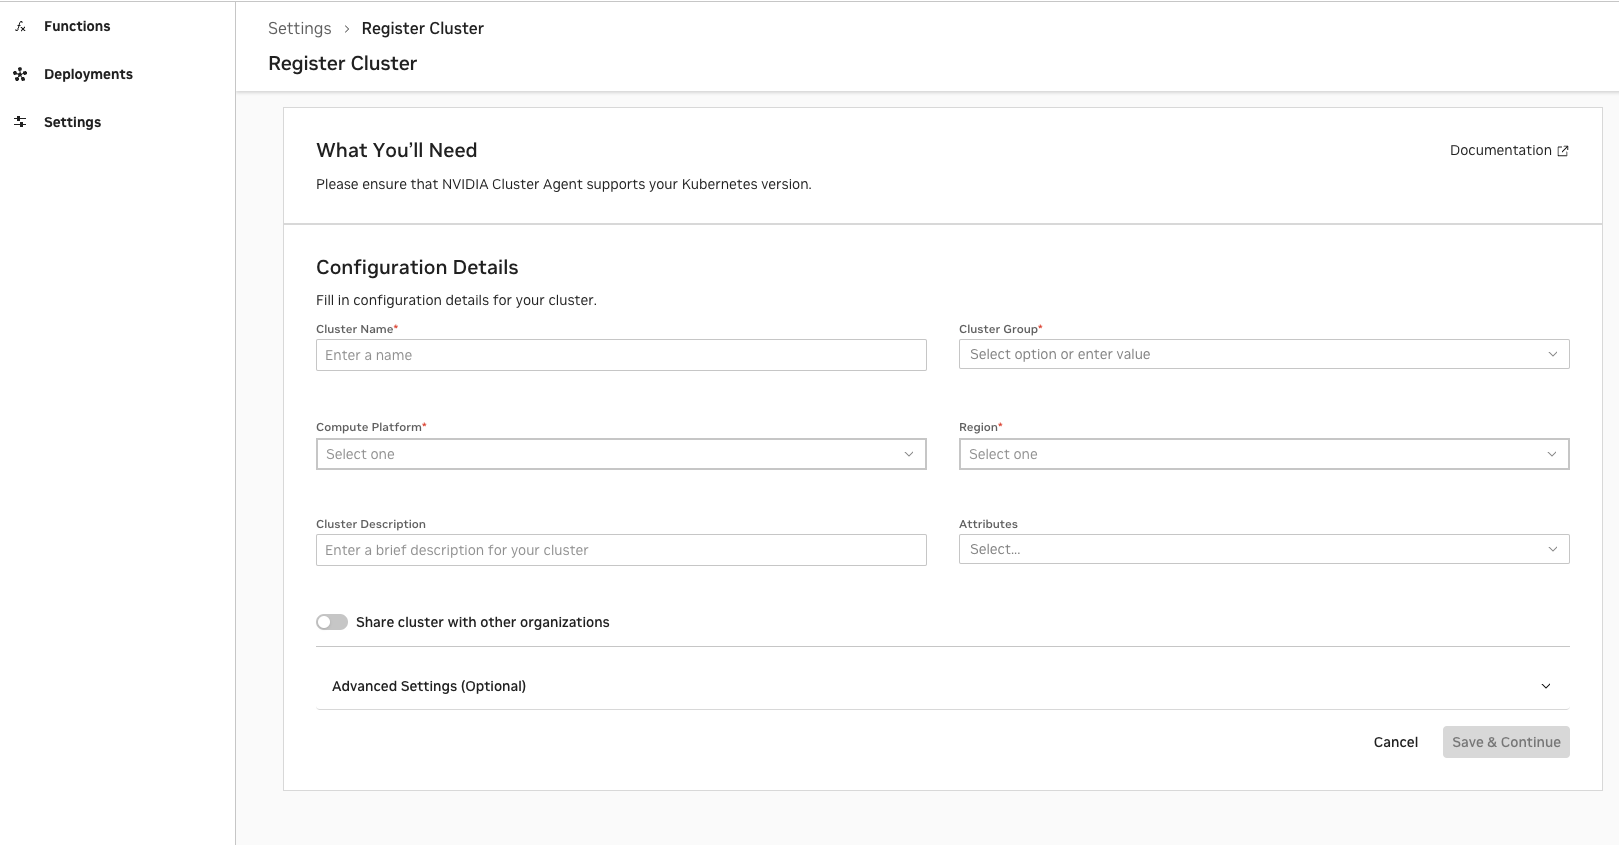
NVCF cluster registration form showing required configuration fields#
Install the NVIDIA Cluster Agent Operator by running the helm command provided in the UI. This command can also be found later in the Settings page:
Example format of the helm command (use the actual command generated by the UI):
helm upgrade nvca-operator \
  -n nvca-operator \
  --create-namespace \
  -i \
  --reset-values \
  --wait \
  "https://helm.ngc.nvidia.com/nvidia/nvcf-byoc/charts/nvca-operator-[OPERATOR_VERSION].tgz" \
  --username='\$oauthtoken' \
  --password="[REDACTED_API_KEY]" \
  --set ngcConfig.serviceKey="[REDACTED_API_KEY]" \
  --set ncaID="[REDACTED_NCA_ID]" \
  --set clusterID="[REDACTED_CLUSTER_ID]"
Note
Please refer to the cluster-setup-management for additional prerequisites and step-by-step instructions.
Create and Deploy the Function#
This section guides you through deploying a NIM using NVCF. Here’s an overview of the process:
Create a new function using the appropriate NIM container.
Deploy a version of the function.
Manage the function with the NGC CLI.
Note
Before you begin, please ensure you have completed all the requirements in the Register a Kubernetes Cluster with NVCF and Register NIM with Private Registry sections.
Follow these steps to quickly get started with your NIM deployment:
Log in to your NVCF account and navigate to the Functions page.
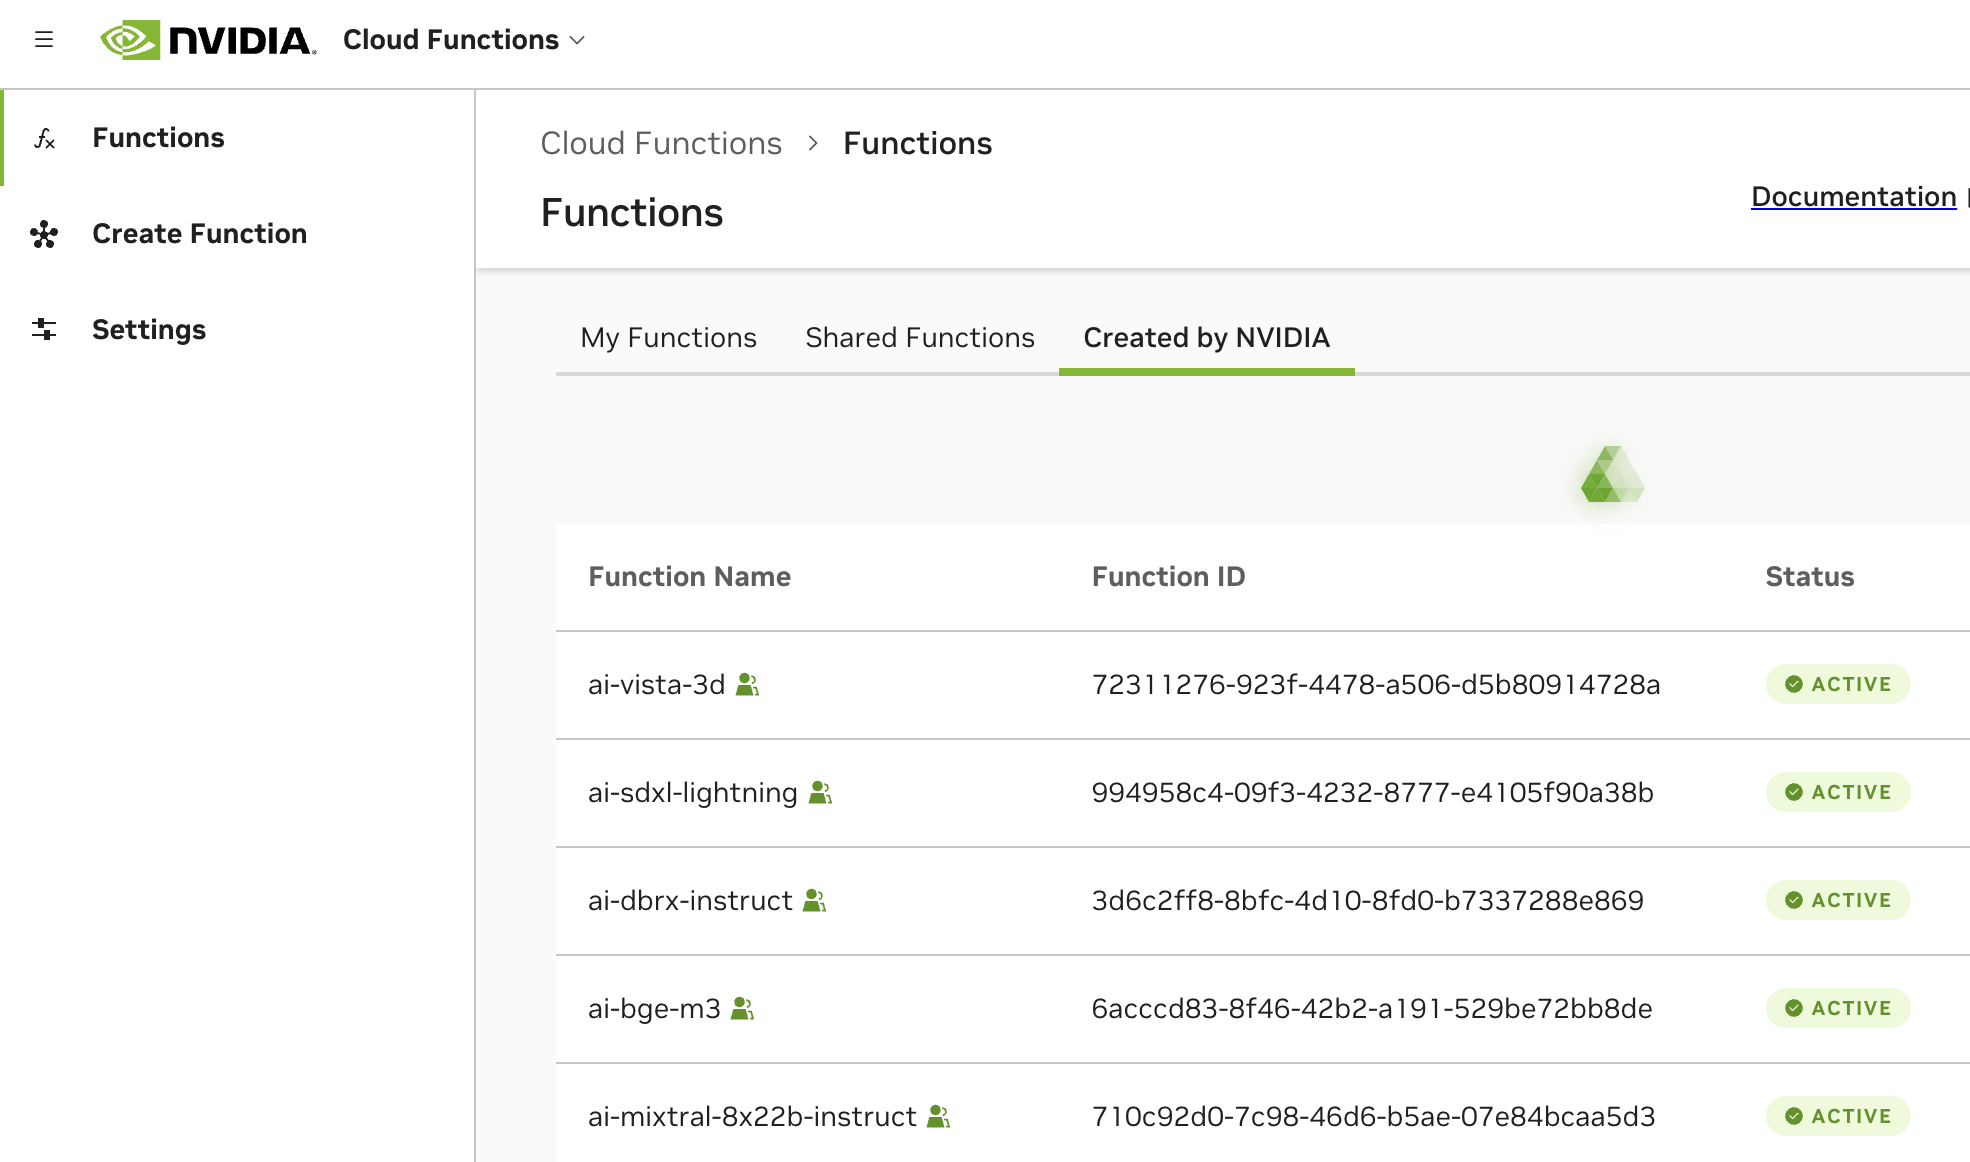
NVCF interface showing the Functions page with available tabs#
Click “Create Function” and choose “Elastic NIM” to start creating a new function.

This image shows the button used to create a new function.#
Fill in the function details, some fields will populate automatically:
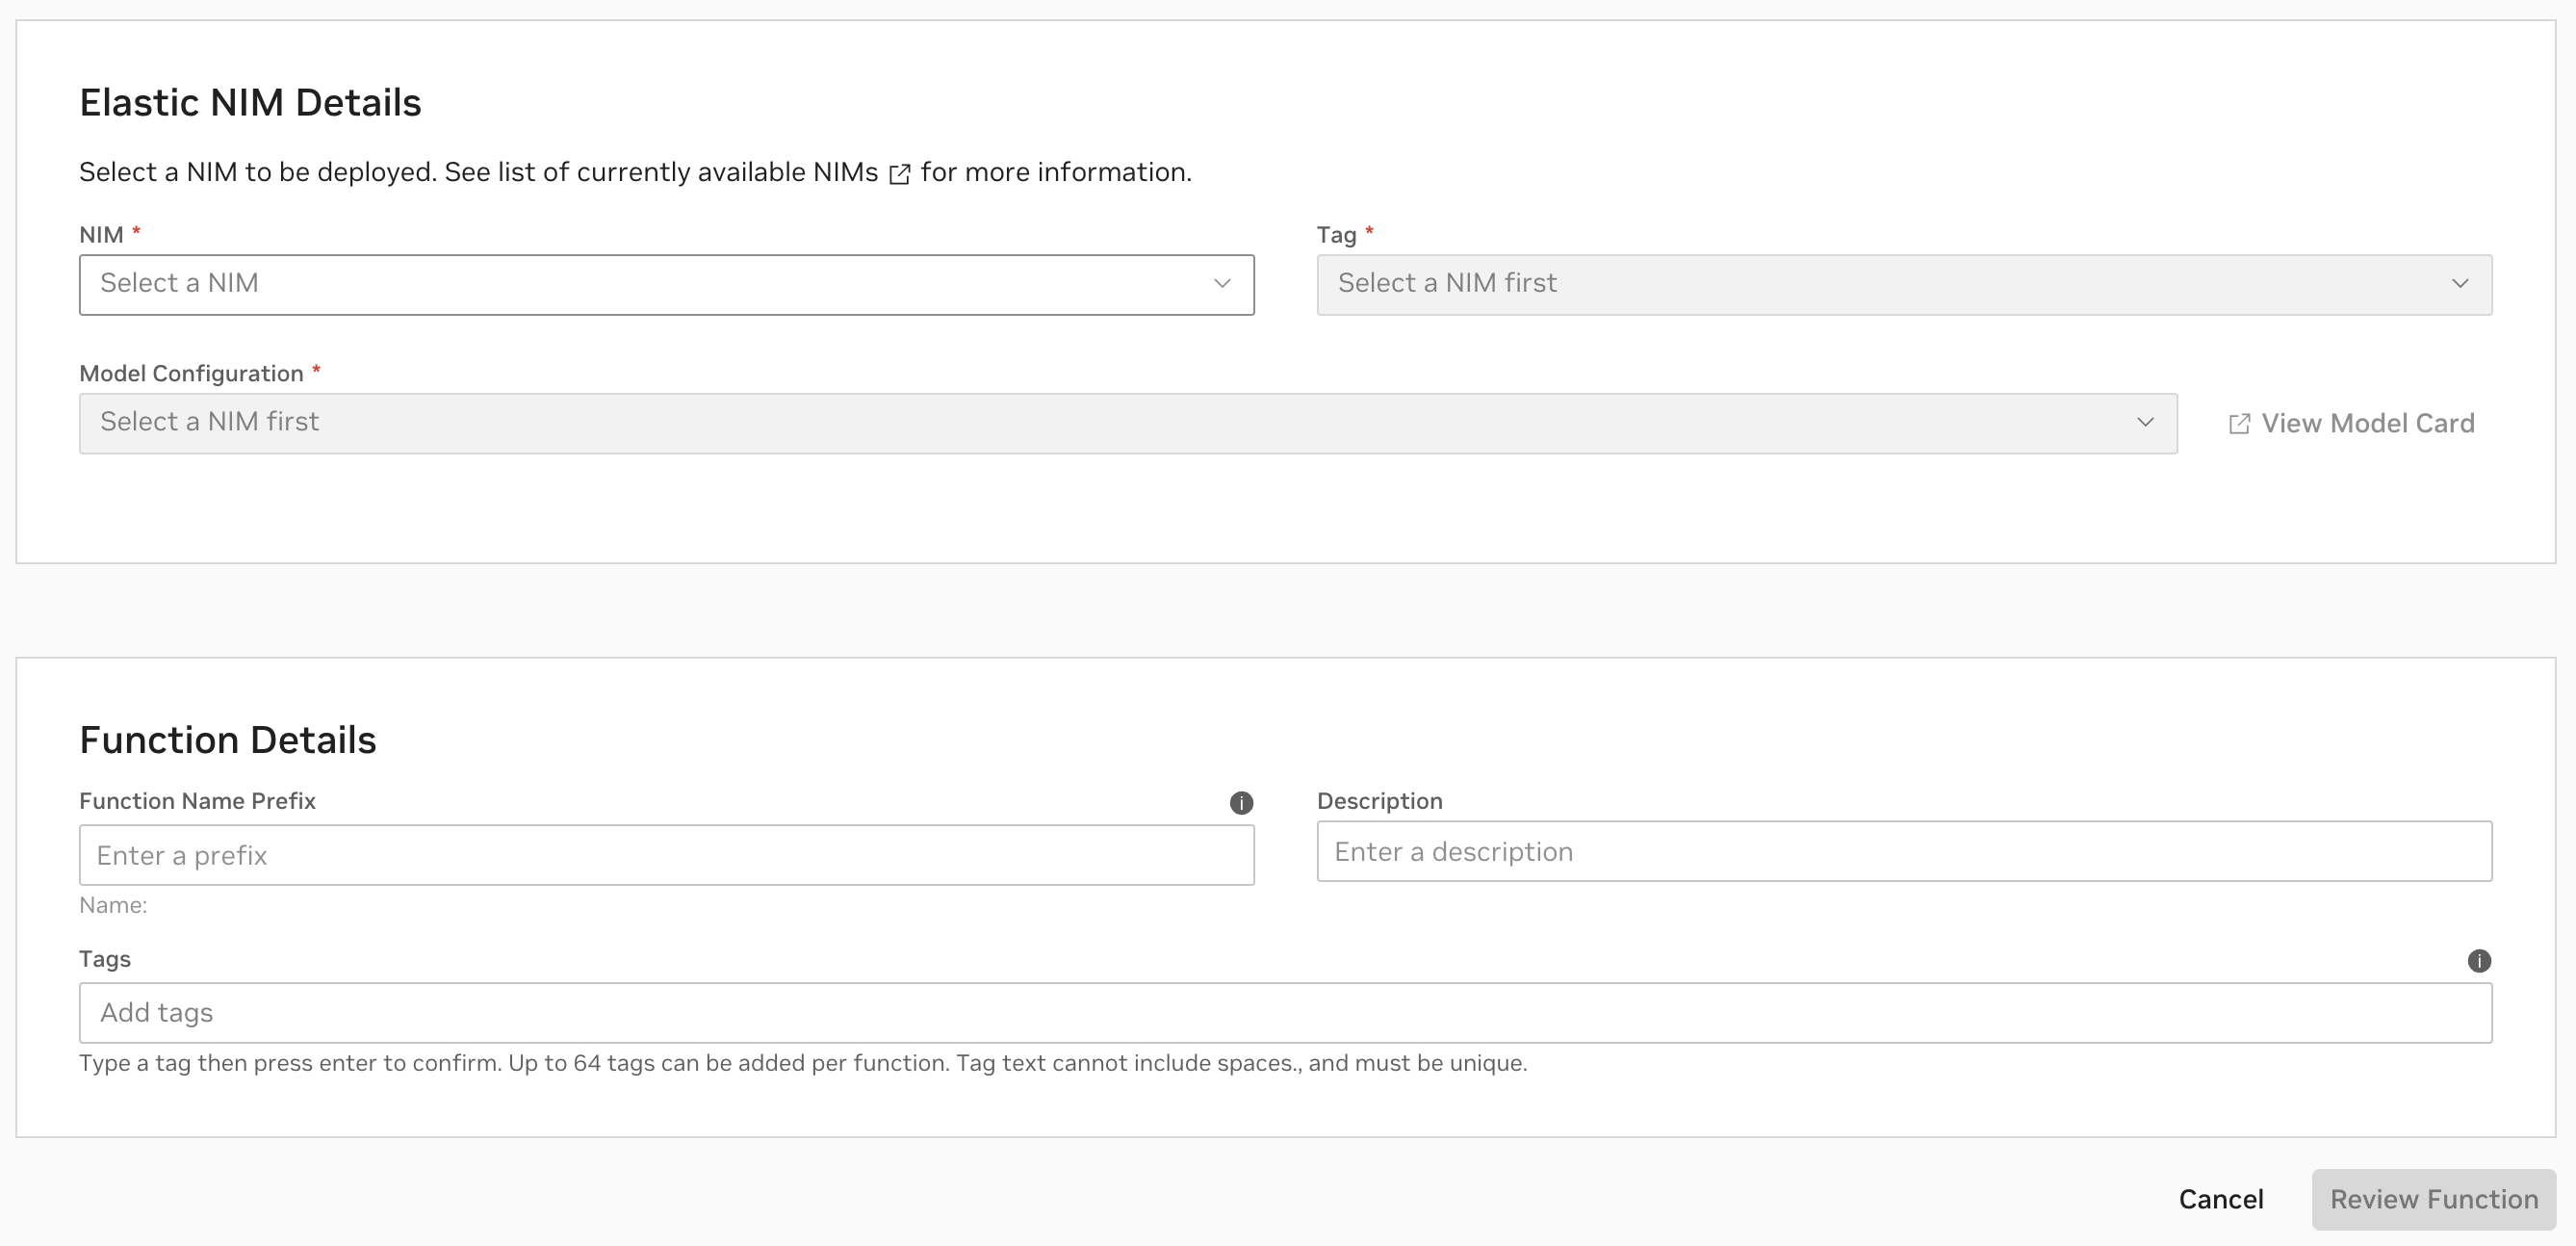
This image shows the details for creating an Elastic NIM.#
NIM: Select NIM from the dropdown
Tag: Choose a tag
Model Configuration: A profile that matches available hardware
Prefix: (Optional) Prefix for the function name
Description: (Optional) Description
Metadata Tags: (Optional) Metadata tags for the function
Telemetry Endpoint: (Optional) Select a configured telemetry endpoint for monitoring. For details on configuring telemetry endpoints, see External Observability.
Attention
Not all NIMs are currently onboarded to Elastic NIM. To manually deploy a downloadable NIM as a function, follow the Manual NIM Deployment guide.
Review and Deploy a Version of the Function
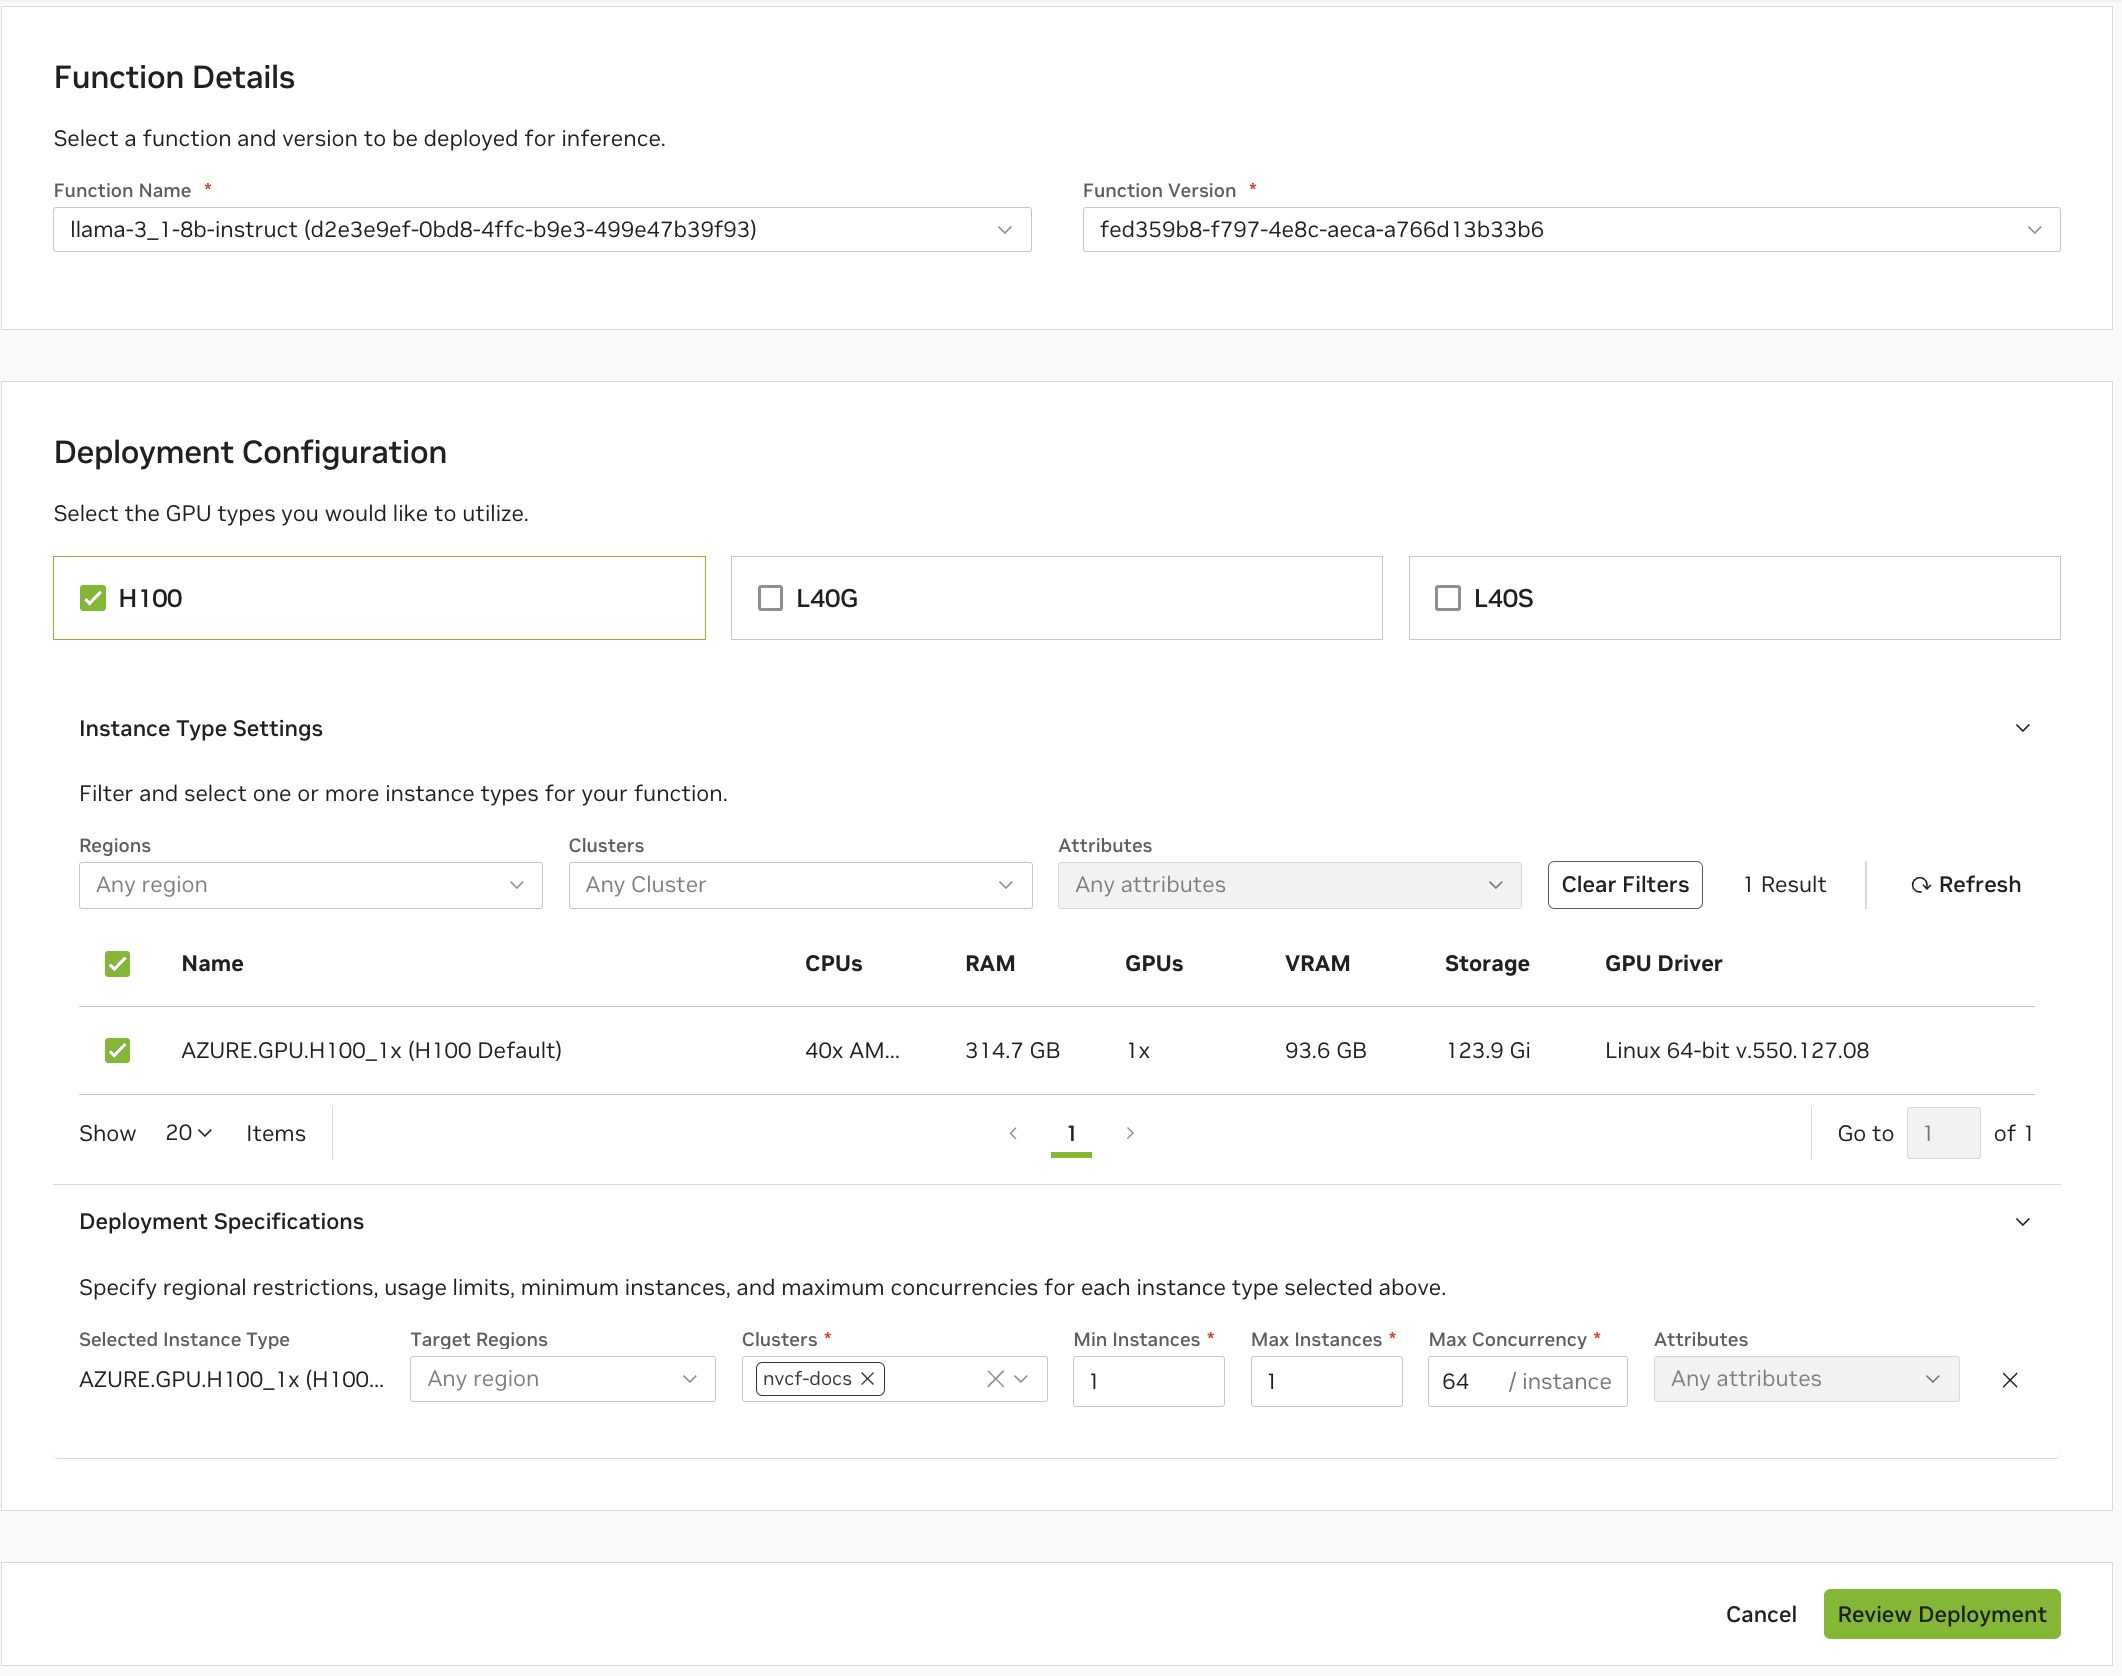
Configure deployment settings for your function version#
GPU Type: Select the appropriate GPU type for your workload (e.g., L40S, H100)
Min Instances: Minimum number of function instances to maintain, even when idle. Set this to 0 for scale-to-zero capability
Max Instances: Maximum number of function instances that can be created to handle increased load
Max Concurrency: Maximum number of simultaneous requests a single function instance can handle. Higher values improve throughput but require more memory
The deployment process will begin, and NVCF will deploy the NIM container to the cluster.
Note
The initial deployment may take a few minutes. You can monitor the status in the NVCF UI or using the CLI.
Managing Your Function using the NGC CLI#
NVCF can be managed using the NGC CLI. These steps show how to install and configure the NGC CLI and use it to manage your functions.
Note
Before using the NGC CLI, ensure you have created a Personal API Key as described in the prerequisites section.
NGC CLI Installation and Configuration
Note
The NGC CLI is required when using NVCF command-line tools for operations like function validation and container image management.
The NGC CLI is supported on Linux, Windows, and macOS operating systems. For detailed system requirements and installation instructions, visit the NGC CLI Installation Guide.
The following installation steps are for Ubuntu Linux. For Windows, macOS, or other Linux distributions, refer to the NGC CLI Installation Guide for equivalent steps.
Download and install NGC CLI:
# Download NGC CLI
wget --content-disposition https://api.ngc.nvidia.com/v2/resources/nvidia/ngc-apps/ngc_cli/versions/3.58.0/files/ngccli_linux.zip -O ngccli_linux.zip && unzip ngccli_linux.zip
Verify the download integrity:
# Check MD5 hash
find ngc-cli/ -type f -exec md5sum {} + | LC_ALL=C sort | md5sum -c ngc-cli.md5

# Check SHA256 hash
sha256sum ngccli_linux.zip
Compare the SHA256 output with:
1aa098196b26f66a1c7af3cbf5439b236acbbdcc041f2f0f6b8d2ceb28c6955fMake the NGC CLI executable and add to PATH:
# Make executable
chmod u+x ngc-cli/ngc

# Add absolute path to NGC CLI to your PATH
echo "export PATH=\"$PATH:\$PWD/ngc-cli\"" >> ~/.bashrc
source ~/.bashrc

# Verify NGC CLI is in path
which ngc
Configure NGC CLI with your NGC API Key:
Important
The NGC API Key required here is different from the Personal API Key (which begins with
nvapi)Make sure to save your NGC API Key securely after generation, as it cannot be viewed again later
For detailed NGC CLI documentation and commands, refer to the NGC CLI Documentation
# Configure NGC CLI
ngc config set
Verify NGC CLI cloud-function command:
# List available functions to verify the command works
ngc cloud-function function list
If the command works, you’ll see a list of functions in your organization (which may be empty if no functions have been created yet).
Export NGC_API_KEY Environment Variable#
export NGC_API_KEY=<nvapi-...>
List All Functions#
ngc cloud-function function list
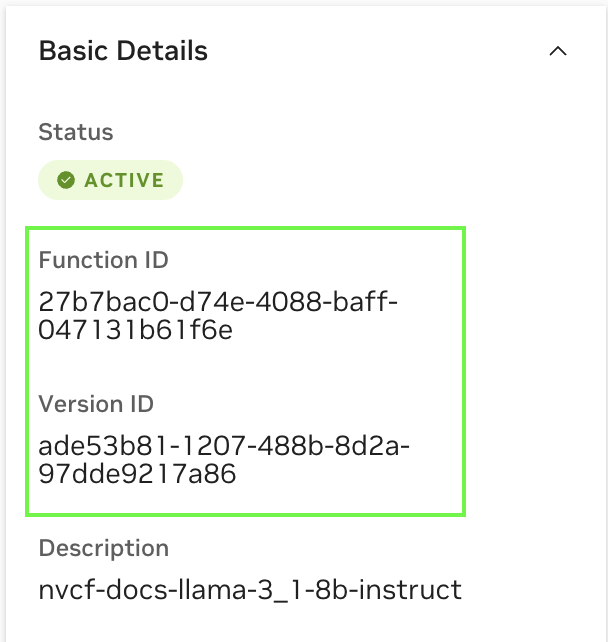
Get Function Information (Specify Version)#
ngc cloud-function function info <function-id>:<version-id>
Delete a Function#
ngc cloud-function function remove <function-id>:<version-id>
Test the NIM Function with Sample Input#
Note
This example demonstrates how to use the OpenAI API through the NIM framework.
curl -X POST \
  https://${FUNCTION_ID}.invocation.api.nvcf.nvidia.com/v1/chat/completions \
  -H 'Content-Type: application/json' \
  -H 'Accept: application/json' \
  -H "Authorization: Bearer ${NGC_API_KEY}" \
  -d '{
    "model": "meta/llama-3.1-8b-instruct",
    "messages": [
      {
        "role": "user",
        "content": "What is machine learning?"
      }
    ],
    "temperature": 0.7,
    "max_tokens": 100,
    "stream": false
  }'
The response will include the model’s completion of your prompt, confirming that the function is working correctly.
For more information about NGC CLI commands, refer to the NGC CLI Documentation.
Deployment Best Practices#
Scaling Configuration Set appropriate minimum and maximum instance counts based on your workload Configure max concurrency based on your container’s capabilities Enable autoscaling to handle varying workloads efficiently Monitor function request queue depth for scaling decisions
Note
Before deploying, it’s recommended to run the Deployment Validator to catch common configuration issues.
Troubleshooting Guide#
Function Deployment Taking Too Long If the function deployment process is taking longer than expected:
Remember that NIMs need to download the model weights which can be several GB in size.
Verify that your NGC Personal API Key is valid and has the appropriate permissions
Check the event logs for any error messages or issues:
# Check function status and events
ngc cloud-function function info <function-id>:<version-id>
function-id and version-id can be found in the NVCF UI or using the CLI.
# Check pod events in the nvcf-backend namespace
kubectl get events -n nvcf-backend
# View pod logs
kubectl logs <pod-name> -n nvcf-backend
# Check node resources
kubectl describe nodes | grep -A 5 "Allocated resources"
# View total and available GPUs
kubectl get nodes -o=custom-columns=NAME:.metadata.name,TOTAL_GPUS:.status.capacity.'nvidia\.com/gpu',AVAILABLE_GPUS:.status.allocatable.'nvidia\.com/gpu'
Ensure there are sufficient resources in your cluster:
# Check node resources
kubectl describe nodes | grep -A 5 "Allocated resources"
# View total and available GPUs
kubectl get nodes -o=custom-columns=NAME:.metadata.name,TOTAL_GPUS:.status.capacity.'nvidia\.com/gpu',AVAILABLE_GPUS:.status.allocatable.'nvidia\.com/gpu'
GPU Scheduling Issues If pods cannot be scheduled:
Verify that GPU-enabled pods can be scheduled in your cluster:
# Check if pods are scheduled and running
kubectl get pods -n nvcf-system
# View detailed pod status and events
kubectl describe pods -n nvcf-system
# Check GPU device plugin pods
kubectl get pods -n nvidia-gpu-operator
# View GPU operator status
kubectl get clusterpolicy -n nvidia-gpu-operator
# Check if nodes have required GPU labels (should see nvidia.com/gpu.present=true)
kubectl get nodes --show-labels
# Check for taints that might prevent pod scheduling
kubectl describe nodes | grep Taint
Check that GPUs are available and properly configured:
# Check GPU devices on nodes (replace xxxx with actual pod name)
kubectl exec -it -n gpu-operator nvidia-device-plugin-daemonset-xxxx -- nvidia-smi
# Get the actual pod name
kubectl get pods -n gpu-operator -l app=nvidia-device-plugin-daemonset
# Verify GPU feature discovery is running
kubectl get pods -n gpu-operator -l app=gpu-feature-discovery
kubectl logs -n gpu-operator -l app=gpu-feature-discovery
# Check GPU metrics from DCGM
kubectl get pods -n gpu-operator -l app=nvidia-dcgm-exporter
kubectl logs -n gpu-operator -l app=nvidia-dcgm-exporter
Ensure no taints exist that would block the scheduler:
# List node taints
kubectl get nodes -o custom-columns=NAME:.metadata.name,TAINTS:.spec.taints
Related Resources
NVIDIA Cloud Functions
- NVIDIA NIM Microservices