AR SDK System Guide
AR SDK System Guide
The AR SDK System Guide provides the requirements for the hardware, the software, and the sample application, how to install the SDK, and how to build and run the sample applications.
NVIDIA® AR SDK enables real-time modeling and tracking of human faces from video.
The SDK is powered by NVIDIA graphics processing units (GPUs) with Tensor Cores, and as a result, the algorithm throughput is greatly accelerated, and latency is reduced. NVIDIA AR SDK has the following features:
- Face detection and tracking (Beta) detects, localizes, and tracks human faces in images or videos by using bounding boxes.
- Facial landmark detection and tracking (Beta) predicts and tracks the pixel locations of human facial landmark points and head poses in images or videos.
It can predict 68 and 126 landmark points. The 68 detected facial landmarks follow the Multi-PIE 68 point mark-ups information in Facial point annotations. The 126 facial landmark points detector can predict more points on the cheeks, the eyes, and on laugh lines.
- Face 3D mesh and tracking (Beta) reconstructs and tracks a 3D human face and its head pose from the provided facial landmarks.
- 3D Body Pose tracking (Beta) predicts and tracks the 3D human pose from images or videos.
It predicts 34 keypoints of body pose in 2D and 3D with Joint Angles and supports multi-person tracking. Refer to Appendix B for the keypoints.
- Eye Contact (Beta) estimates the gaze angles of a person in an image or video and redirects the gaze to make it frontal.
It can operate in the following modes:
- Head pose and gaze angles are estimated in camera coordinates without any redirection and another.
- In addition to estimation, the eyes of the person are redirected to make eye contact with the camera within a permissible range.
- Facial Expression Estimation (Beta) estimates face expression coefficients from the provided facial landmarks.
The AR SDK can be used in a wide variety of applications, such as augmented reality, beautification, 3D face animation, modeling, and so on. The SDK also provides sample applications that demonstrate the features listed above in real-time by using a webcam or offline videos.
This table lists performance data for the features listed above on supported GPU architectures:
1.1. Getting Started with the AR SDK for Windows
This section provides information about how to get started with the AR SDK for Windows.
1.1.1. Hardware and Software Requirements
The AR SDK requires specific NVIDIA GPUs, a specific version of the Windows OS, and other associated software on which the SDK depends.
This SDK is designed and optimized for client-side application integration and local deployment. We do not officially support the testing, experimentation, deployment of this SDK to a datacenter/cloud environment.
1.1.1.1. Hardware Requirements
The AR SDK is compatible with GPUs that are based on the NVIDIA Turing™, the NVIDIA Ampere™ architecture, the NVIDIA Ada™ architecture, and have Tensor Cores.
1.1.1.2. Software Requirements
NVIDIA AR SDK requires a specific version of the Windows OS and other associated software on which the SDK depends. The NVIDIA CUDA® and TensorRTTM dependencies are bundled with the SDK Installer. Refer to Installing NVIDIA AR SDK and Associated Software.
1.2. Installing the AR SDK and the Associated Software
Here is some information about installing the SDK.
The SDK is distributed in the following forms:
- The development SDK package
The development package includes everything in the SDK including the API headers, runtime dependencies, and sample apps.
- The redistributable SDK package.
The redistributable package is more convenient if your application only wants to integrate SDK API headers and ask end users to download and install the SDK runtime dependencies.
To develop applications, because the essential contents in these two packages are the same, you can use either package.
The redistributable SDK package comprises the following parts:
- An open-source repository that includes the SDK API headers, the sample applications and their dependency libraries, and a proxy file to enable compilation without the SDK DLLs.
- An installer that installs the following SDK runtime dependencies:
- The DLLs
- The models
- The SDK dependency libraries
The install location is the C:\Program Files\NVIDIA Corporation\NVIDIA AR SDK\ directory.
For an application that is built on the SDK, the developer can package the runtime dependencies into the application or require application users to use the SDK installer.
The source code and sample applications are in the development package and are hosted on GitHub at https://github.com/NVIDIA/MAXINE-AR-SDK.
To use the SDK redistributable package, download the source code from GitHub and install the SDK binaries.
If you are using a development package, you can ignore this step.
The sample app source code demonstrates how to integrate API headers and call the SDK APIs. The sample app also includes the nvARProxy.cpp file that is used to link against the SDK DLL without requiring an import library (.lib) file. With this file, you can compile the open-source code independently of the SDK installer. However, the SDK runtime dependencies are still required to load the runtime dependencies, the DLLs, and models.
1.3. Building the Sample Applications on Windows
The open source repository includes the source code to build the sample applications, and the nvARProxy.cpp proxy file to enable compilation without explicitly linking against the SDK DLL.
To download the models and runtime dependencies required by the features, you need to run the SDK Installer.
- In the root folder of the downloaded source code, start the CMake GUI and specify the source folder and a build folder for the binary files.
- For the source folder, ensure that the path ends in
OSS. - For the build folder, ensure that the path ends in OSS/build. Use CMake to configure and generate the Visual Studio solution file.
- Click Configure.
- When prompted to confirm that CMake can create the build folder, click OK.
- Select Visual Studio for the generator and x64 for the platform.
- To complete configuring the Visual Studio solution file, click Finish.
- To generate the Visual Studio Solution file, click Generate.
- Verify that the build folder contains the
NvAR_SDK.slnfile. Use Visual Studio to generate theFaceTrack.exeandBodyTrack.exefiles from theNvAR_SDK.slnfile. - In CMake, to open Visual Studio, click
Open Project. - In Visual Studio, select Build > Build Solution.
1.4. Running the Sample Applications on Windows
The SDK provides the FaceTrack, BodyTrack, GazeDirect, and ExpressionApp sample applications.
Before you run the application, connect a camera to the computer on which you plan to run the sample application.
The application uses the video feed from this camera.
- Open a Command Prompt window.
- To run a sample application, complete one of the following steps:
- For the
FaceTracksample application, from the samples\FaceTrack folder, under the root folder of the AR SDK, execute therun.batfile. - To run the
BodyTracksample application, from the samples\BodyTrack folder, under the root folder of the AR SDK, execute therun.batfile. - To run the ExpressionApp sample application, from the
samples\ExpressionAppfolder, under the root folder of the AR SDK, execute therun.batfile.
This command launches an OpenCV window with the camera feed.
Here is some additional information:
- FaceTrack draws a 3D face mesh over the largest detected face.
- GazeRedirect plots the head pose and estimated gaze for the largest detected face along with a side-by-side view of the gaze redirected face.
- BodyTrack draws a Body Pose skeleton over the detected person.
- ExpressionApp renders a virtual avatar face on a separate frame buffer.
- For the
1.5. Sample Applications for the SDK
FaceTrack is a sample Windows application that demonstrates the face tracking, landmark tracking, and 3D mesh tracking features of the AR SDK. Similarly, BodyTrack is a sample Windows application that demonstrates the 3D Body Pose Tracking feature of the SDK.
1.5.1. FaceTrack Sample Application
This section provides information about the FaceTrack sample application.
1.5.1.1. Command-Line Arguments for the FaceTrack Sample Application
Here is a list of the command-line arguments for the FaceTrack sample application.
-
--model_path=path - Specifies the path to the models.
-
--landmarks_126[=(true|false)] -
Specifies whether to set the number of landmark points to 126 or 68.
true: set number of landmarks to 126.false: set number of landmarks to 68.
-
--landmarks_mode [0|1] -
Specifies whether to set the high quality landmark model or high performance model.
0: Use high performance landmark model [default mode].1: Use high quality landmark model.
-
--temporal[=(true|false)] - Optimizes the results for temporal input frames. If the input is a video, set this value to true.
-
--offline_mode[=(true|false)] -
Specifies whether to use offline video or an online camera video as the input.
- true: Use offline video as the input.
- false: Use an online camera as the input.
-
--capture_outputs[=(true|false)] -
If
--offline_mode=false, specifies whether to enable the following features:- Toggling video capture on and off by pressing the C key.
- Saving an image frame by pressing the S key.
Additionally, a result file that contains the detected landmarks and /or face boxes is written at the time of capture.
If
--offline_mode=true, this argument is ignored. -
--cam_res=[width x] height -
- If
--offline_mode=false, specifies the camera resolution, and width is optional. If omitted, width is computed from height to give an aspect ratio of 4:3, for example:--cam_res=640x480 or --cam_res=480.
- If
--offline_mode=true, this argument is ignored.
- If
-
--in_file=file -
--in=file- If
--offline_mode=true, specifies the input video file. - If
--offline_mode=false, this argument is ignored.
- If
-
--out_file=file -
--out=file- If
--offline_mode=true, specifies the output video file. - If
--offline_mode=false, this argument is ignored.
- If
1.5.1.2. Keyboard Controls for the FaceTrack Sample Application
The FaceTrack sample application provides keyboard controls to change the runtime behavior of the application.
Here is a list of these controls:
<b>1</b>selects the face-tracking-only mode and shows only the bounding boxes.<b>2</b>selects the face and landmark tracking mode and shows only landmarks.<b>3</b>selects face, landmark, and 3D mesh tracking mode and shows only 3D face meshes.<b>W</b>toggles the selected visualization mode on and off.<b>F</b>toggles the frame rate display.<b>C</b>toggles video saving on and off.- When video saving is toggled off, a file is saved with the captured video with a result file that contains the detected face box and/or landmarks.
- This control is enabled only if
--offline_mode=falseand--capture_outputs=true.
<b>S</b>saves an image and a result file.
This control is enabled only if --offline_mode=false and --capture_outputs=true.
1.5.2. BodyTrack Sample Application
This section provides information about the BodyTrack sample application.
1.5.2.1. Command-Line Arguments for the BodyTrack Sample Application
Here is a list of the command-line arguments for the BodyTrack sample application.
-
--model_path=path - Specifies the path to the models.
-
--mode[=(0|1)] -
Specifies whether to select High Performance mode or High Quality mode.
0: set mode to High Quality.1: set mode to High Performance.
-
--app_mode[=(0|1)] -
Specifies whether to select Body Detection or Body Pose Detection.
0: set mode to Body Detection.1: set mode to Body Pose Detection.
-
--temporal[=(true|false)] - Optimizes the results for temporal input frames. If the input is a video, set this value to true.
-
--use_cuda_graph[=(true|false)] - Uses CUDA Graphs to improve performance. CUDA graph reduces the overhead of the GPU operation submission of 3D body tracking.
-
--offline_mode[=(true|false)] -
Specifies whether to use offline video or an online camera video as the input.
true: Use offline video as the input.false: Use an online camera as the input.
-
--capture_outputs[=(true|false)] -
- If
--offline_mode=false, specifies whether to enable the following features:- Toggling video capture on and off by pressing the C key.
- Saving an image frame by pressing the S key.
Additionally, a result file that contains the detected landmarks and /or face boxes is written at the time of capture.
- If
--offline_mode=true, this argument is ignored.
- If
-
--cam_res=[width x] height -
- If
--offline_mode=false, specifies the camera resolution, and width is optional.If omitted, width is computed from height to give an aspect ratio of 4:3.
For example:
--cam_res=640x480 or --cam_res=480.
- If
--offline_mode=true, this argument is ignored.
- If
-
--in_file=file -
--in=file- If
--offline_mode=true, specifies the input video file. - If
--offline_mode=false, this argument is ignored.
- If
-
--out_file=file -
--out=file- If
--offline_mode=true, specifies the output video file. - If
--offline_mode=false, this argument is ignored.
- If
-
--enable_people_tracking[=(true|false)] - Enables Multi-Person tracking.
-
--shadow_tracking_age=<unsigned int> - This argument sets the Shadow Tracking Age for Multi-Person Tracking, and the default value is 90.
-
--probation_age=<unsigned int> - This argument sets the Probation Age for Multi-Person tracking, and the default value is 10.
-
--max_targets_tracked=<unsigned int> - This argument sets the Maxinum Targets Tracked. The default value is 30, and the minimum is value is 1.
1.5.2.2. Keyboard Controls for the BodyTrack Sample Application
The BodyTrack sample application provides keyboard controls to change the runtime behavior of the application.
Here is a list of these controls:
<b>1</b>selects the body-tracking-only mode and shows only the bounding boxes.<b>2</b>selects the body and body pose tracking mode and shows the bounding boxes and body pose keypoints.<b>W</b>toggles the selected visualization mode on and off.<b>F</b>toggles the frame rate display.<b>C</b>toggles video saving on and off.- When video saving is toggled off, a file is saved with the captured video with a result file that contains the detected face box and/or landmarks.
- This control is enabled only if
--offline_mode=falseand--capture_outputs=true.
<b>S</b>saves an image and a result file.
This control is enabled only if --offline_mode=false and --capture_outputs=true.
1.5.3. Eye Contact Sample Application
This section provides information about the GazeRedirect sample application.
1.5.3.1. Command-Line Arguments for the Eye Contact Sample Application
Here is a list of the command-line arguments for the GazeRedirect sample application.
-
<b class="spb">--model_path=path</b> - Specifies the path to the models.
-
<b class="spb">--landmarks_126[=(true|false)]</b> -
Specifies whether to set the number of landmark points to 126 or 68 for computation of keypoints.
true: set number of landmarks to 126.false: set number of landmarks to 68.
-
<b class="spb">--temporal[=(true|false)]</b> -
When set to
true, the landmark computation for eye contact is temporally optimized. -
<b class="spb">--offline_mode[=(true|false)]</b> -
Specifies whether to use offline video or an online camera video as the input.
true: Use offline video as the input.false: Use an online camera as the input.
-
<b class="spb">--redirect_gaze[=(true|false)]</b> -
<b class="spb">--split_screen_view[=(true|false)]</b> -
This argument is applicable when redirection is enabled. It specifies whether to show the original video in addition to output video. If
--offline_mode=false, split screen mode can be toggled on and off by pressing the O key.true: Show the original video and gaze redirected output videos side by side. The visualizations are displayed on the original video. .false: Show only the gaze redirected output video.
-
<b class="spb">--draw_visualizations[=(true|false)]</b> -
When set to true, visualizations for the head pose and gaze direction are displayed. In addition, the head translation (x,y,z) and gaze angles (pitch, yaw) are displayed on the original video. The head pose visualization follows the red, green, blue as the x,y, and z color coding. If gaze redirection is enabled, the split screen view should be enabled to draw the visualization. If
--offline_mode=false, visualization mode can be toggled on and off by pressing the W key. -
<b class="spb">--capture_outputs[=(true|false)]</b> -
If
--offline_mode=false, video capture can be toggled on and off by pressing the C key. A result file that contains the output video is written at the time of capture. In case If--offline_mode=true, this argument is ignored. -
<b class="spb">--cam_res=[width x] height</b> -
If
--offline_mode=false, specifies the camera resolution, and width is optional. If you omit a value for the width, this value is computed from the height for an aspect ratio of 4:3 (for example,--cam_res=640x480 or --cam_res=480).If
--offline_mode=true, this argument is ignored. -
<b class="spb">--in=file</b> -
- If
--offline_mode=true, specifies the input video file. - If
--offline_mode=false, this argument is ignored.
- If
-
<b class="spb">--out=file</b> -
- If
--offline_mode=true, specifies the output video file. - If
--offline_mode=false, this argument is ignored.
- If
-
-eyesize_sensitivity=<integer 2-5> -
This argument correlates with the size of the eye region used to redirect the eyes. Larger the value, larger is the eye region. Default value is set to 3.
-
--use_cuda_graph=[=(true|false)] -
Uses CUDA Graphs to improve performance.CUDA graph reduces the overhead of the GPU operation submission of Eye contact networks. By default, this is set to false.
1.5.3.2. Keyboard Controls for the Eye Contact Sample Application
The GazeRedirect sample application provides keyboard controls to change the runtime behavior of the application.
Here is a list of these controls:
<b>F</b>toggles the frame rate display.-
<b class="spb">C</b>toggles video saving on and off.When video saving is toggled off, a file is saved with the captured video with a result file that contains the detected face box and/or landmarks. This control is enabled only if
--offline_mode=falseand--capture_outputs=true. <b>L</b>toggles the display of landmarks.When the display of landmarks is toggled on, facial landmarks are displayed in addition to head pose and gaze. This control is enabled only if
--offline_mode=falseand--draw_visualization=true.<b>O</b>toggles the split screen view.When toggled on, both the original and gaze redirected frames are displayed side-by-side.
If --draw_visualization=trueor visualization is toggled on, the head pose and gaze visualizations are displayed on the original frame. Landmarks are also displayed on the original frame optionally.This control is enabled only if
--offline_mode=falseand--redirect_gaze=true.<b>W</b>toggles the visualizations.When the visualization is toggled on, head pose, gaze and landmarks can be visualized on the original frame. When toggled off, the visualizations are not displayed. This control is enabled only if
--offline_mode=false. When--redirect_gaze=true, visualizations are seen only when--split_screen_modeis also enabled or toggled on.
1.5.4. ExpressionApp Sample Application
ExpressionApp is a sample application using the AR SDK to extract face expression signals from video. These signals are used to control the expressions, pose and gaze of a 3D morphable face model. The application can either process real-time video from a webcam or offline videos from files. It illustrates the facial keypoints that are tracked, plots the expression signals that are derived, and renders an animated 3D avatar mesh.
The sample app demonstrates the following approaches to expression estimation:
- Facial Expression Estimation (default and is recommended for avatar animation).
- Face3DReconstruction-based expression estimation.
Facial Expression Estimation is the preferred feature for avatar animation.
Face3DReconstruction is demonstrated for its ability to track the face over time for AR effects. In addition to expression estimation, this feature enables identity face shape estimation and is better demonstrated in the FaceTrack sample application. The resulting expression weights from Facial Expression Estimation are also more accurate than the weights from Face3DReconstruction.
1.5.4.1. Command-Line Arguments for the ExpressionApp Sample Application
Here is a list of the command-line arguments for the ExpressionApp sample application.
-
--cam_res=[width x] height - Specifies the resolution as height or width x height.
-
--codec=<fourcc> -
The FOURCC code for the desired codec, and the default value is
avc1. -
--debug[=(true|false)] -
Reports the debugging information, and the default value is
false. -
--expr_mode=<number> -
SDK feature used for generation expressions. The default value is 2.
1=Face3DReconstruction2=Facial Expression Estimation
-
--pose_mode=<number> -
Pose mode used for the FaceExpressions feature only. The default value is 0.
0=3DOF1=6DOF
-
--face_model=<file> -
Specifies the face model to be used for fitting, and the default value is
face_model2.nvf. -
--filter=<bitfield> -
Here are the available values:
1: face box2: landmarks4: pose16: expressions32: gaze256: eye and mouth closure
The default value is
55, which means face box, landmarks, pose, expressions, gaze, and no closure.
-
--gaze=<number> -
Specifies the gaze estimation mode:
0=implicit1=explicit
The default value is 0.
-
--cheekpuff[=(true|false)] -
(Experimental) Enable cheek puff blendshapes. The default value is
false. -
--fov=<degrees> -
Field of view, in degrees, and
0implies orthographic. The defualt value is0. -
<b class="spb">--help</b> -
Prints the help message.
-
<b class="spb">--in=<file></b> -
Specifies the input file, and the default value is
webcam 0. -
--loop[=(true|false)] -
Plays the same video repeatedly.
-
--model_dir=<path> -
Specifies the directory that contains the TRT models.
-
--model_path=<path> -
Specifies the directory that contains the TRT models.
-
--out=<file> -
Specifies the output file.
-
--render_model=<file> -
Specifies the face model that will be used for rendering, and the default is
face_model2.nvf. Useface_model3.nvffor a more comprehensive visualization model using partitions. -
--show[=(true|false)] -
Shows the results, and unless
--outis empty, the default value isfalse. -
<b class="spb">--show_ui[=(true|false)]</b> -
Shows the expression calibration UI, and the default value is
false. -
--temporal=<bitfield> -
Applies the temporal filter. See
--filterfor more information. -
--view_mode=<bitfield> -
Here are the values:
<b>1</b>: mesh<b>2</b>: image<b>4</b>: plot<b>8</b>: landmarks
The default value is
15, which meansall.
-
--verbose[=(true|false)] -
Reports interesting information, and the default
off.
1.5.4.2. Keyboard Controls for the ExpressionApp Sample Application
The ExpressionApp sample application provides keyboard controls to change the runtime behavior of the application.
Here is a list of these controls:
- Escape,
qor<b>Q</b>to quit <b>m</b>to toggle mesh display<b>n</b>to calibrate expression weights<b>i</b>to toggle image display<b>p</b>to toggle plot display<b>l</b>to toggle landmark display<b>f</b>to toggle frame rate display<b>L</b>or ctrl-L to toggle landmark filtering<b>N</b>or ctrl-N to un-calibrate expression weights<b>P</b>or ctrl-P to toggle pose filtering<b>E</b>or ctrl-E to toggle expression filtering<b>G</b>or ctrl-G to toggle gaze filtering<b>C</b>or ctrl-C to toggle closure enhancement<b>M</b>or ctrl-M toggles pose mode<b>1</b>expressions from mesh fitting<b>2</b>expressions from DNN (Facial Expression Estimation)
1.5.4.3. Application GUI
The GUI is simple and easy to use. Expression coefficients and their fine-tuned control can be displayed by selecting the Expression Graph checkboxes. To set different display options, in Expression Mode, enter 1 or 2. You can save or load settings by clicking SaveSettings and LoadSettings.
The calibration process might require some fine tuning, which can take time.

1.5.4.4. Expression Coefficient Transfer Function
The ExpressionApp estimates the expression coefficients for each frame that serves as the input. To extract the maximum expressivity in the final model, use each expression coefficient. To achieve additional expressivity and responsiveness, you can optionally tune additional parameters through calibration. Refer to Calibration for more information.
The parameters that are tuned during calibration are applied to a transfer function, where the coefficients range between 0 and 1:
- 0: This expression blendshape is not activated.
- 1: This expression blendshape is fully activated.
To fine tune the expressivity, a transfer function is applied to the expression coefficients before they are sent over for rendering the model to introduce scaling, offsets, and non-linearities. The transfer function looks like the following:
y = 1 - (pow(1 - (max(x + a, 0) * b), c)), {0<=x<=1}
Where x is the input coefficient, and y is the output coefficient. Here are the parameters:
- a = offset
- b = scale
- c = exponent
The parameters are tunable from the application's GUI for each expression mode.
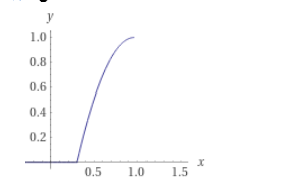
The plot of the function is a=-0.3, b=1.5, c=2.
By playing around with the parameters, you can get a feeling for their effects, specifically for larger expression shapes such as jawOpen, or brow expressions. Instead of randomly trying to use parameters, you can use semi-automatic calibration to tune the parameters.
1.5.4.5. Calibration
The calibration process comprises automatic and manual portions. For each step, you can determine the a, b, and c parameters.
Calibration is not required, but it aids in the responsiveness and the accuracy of shape coefficients, especially to properly close the lips and add responsiveness to speech.
Here is the calibration process:
- Calibrate the neutral expression.
This is the automatic part of the calibration process where you sit straight in front of the web camera, keep a neutral face while looking straight into the camera, and click Calibrate. This function computes the offset parameters for each expression based on your neutral face and estimates the scaling parameters based on the offsets. The bar graph now keeps most expression coefficients close to zero when you maintain a neutral face.
- Scale the expressions. For example, focus on the following expressions:
-
browInnerUp_R -
browInnerUp_L -
browOuterUp_R -
browOuterUp_L
Most people are can completely raise their eyebrows, which corresponds to these expression coefficients to be set to 1.
When you select the Brow checkbox in Expression Graph Options, the brow-related expressions are displayed in a new window.
- In the Expression Graph Options section in the GUI, select the Brow checkbox. A new window displays the brow-related expressions.
- o tune the scaling, perform the full eyebrow raise expression, and move the sliders to correspond to the scale parameter until all four expression coefficients are close to 1.
If you scale the expressions too much, it will lead to over exposure.

- Repeat the same process for
browDown_RandbrowDown_Lwhile lowering the eyebrows.Not all expressions can be isolated the same way as brow shapes can but some additional expression scalings can be applied.
Here is a subset of expressions that can be scaled in a relatively isolated manner:
-
browDown_L -
browDown_R -
browInnerUp_L -
browInnerUp_R -
browOuterUp_L -
browOuterUp_R -
cheekPuff_L -
cheekPuff_R -
eyeBlink_L -
eyeBlink_R -
jawForward -
jawLeft -
jawOpen -
jawRight -
mouthClose -
mouthLeft -
mouthRight -
mouthSmile_L -
mouthSmile_R
Try to isolate individual shapes and apply scaling accordingly to max out these expressions.
Note:mouthCloseis a special shape and should not be tuned individually. It works as a corrective shape for thejawOpenshape. This means it should have the same scaling and the same exponent as thejawOpenshape and should be tuned accordingly. Otherwise it will lead to intersections where the upper and lower lips intersect past each other.
-
-
- Determine the expression exponents.
This step is the least scientific one, but it provides additional expressivity and responsiveness, especially for mouth shapes that can be slightly muted during speech. A high exponent value makes the expression more responsive in the low range of values, and a low exponent mutes the expression. Another approach to increase the responsiveness while talking is to increase the exponents of all mouth-related blendshapes to a specific value, for example between 1.5 and 2. The values depend on your needs which is why each calibration is an individual process.
If the exponent of the
jawOpenormouthCloseshape is changed, change the value of the other shape to the same value because the shapes work with each other.To reset the calibration settings, click UnCalibrate.
1.5.4.6. Saving and Loading Calibration Files
When you have finished calibrating, to save it, click SaveSettings. To load the previously saved settings, the ExpressionAppSettings.json file in the application folder, click LoadSettings. To load a specific file from a previous calibration setting, click LoadSettingsFromFile.
A calibration file generally corresponds to a person in a specific setting (lighting conditions being mostly the same and the camera should be the same). If the capture setting is different, in general, a new calibration session needs to take place.
1.5.4.7. GUI Window
Windows are resizable. If all expressions are not displayed in the calibration window, group them by using the check boxes. Keyboard shortcuts only work when the ExpressionApp main window is in focus.
1.5.4.8. Calibration Between Modes
When switching between expression mode 1 and expression mode 2, the calibration settings should not be the same. The two modes estimate expression shapes differently, so the set of coefficients will vary significantly, and you need to start a new calibration session.
1.6. Additional Information
This section has additional information about using the AR SDK.
1.6.1. Saving the Output Video in a Lossless Format
Lossless codec, such as the Ut Video Codec, can be used to save an output video of the sample applications without any compression artifacts. For example, to save an output video with this codec, use the --codec=ULY0 option.
1.7. Environment Variables
Here is information about the environmental variables in the AR SDK.
The environmental variables are as follows:
NVAR_MODEL_DIRIf the application has not provided the path to the model's directory by setting the
NvAR_Parameter_Config_ModelDirstring, the SDK tries to load the models from the path in theNVAR_MODEL_DIRenvironment variable. The SDK installer setsNVAR_MODEL_DIRto %ProgramFiles%\NVIDIA Corporation\NVIDIA AR SDK\models.NV_AR_SDK_PATHBy default, applications that use the SDK will try to load the SDK DLL and its dependencies from the SDK install directory, for example, %ProgramFiles%\NVIDIA Corporation\NVIDIA AR SDK\models. Applications might also want to include and load the SDK DLL and its dependencies directly from the application folder.
To prevent the files from being loaded from the install directory, the application can set this environment variable to
USE_APP_PATH. IfNV_AR_SDK_PATHis set toUSE_APP_PATH, instead of loading the binaries from the Program Files install directory, the SDK follows the standard OS search order to load the binaries. For example, the app folder followed by the PATH environment variable.Important:Set this variable only for the application process. Setting this variable as a user or a system variable affects other applications that use the SDK.
1.8. Performance reference
This table lists performance data for features of the NVIDIA AR SDK on supported GPU architectures.
Eye Contact latency computed at 720p video resolution. Facial Landmark tracking computed with 68 landmark points detected on face.
Notice
This document is provided for information purposes only and shall not be regarded as a warranty of a certain functionality, condition, or quality of a product. NVIDIA Corporation (“NVIDIA”) makes no representations or warranties, expressed or implied, as to the accuracy or completeness of the information contained in this document and assumes no responsibility for any errors contained herein. NVIDIA shall have no liability for the consequences or use of such information or for any infringement of patents or other rights of third parties that may result from its use. This document is not a commitment to develop, release, or deliver any Material (defined below), code, or functionality.
NVIDIA reserves the right to make corrections, modifications, enhancements, improvements, and any other changes to this document, at any time without notice.
Customer should obtain the latest relevant information before placing orders and should verify that such information is current and complete.
NVIDIA products are sold subject to the NVIDIA standard terms and conditions of sale supplied at the time of order acknowledgement, unless otherwise agreed in an individual sales agreement signed by authorized representatives of NVIDIA and customer (“Terms of Sale”). NVIDIA hereby expressly objects to applying any customer general terms and conditions with regards to the purchase of the NVIDIA product referenced in this document. No contractual obligations are formed either directly or indirectly by this document.
NVIDIA products are not designed, authorized, or warranted to be suitable for use in medical, military, aircraft, space, or life support equipment, nor in applications where failure or malfunction of the NVIDIA product can reasonably be expected to result in personal injury, death, or property or environmental damage. NVIDIA accepts no liability for inclusion and/or use of NVIDIA products in such equipment or applications and therefore such inclusion and/or use is at customer’s own risk.
NVIDIA makes no representation or warranty that products based on this document will be suitable for any specified use. Testing of all parameters of each product is not necessarily performed by NVIDIA. It is customer’s sole responsibility to evaluate and determine the applicability of any information contained in this document, ensure the product is suitable and fit for the application planned by customer, and perform the necessary testing for the application in order to avoid a default of the application or the product. Weaknesses in customer’s product designs may affect the quality and reliability of the NVIDIA product and may result in additional or different conditions and/or requirements beyond those contained in this document. NVIDIA accepts no liability related to any default, damage, costs, or problem which may be based on or attributable to: (i) the use of the NVIDIA product in any manner that is contrary to this document or (ii) customer product designs.
No license, either expressed or implied, is granted under any NVIDIA patent right, copyright, or other NVIDIA intellectual property right under this document. Information published by NVIDIA regarding third-party products or services does not constitute a license from NVIDIA to use such products or services or a warranty or endorsement thereof. Use of such information may require a license from a third party under the patents or other intellectual property rights of the third party, or a license from NVIDIA under the patents or other intellectual property rights of NVIDIA.
Reproduction of information in this document is permissible only if approved in advance by NVIDIA in writing, reproduced without alteration and in full compliance with all applicable export laws and regulations, and accompanied by all associated conditions, limitations, and notices.
THIS DOCUMENT AND ALL NVIDIA DESIGN SPECIFICATIONS, REFERENCE BOARDS, FILES, DRAWINGS, DIAGNOSTICS, LISTS, AND OTHER DOCUMENTS (TOGETHER AND SEPARATELY, “MATERIALS”) ARE BEING PROVIDED “AS IS.” NVIDIA MAKES NO WARRANTIES, EXPRESSED, IMPLIED, STATUTORY, OR OTHERWISE WITH RESPECT TO THE MATERIALS, AND EXPRESSLY DISCLAIMS ALL IMPLIED WARRANTIES OF NONINFRINGEMENT, MERCHANTABILITY, AND FITNESS FOR A PARTICULAR PURPOSE. TO THE EXTENT NOT PROHIBITED BY LAW, IN NO EVENT WILL NVIDIA BE LIABLE FOR ANY DAMAGES, INCLUDING WITHOUT LIMITATION ANY DIRECT, INDIRECT, SPECIAL, INCIDENTAL, PUNITIVE, OR CONSEQUENTIAL DAMAGES, HOWEVER CAUSED AND REGARDLESS OF THE THEORY OF LIABILITY, ARISING OUT OF ANY USE OF THIS DOCUMENT, EVEN IF NVIDIA HAS BEEN ADVISED OF THE POSSIBILITY OF SUCH DAMAGES. Notwithstanding any damages that customer might incur for any reason whatsoever, NVIDIA’s aggregate and cumulative liability towards customer for the products described herein shall be limited in accordance with the Terms of Sale for the product.
VESA DisplayPort
DisplayPort and DisplayPort Compliance Logo, DisplayPort Compliance Logo for Dual-mode Sources, and DisplayPort Compliance Logo for Active Cables are trademarks owned by the Video Electronics Standards Association in the United States and other countries.
HDMI
HDMI, the HDMI logo, and High-Definition Multimedia Interface are trademarks or registered trademarks of HDMI Licensing LLC.
OpenCL
OpenCL is a trademark of Apple Inc. used under license to the Khronos Group Inc.
Trademarks
NVIDIA, the NVIDIA logo, and cuBLAS, CUDA, CUDA Toolkit, cuDNN, DALI, DIGITS, DGX, DGX-1, DGX-2, DGX Station, DLProf, GPU, JetPack, Jetson, Kepler, Maxwell, NCCL, Nsight Compute, Nsight Systems, NVCaffe, NVIDIA Ampere GPU architecture, NVIDIA Deep Learning SDK, NVIDIA Developer Program, NVIDIA GPU Cloud, NVLink, NVSHMEM, PerfWorks, Pascal, SDK Manager, T4, Tegra, TensorRT, TensorRT Inference Server, Tesla, TF-TRT, Triton Inference Server, Turing, and Volta are trademarks and/or registered trademarks of NVIDIA Corporation in the United States and other countries. Other company and product names may be trademarks of the respective companies with which they are associated.