Audio Effects SDK Programming Guide
Audio Effects SDK
The Audio Effects SDK Programming Guide provides audio effects for broadcast use cases with real-time audio processing.
The NVIDIA® Audio Effects SDK provides the following audio effects for broadcast use cases with real-time audio processing:
- Noise Removal/Denoising: Recordings of speech made outside of a recording studio can contain a lot of background noise, which causes the speech to be garbled and difficult to understand.
The audio denoising effect removes this background noise from audio.
- Room Echo Removal/Dereverb/Room Echo Cancellation: Recordings of speech might contain reverberations from the recording environment, which can affect speech clarity.
The dereverb effect helps remove or suppress these reverbs from audio.
-
Noise Removal and Room Echo Removal/Denoise Plus Dereverb: The effect combines both the above effects to remove/suppress both noise and reverbs from audio.
This offers much better performance than applying these effects separately.
- Audio Super-Resolution: This effect improves the sound quality by adding higher frequency content to the audio stream.
For low-frequency audio, this feature predicts the higher frequency spectrum of input audio, which improves audio quality.
- Acoustic Echo Cancellation (AEC): This effect removes acoustic echo and feedback from audio, which improves the bidirectional audio quality.
The Windows SDK is optimized for client-side application integration, and the Linux SDK is designed and optimized for server-side (datacenter/cloud) deployments.
Using these SDKs for testing, experimentation, and production deployment outside these use cases is not officially supported.
1.1. About the Noise Removal/Background Noise Suppression Effect
Recordings of speech made outside a recording studio can contain a lot of background noise. The Audio Denoiser Effect removes a variety of background noises from audio recordings.
This effect retains emotive tones in speech, such as happy, sad, excited, and angry tones, which were removed as noise in previous releases of the SDK. Extreme emotive cases such as loud laughing, shrieking, screaming, and crying might not be retained.
In this guide, the term Background Noise Suppression is used interchangeably with Denoising and Noise Removal (referred to as denoiser in the API).
This effect supports removing the following types of background noise:
- AC noise
- Babble/crowd noise
- Baby crying
- Bird chirping
- Body noises
- Chatter from other people
- Clapping
- Construction site sounds
- Cooking sounds (cutting, cooker, and so on)
- Door slamming
- Drums
- Fan noise
- Gaussian/white noise
- Keyboard
- Metal sounds
- Mouse clicks
- PC noise
- Pet sounds
- Phone ringing
- Rains
- Sirens
- Sounds of a train passing by
- Sounds of a vacuum cleaner
- Sounds of furniture moving
- Sounds of glass breaking
- Tapping
- Traffic noise
- Washing machine
- Water taps/running water
- Wrappers (plastic/non-plastic rustling)
To run the sample application on Windows for this effect, use the following command (refer to Running the Sample Application for more information):
            :: For SDK Developer Package:
:: Format: run_effects_demo.bat <architecture> <effect> <input_sample_rate> <output_sample_rate>
:: 16k effect on turing GPU
run_effects_demo.bat turing denoiser 16k 16k
:: 48k effect on ampere GPU
run_effects_demo.bat ampere denoiser 48k 48k
:: For SDK Redistributable Package:
:: Format: run_effects_demo.bat <effect> <input_sample_rate> <output_sample_rate>
:: 16k effect
run_effects_demo.bat denoiser 16k 16k
:: 48k effect
run_effects_demo.bat denoiser 48k 48k
To run the sample application on Linux for this effect, use the following command (refer to Running the Sample Application Using the Helper Script for more information):
            # Format: ./run_effect.sh -g gpu -s sample_rate -e denoiser
# 16k effect
./run_effect.sh -g t4 -s 16 -e denoiser
# 48k effect
./run_effect.sh -g t4 -s 48 -e denoiser
This effect has the following characteristics:
- Supported input/output audio format is 32-bit float audio with a sampling rate of 16kHz/48kHz.
- In the Linux SDK, this effect has the following maximum throughput (# batches supported in real-time):
This effect might miss some noises in the first 1-2 seconds of input audio. Low-volume noises during speech might also be missed.
1.2. About the Room Echo Removal/Room Echo Cancellation Effect
Recordings of speech made in a large room/hall contain echoes and reverbs. The Audio Room Echo Cancellation Effect removes/suppresses these echoes and reverbs from audio recordings.
In this guide, the term Room Echo Cancellation is used interchangeably with Dereverb and Room Echo Removal (referred to as dereverb in the API).
To run the sample application on Windows for this effect, use the following command (refer to Running the Sample Application using the Helper Batch Script for more information):
            :: For SDK Developer Package
:: Format: run_effects_demo.bat <architecture> <effect> <input_sample_rate> <output_sample_rate>
:: 16k effect
run_effects_demo.bat turing dereverb 16k 16k
:: 48k effect
run_effects_demo.bat ampere dereverb 48k 48k
:: For SDK Redistributable Package:
:: Format: run_effects_demo.bat <effect> <input_sample_rate> <output_sample_rate>
:: 16k effect
run_effects_demo.bat dereverb 16k 16k
:: 48k effect
run_effects_demo.bat dereverb 48k 48k
To run the sample application on Linux for this effect, use the following command (refer to Running the Sample Application Using the Helper Script for more details):
            # Format: ./run_effect.sh -g gpu -s sample_rate -e dereverb
# 16k effect
./run_effect.sh -g t4 -s 16 -e dereverb
# 48k effect
./run_effect.sh -g t4 -s 48 -e dereverb
This effect has the following characteristics:
- Supported input/output format is 32-bit float audio with a sampling rate of 16kHz/48kHz.
- In the Linux SDK, this effect has the following maximum throughput (# batches supported in real-time):
1.3. About the Noise Removal and Room Echo Removal/Room Echo Cancellation + Background Noise Suppression Effect
This effect applies a denoising and a dereverb effect on input audio.
In this guide, the term Room Echo Cancellation + Background Noise Suppression is used interchangeably with Dereverb+Denoiser and Noise Removal and Room Echo Removal (referred to as dereverb_denoiser in the API).
To run the sample application on Windows for this effect, use the following command (refer to Running the Sample Application using the Helper Batch Script for more details):
            :: For SDK Developer Package:
:: Format: run_effects_demo.bat <architecture> <effect> <input_sample_rate> <output_sample_rate>
:: 16k effect on turing GPU
run_effects_demo.bat turing dereverb_denoiser 16k 16k
:: 48k effect on ampere GPU
run_effects_demo.bat ampere dereverb_denoiser 48k 48k
:: For SDK Redistributable Package:
:: Format: run_effects_demo.bat <effect> <input_sample_rate> <output_sample_rate>
:: 16k effect
run_effects_demo.bat dereverb_denoiser 16k 16k
:: 48k effect
run_effects_demo.bat dereverb_denoiser 48k 48k
To run the sample application on Linux for this effect, use the following command (refer to Running the Sample Application Using the Helper Script for more details):
            # Format: ./run_effect.sh -g gpu -s sample_rate -e dereverb_denoniser
# 16k effect
./run_effect.sh -g t4 -s 16 -e dereverb_denoiser
# 48k effect
./run_effect.sh -g t4 -s 48 -e dereverb_denoiser
This effect has the following characteristics:
- Supported input/output format is 32-bit float audio with a sampling rate of 16kHz/48kHz.
- In the Linux SDK, this effect has the following maximum throughput (# batches supported in real-time):
1.4. About the Audio Super-Resolution Effect
The Audio Super-Resolution effect upsamples the audio. For low-frequency audio, this feature predicts the higher frequency spectrum of input audio, which improves audio quality.
In this guide, the term Super-Resolution is used interchangeably with Superres/superresolution (referred to as superres in the API).
The main purpose of this effect is to enhance the sampling rate of input audio. The level of enhancement seen in the output audio depends on the type of audio.
Audio that is captured on Windows with the audio enhancement settings disabled produces better superres outputs than when this setting is enabled.
To run the sample application on Windows for this effect, use the following command (refer to Running the Sample Application using the Helper Batch Script for more information):
            :: For SDK Developer Package:
:: Format: run_effects_demo.bat <architecture> <effect> <input_sample_rate> <output_sample_rate>
:: 8k - 16k effect on turing GPU
run_effects_demo.bat turing superres 8k 16k
:: 16k - 48k effect on ampere GPU
run_effects_demo.bat ampere superres 16k 48k
:: 8k - 48k effect on ADA GPU
run_effects_demo.bat ada superres 8k 48k
:: For SDK Redistributable Package:
:: Format: run_effects_demo.bat <effect> <input_sample_rate> <output_sample_rate>
:: 8k - 16k effect
run_effects_demo.bat superres 8k 16k
:: 16k - 48k effect
run_effects_demo.bat superres 16k 48k
:: 8k - 48k effect
run_effects_demo.bat superres 8k 48k
To run the sample application on Linux for this effect, use the following command (refer to Running the Sample Application Using the Helper Script for more information):
            # Format: ./run_effect.sh -g gpu -s sample_rate -e superres
# 8k - 16k effect
./run_effect.sh -g t4 -s 8 -o 16 -e superres
# 8k - 48k effect
./run_effect.sh -g t4 -s 8 -o 48 -e superres
# 16k - 48k effect
./run_effect.sh -g t4 -s 16 -o 48 -e superres
This effect works best on clean input audio. If the input audio contains noise or echoes/reverbs, the output audio may contain minor artifacts.
If input audio is expected to contain noise, use this effect in combination with the Noise Removal Effect or Noise Removal and Room Echo Removal Effect. For further details, refer to Chaining Effects.
This effect has the following characteristics:
- Supported input/output format is 32-bit float audio.
- Supported upsampling of 8kHz input audio to 16kHz output (2x), 8kHz input audio to 48 kHz output (6x), and 16kHz input audio to 48kHz output (3x).
- In the Linux SDK, this effect has the following maximum throughput (# batches supported in real-time):
Architecture Maximum Throughput for the 8K to 16K Effect Maximum Throughput for the 8K to 48K Effect Maximum Throughput for the 16K to 48K Effect T4 192 64 96 V100 512 200 256 A100 928 400 448 A10 416 128 192
1.5. About the Acoustic Echo Cancellation Effect (BETA)
This effect removes acoustic echo and feedback from audio, which improves the bidirectional audio quality.
In this guide, the term Acoustic Echo Cancellation is used interchangeably with AEC (referred to as aec in the API).
An acoustic echo occurs when a microphone, also known as a near-end microphone, picks up audio signals from the speaker and sends it back to the original recipient. The original recipient hears his or her own delayed voice mixed with a target signal, which makes the communication unintelligible. The Acoustic Echo Cancellation Effect (AEC) effect cancels/suppresses this delayed voice, also known as an acoustic feedback/echo, from the audio. This process improves the overall quality of the recording.
Acoustic Echo Cancellation is useful only for near mic echo. For echo caused by reverberations, use the Room Echo Removal effect (see About the Room Echo Removal/Room Echo Cancellation Effect for more details).
To run the sample application on Windows for this effect, use the following command (refer to Running the Sample Application using the Helper Batch Script for more information):
            :: For SDK Developer Package:
:: Format: run_effects_demo.bat <architecture> <effect> <input_sample_rate> <output_sample_rate>
:: 16k effect on turing GPU
run_effects_demo.bat turing aec 16k 16k
:: 48k effect on ampere GPU
run_effects_demo.bat ampere aec 48k 48k
:: For SDK Redistributable Package:
:: Format: run_effects_demo.bat <effect> <input_sample_rate> <output_sample_rate>
:: 16k effect
run_effects_demo.bat aec 16k 16k
:: 48k effect
run_effects_demo.bat aec 48k 48k
To run the sample application on Linux for this effect, use the following command (refer to Running the Sample Application Using the Helper Script for more information):
            # Format: ./run_effect.sh -g gpu -s sample_rate -e aec
# 16k effect
./run_effect.sh -g t4 -s 16 -e aec
# 48k effect
./run_effect.sh -g t4 -s 48 -e aec
This effect has the following characteristics:
- Supported input/output format is 32-bit float audio with a sampling rate of 16kHz/48kHz.
- In the Linux SDK, this effect has the following maximum throughput (# batches supported in real-time):
1.5.1. Using the Acoustic Echo Cancellation Effect
This section describes the procedure for using the AEC effect.
Figure 1. Basic AEC Scenario
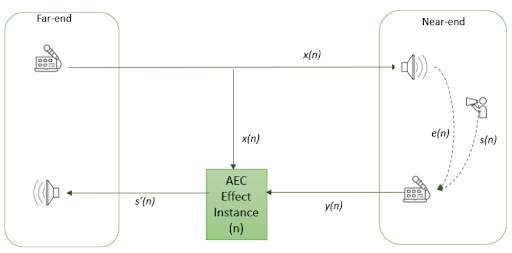
The AEC Effect takes the following inputs:
- The near-end microphone signal (denoted by y).
- The far-end microphone signal (denoted by x).
The far-end speaker signal x is the microphone signal of the original recipient. The near-end microphone signal (y) can be described as a combination of the near-end speech signal s and echo signal of the far-end speaker e. The output of the effect is the near-end speech signal s’, which is the input combination s + e with the far-end echo signal e removed:s' = (Mixture of s + e) - es' = (Mixture of s + e) - e
s' = (Mixture of s + e) - e
If only the far-end echo signal e is present, and near-end signal s is silent, the output from this effect will be silent.
When the AEC effect is integrated in a conferencing application server, multiple streams of data need to run in a batch, one for each speaker. Consider the scenario in Figure 2, where s(1) corresponds to AEC batch 1, and s(2) corresponds to batch 2: The AEC Effect takes the following inputs:
- The near-end microphone signal (denoted by
y). - The far-end microphone signal (denoted by
x).
The far-end speaker signal x is the microphone signal of the original recipient. The near-end microphone signal (y) can be described as a combination of the near-end speech signal s and echo signal of the far-end speaker e. The output of the effect is the near-end speech signal s’, which is the input combination s + e with the far-end echo signal e removed:
s' = (Mixture of s + e) - e
If only the far-end echo signal e is present, and near-end signal s is silent, the output from this effect will be silent.
When the AEC effect is integrated in a conferencing application server, multiple streams of data need to run in a batch, one for each speaker. Consider the scenario in Figure 2, where s(1) corresponds to AEC batch 1, and s(2) corresponds to batch2:
Figure 2. Batched Audio Processing
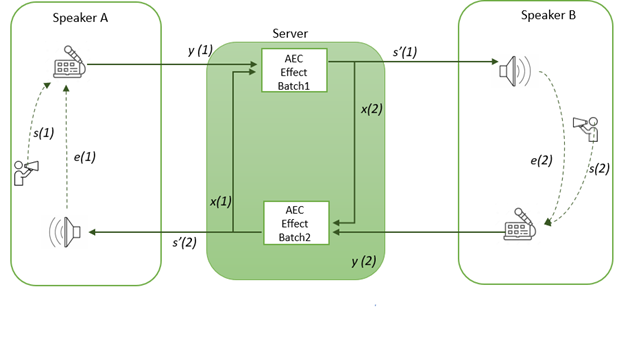
The following steps describe how the AEC effect processes audio as seen in Figure 2:
- The application server receives a microphone recording from Speaker A y(1).
- The Application server passes y(1)to the AEC batch (1).
Silence is passed down as a far-end speech signal x(1) to the effect because the server does not yet have the far-end speech.
- The Effect produces processed audio s'(1), which is passed down to Speaker B.
- Speaker B sends the near-end audio y(2) to the application server.
This data consists of speech (s(1)), and audio played on speakers (e(2)).
- The Application server processes batch (2) with y(1) as near-end audio, and the s'(1) that was received from Step 3 as far-end audio.
This is the same audio that was played on the server.
- The output from batch s'(2) is passed to Speaker A.
Refer to Setting the Parameters of an Audio Effect for the settings that are required for the AEC effect.
This section provides information about the hardware and software requirements to install the Windows SDK.
2.1. Hardware and Software Requirements
The Audio Effects SDK requires specific GPUs, a specific version of the Windows OS, and other software dependencies.
2.1.1. Hardware Requirements
The SDK is supported on NVIDIA GPUs with Tensor Cores.
2.1.2. Software Requirements
The NVIDIA CUDA® and NVIDIA TensorRT™ dependencies are bundled with the SDK Installer (refer to Installing the Audio Effects SDK for Windows).
The Audio Effects SDK is designed and optimized for client-side application integration and for local deployment. We do not officially support the testing, experimentation, deployment of this SDK in a datacenter/cloud environment.
All libraries that are required to use the SDK are in the package, under external, do not need to be separately installed.
2.2. Installing the Audio Effects SDK for Windows
The Audio Effects SDK for Windows is distributed in the following parts:
- A developer package that contains the AI models, binaries, header file, and a sample app.
- A redistributable package that contains only the AI models and binaries.
This package streamlines the installation and usage of the SDK on the end-user’s computer.
To develop applications with the Audio Effects SDK, you must install the developer package and provide the path to this package during compilation and linking. Your app will use the SDK functions that are exposed by the SDK header and dynamically link against the provided libraries. During deployment, the redistributable package installer helps install the necessary runtime components. To help your app access the runtime components on the end-user’s computer, after the redistributable package is installed, the installer completes the following tasks:
- Copies the AI models and binaries to the install location.
- Sets the
NVAFX_SDK_DIRenvironment variable, which points to the directory where the redistributable package is installed and contains the AI models and binaries.Your app needs to use this environment variable to locate and load the binaries and the AI model.
2.3. Audio Effects SDK Sample Application
The sample includes the application effects_demo.exe that can be directly executed and also its corresponding effects_demo.cpp source file that can optionally be compiled and run.
2.3.1. (Optional) Building the Sample Application
To build the sample application:
- Start the CMake GUI and specify the source folder and a build folder for the binary files.
- For the source folder, ensure that the path ends in
package. - For the build folder, ensure that the path ends in
package/build.
- For the source folder, ensure that the path ends in
- Use CMake to configure and generate the Visual Studio solution file.
- Click Configure.
- When prompted to confirm whether CMake can create the build folder, click OK.
- To enable CMake to locate the CUDA compiler, select Visual Studio for the generator and x64 for the platform.
- To finish configuring the Visual Studio solution file, click Finish.
- To generate the Visual Studio solution file, click Generate. Click Open Project to open the project.
- Use Visual Studio to generate the application binary (
.exe) file from the solution file that was generated in the previous step.- In CMake, to open Visual Studio, click Open Project.
- In Visual Studio select Build > Build Solution.
2.3.2. Running the Sample Application
To run the application, in a Command Prompt window, enter the following command:
effects_demo.exe -c config-file
where -c config-file specifies the path of the effect sample config file, for example, denoise48k_cfg_turing.txt, which is supplied with the sample app.
Configurations for other effects can be generated on the fly using run_effects_demo.bat. Refer to readme.txt in the samples/effects_demo folder for more information.
The SDK Developer package also includes the following sample windows batch/config files for the 48k denoiser model:
            # 48k effect
run_denoiser_48k_ada.bat //for ADA based GPU architecture
run_denoiser_48k_ampere.bat //for Ampere based GPU architecture
run_denoiser_48k_turing.bat //for Turing based GPU architecture
The SDK Redistributable package includes the following sample windows batch/config files for the 48k denoiser model:
            # 48k effect
run_denoiser_48k.bat
The following example runs the effects_demo.exe sample application:
effects_demo.exe -c denoise48k_cfg_turing.txt
The config files contain the following parameters with one pair per line:
-
effect effect - Specifies the effect that will be applied, for example, denoiser. Refer to Introduction to the NVIDIA Audio Effects SDK for a complete list of supported effects.
-
model model-file -
Specifies the path of the model file that will be used in the sample application, for example,
denoiser_48k.trtpkg.Note:The models, which were in the
bin/modelsfolder in previous SDK versions, have been moved to thesamples/effects_demo/modelsfolder.
-
input_wav input-audio-file -
Specifies the path of the noisy input audio
.wavfile to use, for example,noisy_48k.wav. The file should contain mono channel audio in signed 16-bit or 32-bit float format with a basic WAV header.Note:The sample inputs, which were in the
samples/effects_demofolder in previous SDK versions, have been moved to thesamples/effects_demo/input_filesfolder.
-
input_farend_wav input-farend-audio-file -
Specifies the path of the farend input audio .wav file to use, for example, farend_48k.wav.
Note:
The
input_farend_wavaudio file is only for the AEC effect, which requires the following inputs:- Far-end (specified by the input_farend_wav parameter)
- Near-end (specified by the input_wav parameter)
The near-end input is picked up from the microphone, and the far-end audio might have leaked speaker audio data that is picked up by the microphone.
Note:Sample input audio files are included with the sample application.
-
output_wav output-audio-file -
Specifies the path of the file to which the processed audio output will be written by the sample application, for example,
denoised_48k.wav.Note:Only the
.wavfile format is supported.
-
intensity_ratio intensity-ratio -
Specifies the effect intensity ratio. The value of this parameter ranges from
0.0fto1.0f, where a higher value indicates a stronger suppression of noise/reverb. A value of0.0fis equivalent to a passthrough of input audio. -
real_time enable - Simulates real-time audio input, set to 1 to enable or 0 to disable (disabled by default). When this option is enabled, each audio frame is passed to the SDK with a delay of 10ms, similar to how audio is received from a physical device or stream.
-
enable_vad enable -
Specifies whether to enable the Voice Activity Detection (VAD) algorithm.
Set to
1to enable or0to disable. (By default, the parameter is disabled.)When this option is enabled, the sample application passes each audio frame to the VAD algorithm to check voice activity and zeros out the frames that do not have voice activity.
2.3.2.1. Running the Sample Application Using the Helper Batch Script on Windows
run_effects_demo.bat is a windows batch file that can be used to run the sample application for various effects. This script generates a config file for the specified effect, GPU, and sample inputs for that effect and runs effect_demo.exe on the sample files.
To apply the effect on custom input files, place the input files in the input sample folder that corresponds to the effect/sample rate and run the helper script. This will generate a configuration file to apply the effect on these inputs and run effect_demo.exe with this file. The processed audio outputs will be placed in the output folder that corresponds to the effect/output sample rate.
For example, to apply the Background Noise Removal (Denoiser effect) on custom 48kHz files, copy the files to input_files/denoiser/48k and run run_effects_demo.bat. Processed outputs will be generated in output_files/denoiser/48k.
Refer to readme.txt in the samples/effects_demo folder in SDK for more information.
For the SDK Developer package, an effect can be run using the following command:
run_effects_demo.bat <architecture> <effect> <input_sample_rate> <output_sample_rate>
where:
-
architecture: GPU Supported Architecture -
The supported values are
turing,ampere, andada. -
effect: Effect to be applied -
The supported values are
denoiser,dereverb,ndereverb,denoiser,aec, andsuperres. -
input_sample_rate: Input Sample Rate for the effect -
The supported values are
8k,16k, and48k. -
output_sample_rate: Output Sample Rate for the effect -
The supported values are
16kand48k.
For example, to run the 16kHz AEC effect on ADA, run run_effects_demo.bat ada aec 16k 16k.
Refer to the readme.txt in the samples/effects_demo folder in SDK for more information.
For the SDK Redistributable package, NVIDIA provides separate installers for each GPU architecture, an effect can be run using the following command:
run_effects_demo.bat <effect> <input_sample_rate> <output_sample_rate>
where:
-
effect: Effect to be applied -
The supported values are
denoiser,dereverb,dereverb_denoiser,aec, andsuperres. -
input_sample_rate: Input Sample Rate for the effect -
The supported values are 8k, 16k, and 48k.
-
output_sample_rate: Output Sample Rate for the effect -
The supported values are 16k and 48k.
For example, to run the 16kHz AEC effect, run run_effects_demo.bat ada aec 16k 16k.
2.3.3. Chaining Effects
This section describes how to run effects in a chain.
The effects_demo sample application also provides config files in which multiple effects are run in a chain (refer to Running Multiple Effects in a Chain for more information). For example, the following command runs the 16kHz to 48kHz Superresolution effect followed by the 48kHz Denoiser effect on input audio on turing GPU:
For the SDK Developer package:
run_effects_demo.bat turing superres 16k 48k denoiser 48k 48k
For the SDK Redistributable package:
run_effects_demo.bat superres 16k 48k denoiser 48k 48k
To run effects in a chain, the configuration file uses syntax similar to the syntax used when running one effect, with the following changes:
-
effect effect-1,effect-2 -
Specifies the effects in sequence to be used for chaining. For more information about possible chaining combinations, refer to Running Multiple Audio Effects in a Chain.
Note:
Chaining effects only support combination of Superres and Denoiser/Dereverb and Combined Denoiser+Dereverb. Other effect chains are not supported. If combining Denoiser effect and Dereverb effect, use the combined Denoiser+Dereverb model (refer to About the Room Echo Cancellation + Background Noise Suppression Effect for more information).
-
model model-file-1,model-file-2 -
Specifies the path of the model files in sequence that will be used in the sample application, for example,
superres_16kto48k.trtpkg,denoiser_48k.trtpkg. -
intensity_ratio intensity-ratio-1,intensity-ratio-2 - Specifies the intensity ratio for the effects. The value of this parameter ranges from 0.0f to 1.0f, where a higher value indicates a stronger suppression of noise/reverb. A value of 0.0f is equivalent to a passthrough of input audio.
2.3.3.1. Running the Sample Application Using the Helper Script for Chaining
Users can modify the sample config/batch files provided with the SDK as required and use them with effect_demo.exe.
To apply the effect on custom input files, place the input files in the input sample folder that corresponds to the effect/sample rate and run the helper script. The processed audio outputs will be placed in the output folder that corresponds to the effect/output sample rate.
For example, to apply the Background Noise Removal effect on custom 48kHz files, copy the files to the input_files/denoiser/48k folder and run run_effects_demo.bat. The processed outputs will be generated in the output_files/denoiser/48k folder.
To apply the Background Noise Removal (Denoiser effect) + Superres effect on 16k files, copy the files in the input_files/chaining/denoiser/16k folder and run run_effects_demo.bat. The outputs will be generated in the output_files/chaining/denoiser16k_superres16kto48k folder.
For the SDK Developer package, chained effects can be run with the helper script using the following command:
run_effects_demo.bat <architecture> <effect_1> <input_sample_rate_1> <output_sample_rate_1> <effect_2> <input_sample_rate_2> <output_sample_rate_2>
where:
-
architecture: GPU Supported Architecture. -
The supported values are
turing,ampere, andada. -
effect_1: 1st Effect to be applied. -
The supported values are
denoiser,dereverb,dereverb_denoiser, andsuperres. -
input_sample_rate_1: Input Sample Rate the first effect. -
The supported values are
8k,16k, and48k. -
output_sample_rate_1: Output Sample Rate the first effect. -
The supported values are
16kand48k. -
effect_2: The second effect to be applied. -
The supported values are
denoiser,dereverb,dereverb_denoiser, andsuperres. -
input_sample_rate_2: Input Sample Rate for the second effect. -
The supported values are
8k,16k, and48k. -
output_sample_rate_2: Output Sample Rate for the second effect. -
The supported values are
16kand48k.
Refer to readme.txt in the samples/effects_demo folder in SDK for more information.
For the SDK Redistributable package, as separate installers are provided for each supported GPU architecture, chained effects can be run with the helper script using the following command:
run_effects_demo.bat <effect_1> <input_sample_rate_1> <output_sample_rate_1> <effect_2> <input_sample_rate_2> <output_sample_rate_2>
where:
-
effect_1: First effect to be applied -
Supported values are
denoiser,dereverb,dereverb_denoiser, andsuperres. -
input_sample_rate_1: Input Sample Rate for the first effect -
The supported values are
8k,16k, and48k. -
output_sample_rate: Output Sample Rate for the first effect -
The supported values are
16kand48k. -
effect_2: Second effect to be applied -
Supported values are
denoiser,dereverb,dereverb_denoiser, andsuperres. -
input_sample_rate_2: Input Sample Rate for the second effect -
The supported values are
8k,16k, and48k. -
output_sample_rate_2: Output Sample Rate for the second effect -
The supported values are
16kand48k.
This section provides information about the hardware and software requirements and installing the Linux SDK.
3.1. Hardware and Software Requirements
The Audio Effects SDK requires specific GPUs, a specific version of the Linux OS, and other software dependencies.
3.1.1. Hardware Requirements
The Audio Effects SDK is supported on systems with a minimum of 10 GB RAM and NVIDIA GPUs with Tensor Cores.
| Hardware | Required Version |
|---|---|
| GPU |
GPUs with Tensor Cores:
Note:
NVIDIA® Ada GPU architecture and NVIDIA® Hopper architecture are currently not supported for Linux SDK.
Note:
The SDK supports Multi-Instance GPU (MIG) only on NVIDIA Tesla® A30 and A100. When MIG is enabled, the GPU instance and corresponding compute instance must be defined, regardless of whether the SDK is executed on a specific GPU instance or on the entire GPU.
|
For best performance with NVIDIA T4 and other server GPUs, ensure that you use a server that meets the thermal and airflow requirements for these types of products. Refer to Qualified Server Catalog for the latest list of qualified servers.
3.1.2. Software Requirements
The SDK has the following requirements:
| Software | Required Version |
|---|---|
| Linux distribution | 64-bit Linux distribution
|
| NVIDIA Graphics Driver for Linux | 520.61.05 or later 450/470 can be used with NVIDIA CUDA® Forward Compatible Upgrade. Refer to Using Older Drivers (450/470) with CUDA Forward-Compatible Upgrade for more information. |
| CUDA/NVIDIA TensorRT™/NVIDIA CUDA Deep Neural Network (cuDNN) Note:
All libraries that are required to use the SDK are in the package under
|
|
The Linux SDK is designed and optimized for server-side (datacenter/cloud) deployment.
Using this SDK for testing, experimentation, and production deployment of these SDKs outside this use case is not officially supported.
3.2. Installing the Audio Effects SDK for Linux
To develop applications with the Audio Effects SDK, extract the files from the SDK package and provide the library path to the extracted library during compilation and linking. A sample application is also bundled with the SDK (source/pre-built binaries).
To install the SDK, extract the contents of the Audio Effects SDK archive to the required location on your computer, for example, by using the following command:
tar xvf Audio_Effects_SDK.tar.gz
3.2.1. Using Older Drivers (450/470) with a CUDA Forward-Compatible Upgrade
Applications can use the SDK with older drivers (450/470) by using the CUDA Forward-Compatible upgrade path (refer to CUDA Forward-Compatible Upgrade Path for more information).
To use older supported drivers with the SDK, download the user-mode CUDA libraries (libcuda.so.*) and the JIT compiler libraries for PTX files (libnvidia-ptxjitcompiler.so.*) from one of the following locations:
- The CUDA 11.8 Toolkit/datacenter drivers.
- The CUDA network repositories (
cuda-compat-11.8).
Before you run the applications by using the SDK, ensure that LD_LIBRARY_PATH contains the location that contains these libraries.
For example, to use the CUDA network repository on an Ubuntu 18.04 system with older drivers:
- To add the CUDA repository to your system, go to CUDA Toolkit 11.8 Downloads:
- Under Operating System, click Linux.
- Under Distribution, click Ubuntu.
- Under Installer Type, click deb (network).
- To add the CUDA repository to the system, follow the steps under Installation Instructions.
- Update the
aptrepository cache.$ sudo apt-get update
- Install the compatibility package.
$ sudo apt-get install -y cuda-compat-11-8
The commands in this step will install the compatibility package libraries in the
/usr/local/cuda-11.8/compatfolder. - Append this path to
LD_LIBRARY_PATHwhen the SDK applications are run.# Add path to LD_LIBRARY_PATH # Note: This command works only for the current terminal session, please add to ~/.bashrc or similar to make this permanent. For further details, # refer to your distribution's documentation. $ export LD_LIBRARY_PATH=/usr/local/cuda-11.8/compat:$LD_LIBRARY_PATH # Run application $ ./effects_demo -c t4_denoise48k_1_cfg.txt
Refer to CUDA Forward-Compatible Upgrade Path for more information.
3.3. Sample Applications
The SDK provides the following sample applications:
effects_demoeffects_delayed_streams_demo
These applications include the source code (effects_demo.cpp/effects_delayed_streams_demo.cpp) and the pre-built binaries.
3.3.1. effects_demo Application
This application demonstrates how to use the SDK to apply effects to audio.
3.3.1.1. (Optional) Building the Application
To build the application:
- Navigate to the samples/effects_demo directory.
- Optional: To compile the application instead of running the pre-built binary file, run the
makecommand.:/Audio Effects SDK/samples/effects_demo$ make
3.3.1.2. Running the Application
The sample application can be run by using the run_effect.sh helper script or directly by using the effects_demo executable file.
3.3.1.2.1. Running the Sample Application Using the Helper Script
The run_effect.sh helper script is a wrapper around the effects_demo application.
Depending on the arguments that are passed to run_effect.sh, the script generates a temporary config file and runs the effects_demo application with this config file.
The helper script can be run using the following command:
./run_effect.sh -g gpu -e effect -s input_sample_rate -o output_sample_rate -b batch_size
For example, to run the sample application on T4 with the 16k denoiser effect that has a batch size of 10, run the following command:
./run_effect.sh -g t4 -s 16 -b 10 -e denoiser
This command generates a config file at /tmp/tmp_cfg.txt with the above configuration.
Run the application using one of the following scripts:
            :/Audio Effects SDK/samples/effects_demo$ ./run_effect.sh -g v100 -s 16 -b 1 -e denoiser
:/Audio Effects SDK/samples/effects_demo$ ./run_effect.sh -g v100 -s 48 -b 1 -e dereverb
:/Audio Effects SDK/samples/effects_demo$ ./run_effect.sh -g v100 -s 16 -b 400 -e denoiser
:/Audio Effects SDK/samples/effects_demo$ ./run_effect.sh -g v100 -s 48 -b 400 -e dereverb_denoiser
:/Audio Effects SDK/samples/effects_demo$ ./run_effect.sh -g v100 -s 48 -b 400 -e aec
:/Audio Effects SDK/samples/effects_demo$ ./run_effect.sh -g v100 -s 8 -o 16 -b 400 -e superres
or
            :/Audio Effects SDK/samples/effects_demo$ ./run_effect.sh -g t4 -s 16 -b 1 -e denoiser
:/Audio Effects SDK/samples/effects_demo$ ./run_effect.sh -g t4 -s 48 -b 1 -e dereverb
:/Audio Effects SDK/samples/effects_demo$ ./run_effect.sh -g t4 -s 16 -b 400 -e denoiser
:/Audio Effects SDK/samples/effects_demo$ ./run_effect.sh -g t4 -s 48 -b 400 -e dereverb_denoiser
:/Audio Effects SDK/samples/effects_demo$ ./run_effect.sh -g t4 -s 48 -b 400 -e aec
:/Audio Effects SDK/samples/effects_demo$ ./run_effect.sh -g t4 -s 8 -o 16 -b 96 -e superres
Ensure that the application uses the correct versions of TensorRT (requires the exact version)/CUDA libraries (requires the exact version or later). Refer to Software Requirements for the required versions. The SDK includes all required libraries under external/cuda/lib. If the distro/OS exports LD_LIBRARY_PATH from ~/.bashrc or similar, or the external libraries are moved to a different folder structure, the path of TensorRT and CUDA libraries loaded by the SDK might be overridden. As a result, the SDK might load incompatible CUDA/TensorRT library versions and return errors. (Libraries loaded can be verified using ltrace/strace/similar - some libraries are loaded dynamically, hence ldd/similar may not show full results). To avoid this issue, before you run the sample program, append the external directory to LD_LIBRARY_PATH by executing the following command: $ export LD_LIBRARY_PATH=external/cuda/lib:$LD_LIBRARY_PATH
The sample app might hit the limit for the maximum number of open files that is imposed by default by the Linux kernel, especially for large batch sizes. When this occurs, the sample application will exit with the following error message:[Error] Unable to read wav file: ../input_files/denoiser/48k/Fan_48k.wav. Open file limit reached. To increase this limit, before you run the sample application, use the ulimit command in the same shell to increase the number of open files. For example, ulimit -n 20000 will increase the open file limit to 20,000 for that shell. For more information, refer to your distribution’s documentation on how to increase open file descriptor limits.
The helper script supports the following parameters:
-i/--input-file (default: Not specified)specifies the input files/folder on which to run the effect.If this parameter is not specified, the helper script will use the sample files that are distributed with the SDK in the
samples/input_filesdirectory. If this parameter specifies a file/folder, the helper script will use this file/files in this folder.The supported value is a path to the input file in the correct format (refer to Directly Running the Sample Application for more information), or a folder that contains multiple input files in the correct formats. If a folder is specified, only the files that are present at the top level of the folder will be processed. For example, if the input folder is folder1, then
folder1/a.wav,folder1/b.wav, and so on will be processed, whilefolder1/subfolder/a.wavwill not be processed.-g / --gpu (default=t4)specifies the GPU on which to run the effect.Supported options are
a2,v100,a16,a100,a10,t4,a30, anda40.The helper script selects the appropriate model based on the value of this parameter. If a model is not specified, the default value is
t4.-e / --effect (default=denoiser)specifies whether to use thedenoiser,dereverb,dereverb_denoiser,aec, orsuperres.If an effect is not specified, the default value is denoiser.
-s / --sample_rate (default=16)specifies the sample rate of input audio in kHz.Supported options are
48,16, or8. If the rate is not specified, the default value is16.- (Superresolution only)
-o / --output_sample_rate (default=16)specifies the sample rate of output audio.If the rate is not specified, the default value is
16. -b / --batch_size (default=1, max=1024)specifies the batch size to use.The script generates an input file list and corresponding output file list with a size that is equal to the batch size. The input file list is taken from the sample input files provided with the SDK (from
samples/input_files).If the batch size is not specified, the default value is
1.-c / --cfg-file (default=/tmp/tmp_cfg.txt)specifies the path to which the temporary configuration file will be written.If the path is not specified, the default location is
/tmp/tmp_cfg.txt.-f / --frame_size (default=10)specifies the frame size (10 or 20) that will be used (in milliseconds).If the frame size is not specified, the default value is
10.-h / --helpprints the parameters that are supported by this script.
3.3.1.2.2. Directly Running the Sample Application
To directly run the sample application, run the following command:
./effects_demo -c config-file
where -c config-file specifies the path of the sample config file, for example, t4_denoise48k_1_cfg.txt. Sample config files are provided with the sample application.
Config files that are used by the sample app can be generated by using the run_effects.sh script, which accepts a path specified by the -c or the --cfg-file flag. If this path is specified, the script writes a config file with the specified configuration parameters to that path. This config file can be reused by the effects_demo sample app.
For example, the following command will write the configuration to the t4_aec.cfg:./run_effect.sh -e aec -s 48 -g t4 -c t4_aec.cfg file.
For example, to denoise a 48kHz stream on a T4 GPU with a batch size of 1, run:
./effects_demo -c t4_denoise48k_1_cfg.txt
The configuration files contain pairs of parameters and their values, with one pair per line. Currently, the following parameters are supported:
-
reset list-of-stream-ids - Specifies the stream identifiers to reset, starting with 1. Multiple identifiers are separated by spaces.
-
effect effect-name -
Specifies the name of the effect to apply. Supported effects are
denoiser,dereverb,dereverb_denoiser,aec, andsuperres. -
sample_rate audio-sample-rate - Specifies the sample rate of the audio in Hz. Supported values are 8000, 16000, and 48000.
-
model model-file -
Specifies the path of the model file to be used in the sample application, for example,
models/sm_70/denoiser_48k_1152.trtpkg. The model file should match the audio sample rate that was specified in thesample_rateparameter and the number of input wav files specified ininput_wav_listparameter (see Setting the Parameters of an Audio Effect for more information). -
frame_size frame-size-value-in-milliseconds -
Specifies the input frame size (in milliseconds) to be used in the
NvAFX_Run()call. The supported values are 10 and 20. -
input_wav_list input-audio-file-list -
Specifies a list of paths to input noisy audio
.wavfiles to use. Each file should contain mono channel audio in signed 16-bit or 32-bit float format with a basic WAV header. Multiple files are separated by a space. The number of input files must match the number of streams/batch size. In a stream, the files that are separated by a semicolon (;) are processed one after another in the same stream. In addition, if the stream ID exists in the reset list,NvAFX_Resetis called on the stream identifiers when switching between files.For example, the following configuration specifies that streams 1, 2 and 4 use file1.wav, file2.wav and file6.wav as the input to the stream, and stream 3 uses multiple files (file3.wav, file4.wav, file5.wav) as the input to the stream:
input_wav_list file1.wav file2.wav file3.wav;file4.wav;file5.wav file6.wav
Note:Sample input audio files are included with the sample application in the
samples/input_files/16kand in thesamples/input_files/48kdirectory.
-
input_farend_wav_list input-farend-audio-file-list - (AEC only) Specifies a list of paths to input noisy audio .wav files to be used as far-end audio. Each entry in this list matches a near-end input that was specified in the input_wav_list, and the number of audio samples in this file must be the same as the number of samples in the corresponding nearend input file.
-
output_wav_list output-audio-file-list -
Specifies the files to which the output audio will be written. Output files contain mono audio in 32-bit float format. Multiple files are separated by spaces. In a stream, if multiple input files are specified (separated using semicolon), multiple output files will be created with the same name followed by
_1,_2, and so on.For example, in the following configuration, the output will be written to
out1.wav(output offile1.wav),out2.wav(output offile2.wav),out3.wav(output offile3.wav),out3_1.wav(output offile4.wav),out3_2.wav(output of file5.wav), andout4.wav(output offile6.wav).input_wav_list file1.wav file2.wav file3.wav;file4.wav;file5.wav file6.wav output_wav_list out1.wav out2.wav out3.wav out4.wav
Note:In input/output
.wavfiles, only the basic WAV header is supported.
-
real_time enable - Simulates real-time audio input, set to 1 to enable, or 0 to disable (disabled by default). When this option is enabled, each audio frame is passed to the SDK with a delay, like how audio is received from a physical device or stream. For example, if the frame size is 10ms, each frame is passed in every 10ms, like how audio is received from a microphone (10ms audio received from the mic approximately every 10ms).
-
intensity_ratio ratio -
Specifies the denoising intensity ratio. The value of this parameter ranges from
0.0to1.0(inclusive), where a higher value indicates a stronger suppression of noise/reverb. A value of0.0is equivalent to passing out input audio without applying noise removal/dereverb.
3.3.1.3. Chaining Effects
This sample application also supports chaining multiple effects (refer to Running Multiple Effects in a Chain for more information).
To run the application in chaining mode, use run_effect_chained.sh:
            ./run_effect_chained.sh  -g gpu -e1 effect1 -s1
input_sample_rate_1 -o1 output_sample_rate_1 -e2 effect2 -s2
input_sample_rate_2 -o2 output_sample_rate_2 [-c
path_to_save_config_file] [-i input_file_or_folder]
This script generates a config file that can be used with the effects_demo sample to run multiple effects in a chain and runs the application with this file.
For example, to run the application on A16, with the Denoiser 16k + Superresolution 16k->48k chain with batch size of 20, use the following command:
./run_effect_chained.sh -g a16 -e1 denoiser -s1 16 -o1 16 -e2 superres -s2 16 -o2 48 -b 20
Refer to Creating a Chained Audio Effect for the list of supported combinations of chaining effects.
The config file that is used for chaining follows the same format and parameters as effects_demo, with the following modifications:
-
effect effect-name-1 effect-name-2 -
Specifies the names of the effects to apply to input audio (effect-name-1 will be applied to input audio first, and effect-name-2 will be applied to this output). For more information about possible chaining combinations, refer to Creating a Chained Audio Effect.
Note:
Chaining effects only support combination of Superres and Denoiser/Dereverb and Combined Denoiser+Dereverb effect. Other effect chains are not supported. If you combine the Denoiser effect and Dereverb effect, use the combined Denoiser+Dereverb model (refer to About the Room Echo Cancellation + Background Noise Suppression Effect for more information).
-
sample_rate audio-sample-rate-1 audio-sample-rate-2 - Specifies the input sample rate of the audio in Hz for the effects. The supported values are 8000, 16000, and 48000.
-
model model-file-1 model-file-2 -
Specifies the path of the model file to be used by the effects, for example, models/sm_70/denoiser_48k_1152.trtpkg. The model file should match the audio sample rate that was specified in the
sample_rateparameter and the number of input wav files specified ininput_wav_listparameter (see Setting the Parameters of an Audio Effect for more information). -
intensity_ratio intensity-ratio-1 intensity-ratio-2 - Specifies the intensity ratio for the effects. The value of this parameter ranges from 0.0f to 1.0f, where a higher value indicates a stronger suppression of noise/reverb. A value of 0.0f is equivalent to a passthrough of input audio.
-
chained_effect_gpu_list gpu-1 gpu-2 - In a multi-GPU system, specifies the GPU device ID that will be used for the first and the second effect in the chain.
-
-i/--input-file (default: Not specified) -
Specifies the input files/folder on which to run the effect.
The helper script will use the sample files distributed with the SDK by default (in
samples/input_files). The user can also optionally provide a files/folder that contains the files to be processed by using this parameter.The supported value for this parameter is a path to the input file in correct format (refer to Directly Running the Sample Application for more information), or a folder that contains multiple input files in the correct formats. If a folder is specified, only the files present in the top level of the folder will be processed. For example, if the input folder is
folder1, thenfolder1/a.wav, folder1/b.wav, and so on will be processed, butfolder1/subfolder/a.wavwill not be processed.
3.3.2. effects_delayed_streams_demo Application
This application demonstrates the use-case for handling delayed streams (refer to Running an Audio Effect on Delayed Streams for more information about delayed streams). In this sample, each of the input streams falls under one of the following categories:
-
one_step_delay_streams -
These streams have a delay of 1 frame. For example, if the frame size is 10ms, these streams will have a delay of 10ms. This means that these streams will be active every alternate iteration, and when the streams are active, they will receive data for both frames (20ms). As a result, when data from these streams arrive,
NvAFX_Runshould be called two times, once with the delayed data and once with the current data. -
two_step_delay_streams -
These streams have a delay of 2 frames. For example, if the frame size is 10ms, these streams will have a delay of 20ms. This means that these streams will be active after every two iterations, and when the streams are active, they will receive data for three iterations (30ms). As a result, when data from these streams arrive,
NvAFX_Runshould be called three times, twice with the delayed data and once with the current data. -
always_active_streams -
These streams have no delay and are always active, with one
NvAFX_Runcall per iteration.
NvAFX_Run() calls are made based on the description above to generate processed audio output. The configuration files provide a parameter to specify one_step_delay_streams and two_step_delay_streams (refer to Running the Application for more information). These values and the batch size are used to infer the list of always_active_streams.
3.3.2.1. (Optional) Building the Application
To build the application:
- Navigate to the samples/effects_delayed_streams_demo directory.
- To compile the application, run the make command.
:/Audio Effects SDK/samples/effects_delayed_streams_demo$ make
3.3.2.2. Running the Application
The sample application can be run using the run_effect.sh helper script or directly by using the effects_delayed_streams_demo executable file.
3.3.2.2.1. Running the Sample Application with the Helper Script
The run_effect.sh helper script is a wrapper around the effects_delayed_streams_demo application and runs like the helper script in effects_demo (refer to Running the Sample Application Using the Helper Script for more information).
This script supports 10 streams that are always preconfigured into active streams, streams with a one-step delay, and streams with a two-step delay. In addition to the parameters in run_effects.sh that were specified (refer to Running the Sample Application Using the Helper Script), this script also supports the -t / --all_streams_active parameter, which specifies that all 10 streams are always active. If this parameter is not specified, several streams are configured with a one-step or a two-step delay.
For example, to run the sample application on T4 with the 16k denoiser effect, a batch size of 10, and with all streams active, run the following command:
./run_effect.sh -g t4 -s 16 -b 10 -e denoiser -a
3.3.2.2.2. Directly Running the Sample Application
To run the sample application, run the following command:
./effects_delayed_streams_demo -c config-file
where -c config-file specifies the path of the config file, for example, t4_denoise48k_10_cfg.txt.
For example:
./effects_delayed_streams_demo -c t4_denoise48k_10_cfg.txt
Sample config files for 16kHz and 48kHz audio are provided with the application.
Like effects_demo, the configuration files contain pairs of parameters and their values, with one pair per line. In addition to the configuration parameters used by effects_demo,effects_delayed_streams_demo requires the following parameters:
-
one_step_delay_streams list-of-stream-id -
Specifies the stream identifiers that belong to the
one_step_delay_streamscategory as mentioned in the previous section. If none of the streams are in this category, this value should be set to none. -
two_step_delay_streams list-of-stream-id -
Specifies the stream identifiers that belong to the
two_step_delay_streamscategory as mentioned in the previous section. If none of the streams are in this category, this value should be set tonone.
3.3.2.3. Chaining Effects
This sample application also supports chaining multiple effects (refer to Creating a Chained Audio Effect for more information).
To run the application in chaining mode, use run_effect_chained.sh:
            ./run_effect_chained.sh  -g gpu -e1 effect1 -s1
input_sample_rate_1 -o1 output_sample_rate_1 -e2 effect2 -s2
input_sample_rate_2 -o2 output_sample_rate_2 [-c path_to_save_config_file]
For example, to run the application on A100, with the Denoiser 16k + Superresolution 16k->48k chain, use the following command:
./run_effect_chained.sh -g a100 -e1 denoiser -s1 16 -o1 16 -e2 superres -s2 16 -o2 48
Refer to Creating a Chained Audio Effect for the list of supported combinations of chaining effects.
The configuration used for this script is the same as the configuration that is used for effects_demo (refer to Chaining Effects for more information). The script also uses the same parameters that are used by effects_delayed_streams_demo (refer to Running the Application for more information).
The Audio Effects API is a C API but can also be used with applications that are built using C++.
4.1. Workflow in the SDK Application
The following section describes the typical workflow for using an effect in applications.
This flow is a simplified version of the sample program (effects_demo/ effects_delayed_streams_demo (Linux only)). The same flow is also used for chained effects, with a few differences in API calls.
- Create an effect handle for the effect.
            NvAFX_Handle handle;
// Single effect
NvAFX_Status status = NvAFX_CreateEffect(NVAFX_EFFECT_DENOISER, &handle);
// OR, create a chained effect
NvAFX_CreateChainedEffect(NVAFX_CHAINED_EFFECT_SUPERRES_8k_TO_16k_DENOISER_16k, &handle);
- Set the required parameters (model, batch size (Linux only), input sample rate (Linux only)).
            // Set model name
// Single effect (can also use SetStringList with size 1)
NvAFX_SetString(handle, NVAFX_PARAM_MODEL_PATH, "denoiser_48k.trtpgk");
// Chained effect
NvAFX_SetStringList(handle, NVAFX_PARAM_MODEL_PATH, model_files, num_model_files);

// Linux only: Set input sample rate, number of streams
NvAFX_SetU32(handle, NVAFX_PARAM_INPUT_SAMPLE_RATE, 48000);
NvAFX_SetU32(handle, NVAFX_PARAM_NUM_STREAMS, 20);
- Set optional parameters, such as intensity ratio, use default GPU, VAD enable, Cuda Graph enable/disable (Windows only) and the delayed streams enable/disabled (Linux only), by using the
NvAFX_SetU32/NvAFX_SetFloatparameters.- (Linux only) Optionally, set input samples per frame. A list of supported input sample rates can be queried using
NvAFX_GetU32List(refer to Getting the Parameters of an Effect).
Refer to Using the Audio Effects SDK in Applications for more information.
- (Optional) Set the GPU on which the model will be loaded. Refer to Using Multiple GPUs for more information.
- Load the model.
NvAFX_Load(handle);
- After a successful load, query the input/output sample rate, channels, and samples per frame for the effect.
            // Sample rate
NvAFX_GetU32(handle, NVAFX_PARAM_INPUT_SAMPLE_RATE, &input_sample_rate_);
NvAFX_GetU32(handle, NVAFX_PARAM_OUTPUT_SAMPLE_RATE, &output_sample_rate_);

// Channels
NvAFX_GetU32(handle, NVAFX_PARAM_NUM_INPUT_CHANNELS, &num_input_channels_);
NvAFX_GetU32(handle, NVAFX_PARAM_NUM_OUTPUT_CHANNELS, &num_output_channels_);

// Samples per frame
// Windows only
NvAFX_GetU32(handle, NVAFX_PARAM_NUM_INPUT_SAMPLES_PER_FRAME, &num_input_samples_per_frame_);
NvAFX_GetU32(handle, NVAFX_PARAM_NUM_OUTPUT_SAMPLES_PER_FRAME, &num_output_samples_per_frame_);
// Linux only
NvAFX_GetU32(handle, NVAFX_PARAM_NUM_SAMPLES_PER_INPUT_FRAME, &num_input_samples_per_frame_);
NvAFX_GetU32(handle, NVAFX_PARAM_NUM_SAMPLES_PER_OUTPUT_FRAME, &num_output_samples_per_frame_);
- For each input sample, process the audio by using
NvAFX_Run.NvAFX_Run(handle, input, output, num_input_samples_per_frame_, num_input_channels_);
- If there is a disconnection in audio processing (for example, a batch was reused for a different audio source), use
NvAFX_Resetto reset internal effect states.// Windows only NvAFX_Reset(handle); // Linux only NvAFX_Reset(handle, states_array, input_wav_list.size());
- (Linux only) During batching, to temporarily pause streams (for example, if data is not ready for that stream but is available for processing for other streams) use
NVAFX_PARAM_ACTIVE_STREAMSas required.
Refer to Running an Audio Effect on Delayed Audio Streams (Linux SDK only) for more information. - After audio processing is complete, to free resources, use
NvAFX_Destroy(handle).
4.1.1. Building Applications with the SDK
The SDK includes dependent libraries in external/cuda/lib, which are required to compile and run applications and do not require libraries to be separately installed. Refer to Getting Started with the Audio Effects SDK for Windows or Hardware and Software Requirements (Linux) for runtime requirements for applications that use the SDK.
4.1.1.1. Building Applications with the Windows SDK
To build applications with SDK on Windows, use one of the following methods:
- Statically link the library in Visual Studio by using
lib(NVAudioEffects.lib).
Refer to Building the Sample Application for more information. - Load the SDK DLL at runtime by using LoadLibrary/GetProcAddress.
For example, NvAFX_CreateEffect can be called in the following way:
            typedef NvAFX_Status(*NVAFX_CREATEEFFECT)(NvAFX_EffectSelector, NvAFX_Handle*);
HINSTANCE h = LoadLibraryW(L"NVAudioEffects.dll");
_NvAFX_CreateEffect = (NVAFX_CREATEEFFECT)GetProcAddress(h, "NvAFX_CreateEffect");
void *nv_handle;
_NvAFX_CreateEffect(“denoiser”, &nv_handle);
// Similarly for other APIs
FreeLibrary(h);
Previous releases of TensorRT might have a bug where cuBLAS is not unloaded after you unload the SDK DLL, which might cause a memory leak. To workaround this issue, run the following workaround:
            int maxLoopCount = 5;
while (maxLoopCount--) {
HMODULE cublas_handle = GetModuleHandle(L"cublasLt64_11");
if (!cublas_handle) break;
if (FreeLibrary(cublas_handle) == false) break;
}
4.1.1.2. Building Applications with the Linux SDK
To build applications with SDK on Linux, use either of the following methods:
At compile time, link to
libnv_audiofx.so.
For example, with gcc:gcc -L"../../nvafx/lib" -l"nv_audiofx" -L"../../external/cuda/lib/" -I"../../nvafx/include" source.c
Dynamically load
libnv_audiofx.soby usingdlopen/dlsymwith the correct library paths set (usingLD_LIBRARY_PATH/similar).
Refer to thedlopen(3)/dlsym(3)man pages for more information.Note:Some versions of TensorRT may attempt to dynamically load
libcublas.so. This library is not installed by newer versions of CUDA by default (installs onlylibcublas.so.11). Hence, if not using the libraries inexternal/cuda/lib, and if previous versions of CUDA are installed, SDK may load an incompatible version oflibcublas.soand fail to load effects completely. This can be verified usingltrace/strace/similar to check the libraries loaded by the SDK - note thatldd/similar would not show this as the library is dynamically loaded.To resolve this issue, either use the libraries under
external/cuda/lib(by settingLD_LIBRARY_PATH/similar), or correct/create a symlink to the correctlibcublas.so(for example, by executingln -s /usr/local/cuda-11.8/lib64/libcublas.so.11 libcublas.soand exporting the current directory inLD_LIBRARY_PATHusingexport LD_LIBRARY_PATH=$(pwd):$LD_LIBRARY_PATHor equivalent)For example:
            // Typedefs for functions, similarly define for other functions as required
typedef NvAFX_Status (*fnNvAFX_CreateEffect)(NvAFX_EffectSelector code, NvAFX_Handle* effect);

// Load library and bind
// Note: ensure that external/cuda/lib is in library path, or fix via RPATH/similar
void* handle = dlopen("libnv_audiofx.so", RTLD_LAZY);
assert(handle);
fnNvAFX_CreateEffect f = (fnNvAFX_CreateEffect) dlsym(handle, "NvAFX_CreateEffect");
assert(f);

// Call functions
NvAFX_Handle effect;
auto ret = f(NVAFX_EFFECT_DENOISER, &effect);
assert(ret == NVAFX_STATUS_SUCCESS);
4.2. Creating an Audio Effect
Call the NvAFX_CreateEffect() function with the following parameters:
- The
NvAFX_EffectSelectortypeNVAFX_EFFECT_DENOISER,NVAFX_EFFECT_DEREVERB,NVAFX_EFFECT_DEREVERB_DENOISER,NVAFX_EFFECT_AEC, orNVAFX_EFFECT_SUPERRES. - The pointer to the location that stores the handle to the newly created audio effect.
The NvAFX_CreateEffect() function creates a handle to the audio effect instance for use in additional API calls.
The following example creates a denoiser audio effect:
NvAFX_Status err = NvAFX_CreateEffect(NVAFX_EFFECT_DENOISER, &handle);
4.3. Creating a Chained Effect
The SDK supports running multiple effects in a chain where the output from one effect is passed as the input to the second effect without performing unnecessary pre and post-processing computations. For example, the SDK can chain the Denoiser and Superresolution effects, which will take in 16kHz input data, remove the noise from this audio, and upsample the audio to 48kHz.
This process is more efficient than creating two stand-alone audio effect objects and passing the output of the first object to the second object, and the process also avoids creating unnecessary device-to-host and host-to-device copies.
The following effect chains are supported by the SDK models:
- Superresolution effect (8kHz to 16kHz) + Background Noise Removal effect (16kHz)
- Superresolution effect (8kHz to 16kHz) + Room Echo Removal effect (16kHz)
- Superresolution effect (8kHz to 16kHz) + Combined Background Noise Removal/Room Echo Removal effect (16kHz)
- Background Noise Removal effect (16kHz) + Superresolution effect (16kHz to 48kHz)
- Room Echo Removal effect (16kHz) + Superresolution effect (16kHz to 48kHz)
- Combined Background Noise Removal/Room Echo Removal effect (16kHz) + Superresolution effect (16kHz to 48kHz)
No other effect chains are supported by the SDK models. Using an unsupported chain by manually chaining individual effects might result in degraded audio quality.
If you combine the Denoiser effect and the Dereverb effect, use the combined Denoiser+Dereverb model (refer to About the Room Echo Cancellation + Background Noise Suppression Effect for more information).
To create a chained effect, call NvAFX_CreateChainedEffect with one of the following effect selectors:
- One of the following effect selectors:
NVAFX_CHAINED_EFFECT_DENOISER_16k_SUPERRES_16k_TO_48kNVAFX_CHAINED_EFFECT_DEREVERB_16k_SUPERRES_16k_TO_48kNVAFX_CHAINED_EFFECT_DEREVERB_DENOISER_16k_SUPERRES_16k_TO_48kNVAFX_CHAINED_EFFECT_SUPERRES_8k_TO_16k_DENOISER_16kNVAFX_CHAINED_EFFECT_SUPERRES_8k_TO_16k_DEREVERB_16kNVAFX_CHAINED_EFFECT_SUPERRES_8k_TO_16k_DEREVERB_DENOISER_16k
The pointer to the location that stores the handle to the newly created audio effect.
The following example creates a chained audio Background Noise Removal effect (16kHz) + Superresolution effect (16kHz to 48kHz) effect:NvAFX_Status err = NvAFX_CreateChainedEffect(NVAFX_CHAINED_EFFECT_DENOISER_16k_SUPERRES_16k_TO_48k, &handle);
- In the Linux SDK, this effect has the following maximum throughput (# batches supported in real-time):
Running effects in a chain might impact the performance and latency of the audio pipeline.
4.4. Setting the Parameters of an Audio Effect
An audio effect requires a model to transform the input audio. Each model supports a specific audio sample rate. The path to the model file and input audio sample rate (Linux SDK only) must be set in the SDK. After required parameters for the effect are set, the effect can be loaded using NvAFX_Load.
The Linux SDK also supports several frame sizes (the number of samples per frame), which can be queried and set in the SDK (refer to Getting the Parameters of an Effect for more information).
To set U32 values, call the NvAFX_SetU32() function with the following parameters:
- Previously created effect handle.
- The selector string for the parameter to be set:
- (Linux SDK Only) To set the sample rate, specify:
NVAFX_PARAM_INPUT_SAMPLE_RATE
- To set the number of audio streams, specify:
NVAFX_PARAM_NUM_STREAMS
- To set the number of samples per input frame, specify:
- For Linux
NVAFX_PARAM_NUM_SAMPLES_PER_INPUT_FRAME
- For Windows
NVAFX_PARAM_NUM_INPUT_SAMPLES_PER_FRAME
-
In a Multi-GPU setup, to have SDK automatically select the GPU compatible with the model set in SDK, set the following parameter to 1:
Note:The default value is 0.
NVAFX_PARAM_USE_DEFAULT_GPU
This parameter is not supported by chained effects.
-
(Windows SDK Only) To allow users to create and manage their own CUDA context, set the following parameter to 1:
Note:The default value is 0.
NVAFX_PARAM_USER_CUDA_CONTEXT
-
(Windows SDK only) To disable CUDA graphs, set the following parameter to 1.
Note:The default value is 0.
NVAFX_PARAM_DISABLE_CUDA_GRAPH
-
In a Multi-GPU setup, to have SDK automatically select the GPU compatible with the model set in SDK, set the following parameter to 1:
NVAFX_PARAM_USE_DEFAULT_GPU
The default value is 0, and this parameter is not supported by chained effects.
The Noise Removal and Room Echo Removal/Room Echo Cancellation effect supports VAD, which indicates whether the audio data frame supplied to the SDK through
NvAFX_Runcontains speech data.
When enabled, this feature also removes low-volume noise and all non-speech data from theNvAFX_Runoutput without degrading performance. To enable this feature, set the following parameter to 1:NVAFX_PARAM_ENABLE_VAD
Note:This parameter can only be set before the model is loaded (before the
NvAFX_Loadcall). Setting the parameter after the model is loaded has no effect.The default value is 0, and this parameter is not supported by chained effects.
The VAD status for the last
NvAFX_Runcall can also be queried by using theNvAFX_GetBoolList()function (Linux SDK only). This query can be helpful when the audio output pipeline has an alternative packet loss concealment algorithm. For more information about querying the list, refer to Getting the Parameters of an Effect.- An unsigned integer value that specifies the value for the selector.
To set the model, call the NvAFX_SetString() function with the following parameters:
- Previously created effect handle.
- A null-terminated string specifying the path to the model file.
- For the Linux SDK
- Each model file supports a specific sample rate and a maximum number of audio streams.
- Model files for specific GPU compute versions are located in the
models/<compute_version>directory in the SDK. The following GPU compute versions can be used for the following GPUs:- Volta (V100):
models/sm_70 - Turing (T4):
models/sm_75 - Ampere:
- A100 (
ga100based GPUs):models/sm_80 - A10 (
ga102or later GPUs):models/sm_86
- The specified model should match the sample rate and a specified number of audio streams.
- The model file name uses the following naming convention:
<effect>_<samplerate>_<max-streams>.trtpkg
- For the Superresolution effect, the model file name follows the following naming convention:
<effect>_<input_rate>_<output_rate>_<max-streams>.trtpkg
- Each folder also includes a symlink, which points to the actual model, for example
denoise_16k.trtpkganddenoiser_48k.trtpkg. sampleratecan be 8k, 16k, or 48k.- The number of audio streams should be within the range 1 and
max-streams(both inclusive). - Models give the best throughput performance when the number of audio streams is set to 64 or a multiple of 256 (256, 512, 768, and so on).
For example, thedenoiser_48k_1152.trtpkgmodel can be used for 48kHz and between 1 to 1152 audio streams but will be optimal for 64, 256, 512, 768, and 1024 streams. Code that uses this model can also directly use the symlinkdenoiser_48k.trtpkgin the same folder, which allows the underlying model to be changed without code changes.Note:The maximum number of batches supported by some of the models included in the Linux SDK might be less than the maximum throughput supported by the effect.
In case your use case requires a model with larger batch size, please contact us at maxinesdk-support@nvidia.com.
- For the Windows SDK
- Each model file supports a specific sample rate.
- Model files for specific GPU compute versions are located in the
modelsdirectory in the SDK.
- For chained effects, call the
NvAFX_SetStringListfunction with the following parameters:- The previously created effect handle.
- An array of null-terminated strings, each specifying the path to the model file of the effect to be chained.
For example, for a Denoiser 16k + Superres 16k to 48k chain, an array that contains two paths should be passed in the following paths:
- To the 16k Denoiser model.
- To the 16k to 48k Superres model.
The model paths should follow the same conventions as the conventions of the standalone effect.
The length of the array.
For example, the following code sets the sample rate tosample_rateand the path to the model specified by themodel_file.c_str().NvAFX_Status err; // Set sample rate (Linux only) err = NvAFX_SetU32(handle, NVAFX_PARAM_INPUT_SAMPLE_RATE, sample_rate); // Set model path err = NvAFX_SetString(handle, NVAFX_PARAM_MODEL_PATH, model_file.c_str()); err = NvAFX_SetU32(handle, NVAFX_PARAM_NUM_STREAMS, num_streams);
4.5. Getting the Parameters of an Effect
The number of channels in input/output audio are fixed for the Audio Effect and cannot be changed. Before running an audio effect, the number of channels that are supported by the effect must be queried. The Linux SDK also supports several frame sizes (number of samples per frame), which can be queried and set by using the set API (refer to Setting the Parameters of an Audio Effect for more information). The application can also query and use the default frame size supported by the SDK, as demonstrated in the following sample.
The Linux SDK also supports several frame sizes (number of samples per frame), which can be queried and set by using the set API (refer to Setting the Parameters of an Audio Effect for more information). The application can also query and use the default frame size supported by the SDK, as demonstrated in the following sample.
Chained effects currently only support a 10ms frame size.
Effect parameters, except for supported frame size list (Linux only), can be queried only after the effect is loaded. Querying parameters before the model is loaded might return invalid values, and the function might fail with an error code.
To ensure that the sample rate of the input audio is compatible with the Audio Effect, the sample rate should be queried first.
To query these parameters, call the NvAFX_GetU32() function with the following parameters:
-
Previously created effect handle.
The selector string for the parameter to be queried:- To get the default number of samples per input frame, specify:
- For Linux
NVAFX_PARAM_NUM_SAMPLES_PER_INPUT_FRAME
- For Windows
NVAFX_PARAM_NUM_INPUT_SAMPLES_PER_FRAME
- To get the default number of samples per output frame per channel, specify:
For LinuxNVAFX_PARAM_NUM_SAMPLES_PER_OUTPUT_FRAME
For WindowsNVAFX_PARAM_NUM_OUTPUT_SAMPLES_PER_FRAME
To get the number of channels in input/output audio, specify:NVAFX_PARAM_NUM_INPUT_CHANNELS/NVAFX_PARAM_NUM_OUTPUT_CHANNELS
To get the input/output sample rate, specify:NVAFX_PARAM_INPUT_SAMPLE_RATE/NVAFX_PARAM_OUTPUT_SAMPLE_RATE
-
A pointer to the location where the value will be stored.
To query lists, the user must query the list size, allocate memory for the output, and then pass the newly allocated memory and size to NvAFX_GetU32List() or NvAFX_GetBoolList.
To query the list size, call the NvAFX_GetU32List() or the NvAFX_GetBoolList() function with the following parameters:
- Previously created effect handle.
- The selector string for the parameter to be queried.
To get the list of the number of supported samples per frame (Linux only), specifyNVAFX_PARAM_SUPPORTED_NUM_SAMPLES_PER_FRAME. - An output pointer, set to nullptr (or NULL) to query size.
A pointer to the location where the size of the list is to be stored.
The size should be initialized to zero and will be updated with the actual size when this function is called.The
NvAFX_GetU32List()call retrieves the size of the list for the corresponding parameter selector with anNVAFX_STATUS_OUTPUT_BUFFER_TOO_SMALLerror status. To query the list, allocate memory for the list with the returned size and call theNvAFX_GetU32List()function with the following parameters:The selector string for the parameter to be queried.
To get the list of supported number of samples per frame, specify:NVAFX_PARAM_SUPPORTED_NUM_SAMPLES_PER_FRAME.
- A pointer to a U32 array of size at least of the list size retrieved from the above call.
The list values are written to this array. - A pointer to a location where the value of the size of the list is stored.
The following example queries an effect for the supported number of samples per frame, the number of channels in input/output audio, the sample rate, and the supported frame sizes.
            uunsigned num_samples_per_frame, num_channels, sample_rate;
NvAFX_Status err;
// Linux only
std::unique_ptr<unsigned int[]> supported_list = nullptr;
int list_size = 0;
err = NvAFX_GetU32List(handle, NVAFX_PARAM_SUPPORTED_NUM_SAMPLES_PER_FRAME, supported_list.get(), &list_size);
if (err != NVAFX_STATUS_OUTPUT_BUFFER_TOO_SMALL) {
   // This indicates API failure
   return;
}
supported_list.reset(new unsigned int[list_size]);
err = NvAFX_GetU32List(handle, NVAFX_PARAM_SUPPORTED_NUM_SAMPLES_PER_FRAME, supported_list.get(), &list_size);

// Load model
err = NvAFX_GetU32(handle, NVAFX_PARAM_NUM_SAMPLES_PER_INPUT_FRAME, &num_samples_per_frame);
err = NvAFX_GetU32(handle, NVAFX_PARAM_NUM_INPUT_CHANNELS, &num_channels);
err = NvAFX_GetU32(handle, NVAFX_PARAM_OUTPUT_SAMPLE_RATE, &sample_rate);
// Querying VAD results
// VAD must be supported and enabled on the handle
NvAFX_Run(...); // Process input first

// Query results for last input (Linux only)
// Note: If no voice is detected, output audio is zeroed by the effect
// However, result is also returned (in case custom packet loss concealment is desired) - returns NVAFX_TRUE if input audio had voice, NVAFX_FALSE otherwise
std::vector<NvAFX_Bool> out(num_streams, 0);
uint32_t s = out.size();
auto status = NvAFX_GetBoolList(handle, NVAFX_PARAM_VAD_RESULT, out.data(), &s);
assert(status == NVAFX_STATUS_SUCCESS);
// Use VAD result
4.6. Getting Supported Devices (Windows SDK Only)
The NvAFX_GetSupportedDevices() function can be used to determine the GPUs that are supported by the currently selected model.
This method must be called after you set the model path.
Call this function with the following parameters:
- The effect handle.
- The size of the input array.
If the call succeeds, this value will be set by the function. - Array of size num.
The function will fill the array with the CUDA device indices of devices that are supported by the model, in descending order of preference, where the first device is the most preferred device. This example fetches the list of supported GPUs by the model:
            int numSupportedDevices = 0;
NvAFX_GetSupportedDevices(handle, &numSupportedDevices, nullptr);

std::vector<int> ret(num);
NvAFX_GetSupportedDevices(handle, &numSupportedDevices, ret.data();
4.7. Loading an Audio Effect
Loading an effect involves validating the parameters that were set for the effect and loading the specified model into GPU memory.
To load an audio effect, set the parameters for the effect described in the previous section and call NvAFX_Load() with the effect handle.
NvAFX_Status err = NvAFX_Load(handle);
4.8. Running an Audio Effect
Once the effect is loaded, it can be applied to input audio using the NvAFX_Run() function. When the effect is run, the contents of the input memory buffer are read, the audio effect is applied, and the output is written to the output memory buffer.
Input/Output memory buffers are in CPU memory. Copying to/from GPU memory is handled internally by the SDK.
Except for the Acoustic Echo Cancellation effect, which has two input channels, the SDK supports only mono-channel processing. The number of channels that are supported by the effect can be obtained by querying NVAFX_PARAM_NUM_INPUT_CHANNELS. Refer to Getting the Parameters of an Effect for more information.
To run an audio effect, call the NvAFX_Run() function with the following parameters:
- Previously created effect handle.
- The input memory buffer.
For the AEC effect, specify two channels, where the first channel is the batched near-end audio, and the second channel is the batched far-end audio. - The output memory buffer.
For Super Resolution effect, the size of input and output memory buffer will differ and should be queried by the user using the following:
NVAFX_PARAM_NUM_OUTPUT_SAMPLES_PER_FRAMENVAFX_PARAM_NUM_INPUT_SAMPLES_PER_FRAME
- The number of samples per frame per stream of input/output data.
- The number of channels in input/output audio.
Refer to Getting the Parameters of an Effect for more information.
The following example runs an audio effect:
NvAFX_Status err = NvAFX_Run(handle, input, output, num_samples, num_channels);
4.9. Running Multiple Audio Effects in a chain
The following example demonstrates running two effects in a chain:
            NvAFX_Status err;
err = NvAFX_API NvAFX_CreateChainedEffect(NVAFX_CHAINED_EFFECT_DENOISER_16k_SUPERRES_16k_TO_48k, &effect);
// Set effect parameters & load effect
...
NvAFX_Status err = NvAFX_Run(chained_handle, input_audio, intermediate_output, num_samples, num_channels);
Running effects in a chain might impact the performance and latency of the audio pipeline.
4.10. Running an Audio Effect on Delayed Audio Streams (Linux SDK Only)
The Linux SDK supports cases where some streams do not arrive at the expected time. These streams are referred to as delayed streams. To support handling these streams, the SDK allows applications to specify a list that indicates whether the corresponding stream is currently active or delayed/inactive.
The list can be set by calling NvAFX_SetBoolList() with the following function parameters:
- Previously created effect handle.
- The
NVAFX_PARAM_ACTIVE_STREAMSselector string. - An array of type
NVAFX_BOOLwhere each element represents the status of the corresponding audio stream.
NVAFX_TRUEindicates an active stream, andNVAFX_FALSEindicates an inactive stream - Length of the above array, which is equal to the number of audio streams.
For delayed audio streams, the effect can be initially applied on all delayed audio streams by setting them as active and setting the on-time audio streams as inactive. This should be followed by one or more NvAFX_Run() calls to apply the effect on the delayed audio streams. After the delayed audio streams are processed, the on-time audio streams are set to active, and NvAFX_Run() is executed once to apply the effect.
The following example demonstrates how to process four streams:
- Consider an effect that accepts 10ms audio inputs.
- Audio streams 1 and 3 are delayed by 10ms each and arrive with 20ms worth of data.
- Audio streams 2 and 4 are on time and arrive with 10ms of data.
- Streams can be processed in one of the following ways:
Option 1
Process the extra 10ms only in the delayed streams and then process on-time 10ms data for all streams. Initially, by usingNvAFX_SetBoolList, streams 1 and 3 are set as active, and 2 and 4 are set as inactive.- An
NvAFX_Runcall is executed where 10ms of data from streams 1 and 3 is populated in the input while the rest of the input is set to 0.
This step processes the extra 10ms of data in streams 1 and 3. - A second
NvAFX_SetBoolListcall is executed to set all streams (1, 2, 3, and 4) as active. - An
NvAFX_Runcall is executed with the real-time 10ms data from all four streams.
- Option 2
Process 10ms in all streams and then process the extra 10ms data only in delayed streams:
- Process 10ms of data from all streams (stale data from stream 1 and 3 and new data from stream 2 and 4 by calling
NvAFX_Run. - Set streams 1 and 3 to active and 2 and 4 to inactive by calling
NvAFX_SetBoolList. - Process the extra 10ms from stream 1 and 3 by calling
NvAFX_Run.
The following example runs an audio effect after setting some of the audio streams as inactive:
            NvAFX_Status err = NvAFX_SetBoolList(handle, NVAFX_PARAM_ACTIVE_STREAMS, stream_active_list, num_streams);

NvAFX_Status err = NvAFX_Run(handle, input, output, num_samples, num_channels);
The internal state of each stream is updated during each NvAFX_Run call only for active streams. Setting a stream to inactive will disable updating this state. If required, this state can also be reset using NvAFX_Reset, as described in NvAFX_Reset.
4.11. Destroying an Audio Effect
When an audio effect is no longer required, it should be destroyed to free the resources and memory used by the effect.
To destroy an audio effect, call NvAFX_DestroyEffect() and specify the effect handle to the effect to be destroyed.
NvAFX_Status err = NvAFX_DestroyEffect(handle);
4.12. Using Multiple GPUs
Applications that are developed with the Audio Effects SDK can be used with multiple GPUs. By default, the SDK assumes that the application will set the GPU. Optionally, the SDK can select the best GPU to run the effect(s).
4.12.1. Selecting the GPU for Audio Effects Processing in a Multi-GPU Environment
The GPU that will be used to run audio effect(s) in a multi-GPU environment can be controlled by using the cudaSetDevice() and cudaGetDevice() CUDA functions. The device should be set beforeNvAFX_Load() is called because NvAFX_Load() will succeed only when the currently selected GPU supports the SDK.
            int chosenGPU = 0; // or whichever GPU you want to use
cudaSetDevice(chosenGPU);
NvAFX_Handle effect;
err = NvAFX_API NvAFX_CreateEffect(code, &effect);
err = NvAFX_Set...; // set parameters
…
err = NvAFX_API NvAFX_Load(effect);
…
err = NvAFX_API NvAFX_Run(effect, ...);
4.12.2. Selecting GPUs for Chained Audio Effects (Linux Only)
When using chained effects in a multi-GPU environment, the SDK can optionally run the effects in the chain on separate GPUs. For example, in a Denoiser 16k + Superres 16k to 48k chain, the denoiser effect can be run entirely on one GPU and the Superres effect on another GPU.
To use this feature, create the chained effect and set NVAFX_PARAM_CHAINED_EFFECT_GPU_LIST to an array that specifies the GPU IDs using NvAFX_SetU32List. This parameter must be set before you call NvAFX_Load on the effect.
The following sample demonstrates use of this parameter:
            NvAFX_Handle effect;
err = NvAFX_API NvAFX_CreateChainedEffect(code, &effect);
…
// Run first effect on GPU id 3, second on GPU id 4
uint32_t gpus[] = { 3, 4};
err = NvAFX_API SetU32List(effect, NVAFX_PARAM_CHAINED_EFFECT_GPU_LIST, gpus,
                           sizeof(gpus));

…
err = NvAFX_API NvAFX_Load(effect);
4.12.3. Offloading GPU Selection to the SDK for Audio Effects Processing in a Multi-GPU Environment
In a multi-GPU environment, the SDK can optionally determine the optimal GPU on which to run the audio effect(s). To use this feature, call NvAFX_SetU32 with the NvAFX_SetU32(effect , NVAFX_PARAM_USE_DEFAULT_GPU, 1) parameters before loading effects. If NvAFX_SetU32 is called after an audio effect is loaded, the function will not have any effect.
If the application sets NVAFX_PARAM_USE_DEFAULT_GPU to 0, or does not set this parameter, the SDK will explicitly not select the GPU to run the effect. The application can set the device on which SDK calls are to be executed by using the cudaSetDevice API. If this parameter is not set or is set to 0, the SDK will use the default device (device 0).
If the application sets NVAFX_PARAM_USE_DEFAULT_GPU to 1, the application should not call cudaSetDevice(), and the other effects (or multiple instances of an effect) will use the GPU that was determined by the SDK. If the application explicitly calls cudaSetDevice() before NvAFX_Load(), the SDK might override the application's device preference. If the client calls cudaSetDevice() to set the GPU to a different GPU just before calling NvAFX_Run(), the NvAFX_Run() call will fail.
            NvAFX_Handle effect;
err = NvAFX_API NvAFX_CreateEffect(code, &effect);
err = NvAFX_API SetU32(effect, NVAFX_PARAM_USE_DEFAULT_GPU, 1);
…
err = NvAFX_API NvAFX_Load(effect);
…
NVAFX_PARAM_USE_DEFAULT_GPU and NVAFX_PARAM_USER_CUDA_CONTEXTcannot be used at the same time.
This parameter is not supported for chained effects.
4.12.4. Selecting Different GPUs for Different Tasks
The applications that use the SDK might be designed to perform multiple tasks in a multi-GPU environment in addition to applying the audio effect filter. In this situation, the best GPU for each task should be selected before calling NvAFX_Load() and be set before each NvAFX_Run() call.
The application is responsible for switching to the appropriate GPU before executing SDK calls. If the application does not switch to the appropriate GPU before calling NvAFX_Run(), the call will fail with an error.
The following steps demonstrate how to complete CUDA tasks and SDK calls on different GPUs.
- Call
cudaGetDeviceCount()to determine the number of available GPUs.// Get the number of GPUs cuErr = cudaGetDeviceCount(&deviceCount);
- Determine the best GPU for the task.
For example, this can be determined by iterating over the available GPUs and selecting the GPU with the highest number of SMs by usingcudaGetDeviceProperties(). - In the loop that completes the application’s tasks, select the best GPU for each task before performing the task by calling
cudaSetDevice()to select the GPU for the task. - Before executing SDK calls, call
cudaSetDevice()again to set the GPU back to the Audio Effects GPU.// Select the best GPU for each task and perform the task. while (!done) { … cudaSetDevice(gpuOtherTask); PerformOtherTask(); cudaSetDevice(gpuAFX); err = NvAFX_Run(effect, ...)
4.12.5. CUDA Graph Support (Windows Only)
The Windows SDK supports using CUDA graphs, which improve performance by reducing the CPU overheads that are seen with short-lived CUDA kernels.
By default, graphs are enabled in the Windows SDK, but this can cause issues if the SDK runs in parallel with other applications that are using CUDA graphs. The following example shows you how to disable CUDA graphs:
            // Call before loading model (NvAFX_Load) Windows only
  err = NvAFX_API SetU32(effect, NVAFX_PARAM_DISABLE_CUDA_GRAPH, 1);
  ...
This section provides detailed information about the APIs in the Audio Effects SDK.
5.1. Type Definitions
The Audio Effects SDK type definitions provide selector strings for the audio effect and the parameters of an audio effect.
5.1.1. NvAFX_EffectSelector
This type definition provides selector strings for the audio effect types.
typedef const char* NvAFX_EffectSelector;
The currently supported selectors are:
- NVAFX_EFFECT_DENOISER : "denoiser"
- Denoiser audio effect (refer to About the Background Noise Suppression Effect).
- NVAFX_EFFECT_DEREVERB "dereverb"
- De-reverb effect (refer to About the Room Echo Cancellation Effect).
- NVAFX_EFFECT_DEREVERB_DENOISER "dereverb_denoiser"
- Combined De-reverb and Denoiser effects (refer to About the Noise Removal and Room Echo Removal/Room Echo Cancellation + Background Noise Suppression Effect).
- NVAFX_EFFECT_AEC "aec"
- AEC effect (refer to About the Acoustic Echo Cancellation Effect ).
- NVAFX_EFFECT_SUPERRES
- Audio Super-resolution effect (see About the Audio Super-Resolution Effect ).
- NVAFX_CHAINED_EFFECT_DENOISER_16k_SUPERRES_16k_TO_48k
- Chained effect (Denoiser 16k + Superres 16k to 48k)
- NVAFX_CHAINED_EFFECT_DEREVERB_16k_SUPERRES_16k_TO_48k
- Chained effect (Dereverb 16k + Superres 16k to 48k)
- NVAFX_CHAINED_EFFECT_DEREVERB_DENOISER_16k_SUPERRES_16k_TO_48k
- Chained effect (Dereverb+Denoiser 16k + Superres 16k to 48k)
- NVAFX_CHAINED_EFFECT_SUPERRES_8k_TO_16k_DENOISER_16k
- Chained effect (Superres 8k to 16k + Denoiser 16k)
- NVAFX_CHAINED_EFFECT_SUPERRES_8k_TO_16k_DEREVERB_16k
- Chained effect (Superres 8k to 16k + Dereverb 16k)
- NVAFX_CHAINED_EFFECT_SUPERRES_8k_TO_16k_DEREVERB_DENOISER_16k
- Chained effect (Superres 8k to 16k + Dereverb+Denoiser 16k)
5.1.2. NvAFX_ParameterSelector
This type definition provides selector strings for audio effect parameters.
typedef const char* NvAFX_ParameterSelector;
The currently supported selectors are:
-
NVAFX_PARAM_MODEL_PATH: "model_path" - A character string that specifies the path to the model file for the audio effect.
-
NVAFX_PARAM_INPUT_SAMPLE_RATE: "input_sample_rate" - An unsigned integer that specifies the audio input sample rate for the audio effect.
-
NVAFX_PARAM_OUTPUT_SAMPLE_RATE: "output_sample_rate" - An unsigned integer that specifies the audio output sample rate for the audio effect.
- (Linux SDK only)
NVAFX_PARAM_NUM_SAMPLES_PER_INPUT_FRAME: "num_samples_per_input_frame" - An unsigned integer that specifies the number of samples per input frame per audio stream for the audio effect.
- (Windows SDK only)
NVAFX_PARAM_NUM_INPUT_SAMPLES_PER_FRAME: "num_input_samples_per_frame" - An unsigned integer that specifies the number of samples per input frame per audio stream for the audio effect.
- (Linux SDK only)
NVAFX_PARAM_NUM_SAMPLES_PER_OUTPUT_FRAME: "num_samples_per_output_frame" - An unsigned integer that specifies the number of samples per output frame per audio stream for the audio effect.
- (Windows SDK only)
NVAFX_PARAM_NUM_OUTPUT_SAMPLES_PER_FRAME: "num_output_samples_per_frame" - An unsigned integer that specifies the number of samples per output frame per audio stream for the audio effect.
-
NVAFX_PARAM_NUM_INPUT_CHANNELS: "num_input_channels" - An unsigned integer that specifies the number of audio channels for the audio effect.
-
NVAFX_PARAM_NUM_OUTPUT_CHANNELS: "num_output_channels" - An unsigned integer that specifies the number of output audio channels for the audio effect.
-
NVAFX_PARAM_NUM_STREAMS: "num_streams" - An unsigned integer that specifies the number of audio streams to be processed by the audio effect.
-
NVAFX_PARAM_INTENSITY_RATIO: "intensity_ratio" - A float value that specifies the factor that ranges from 0.0 to 1.0. Setting the factor to 0.0 is identical to a pass through, and a value of 1.0 provides the maximum possible impact of the effect.
- (Linux SDK only)
NVAFX_PARAM_ACTIVE_STREAMS: "active_streams" - A list of
NvAFX_Boolvalues that specify whether the corresponding stream is active. - (Linux SDK only)
NVAFX_PARAM_SUPPORTED_NUM_SAMPLES_PER_FRAME: "supported_num_samples_per_frame" - A list of U32 values that specifies the supported values for the number of samples per frame. This value can be queried before model load after the input sample rate is set.
-
NVAFX_PARAM_CHAINED_EFFECT_GPU_LIST - A list of U32 values specifying the GPUs to be used in chained effects. Each effect in the chain will use the corresponding GPU from the list.
- (Windows SDK Only)
NVAFX_PARAM_USER_CUDA_CONTEXT: "user_cuda_context" - An unsigned integer value that allows SDK users to disable the SDK internal context management. To disable the internal context management, set this value to 1. This value cannot be changed after the model is loaded for that particular session.
-
NVAFX_PARAM_DISABLE_CUDA_GRAPH : "disable_cuda_graph" - An unsigned integer value that specifies whether to enable CUDA graphs (enabled by default):
- To disable CUDA graphs, set this value to 1.
- To enable CUDA graphs, set this value to zero.
For more information about CUDA Graphs, refer to Getting Started with CUDA Graphs.
NVAFX_PARAM_USE_DEFAULT_GPU and NVAFX_PARAM_USER_CUDA_CONTEXT cannot be used at the same time.
The following selectors have been deprecated:
NVAFX_PARAM_NUM_CHANNELS: "num_channels"NVAFX_PARAM_SAMPLE_RATE: "sample_rate"NVAFX_PARAM_NUM_SAMPLES_PER_FRAME: "num_samples_per_frame"
5.1.3. NvAFX_Handle
An opaque handle that is associated with an instance of an audio effect.
typedef void* NvAFX_Handle;
5.1.4. NvAFX_Bool (Linux SDK Only)
This type definition is set to NVAFX_TRUE to represent true and NVAFX_FALSE to represent false.
typedef char NvAFX_Bool;
5.1.5. logging_cb_t (Linux SDK Only)
A callback function type that is used in the NvAFX_InitializeLogger API.
typedef void(*logging_cb_t)(LoggingSeverity level, const char* log, void* userdata);
LoggingSeverity (Linux SDK Only)
The levels of the LoggingSeverity that are used in the NvAFX_InitializeLogger API.
            typedef enum LoggingSeverity_t {
  LOG_LEVEL_ERROR,
  LOG_LEVEL_WARNING,
  LOG_LEVEL_INFO,
} LoggingSeverity
5.1.7. LoggingTarget (Linux SDK Only)
The logging target used in the NvAFX_InitializeLogger API.
            typedef enum LoggingTarget_t
{
  LOG_TARGET_NONE = 0x0,
  LOG_TARGET_STDERR = 0x1,
  LOG_TARGET_FILE = 0x2,
  LOG_TARGET_CALLBACK = 0x4,
} LoggingTarget;
5.2. Functions
This section provides information about the functions in the Audio Effects SDK.
5.2.1. NvAFX_GetEffectList
This function retrieves a list of supported audio effects.
            NvAFX_Status NvAFX_GetEffectList(
  int* num_effects,
  NvAFX_EffectSelector* effects[]
);
Parameters
- num_effects [out]
Type:int*Pointer to an integer that contains the number of effects returned.
- effects [out]
Type:NvAFX_EffectSelector* []Address to a list of effect selection strings that are supported by the SDK. This list is statically allocated by the SDK, so the caller should not allocate memory for this parameter or free it after use. Refer to
NvAFX_EffectSelectorfor more information about the selection strings.
Return Value
NVAFX_STATUS_SUCCESS on success.
Remarks
This function retrieves the list of audio effects that are supported by the SDK. The selection strings for the Audio Effects SDK are populated in the effects output parameter. The number of available effects are written to the num_effects output parameter.
5.2.2. NvAFX_CreateEffect
This function creates an audio effect instance.
            NvAFX_Status NvAFX_CreateEffect(
  NvAFX_EffectSelector code,
  NvAFX_Handle* effect
);
Parameters
- code [in]
Type:NvAFX_EffectSelectorThe selection string for the type of audio effect to be created. Refer to
NvAFX_EffectSelectorfor more information about the allowed selection strings.- effect [out]
Type:NvAFX_Handle*The pointer to the location where the handle to the newly created audio effect instance will be stored.
Return Value
NVAFX_STATUS_SUCCESS on success.
Remarks
This function creates an instance of the specified type of audio effect and returns the handle via this effect to the effect output parameter.
5.2.3. NvAFX_CreateChainedEffect
This function creates a chained effect instance.
            NvAFX_Status NvAFX_CreateChainedEffect(
  NvAFX_EffectSelector code,
  NvAFX_Handle* effect
);
Parameters
- code [in]
Type:NvAFX_EffectSelectorThe selection string for the type of chained audio effect to be created. Refer to
NvAFX_EffectSelectorfor more information about the allowed selection strings.- effect [out]
Type:NvAFX_Handle*The pointer to the location where the handle to the newly created chained audio effect instance will be stored.
Return Value
NVAFX_STATUS_SUCCESS on success.
Remarks
This function creates an instance of the specified type of chained audio effect and returns the handle to this effect instance by using the effect output parameter.
5.2.4. NvAFX_DestroyEffect
This function destroys an effect instance.
            NvAFX_Status NvAFX_DestroyEffect(
  NvAFX_Handle effect
);
Parameters
- effect [in]
Type:NvAFX_HandleThe handle to the audio effect instance to be destroyed.
Return Value
NVAFX_STATUS_SUCCESS on success.
Remarks
This function destroys the audio effect instance with the specified handle and frees all resources and memory that were used by that instance.
5.2.5. NvAFX_SetString
This function sets a string parameter of the specified effect.
            NvAFX_Status NvAFX_SetString(
  NvAFX_Handle effect,
  NvAFX_ParameterSelector param_name,
  const char* val
);
Parameters
- effect [in]
Type:NvAFX_HandleThe handle to the audio effect instance.
- param_name [in]
Type:NvAFX_ParameterSelectorRefer to Setting the Parameters of an Audio Effect for a list of the allowed options.
- val [in]
Type:char*Pointer to the character string to be set.
Return Value
NVAFX_STATUS_SUCCESS on success.
Remarks
This function sets the value of the specified character string parameter for the specified audio effect to the val parameter.
5.2.6. NvAFX_SetStringList
This function sets a string parameter of the specified effect.
            NvAFX_Status NvAFX_SetStringList(
  NvAFX_Handle effect,
  NvAFX_ParameterSelector param_name,
  const char** list, unsigned int list_size
);
Parameters
- effect [in]
Type:NvAFX_HandleThe handle to the audio effect instance.
- param_name [in]
Type:NvAFX_ParameterSelectorRefer to Setting the Parameters of an Audio Effect for a list of the allowed options.
- list[in]
Type:char**Pointer to the character array.
- list_size[in]
Type:unsigned intSize of the character array to be set.
Return Value
NVAFX_STATUS_SUCCESS on success.
Remarks
This function sets the value of the specified character string parameter for the specified audio effect to the val parameter.
5.2.7. NvAFX_SetU32
This function sets a UInt parameter of the specified effect.
            NvAFX_Status NvAFX_SetU32(
  NvAFX_Handle effect,
  NvAFX_ParameterSelector param_name,
  unsigned int val
);
Parameters
- effect [in]
Type:NvAFX_HandleThe handle to the audio effect.
- Param_name [in]
Type:NvAFX_ParameterSelectorRefer to Setting the Parameters of an Audio Effect for the list of allowed options.
Any other selector string returns an error.
Note:For the Linux SDK, the valid values for the
NVAFX_PARAM_NUM_SAMPLES_PER_INPUT_FRAMEsetting can be queried by using theNvAFX_GetU32List()function withNVAFX_PARAM_SUPPORTED_NUM_SAMPLES_PER_FRAMEas the selector.Setting any other value will result in an error.
- val [in]
Type:unsigned intValue to be set for the parameter.
Return Value
NVAFX_STATUS_SUCCESS on success.
Remarks
This function sets the value of the specified 32-bit unsigned integer parameter for the specified audio effect to the val parameter.
5.2.8. NvAFX_GetString
This function gets the current value of the set string parameter of the specified effect.
            NvAFX_Status NvAFX_GetString(
  NvAFX_Handle effect,
  NvAFX_ParameterSelector param_name,
  char* val,
  int max_length
);
Parameters
- effect [in]
Type:NvAFX_HandleThe handle to the audio effect instance.
- Param_name [in]
Type:NvAFX_ParameterSelectorRefer to Setting the Parameters of an Audio Effect for a list of the allowed options.
- val [out]
Type:char*The address of the buffer where the requested character string will be stored. This buffer must be allocated and freed by the caller.
- max_length [in]
Type:intThe length in bytes of the buffer that is specified by the
valparameter.
Return Value
NVAFX_STATUS_SUCCESS on success.
Remarks
This function gets the value of the character string parameter for the specified audio effect and writes the retrieved string to the buffer at the location specified by the val parameter.
5.2.9. NvAFX_GetU32
This function gets the value of a uint parameter of the specified effect.
            NvAFX_Status NvAFX_GetU32(
  NvAFX_Handle effect,
  NvAFX_ParameterSelector param_name,
  unsigned int* val
);
Parameters
- effect [in]
Type:NvAFX_HandleThe handle to the audio effect instance.
- param_name [in]
Type:NvAFX_ParameterSelectorRefer to Setting the Parameters of an Audio Effect for a list of the allowed options.
Note:Effect parameters, except for supported frame size list (Linux only), can be queried only after the effect is loaded. Querying parameters before model load might return invalid values, or the function might fail with an error code.
For the Linux SDK, although
NVAFX_PARAM_NUM_SAMPLES_PER_INPUT_FRAMEcan be queried by using this API to get the default number of samples per frame, you should useNvAFX_GetU32List()with theNVAFX_PARAM_SUPPORTED_NUM_SAMPLES_PER_FRAMEparameter to get the list of supported values.You can then use
NvAFX_SetU32()with theNVAFX_PARAM_NUM_SAMPLES_PER_FRAMEparameter to set the value.- val [out]
Type:unsigned int*The address of the buffer where the retrieved 32-bit unsigned integer parameter value will be written.
Return Value
NVAFX_STATUS_SUCCESS on success.
Remarks
This function gets the value of the specified 32-bit unsigned integer parameter for the specified audio effect and writes the retrieved value to the buffer that is specified by the val parameter.
5.2.10. NvAFX_GetU32List (Linux SDK Only)
This function gets the uint list parameter values for the specified effect.
            NvAFX_Status NvAFX_GetU32List(
  NvAFX_Handle effect,
  NvAFX_ParameterSelector param_name,
  unsigned int* list[],
  int* list_size
);
Parameters
- effect [in]
Type:NvAFX_HandleThe handle to the audio effect instance.
- param_name [in]
Type:NvAFX_ParameterSelectorThe following selector:
NVAFX_PARAM_SUPPORTED_NUM_SAMPLES_PER_FRAMEAny other selector string returns an error.
Note:Values returned for
NVAFX_PARAM_SUPPORTED_NUM_SAMPLES_PER_FRAMEas the selector depends on the sample rate. You must ensure thatNvAFX_SetU32()is called withNVAFX_PARAM_SAMPLE_RATEselector to set the sample rate before making this call.- list [out]
Type:unsigned int* []The address to a list that contains the 32-bit unsigned values for the given selector.
Note:The application needs to call this API with
list_sizeinitialized to zero, andlistset tonullptrto get the size of list to be allocated. The size will be returned inlist_sizeparameter. The application can then allocate an U32 array of at leastlist_sizeand call the API again with list pointing to the array. Refer to Creating an Audio Effect for an example.- list_size [out]
Type:int*Pointer to an integer that contains the number of values that were returned in the list.
Return Value
NVAFX_STATUS_SUCCESSon success.NVAFX_STATUS_OUTPUT_BUFFER_TOO_SMALLwhen thelist_sizeis less than the minimum required size of the list array.
Remarks
This function gets the list of 32-bit unsigned integer values for the specified audio effect, writes the retrieved values to a buffer specified by list and writes the size of the returned list in the buffer specified by list_size.
5.2.11. NvAFX_GetBoolList (Linux SDK only)
This function gets the uint list parameter values for the specified effect.
            NvAFX_Status NvAFX_GetBoolList(
  NvAFX_Handle effect,
  NvAFX_ParameterSelector param_name,
  NvAFX_Bool list*[]
  int* list_size
);
Parameters
- effect [in]
Type:NvAFX_HandleThe handle to the audio effect instance.
- param_name [in]
Type:NvAFX_ParameterSelectorThe following selector:
NVAFX_PARAM_VAD_RESULTAny other selector string returns an error.
- list [out]
Type:NvAFX_Bool* []The address to a list that contains the boolean values for the given selector.
Note:The application needs to call this API with
list_sizeinitialized to zero, andlistset tonullptrto get the size of list to be allocated. The size will be returned inlist_sizeparameter. The application can then allocate an array of at leastlist_sizeand call the API again withlistpointing to the array. Refer to Creating an Audio Effect for an example.- list_size [out]
Type:int*Pointer to an integer that contains the number of values that were returned in the list.
Return Value
NVAFX_STATUS_SUCCESSon success.NVAFX_STATUS_OUTPUT_BUFFER_TOO_SMALLwhen thelist_sizeis less than the minimum required size of thelistarray.
Remarks
This function gets the list of boolean values for the specified audio effect, writes the retrieved values to a buffer specified by list, and writes the size of the returned list in the buffer specified by list_size.
5.2.12. NvAFX_GetSupportedDevices (Windows SDK Only)
The function gets a list of compatible devices that are supported by the currently set model file.
            NvAFX_Status NvAFX_GetSupportedDevices(
  NvAFX_Handle effect,
  int *num,
  int *devices
);
Parameters
- effect [in]
Type:NvAFX_HandleThe handle to the audio effect instance to load.
- num [in, out]
Type:int*The size of the input array. If the call succeeds, this value will be set by the function.
- devices [in, out]
Type:int*Array of size
num. The function will fill the array with CUDA device indices of devices that are supported by the model in descending order of preference, where the first device is the most preferred device.
Return Value
NVAFX_STATUS_SUCCESS on success.
Remarks
This function gets the devices supported by the model.
5.2.13. NvAFX_Load
This function validates effect parameters and loads the specified effect.
            NvAFX_Status NvAFX_Load(
  NvAFX_Handle effect
);
Parameters
- effect [in]
Type:NvAFX_HandleThe handle to the audio effect instance to load.
Return Value
NVAFX_STATUS_SUCCESS on success.
Remarks
This function validates the parameters that are set for the effect and loads the specified audio effect.
5.2.14. NvAFX_Run
This function runs the specified effect.
            NvAFX_Status NvAFX_Run(
  NvAFX_Handle effect,
  const float** input,
  float** output,
  unsigned num_samples,
  unsigned num_channels
);
Parameters
- effect [in]
Type:NvAFX_HandleThe handle to the audio effect instance to run.
- input [in]
Type:const float**Pointer to a user-allocated array of buffers where each buffer holds the audio data for one channel. The size of the array must be equal to the number of input samples in the input frame (set via
NVAFX_PARAM_NUM_SAMPLES_PER_INPUT_FRAME) and multiplied by the number of streams for which the effect is configured (set viaNVAFX_PARAM_NUM_STREAMS, is always1for the Windows SDK).The number of channels must be equal to the value of the
NVAFX_PARAM_NUM_INPUT_CHANNELSparameter that was obtained by theNvAFX_GetU32()function. This value is 2 for the Acoustic Echo Cancellation effect and 1 for all other effects.The sample rate of the audio data must be equal to the sample rate that was preset for the effect. For example, for the Audio Effect, the sample rate must be equal to the value of the
NVAFX_PARAM_INPUT_SAMPLE_RATEparameter that was obtained by theNvAFX_GetU32()function.- output [out]
Type:float**Pointer to a user-allocated array of buffers to which the output of the effect will be written.
The size of the array must be equal to the number of output samples in frame (set via
NVAFX_PARAM_NUM_SAMPLES_PER_OUTPUT_FRAME) multiplied by the number of streams the effect is configured for (set viaNVAFX_PARAM_NUM_STREAMS).Note:The buffers must be allocated, and later freed, by the calling program.
Internally,
NvAFX_Runcopies the input/output to/from the GPU, so pinning input/output buffers does not have any effect.- num_samples [in]
Type:unsignedThe number of samples in the input buffer.
- num_channels [in]
Type:unsignedThe number of input channels.
Return Value
NVAFX_STATUS_SUCCESS on success.
Remarks
This function runs the specified audio effect by reading the contents of the input buffer, applying the audio effect, and writing the output to the output buffer.
5.2.15. NvAFX_Reset
This function resets the internal state and flushes the internal history for specified batches in the effect.
            NNvAFX_Status NvAFX_Reset(
  NvAFX_Handle effect
);
Linux SDK
            NvAFX_Status NvAFX_Reset(
  NvAFX_Handle effect,
  NvAFX_Bool* list,
  int length
);
Parameters
- effect [in]
Type:NvAFX_HandleThe handle to the audio effect instance to run.
- list [in] (Linux SDK Only)
Type:NvAFX_Bool *Pointer to a memory location that indicates the streams to be reset. The
i-th element in this array should be set toNVAFX_TRUEto reset thei-th stream and toNVAFX_FALSEotherwise.- length [in] (Linux SDK Only)
Type:intNumber of elements in the array specified. The value should be equal to the number of streams (batches).
Return Value
NVAFX_STATUS_SUCCESS on success.
Remarks
Allows the state of an effect to be reset.
5.2.16. NvAFX_SetBoolList (Linux SDK Only)
This function sets a list parameter of the specified effect.
            NvAFX_Status NvAFX_SetBoolList(
  NvAFX_Handle effect,
  NvAFX_ParameterSelector param_name,
  const NvAFX_Bool* list,
  unsigned int list_size
);
Parameters
- effect [in]
Type:NvAFX_HandleThe handle to the audio effect.
- Param_name [in]
Type:NvAFX_ParameterSelectorThe following:
NVAFX_PARAM_ACTIVE_STREAMSAny other selector string returns an error.
- list [in]
Type:NvAFX_Bool*Array of Boolean values to be set for the parameter.
- list_size [in]
Type:unsigned intSize of the Boolean array that was passed as the input.
Return Value
NVAFX_STATUS_SUCCESS on success.
Remarks
This function sets the boolean values of the list parameter for the specified audio effect to the values from list.
5.2.17. NvAFX_SetU32List (Linux SDK only)
This function sets a list parameter of the specified effect.
            NvAFX_Status NvAFX_SetU32List(
  NvAFX_Handle effect,
  NvAFX_ParameterSelector param_name,
  const unsigned int* list,
  unsigned int list_size
);
Parameters
- effect [in]
Type:NvAFX_HandleThe handle to the audio effect.
- Param_name [in]
Type:NvAFX_ParameterSelectorThe following:
NVAFX_PARAM_CHAINED_EFFECT_GPU_LISTAny other selector string returns an error.
- list [in]
Type:unsigned int*Array of U32 values to be set for the parameter.
- list_size [in]
Type:unsigned intSize of the array that was passed as the input.
Return Value
NVAFX_STATUS_SUCCESS on success.
Remarks
This function sets the U32 values of the list parameter for the specified audio effect to the values from list.
5.2.18. NvAFX_InitializeLogger (Linux SDK Only)
This function initializes the SDK logger.
            NvAFX_Status NvAFX_InitializeLogger(
  LoggingSeverity level,
  int target,
  const char *filename,
  logging_cb_t cb,
  void* userdata
);
Parameters
- level [in]
Type:LoggingSeverityThe logging level to enable. When you enable a level, it includes the levels before the current level. For example,
LOG_LEVEL_INFOalso includesLOG_LEVEL_WARNINGandLOG_LEVEL_ERROR.The following levels can be used:
LOG_LEVEL_ERRORLOG_LEVEL_WARNINGLOG_LEVEL_INFO
- Target [in]
Type:intLogging targets to write logs to
LoggingTargetcan be binary OR'd to enable multiple targets.The following targets can be used:
LOG_TARGET_NONE = 0x0LOG_TARGET_STDERR = 0x1LOG_LEVEL_FILE = 0x2LOG_LEVEL_CALLBACK = 0x4
- filename [in]
Type:const char*The path of the file to write logs. This parameter is used only when
LOG_TARGET_FILEis enabled.Note:The directory in which the log file resides should exist. For example, if the filename is
/foo/bar/log.txt, the/foo/bardirectory must already exist. If thelog.txtfile exists, it will be overwritten.- cb [in]
Type:const char *Callback to use if
LOG_TARGET_CALLBACKis enabled. A null value can be passed when not using a callback target.- userdata [in]
Type:void *Data passed back with log callback and is used only when
LOG_TARGET_CALLBACKis enabled.A null value can also be passed.
Return Value
NVAFX_STATUS_SUCCESS on success.
Remarks
This API enables logging in the SDK. Depending on the flags that were passed, logs are redirected to stderr, a file, or a callback. Logging can be disabled by using the NvAFX_UninitializeLogger API.
5.2.19. NvAFX_UninitializeLogger (Linux SDK Only)
This function uninitializes the SDK logger.
NvAFX_Status NvAFX_UninitializeLogger(void);
Parameters
NvAFX_UninitializeLogger requires no parameters.
Return Value
NVAFX_STATUS_SUCCESS on success.
Remarks
This API disables all logging targets. Logging can be started again by using the NvAFX_InitializeLogger API.
5.3. Return Codes
The NvAFX_Status enumeration defines the following values that the Audio Effects functions might return to indicate an error or success:
- NVAFX_STATUS_SUCCESS
- Successful execution.
- NVAFX_STATUS_FAILED
- Generic error code, which indicates that the function failed to execute for an unspecified reason.
- NVAFX_STATUS_INVALID_HANDLE
- An invalid effect handle has been supplied.
- NVAFX_STATUS_INVALID_PARAM
- An invalid parameter value has been supplied for this combination of effect and selector string.
- NVAFX_STATUS_IMMUTABLE_PARAM
- User tried to modify an immutable parameter.
- NVAFX_STATUS_INSUFFICIENT_DATA
- There is insufficient data to process.
- NVAFX_STATUS_EFFECT_NOT_AVAILABLE
- The specified effect is not supported.
- NVAFX_STATUS_OUTPUT_BUFFER_TOO_SMALL
- The output buffer length is too small to hold the requested data.
- NVAFX_STATUS_MODEL_LOAD_FAILED
- The specified model file cannot be loaded.
- NVAFX_STATUS_MODEL_NOT_LOADED
- Model is not loaded, and it has to be loaded for this operation.
- NVAFX_STATUS_INCOMPATIBLE_MODEL
- Selected model is incompatible.
- NVAFX_STATUS_GPU_UNSUPPORTED
- The GPU is unsupported. Audio effects SDK requires Turing or later GPU with Tensor cores.
- NVAFX_STATUS_NO_SUPPORTED_GPU_FOUND
- No supported GPU found on the system.
- NVAFX_STATUS_WRONG_GPU
- Current GPU is not the one selected.
- NVAFX_STATUS_CUDA_ERROR
- CUDA operation failure.
- NVAFX_STATUS_INVALID_OPERATION
- Invalid operation performed.
Notice
This document is provided for information purposes only and shall not be regarded as a warranty of a certain functionality, condition, or quality of a product. NVIDIA Corporation (“NVIDIA”) makes no representations or warranties, expressed or implied, as to the accuracy or completeness of the information contained in this document and assumes no responsibility for any errors contained herein. NVIDIA shall have no liability for the consequences or use of such information or for any infringement of patents or other rights of third parties that may result from its use. This document is not a commitment to develop, release, or deliver any Material (defined below), code, or functionality.
NVIDIA reserves the right to make corrections, modifications, enhancements, improvements, and any other changes to this document, at any time without notice.
Customer should obtain the latest relevant information before placing orders and should verify that such information is current and complete.
NVIDIA products are sold subject to the NVIDIA standard terms and conditions of sale supplied at the time of order acknowledgement, unless otherwise agreed in an individual sales agreement signed by authorized representatives of NVIDIA and customer (“Terms of Sale”). NVIDIA hereby expressly objects to applying any customer general terms and conditions with regards to the purchase of the NVIDIA product referenced in this document. No contractual obligations are formed either directly or indirectly by this document.
NVIDIA products are not designed, authorized, or warranted to be suitable for use in medical, military, aircraft, space, or life support equipment, nor in applications where failure or malfunction of the NVIDIA product can reasonably be expected to result in personal injury, death, or property or environmental damage. NVIDIA accepts no liability for inclusion and/or use of NVIDIA products in such equipment or applications and therefore such inclusion and/or use is at customer’s own risk.
NVIDIA makes no representation or warranty that products based on this document will be suitable for any specified use. Testing of all parameters of each product is not necessarily performed by NVIDIA. It is customer’s sole responsibility to evaluate and determine the applicability of any information contained in this document, ensure the product is suitable and fit for the application planned by customer, and perform the necessary testing for the application in order to avoid a default of the application or the product. Weaknesses in customer’s product designs may affect the quality and reliability of the NVIDIA product and may result in additional or different conditions and/or requirements beyond those contained in this document. NVIDIA accepts no liability related to any default, damage, costs, or problem which may be based on or attributable to: (i) the use of the NVIDIA product in any manner that is contrary to this document or (ii) customer product designs.
No license, either expressed or implied, is granted under any NVIDIA patent right, copyright, or other NVIDIA intellectual property right under this document. Information published by NVIDIA regarding third-party products or services does not constitute a license from NVIDIA to use such products or services or a warranty or endorsement thereof. Use of such information may require a license from a third party under the patents or other intellectual property rights of the third party, or a license from NVIDIA under the patents or other intellectual property rights of NVIDIA.
Reproduction of information in this document is permissible only if approved in advance by NVIDIA in writing, reproduced without alteration and in full compliance with all applicable export laws and regulations, and accompanied by all associated conditions, limitations, and notices.
THIS DOCUMENT AND ALL NVIDIA DESIGN SPECIFICATIONS, REFERENCE BOARDS, FILES, DRAWINGS, DIAGNOSTICS, LISTS, AND OTHER DOCUMENTS (TOGETHER AND SEPARATELY, “MATERIALS”) ARE BEING PROVIDED “AS IS.” NVIDIA MAKES NO WARRANTIES, EXPRESSED, IMPLIED, STATUTORY, OR OTHERWISE WITH RESPECT TO THE MATERIALS, AND EXPRESSLY DISCLAIMS ALL IMPLIED WARRANTIES OF NONINFRINGEMENT, MERCHANTABILITY, AND FITNESS FOR A PARTICULAR PURPOSE. TO THE EXTENT NOT PROHIBITED BY LAW, IN NO EVENT WILL NVIDIA BE LIABLE FOR ANY DAMAGES, INCLUDING WITHOUT LIMITATION ANY DIRECT, INDIRECT, SPECIAL, INCIDENTAL, PUNITIVE, OR CONSEQUENTIAL DAMAGES, HOWEVER CAUSED AND REGARDLESS OF THE THEORY OF LIABILITY, ARISING OUT OF ANY USE OF THIS DOCUMENT, EVEN IF NVIDIA HAS BEEN ADVISED OF THE POSSIBILITY OF SUCH DAMAGES. Notwithstanding any damages that customer might incur for any reason whatsoever, NVIDIA’s aggregate and cumulative liability towards customer for the products described herein shall be limited in accordance with the Terms of Sale for the product.
VESA DisplayPort
DisplayPort and DisplayPort Compliance Logo, DisplayPort Compliance Logo for Dual-mode Sources, and DisplayPort Compliance Logo for Active Cables are trademarks owned by the Video Electronics Standards Association in the United States and other countries.
HDMI
HDMI, the HDMI logo, and High-Definition Multimedia Interface are trademarks or registered trademarks of HDMI Licensing LLC.
OpenCL
OpenCL is a trademark of Apple Inc. used under license to the Khronos Group Inc.
Trademarks
NVIDIA, the NVIDIA logo, and cuBLAS, CUDA, CUDA Toolkit, cuDNN, DALI, DIGITS, DGX, DGX-1, DGX-2, DGX Station, DLProf, GPU, JetPack, Jetson, Kepler, Maxwell, NCCL, Nsight Compute, Nsight Systems, NVCaffe, NVIDIA Ampere GPU architecture, NVIDIA Deep Learning SDK, NVIDIA Developer Program, NVIDIA GPU Cloud, NVLink, NVSHMEM, PerfWorks, Pascal, SDK Manager, T4, Tegra, TensorRT, TensorRT Inference Server, Tesla, TF-TRT, Triton Inference Server, Turing, and Volta are trademarks and/or registered trademarks of NVIDIA Corporation in the United States and other countries. Other company and product names may be trademarks of the respective companies with which they are associated.