5. CLI/API Setup Guide#
In this section, we provide guidance for more advanced usage of your NVIDIA DGX Cloud Create cluster via CLI and API.
5.1. Accessing the NVIDIA Run:ai CLI#
Once you have logged into the cluster via the NVIDIA Run:ai UI, you can set up and log in via the CLI.
DGX Cloud Create provides a CLI for Linux, Mac, and Windows systems. Only Administrators and users with a Researcher role (L1 researchers, Research Managers, and L2 researchers) are able to use the NVIDIA Run:ai CLI.
5.1.1. CLI Prerequisites#
Before setting up the NVIDIA Run:ai CLI, you must have the kubeconfig file provided by NVIDIA or by your cluster administrator.
Important
For customer cluster administrators, use the kubeconfig file provided by your TAM during the cluster handover. It is recommended that you make a copy and store this original file safely, as the NVIDIA Run:ai CLI will modify your kubeconfig during setup. Do not use the original file directly but keep it separate. For users, use the kubeconfig file provided by your customer cluster administrator.
You will also need the kubectl CLI tool installed. Navigate to the kubectl download instructions and follow the correct instructions for your operating system if kubectl is not already installed.
Once kubectl is installed on your system, you can proceed with setup. There are two stages to the setup process:
Downloading the NVIDIA Run:ai CLI.
Setting up your kubeconfig file.
Follow the instructions for each stage in the sections below.
5.1.2. Downloading the NVIDIA Run:ai CLI#
After logging into the NVIDIA Run:ai UI, click the Help icon (?) at the top right corner. This will reveal a drop-down menu.
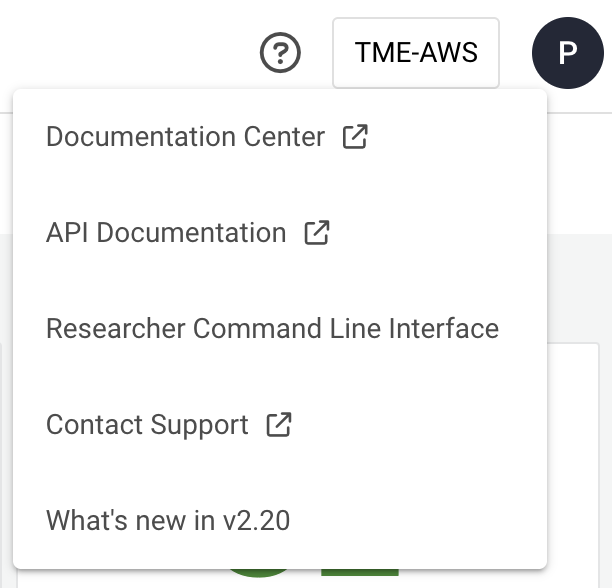
Select Researcher Command Line Interface from the menu. This will load a pop-up menu.

Note
If the Researcher Command Line Interface option is not available, it means your user roles do not permit you to use the CLI. Contact your cluster administrator for assistance.
Select your operating system and download the installer file by running the lines of code given in a terminal on your machine.
If you are working on Linux or a Mac:
Set the executable bit and place the executable in a typical
$PATHlocation. For example:chmod +x ./runai sudo cp ./runai /usr/local/bin
If you are working on a Windows system:
You need to rename the downloaded file to have a
.exeextension and move it to a folder in the$PATH$.
Note
The clients are currently not signed or known to platforms with Privacy and Security settings. You may have to explicitly go to those settings first in order to allow the CLI to run.
5.1.3. Setting up Your Kubernetes Configuration File#
You will be given your kubeconfig file by your NVIDIA TAM during cluster onboarding (if you are the cluster admin) or by your cluster admin (if you are a user of the cluster). This file is specific to your DGX Cloud Create cluster, and should not be amended.
To set up your Kubernetes configuration file:
Create a directory named .kube in the home folder on the system where you installed the CLI.
Save the config file as
configwithin the .kube folder you just created. Your file should now be located at~/.kube/config. Alternatively, set theKUBECONFIGenvironment variable to whatever location you choose by runningexport KUBECONFIG=</path/to/runai/config>.From a terminal window, use the NVIDIA Run:ai client to login by typing
runai login. If successful, the CLI will show a link you must follow. Open this link in a new browser. You will be taken to the NVIDIA Run:ai Login page in the browser.Click the CONTINUE WITH SSO button and log in.
Once logged in you will see a message saying
You were authenticated and can now go back to the CLI. If successful you should receive the messageAuthentication was successfulin the terminal.Execute
runai kubeconfig setin the shell to retrieve the OIDC token needed for theKUBECONFIGfile. If successful you should seeKubeconfig token set successfully.Test the connection by running
kubectl get nodes. You should see the set of nodes available on the cluster, as well as their status.
For full details on how to use the NVIDIA Run:ai CLI, visit the NVIDIA Run:ai CLI Documentation.
5.2. Kubernetes Usage for Researchers#
NVIDIA Run:ai provides AI job scheduling, networking, and storage constructs above Kubernetes which is the predominant container orchestration platform in use today. The Kubernetes platform provides the scalability and resiliency required for various different types of workloads including the interactive workloads (notebooks) and distributed training jobs offered by NVIDIA Run:ai.
This guide cannot provide an exhaustive explanation of the various topics related to Kubernetes and the Kubernetes ecosystem. However, it is important to recognize that since NVIDIA Run:ai is based on Kubernetes it affords the ability to interact with the Kubernetes cluster through the cluster API. Thus, there are many actions that can be taken in a Researcher namespace without using the NVIDIA Run:ai UI or CLI.
Let’s assume that a project was created in the UI named demo-project. That project would be visible via the Kubernetes API as a namespace called runai-demo-project. This would be an example of a Researcher project namespace. The Researcher config will enable us to create Kubernetes resources in that namespace.
kubectl config set-context --current --namespace=runai-demo-project
Once the target namespace is identified, it is possible to create Kubernetes resources in it, such as a PersistentVolumeClaim (PVC) for example. This PVC is essentially
a fundamental Kubernetes storage resource that defines a file system to be mounted to a job (pod). This PVC resource can be expressed as YAML and applied to the Researcher
namespace using the Kubernetes kubectl CLI tool.
 1    apiVersion: v1
 2    kind: PersistentVolumeClaim
 3    metadata:
 4      name: demo-claim
 5      namespace: runai-demo-project
 6    spec:
 7      storageClassName: dgxc-enterprise-file
 8      accessModes:
 9       - ReadWriteMany
10      resources:
11       requests:
12        storage: 100Gi
This YAML could be applied like this:
kubectl apply -n runai-demo-project -f demo-claim.yaml
5.3. Advanced Kubernetes Usage for Admins#
If you are a cluster admin, NVIDIA can assign additional cluster roles to your user to access more of the Kubernetes cluster both within and outside of project namespaces. This can be used for deploying many third-party MLOps tools, Helm charts, operators, and so on, to the cluster for use in AI solutions in addition to NVIDIA Run:ai. However, system resources and components already deployed prior to onboarding cannot be modified in order to preserve the security and stability of the cluster.
The cluster role that can be assigned is the following:
kubectl edit clusterrolebindings dgxc-customer-app-admin-access
Once assigned first by NVIDIA to the cluster admin, the cluster admin has permissions to bind additional admin users to this dgxc-customer-app-admin-access
cluster role binding. To bind additional users, add the following code block inside the editor to assign users to this cluster role binding:
- apiGroup: rbac.authorization.k8s.io
  kind: User
  name: sally@acme.com
This cluster role grants the following permissions to the user:
Resource |
dgxc-customer-app-admin-access ClusterRole |
Application Administrator/L1 Researcher |
|---|---|---|
accessrules |
get list create update patch delete |
none |
bindings |
* |
none |
clusterpolicies |
get list create update patch delete |
none |
clusterrolebindings |
get list create update patch delete |
none |
clusterroles |
get list create update patch delete |
none |
clusters |
create delete deletecollection get list patch update watch |
none |
componentstatuses |
* |
none |
configmaps |
get list create update patch delete |
none |
controllerrevisions |
get list create update patch delete |
none |
cronjobs |
get list create update patch delete |
none |
customresourcedefinitions |
get list create update patch delete |
none |
daemonsets |
get list create update patch delete |
none |
datavolumes |
get list |
none |
departments |
get list |
none |
deployments |
get list create update patch delete |
get list create update patch delete |
distributedpolicies |
get list create update patch delete |
none |
distributedworkloads |
get list create update patch delete |
get list create update patch delete |
endpoints |
get list create update patch delete |
get list |
endpointslices |
get list |
get list |
events |
get list create update patch delete |
get list |
eventsources |
get list create update patch delete |
none |
horizontalpodautoscalers |
get list create update patch delete |
none |
inferencepolicies |
get list create update patch delete |
none |
inferenceworkloads |
get list create update patch delete |
get list create update patch delete |
ingressclasses |
get list create update patch delete |
none |
ingresses |
get list create update patch delete |
none |
interactivepolicies |
get list create update patch delete |
none |
interactiveworkloads |
get list create update patch delete |
none |
jobs |
get list create update patch delete |
get list create update patch delete |
leases |
get list create update patch delete |
none |
limitranges |
* |
none |
localsubjectaccessreviews |
get list create update patch delete |
none |
mpijobs |
get list create update patch delete |
get list create update patch delete |
namespaces |
get list create update patch delete |
get list |
networkpolicies |
get list create update patch delete |
none |
nodepools |
get list |
get list |
nodes |
get list |
get list |
nvstoragelocations |
get list create update patch delete |
none |
persistentvolumeclaims |
get list create update patch delete |
get list create update patch delete |
persistentvolumes |
get list |
none |
poddisruptionbudgets |
get list create update patch delete |
none |
pods |
get list create update patch delete |
get list create update patch delete |
podtemplates |
* |
none |
priorityclasses |
get list create update patch delete |
none |
projects |
get list |
get list |
pytorchjobs |
get list create update patch delete |
get list create update patch delete |
replicasets |
get list create update patch delete |
get list create update patch delete |
replicationcontrollers |
* |
none |
resourcequotas |
* |
none |
revisions |
get list create update patch delete |
none |
rolebindings |
get list create update patch delete |
none |
roles |
get list create update patch delete |
none |
runaidgxclogexporters |
get list create update patch delete |
none |
runaidgxcnetworkpolicies |
get list create update patch delete |
none |
runaidgxcstorages |
get list create update patch delete |
none |
runaijobs |
get list create update patch delete |
get list create update patch delete |
secrets |
get list create update patch delete |
get list create update patch delete |
selfsubjectaccessreviews |
get list create update patch delete |
none |
selfsubjectreviews |
get list create update patch delete |
none |
selfsubjectrulesreviews |
get list create update patch delete |
none |
serviceaccounts |
get list create update patch delete |
none |
services |
get list create update patch delete |
get list create update patch delete |
statefulsets |
get list create update patch delete |
get list create update patch delete |
storageclasses |
get list |
get list |
subjectaccessreviews |
get list create update patch delete |
none |
tfjobs |
get list create update patch delete |
get list create update patch delete |
tokenreviews |
get list create update patch delete |
none |
trainingpolicies |
get list create update patch delete |
none |
trainingworkloads |
get list create update patch delete |
get list create update patch delete |
xgboostjobs |
get list create update patch delete |
get list create update patch delete |
5.4. Setting up the NVIDIA Run:ai REST API on DGX Cloud Create#
Follow these steps to create an Application and use that Application to generate an API token to programmatically call the NVIDIA Run:ai API on your DGX Cloud Create cluster.
Important
Only users with the role of Application Administrator can create and manage Applications.
Log in to NVIDIA Run:ai by opening your web browser and navigating to the NVIDIA Run:ai login page (e.g.,
https://<customer>.nv.run.ai), and clicking CONTINUE WITH SSO.Access the Applications section in the UI by first clicking on Access on the left-hand navigation panel, then clicking on Applications.
Create a new application by following the steps below.
Click NEW APPLICATION.
Enter an application name.
Click CREATE.
Make sure to note down your
Client IDandClient secret. You will need these for the next steps.
Once an application has been created, use the
Client IDandClient secretfrom the previous step to generate your API token by following the steps below.Open your terminal or command prompt.
Use the following command to request an API token. Replace
<runai_url>with the URL of your NVIDIA Run:ai UI in your browser (e.g.,https://<customer>.nv.run.ai), andYour_Client_IDandYour_Client_Secretwith the values you saved earlier:curl -X POST \ 'https://<runai_url>/api/v1/token' \ --header 'Accept: */*' \ --header 'Content-Type: application/json' \ --data-raw '{ "grantType":"app_token", "AppId":"Your_Client_ID", "AppSecret" : "Your_Client_Secret" }'
After executing the
curlcommand, the response payload will contain two tokens. You need theaccessTokenfrom the response. This is the token you will use for authorization. Below is an example of thecurlresponse:{"accessToken":"ey……….Qvg","idToken":"ey….JrA"}
Note
You may need to refresh your API token periodically as it expires.
To use the idToken in your API requests, you can set it as a Bearer Token. If you are using Postman, add it to the request header. For command-line operations, you can set it as an environment variable:
export BEARER_TOKEN="YOUR_idToken"
You can verify that the token is set correctly by running:
echo $BEARER_TOKEN
This should display your token in the terminal.
Now, you can call the CLUSTER GET API using the following
curlcommand:curl -X GET --location 'https://nvidia.run.ai/api/v1/clusters' \ --header "Authorization: Bearer $BEARER_TOKEN"
This command will retrieve information about the clusters.
The response will be in JSON format. For example, you might see output similar to:
[{"uuid":"...","createdAt":"2025-02-27T17:20:07.007Z"}]