Getting Started with DGX Station A100#
This section provides information about how to connect and power on the DGX Station A100.
Connecting and Powering on the DGX Station A100#
To complete this task you need the following items, which are not supplied with the DGX Station A100:
Mini DisplayPort 1.2 to DisplayPort.
USB keyboard
USB mouse
Ethernet cable
Connect a display to any DisplayPort connector and a keyboard and mouse to any two USB ports.
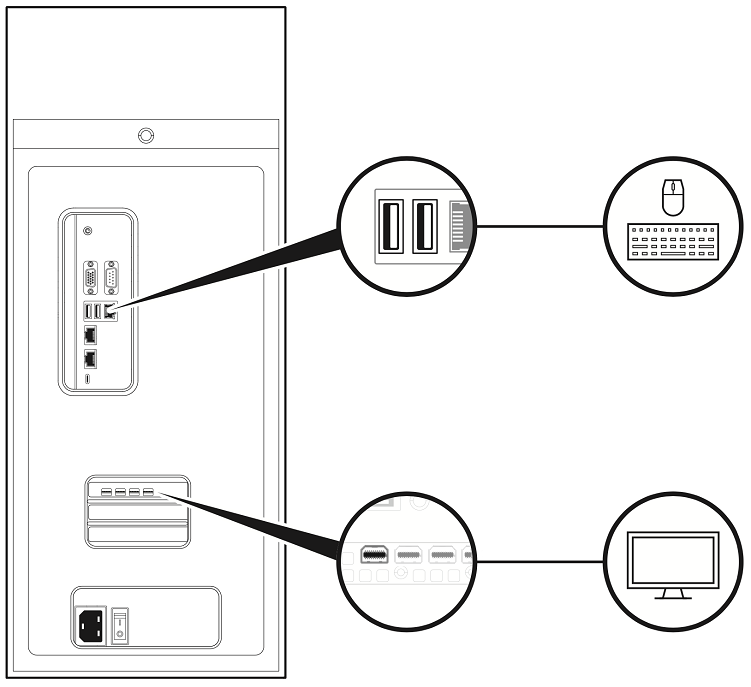
Note
For initial setup, connect only one display to the DGX Station A100. After you complete the initial Ubuntu OS configuration, you can configure the DGX Station A100 to use multiple displays. Refer to the NVDIA DGX OS 5 User Guide for more information.
Use any of the two Ethernet ports to connect the DGX Station A100 to your LAN with Internet connectivity.
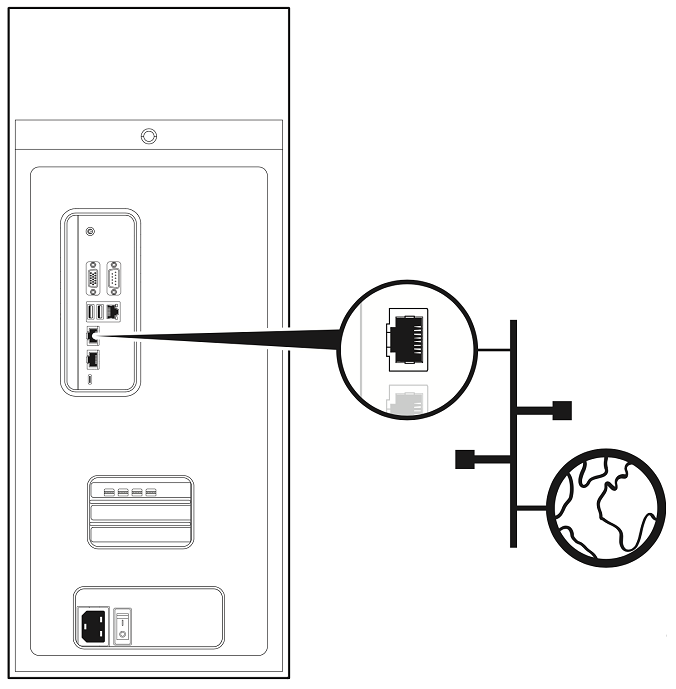
Note
Remember the following information:
Connect only one Ethernet port on the DGX Station A100 to the Internet unless you plan to configure the ports manually and disable DHCP on at least one of the ports.
By default, both Ethernet ports on the DGX Station A100 are configured for DHCP. If both the ports are connected simultaneously, each port will get its own IP address. The IP address that the Linux operating system (OS) uses will then alternate between these addresses, causing the OS and applications to malfunction.
Important
After you boot the system and run through the initial configuration, do not edit the Network Manager Configuration file.
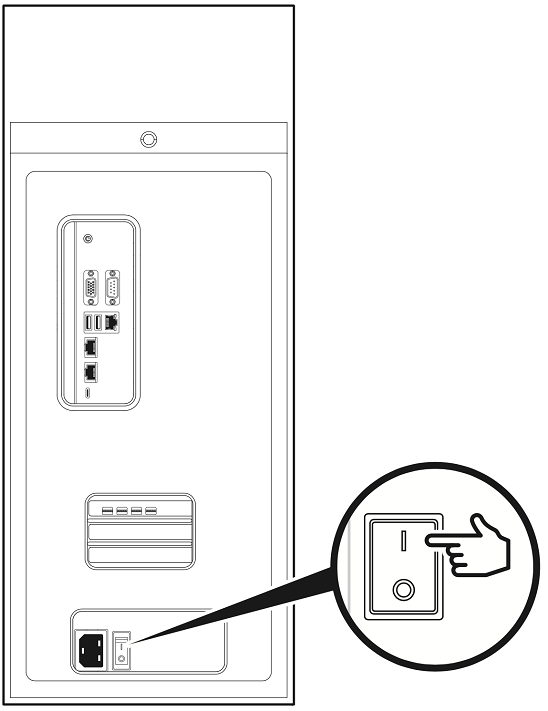
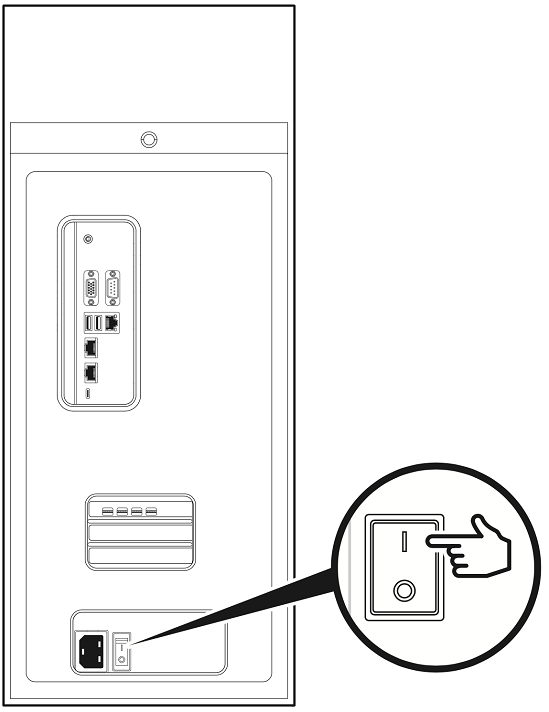
Make sure that the power supply rocker switch is in the OFF position.
Connect the supplied power cable from the power socket at the back of the unit to an appropriately rated, grounded AC outlet.
For details of the power consumption, input voltage, and current rating of the DGX Station A100, see Power Specifications.
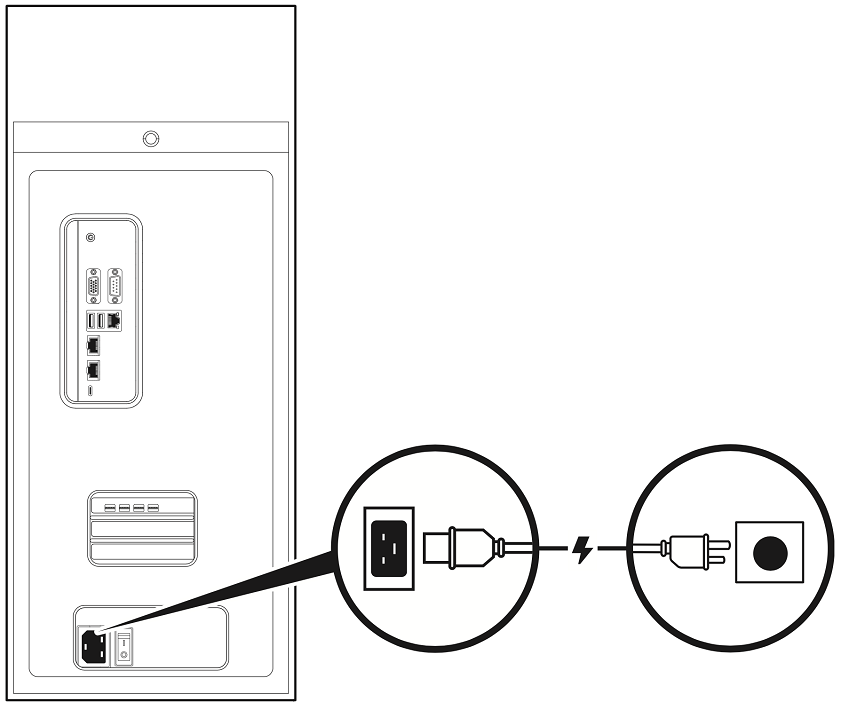
Note
The power source for DGX Station A100 must be 100V and cannot fall below 90V.
Caution
Remember the following information:
Use only the supplied power cable and do not use this power cable with any other products or for any other purpose. Not all power cables have the same current ratings.
Do not use household extension cables with your product. Household extension cables do not have overload protection and are not intended for use with computer systems.
Connect the display to a suitable AC outlet and power on the display.
Move the DGX Station A100 power supply rocker switch to the ON position.
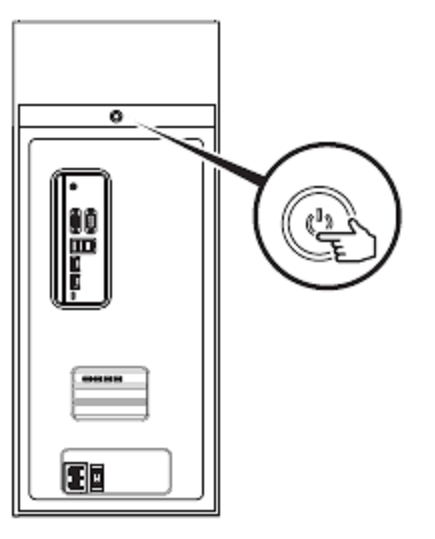
Push the Power button on the front of the unit to power on the DGX Station A100.
Using DGX Station A100 as a Server Without a Monitor#
By default, DGX Station A100 is shipped with the DP port automatically selected in the display.
To enter the SBIOS setup, see Configuring a BMC Static IP Address Using the System BIOS.
If you plan to use DGX Station A100 as a desktop system, use the information in this user guide to get started.
You do not need to make changes to the SBIOS.
If you plan to use it as a server without a monitor, after the machine has booted in the Desktop GUI, the BMC remote console will not show a display.
In this case, return to the BIOS, and complete the following steps.
Important
If you do not change your SBIOS settings, after the machine has booted in the Desktop GUI, the BMC remote console will not show a display.
To change your SBIOS settings:
Tip
The SBIOS screen will show up on any monitor that is connected to the DP port, the VGA port, or the BMC remote console.
In the setup utility, click the Advanced tab.
Select Chipset Configuration.
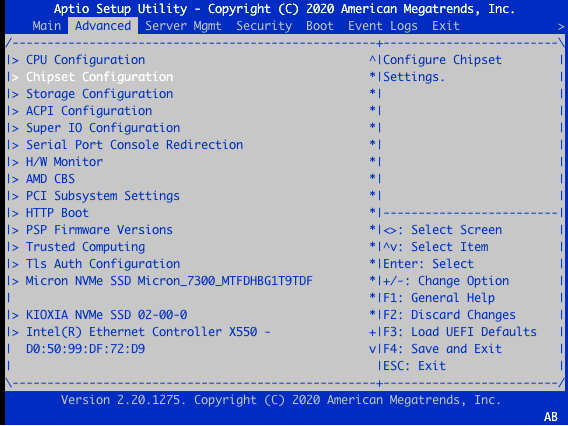
In the OnBrd/Ext VGA Select dialog box, select Onboard.

To save and exit, press F4.
Running Workloads on Systems with Mixed Types of GPUs#
The DGX Station A100 comes equipped with four high performance NVIDIA A100 GPUs and one DGX Display GPU. The NVIDIA A100 GPU is used to run high performance and AI workloads, and the DGX Display card is used to drive a high-quality display on a monitor.
When running applications on this system, it is important to identify the best method to launch applications and workloads to make sure the high performance NVIDIA A100 GPUs are used. You can achieve this in one of the following ways:
When you log into the system and check which GPUs are available, you find the following:
lab@ro-dvt-058-80gb:~$ nvidia-smi -L
GPU 0: Graphics Device (UUID: GPU-269d95f8-328a-08a7-5985-ab09e6e2b751)
GPU 1: Graphics Device (UUID: GPU-0f2dff15-7c85-4320-da52-d3d54755d182)
GPU 2: Graphics Device (UUID: GPU-dc598de6-dd4d-2f43-549f-f7b4847865a5)
GPU 3: DGX Display (UUID: GPU-91b9d8c8-e2b9-6264-99e0-b47351964c52)
GPU 4: Graphics Device (UUID: GPU-e32263f2-ae07-f1db-37dc-17d1169b09bf)
A total of five GPUs are listed by nvidia-smi. This is because nvidia-smi is including the DGX Display GPU that is used to drive the monitor and high-quality graphics output.
When running an application or workload, the DGX Display GPU can get in the way because it does not have direct NVlink connectivity, sufficient memory, or the performance characteristics of the NVIDIA A100 GPUs that are installed on the system. As a result you should ensure that the correct GPUs are being used.
Running with Docker Containers#
On the DGX OS, because Docker has already been configured to identify the high performance NVIDIA A100 GPUs and assign them to the container, this method is the simplest method.
A simple test is to run a small container with the --gpus all flag in the command and once in the container that is running nvidia-smi. The output shows that only the high-performance GPUs are available to the container:
lab@ro-dvt-058-80gb:~$ docker run --gpus all --rm -it ubuntu nvidia-smi -L
GPU 0: Graphics Device (UUID: GPU-269d95f8-328a-08a7-5985-ab09e6e2b751)
GPU 1: Graphics Device (UUID: GPU-0f2dff15-7c85-4320-da52-d3d54755d182)
GPU 2: Graphics Device (UUID: GPU-dc598de6-dd4d-2f43-549f-f7b4847865a5)
GPU 3: Graphics Device (UUID: GPU-e32263f2-ae07-f1db-37dc-17d1169b09bf)
This step will also work when the --gpus n flag is used, where n can be 1, 2, 3, or 4. These values represent the number of GPUs that should be assigned to that container. For example:
lab@ro-dvt-058-80gb:~ $ docker run --gpus 2 --rm -it ubuntu nvidia-smi -L
GPU 0: Graphics Device (UUID: GPU-269d95f8-328a-08a7-5985-ab09e6e2b751)
GPU 1: Graphics Device (UUID: GPU-0f2dff15-7c85-4320-da52-d3d54755d182)
In this example, Docker selected the first two GPUs to run the container, but if the device option is used, you can specify which GPUs to use:
lab@ro-dvt-058-80gb:~$ docker run --gpus '"device=GPU-dc598de6-dd4d-2f43-549f-f7b4847865a5,GPU-e32263f2-ae07-f1db-37dc-17d1169b09bf"' --rm -it ubuntu nvidia-smi -L
GPU 0: Graphics Device (UUID: GPU-dc598de6-dd4d-2f43-549f-f7b4847865a5)
GPU 1: Graphics Device (UUID: GPU-e32263f2-ae07-f1db-37dc-17d1169b09bf)
In this example, the two GPUs that were not used earlier are now assigned to run on the container.
Running on Bare Metal#
To run applications by using the four high performance GPUs, the CUDA_VISIBLE_DEVICES variable must be specified before you run the application.
Note
This method does not use containers.
CUDA orders the GPUs by performance, so GPU 0 will be the highest performing GPU, and the last GPU will be the slowest GPU.
Important
If the CUDA_DEVICE_ORDER variable is set to PCI_BUS_ID, this ordering will be overridden.
In the following example, a CUDA application that comes with CUDA samples is run. In the output, GPU 0 is the fastest in a DGX Station A100, and GPU 4 (DGX Display GPU) is the slowest:
lab@ro-dvt-058-80gb:~$ sudo apt install cuda-samples-11-2
lab@ro-dvt-058-80gb:~$ cd /usr/local/cuda-11.2/samples/1_Utilities/p2pBandwidthLatencyTest
lab@ro-dvt-058-80gb:/usr/local/cuda-11.2/samples/1_Utilities/p2pBandwidthLatencyTest$ sudo make
/usr/local/cuda/bin/nvcc -ccbin g++ -I../../common/inc  -m64    --threads
0 -gencode arch=compute_35,code=sm_35 -gencode arch=compute_37,code=sm_37
-gencode arch=compute_50,code=sm_50 -gencode arch=compute_52,code=sm_52
-gencode arch=compute_60,code=sm_60 -gencode arch=compute_61,code=sm_61
-gencode arch=compute_70,code=sm_70 -gencode arch=compute_75,code=sm_75
-gencode arch=compute_80,code=sm_80 -gencode arch=compute_86,code=sm_86
-gencode arch=compute_86,code=compute_86 -o p2pBandwidthLatencyTest.o -c p2pBandwidthLatencyTest.cu
nvcc warning : The 'compute_35', 'compute_37', 'compute_50', 'sm_35', 'sm_37' and 'sm_50' architectures are deprecated, and may be removed in a future release (Use -Wno-deprecated-gpu-targets to suppress warning).
/usr/local/cuda/bin/nvcc -ccbin g++   -m64
-gencode arch=compute_35,code=sm_35 -gencode arch=compute_37,code=sm_37
-gencode arch=compute_50,code=sm_50 -gencode arch=compute_52,code=sm_52
-gencode arch=compute_60,code=sm_60 -gencode arch=compute_61,code=sm_61
-gencode arch=compute_70,code=sm_70 -gencode arch=compute_75,code=sm_75
-gencode arch=compute_80,code=sm_80 -gencode arch=compute_86,code=sm_86
-gencode arch=compute_86,code=compute_86 -o p2pBandwidthLatencyTest p2pBandwidthLatencyTest.o
nvcc warning : The 'compute_35', 'compute_37', 'compute_50', 'sm_35', 'sm_37' and 'sm_50' architectures are deprecated, and may be removed in a future release (Use -Wno-deprecated-gpu-targets to suppress warning).
mkdir -p ../../bin/x86_64/linux/release
cp p2pBandwidthLatencyTest ../../bin/x86_64/linux/release
lab@ro-dvt-058-80gb:/usr/local/cuda-11.2/samples/1_Utilities/p2pBandwidthLatencyTest $ cd /usr/local/cuda-11.2/samples/bin/x86_64/linux/release
lab@ro-dvt-058-80gb:/usr/local/cuda-11.2/samples/bin/x86_64/linux/release $ ./p2pBandwidthLatencyTest
[P2P (Peer-to-Peer) GPU Bandwidth Latency Test]
Device: 0, Graphics Device, pciBusID: 1, pciDeviceID: 0, pciDomainID:0
Device: 1, Graphics Device, pciBusID: 47, pciDeviceID: 0, pciDomainID:0
Device: 2, Graphics Device, pciBusID: 81, pciDeviceID: 0, pciDomainID:0
Device: 3, Graphics Device, pciBusID: c2, pciDeviceID: 0, pciDomainID:0
Device: 4, DGX Display, pciBusID: c1, pciDeviceID: 0, pciDomainID:0
Device=0 CAN Access Peer Device=1
Device=0 CAN Access Peer Device=2
Device=0 CAN Access Peer Device=3
Device=0 CANNOT Access Peer Device=4
Device=1 CAN Access Peer Device=0
Device=1 CAN Access Peer Device=2
Device=1 CAN Access Peer Device=3
Device=1 CANNOT Access Peer Device=4
Device=2 CAN Access Peer Device=0
Device=2 CAN Access Peer Device=1
Device=2 CAN Access Peer Device=3
Device=2 CANNOT Access Peer Device=4
Device=3 CAN Access Peer Device=0
Device=3 CAN Access Peer Device=1
Device=3 CAN Access Peer Device=2
Device=3 CANNOT Access Peer Device=4
Device=4 CANNOT Access Peer Device=0
Device=4 CANNOT Access Peer Device=1
Device=4 CANNOT Access Peer Device=2
Device=4 CANNOT Access Peer Device=3


***NOTE: In case a device doesn't have P2P access to other one, it falls back to normal memcopy procedure.
So you can see lesser Bandwidth (GB/s) and unstable Latency (us) in those cases.

P2P Connectivity Matrix
     D\D     0     1     2     3     4
     0            1     1     1     1     0
     1            1     1     1     1     0
     2            1     1     1     1     0
     3            1     1     1     1     0
     4            0     0     0     0     1
Unidirectional P2P=Disabled Bandwidth Matrix (GB/s)
   D\D     0      1      2      3      4
     0 1323.03  15.71  15.37  16.81  12.04
     1  16.38 1355.16  15.47  15.81  11.93
     2  16.25  15.85 1350.48  15.87  12.06
     3  16.14  15.71  16.80 1568.78  11.75
     4  12.61  12.47  12.68  12.55 140.26
Unidirectional P2P=Enabled Bandwidth (P2P Writes) Matrix (GB/s)
   D\D     0      1      2      3      4
     0 1570.35  93.30  93.59  93.48  12.07
     1  93.26 1583.08  93.55  93.53  11.93
     2  93.44  93.58 1584.69  93.34  12.05
     3  93.51  93.55  93.39 1586.29  11.79
     4  12.68  12.54  12.75  12.51 140.26
Bidirectional P2P=Disabled Bandwidth Matrix (GB/s)
   D\D     0      1      2      3      4
     0 1588.71  19.60  19.26  19.73  16.53
     1  19.59 1582.28  19.85  19.13  16.43
     2  19.53  19.39 1583.88  19.61  16.58
     3  19.51  19.11  19.58 1592.76  15.90
     4  16.36  16.31  16.39  15.80 139.42
Bidirectional P2P=Enabled Bandwidth Matrix (GB/s)
   D\D     0      1      2      3      4
     0 1590.33 184.91 185.37 185.45  16.46
     1 185.04 1587.10 185.19 185.21  16.37
     2 185.15 185.54 1516.25 184.71  16.47
     3 185.55 185.32 184.86 1589.52  15.71
     4  16.26  16.28  16.16  15.69 139.43
P2P=Disabled Latency Matrix (us)
   GPU     0      1      2      3      4
     0   3.53  21.60  22.22  21.38  12.46
     1  21.61   2.62  21.55  21.65  12.34
     2  21.57  21.54   2.61  21.55  12.40
     3  21.57  21.54  21.58   2.51  13.00
     4  13.93  12.41  21.42  21.58   1.14

   CPU     0      1      2      3      4
     0   4.26  11.81  13.11  12.00  11.80
     1  11.98   4.11  11.85  12.19  11.89
     2  12.07  11.72   4.19  11.82  12.49
     3  12.14  11.51  11.85   4.13  12.04
     4  12.21  11.83  12.11  11.78   4.02
P2P=Enabled Latency (P2P Writes) Matrix (us)
   GPU     0      1      2      3      4
     0   3.79   3.34   3.34   3.37  13.85
     1   2.53   2.62   2.54   2.52  12.36
     2   2.55   2.55   2.61   2.56  12.34
     3   2.58   2.51   2.51   2.53  14.39
     4  19.77  12.32  14.75  21.60   1.13

   CPU     0      1      2      3      4
     0   4.27   3.63   3.65   3.59  13.15
     1   3.62   4.22   3.61   3.62  11.96
     2   3.81   3.71   4.35   3.73  12.15
     3   3.64   3.61   3.61   4.22  12.06
     4  12.32  11.92  13.30  12.03   4.05

NOTE: The CUDA Samples are not meant for performance measurements. Results may vary when GPU Boost is enabled.
The example above shows the peer-to-peer bandwidth and latency test across all five GPUs, including the DGX Display GPU. The application also shows that there is no peer-to-peer connectivity between any GPU and GPU 4. This indicates that GPU 4 should not be used for high-performance workloads.
Run the example one more time by using the CUDA_VISIBLE_DEVICES variable, which limits the number of GPUs that the application can see.
Note
All GPUs can communicate with all other peer devices.
lab@ro-dvt-058-80gb:/usr/local/cuda-11.2/samples/bin/x86_64/linux/release$ CUDA_VISIBLE_DEVICES=0,1,2,3 ./p2pBandwidthLatencyTest
[P2P (Peer-to-Peer) GPU Bandwidth Latency Test]
Device: 0, Graphics Device, pciBusID: 1, pciDeviceID: 0, pciDomainID:0
Device: 1, Graphics Device, pciBusID: 47, pciDeviceID: 0, pciDomainID:0
Device: 2, Graphics Device, pciBusID: 81, pciDeviceID: 0, pciDomainID:0
Device: 3, Graphics Device, pciBusID: c2, pciDeviceID: 0, pciDomainID:0
Device=0 CAN Access Peer Device=1
Device=0 CAN Access Peer Device=2
Device=0 CAN Access Peer Device=3
Device=1 CAN Access Peer Device=0
Device=1 CAN Access Peer Device=2
Device=1 CAN Access Peer Device=3
Device=2 CAN Access Peer Device=0
Device=2 CAN Access Peer Device=1
Device=2 CAN Access Peer Device=3
Device=3 CAN Access Peer Device=0
Device=3 CAN Access Peer Device=1
Device=3 CAN Access Peer Device=2

***NOTE: In case a device doesn't have P2P access to other one, it falls back to normal memcopy procedure.
So you can see lesser Bandwidth (GB/s) and unstable Latency (us) in those cases.

P2P Connectivity Matrix
     D\D     0     1     2     3
     0            1     1     1     1
     1            1     1     1     1
     2            1     1     1     1
     3            1     1     1     1
Unidirectional P2P=Disabled Bandwidth Matrix (GB/s)
   D\D     0      1      2      3
     0 1324.15  15.54  15.62  15.47
     1  16.55 1353.99  15.52  16.23
     2  15.87  17.26 1408.93  15.91
     3  16.33  17.31  18.22 1564.06
Unidirectional P2P=Enabled Bandwidth (P2P Writes) Matrix (GB/s)
   D\D     0      1      2      3
     0 1498.08  93.30  93.53  93.48
     1  93.32 1583.08  93.54  93.52
     2  93.55  93.60 1583.08  93.36
     3  93.49  93.55  93.28 1576.69
Bidirectional P2P=Disabled Bandwidth Matrix (GB/s)
   D\D     0      1      2      3
     0 1583.08  19.92  20.47  19.97
     1  20.74 1586.29  20.06  20.22
     2  20.08  20.59 1590.33  20.01
     3  20.44  19.92  20.60 1589.52
Bidirectional P2P=Enabled Bandwidth Matrix (GB/s)
   D\D     0      1      2      3
     0 1592.76 184.88 185.21 185.30
     1 184.99 1589.52 185.19 185.32
     2 185.28 185.30 1585.49 185.01
     3 185.45 185.39 184.84 1587.91
P2P=Disabled Latency Matrix (us)
   GPU     0      1      2      3
     0   2.38  21.56  21.61  21.56
     1  21.70   2.34  21.54  21.56
     2  21.55  21.56   2.41  21.06
     3  21.57  21.34  21.56   2.39

   CPU     0      1      2      3
     0   4.22  11.99  12.71  12.09
     1  11.86   4.09  12.00  11.71
     2  12.52  11.98   4.27  12.24
     3  12.22  11.75  12.19   4.25
P2P=Enabled Latency (P2P Writes) Matrix (us)
   GPU     0      1      2      3
     0   2.32   2.57   2.55   2.59
     1   2.55   2.32   2.59   2.52
     2   2.59   2.56   2.41   2.59
     3   2.57   2.55   2.56   2.40

   CPU     0      1      2      3
     0   4.24   3.57   3.72   3.81
     1   3.68   4.26   3.75   3.63
     2   3.79   3.75   4.34   3.71
     3   3.72   3.64   3.66   4.32

NOTE: The CUDA Samples are not meant for performance measurements. Results may vary when GPU Boost is enabled.
For bare metal applications, the UUID can also be specified in the CUDA_VISIBLE_DEVICES variable as shown below:
lab@ro-dvt-058-80gb:/usr/local/cuda-11.2/samples/bin/x86_64/linux/release $ CUDA_VISIBLE_DEVICES=GPU-0f2dff15-7c85-4320-da52-d3d54755d182,GPU-dc598de6-dd4d-2f43-549f-f7b4847865a5 ./p2pBandwidthLatencyTest
The GPU specification is longer because of the nature of UUIDs, but this is the most precise way to pin specific GPUs to the application.
Using Multi-Instance GPUs#
Multi-Instance GPUs (MIG) is a technology that is available on NVIDIA A100 GPUs. If MIG is enabled on the GPUs and if the GPUs have been partitioned already, then applications can be limited to run on these devices.
This works for both Docker containers and for bare metal using the CUDA_VISIBLE_DEVICES as shown in the examples below. For instructions on how to configure and use MIG, refer to the NVIDIA Multi-Instance GPU User Guide.
Identify the MIG instances that will be used. Here is the output from a system that has GPU 0 partitioned into 7 MIGs:
lab@ro-dvt-058-80gb:~$ nvidia-smi -L
GPU 0: Graphics Device (UUID: GPU-269d95f8-328a-08a7-5985-ab09e6e2b751)
  MIG 1g.10gb Device 0: (UUID: MIG-GPU-269d95f8-328a-08a7-5985-ab09e6e2b751/7/0)
  MIG 1g.10gb Device 1: (UUID: MIG-GPU-269d95f8-328a-08a7-5985-ab09e6e2b751/8/0)
  MIG 1g.10gb Device 2: (UUID: MIG-GPU-269d95f8-328a-08a7-5985-ab09e6e2b751/9/0)
  MIG 1g.10gb Device 3: (UUID: MIG-GPU-269d95f8-328a-08a7-5985-ab09e6e2b751/11/0)
  MIG 1g.10gb Device 4: (UUID: MIG-GPU-269d95f8-328a-08a7-5985-ab09e6e2b751/12/0)
  MIG 1g.10gb Device 5: (UUID: MIG-GPU-269d95f8-328a-08a7-5985-ab09e6e2b751/13/0)
  MIG 1g.10gb Device 6: (UUID: MIG-GPU-269d95f8-328a-08a7-5985-ab09e6e2b751/14/0)
GPU 1: Graphics Device (UUID: GPU-0f2dff15-7c85-4320-da52-d3d54755d182)
GPU 2: Graphics Device (UUID: GPU-dc598de6-dd4d-2f43-549f-f7b4847865a5)
GPU 3: DGX Display (UUID: GPU-91b9d8c8-e2b9-6264-99e0-b47351964c52)
GPU 4: Graphics Device (UUID: GPU-e32263f2-ae07-f1db-37dc-17d1169b09bf)
In Docker, enter the MIG UUID from this output, in which GPU 0 and Device 0 have been selected.
If you are running on DGX Station A100, restart the nv-docker-gpus and docker system services any time MIG instances are created, destroyed or modified by running the following:
lab@ro-dvt-058-80gb:~$ sudo systemctl restart nv-docker-gpus; sudo systemctl restart docker
nv-docker-gpus has to be restarted on DGX Station A100 because this service is used to mask the available GPUs that can be used by Docker. When the GPU architecture changes, the service needs to be refreshed.
lab@ro-dvt-058-80gb:~$ docker run --gpus '"device=MIG-GPU-269d95f8-328a-08a7-5985-ab09e6e2b751/7/0"' --rm -it ubuntu nvidia-smi -L
GPU 0: Graphics Device (UUID: GPU-269d95f8-328a-08a7-5985-ab09e6e2b751)
  MIG 1g.10gb Device 0: (UUID: MIG-GPU-269d95f8-328a-08a7-5985-ab09e6e2b751/7/0)
On bare metal, specify the MIG instances:
Note
This application measures the communication across GPUs, and it is not relevant to read the bandwidth and latency with only one GPU MIG.
The purpose of this example is to illustrate how to use specific GPUs with applications, which is clearly illustrated below.
lab@ro-dvt-058-80gb: /usr/local/cuda-11.2/samples/bin/x86_64/linux/release$ CUDA_VISIBLE_DEVICES=MIG-GPU-269d95f8-328a-08a7-5985-ab09e6e2b751/7/0 ./p2pBandwidthLatencyTest
[P2P (Peer-to-Peer) GPU Bandwidth Latency Test]
Device: 0, Graphics Device MIG 1g.10gb, pciBusID: 1, pciDeviceID: 0, pciDomainID:0

***NOTE: In case a device doesn't have P2P access to other one, it falls back to normal memcopy procedure.
So you can see lesser Bandwidth (GB/s) and unstable Latency (us) in those cases.

P2P Connectivity Matrix
     D\D     0
     0            1
Unidirectional P2P=Disabled Bandwidth Matrix (GB/s)
   D\D     0
     0 176.20
Unidirectional P2P=Enabled Bandwidth (P2P Writes) Matrix (GB/s)
   D\D     0
     0 187.87
Bidirectional P2P=Disabled Bandwidth Matrix (GB/s)
   D\D     0
     0 190.77
Bidirectional P2P=Enabled Bandwidth Matrix (GB/s)
   D\D     0
     0 190.53
P2P=Disabled Latency Matrix (us)
   GPU     0
     0   3.57

   CPU     0
     0   4.07
P2P=Enabled Latency (P2P Writes) Matrix (us)
   GPU     0
     0   3.55

   CPU     0
     0   4.07

NOTE: The CUDA Samples are not meant for performance measurements. Results may vary when GPU Boost is enabled.
Completing the Initial Ubuntu OS Configuration#
When you power on the DGX Station A100 for the first time, you are prompted to accept end user license agreements for NVIDIA software. You are then guided through the process for completing the initial Ubuntu OS configuration.
For the complete procedure, refer to the NVIDIA DGX OS 5 User Guide.