Using the BMC#
The DGX Station A100 comes with a baseboard management controller (BMC) to monitor and control various hardware devices on the system, system sensors, and other parameters.
Caution
Before you can log into the BMC, see the security information in Security.
BMC features its own management network port and VGA Display port.
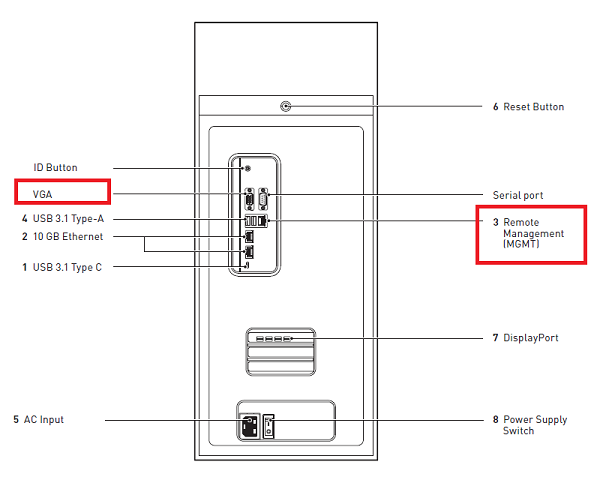
The DGX Station A100 features two display devices, the DGX Display Adapter and the BMC Display Adapter. Depending on the BIOS settings you can direct the OS X display to either adapter. These settings can be adjusted to use one of the three modes listed before from the BIOS. The nvidia-conf-xconfig.service manages this function for the X-Windowing system.
Here is a list of the display select modes:
Auto: Automatically configures the X-windowing system to use whichever compatible display adapter is currently present in the system. The default choice is to use the NVIDIA DGX Display Adapter (mini-DP), however if this adapter is not present the on-board BMC Display Adapter (15pin VGA) will be chosen. If neither of the adapters is detected for any reason, the service will exit without setup.
On-Board: Configures the X-windowing system to exclusively use the on-board BMC Display Adapter. If for any reason BMC Display Adapter is not present, it will fall back to use NVIDIA DGX Display Adapter (if present), otherwise the service will exit without any setup.
External: Configures the X-windowing system to exclusively use the DGX Display Adapter. The BMC Display Adapter is disabled. If for any reason NVIDIA DGX Display Adapter is not present, the service will exit without any setup.
See Using DGX Station A100 as a Server Without a Monitor for more information.
Understanding the BMC Controls#
In the BMC dashboard, the left navigation pane on the BMC main page contains the primary controls.
Here is a list of the controls:
Control |
Description |
|---|---|
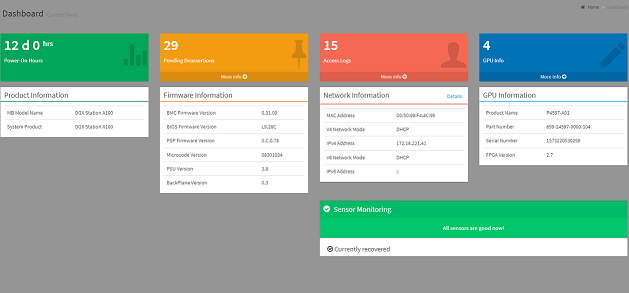
Dashboard |
Displays the overall information about the status of the device. |
Sensor |
Provides status and readings for system sensors, such as SSD, PSUs, voltages, CPU temperatures, DIMM temperatures, and fan speeds. |
System Inventory |
Displays inventory information of the following system modules: System, Processor, Memory Controller, BaseBoard, Power, Thermal, PCIE Device, PCIE Function, and Storage. |
FRU Information |
Provides, chassis, board, and product information. |
GPU Information |
Provides basic information on all the GPUs in the systems, including GUID, VBIOS version, InfoROM version, and number of retired pages for each GPU. |
Logs and Reports |
View, and if applicable, download and erase, the IPMI event log, and System, Audit, Video, and POST Code logs. |
Settings |
Configure the following settings: Captured BSOD, Date & Time, External User Services, KVM Mouse Setting, Log Settings, Media Redirection Settings, Network Settings, PAM Order Settings, Platform Event Filter, Services, SMTP Settings, SSL Settings, System Firewall, User Management, Video Recording, and IPMI Interfaces. |
Remote Control |
Opens the KVM Launch page for accessing the DGX A100 console remotely. |
Power Control |
Perform the following power actions: Power On, Power Off, Power Cycle, Hard Reset, and ACPI/Shutdown |
Maintenance |
Perform the following maintenance tasks: Backup Configuration, Firmware Image Location, Firmware Update, BIOS Update, Preserve Configuration, PSU Update, FPGA Update, Retimer Update, BackPlane Update, Preserve Configuration, Restore Configuration, Restore Factory Defaults, and Reset |
Sign out |
Sign out of the BMC web UI. |
Configuring a Static IP Address for the BMC#
Here is some information about how to configure a static IP address for the BMC.
Configuring a BMC Static IP Address Using ipmitool#
Here is some information about how to set a static IP address for the BMC from the Ubuntu command line.
Note
If you cannot access the DGX Station A100 remotely, connect a display (1440x900 or lower resolution) and keyboard directly to the DGX Station A100.
To view the current settings, enter the following command.
$ sudo ipmitool lan print 1
To set a static IP address for the BMC, complete the following steps:
Set the IP address source to
static.$ sudo ipmitool lan set 1 ipsrc static
Set the appropriate address information.
To set the IP address, in Station IP address, enter the following, and replace the italicized text with your information.
$ sudo ipmitool lan set 1 ipaddr<my-ip-address>
To set the subnet mask, enter the following and replace the italicized text with your information.
$ sudo ipmitool lan set 1 netmask<my-netmask-address>
To set the default gateway IP, in Router IP address, enter the following and replace the italicized text with your information.
$ sudo ipmitool lan set 1 defgw ipaddr<my-default-gateway-ip-address>
Configuring a BMC Static IP Address Using the System BIOS#
This section describes how to set a static IP address for the BMC when you cannot remotely access the DGX Station A100. This process involves setting the BMC IP address during system boot.
Connect a keyboard and display (1440 x 900 maximum resolution) to the DGX A100 System and power on the DGX Station A100.
When you see the SBIOS version screen, to enter the BIOS Setup Utility screen, press Del or F2.
In the BIOS Setup Utility screen, on the Server Mgmt tab, scroll to BMC Network Configuration, and press Enter.
Scroll to Configuration address source and press Enter.
In the Configuration address source dialog box, select Static and then press Enter.
Set the addresses for the Station IP address, Subnet mask, and Router IP address as needed by completing the following steps for each address:
Scroll to the specific item and press Enter.
Enter the appropriate information in the dialog box and press Enter.
After completing your changes, press F4 to save and exit.
Logging into the BMC#
Here are the steps to log into the BMC.
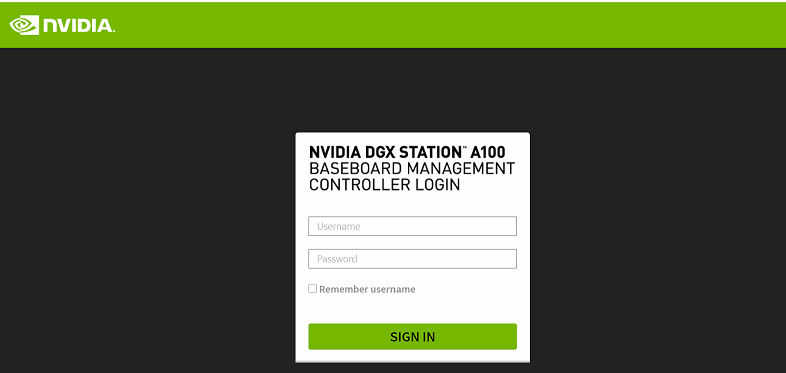
To log into the BMC, entered the configured IP address in a browser and press Enter.
Enter the BMC username and password that you configured earlier.
Warning
If you enter the incorrect password 5 or more times, the Login Failed message is displayed, and you will be locked out. See Logging in After Entering an Incorrect Password for more information about when you can log back in.
Click Sign in.
Here is an example of the BMC dashboard:
Changing Your Default BMC Password#
When you complete one of the following tasks:
In the BMC web UI, click Restore Factory Defaults and do not click Save to preserve the settings.
Run the
$ sudo ipmitool raw 0x32 0x66command.
the passwords for the admin and Administrator users revert to the following default passwords:
admin(for the admin role)superuser(for the Administrator role)
All other users on the system will be deleted.
We strongly recommend that you change your password. If you do not change your password, anyone can use the default passwords and log in to the BMC.
Logging in After Entering an Incorrect Password#
After you enter an incorrect login BMC password at least five (5) times, you will be locked out. Here is some important information about how you can log in to the BMC again.
After entering incorrect passwords at least 5 times, you will be locked out for 10 minutes before you can attempt to log in again. During this 10-minute period, if you enter an incorrect password again, the lockout period is extended.
The lockout period is calculated in the following way:
10 minutes * (failure count - 5 tolerances)
For example, if you entered incorrect passwords 7 times, you must wait for 20 minutes (10 * (7 – 5) before you can log in again.
Important
The start of the current lockout period is calculated from the latest incorrect password that you entered and not from the first lock time.
If you need to unlock users immediately, you must reset the BMC.
Common BMC Tasks#
This section provides information about the most common tasks you can complete in the BMC.
Configuring the BMC Login Credentials#
Here is some information about how to add or remove users from the BMC.
Log into the BMC.
In the left navigation pane, click Settings.
Click the User Management card.
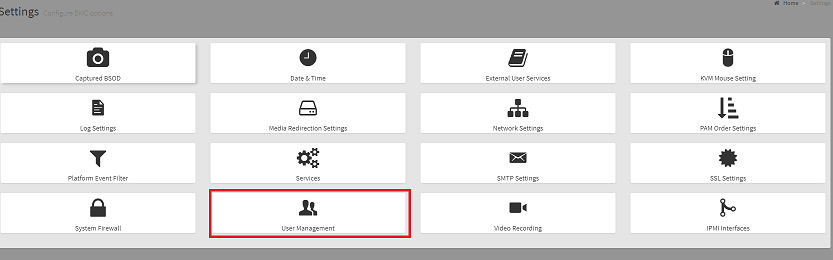
Click the Help icon for additional information about how to configure users and create a password.
Important
The password must be at least 13 characters long.
Log out and log back in with the new credentials.
Using the Remote Control#
Here is information about how to start the remove KVM and access the DGX A100 Station console.
Important
If you select the Media Boost checkbox, the processes that are related to media redirection will have a higher priority than other processes.

In the left navigation, click Remote Control.
Click Launch KVM.
Setting Up Active Directory or LDAP/E-Directory#
Here is some information about setting up Active Directory or LDAP/E-Directory in BMC.
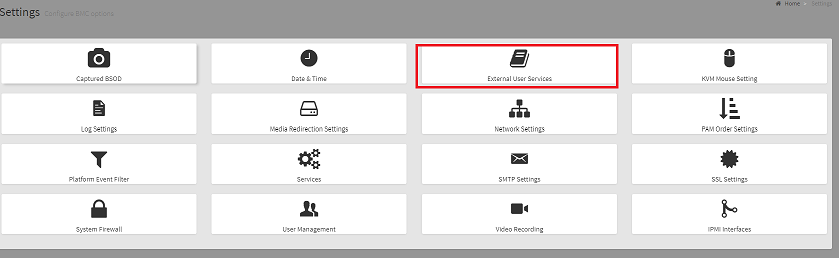
In the left navigation pane, click Settings.
Click External User Services.
Click one of the following options and follow the instructions:

Configuring Platform Event Filters#
Here is some information about how to configure event filters.
In the left navigation pane, click Settings > Platform Event Filters.
The Event Filters page shows all configured event filters and available slots. You can modify or add new event filter entry on this page.
To view available configured and unconfigured slots, click All in the upper-left corner of the page.
To view available configured slots, click Configured in the upper-left corner of the of the page.
To view available unconfigured slots, click UnConfigured in the upper-left corner of of the page.
To delete an event filter from the list, click the x icon.
Uploading or Generating SSL Certificates#
Here is some information about how you can upload or generate SSL certificates.
You can set up a new SSL certificate in one of the following ways:
Generate a self-signed SSL.
Upload an SSL, for example, to use a Trusted CA-signed certificate.
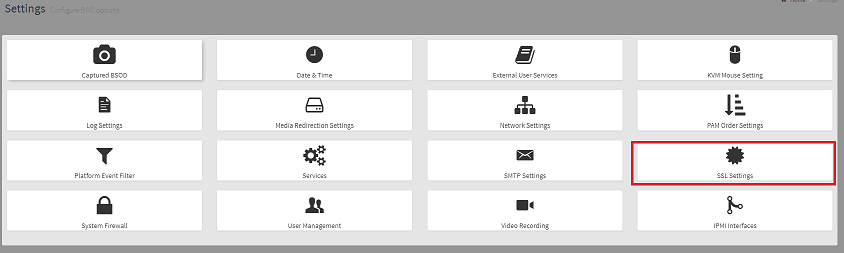
In the left navigation pane, click Settings > External User Services.
Viewing the SSL Certificate#
You can display the SSL certificate that you generated or uploaded.
On the SSL Setting page, click View SSL Certificate.

The View SSL Certificate page displays the following basic information about the uploaded SSL certificate:
Certificate Version, Serial Number, Algorithm, and Public Key
Issuer information
Valid Date range
Issued to information
Generating the SSL Certificate#
Here are the steps to generate an SSL certificate.
In the SSL Settings page, click Generate SSL Certificate.

Enter the appropriate information as described in the following table:
Fields to Generate an SSL Certificate# Item
Description
Common Name (CN)
The common name for which the certificate is to be generated.
Maximum length of 64 alphanumeric characters.
The special characters,
#and$are not allowed.
Organization (O)
The name of the organization for which the certificate is generated.
Maximum length of 64 alphanumeric characters.
The special characters,
#and$are not allowed.
Organization Unit (OU)
Overall organization section unit name for which the certificate is generated.
Maximum length of 64 alphanumeric characters.
The special characters,
#and$are not allowed.
City or Locality (L)
(Mandatory) City or Locality of the organization
Maximum length of 64 alphanumeric characters.
The special characters,
#and$are not allowed.Maximum length of 64 alphanumeric characters.
The special characters,
#and$are not allowed.
State or Province (ST)
(Mandatory) State or Province of the organization
Maximum length of 64 alphanumeric characters.
The special characters,
#and$are not allowed.
Country (C)
Country code of the organization.
Only two characters are allowed.
Special characters are not allowed.
Email Address
(Mandatory) Email address of the organization
Valid for
Validity of the certificate.
Enter a range from 1 to 3650 (days)
Key Length
The key length bit value of the certificate (for example, 2048 bits)
To generate the certificate, click Save.
Uploading the SSL Certificate#
In BMC, you can upload your SSL certificate.
Make sure the certificate and key meet the following requirements:
SSL certificates and keys must both use the .pem file extension.
Private keys must not be encrypted.
SSL certificates and keys must each be less than 3584 bits in size.
SSL certificates must be current (not expired).
On the SSL Setting page, click Upload SSL Certificate.

Click the New Certificate folder icon, browse to locate the appropriate file, and select it.
Click the New Private Key folder icon, browse and locate the appropriate file, and select it.
Click Save.