Introduction#
This topic contains instructions for replacing the NVIDIA DGX™ B300 system components. Make sure to familiarize yourself with the NVIDIA Terms and Conditions documents before attempting to perform any modification or repair to the DGX B300 system. These Terms and Conditions for the DGX B300 system can be found through the NVIDIA DGX Systems Support page.
Contact NVIDIA Enterprise Support to obtain an RMA number for any system or component that needs to be returned for repair or replacement. When replacing a component, use only the replacement supplied to you by NVIDIA.
Customer-replaceable Components#
List of customer-replaceable components in the DGX B300 system.
Be sure to familiarize yourself with the NVIDIA Terms & Conditions documents before attempting to perform any modification or repair to the DGX B300 system. These Terms & Conditions for the DGX B300 system can be found through the NVIDIA DGX Systems Support page.
Customer Replaceable Units
Contact NVIDIA Enterprise Support to obtain an RMA number for any system or component that needs to be returned for repair or replacement. When replacing a component, use only the replacement supplied to you by NVIDIA.
You can obtain the following components for replacement in your data center.
Bezel
Ear cover
Locking power cords (if applicable)
Power supply
Fan module
Rackmount kit
DIMMs
E1.S data drive
BlueField-3 I/O bay
M.2 boot (OS) storage drive
Assembly with 2 M.2 drives
Motherboard battery
DC-SCM module
Contact NVIDIA Enterprise Support for replacement instructions and guidance for specific components if those instructions are not included in this document.
Recommended Tools#
Here are the tools that are required for the procedures outlined in the presentation. Each procedure will indicate which tool is needed for the different actions.
Important
Hearing protection is mandatory when working with or in the vicinity of this equipment
Laptop
USB key with tools and drivers
USB key imaged with the DGX Server OS ISO
Screwdrivers
Phillips #1
Phillips #2
Torx T15
Torx T10
KVM Crash Cart
Electro Static Discharge strap and/or mat
Masking tape or label maker
Tie wraps or VELCRO® Brand for cable management
Box cutter
Black Permanent Marker or Labels/labeler for cable identification
Packing materials
DGX B300 Exploded Views#
These exploded view diagrams depict the system components and their installations within the system. The front of the system provides access to the fans, drives, bezel, front cage, and power distribution board. The back of the system allows access to the GPU tray, motherboard tray, and power supplies.
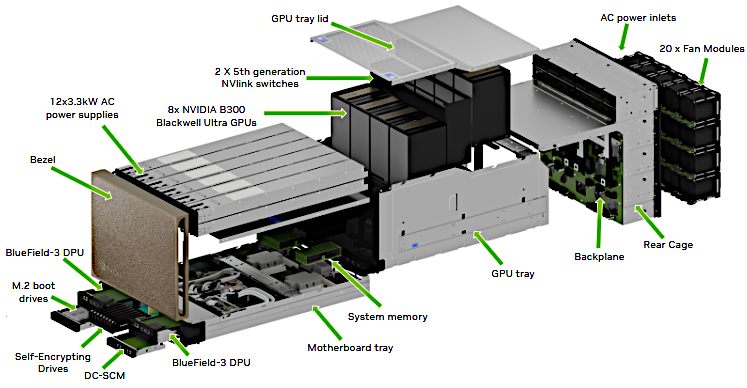
Exploded View of DGX B300 with AC Power Components#
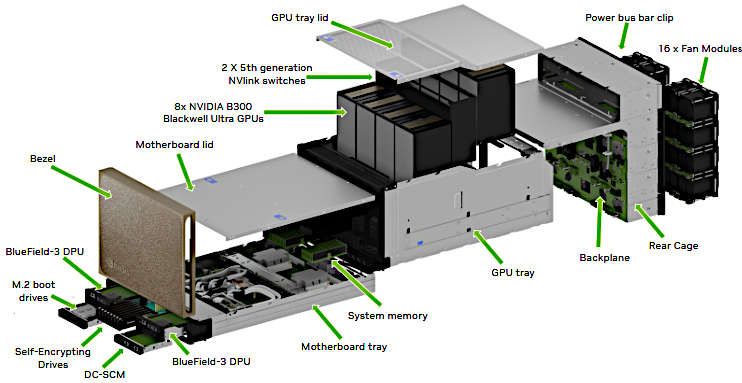
Exploded View of DGX B300 with DC Power Components#
Customer Support#
Contact NVIDIA Enterprise Support for assistance in reporting, troubleshooting, or diagnosing problems with your DGX B300 system. Also contact NVIDIA Enterprise Support for assistance in installing or moving the DGX B300 system.
For details on how to obtain support, visit the NVIDIA Enterprise Support web site.
Running the Pre-flight Test#
Instructions for running the DGX stress test.
NVIDIA recommends running the pre-flight stress test before putting a system into a production environment or after servicing. You can specify running the test on the GPUs, CPU, memory, and storage, and also specify the duration of the tests.
To run the tests, use NVSM.
Syntax:
sudo nvsm stress-test [--usage] [--force] [--no-prompt] [<test>...] [DURATION]
For help on running the test, issue the following.
sudo nvsm stress-test --usage
Recommended Command
The following command runs the test on all supported components (GPU, CPU, memory, and storage), and takes approximately 20 minutes.
sudo nvsm stress-test --force