Quick Start Guide
Virtual GPU Software Quick Start Guide
Minimal instructions for installing and configuring NVIDIA virtual GPU software.
Virtual GPU Software Quick Start Guide provides minimal instructions for installing and configuring NVIDIA® virtual GPU software on the Citrix Hypervisor or VMware vSphere hypervisor and for installing and configuring a single-instance NVIDIA virtual GPU License Server on Windows. If you need complete instructions, are using other platforms, or require high availability for the license server, refer to Virtual GPU Software User Guide and Virtual GPU License Server User Guide.
After your order for NVIDIA vGPU software is processed, you will receive an order confirmation message from NVIDIA. This message contains information that you need for getting your NVIDIA vGPU software from the NVIDIA Licensing Portal. To log in to the NVIDIA Licensing Portal, you must have an NVIDIA Enterprise Account.
1.1. Before You Begin
Before following the procedures in this guide, ensure that the following prerequisites are met:
- You have a server platform that is capable of hosting your chosen hypervisor and NVIDIA GPUs that support NVIDIA vGPU software. For a list of validated server platforms, refer to NVIDIA GRID Certified Servers.
- One or more NVIDIA GPUs that support NVIDIA vGPU software is installed in your server platform.
- A supported virtualization software stack is installed according to the instructions in the software vendor's documentation.
- A virtual machine (VM) running a supported Windows guest operating system (OS) is configured in your chosen hypervisor.
For information about supported hardware and software, and any known issues for this release of NVIDIA vGPU software software, refer to the Release Notes for your chosen hypervisor:
- Virtual GPU Software for Citrix Hypervisor Release Notes
- Virtual GPU Software for VMware vSphere Release Notes
1.2. Your Order Confirmation Message
After your order for NVIDIA vGPU software is processed, you will receive an order confirmation message to which your NVIDIA Entitlement Certificate is attached.
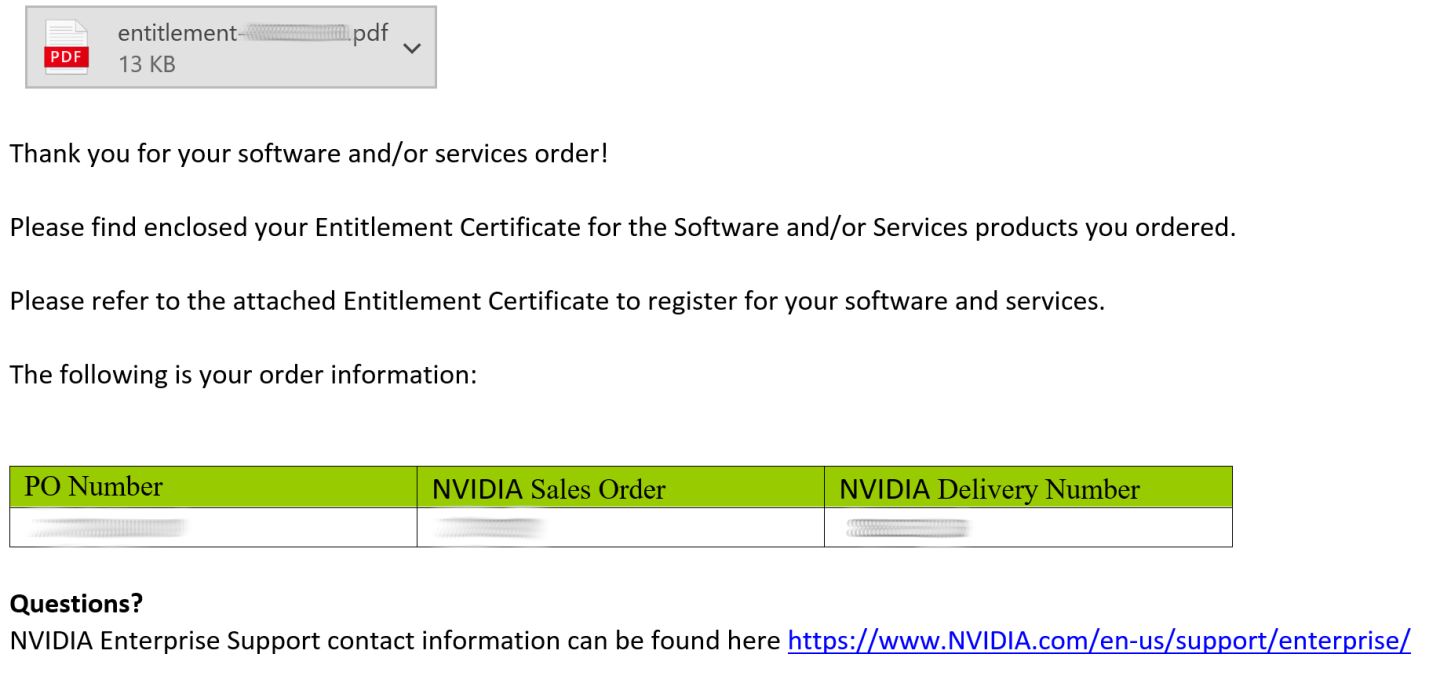
Your NVIDIA Entitlement Certificate contains your product activation keys.
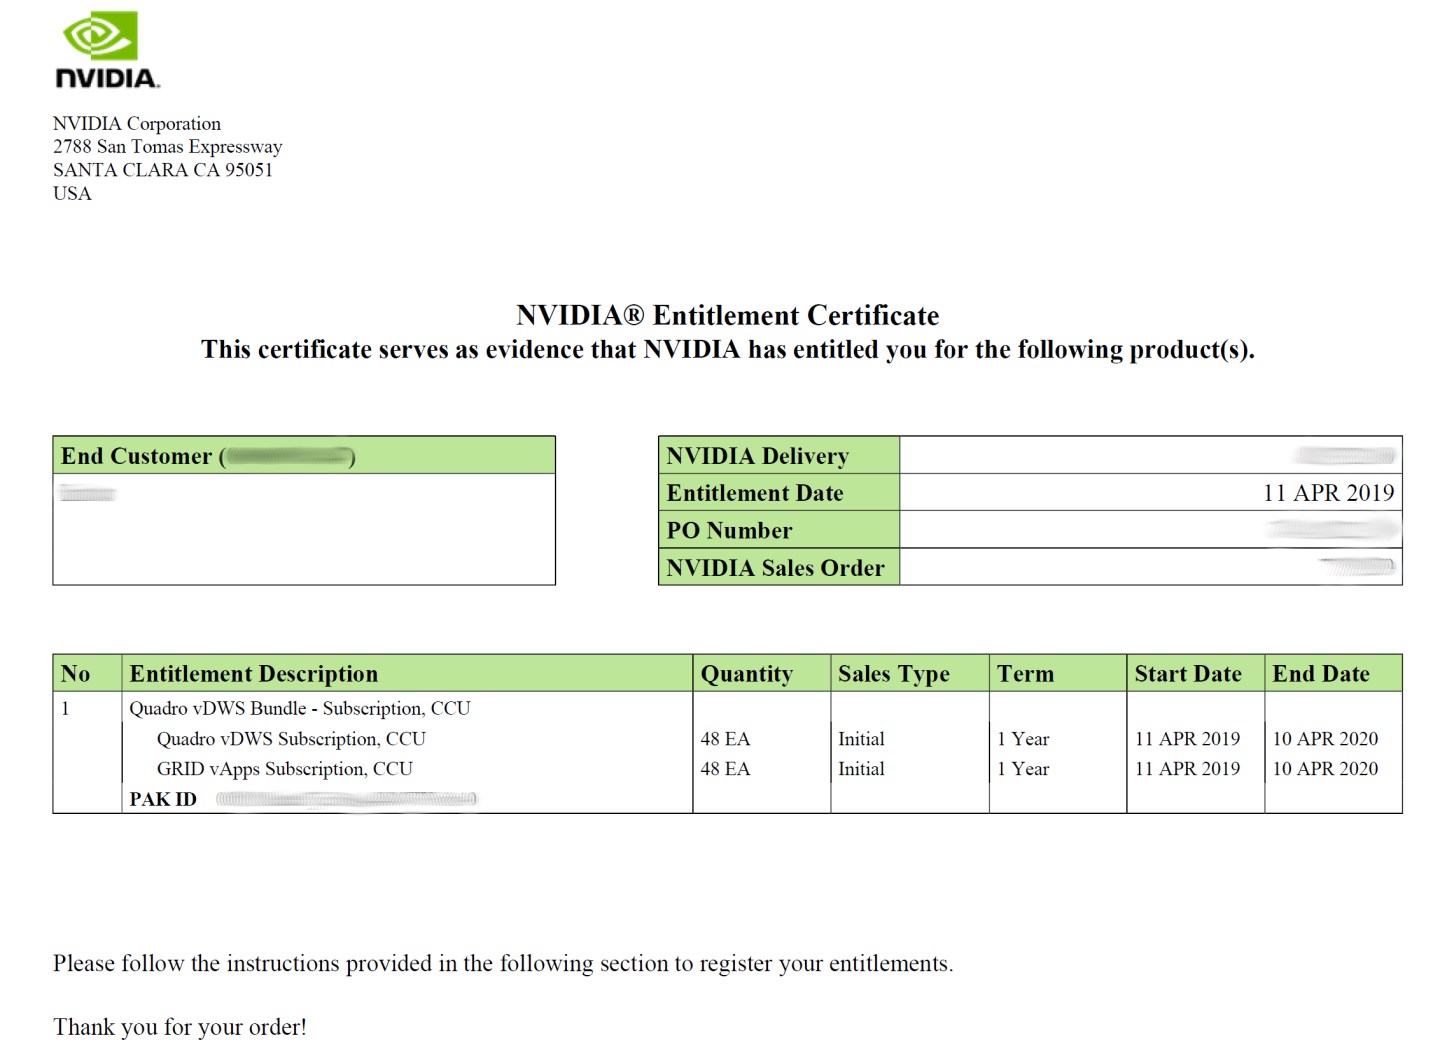
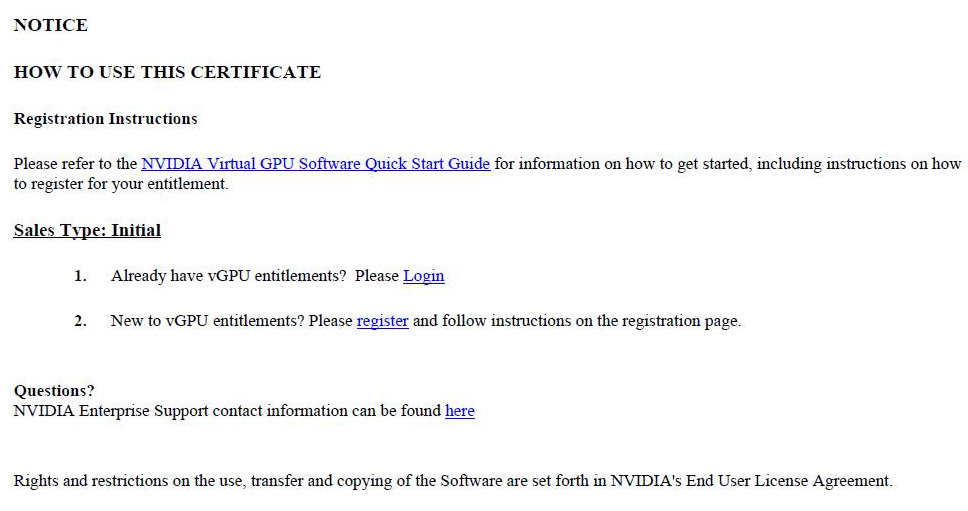
Your NVIDIA Entitlement Certificate also provides instructions for using the certificate.
To get your NVIDIA vGPU software, you must have an NVIDIA Enterprise Account.
For a Support, Upgrade, and Maintenance Subscription (SUMS) renewal, you should already have an NVIDIA Enterprise Account and this requirement should already be met.
- If you do not have an account, follow the Register link in the instructions for using the certificate to create your account. For details, see Creating your NVIDIA Enterprise Account.
- If you already have an account, follow the Login link in the instructions for using the certificate to log in to the NVIDIA Enterprise Application Hub, go to the NVIDIA Licensing Portal, and download your NVIDIA vGPU software. For details, see Downloading your NVIDIA vGPU Software.
1.3. Creating your NVIDIA Enterprise Account
If you do not have an NVIDIA Enterprise Account, you must create an account to be able to log in to the NVIDIA Licensing Portal.
If you already have an account, skip this task and go to Downloading your NVIDIA vGPU Software.
Before you begin, ensure that you have your order confirmation message.
- In the instructions for using your NVIDIA Entitlement Certificate, follow the Register link.
- Fill out the form on the NVIDIA Enterprise Account Registration page and click Register.
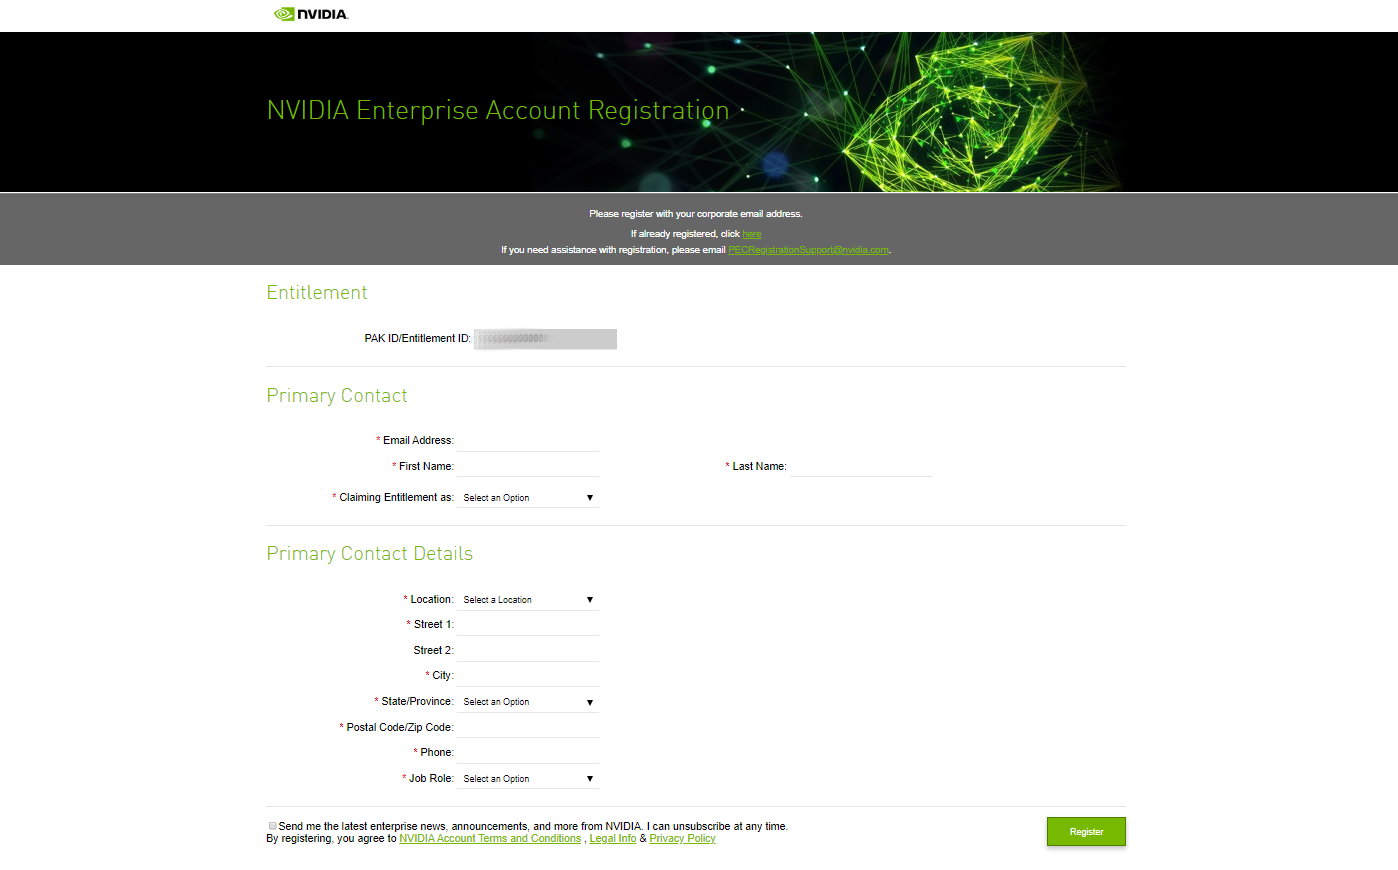
A message confirming that an account has been created appears and an e-mail instructing you to set your NVIDIA password is sent to the e-mail address you provided.
- Open the e-mail instructing you to set your password and click SET PASSWORD.
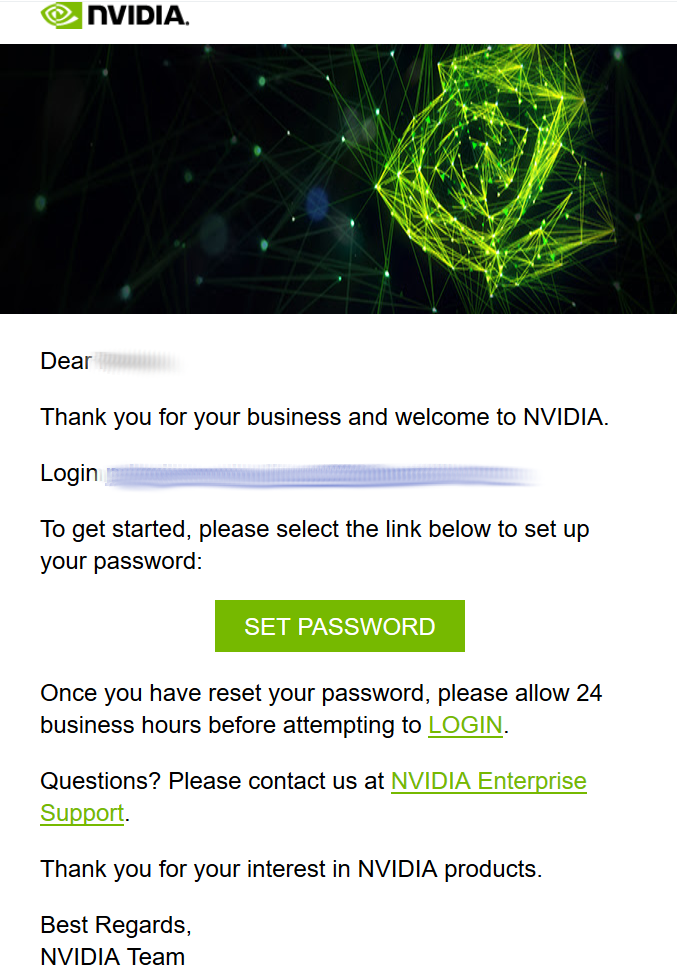 Note:
Note:After you have set your password during the initial registration process, you will be able to log in to your account within 15 minutes. However, it may take up to 24 business hours for your entitlement to appear in your account.
For your account security, the SET PASSWORD link in this e-mail is set to expire in 24 hours.
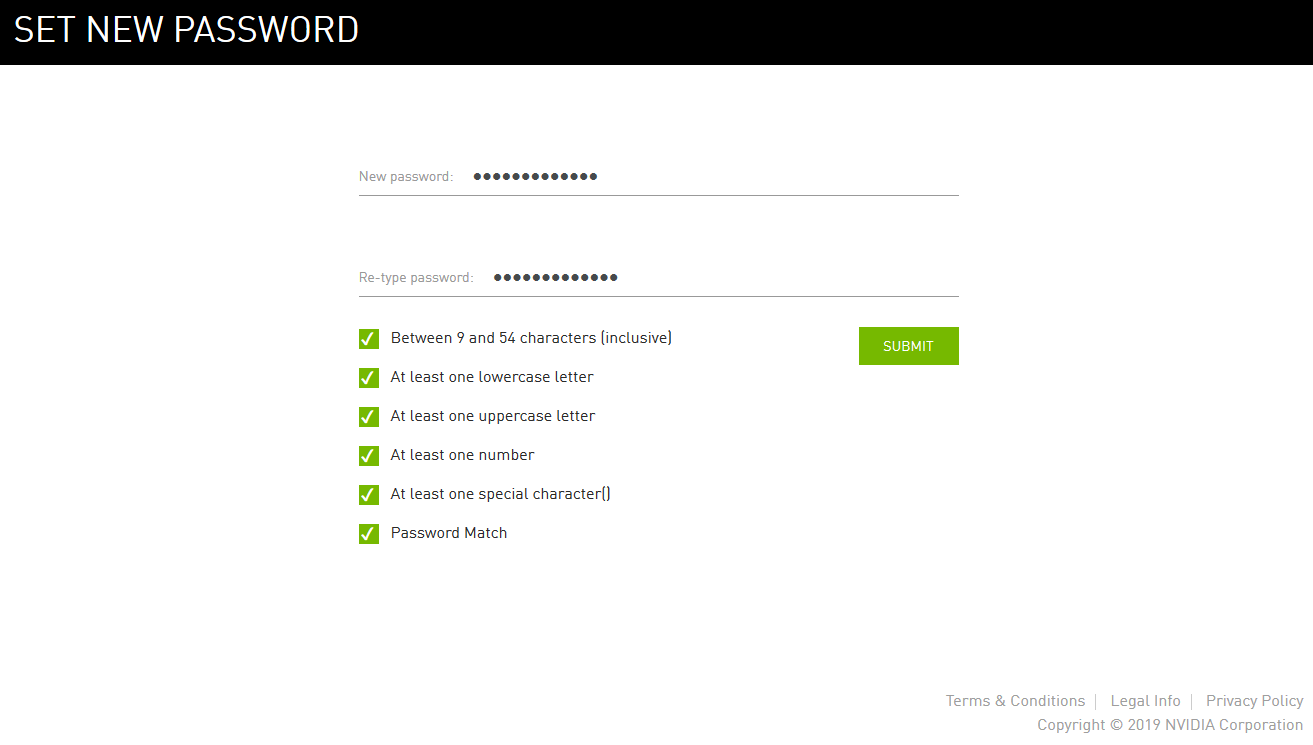
- Enter and re-enter your new password, and click SUBMIT.
A message confirming that your password has been set successfully appears.
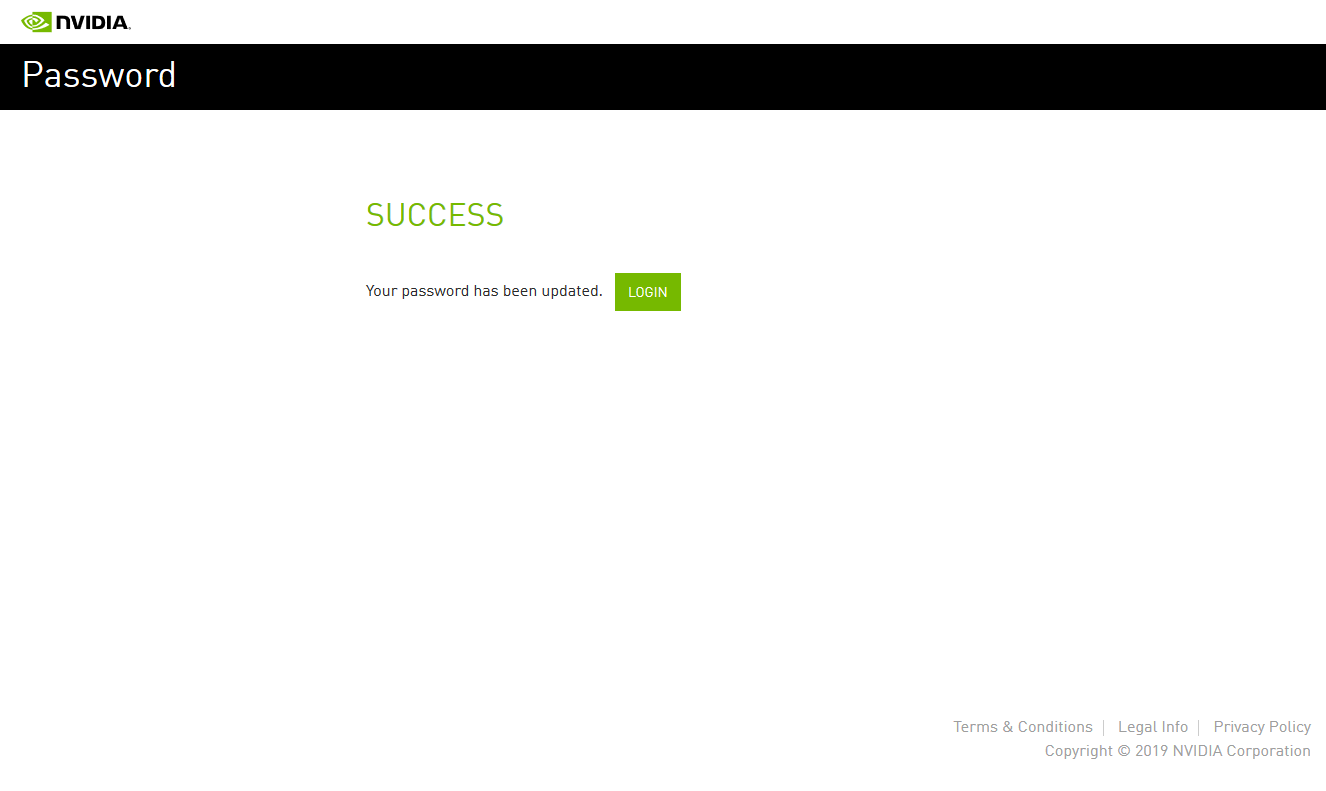
You are then automatically directed to log in to the NVIDIA Licensing Portal with your new password.
1.4. Downloading your NVIDIA vGPU Software
Before you begin, ensure that you have your order confirmation message and have created an NVIDIA Enterprise Account.
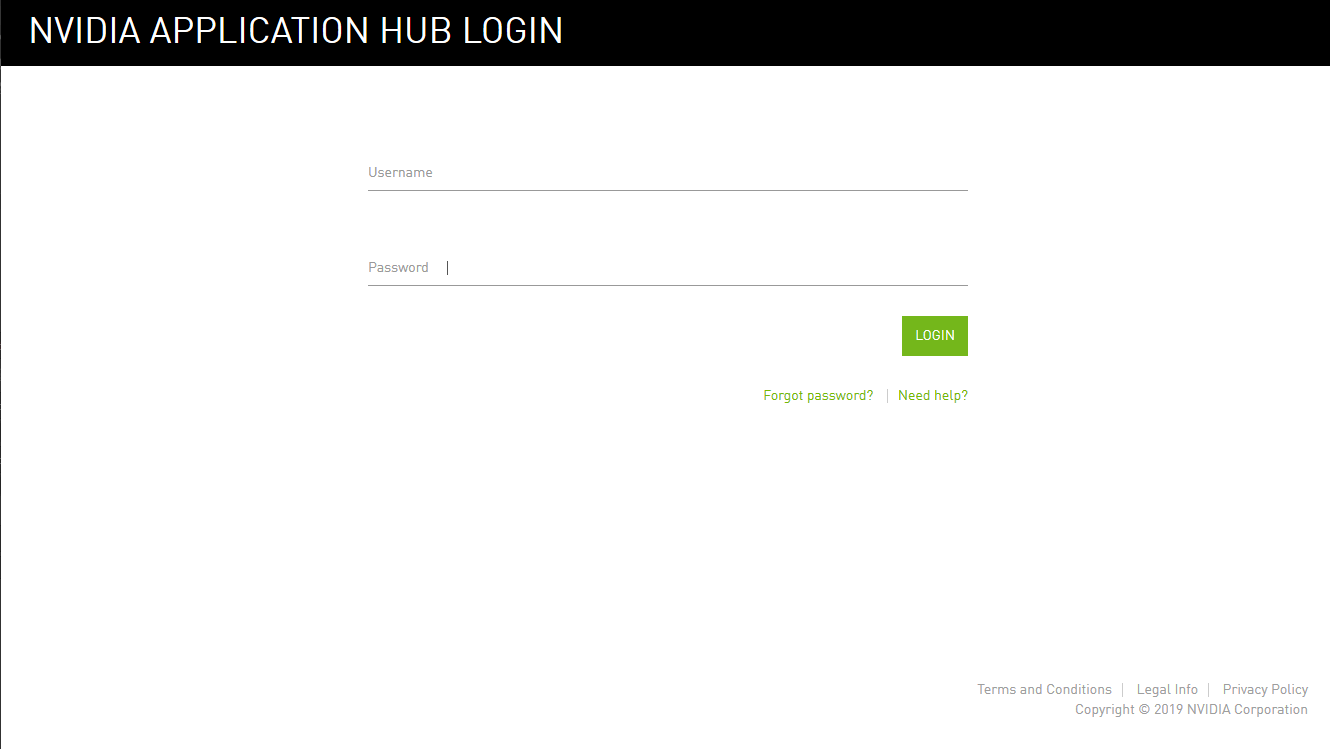
- Visit the NVIDIA Enterprise Application Hub by following the Login link in the instructions for using your NVIDIA Entitlement Certificate or when prompted after setting the password for your NVIDIA Enterprise Account.
- When prompted, provide your e-mail address and password, and click LOGIN.
- On the NVIDIA APPLICATION HUB page that opens, click NVIDIA LICENSING PORTAL.
The NVIDIA Licensing Portal dashboard page opens.
 Note:
Note:Your entitlement might not appear on the NVIDIA Licensing Portal dashboard page until 24 business hours after you set your password during the initial registration process.
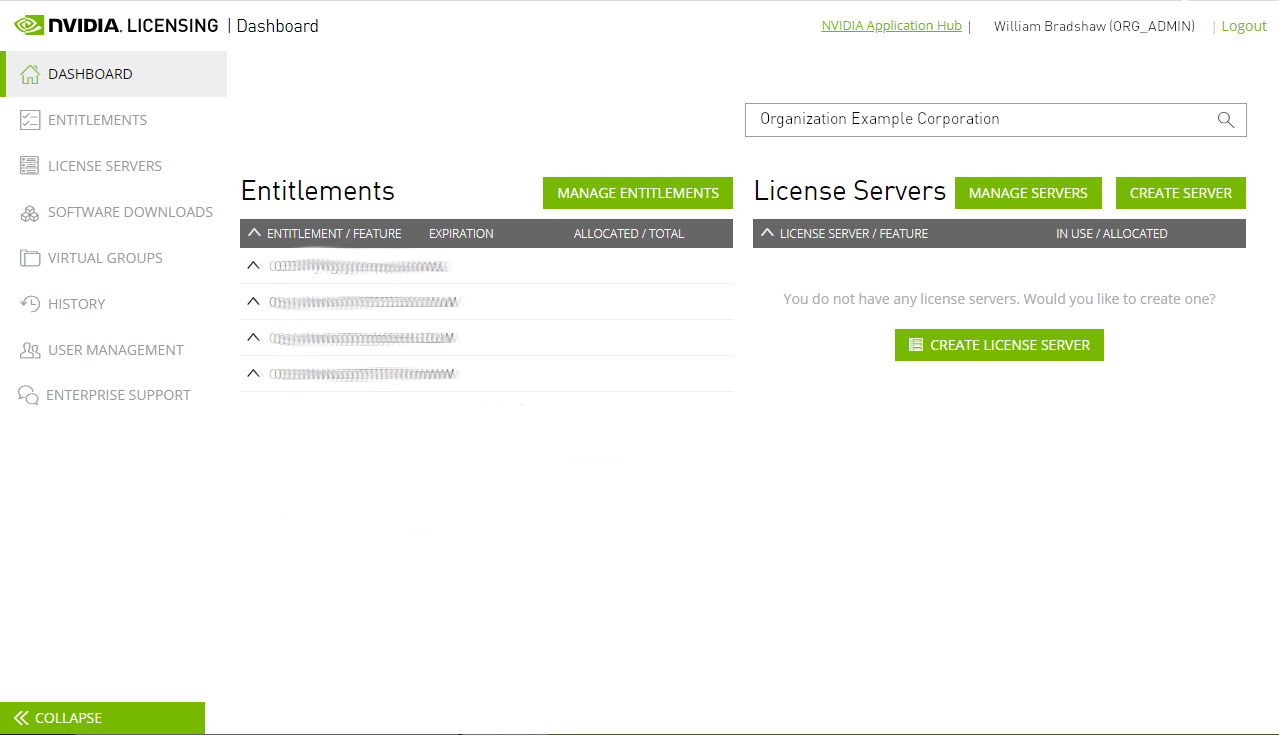
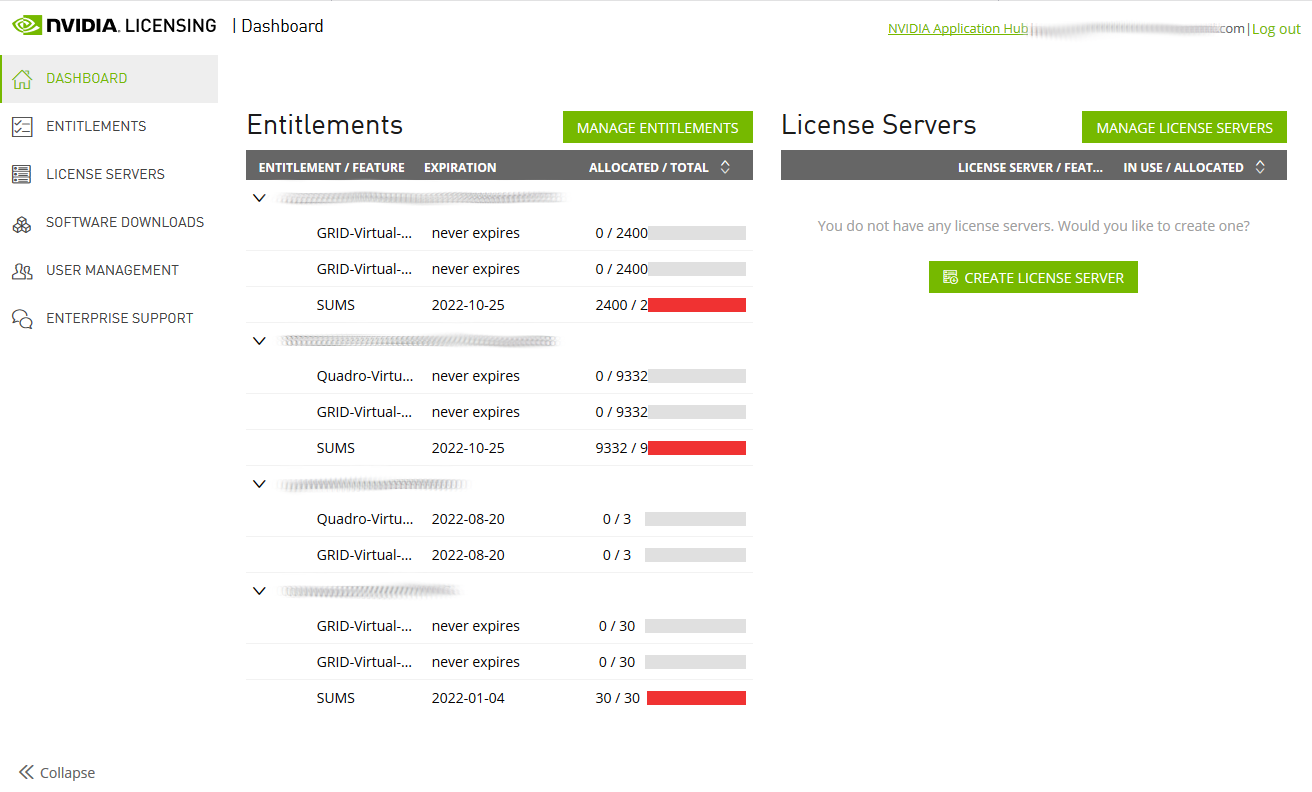
- In the NVIDIA Licensing Portal dashboard page opens, click the down arrow next to each entitlement listed to view details of the NVIDIA vGPU software that you purchased.
- In the left navigation pane of the NVIDIA Licensing Portal dashboard, click SOFTWARE DOWNLOADS.
- On the Product Download page that opens, follow the Download link for the brand and version of your chosen hypervisor for the release of NVIDIA vGPU software that you are using, for example, NVIDIA vGPU for vSphere 6.7 for NVIDIA vGPU software release 9.2.
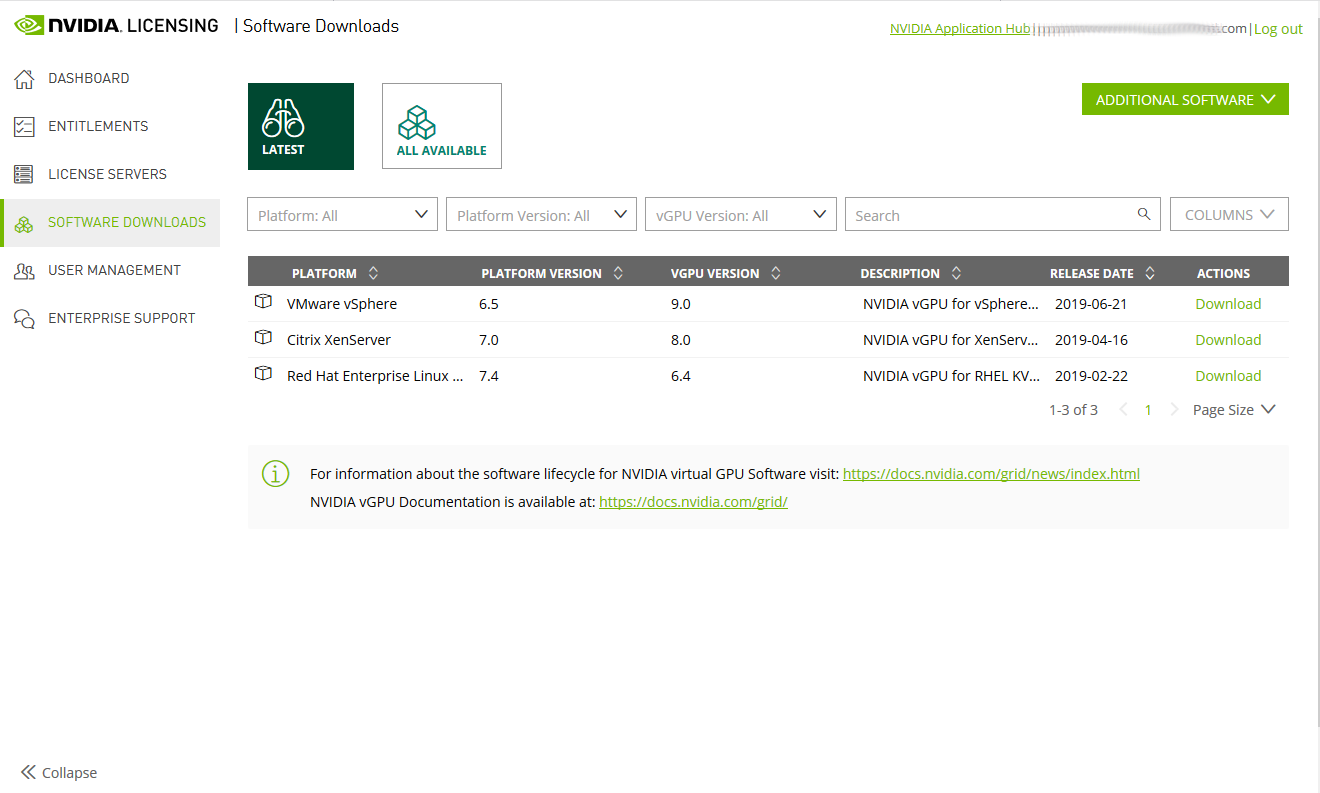
If you don't see the brand and version of your chosen hypervisor for the release of NVIDIA vGPU software that you are using, click ALL AVAILABLE to see a list of all NVIDIA vGPU software available for download. Use the drop-down lists or the search box to filter the software listed.
- When prompted to accept the license for the software that you are downloading, click AGREE & DOWNLOAD.
- When the browser asks what it should do with the file, select the option to save the file.
When the download is complete, the Download Complete pop-up window remains open for you to download any additional software that you might need for your NVIDIA vGPU software deployment.
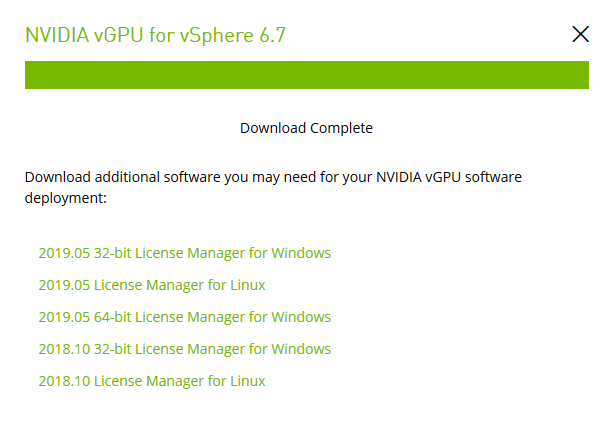
- In the Download Complete pop-up window, follow the links to download any additional software that you need for your NVIDIA vGPU software deployment.
- Follow the link to the NVIDIA vGPU software license server software for your license server host machine’s operating system, for example, License Manager for Windows.
- If you are using an NVIDIA Tesla™ M60 or M6 GPU and think you might need to change its mode, follow the Mode Change Utility link. For details about when you need to change the mode, see Switching the Mode of a Tesla M60 or M6 GPU.
The NVIDIA vGPU software License Server is used to serve a pool of floating licenses to NVIDIA vGPU software licensed products. The license server is designed to be installed at a location that is accessible from a customer’s network, and be configured with licenses obtained from the NVIDIA Licensing Portal.
These instructions cover only the installation and configuration of a single-instance license server. If you require high availability for the license server, refer to Virtual GPU License Server User Guide for instrictions for how to configure a primary and secondary license server. If you do not register a secondary server when the primary server is registered, you cannot register the secondary server later.
2.1. Overview of NVIDIA vGPU software Licensing
NVIDIA vGPU software is a licensed product. Licensed vGPU functionalities are activated during guest OS boot by the acquisition of a software license served over the network from an NVIDIA vGPU software license server. The license is returned to the license server when the guest OS shuts down.
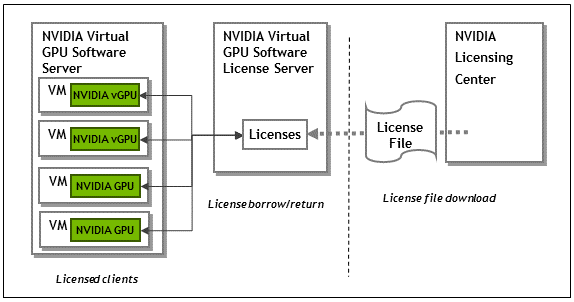
The licenses served by the NVIDIA vGPU software license server are obtained from the NVIDIA Licensing Portal as downloadable license files, and installed into the license server through its management interface.
2.2. Platform Configuration Requirements
- The platform must have a fixed (unchanging) IP address. The IP address may be assigned dynamically by DHCP or statically configured, but must be constant.
- The platform must have at least one unchanging Ethernet MAC address, to be used as a unique identifier when registering the server and generating licenses in the NVIDIA Licensing Portal.
- The platform’s date and time must be set accurately. NTP is recommended.
2.3. Installing the Java Runtime Environment
If a suitable Java runtime environment (JRE) version is not already installed on your system, install a supported JRE before running the NVIDIA license server installer.
Install a JRE for the same the processor architecture as the license server that you will install: If you will install a 32-bit license server, install a 32-bit JRE; if you will install a 64-bit license server, install a 64-bit JRE.
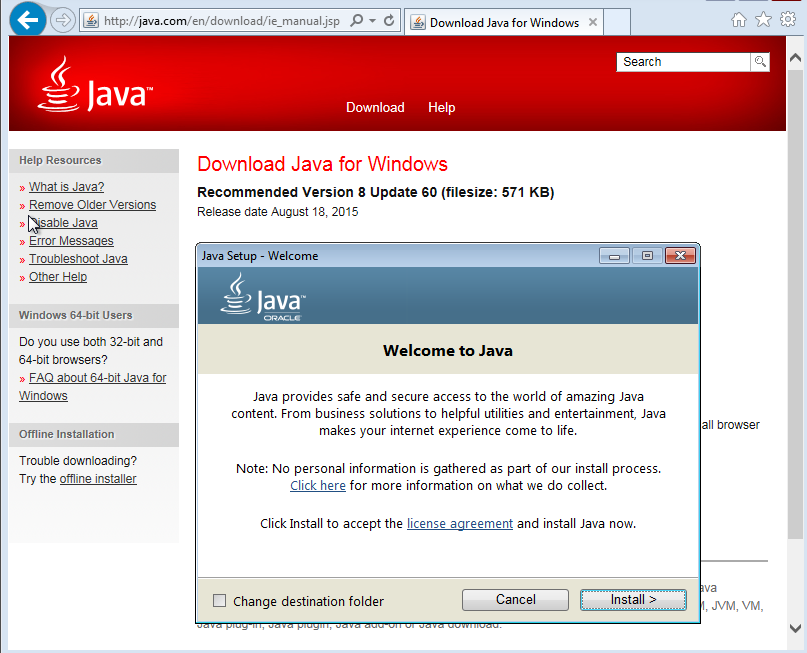
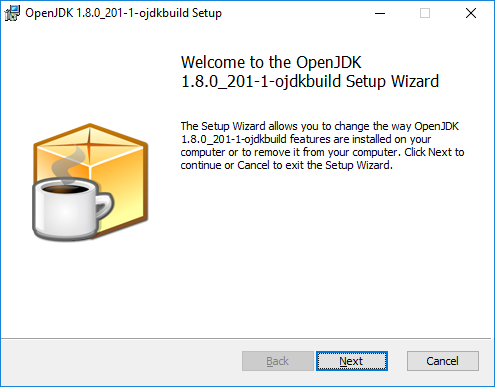
- Download a supported Oracle Java SE JRE or OpenJDK JRE.
- Download Oracle Java SE JRE from the java.com: Java + You page.
- Download OpenJDK JRE from the Community builds using source code from OpenJDK project on GitHub.
- Install the JRE that you downloaded.
Oracle Java SE JRE installation:
OpenJDK JRE installation:
- Set the
JAVA_HOMEsystem variable to the full path to the jre folder of your JRE installation. For example:- For 64-bit Oracle Java SE JRE: C:\Program Files\Java\jre1.8.0_191
- For 32-bit Oracle Java SE JRE: C:\Program Files (x86)\Java\jre1.8.0_191
- For 64-bit OpenJDK JRE: C:\Program Files\ojdkbuild\java-1.8.0-openjdk-1.8.0.201-1\jre
- For 32-bit OpenJDK JRE: C:\Program Files (x86)\ojdkbuild\java-1.8.0-openjdk-1.8.0.201-1\jre
Ensure that the path does not include any trailing characters, such as a slash or a space.
The license server installer warns users if the path in the
JAVA_HOMEsystem environment variable appears to be incorrect.If you are upgrading to a new version of the JRE, update the value of the
JAVA_HOMEsystem variable to the full path to the jre folder of your new JRE version. - Ensure that the
Pathsystem variable contains the path to the java.exe executable file. The installer may have already added this path for you. For example:- For 64-bit Oracle Java SE JRE: C:\Program Files\Java\jre1.8.0_191\bin
- For 32-bit Oracle Java SE JRE: C:\Program Files (x86)\Java\jre1.8.0_191\bin
- For 64-bit OpenJDK JRE: C:\Program Files\ojdkbuild\java-1.8.0-openjdk-1.8.0.201-1\bin
- For 32-bit OpenJDK JRE: C:\Program Files (x86)\ojdkbuild\java-1.8.0-openjdk-1.8.0.201-1\bin
2.4. Installing the License Server Software
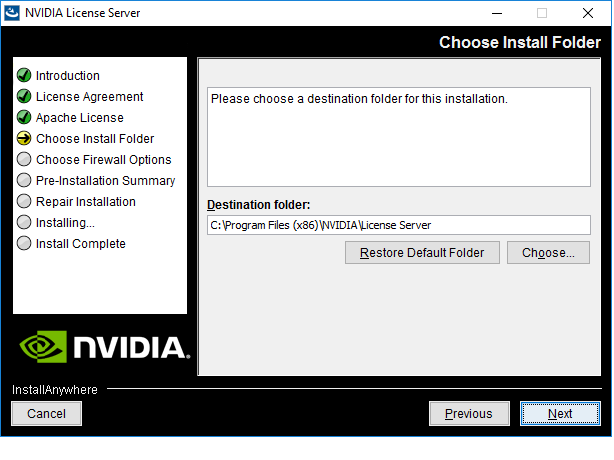
- Unzip the license server installer and run setup.exe.
- Accept the EULA for the license server software and the Apache Tomcat software used to support the license server’s management interface.

- Choose the destination folder where you want the license server software to be installed.
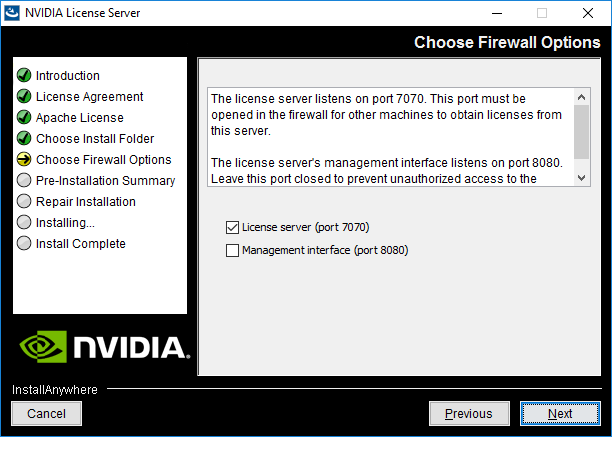
- In the Choose Firewall Options dialog box, select the ports to be opened in the firewall.
To enable remote clients to access licenses from the server and prevent remote access to the management interface, use the default setting, which sets ports as follows:
- Port 7070 is open to enable remote clients to access licenses from the server.
- Port 8080 is closed to ensure that the management interface is available only through a web browser running locally on the license server host.
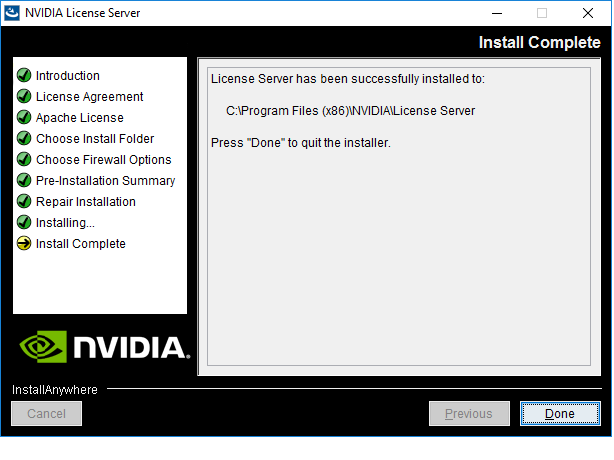
- After installation has completed successfully, click Done to exit the installer.
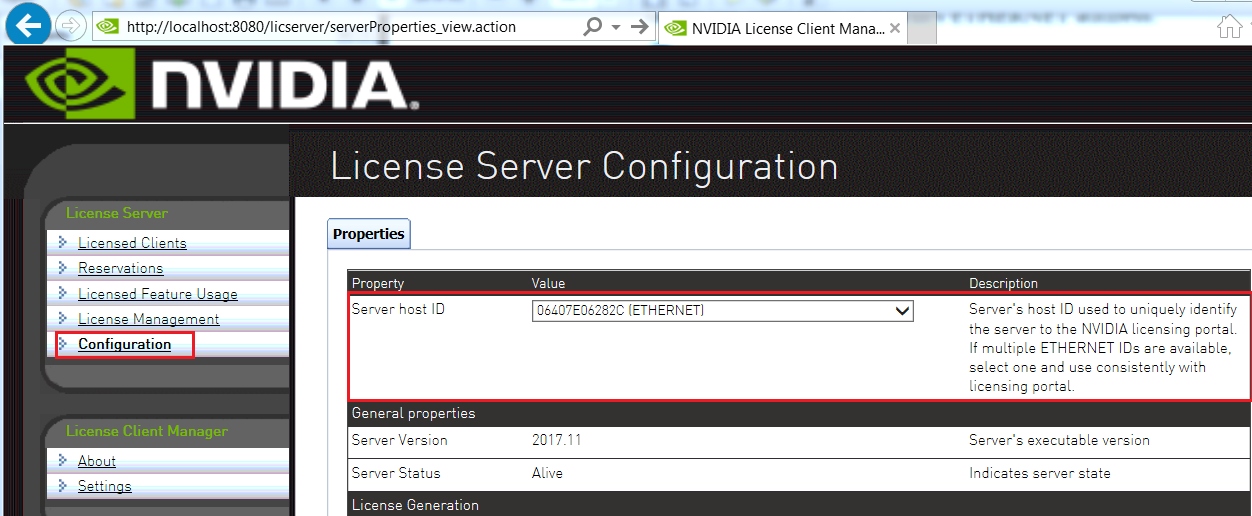
2.5. Obtaining the License Server’s MAC Address
The license server’s Ethernet MAC address uniquely identifies your server to the NVIDIA Licensing Portal. You will need this address to register your license server with the NVIDIA Licensing Portal to generate license files.
- Open a web browser on the license server host and connect to the URL
http://localhost:8080/licserver. - In the license server management interface, select Configuration.
- On the License Server Configuration page that opens, in the Server host ID drop-down list, select the platform’s ETHERNET address.
2.6. Managing your License Servers and Getting your License Files
To be able to download NVIDIA vGPU software licenses, you must create at least one license server on the NVIDIA Licensing Portal and allocate licenses to the server. After creating a license server and allocating licenses to it, you can download your license file.
2.6.1. Creating a License Server on the NVIDIA Licensing Portal
To be able to download NVIDIA vGPU software licenses, you must create at least one license server on the NVIDIA Licensing Portal. Creating a license server on the NVIDIA Licensing Portal registers your license server host with the NVIDIA Licensing Portal through the MAC address of the host.
- In the NVIDIA Licensing Portal, navigate to the organization or virtual group for which you want to create the license server.
- If you are not already logged in, log in to the NVIDIA Enterprise Application Hub and click NVIDIA LICENSING PORTAL to go to the NVIDIA Licensing Portal.
- Optional: If your assigned roles give you access to multiple virtual groups, select the virtual group for which you are creating the license server from the list of virtual groups at the top right of the page.
If no license servers have been created for your organization or virtual group, the NVIDIA Licensing Portal dashboard displays a message asking if you want to create a license server.
- On the NVIDIA Licensing Portal dashboard, click CREATE LICENSE SERVER.
The Create License Server pop-up window opens.
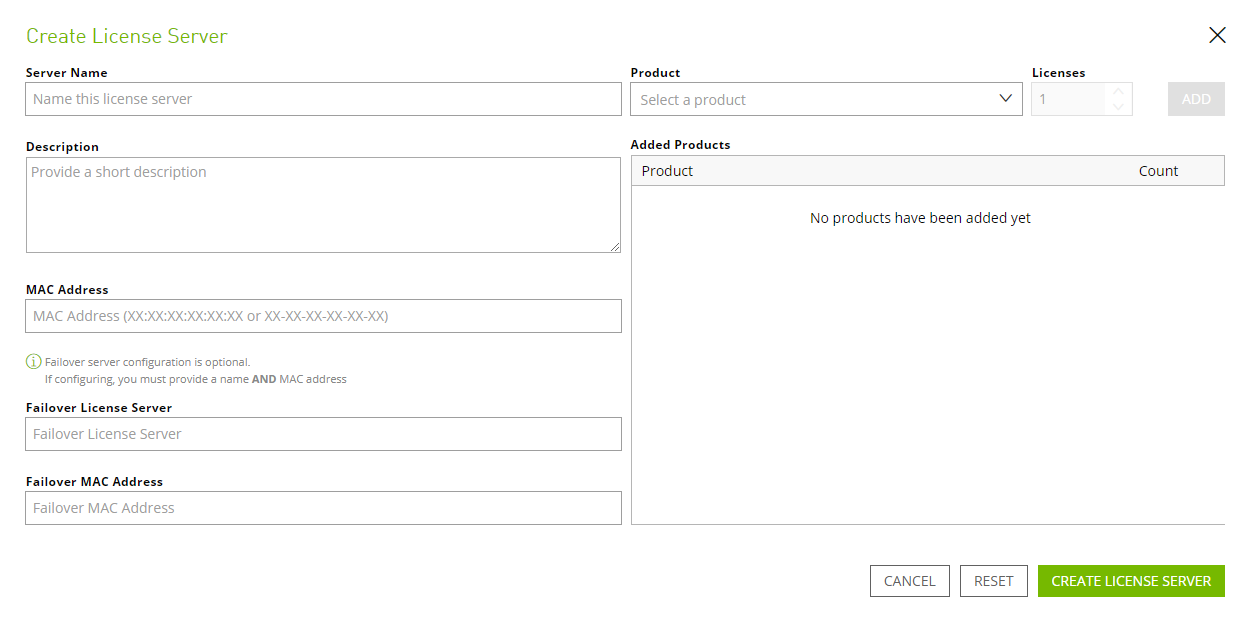
- Provide the details of your license server.
- In the Server Name field, enter the host name of the license server.
- In the Description field, enter a text description of the license server. This description is required and will be displayed on the details page for the license server that you are creating.
- In the MAC Address field, enter the MAC address of your license server.
- Add the licenses for the products that you want to allocate to this license server. For each product, add the licenses as follows:
- From the Product drop-down list, select the product for which you want to add licenses.
- In the Licenses field, enter the number of licenses for the product that you want to add.
- Click ADD.
- Leave the Failover License Server and Failover MAC Address fields unset.
- Click CREATE LICENSE SERVER.
2.6.2. Downloading a License File
Each license server that you create has license file associated with it. The license file contains all the licenses that you allocated to the license server. After downloading the license file, you can install it on the license server host associated with the license server on the NVIDIA Licensing Portal.
- In the NVIDIA Licensing Portal, navigate to the organization or virtual group for which you want to download the license file.
- If you are not already logged in, log in to the NVIDIA Enterprise Application Hub and click NVIDIA LICENSING PORTAL to go to the NVIDIA Licensing Portal.
- Optional: If your assigned roles give you access to multiple virtual groups, select the virtual group for which you are downloading the license file from the list of virtual groups at the top right of the page.
- In the list of license servers on the NVIDIA Licensing Portal dashboard, select the license server whose associated license file you want to download.
- In the License Server Details page that opens, review the licenses allocated to the license server.
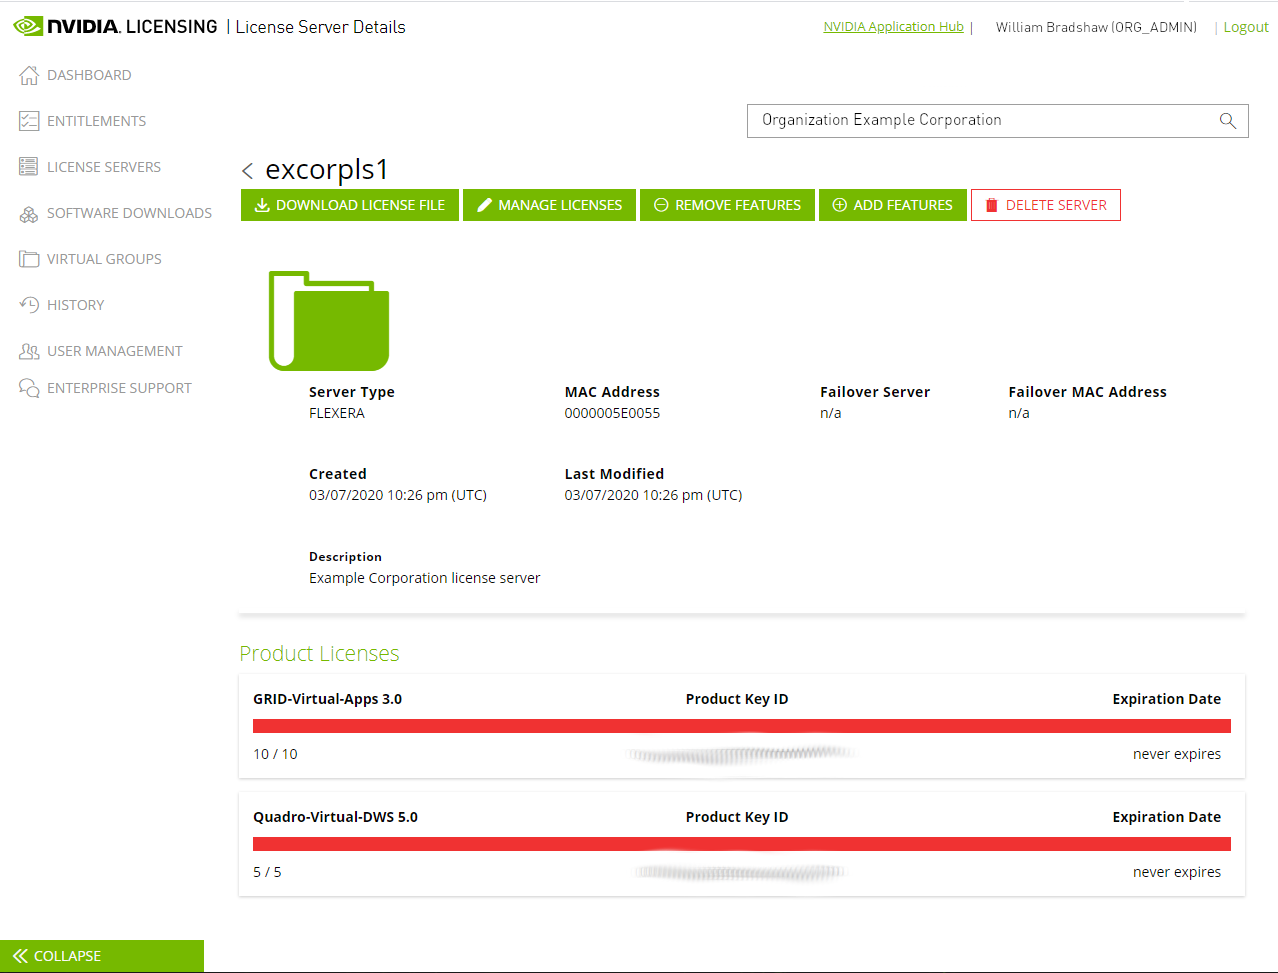
- Click DOWNLOAD LICENSE FILE and save the .bin license file to your license server for installation.
2.7. Installing a License
NVIDIA vGPU software licenses are distributed as .bin files for download from the NVIDIA Licensing Portal.
Before installing a license, ensure that you have downloaded the license file from the NVIDIA Licensing Portal.
- In the license server management interface, select License Management.
- On the License Management page that opens, click Choose File.
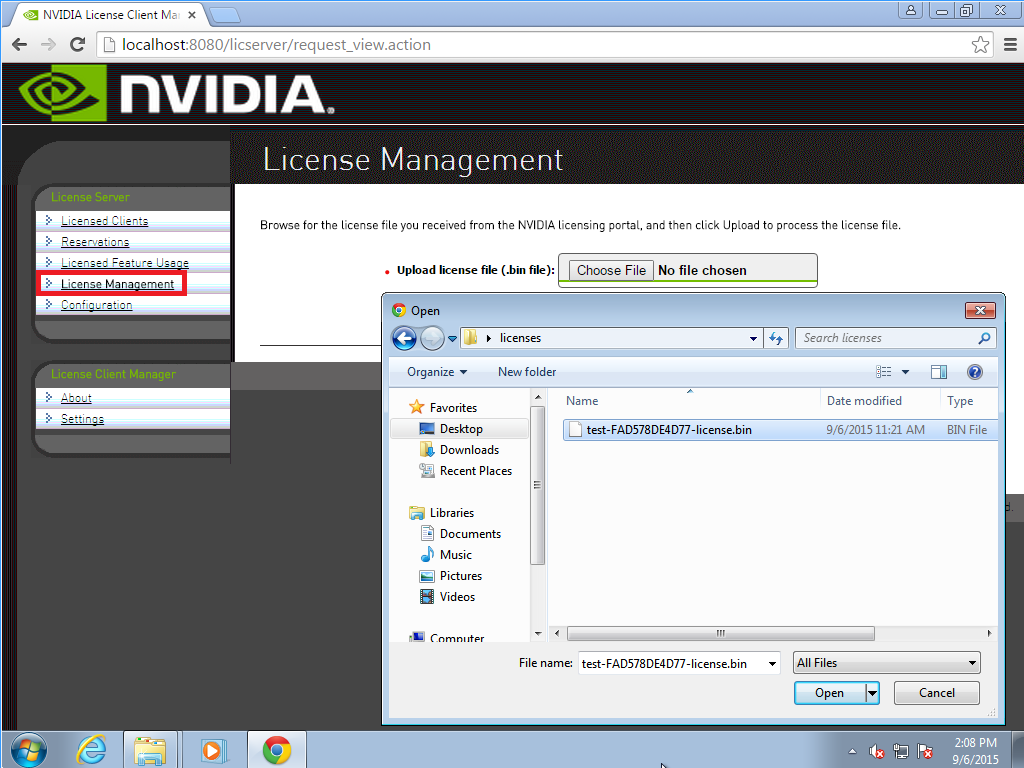
- In the file browser that opens, select the .bin file and click Open.
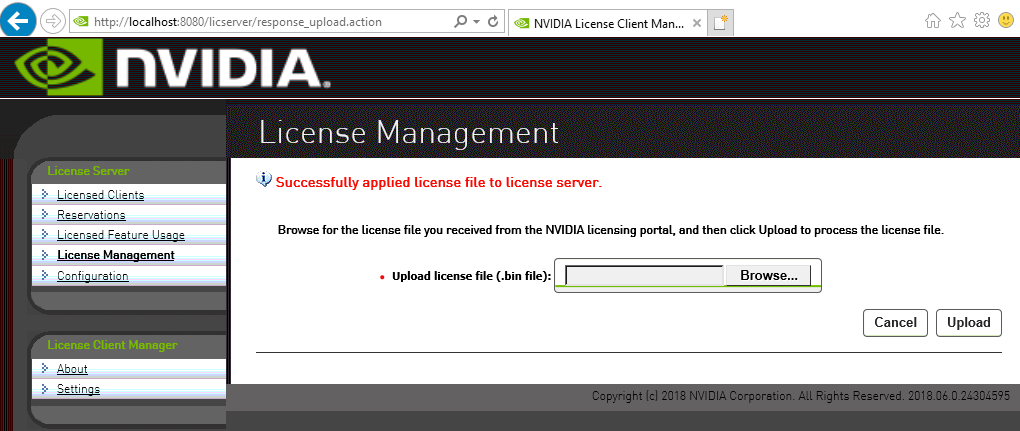
- Back on the License Management page, click Upload to install the license file on the license server. The license server should confirm successful installation of the license file.
Before installing and configuring NVIDIA vGPU Manager and the Guest Driver, ensure that a VM running a supported Windows guest OS is configured in your chosen hypervisor.
The factory settings of some supported GPU boards are incompatible with NVIDIA vGPU software. Before configuring NVIDIA vGPU software on these GPU boards, you must configure the boards to change these settings.
3.1. Switching the Mode of a Tesla M60 or M6 GPU
Tesla M60 and M6 GPUs support compute mode and graphics mode. NVIDIA vGPU requires GPUs that support both modes to operate in graphics mode.
Only Tesla M60 and M6 GPUs require and support mode switching. Other GPUs that support NVIDIA vGPU do not require or support mode switching.
Even in compute mode, Tesla M60 and M6 GPUs do not support NVIDIA Virtual Compute Server vGPU types.
Recent Tesla M60 GPUs and M6 GPUs are supplied in graphics mode. However, your GPU might be in compute mode if it is an older Tesla M60 GPU or M6 GPU, or if its mode has previously been changed.
If your GPU supports both modes but is in compute mode, you must use the gpumodeswitch tool to change the mode of the GPU to graphics mode. If you are unsure which mode your GPU is in, use the gpumodeswitch tool to find out the mode.
For more information, see gpumodeswitch User Guide.
3.2. Installing the NVIDIA Virtual GPU Manager
Before guests enabled for NVIDIA vGPU can be configured, the NVIDIA Virtual GPU Manager must be installed in your chosen hypervisor. The process for installing the NVIDIA Virtual GPU Manager depends on the hypervisor that you are using.
If you need more detailed instructions, refer to the appropriate NVIDIA vGPU installation guide.
3.2.1. Installing the NVIDIA Virtual GPU Manager on VMware vSphere
The NVIDIA Virtual GPU Manager for VMware vSphere ESXi is distributed as a vSphere Installation Bundle (VIB) file.
- Copy the NVIDIA Virtual GPU Manager VIB file to the ESXi host.
- Put the ESXi host into maintenance mode.
$ esxcli system maintenanceMode set –-enable true
- Run the esxcli command to install the NVIDIA Virtual GPU Manager from the VIB file.
$ esxcli software vib install –v directory/NVIDIA**.vib
- Exit maintenance mode.
$ esxcli system maintenanceMode set –-enable false
- Reboot the ESXi host.
$ reboot
- Verify that the NVIDIA kernel driver can successfully communicate with the physical GPUs in your system by running the nvidia-smi command without any options.
$ nvidia-smi
3.2.2. Installing the NVIDIA Virtual GPU Manager on Citrix Hypervisor
The NVIDIA Virtual GPU Manager for Citrix Hypervisor is distributed as an RPM Package Manager (RPM) file. It runs in the Citrix Hypervisor Control Domain (dom0) shell.
- Copy the NVIDIA Virtual GPU Manager RPM file to the Citrix Hypervisor dom0 shell.
- Run the rpm command to install the package.
[root@xenserver ~]# rpm -iv NVIDIA-**.rpm
- Reboot the Citrix Hypervisor platform.
[root@xenserver ~]# shutdown -r now
- After the Citrix Hypervisor host has rebooted, verify the installation of the NVIDIA Virtual GPU Manager package for Citrix Hypervisor by checking for the NVIDIA kernel driver in the list of kernel-loaded modules.
            [root@xenserver ~]# lsmod |grep nvidia
nvidia 8152994 0
i2c_core 20294 2 nvidia,i2c_
3.3. Disabling and Enabling ECC Memory
Some GPUs that support NVIDIA vGPU software support error correcting code (ECC) memory with NVIDIA vGPU. ECC memory improves data integrity by detecting and handling double-bit errors. However, not all GPUs, vGPU types, and hypervisor software versions support ECC memory with NVIDIA vGPU.
On GPUs that support ECC memory with NVIDIA vGPU, ECC memory is supported with C-series and Q-series vGPUs, but not with A-series and B-series vGPUs. Although A-series and B-series vGPUs start on physical GPUs on which ECC memory is enabled, enabling ECC with vGPUs that do not support it might incur some costs.
On physical GPUs that do not have HBM2 memory, the amount of frame buffer that is usable by vGPUs is reduced. All types of vGPU are affected, not just vGPUs that support ECC memory.
The effects of enabling ECC memory on a physical GPU are as follows:
- ECC memory is exposed as a feature on all supported vGPUs on the physical GPU.
- In VMs that support ECC memory, ECC memory is enabled, with the option to disable ECC in the VM.
- ECC memory can be enabled or disabled for individual VMs. Enabling or disabling ECC memory in a VM does not affect the amount of frame buffer that is usable by vGPUs.
GPUs based on the Pascal GPU architecture and later GPU architectures support ECC memory with NVIDIA vGPU. These GPUs are supplied with ECC memory enabled.
Tesla M60 and M6 GPUs support ECC memory when used without GPU virtualization, but NVIDIA vGPU does not support ECC memory with these GPUs. In graphics mode, these GPUs are supplied with ECC memory disabled by default.
Some hypervisor software versions do not support ECC memory with NVIDIA vGPU.
If you are using a hypervisor software version or GPU that does not support ECC memory with NVIDIA vGPU and ECC memory is enabled, NVIDIA vGPU fails to start. In this situation, you must ensure that ECC memory is disabled on all GPUs if you are using NVIDIA vGPU.
3.3.1. Disabling ECC Memory
If ECC memory is unsuitable for your workloads but is enabled on your GPUs, disable it. You must also ensure that ECC memory is disabled on all GPUs if you are using NVIDIA vGPU with a hypervisor software version or a GPU that does not support ECC memory with NVIDIA vGPU. If your hypervisor software version or GPU does not support ECC memory and ECC memory is enabled, NVIDIA vGPU fails to start.
Where to perform this task from depends on whether you are changing ECC memory settings for a physical GPU or a vGPU.
- For a physical GPU, perform this task from the hypervisor host.
- For a vGPU, perform this task from the VM to which the vGPU is assigned.
Note:
ECC memory must be enabled on the physical GPU on which the vGPUs reside.
Before you begin, ensure that NVIDIA Virtual GPU Manager is installed on your hypervisor. If you are changing ECC memory settings for a vGPU, also ensure that the NVIDIA vGPU software graphics driver is installed in the VM to which the vGPU is assigned.
- Use nvidia-smi to list the status of all physical GPUs or vGPUs, and check for ECC noted as enabled.
            # nvidia-smi -q

==============NVSMI LOG==============

Timestamp                           : Wed Jun 10 18:36:45 2019
Driver Version                      : 430.99

Attached GPUs                       : 1
GPU 0000:02:00.0

[...]

    Ecc Mode
        Current                     : Enabled
        Pending                     : Enabled

[...]
- Change the ECC status to off for each GPU for which ECC is enabled.
- If you want to change the ECC status to off for all GPUs on your host machine or vGPUs assigned to the VM, run this command:
# nvidia-smi -e 0
- If you want to change the ECC status to off for a specific GPU or vGPU, run this command:
# nvidia-smi -i id -e 0
id is the index of the GPU or vGPU as reported by nvidia-smi.
This example disables ECC for the GPU with index
0000:02:00.0.# nvidia-smi -i 0000:02:00.0 -e 0
- If you want to change the ECC status to off for all GPUs on your host machine or vGPUs assigned to the VM, run this command:
- Reboot the host or restart the VM.
- Confirm that ECC is now disabled for the GPU or vGPU.
            # nvidia—smi —q

==============NVSMI LOG==============

Timestamp                           : Fri Mar 13 18:37:53 2019
Driver Version                      : 430.99

Attached GPUs                       : 1
GPU 0000:02:00.0
[...]

    Ecc Mode
        Current                     : Disabled
        Pending                     : Disabled

[...]
3.3.2. Enabling ECC Memory
If ECC memory is suitable for your workloads and is supported by your hypervisor software and GPUs, but is disabled on your GPUs or vGPUs, enable it.
Where to perform this task from depends on whether you are changing ECC memory settings for a physical GPU or a vGPU.
- For a physical GPU, perform this task from the hypervisor host.
- For a vGPU, perform this task from the VM to which the vGPU is assigned.
Note:
ECC memory must be enabled on the physical GPU on which the vGPUs reside.
Before you begin, ensure that NVIDIA Virtual GPU Manager is installed on your hypervisor. If you are changing ECC memory settings for a vGPU, also ensure that the NVIDIA vGPU software graphics driver is installed in the VM to which the vGPU is assigned.
- Use nvidia-smi to list the status of all physical GPUs or vGPUs, and check for ECC noted as disabled.
            # nvidia-smi -q

==============NVSMI LOG==============

Timestamp                           : Wed Jun 10 18:36:45 2019
Driver Version                      : 430.99

Attached GPUs                       : 1
GPU 0000:02:00.0

[...]

    Ecc Mode
        Current                     : Disabled
        Pending                     : Disabled

[...]
- Change the ECC status to on for each GPU or vGPU for which ECC is enabled.
- If you want to change the ECC status to on for all GPUs on your host machine or vGPUs assigned to the VM, run this command:
# nvidia-smi -e 1
- If you want to change the ECC status to on for a specific GPU or vGPU, run this command:
# nvidia-smi -i id -e 1
id is the index of the GPU or vGPU as reported by nvidia-smi.
This example enables ECC for the GPU with index
0000:02:00.0.# nvidia-smi -i 0000:02:00.0 -e 1
- If you want to change the ECC status to on for all GPUs on your host machine or vGPUs assigned to the VM, run this command:
- Reboot the host or restart the VM.
- Confirm that ECC is now enabled for the GPU or vGPU.
            # nvidia—smi —q

==============NVSMI LOG==============

Timestamp                           : Fri Mar 13 18:37:53 2019
Driver Version                      : 430.99

Attached GPUs                       : 1
GPU 0000:02:00.0
[...]

    Ecc Mode
        Current                     : Enabled
        Pending                     : Enabled

[...]
3.4. Attaching an NVIDIA vGPU Profile to a VM
To attach an NVIDIA vGPU profile to a virtual machine (VM), you must configure the VM hardware. The process for attaching an NVIDIA vGPU profile to a VM depends on the hypervisor that you are using.
3.4.1. Configuring a vSphere VM with NVIDIA vGPU
Output from the VM console in the VMware vSphere Web Client is not available for VMs that are running vGPU. Make sure that you have installed an alternate means of accessing the VM (such as VMware Horizon or a VNC server) before you configure vGPU.
VM console in vSphere Web Client will become active again once the vGPU parameters are removed from the VM’s configuration.
- Open the vCenter Web UI.
- In the vCenter Web UI, right-click the VM and choose Edit Settings.
- Click the Virtual Hardware tab.
- In the New device list, select Shared PCI Device and click Add. The PCI device field should be auto-populated with NVIDIA GRID vGPU.
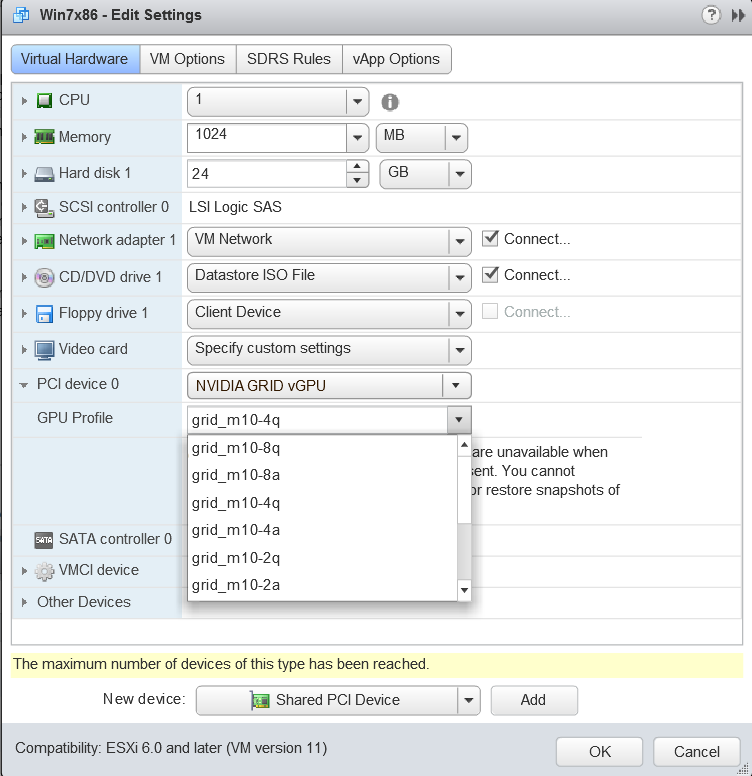
- From the GPU Profile drop-down menu, choose the type of vGPU you want to configure and click OK.
- Ensure that VMs running vGPU have all their memory reserved:
- Select Edit virtual machine settings from the vCenter Web UI.
- Expand the Memory section and click Reserve all guest memory (All locked).
After you have configured a vSphere VM with a vGPU, start the VM. VM console in vSphere Web Client is not supported in this vGPU release. Therefore, use VMware Horizon or VNC to access the VM’s desktop.
3.4.2. Configuring a Citrix Hypervisor VM with Virtual GPU
- Ensure the VM is powered off.
- Right-click the VM in XenCenter, select Properties to open the VM’s properties, and select the GPU property. The available GPU types are listed in the GPU type drop-down list:
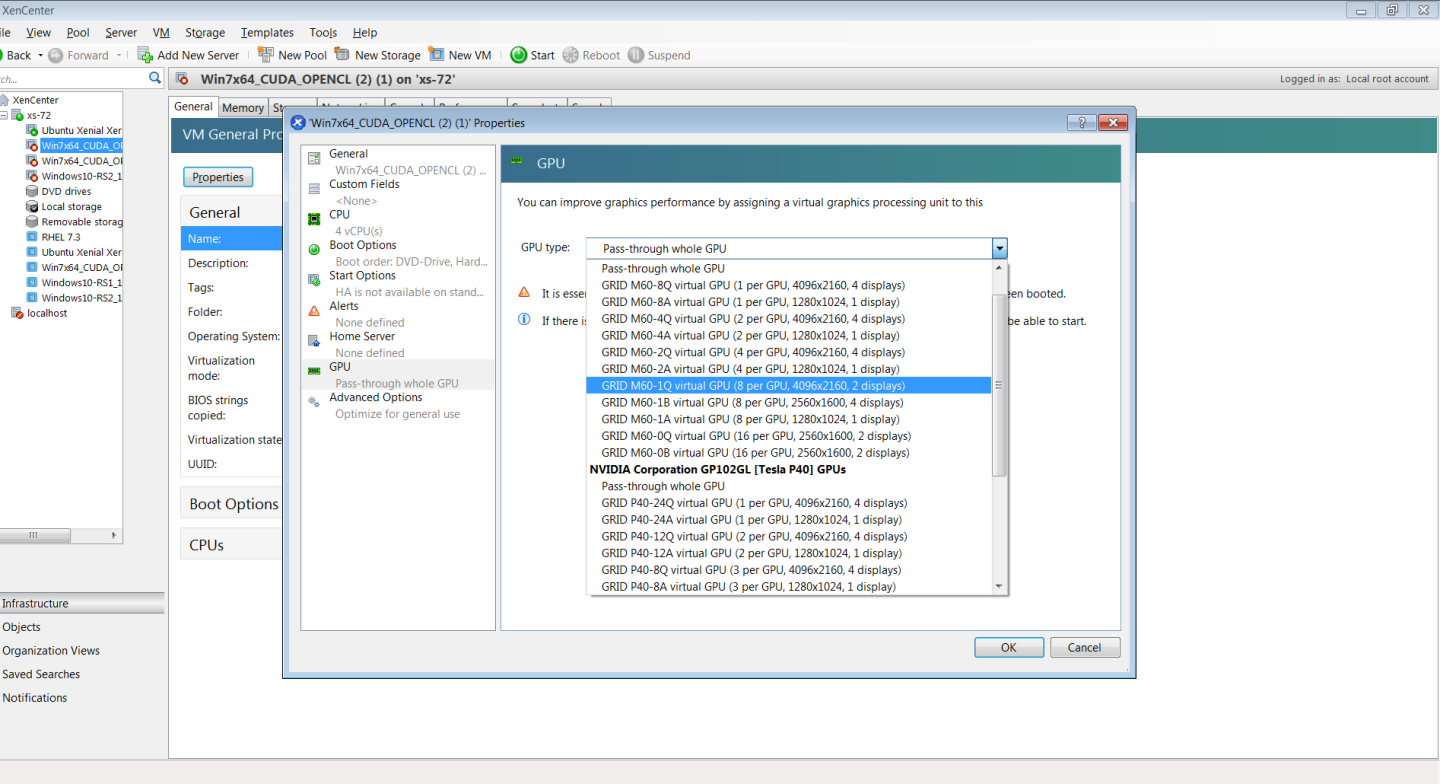
After you have configured a Citrix Hypervisor VM with a vGPU, start the VM, either from XenCenter or by using xe vm-start in a dom0 shell. You can view the VM’s console in XenCenter.
3.5. Installing the NVIDIA vGPU Software Graphics Driver
After you create a Windows VM on the hypervisor and boot the VM, the VM should boot to a standard Windows desktop in VGA mode at 800×600 resolution. You can use the Windows screen resolution control panel to increase the resolution to other standard resolutions, but to fully enable GPU operation, the NVIDIA vGPU software graphics driver must be installed.
- Copy the NVIDIA Windows driver package to the guest VM where you are installing the driver.
- Execute the package to unpack and run the driver installer.
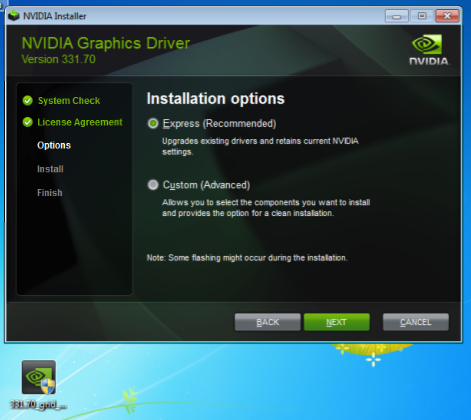
- Click through the license agreement.
- Select Express Installation and click NEXT. After the driver installation is complete, the installer may prompt you to restart the platform.
- If prompted to restart the platform, do one of the following:
- Select Restart Now to reboot the VM.
- Exit the installer and reboot the VM when you are ready.
After the VM restarts, it boots to a Windows desktop.
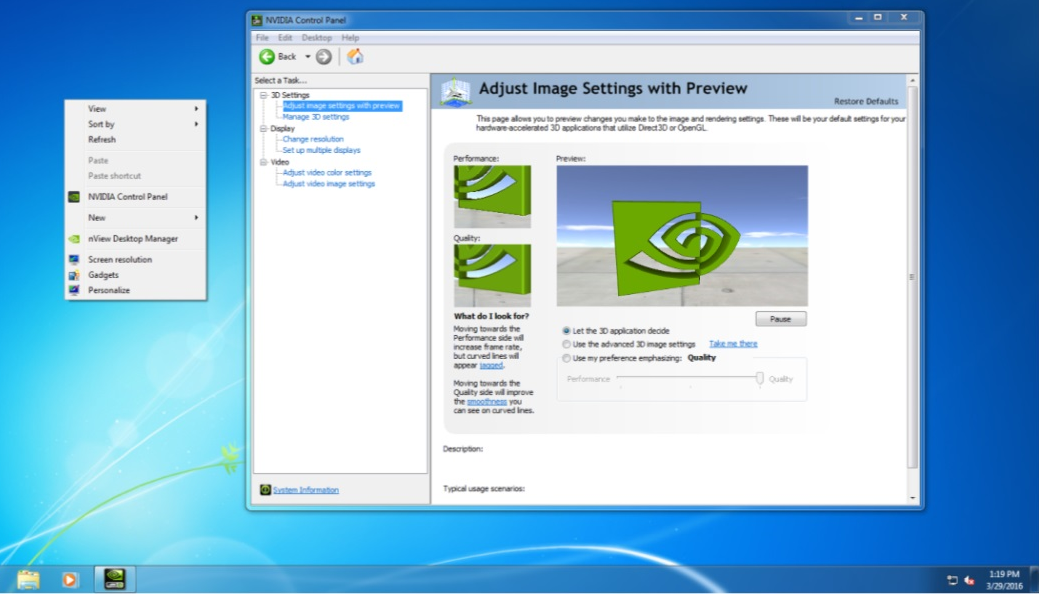
- Verify that the NVIDIA driver is running.
- Right-click on the desktop.
- From the menu that opens, choose NVIDIA Control Panel.
- In the NVIDIA Control Panel, from the Help menu, choose System Information.
NVIDIA Control Panel reports the vGPU that is being used, its capabilities, and the NVIDIA driver version that is loaded.
3.6. Licensing an NVIDIA vGPU
Perform this task from the guest VM to which the vGPU is assigned.
The NVIDIA Control Panel tool that you use to perform this task detects that a vGPU is assigned to the VM and, therefore, provides no options for selecting the license type. After you license the vGPU, NVIDIA vGPU software automatically selects the correct type of license based on the vGPU type.
These instructions cover only licensing for a single-instance license server. If you configured a primary and secondary license server, refer to Virtual GPU Client Licensing User Guide for instructions for how to specify the address and port number of the primary and secondary license servers.
- Open NVIDIA Control Panel:
- Right-click on the Windows desktop and select NVIDIA Control Panel from the menu.
- Open Windows Control Panel and double-click the NVIDIA Control Panel icon.
- In NVIDIA Control Panel, select the Manage License task in the Licensing section of the navigation pane.
The Manage License task pane shows that NVIDIA vGPU is currently unlicensed.Note:
If the Licensing section and Manage License task are not displayed in NVIDIA Control Panel, the system has been configured to hide licensing controls in NVIDIA Control Panel. For information about registry settings, see Virtual GPU Client Licensing User Guide.
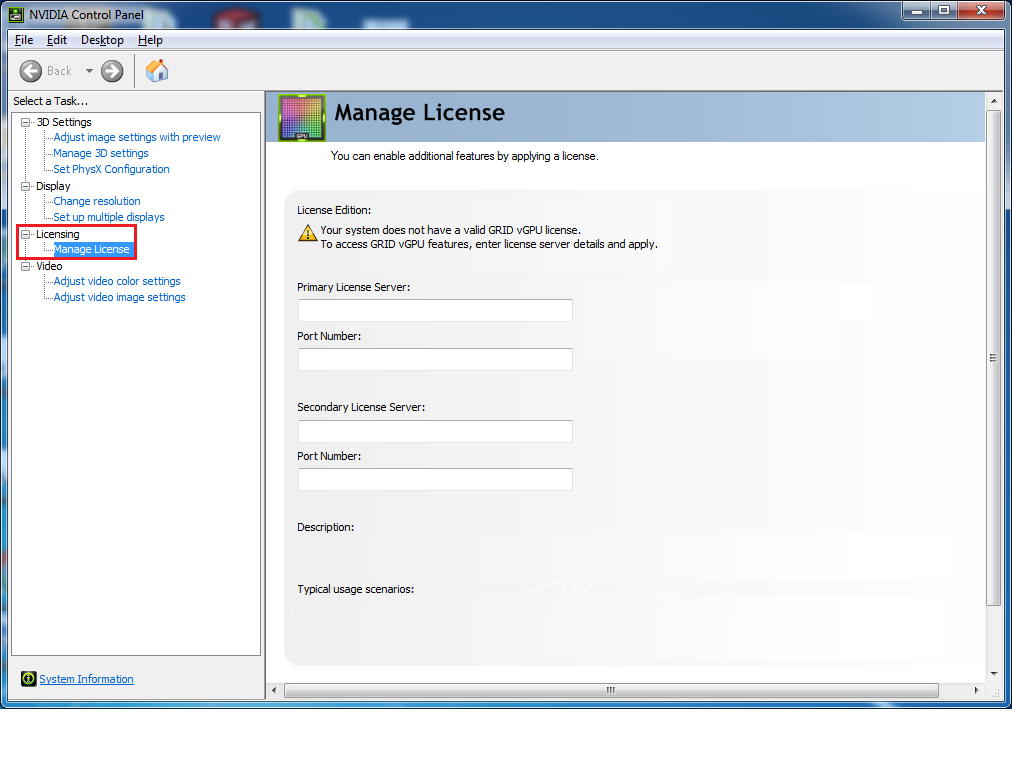
- In the Primary License Server field, enter the address of yourNVIDIA vGPU software License Server. The address can be a fully-qualified domain name such as
gridlicense1.example.com, or an IP address such as10.31.20.45. - Leave the Port Number field under the Primary License Server field unset. The port defaults to
7070, which is the default port number used by NVIDIA vGPU software License Server. - Leave the Secondary License Server field and the Port Number field under it unset.
- Click Apply to assign the settings. The system requests the appropriate license for the current vGPU from the configured license server.
The vGPU within the VM should now exhibit full frame rate, resolution, and display output capabilities. The VM is now capable of running the full range of DirectX and OpenGL graphics applications.
You have now completed the process of installing NVIDIA vGPU software and setting up a single VM to use NVIDIA vGPU.
If the system fails to obtain a license, see Virtual GPU Client Licensing User Guide for guidance on troubleshooting.
Notice
This document is provided for information purposes only and shall not be regarded as a warranty of a certain functionality, condition, or quality of a product. NVIDIA Corporation (“NVIDIA”) makes no representations or warranties, expressed or implied, as to the accuracy or completeness of the information contained in this document and assumes no responsibility for any errors contained herein. NVIDIA shall have no liability for the consequences or use of such information or for any infringement of patents or other rights of third parties that may result from its use. This document is not a commitment to develop, release, or deliver any Material (defined below), code, or functionality.
NVIDIA reserves the right to make corrections, modifications, enhancements, improvements, and any other changes to this document, at any time without notice.
Customer should obtain the latest relevant information before placing orders and should verify that such information is current and complete.
NVIDIA products are sold subject to the NVIDIA standard terms and conditions of sale supplied at the time of order acknowledgement, unless otherwise agreed in an individual sales agreement signed by authorized representatives of NVIDIA and customer (“Terms of Sale”). NVIDIA hereby expressly objects to applying any customer general terms and conditions with regards to the purchase of the NVIDIA product referenced in this document. No contractual obligations are formed either directly or indirectly by this document.
NVIDIA products are not designed, authorized, or warranted to be suitable for use in medical, military, aircraft, space, or life support equipment, nor in applications where failure or malfunction of the NVIDIA product can reasonably be expected to result in personal injury, death, or property or environmental damage. NVIDIA accepts no liability for inclusion and/or use of NVIDIA products in such equipment or applications and therefore such inclusion and/or use is at customer’s own risk.
NVIDIA makes no representation or warranty that products based on this document will be suitable for any specified use. Testing of all parameters of each product is not necessarily performed by NVIDIA. It is customer’s sole responsibility to evaluate and determine the applicability of any information contained in this document, ensure the product is suitable and fit for the application planned by customer, and perform the necessary testing for the application in order to avoid a default of the application or the product. Weaknesses in customer’s product designs may affect the quality and reliability of the NVIDIA product and may result in additional or different conditions and/or requirements beyond those contained in this document. NVIDIA accepts no liability related to any default, damage, costs, or problem which may be based on or attributable to: (i) the use of the NVIDIA product in any manner that is contrary to this document or (ii) customer product designs.
No license, either expressed or implied, is granted under any NVIDIA patent right, copyright, or other NVIDIA intellectual property right under this document. Information published by NVIDIA regarding third-party products or services does not constitute a license from NVIDIA to use such products or services or a warranty or endorsement thereof. Use of such information may require a license from a third party under the patents or other intellectual property rights of the third party, or a license from NVIDIA under the patents or other intellectual property rights of NVIDIA.
Reproduction of information in this document is permissible only if approved in advance by NVIDIA in writing, reproduced without alteration and in full compliance with all applicable export laws and regulations, and accompanied by all associated conditions, limitations, and notices.
THIS DOCUMENT AND ALL NVIDIA DESIGN SPECIFICATIONS, REFERENCE BOARDS, FILES, DRAWINGS, DIAGNOSTICS, LISTS, AND OTHER DOCUMENTS (TOGETHER AND SEPARATELY, “MATERIALS”) ARE BEING PROVIDED “AS IS.” NVIDIA MAKES NO WARRANTIES, EXPRESSED, IMPLIED, STATUTORY, OR OTHERWISE WITH RESPECT TO THE MATERIALS, AND EXPRESSLY DISCLAIMS ALL IMPLIED WARRANTIES OF NONINFRINGEMENT, MERCHANTABILITY, AND FITNESS FOR A PARTICULAR PURPOSE. TO THE EXTENT NOT PROHIBITED BY LAW, IN NO EVENT WILL NVIDIA BE LIABLE FOR ANY DAMAGES, INCLUDING WITHOUT LIMITATION ANY DIRECT, INDIRECT, SPECIAL, INCIDENTAL, PUNITIVE, OR CONSEQUENTIAL DAMAGES, HOWEVER CAUSED AND REGARDLESS OF THE THEORY OF LIABILITY, ARISING OUT OF ANY USE OF THIS DOCUMENT, EVEN IF NVIDIA HAS BEEN ADVISED OF THE POSSIBILITY OF SUCH DAMAGES. Notwithstanding any damages that customer might incur for any reason whatsoever, NVIDIA’s aggregate and cumulative liability towards customer for the products described herein shall be limited in accordance with the Terms of Sale for the product.
VESA DisplayPort
DisplayPort and DisplayPort Compliance Logo, DisplayPort Compliance Logo for Dual-mode Sources, and DisplayPort Compliance Logo for Active Cables are trademarks owned by the Video Electronics Standards Association in the United States and other countries.
HDMI
HDMI, the HDMI logo, and High-Definition Multimedia Interface are trademarks or registered trademarks of HDMI Licensing LLC.
OpenCL
OpenCL is a trademark of Apple Inc. used under license to the Khronos Group Inc.
Trademarks
NVIDIA, the NVIDIA logo, NVIDIA GRID, NVIDIA GRID vGPU, NVIDIA Maxwell, NVIDIA Pascal, NVIDIA Turing, NVIDIA Volta, Quadro, and Tesla are trademarks or registered trademarks of NVIDIA Corporation in the U.S. and other countries. Other company and product names may be trademarks of the respective companies with which they are associated.