License Server User Guide
Virtual GPU Software License Server User Guide
Documentation for system administrators that explains how to install, configure, and manage the NVIDIA virtual GPU software license server.
The NVIDIA vGPU software License Server is used to serve a pool of floating licenses to NVIDIA vGPU software licensed products. The license server is designed to be installed at a location that is accessible from a customer’s network, and be configured with licenses obtained from the NVIDIA Licensing Portal.
1.1. Overview of NVIDIA vGPU software Licensing
NVIDIA vGPU software is a licensed product. Licensed vGPU functionalities are activated during guest OS boot by the acquisition of a software license served over the network from an NVIDIA vGPU software license server. The license is returned to the license server when the guest OS shuts down.
Figure 1. NVIDIA vGPU Software Licensing Architecture
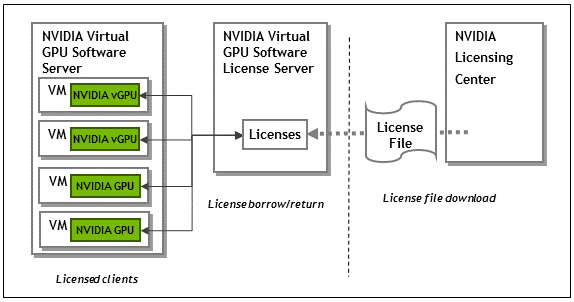
The licenses served by the NVIDIA vGPU software license server are obtained from the NVIDIA Licensing Portal as downloadable license files, and installed into the license server through its management interface.
1.2. NVIDIA vGPU Software License Server High Availability
To provide NVIDIA vGPU software clients with continued access to NVIDIA vGPU software features if a single license server fails, you can configure the license server for high availability. High availability requires two license servers in a failover configuration:
- A primary license server, which is actively serving licenses to NVIDIA vGPU software clients
- A secondary license server, which acts as a backup for the primary license server
Configuring two servers in a failover configuration increases availability because simultaneous failure of two servers is rare. The primary and secondary license servers work together to ensure that licenses in the enterprise remain continually available to NVIDIA vGPU software clients.
If the primary license server fails, failover occurs and the secondary server can continue to serve licenses for up to the license server maintenance interval, which is seven days.
To ensure that licenses in the enterprise remain continually available after failure of the primary license server, return the primary server to service within seven days of the failure. Furthermore, the remaining server becomes a single point of failure. Therefore, you should return the failed server to service as quickly as possible to restore high availability support for the license server.
During normal operation, the primary license server periodically updates the secondary server with information about the licenses that are being served to clients. However, when the primary server is returned to service after a failure, it is not updated with information from the secondary server about licenses that were served while the primary server was out of service.
For more information about configuring the license server for high availability, see High Availability Requirements.
1.3. Overview of the NVIDIA vGPU Software Licensing Process
The following table lists the major tasks in the process of licensing NVIDIA vGPU software and provides a cross-reference to instructions for performing each task.
If you are configuring the license server for high availability, you must perform some tasks for both the primary license server and the secondary license server. For more information, see High Availability Requirements.
| Task | Instructions |
|---|---|
| Get your NVIDIA vGPU software and NVIDIA vGPU software License Server software. | Virtual GPU Software Quick Start Guide |
| Install the NVIDIA vGPU software License Server software. | Installing and Configuring the NVIDIA vGPU Software License Server |
| Access the management interface of the license server. | Accessing the License Server Management Interface |
| Get the MAC address of the license server. | Obtaining the License Server’s MAC Address |
| HA license servers only: Enable failover support. | Enabling Failover Support on the Primary and Secondary License Servers |
| Register your license server, generate licenses, and download license files. | Managing Entitlements, Licenses, and Contacts on the NVIDIA Licensing Portal |
| Install a license. | Installing a License |
| View available licenses. | Viewing Information About Installed Licenses |
| Reserve and release licenses. | Reserving Licenses |
| Move a license to a new server. | |
| Convert a trial license server to a permanent license server. | Converting an Evaluation License Server to a Permanent License Server |
| Configure licensed NVIDIA vGPU software products for use with license server. | Virtual GPU Client Licensing User Guide |
| Troubleshoot the license server. | Troubleshooting the NVIDIA vGPU Software License Server |
| Uninstall the license server software. | Uninstalling the NVIDIA vGPU Software License Server |
You can install the NVIDIA vGPU software license server on Windows and Linux systems that meet the license server’s platform requirements. If you require high availability for the license server, you must install the license server both on the system that you will use as the primary license server and on the system that you will use as the secondary license server.
The license server requires a Java runtime environment and an Apache Tomcat server. Before you install the license server software, ensure that the required software is already installed on each license server host machine that you are using:
- On Windows, you need ensure only that the Java runtime environment is installed. The Apache Tomcat server is included in the license server installer for Windows.
- On Linux, you must ensure that both the Java runtime environment and the Apache Tomcat server are installed.
Also ensure that you have obtained your NVIDIA vGPU software and NVIDIA vGPU software License Server software. For more information, refer to Virtual GPU Software Quick Start Guide.
2.1. Platform Requirements
Before proceeding, ensure that you have a platform suitable for hosting the license server.
2.1.1. Hardware and Software Requirements
- The hosting platform may be a physical machine, an on-premises virtual machine (VM), or a VM on a supported cloud service. NVIDIA recommends using a host that is dedicated solely to running the license server.
- The recommended minimum configuration is 2 CPU cores and 4 Gbytes of RAM. A high-end configuration of 4 or more CPU cores with 16 Gbytes of RAM is suitable for handling up to 150,000 licensed clients.
- At least 1 Gbyte of hard drive space is required.
- The hosting platform must run a supported operating system.
- On Window platforms, .NET Framework 4.5 or later is required.
Before proceeding with the installation, refer to Virtual GPU License Server Release Notes for details of supported operating systems and known issues.
2.1.2. Platform Configuration Requirements
- The platform must have a fixed (unchanging) IP address. The IP address may be assigned dynamically by DHCP or statically configured, but must be constant.
- The platform must have at least one unchanging Ethernet MAC address, to be used as a unique identifier when registering the server and generating licenses in the NVIDIA Licensing Portal.
- The platform’s date and time must be set accurately. NTP is recommended.
2.1.3. Network Ports and Management Interface
The license server requires TCP port 7070 to be open in the platform’s firewall, to serve licenses to clients. By default, the installer will automatically open this port.
The license server’s management interface is web-based, and uses TCP port 8080. The management interface itself does not implement access control; instead, the installer does not open port 8080 by default, so that the management interface is only available to web browsers running locally on the license server host. Access to the management interface is therefore controlled by limiting remote access (via VNC, RDP, etc.) to the license server platform.
If you choose to open port 8080 during license server installation, or at any time afterwards, the license server’s management interface is unprotected.
2.1.4. High Availability Requirements
If you plan to configure high availability for the license sever by configuring a primary server and a secondary server, these requirements must be met:
- Both servers must run the same version of the NVIDIA vGPU Software License Server software.
- The clocks on both servers must be accurate and synchronized. NTP is recommended.
- The same license configuration file must be installed on both servers. This file is configured to include the Ethernet MAC addresses of both servers.
If you are configuring the license server for high availability, you must perform the following tasks for both the primary license server and the secondary license server:
- Installing the license server:
- Obtaining the License Server’s MAC Address
- Enabling Failover Support on the Primary and Secondary License Servers
- Managing Entitlements, Licenses, and Contacts on the NVIDIA Licensing Portal
- Installing a License
- Verifying High Availability Setup of the License Server
- Reserving Licenses
2.2. Installing the NVIDIA vGPU Software License Server on Windows
The license server requires a Java runtime environment, which must be installed separately before you install the license server.
If you require high availability for the license server, you must install the license server both on the system that you will use as the primary license server and on the system that you will use as the secondary license server.
2.2.1. Installing the Java Runtime Environment on Windows
If a suitable Java runtime environment (JRE) version is not already installed on your system, install a supported JRE before running the NVIDIA license server installer.
If you are installing OpenJDK to migrate from Oracle Java SE JRE and upgrade your license server version, see Upgrading the NVIDIA vGPU Software License Server and Migrating to OpenJDK on Windows.
- Download a supported Oracle Java SE JRE or OpenJDK JRE.
- Download Oracle Java SE JRE from the Java Downloads for All Operating Systems page.
- Download OpenJDK JRE from the Community builds using source code from OpenJDK project on GitHub.
- Install the JRE that you downloaded.
Oracle Java SE JRE installation:

OpenJDK JRE installation:

- Set the
JAVA_HOMEsystem variable to the full path to the jre folder of your JRE installation. For example:- For Oracle Java SE JRE: C:\Program Files\Java\jre1.8.0_191
- For OpenJDK JRE: C:\Program Files\ojdkbuild\java-1.8.0-openjdk-1.8.0.201-1\jre
Ensure that the path does not include any trailing characters, such as a slash or a space.
If you are upgrading to a new version of the JRE, update the value of the
JAVA_HOMEsystem variable to the full path to the jre folder of your new JRE version. - Ensure that the
Pathsystem variable contains the path to the java.exe executable file. The installer may have already added this path for you. For example:- For Oracle Java SE JRE: C:\Program Files\Java\jre1.8.0_191\bin
- For OpenJDK JRE: C:\Program Files\ojdkbuild\java-1.8.0-openjdk-1.8.0.201-1\bin
2.2.2. Installing the License Server Software on Windows in Graphical Mode
If you are replacing an existing version of the license server that was configured to use HTTPS, copy the files that are necessary to re-instate the configuration after you install the new version.
-
If you configured HTTPS for connections between the management interface and the license server, copy the SSL certificate that the license server was configured with. The installer deletes the entire contents of any existing license server installation folder, including files that were added after the license server software was installed, such as the SSL certificate.
Note:Copying an SSL certificate might corrupt it. To determine if the certificate is corrupted, run this command:
$JAVA_HOME/bin/keytool -list -keystore certificate-file-name.jks -storepass certificate-password
If the certificate is corrupted, contact the CA that issued your certificate to obtain a new certificate.
-
If you specified HTTPS for connections from a web browser to the license server management interface, copy the Tomcat configuration file server.xml so that you can reinstate the necessary changes to the Tomcat configuration. The installer overwrites the existing server.xml file and any custom configuration specified in the file is lost.
- Unzip the license server installer and run setup.exe.
- Accept the EULA for the license server software and the Apache Tomcat software used to support the license server’s management interface.
Figure 2. License Agreements on Windows

- Choose the destination folder where you want the license server software to be installed.
Figure 3. Destination Folder Selection on Windows

- In the Choose Firewall Options dialog box, select the ports to be opened in the firewall.
To enable remote clients to access licenses from the server and prevent remote access to the management interface, use the default setting, which sets ports as follows:
- Port 7070 is open to enable remote clients to access licenses from the server.
- Port 8080 is closed to ensure that the management interface is available only through a web browser running locally on the license server host.
Figure 4. Firewall Settings on Windows

- After installation has completed successfully, click Done to exit the installer.
Figure 5. Completed License Server Installation on Windows

If you are replacing an existing version of the license server and it was configured to use HTTPS, re-instate the HTTPS configuration as explained in Configuring HTTPS for Connections Between the Management Interface and the License Server and Specifying HTTPS for Connections from a Web Browser to the License Server Management Interface.
Verify the installation by accessing the license server management interface as explained in Accessing the License Server Management Interface.
2.2.3. Installing the License Server Software on Windows in Console Mode
Support for installation in Windows console mode was introduced in license server release 2018.06. It is not supported in earlier license server releases. The license server installer for earlier releases must be run in a graphical desktop environment. Installation in silent mode is not supported in any release.
If you are replacing an existing version of the license server that was configured to use HTTPS, copy the files that are necessary to re-instate the configuration after you install the new version.
-
If you configured HTTPS for connections between the management interface and the license server, copy the SSL certificate that the license server was configured with. The installer deletes the entire contents of any existing license server installation folder, including files that were added after the license server software was installed, such as the SSL certificate.
Note:Copying an SSL certificate might corrupt it. To determine if the certificate is corrupted, run this command:
$JAVA_HOME/bin/keytool -list -keystore certificate-file-name.jks -storepass certificate-password
If the certificate is corrupted, contact the CA that issued your certificate to obtain a new certificate.
-
If you specified HTTPS for connections from a web browser to the license server management interface, copy the Tomcat configuration file server.xml so that you can reinstate the necessary changes to the Tomcat configuration. The installer overwrites the existing server.xml file and any custom configuration specified in the file is lost.
- Extract the contents of the license server zip archive.
- Run the extracted setup binary.
C:\> setup.exe -i console
- In the Introduction screen, press Enter to continue.
- In the License Agreement screen, press Enter each time you are prompted to page through the license agreement. When you reach the end of the license agreement, you are prompted to accept its terms.
- Type y to accept the terms of the license agreement and proceed with installation.
- In the Apache License Agreement screen, press Enter each time you are prompted to page through the license agreement. When you reach the end of the license agreement, you are prompted to accept its terms.
- Type y to accept the terms of the license agreement and proceed with installation.
- In the Choose Install Folder screen, specify where you want the license server software to be installed:
- Press Enter to accept the default installation folder.
- Enter the absolute path to the destination folder where you want the license server software to be installed.
- In the Choose Firewall Options screen box, select the ports to be opened in the firewall.
The options for selecting ports to be opened in the firewall are presented as follows:
            ->1- License server (port 7070)
    2- Management interface (port 8080)
- Press Enter to accept the default setting.
- Enter a comma-separated list of numbers that represent your choice of ports to be opened.
To enable remote clients to access licenses from the server and prevent remote access to the management interface, use the default setting, which sets ports as follows:
- Port 7070 is open to enable remote clients to access licenses from the server.
- Port 8080 is closed to ensure that the management interface is available only through a web browser running locally on the license server host.
- In the Pre-Installation Summary screen, review your choices and press Enter to start the installation. After installation has completed successfully, the Install Completescreen is displayed.
- In the Install Complete screen, press Enter to exit the installer.
If you are replacing an existing version of the license server and it was configured to use HTTPS, re-instate the HTTPS configuration as explained in Configuring HTTPS for Connections Between the Management Interface and the License Server and Specifying HTTPS for Connections from a Web Browser to the License Server Management Interface.
Verify the installation by accessing the license server management interface as explained in Accessing the License Server Management Interface.
2.2.4. Upgrading the NVIDIA vGPU Software License Server and Migrating to OpenJDK on Windows
If you no longer want to use Oracle Java SE JRE and are upgrading your existing installation of NVIDIA vGPU software license server, you can replace the Oracle Java SE JRE with the OpenJDK JRE.
Do not perform this task for upgrades from a 32-bit license server to a 64-bit license server. Instead, follow the instructions in Upgrading from a 32-Bit to a 64-Bit NVIDIA vGPU Software License Server on Windows.
- Use the Services application to confirm that the Apache Tomcat 8.5 Tomcat8 service is running.

- Use the Services application to confirm that the FlexNet License Server - nvidia service is running.

- In the Services application, context-click the FlexNet License Server - nvidia service and choose Stop.
- In the Services application, context-click the Apache Tomcat 8.5 Tomcat8 service and choose Stop.
- Uninstall Oracle Java SE JRE.
- Open Windows Control Panel and under Programs, follow the Uninstall a program link.
- Context-click the installed Oracle Java SE JRE program, choose Uninstall, and if you are prompted to confirm that you want to uninstall the program, click Yes.

- Install OpenJDK.
- Set the
JAVA_HOMEsystem variable to the full path to the jre folder of your JRE installation. For example: C:\Program Files\ojdkbuild\java-1.8.0-openjdk-1.8.0.201-1\jre.Ensure that the path does not include any trailing characters, such as a slash or a space.
If you are upgrading to a new version of the JRE, update the value of the
JAVA_HOMEsystem variable to the full path to the jre folder of your new JRE version. - Ensure that the
Pathsystem variable contains the path to the java.exe executable file. For example: C:\Program Files\ojdkbuild\java-1.8.0-openjdk-1.8.0.201-1\bin. - Ensure that Apache Tomcat can locate your OpenJDK JRE.
- In Windows File Explorer, navigate to the bin folder of your Apache Tomcat installation. This default folder is %SystemDrive%:\NVIDIA\LicenseServer\Tomcat\bin.
- Double-click the Tomcat8w application in this folder.
- In the Apache Tomcat 8.5 Tomcat8 Properties window that opens, click the Java tab.
- Deselect the Use default option, set Java Virtual Machine to the full path to the JVM DLL file jvm.dll of your OpenJDK installation and click OK. For example: C:\Program Files\ojdkbuild\java-1.8.0-openjdk-1.8.0.201-1\jre\bin\server\jvm.dll.
- In the Services application, context-click the Apache Tomcat 8.5 Tomcat8 service and choose Start.
- In the Services application, context-click the FlexNet License Server - nvidia service and choose Start.
- Confirm that the license server is working by accessing the license server management interface as explained in Accessing the License Server Management Interface.
Upgrade to this release of the license server by installing the license server software as explained in the following topics:
- Installing the License Server Software on Windows in Graphical Mode
- Installing the License Server Software on Windows in Console Mode
2.2.5. Upgrading from a 32-Bit to a 64-Bit NVIDIA vGPU Software License Server on Windows
The 64-bit NVIDIA vGPU software license server requires a 64-bit JRE. If you want to upgrade from a 32-bit license server to a 64-bit license server, you must uninstall and reinstall the license server and associated software to meet this requirement.
If you are replacing an existing version of the license server that was configured to use HTTPS, copy the files that are necessary to re-instate the configuration after you install the new version.
-
If you configured HTTPS for connections between the management interface and the license server, copy the SSL certificate that the license server was configured with. The installer deletes the entire contents of any existing license server installation folder, including files that were added after the license server software was installed, such as the SSL certificate.
Note:Copying an SSL certificate might corrupt it. To determine if the certificate is corrupted, run this command:
$JAVA_HOME/bin/keytool -list -keystore certificate-file-name.jks -storepass certificate-password
If the certificate is corrupted, contact the CA that issued your certificate to obtain a new certificate.
-
If you specified HTTPS for connections from a web browser to the license server management interface, copy the Tomcat configuration file server.xml so that you can reinstate the necessary changes to the Tomcat configuration. The installer overwrites the existing server.xml file and any custom configuration specified in the file is lost.
- Uninstall the existing 32-bit license server. For instructions, see Uninstalling the NVIDIA vGPU Software License Server on Windows.
- Uninstall the existing 32-bit Apache Tomcat software.
- Open Windows Control Panel.
- Select Programs and Features.
- In the list of programs, select Apache Tomcat and click Uninstall/Change.
- Remove the existing license server log files and trusted storage database by deleting all files in the folder %SystemDrive%:\Windows\ServiceProfiles\NetworkService\flexnetls\nvidia.
- Uninstall the existing 32-bit JRE.
- Open Windows Control Panel and under Programs, follow the Uninstall a program link.
- Context-click the installed JRE program, choose Uninstall, and if you are prompted to confirm that you want to uninstall the program, click Yes.
- Install a 64-bit JRE. For instructions, see Installing the Java Runtime Environment on Windows.
- Install the 64-bit license server and Apache Tomcat software. For instructions, see the following topics:
If you are replacing an existing version of the license server and it was configured to use HTTPS, re-instate the HTTPS configuration as explained in Configuring HTTPS for Connections Between the Management Interface and the License Server and Specifying HTTPS for Connections from a Web Browser to the License Server Management Interface.
Verify the installation by accessing the license server management interface as explained in Accessing the License Server Management Interface.
After uninstalling and reinstalling the license server, you must reinstall each of your licenses as explained in Installing a License. Installed NVIDIA vGPU software licenses are not retained across an uninstallation followed by reinstallation.
2.3. Installing the NVIDIA vGPU Software License Server on Linux
The license server requires a Java runtime environment and an Apache Tomcat server, which must be installed separately before you install the license server software.
If you require high availability for the license server, you must install the license server both on the system that you will use as the primary license server and on the system that you will use as the secondary license server.
2.3.1. Installing the Java Runtime Environment on Linux
If a suitable Java runtime environment (JRE) version is not already installed on your system, you can install OpenJDK from your Linux distribution’s package repositories.
If you are installing OpenJDK to migrate from Oracle Java SE JRE and upgrade your license server version, see Upgrading the NVIDIA vGPU Software License Server and Migrating to OpenJDK on Linux.
For information about installing Oracle Java SE JRE, see the Java Platform, Standard Edition Documentation in the Oracle Help Center. After installing Oracle Java SE JRE, set the JAVA_HOME environment variable to the jre folder of your Oracle Java SE JRE installation.
- Determine whether a version of Java is installed on your system.
[nvidia@localhost ~]$ java -version
If a Java version is installed, the version is shown as follows and you do not need to install JRE.
            java version "1.7.0_51"
OpenJDK Runtime Environment (rhel-2.4.5.5.el7-x86_64 u51-b31)
OpenJDK 64-Bit Server VM (build 24.51-b03, mixed mode)
[nvidia@localhost ~]$
- Use your Linux distribution’s package manager to install OpenJDK.
-
For distributions based on Red Hat, use the yum package manager to install the
javapackage.[nvidia@localhost ~]$ sudo yum install java
-
For distributions based on Debian, use the apt package manager to install the
default-jdkpackage.[nvidia@localhost ~]$ sudo apt install default-jdk
-
- Set the
JAVA_HOMEenvironment variable to the jre folder of your OpenJDK JRE installation, for example, /usr/lib/jvm/java-8-openjdk-amd64/jre.
2.3.2. Installing and Running the Apache Tomcat Server on Linux
The license server’s management interface requires an Apache Tomcat server.
- Use your Linux distribution’s package manager to install the required Apache Tomcat packages.
Note:
The version of Apache Tomcat that is installed by your Linux distribution’s package manager depends on the OS version that you are using. This version might not be supported with this release of the license server.
For example, installing
tomcat8on Ubuntu 16.04 installs tomcat 8.0.32, but on Ubuntu 18.04, Apache Tomcat 8.5.x is installed.If your package manager installs an unsupported version, use another means to install a version that is supported with this release of the license server.
-
For distributions based on Red Hat, use the yum package manager to install the
tomcatandtomcat-webappspackages.[nvidia@localhost ~]$ sudo yum install tomcat tomcat-webapps
-
For distributions based on Debian, use the apt package manager to install the
tomcatreleasepackage. For example, for Apache Tomcat 8, run:[nvidia@localhost ~]$ sudo apt install tomcat8
-
- After installing the packages, enable the Tomcat service for automatic startup on boot.
-
For distributions based on Red Hat, enable the
tomcatservice.[nvidia@localhost ~]$ sudo systemctl enable tomcat.service
-
For distributions based on Debian, enable the
tomcatreleaseservice. For example, for Apache Tomcat 8, run:[nvidia@localhost ~]$ sudo systemctl enable tomcat8.service
-
- Start the Tomcat service.
-
For distributions based on Red Hat, start the
tomcatservice.[nvidia@localhost ~]$ sudo systemctl start tomcat.service
-
For distributions based on Debian, start the
tomcatreleaseservice. For example, for Apache Tomcat 8, run:[nvidia@localhost ~]$ sudo systemctl start tomcat8.service
-
- Verify that the Tomcat service is operational by opening the URL
http://localhost:8080in a web browser. The home page of the default Tomcat web application should be displayed, as shown in Figure 6.Figure 6. Verifying the Apache Tomcat Installation

Do not relocate the webapps folder, which is where Web applications are deployed on Apache Tomcat Server. If you relocate this folder, the installation of the license server software may fail.
2.3.3. Installing the License Server Software on Linux in Graphical Mode
- Extract the contents of the license server ZIP archive.
[nvidia@localhost ~]$ unzip NVIDIA-ls-linux-2019.11.0.26416627.zip
- Add execute permission to the extracted setup binary file.
[nvidia@localhost ~]$ chmod +x setup.bin
- As root, run the extracted setup binary.
[nvidia@localhost ~]$ sudo ./setup.bin
- Accept the EULA to proceed with installation.
Figure 7. License Agreements on Linux

- Choose the destination folder where you want the license server software to be installed.
Figure 8. Destination Folder Selection on Linux

- Specify the path to the folder on the local host that contains the webapps folder.
Web applications are deployed on Apache Tomcat Server to the webapps folder.
-
For distributions based on Red Hat, the default path to this folder is /usr/share/tomcat.
-
For distributions based on Debian, the default path to this folder is /var/lib/tomcatrelease, for example /var/lib/tomcat8, for Apache Tomcat 8.
Figure 9. Apache Tomcat Server Path on Linux

-
- In the Choose Firewall Options dialog box, shown in Figure 10, select the ports to be opened in the firewall.
To enable remote clients to access licenses from the server and prevent remote access to the management interface, use the default setting, which sets ports as follows:
- Port 7070 is open to enable remote clients to access licenses from the server.
- Port 8080 is closed to ensure that the management interface is available only through a web browser running locally on the license server host.
Figure 10. Firewall Settings on Linux

- After installation has completed successfully, click Done to exit the installer.
Figure 11. Completed License Server Installation on Linux

Verify the installation by accessing the license server management interface as explained in Accessing the License Server Management Interface.
2.3.4. Installing the License Server Software on Linux in Console Mode
Support for installation in Linux console mode was introduced in license server release 2018.06. It is not supported in earlier license server releases. The license server installer for earlier releases must be run in a graphical desktop environment. Installation in silent mode is not supported in any release.
- Extract the contents of the license server ZIP archive.
[nvidia@localhost ~]$ unzip NVIDIA-ls-linux-2019.11.0.26416627.zip
- Add execute permission to the extracted setup binary file.
[nvidia@localhost ~]$ chmod +x setup.bin
- As root, run the extracted setup binary.
[nvidia@localhost ~]$ sudo ./setup.bin -i console
- In the Introduction screen, press Enter to continue.
- In the License Agreement screen, press Enter each time you are prompted to page through the license agreement. When you reach the end of the license agreement, you are prompted to accept its terms.
- Type y to accept the terms of the license agreement and proceed with installation.
- In the Choose Install Folder screen, specify where you want the license server software to be installed:
- Press Enter to accept the default installation folder.
- Enter the absolute path to the destination folder where you want the license server software to be installed.
- In the Choose Local Tomcat Server Path screen, enter the path to the folder on the local host that contains the webapps folder.
Web applications are deployed on Apache Tomcat Server to the webapps folder.
-
For distributions based on Red Hat, the default path to this folder is /usr/share/tomcat.
-
For distributions based on Debian, the default path to this folder is /var/lib/tomcatrelease, for example /var/lib/tomcat8, for Apache Tomcat 8.
-
- In the Choose Firewall Options screen box, select the ports to be opened in the firewall.
The options for selecting ports to be opened in the firewall are presented as follows:
            ->1- License server (port 7070)
    2- Management interface (port 8080)
- Press Enter to accept the default setting.
- Enter a comma-separated list of numbers that represent your choice of ports to be opened.
To enable remote clients to access licenses from the server and prevent remote access to the management interface, use the default setting, which sets ports as follows:
- Port 7070 is open to enable remote clients to access licenses from the server.
- Port 8080 is closed to ensure that the management interface is available only through a web browser running locally on the license server host.
- In the Pre-Installation Summary screen, review your choices and press Enter to start the installation. After installation has completed successfully, the Install Completescreen is displayed.
- In the Install Complete screen, press Enter to exit the installer.
Verify the installation by accessing the license server management interface as explained in Accessing the License Server Management Interface.
2.3.5. Upgrading the NVIDIA vGPU Software License Server and Migrating to OpenJDK on Linux
If you no longer want to use Oracle Java SE JRE and are upgrading your existing installation of NVIDIA vGPU software license server, you can replace the Oracle Java SE JRE with the OpenJDK JRE.
- Check status of the Apache Tomcat service.
-
For distributions based on Red Hat, check the status of the
tomcatservice.[nvidia@localhost ~]$ systemctl status tomcat.service
-
For distributions based on Debian, check the status of the
tomcatreleaseservice. For example, for Apache Tomcat 8, run:[nvidia@localhost ~]$ sudo systemctl status tomcat8.service
-
- Check the status of the NVIDIA vGPU software license server flexnetls-nvidia service.
[nvidia@localhost ~]$ systemctl status flexnetls-nvidia.service
- Stop the NVIDIA vGPU software license server flexnetls-nvidia service.
[nvidia@localhost ~]$ systemctl stop flexnetls-nvidia.service
- Stop the Apache Tomcat service.
-
For distributions based on Red Hat, stop the
tomcatservice.[nvidia@localhost ~]$ sudo systemctl stop tomcat.service
-
For distributions based on Debian, stop the
tomcatreleaseservice. For example, for Apache Tomcat 8, run:[nvidia@localhost ~]$ sudo systemctl stop tomcat8.service
-
- Use your Linux distribution’s package manager to install OpenJDK.
-
For distributions based on Red Hat, use the yum package manager to install the
javapackage.[nvidia@localhost ~]$ sudo yum install java
-
For distributions based on Debian, use the apt package manager to install the
default-jdkpackage.[nvidia@localhost ~]$ sudo apt install default-jdk
-
- Optional: Uninstall Oracle Java SE JRE. For information about uninstalling Oracle Java SE JRE, see How do I uninstall Java for Linux ? on the java.com: Java + You website.
- Ensure that Apache Tomcat can locate your OpenJDK JRE.
- Get the parent of the jre folder for your OpenJDK installation.
The following example gets the parent of the jre folder for an installation of 64-bit OpenJDK 8.
            [nvidia@localhost ~] update-java-alternatives -l
java-1.8.0-openjdk-amd64       1081       /usr/lib/jvm/java-1.8.0-openjdk-amd64
- Open the file /etc/default/tomcat8 in a plain text editor and edit the value of the
JAVA_HOMEenvironment variable to specify the full path to the jre folder of your OpenJDK installation.The following example sets
JAVA_HOMEfor an installation of 64-bit OpenJDK 8.JAVA_HOME=/usr/lib/jvm/java-8-openjdk-amd64/jre
- Get the parent of the jre folder for your OpenJDK installation.
- Start the Apache Tomcat service.
-
For distributions based on Red Hat, start the
tomcatservice.[nvidia@localhost ~]$ sudo systemctl start tomcat.service
-
For distributions based on Debian, start the
tomcatreleaseservice. For example, for Apache Tomcat 8, run:[nvidia@localhost ~]$ sudo systemctl start tomcat8.service
-
- Start the NVIDIA vGPU software license server flexnetls-nvidia service.
[nvidia@localhost ~]$ systemctl start flexnetls-nvidia.service
- Confirm that the license server is working by accessing the license server management interface as explained in Accessing the License Server Management Interface.
Upgrade to this release of the license server by installing the license server software as explained in the following topics:
- Installing the License Server Software on Linux in Graphical Mode
- Installing the License Server Software on Linux in Console Mode
2.4. Installing and Securing the License Server in the Cloud
To support bring your own license (BYOL) deployments of NVIDIA vGPU software on supported cloud services, you can host the license server on a VM on a supported cloud service.
If you are using BYOL, you can host the license server on a physical machine or an on-premises VM if you prefer.
The following cloud services support NVIDIA vGPU software running in GPU pass-through mode:
- Amazon EC2
- Google Cloud Platform
- Microsoft Azure
For more information, see NVIDIA Virtual GPU Software Supported Cloud Services.
A license server that is hosted in the cloud is accessed over the public Internet. For increased security, protect the license server and the licenses installed on it as follows:
- Use the features of the license server to secure the license server as as explained in Securing the NVIDIA vGPU Software License Server.
- Restrict access to the license server by client machines in one of the following ways:
- Use firewall settings on the license server host or elsewhere to limit the machines that can access the license server.
- Configure the license server host and the licensed client VMs to operate within a virtual private network.
2.5. Accessing the License Server Management Interface
Access the license server management interface to verify that the license server is operating correctly or to manage licenses on the license server.
- In a web browser, visit the home page for the license server management interface.
- If the license server host does not permit remote access, open a web browser on the license server host and connect to one of the following URLs, depending on whether the connection protocol is HTTP or HTTPS:
- HTTP:
http://localhost:8080/licserver - HTTPS:
https://localhost:https-port/licserver
- HTTP:
- If the license server host’s network firewall is configured to permit remote access to the license server, open a web browser on a remote machine and connect to one of the following URLs, depending on whether the connection protocol is HTTP or HTTPS:
- HTTP:
http://hostname:8080/licserver - HTTPS:
https://hostname:https-port/licserver
- HTTP:
- https-port
- The HTTPS port for users' connections from a web browser to the license server management interface, for example, 8443. This port is specified in the Apache Tomcat configuration as explained in Specifying HTTPS for Connections from a Web Browser to the License Server Management Interface.
- hostname
- The fully-qualified domain name or IP address of the license server host.
the Login page is displayed.
- If the license server host does not permit remote access, open a web browser on the license server host and connect to one of the following URLs, depending on whether the connection protocol is HTTP or HTTPS:
- If administrative security is enabled for the license server, log in to the license server.
- In the license server management interface, select Login.
- In the Login page that is displayed, enter your user name and password for logging in to the license server and click Authorize.
Figure 12. License Server Login Page

Note:If administrative security is not enabled for the license server and you try to log in, the license server reports that the login failed. However, you can ignore the login failure and continue to use the license server management interface.
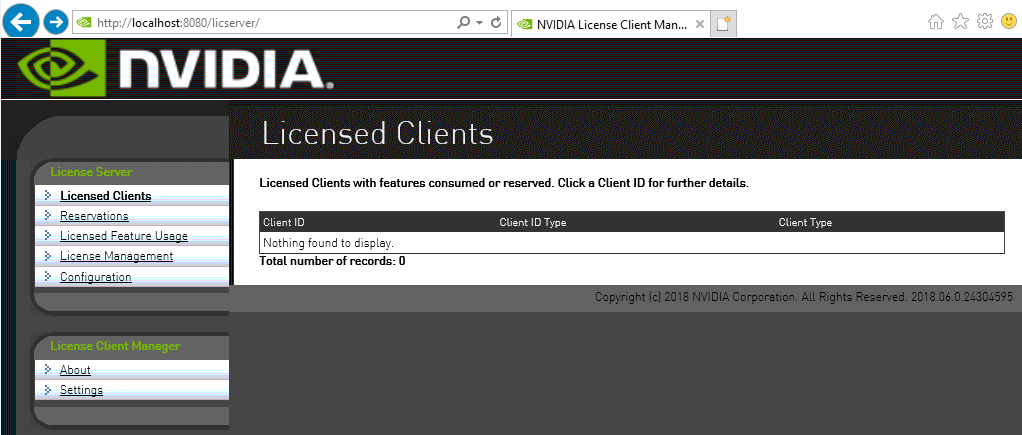
The browser should display the home page for the license server management interface, as shown in Figure 13.
Figure 13. License Server Management Interface
If the management interface is not displayed, consult Management Interface Connection Errors for troubleshooting steps.
2.6. Obtaining the License Server’s MAC Address
The license server’s Ethernet MAC address uniquely identifies your server to the NVIDIA Licensing Portal. You will need this address to register your license server with the NVIDIA Licensing Portal to generate license files.
If you are configuring the license server for high availability, you will need the MAC address of both the primary license server and the secondary license server.
- In the license server management interface, select Configuration.
- On the License Server Configuration page that opens, in the Server host ID drop-down list, select the platform’s ETHERNET address.
Figure 14. Obtaining the License Server's MAC Address
 Note:
Note:You must use the same ETHERNET ID to consistently identify the server when generating licenses on the NVIDIA Licensing Portal. If your platform has multiple Ethernet interfaces, multiple ETHERNET entries may be displayed in the Server host ID drop-down list. To ensure that you use the same ETHERNET ID to consistently to identify the server, select one entry that corresponds to a primary (nonremovable) interface on the platform.
2.7. Enabling Failover Support on the Primary and Secondary License Servers
If you are configuring high availability for the license server, you must enable failover support on both the primary license server and on the secondary license server. Set the same options on both servers.
The default log level of the license server is ERROR. If you enable failover support with the log level set to ERROR, INFO level messages are not recorded in the log files and you will not be able to verify the setup as explained in Verifying High Availability Setup of the License Server. To ensure that you can verify the setup, set the log level to INFO before enabling failover support. If necessary, revert the log level to ERROR after verifying the setup. For instructions, see Changing the License Server Log Level.
- In the license server management interface, select Configuration. The License Server Configuration page opens.
Figure 15. License Server Settings for Enabling Failover Support

- Under License Generation, use the Backup URI and Main URI fields to set the URI to each server in a failover configuration.
- In the Backup URI field, enter http://secondary-server:7070/fne/bin/capability.
- In the Main URI field, enter http://primary-server:7070/fne/bin/capability.
- secondary-server
-
The fully-qualified domain name (for example,
gridlicense2.example.com) or the IP address (for example,10.31.20.46) of the secondary license server. - primary-server
-
The fully-qualified domain name (for example,
gridlicense1.example.com) or the IP address (for example,10.31.20.45) of the primary license server.
- Set the options under Settings for server to sync between License servers as follows:
- Set the Synchronization to fne enabled option to true.
- In the Main FNE Server URI field, enter http://primary-server:7070/fne/bin/capability.
- primary-server
-
The fully-qualified domain name (for example,
gridlicense1.example.com) or the IP address (for example,10.31.20.45) of the primary license server.
- Click Save.
3.1. Controlling Access to the License Server Management Interface
For increased security, you can control access to the license server management interface by allowing access only to authorized users. When access to the license server management interface is controlled, authorized users must authenticate themselves to manage licenses on the license server.
You control access to the license server management interface by using the nvidialsadmin command. For general information about the nvidialsadmin command that you need to complete this task, see:
- Running the nvidialsadmin Utility
- Setting the License Server Base URL for the nvidialsadmin Utility
- Getting Help for the nvidialsadmin Utility
3.1.1. Enabling Administrative Security for the License Server
When administrative security is enabled for the license server, any user attempting to administer the license server through the command line tool or the license server management interface must provide a set of authorization credentials. By default, administrative security is not enabled on the license server.
To protect sensitive data that is being transmitted during administrative operations, use the HTTPS protocol for communications between the license server and its management interface when administrative security is enabled for the license server. For more information, see Configuring HTTPS for Connections Between the Management Interface and the License Server.
Perform this task in a command shell on the license server host.
Set the property security.enabled to true.
            nvidialsadmin -config -set security.enabled=true

Updated the property:security.enabled with value:true successfully
In any subsequent nvidialsadmin command, users must provide the required credentials for authenticating with the license server. For more information, see Authenticating with the License Server.
If you no longer require administrative security to be enabled on the license server, set the property security.enabled to false.
            nvidialsadmin -authorize admin admin-password -config -set security.enabled=false
User authentication succeeded.

Updated the property:security.enabled with value:false successfully
After setting the property security.enabled to false, restart the Apache Tomcat server and the flexnetls-nvidia service.
3.1.2. Default License Server Administrative Credentials
When the license server is started, the default administrator account is created and assigned super user role. This account is inactive until administrative security is enabled for the license server. By default, administrative security is not enabled for the license server.
When administrative security is enabled for the license server, the default administrator account grants a full range of privileges to administer the license server, including authorization to create and manage other user accounts that have limited administrative privileges or other license server administrator accounts.
The default credentials for the license server administrator account are as follows:
- User name: admin
- Password: Admin@123
For increased security, reset the administrator password immediately after enabling administrative security for the license server. For instructions, see Resetting the Default Administrator Password for the License Server.
3.1.3. License Server Password Requirements
To help you set strong passwords, the license server enforces some requirements on the length and complexity of passwords.
A license server password must be 8-64 characters long, contain no white space, and contain all of the following:
- At least one lowercase character
- At least one uppercase character
- At least one number
- At least one special character (for example, ^, *, $, -, +, ?, _, &, =, !, %, {, }, /, and #)
The password is case sensitive.
3.1.4. Resetting the Default Administrator Password for the License Server
When the license server is started, the default administrator account is created and assigned super user role. For increased security, reset the administrator password immediately after enabling administrative security for the license server.
Perform this task in a command shell on the license server host.
Change the password of the admin user.
nvidialsadmin -authorize admin Admin@123 -users -edit admin new-password
- new-password
- Your choice of new password for the default administrator account. The password is case sensitive and must be a strong password that meets the requirements in License Server Password Requirements.
3.1.5. Listing All License Server User Accounts
Perform this task in a command shell on the license server host.
For clarity, required options for authenticating the administrator user and specifying the license server URL are omitted from this example.
Run the nvidialsadmin utility with only the -users option and no other options.
nvidialsadmin -users
3.1.6. Creating a License Server User Account
Perform this task in a command shell on the license server host.
For clarity, required options for authenticating the administrator user and specifying the license server URL are omitted from this example.
Run the nvidialsadmin utility with the -users and -create options.
nvidialsadmin -users -create new-username new-user-password[ roles]
- new-username
- Your choice of user name for the user that you are adding.
- new-user-password
- Your choice of password for authenticating the user that you are adding. The password is case sensitive and must be a strong password that meets the requirements in License Server Password Requirements.
- roles
-
One or more roles that determine operations allowed by the user for managing licenses on the license server:
- ROLE_READ grants the user privileges to perform read-only operations on the license server, for example, to query features, licenses, license reservations, or license server status. This role is assigned by default.
- ROLE_RESERVATIONS grants the user privileges to create and manage license reservations.
- ROLE_ADMIN grants the user administrator privileges to update license server policies (local license server only), create and manage other user accounts, and perform other administrative tasks.
You can assign multiple roles to a user by separating each role with the
+sign, for example, ROLE_READ+ROLE_RESERVATIONS.
This example adds the user lsmgr with the password 3Nt3rl5vr and the ROLE_ADMIN role.
nvidialsadmin -users -create lsmgr 3Nt3rl5vr ROLE_ADMIN
3.1.7. Modifying a License Server User Account
You can modify the account of an existing license server user to change the password or the roles for the account.
Perform this task in a command shell on the license server host.
For clarity, required options for authenticating the administrator user and specifying the license server URL are omitted from this example.
Run the nvidialsadmin utility with the -users and -edit options.
nvidialsadmin -users -edit username user-password[ new-roles]
- username
- The user name of the user whose account you are modifying.
- user-password
-
The password for authenticating the user whose account you are modifying.
You must specify the password, even if you are not changing it.
- To leave the password unchanged, specify the user's existing password.
- To change the password, specify a new password. The password is case sensitive and must be a strong password that meets the requirements in License Server Password Requirements.
- new-roles
-
The new roles that determine operations allowed by the user for managing licenses on the license server.
Specify new roles only if you want to change the roles for the account. To leave the user's existing roles unchanged, do not specify any roles in the command.
You can assign multiple roles to a user by separating each role with the
+sign, for example, ROLE_READ+ROLE_RESERVATIONS.
This example changes role of the user lsmgr to the ROLE_RESERVATIONS role. Because the user's existing password 3Nt3rl5vr is specified, the password is not changed.
nvidialsadmin -users -edit lsmgr 3Nt3rl5vr ROLE_RESERVATIONS
3.1.8. Deleting a License Server User Account
Perform this task in a command shell on the license server host.
For clarity, required options for authenticating the administrator user and specifying the license server URL are omitted from this example.
Run the nvidialsadmin utility with the -users and -delete options.
nvidialsadmin -users -delete username
- username
- The user name for the user whose account you are deleting.
This example deletes the user account lsmgr from the license server.
nvidialsadmin -users -delete lsmgr
3.2. Configuring HTTPS for Connections Between the Management Interface and the License Server
By default, the license server management interface connects to the license server over the HTTP protocol. This connection is for communications between two processes that are running on the same host machine. For increased security, you can specify that the license server management interface connects to the license server over HTTPS.
To configure HTTPS for connections between the management interface and the license server, follow this sequence of instructions:
- Obtaining an SSL Certificate for the License Server
- Configuring the License Server with an SSL Certificate
- Setting the License Server Connection Protocol to HTTPS
You can also specify HTTPS for users' connections from a web browser to the license server management interface. See Specifying HTTPS for Connections from a Web Browser to the License Server Management Interface.
3.2.1. Obtaining an SSL Certificate for the License Server
- Request an SSL certificate from a certificate authority (CA) in Java keystore format (not a PEM text file) and secured with a password.
In the certificate, you can choose to identify the license server host through either its host name or its fully qualified domain name. In your certificate signing request (CSR) to the CA, ensure that the Common Name (CN) attribute of the CSR matches how the license server is identified in the certificate. For example, if the license server is identified in the certificate through its fully qualified domain name, set the CN attribute to the fully qualified domain name of the license server.
If necessary, contact the CA that will provide your certificate for information about how to request a certificate in Java keystore format or convert an existing certificate to this format.
- Store the SSL certificate in the appropriate directory on the license server host.
- On Linux, store the SSL certificate in the /opt/flexnetls/nvidia/ directory.
- On Windows, store the SSL certificate in the folder in which the license server is installed. The default license server installation folder is %SystemDrive%:\NVIDIA\LicenseServer.
- Optional: To prevent the password from being stored in plain text in license server configuration files, obfuscate the password.
java -jar flexnetls.jar --password=password
- password
- The password with which the certificate is secured.
This example obfuscates the password
abracadabra.java -jar flexnetls.jar --password=abracadabra abracadabra => OBF:1ri71v1r1v2n1ri71shq1ri71shs1ri71v1r1v2n1ri7
3.2.2. Configuring the License Server with an SSL Certificate
Before configuring the license server with an SSL certificate, ensure that the following prerequisites are met:
- You have obtained the certificate from a trusted CA.
- The license server is not blocked by a firewall.
How to configure the license server with an SSL certificate depends on whether the license server is running on a Windows or Linux platform.
3.2.2.1. Configuring the License Server with an SSL Certificate on Windows
- In the license-server-installation-folder\server\local-configuration.yaml file, edit the
https-insection to set attributes that provide access to the certificate.- license-server-installation-folder
- The folder in which the license server software is installed. The default license server installation folder is %SystemDrive%:\NVIDIA\LicenseServer.
Specifically, set the following attributes:
- Enable HTTPS
- The port number for incoming HTTPS requests
- The full or relative path to the SSL certificate file for the license server on the license server host
- The password with which the certificate is secured
            https-in:
# Set to true to enable HTTPS
enabled: true
# HTTPS listening port
port: https-port
# Path to keystore
keystore-path: server-certificate-file-path
# Keystore password. You can obfuscate this with java -jar flexnetls.jar -password your-password-here
keystore-password: password
- https-port
- The port number for incoming HTTPS requests, for example, 443.
- server-certificate-file-path
- The full or relative path to the SSL certificate file for the license server on the license server host.
- password
-
The password with which the certificate is secured. If the password is obfuscated, specify the entire obfuscated string, including the
OBF:prefix, for example,OBF:1ri71v1r1v2n1ri71shq1ri71shs1ri71v1r1v2n1ri7.Note:To protect this password, ensure that the file that contains the password is appropriately secured. Specifically, limit access to the file that contains the password so that it can be read only by the user that the Tomcat process runs as and the administrator user on Windows or the root user on Linux.
This example provides access to the SSL certificate file keystore.jks, which is protected by an obfuscated password. The port number for incoming HTTPS requests is 443.
            https-in:
# Set to true to enable HTTPS
enabled: true
# HTTPS listening port
port: 443
# Path to keystore
keystore-path: ..\keystore.jks
# Keystore password. You can obfuscate this with java -jar flexnetls.jar -password your-password-here
keystore-password: OBF:1ri71v1r1v2n1ri71shq1ri71shs1ri71v1r1v2n1ri7
- Restart the license server.
3.2.2.2. Configuring the License Server with an SSL Certificate on Linux
- In the /opt/flexnetls/nvidia/local-configuration.yaml file, edit the
https-insection to set attributes that provide access to the certificate.Specifically, set the following attributes:
- Enable HTTPS
- The port number for incoming HTTPS requests
- The name of the SSL certificate file for the license server on the license server host
- The password with which the certificate is secured
            https-in:
# Set to true to enable HTTPS
enabled: true
# HTTPS listening port
port: https-port
# Path to keystore
keystore-path: server-certificate-file-name
# Keystore password. You can obfuscate this with java -jar flexnetls.jar -password your-password-here
keystore-password: password
- https-port
-
The port number for incoming HTTPS requests, for example, 1443. To avoid the need to run the license server from a privileged account, use a port number greater than or equal to 1024. On Linux systems, access to ports below 1024 is restricted to processes that run with root user privileges.
The default port for HTTPS requests is 443. If you use a different port, you can re-direct incoming HTTPS requests for the default port to the port that you are using.
- server-certificate-file-name
- The name of the SSL certificate file for the license server on the license server host. Do not include the path to this file.
- password
-
The password with which the certificate is secured. If the password is obfuscated, specify the entire obfuscated string, including the
OBF:prefix, for example,OBF:1ri71v1r1v2n1ri71shq1ri71shs1ri71v1r1v2n1ri7.Note:To protect this password, ensure that the file that contains the password is appropriately secured. Specifically, limit access to the file that contains the password so that it can be read only by the user that the Tomcat process runs as and the administrator user on Windows or the root user on Linux.
This example provides access to the SSL certificate file keystore.jks, which is protected by an obfuscated password. The port number for incoming HTTPS requests is 1443.
            https-in:
# Set to true to enable HTTPS
enabled: true
# HTTPS listening port
port: 1443
# Path to keystore
keystore-path: keystore.jks
# Keystore password. You can obfuscate this with java -jar flexnetls.jar -password your-password-here
keystore-password: OBF:1ri71v1r1v2n1ri71shq1ri71shs1ri71v1r1v2n1ri7
- Restart the license server.
[nvidia@localhost ~]$ systemctl restart flexnetls-nvidia
- Optional: If necessary, use the iptables command to re-direct incoming HTTPS requests from the local host for the default port to the port that you specified earlier.
Perform this step if you are not using the default port for incoming HTTPS requests (443) and cannot guarantee that all incoming HTTPS requests will specify the port number.
To re-direct incoming HTTPS requests from the local host, use the
OUTPUTchain.For example, to re-direct incoming HTTPS requests from the local host for port 443 to 1443, type this command:
            [nvidia@localhost ~]$ sudo iptables -t nat -A OUTPUT -o lo -p tcp \
--dport 443 -j REDIRECT --to-port 1443
3.2.3. Setting the License Server Connection Protocol to HTTPS
- In the license server management interface, select Settings. The Settings page opens.
Figure 16. License Server Settings for Setting the Connection Protocol

- In the Settings page, set the properties for connecting to the license server over HTTPS and click Save.
- Set the License server host name property to the value of the CN attribute in the certificate signing request for your license server certificate. For example, if the CN attribute was set to the fully qualified domain name, set License server host name to the fully qualified domain name of the license server.
- Set the License server listen port property to the port number for incoming HTTPS requests, for example, 443 or 1443. The port number is set in the license server configuration files. If necessary, ask the system administrator who configured the license server for the port number.
- Set the Connect using HTTPS property to Yes.
The license server management interface will now connect to the license server over HTTPS.
To specify that the license server management interface connects to the license server over HTTP, set the License server listen port to the port number for incoming HTTP requests, for example, 7070, set. the Connect using HTTPS property to No, and click Save.
3.3. Specifying HTTPS for Connections from a Web Browser to the License Server Management Interface
By default, users connect from a web browser to the license server management interface over the HTTP protocol. For increased security, particularly if the license server is accessed over the public Internet, you can specify HTTPS for users' connections from a web browser to the license server management interface. Specifying HTTPS for these connections involves configuring an HTTPS connector for the Apache Tomcat server that the license server management interface uses.
- In the Tomcat configuration file catalina-base/conf/server.xml, add a
Connectorelement to define an SSL Coyote HTTP/1.1 connector on a specific port, for, example, 8443.- catalina-base
- The base directory of the Apache Tomcat instance.
            <!-- Define a SSL Coyote HTTP/1.1 Connector on the specified port -->
<Connector
    protocol="org.apache.coyote.http11.Http11NioProtocol"
    port="port"
    maxThreads="200"
    scheme="https"
    secure="true"
    SSLEnabled="true"
    keystoreFile="path-to-server-certificate"
    keystorePass="password"
    clientAuth="false"
    sslProtocol="TLS"
/>
- port
-
The HTTPS port for users' connections from a web browser to the license server management interface, for example, 8443.
Ensure that the port is not already in use by another service. For example, do not use the port for accessing the license server SSL certificate as described in Configuring the License Server with an SSL Certificate on Windows and Configuring the License Server with an SSL Certificate on Linux.
- path-to-server-certificate
- The full path to the certificate file on the license server host.
- password
-
The password with which the certificate is secured. The password must be specified in plain text. You cannot use an obfuscated password.
Note:
To protect this password, ensure that the file that contains the password is appropriately secured. Specifically, limit access to the file that contains the password so that it can be read only by the user that the Tomcat process runs as and the administrator user on Windows or the root user on Linux.
For additional information about how to obscure the password, see Apache Tomcat Passwords FAQ.
For more information, see Edit the Tomcat Configuration File in the Apache Tomcat SSL/TLS Configuration HOW-TO.
- Restart the Apache Tomcat service.
Users now must access the license server management interface from a web browser through HTTPS on the specified port, for example, port 8443.
The NVIDIA Licensing Portal provides access to the entitlements that you purchased and the licenses that they contain. To help you manage your entitlements and licenses on the NVIDIA Licensing Portal, you can add other users as registered contacts in the organization associated with your NVIDIA Enterprise Account. To secure your entitlements and licenses, NVIDIA Licensing Portal provides role-based access for all registered contacts.
To be able to download NVIDIA vGPU software licenses, you must create at least one license server on the NVIDIA Licensing Portal and allocate licenses in your entitlements to the server. You can also distribute your licenses across multiple license servers as necessary, add new licensed products to an existing server, and delete license servers that you no longer require.
By default, all entitlements are associated with a top-level organization and are accessible to all contacts in the organization. If you need to allow only specific groups of contacts within your organization to access specific entitlements, you can partition your entitlements into isolated segments. However, if a single collection of entitlements that spans your entire organization meets your business needs, you can leave all your entitlements in the top-level organization.
To partition your entitlements into isolated segments, NVIDIA Licensing Portal provides the ability to create virtual groups and assign entitlements and contacts to them. For more information, see Managing Virtual Groups.
4.1. Role-Based Access to an Organization and Virtual Groups
Role-based access helps secure the entitlements and licenses in your organization on the NVIDIA Licensing Portal. If you partition your entitlements into isolated segments, role-based access also provides isolation between the segments into which your entitlements are partitioned. It does so by ensuring that only specific contacts in your organization are allowed to view or perform actions on the entitlements and contacts that are allocated to a virtual group.
A role is a collection of actions or capabilities within the NVIDIA Licensing Portal. Each role has a scope that determines the context to which the actions and capabilities of the role apply, specifically, a virtual group within an organization or the organization itself.
Every registered contact has at least one role, but can have multiple roles if the scope of each role is a virtual group. As a result, a contact can be a member of multiple virtual groups. However, roles with a virtual group scope and roles with an organization scope are mutually exclusive. A contact that has a virtual group role cannot also have an organization role.
To enable role-based access to an organization and virtual groups, the NVIDIA Licensing Portal provides pre-defined roles.
4.1.1. Organization Administrator
An organization administrator has the highest level of visibility and access within an organization. The person that created the organization's NVIDIA Enterprise Account is initially assigned the organization administrator role.
Each organization must have at least one organization administrator. Multiple organization administrators in an organization are allowed. To prevent the absence of a single user from denying you access to your organization's entitlements, consider adding at least two organization administrators to your organization.
An organization administrator can see all of the following items for the organization on the NVIDIA Licensing Portal:
- Entitlements
- Users
- Virtual groups
- License servers provisioned from the entitlements that have not been assigned to a virtual group
An organization administrator can mange virtual groups as follows:
- Create a virtual group.
- Delete a virtual group.
- Assign an entitlement at the organization level to a virtual group.
- Remove an entitlement from a virtual group and return it to the organization.
An organization administrator can manage other contacts in the organization as follows:
- Invite a contact currently not within the organization to register at the organization level.
- Add users and administrators to a virtual group when creating the virtual group.
- Delete any administrator or user at either the organization level or the virtual group level except the last virtual group administrator in a virtual group.
- Manage the role of any organization-level contact.
An organization administrator also has all the capabilities of an organization user.
4.1.2. Organization User
An organization user has restricted visibility within an organization and can access only items that are at the organization level and that have not been assigned to a virtual group. An organization user is a contact that has been added to the organization as a base user.
An organization can have no organization users, only one organization user, or multiple organization users.
An organization user can see the following items for the organization on the NVIDIA Licensing Portal:
- All organization administrators
- All other organization users
- All organization-level entitlements
- All license servers provisioned from organization-level entitlements
An organization user can mange entitlements that have not been assigned to a virtual group as follows:
- Create a license server.
- Delete a license server.
- Add licensed products to a license server.
- Remove licensed products from a license server.
- Download a license file.
- Download software.
An organization user cannot manage other contacts.
4.1.3. Virtual Group Administrator
A virtual group administrator has restricted visibility within an organization and can access items and manage contacts only in the virtual group to which the virtual group administrator is assigned. A virtual group administrator is a contact that has been added to the virtual group as an admin user.
Each virtual group must have at least one virtual group administrator. Multiple virtual group administrators in a virtual group are allowed. To prevent the absence of a single user from denying you access to a virtual group, consider adding at least two virtual group administrators to each virtual group in your organization.
A virtual group administrator can see the following items on the NVIDIA Licensing Portal:
- All organization administrators
- All other contacts in the virtual group
- All entitlements assigned to the virtual group
- All license servers provisioned from entitlements assigned to the virtual group
A virtual group administrator can manage other contacts in the virtual group as follows:
- Add an exiting contact within the organization who is not an organization administrator to the virtual group.
- Invite a contact currently not within the organization to register and join the virtual group.
- Remove any other contact in the virtual group, regardless of the contact's role.
Virtual group administrators cannot remove themselves from a virtual group.
- Manage the role of any other contact in the virtual group.
Virtual group administrators cannot manage their own roles.
A virtual group administrator also has all the capabilities of a virtual group user.
4.1.4. Virtual Group User
A virtual group user has no visibility within an organization and can view and access items only in a virtual group. A virtual group user is a contact that has been added to the virtual group as a base user.
A virtual group can have no virtual group users, only one virtual group user, or multiple virtual group users.
A virtual group user can see the following items for the virtual group on the NVIDIA Licensing Portal:
- All other contacts in the virtual group
- All entitlements assigned to the virtual group
- All license servers provisioned from entitlements assigned to the virtual group
A virtual group user can mange entitlements within a virtual group as follows:
- Create a license server.
- Delete a license server.
- Add licensed products to a license server.
- Remove licensed products from a license server.
- Download a license file.
- Download software.
A virtual group user cannot manage other contacts.
4.2. Creating a License Server on the NVIDIA Licensing Portal
To be able to download NVIDIA vGPU software licenses, you must create at least one license server on the NVIDIA Licensing Portal. Creating a license server on the NVIDIA Licensing Portal registers your license server host with the NVIDIA Licensing Portal through the MAC address of the host.
You can also create multiple servers on the NVIDIA Licensing Portal and distribute your licenses across them as necessary, for example to group licenses functionally or geographically.
The role that this task requires depends on whether the license server is being created for an organization or a virtual group:
- For an organization, this task requires the Organization Administrator or the Organization User role.
- For a virtual group, this task requires the Virtual Group Administrator or the Virtual Group User role.
- In the NVIDIA Licensing Portal, navigate to the organization or virtual group for which you want to create the license server.
- If you are not already logged in, log in to the NVIDIA Enterprise Application Hub and click NVIDIA LICENSING PORTAL to go to the NVIDIA Licensing Portal.
- Optional: If your assigned roles give you access to multiple virtual groups, select the virtual group for which you are creating the license server from the list of virtual groups at the top right of the page.
If no license servers have been created for your organization or virtual group, the NVIDIA Licensing Portal dashboard displays a message asking if you want to create a license server.

- On the NVIDIA Licensing Portal dashboard, click CREATE LICENSE SERVER. If you are adding a license server to an organization or virtual group for which a license server has already been created, click CREATE SERVER.
The Create License Server pop-up window opens.

- Provide the details of your primary license server.
- In the Server Name field, enter the host name of the primary license server.
- In the Description field, enter a text description of the license server. This description is required and will be displayed on the details page for the license server that you are creating.
- In the MAC Address field, enter the MAC address of your primary license server.
- Add the licenses for the products that you want to allocate to this license server. For each product, add the licenses as follows:
- From the Product drop-down list, select the product for which you want to add licenses.
- In the Licenses field, enter the number of licenses for the product that you want to add.
- Click ADD.
- Optional: Provide the details of your secondary license server.
- In the Failover License Server field, enter the host name of the secondary license server. If you have only one license server configured, leave this field unset.
- In the Failover MAC Address field, enter the MAC address of your secondary license server. If you have only one license server configured, leave this field unset.
- Click CREATE LICENSE SERVER.
4.3. Downloading a License File
Each license server that you create has license file associated with it. The license file contains all the licenses that you allocated to the license server. After downloading the license file, you can install it on the license server host associated with the license server on the NVIDIA Licensing Portal.
The role that this task requires depends on whether the license file is being downloaded for an organization or a virtual group:
- For an organization, this task requires the Organization Administrator or the Organization User role.
- For a virtual group, this task requires the Virtual Group Administrator or the Virtual Group User role.
- In the NVIDIA Licensing Portal, navigate to the organization or virtual group for which you want to download the license file.
- If you are not already logged in, log in to the NVIDIA Enterprise Application Hub and click NVIDIA LICENSING PORTAL to go to the NVIDIA Licensing Portal.
- Optional: If your assigned roles give you access to multiple virtual groups, select the virtual group for which you are downloading the license file from the list of virtual groups at the top right of the page.
- In the list of license servers on the NVIDIA Licensing Portal dashboard, select the license server whose associated license file you want to download.
- In the License Server Details page that opens, review the licenses allocated to the license server.

If necessary, add or remove licenses on the server as explained in Managing Licenses on a License Server.
- Click DOWNLOAD LICENSE FILE and save the .bin license file to your license server for installation.
4.4. Managing Licenses on a License Server
Manage licenses on a license server if you need to add or remove licenses for a specific product on the server.
If you want to remove licensed products from a license server to return all licenses for the product to the entitlement, see Removing Licensed Products from a License Server.
The role that this task requires depends on whether the licenses are being managed for an organization or a virtual group:
- For an organization, this task requires the Organization Administrator or the Organization User role.
- For a virtual group, this task requires the Virtual Group Administrator or the Virtual Group User role.
- In the NVIDIA Licensing Portal, navigate to the organization or virtual group for which you want to manage licenses.
- If you are not already logged in, log in to the NVIDIA Enterprise Application Hub and click NVIDIA LICENSING PORTAL to go to the NVIDIA Licensing Portal.
- Optional: If your assigned roles give you access to multiple virtual groups, select the virtual group for which you are managing licenses from the list of virtual groups at the top right of the page.
- In the list of license servers on the NVIDIA Licensing Portal dashboard, select the license server to which you want to add or from which you want to remove licenses.
- In the License Server Details page that opens, click MANAGE LICENSES.
- In the Manage Licenses pop-up window that opens, add or remove licenses for the licensed products that you are interested in.
Add or remove licenses for each licensed product as follows:

- From the Feature drop-down list, select the product for which you want to add or remove licenses.
- In the Licenses field, enter the number of licenses for the product that you want to remain on the server after updating licenses.
-
To add licenses to the server, enter a number greater than the number already allocated to the server, but less than or equal to the total number of licenses available.
If you enter a number greater than the total number of licenses available, an error occurs.
-
To remove licenses from the server, enter a number less than the number already allocated to the server but greater than 0.
For example, to remove 4 licenses from a server to which 10 licenses are allocated, leaving 6 licenses allocated to the server, enter 6 in the Licenses field.
If you enter 0, an error occurs. You must leave at least 1 license on the license server. If you want to remove all licenses for a product from the license server, you must follow the instructions in Removing Licensed Products from a License Server.
-
- Click ADD.
The product and number of licenses are added to the Features to Modify list.
- After adding or removing licenses for all the products that you are interested in, click UPDATE LICENSES.
To ensure that the correct licenses are available on your license server host, download and install the license file after you add or remove licenses.
4.5. Adding Licensed Products to a License Server
You can add a new licensed product to a license server after the license server has been created. When you add a licensed product to a license server, you must also set the number of consumed licenses.
The role that this task requires depends on whether the licensed products are being added for an organization or a virtual group:
- For an organization, this task requires the Organization Administrator or the Organization User role.
- For a virtual group, this task requires the Virtual Group Administrator or the Virtual Group User role.
- In the NVIDIA Licensing Portal, navigate to the organization or virtual group for which you want to add licensed products.
- If you are not already logged in, log in to the NVIDIA Enterprise Application Hub and click NVIDIA LICENSING PORTAL to go to the NVIDIA Licensing Portal.
- Optional: If your assigned roles give you access to multiple virtual groups, select the virtual group for which you are adding licensed products from the list of virtual groups at the top right of the page.
- In the list of license servers on the NVIDIA Licensing Portal dashboard, select the license server to which you want to add licensed products.
- In the License Server Details page that opens, click ADD FEATURES.
- In the Add Features pop-up window that opens, add the licensed products that you are interested in.
Add each licensed product as follows:

- From the Product drop-down list, select the licensed product that you want to add to the license server.
- In the Licenses field, enter the number of licenses for the product that you want to allocate to the server.
- Click ADD.
The product and number of licenses are added to the Features to Add list.
- After adding all the licensed products that you are interested in, click ADD FEATURES.
4.6. Removing Licensed Products from a License Server
Remove licensed products from a license server if they are no longer needed or in preparation for migrating them to a new server. All licenses for the products that you remove are returned to the entitlement.
The role that this task requires depends on whether the licensed products are being removed for an organization or a virtual group:
- For an organization, this task requires the Organization Administrator or the Organization User role.
- For a virtual group, this task requires the Virtual Group Administrator or the Virtual Group User role.
- In the NVIDIA Licensing Portal, navigate to the organization or virtual group for which you want to remove licensed products.
- If you are not already logged in, log in to the NVIDIA Enterprise Application Hub and click NVIDIA LICENSING PORTAL to go to the NVIDIA Licensing Portal.
- Optional: If your assigned roles give you access to multiple virtual groups, select the virtual group for which you are removing licensed products from the list of virtual groups at the top right of the page.
- In the list of license servers on the NVIDIA Licensing Portal dashboard, select the license server from which you want to remove licensed products.
- In the License Server Details page that opens, click REMOVE FEATURES.
- In the Remove Features pop-up window that opens, select the licensed products that you want to remove. For each licensed product that you want to remove, select the product from the Product drop-down list and click REMOVE.

- After removing all the licensed products that you are interested in, click REMOVE FEATURES.
If you removed licenses in preparation for migrating them to a new server, add them to the new server as explained in Adding Licensed Products to a License Server.
4.7. Deleting a License Server
The role that this task requires depends on whether the license server is being deleted for an organization or a virtual group:
- For an organization, this task requires the Organization Administrator or the Organization User role.
- For a virtual group, this task requires the Virtual Group Administrator or the Virtual Group User role.
- In the NVIDIA Licensing Portal, navigate to the organization or virtual group for which you want to delete the license server..
- If you are not already logged in, log in to the NVIDIA Enterprise Application Hub and click NVIDIA LICENSING PORTAL to go to the NVIDIA Licensing Portal.
- Optional: If your assigned roles give you access to multiple virtual groups, select the virtual group for which you are deleting the license server from the list of virtual groups at the top right of the page.
- In the list of license servers on the NVIDIA Licensing Portal dashboard, select the license server that you want to delete.
- In the License Server Details page that opens, click DELETE SERVER.
- When asked to confirm that you want to delete the license server, click DELETE LICENSE SERVER.
4.8. Managing Contacts on the NVIDIA Licensing Portal
To help you manage your entitlements and licenses on the NVIDIA Licensing Portal, you can add other users as registered contacts in the organization associated with your NVIDIA Enterprise Account. You can also remove users who no longer require access from your account on the NVIDIA Licensing Portal.
To secure your entitlements and licenses, NVIDIA Licensing Portal provides role-based access for all registered contacts. Each role has a scope that determines whether the role applies to a virtual group within an organization or the organization itself. For more information, see Role-Based Access to an Organization and Virtual Groups.
4.8.1. Adding a Contact on the NVIDIA Licensing Portal
The role that this task requires depends on whether the contact is being added to an organization or a virtual group:
- For an organization, this task requires the Organization Administrator role.
- For a virtual group, this task requires the Virtual Group Administrator role.
- In the NVIDIA Licensing Portal, navigate to the organization or virtual group to which you want to add a contact.
- If you are not already logged in, log in to the NVIDIA Enterprise Application Hub and click NVIDIA LICENSING PORTAL to go to the NVIDIA Licensing Portal.
- Optional: If your assigned roles give you access to multiple virtual groups, select the virtual group to which you are adding a contact from the list of virtual groups at the top right of the page.
- In the left navigation pane of the NVIDIA Licensing Portal dashboard, click USER MANAGEMENT.

- In the USER MANAGEMENT page that opens, click INVITE USER.
- In the Invite User pop-up window that opens, provide the e-mail address and the name of the contact, select the contact's role, and click SEND INVITATION.

The role to select depends on whether you are adding the contact to an organization or a virtual group.
- For an organization, select one of the following roles:
- ORG ADMIN
- Assigns the contact the Organization Administrator role.
- ORG USER
- Assigns the contact the Organization User role.
- For a virtual group, select one of the following roles:
- VIRTUAL GROUP ADMIN
- Assigns the contact the Virtual Group Administrator role.
- VIRTUAL GROUP USER
- Assigns the contact the Virtual Group User role.
- For an organization, select one of the following roles:
- If you added a contact who is already registered to a virtual group, the contact will be able the select the virtual group after next logging in.
- If the contact is a new contact, an e-mail is sent to the contact at the e-mail address that you provided.
 Note:
Note:The link to the NVIDIA Enterprise Support Portal in this e-mail provides information about how to contact NVIDIA Enterprise Support.
If the contact that you added is a new contact, tell the contact to follow the directions in the e-mail to create an NVIDIA Enterprise Account as explained in Virtual GPU Software Quick Start Guide.
4.8.2. Removing a Contact on the NVIDIA Licensing Portal
The role that this task requires depends on whether the contact is being removed from an organization or a virtual group:
- For an organization, this task requires the Organization Administrator role.
- For a virtual group, this task requires the Virtual Group Administrator role.
- In the NVIDIA Licensing Portal, navigate to the organization or virtual group from which you want to remove a contact.
- If you are not already logged in, log in to the NVIDIA Enterprise Application Hub and click NVIDIA LICENSING PORTAL to go to the NVIDIA Licensing Portal.
- Optional: If your assigned roles give you access to multiple virtual groups, select the virtual group from which you are removing a contact from the list of virtual groups at the top right of the page.
- In the left navigation pane of the NVIDIA Licensing Portal dashboard, click USER MANAGEMENT.

- In the list of contacts in the User Management page that opens, follow the link to remove the contact.
- If you are removing the contact from an organization, follow the Delete link.
- If you are removing the contact from a virtual group, follow the Remove link.
Note:
You cannot remove the only virtual group administrator from a virtual group. The Remove link for that contact is inactive and dimmed.
- When prompted, confirm that you want to remove the contact.
The contact is removed from the list of contacts on the USER MANAGEMENT page.
- A contact that is removed from an organization is removed from the list of registered contacts for the organization.
- A contact that was a member of multiple virtual groups when removed from a virtual group remains a member of the other virtual groups.
- A contact that was a member of only the virtual group from which you removed the contact is returned to the organization with the organization user role.
4.8.3. Changing the Role of a Contact on the NVIDIA Licensing Portal
You can change the role of a contact on the NVIDIA Licensing Portal within the scope of the contact's current role. For example, you can change the role from organization user to organization administrator or from virtual group administrator to virtual group user. However, you cannot change the scope of the contact's current role, for example, from organization administrator to virtual group user.
The role that this task requires depends on whether the contact whose role is being changed belongs to the organization or a virtual group:
- For the organization, this task requires the Organization Administrator role.
- For a virtual group, this task requires the Virtual Group Administrator role.
You cannot change your own role.
- In the NVIDIA Licensing Portal, navigate to the organization or virtual group to which the contact belongs.
- If you are not already logged in, log in to the NVIDIA Enterprise Application Hub and click NVIDIA LICENSING PORTAL to go to the NVIDIA Licensing Portal.
- Optional: If your assigned roles give you access to multiple virtual groups, select the virtual group to which the contact belongs from the list of virtual groups at the top right of the page.
- In the left navigation pane of the NVIDIA Licensing Portal dashboard, click USER MANAGEMENT.
- In the list of contacts in the User Management page that opens, follow the View role link for the contact. You are shown the contact's current role and the role to which you can change it.
- In the User Role window, click the button to change the contact's role.
4.9. Managing Virtual Groups
Virtual groups provide the means for segmenting your organization's entitlements into partitions. The virtual groups in an organization are isolated from each other and from the organization. An entitlement cannot be partitioned and cannot be shared between partitions. All licensed products in an entitlement are moved with the entitlement when the entitlement is added to a virtual group or returned to the organization.
You are free to determine how many virtual groups among which to partition your entitlements and what those virtual groups represent. For example, you might create virtual groups to partition your entitlements by location, division, product, or some combination of factors. Irrespective of how you choose to partition your entitlements among virtual groups, every virtual group isolates the entitlements assigned to it from other virtual groups.
The following diagram shows the relationship between an organization, the virtual groups in an organization, and the components of a virtual group.
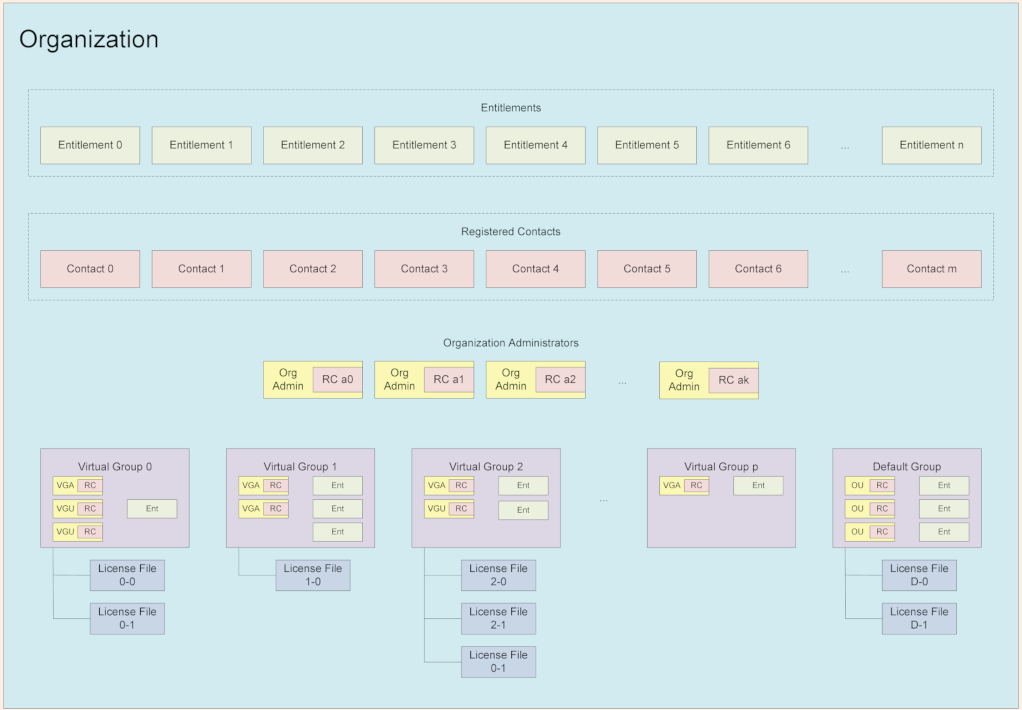
4.9.1. Creating a Virtual Group
Ensure that the following prerequisites are met:
- Your organization contains at least one registered contact to whom you can assign the virtual group administrator role.
- No licensed products in any of the entitlements that you want to add to the group have been added to a license server.
This task requires the Organization Administrator role.
- If you are not already logged in, log in to the NVIDIA Licensing Portal.
- In the left navigation pane of the NVIDIA Licensing Portal dashboard, click VIRTUAL GROUPS.

- In the Virtual Groups page that opens, click CREATE VIRTUAL GROUP.
The Create Virtual Group pop-up window opens.

- In the Virtual Group Name field, enter your choice of name for the group.
- In the Description field, enter a short text description of the group. This description will be displayed for the group in the list of virtual groups on the Virtual Groups page.
- Add the entitlements that you want to assign to the virtual group. For each entitlement that you want to add, select the entitlement from the Entitlements drop-down list and click ADD. You must add at least one entitlement. You cannot create a virtual group with no entitlements. Each entitlement that you select is added to the Added Entitlements list.
- Add the users that you want to be members of the virtual group. Add each user as follows:
- From the drop-down list of users, select the user.
- Follow the link to add the user with the role that you want for the user.
- To add the user with the Virtual Group Administrator role, follow the Add as Admin link.
- To add the user with the Virtual Group User role, follow the Add as User link.
The user is added to the box under the drop-down list of users.
Note:Any user with the Organization Administrator role loses that role and gains the role that you assign when added to the virtual group.
You must add at least one virtual group administrator to the group. You cannot create a virtual group with no administrators.
Tip:To prevent the absence of a single user from denying you access to the virtual group, consider adding at least two virtual group administrators to the virtual group.
- Click CREATE VIRTUAL GROUP in the Create Virtual Group pop-up window.
After you create a virtual group, you can perform only the following operations on the virtual group:
- Deleting the virtual group
- Assigning an entitlement at the organization level to the virtual group
- Removing an entitlement from the virtual group and returning it to the organization
Other operations on the virtual group require the virtual group administrator or virtual group user role.
4.9.2. Deleting a Virtual Group
Delete a virtual group if it is no longer needed. When the group is deleted, all entitlements assigned to the group and any contacts who are members only of this group are returned to the organization. Contacts who are returned to the organization are assigned the organization user role.
This task requires the Organization Administrator role.
- If you are not already logged in, log in to the NVIDIA Licensing Portal.
- In the left navigation pane of the NVIDIA Licensing Portal dashboard, click VIRTUAL GROUPS.

- In the list of virtual groups on the Virtual Groups page, follow the Delete link for the virtual group that you want to delete.
- When asked to confirm that you want to delete the virtual group, click DELETE VIRTUAL GROUP.
4.9.3. Moving an Entitlement from your Organization to a Virtual Group
Ensure that the following prerequisites are met:
- The entitlements that you want to add belong to the organization and not to a virtual group.
- No licensed products in any of the entitlements that you want to add to the group have been added to a license server.
This task requires the Organization Administrator role.
- If you are not already logged in, log in to the NVIDIA Licensing Portal.
- In the left navigation pane of the NVIDIA Licensing Portal dashboard, click VIRTUAL GROUPS.
- Expand the list of entitlements in the organization by clicking the up arrow head adjacent to the organization in the list of virtual groups.

- In the list of entitlements, follow the Move link for the entitlement.
Note:
You cannot move an entitlement if any of its licensed products has been added to a license server. The Move link for the entitlement is inactive and dimmed.
- In the Move Entitlement window that opens, select the virtual group where you want to move the entitlement and click MOVE ENTITLEMENT. The entitlement is removed from the list of entitlements in the organization and added to the list of entitlements in the virtual group.
4.9.4. Removing an Entitlement from a Virtual Group
Remove an entitlement from a virtual group to return it to the organization either to make it available to users at the organization level or to transfer it to a different virtual group.
Ensure that no licensed products in the entitlement that you want to remove have been added to a license server.
This task requires the Organization Administrator role.
- If you are not already logged in, log in to the NVIDIA Licensing Portal.
- In the left navigation pane of the NVIDIA Licensing Portal dashboard, click VIRTUAL GROUPS.
- Expand the list of entitlements in the virtual group that contains the entitlement that you want to remove by clicking the up arrow head adjacent to the group.

- In the list of entitlements, follow the Remove link for the entitlement.
Note:
You cannot remove an entitlement if any of its licensed products has been added to a license server or if it is the only entitlement in a group. The Remove link for the entitlement is inactive and dimmed.
- When asked to confirm that you want to remove the entitlement, click REMOVE ENTITLEMENT. The entitlement is removed from the list of entitlements in the virtual group and added to the list of entitlements in the organization.
You can now move the entitlement that you removed to transfer it to a different virtual group as explained in Moving an Entitlement from your Organization to a Virtual Group.
4.9.5. Common Business Scenarios for Virtual Groups
4.9.5.1. Multinational Corporation and Subsidiaries with Central Licensing Management
Organization Administrators
The organization administrators are responsible for setting up virtual groups and managing entitlements for the entire organization. The individuals chosen to be organization administrators must understand the organization structure and purchasing process, so that they are capable of routing newly purchased entitlements appropriately.
To ensure that someone is always available to move newly purchased entitlements into the correct virtual group, consider designating at least three organization administrators.
Virtual Groups
To simplify the allocation entitlements to the entity for which they were purchased, consider creating a virtual group for every subsidiary or geographic region, as appropriate.
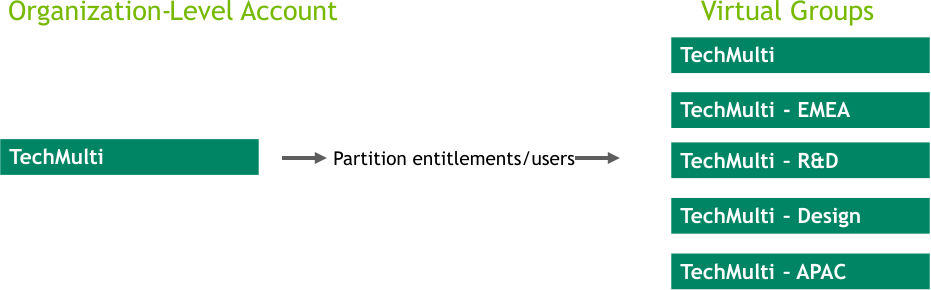
Virtual Group Contacts
To ensure redundancy at every level in your organization, designate at least two virtual group administrators for each virtual group.
After a virtual group is created, its virtual group administrators are free to add contacts who are not organization administrator as required.
4.9.5.2. Government Dark Sites
Organization Administrators
The organization administrators are responsible for setting up virtual groups and managing entitlements for the entire organization. The individuals chosen to be organization administrators must have the clearances necessary to view all entitlements purchased by the organization.
To ensure that someone is always available to move newly purchased entitlements into the correct virtual group, consider designating at least three organization administrators.
Virtual Groups
To allow complete isolation between the groups, as required by law or other regulations, consider creating a virtual group for every management entity or governmental department, as appropriate.
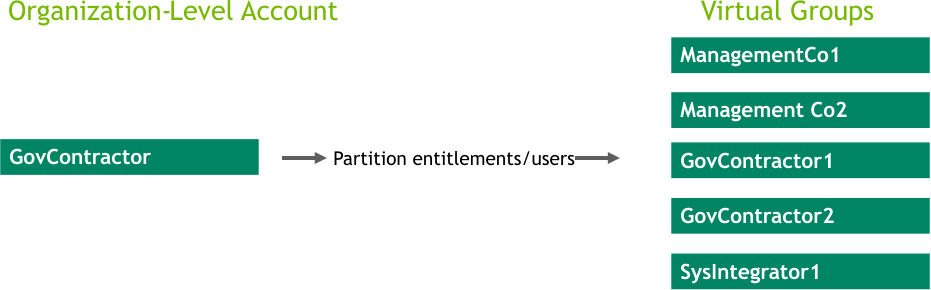
Virtual Group Contacts
To ensure redundancy at every level in your organization, designate at least two virtual group administrators for each virtual group.
After a virtual group is created, its virtual group administrators are free to add contacts who are not organization administrator as required.
4.9.5.3. System Integrator and Managed Service Provider Within a Single Organization
Organization Administrators
The organization administrators are responsible for setting up virtual groups and managing entitlements for the entire organization. The individuals chosen to be organization administrators must have approval to view all entitlements purchased by the organization. At least one of the individuals chosen to be an organization administrator should be an employee of the organization to ensure that at least one direct employee is able to view the entire account.
To ensure that someone is always available to move newly purchased entitlements into the correct virtual group, consider designating at least three organization administrators.
Virtual Groups
To allow complete isolation between the groups, as preferred by the management entity or the organization, consider creating a virtual group for every managed group, as appropriate.
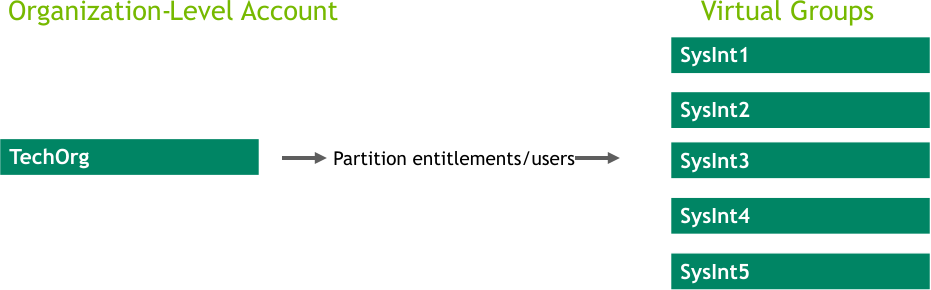
Virtual Group Contacts
To ensure redundancy at every level in your organization, designate at least two virtual group administrators for each virtual group.
After a virtual group is created, its virtual group administrators are free to add contacts who are not organization administrator as required.
4.9.5.4. Independent Software Vendor (ISV) Embedded Business Model
Organization Administrators
The organization administrators are responsible for setting up virtual groups and managing entitlements for the entire organization. The individuals chosen to be organization administrators should be employees of the ISV who have approval to view and manage all entitlements for the organization.
To ensure that someone is always available to add new virtual groups and respond to inquiries from the virtual group administrators, who are customers, consider designating at least three organization administrators.
Virtual Groups
To allow complete isolation between customers, as required, consider creating a virtual group for each customer, as appropriate.

Virtual Group Contacts
To ensure redundancy at every level in your organization, designate at least two virtual group administrators for each virtual group.
After a virtual group is created, its virtual group administrators are free to add contacts who are not organization administrator as required.
4.9.5.5. Flexibility in ELA Consumption with Fencing
Organization Administrators
The organization administrators are responsible for setting up virtual groups and managing entitlements for the entire organization. The individuals chosen to be organization administrators must understand the organization structure and purchasing process, so that they are capable of routing newly purchased entitlements appropriately.
To ensure that someone is always available to move newly purchased entitlements into the correct virtual group, consider designating at least three organization administrators.
Virtual Groups
To allow billing and metering for the licenses generated from those entitlements to be isolated to the users that the ELA is intended to cover, as is required, consider creating a virtual group for every ELA or billing entity, as appropriate.
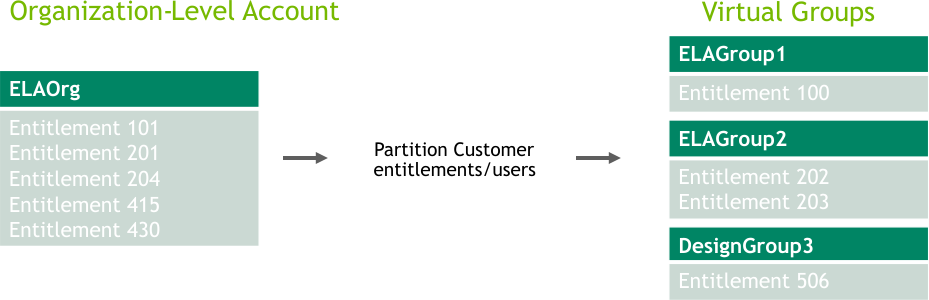
Virtual Group Contacts
To ensure redundancy at every level in your organization, designate at least two virtual group administrators for each virtual group.
After a virtual group is created, its virtual group administrators are free to add contacts who are not organization administrator as required.
Managing licenses on your local NVIDIA vGPU software license server involves installing licenses on the license server and controlling and monitoring the usage of installed licenses. You manage the license server in a web browser through the license server management interface.
You can also manage the license server from the command line.
5.1. Installing a License
NVIDIA vGPU software licenses are distributed as .bin files for download from the NVIDIA Licensing Portal.
If you have configured high availability for the license server, you must install the license both on the primary license server and on the secondary license server.
Before installing a license, ensure that you have downloaded the license file from the NVIDIA Licensing Portal.
- In the license server management interface, select License Management.
- On the License Management page that opens, click Choose File.
Figure 17. Selecting a License File

- In the file browser that opens, select the .bin file and click Open.
- Back on the License Management page, click Upload to install the license file on the license server. The license server should confirm successful installation of the license file.
Figure 18. Successful Upload of a License File

- If you have configured high availability for the license server, restart the license server service on the primary license server and on the secondary license server.
- On Windows, use the Service Manager, which is accessible from Task Manager, to restart the FNLS-nvidia service.
- On Linux, as root, restart the
flexnetls-nvidiaservice.[nvidia@localhost ~]$ sudo systemctl restart flexnetls-nvidia
5.2. Verifying High Availability Setup of the License Server
Messages in the license server log file about synchronization requests indicate the failover role of the given license server and its synchronization status. The primary server receives synchronization requests that the secondary server has initiated.
For the location of the log file on your platform, refer to Log File Locations and Types.
In the license server log file, search for the string that indicates whether the server has received or initiated a synchronization request. The line that contains the string and the lines that follow it indicate the role and status of the server.
- For the primary server, search for the string
Received sync request from the backup server.22:46:30,085 INFO [request sync-session=480THG8NMUHJ] Received sync request from the backup server 22:46:30,977 INFO [request] POST:/fne/bin/capability 22:46:30,977 INFO [request sync-session=480THG8NMUHJ] Received sync request from the backup server 22:46:51,034 INFO [request] POST:/request
- For the secondary server, search for the string
Starting sync: backup requests main -> backup.22:46:29,648 INFO [sync-session=480THG8NMUHJ] Starting sync: backup requests main -> backup. 22:46:31,438 INFO [sync-session=480THG8NMUHJ] Successfully completed sync from main server
When a client acquires a license from the primary server, the number of available licensed features is reduced by 1 on both the primary and the secondary servers. When the license server is operating, you can verify its high availability setup by confirming that the count of available licenses on the primary and the secondary servers changes as expected as clients acquire licenses from the server.
5.3. Viewing Information About Installed Licenses
From the license server management interface, you can find out which licenses are installed on the server, view detailed information about individual licenses, and see how licensed clients are using the installed licenses.
5.3.1. Viewing the Properties of All Installed Licensed Features
By viewing licensed feature properties, you can see the licenses that are installed on the server and get detailed information about each installed license feature.
In the license server management interface, select Licensed Feature Usage.
The Licensed Feature Usage page that opens lists all licensed features installed on the license server.
Figure 19. Viewing Licensed Feature Properties
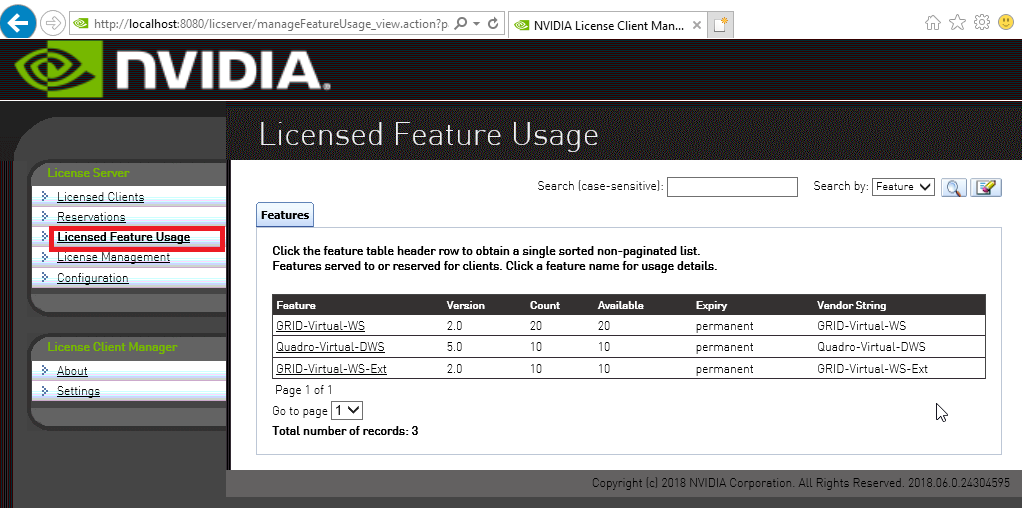
For each licensed feature, the properties in the following table are displayed.
| Property | Description |
|---|---|
| Feature | An abbreviated name for the feature. |
| Version | The version number associated with the feature. |
| Count | The number of licenses for the feature that are currently installed on the license server. Each concurrent user of a feature normally consumes one license. |
| Available | The number of licenses for the feature that are currently available to borrow from the server. This number decreases as users borrow licenses from the server, and increases as licenses are returned. |
| Expiry | The date on which the right to use the licensed feature expires. If the licenses are perpetual use licenses, they have no expiration date. Perpetual licenses are indicated by permanent in place of an expiration date. |
5.3.2. Viewing the Details of a Single Licensed Feature
For each installed license feature, you can view detailed information about the feature.
- In the license server management interface, select Licensed Feature Usage.
- On the Licensed Feature Usage page that opens, click the individual licensed feature about which you want detailed information. The Licensed Feature Details page that opens shows information about the feature.
Figure 20. Licensed Feature Usage Details

5.3.3. Viewing Information About All Borrowed Licenses
By viewing information about all borrowed licenses, you can find out which licenses have been borrowed from the license server and are in use by a licensed client.
In the license server management interface, select Licensed Clients.
The Licensed Clients page that opens lists the NVIDIA vGPU software client virtual machines are using licensed features.
The example in Figure 21 shows that one NVIDIA vGPU software client virtual machine is using a Quadro-Virtual-DWS license.
Figure 21. Viewing License Usage
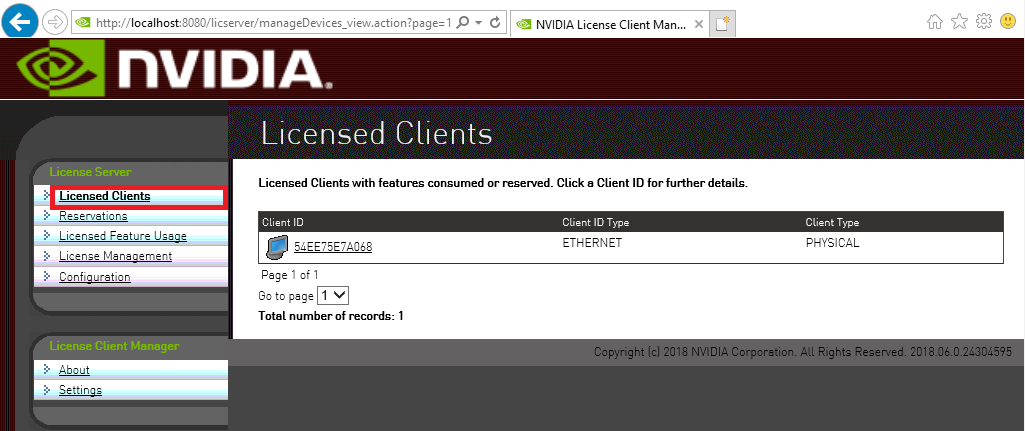
5.3.4. Viewing the Details of a Single Licensed Client
- In the license server management interface, select Licensed Clients.
- On the Licensed Clients page that opens, click the Client ID of the licensed client about which you want detailed information. The Client Details page opens to show detailed information about the licensed client.
Figure 22. Licensed Client Details

5.3.5. About the License Borrow Period
At the end of the borrow period, typically multiple days, a borrowed license is automatically freed by the license server for use by other clients, and becomes unavailable on the licensed client that previously held it. While active, a licensed client renews its license periodically to ensure the borrow period does not expire, if it continues to use the license and has ongoing network connectivity to the license server.
5.4. Reserving Licenses
Licenses are normally distributed to clients on a first-come, first-served basis. Reservations allow licenses to be set aside for specific clients, ensuring that those clients can always obtain a license.
5.4.1. Creating License Reservations
The license server management interface enables you to set up several new reservations and submit them to the license server in a single group.
After creating a group of license reservations, you cannot use the management UI to delete individual reservations in the group or to add new reservations to the group. If you try to use the management UI to delete a single entry from the Reservation page, all entries on the page are deleted. For more information about this issue and its workaround, see Virtual GPU License Server Release Notes.
In an HA configuration, create identical license reservations on the primary license server and the secondary license server. To ensure that the license reservations are identical on both servers, you can export reservations from one server and import them into the other server as explained in Exporting and Importing License Reservations.
- In the license server management interface, select Reservations. The License Reservations page opens.
- Add each reservation that you want to create to the list of pending reservations.
Figure 23. Adding a License Reservation

- On the License Reservations page, click Add.
- On the Add Reservation page that opens, provide the details of the client for which you are creating the reservation and click Add.
- Group Name
- (Optional) Enter the name you want to assign to this reservation group.
- Client ID
- Enter the client’s Ethernet MAC address without spaces.
- Feature Name
- Enter the licensed feature name as listed on the Licensed Feature Usage page, which is shown in Viewing the Properties of All Installed Licensed Features.
- Version
- Enter the version number listed for the feature listed on the Licensed Feature Usage page.
- Count
- Set to the number of licenses that you want to reserve for the client.
- After adding all reservations that you want to create, click Submit to commit the pending reservations to the license server.
Figure 24. Submitting a Pending Reservation

After the reservations are submitted, the License Reservations page shows a list of currently stored reservations on the server.
Figure 25. Listing Reservations
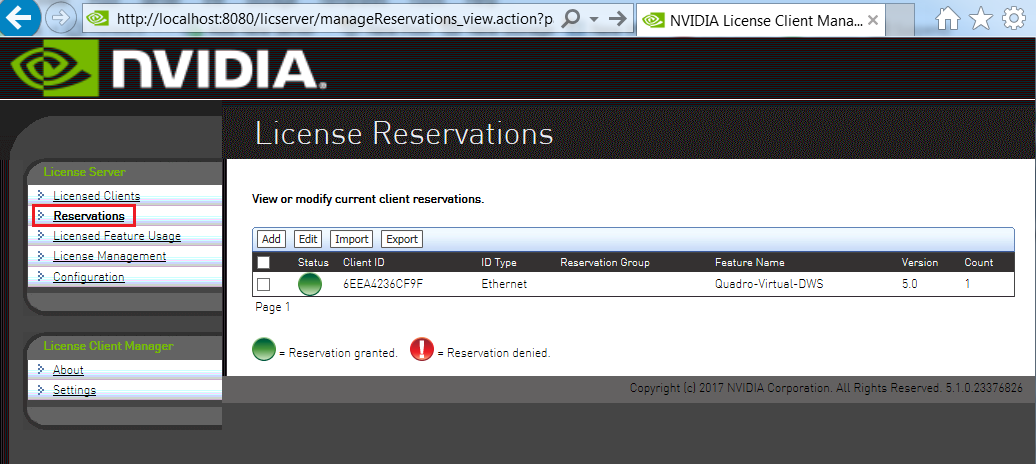
If GRID Virtual Workstation licenses and licenses are available on the same license server, GRID Virtual Workstation licenses are assigned first, even to clients that have reserved licenses.
5.4.2. Deleting License Reservations
If a client no longer requires a license that is reserved for it, delete the reservation to release the license for distribution to other clients.
- In the license server management interface, select Reservations.
- On the License Reservations page that opens, select the reservations that you want to delete and click Edit.
The License Reservations page is updated to replace the existing buttons on the page with the Delete button.
- On the updated License Reservations page, click Delete.
Figure 26. Deleting a Reservation

- In the confirmation dialog box that opens, click OK.
5.4.3. Exporting and Importing License Reservations
Exporting license reservations downloads the current reservation list as an XML file through your web browser. Importing license reservations from an XML file replaces the license server’s current reservation list with the contents of the file.
Because importing license reservations from a file replaces the license server’s current reservation list, any reservations on the server that are not in the file are lost.
- In the license server management interface, select Reservations.
- On the License Reservations page that opens, do one of the following:
- To export license reservations, click Export.
- To import license reservations, click Import, browse to the XML file that contains the reservations, and click Upload.
Figure 27. Exporting and Importing License Reservations

Converting an Evaluation License Server to a Permanent License Server
If you purchase NVIDIA vGPU software licenses after evaluating the software, you can use the same license server that you created for your evaluation licenses to serve your permanent licenses.
- Log in to the NVIDIA Licensing Portal with the account that you created for getting your evaluation licenses.
- Get the NVIDIA vGPU software for the licenses that you purchased. For instructions, refer to Virtual GPU Software Quick Start Guide.
- Add the licenses that you purchased to your license server on the NVIDIA Licensing Portal as explained in Adding Licensed Products to a License Server.
- Download your new license file as explained in Downloading a License File.
You can troubleshoot some common issues with the license server yourself without the need to obtain help from NVIDIA.
Before troubleshooting, review Virtual GPU License Server Release Notes for information about known issues and potential workarounds.
6.1. Obtaining Diagnotsic Information from the License Server Log files
The license server log files contain diagnostic information to help with troubleshooting. If necessary, you can increase the amount of information in the log files by changing the log level of the license server.
6.1.1. Log File Locations and Types
Log files from the installer and license server are in the locations in the following table.
To confirm the location of the license server log files, use the license server management interface: Select Configuration and click the Properties tab.
The location of the log files is displayed on the License Server Configuration page in the Logging Directory field.
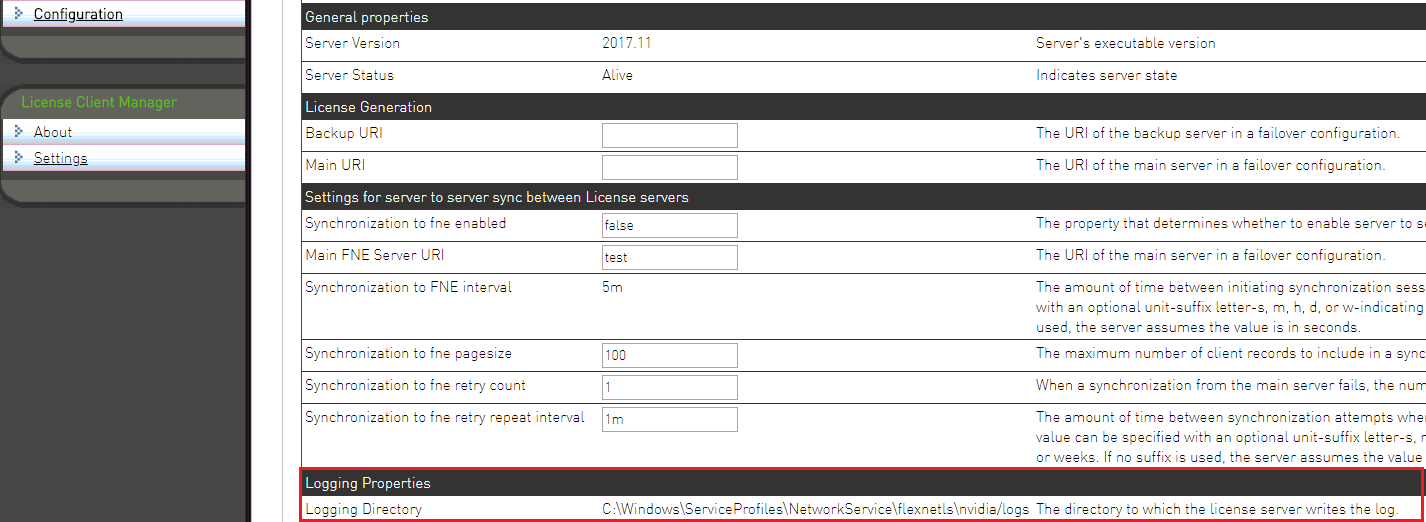
The license server generates these types of runtime log files:
- Management interface accesses are recorded in
access_*.request.logfiles. - License server activity is recorded in
flexnetls_*.logfiles.
6.1.2. Changing the License Server Log Level
The default log level of the license server is ERROR.
To adjust the amount of information in the log files, set the log level to a different level.
- In the license server management interface, select Configuration and click the Properties tab.
- On the License Server Configuration page, in the Logging Threshold field, enter a new log level, for example WARN or ERROR, and click Save.
Figure 28. Changing the License Server Log Level

All messages at or below the level you set are recorded in the log file. For example, if you set the log level to WARN, fatal-event, error, and warning messages are recorded.
6.2. Management Interface Connection Errors
The management interface at http://hostname:8080/licserver might be unreachable because the license server host’s firewall disallows remote access to server TCP port 8080 or because the Apache Tomcat service is not running on the server.
- If you are trying to access the management interface from a remote machine, try accessing the interface locally from the license server host. To access the interface locally, open a web browser on the license server host and connect to the URL
http://localhost:8080/licserver. - If you can access the management interface locally, ensure that the license server host’s firewall is configured to allow remote access to server TCP port 8080.
- If you cannot access the management interface locally, verify that the Apache Tomcat service is running on the license server host.
- On Windows, use the Services application to restart the service if it is not running.
Figure 29. Apache Tomcat Status in the Windows Services Application
- On Linux, check the status of the tomcat service.
            [nvidia@localhost ~]$ systemctl status tomcat.service
tomcat.service - Apache Tomcat Web Application Container
   Loaded: loaded (/usr/lib/systemd/system/tomcat.service; enabled)
   Active: active (running) since Fri 2019-04-19 07:39:11 PDT; 9h ago
 Main PID: 1373 (java)
   CGroup: /system.slice/tomcat.service
           └─1373 java -classpath /usr/share/tomcat/bin/bootstrap.jar:/usr/sh...
- On Windows, use the Services application to restart the service if it is not running.
6.3. License Server Connection Errors
If the license server’s management interface cannot establish a connection to the license server, the management interface displays an error message.
Figure 30. License Server Connection Error
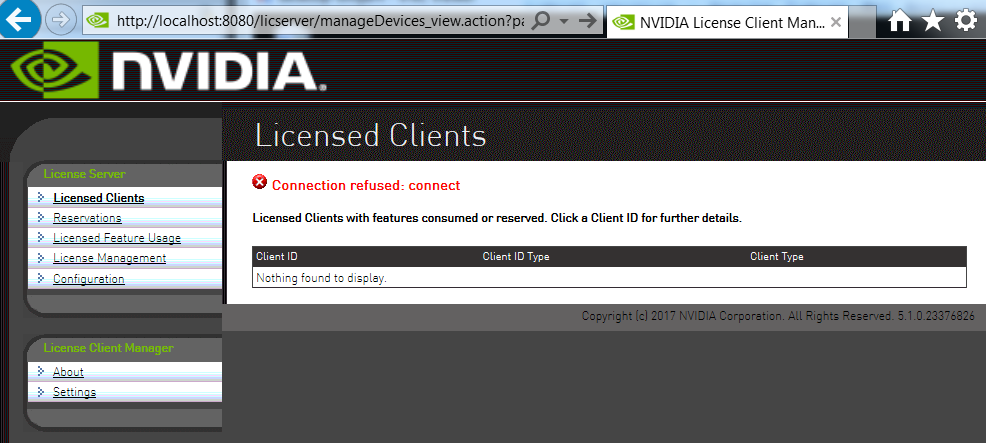
- Verify that the license service is running.
- On Windows, use the Services application to restart the service if it is not running.
Figure 31. License Server Status in the Windows Services Application
- On Linux, check the status of the flexnetls-nvidia service.
            [nvidia@localhost ~]$ systemctl status flexnetls-nvidia.service
flexnetls-nvidia.service - LSB: start and stop FlexNet License Server
   Loaded: loaded (/etc/rc.d/init.d/flexnetls-nvidia)
   Active: active (running) since Fri 2019-04-19 14:44:34 PDT; 2h 49min ago
  Process: 4502 ExecStart=/etc/rc.d/init.d/flexnetls-nvidia start (code=exited, status=0/SUCCESS)
   CGroup: /system.slice/flexnetls-nvidia.service
           ├─4567 java -Dbase.dir=/var/opt/flexnetls/nvidia -jar /opt/flexnet...
           └─4609 java -Dbase.dir=/var/opt/flexnetls/nvidia -jar /opt/flexnet...
- On Windows, use the Services application to restart the service if it is not running.
- Inspect the license server log files, which are described in Log File Locations and Types.
6.4. License Upload Failures
Errors may occur during an attempt to upload a license file to the license server.
6.4.1. License Response Fails Trust Criteria
The license server reports a trust failure if it attempts to reload a license file that’s already loaded.
Verify that the license file being uploaded is not already active on the server.
6.4.2. Capability Response Rejected - Response Time Too Old
The license server reports this error if the license file you are attempting to upload has expired. Licenses generated on the NVIDIA licensing portal must be installed onto your license server within 24 hours of generation.
Generate a new license file on the licensing portal and promptly upload the new file to your license server.
6.4.3. Capability Response Rejected – Update Time Invalid
The license server reports this error if the license server is already configured with a license file that is newer than the license file you are attempting to upload.
You cannot roll back an active license to an older license file.
6.4.4. Capability Response Rejected - Response Enterprise ID Does Not Match the Server
The license server reports this error if you are trying to download a license file to a license server on which licenses from a different customer account are installed. To resolve this issue:
- Stop the license server.
- Delete the license server's trusted storage database.
- Restart the license server.
- Download and install the new license.
6.5. Trusted Storage Database Errors
Errors in the trusted storage database, such as corruption of the database, can prevent the license server from reading the database. If it cannot read the database, the license server cannot start. You can correct errors in the trusted storage database in one of the following ways:
- Restoring the database from a backup
- Deleting the database and then reinstalling licenses on the license server
6.5.1. Restoring the Trusted Storage Database from a Backup
The license server automatically backs up the database after every 1,000 license checkouts or after every five-minute interval in which a change has taken place, whichever event occurs first. If no change to the database occurs during a five-minute interval, the database is not backed up. Backups are triggered by changes such as the checkout, renewal, or release of a license.
6.5.1.1. Restoring the Trusted Storage Database from a Backup on Windows
Before restoring the trusted storage database from a backup, ensure that the following prerequisites are met:
- The
JAVA_HOMEenvironment variable is set to the folder where the Java runtime environment is installed on the license server host. - The
TRUSTED_STORAGE_DIRenvironment variable is set to %SystemDrive%:\Windows\ServiceProfiles\NetworkService\flexnetls\nvidia, which is the folder that contains the trusted storage database files.
- Open a Command Prompt window and change to the license-server-installation-folder\server folder.
- license-server-installation-folder
- The folder in which the license server software is installed. The default license server installation folder is %SystemDrive%:\NVIDIA\LicenseServer.
For example:
            C:\>cd C:\NVIDIA\LicenseServer\server
C:\NVIDIA\LicenseServer\server>
- In the Command Prompt window, run the command to restore the database.
C:\NVIDIA\LicenseServer\server>flexnetls.bat -restore-database
The database is restored to the location defined in the TRUSTED_STORAGE_DIR environment variable.
6.5.1.2. Restoring the Trusted Storage Database from a Backup on Linux
Before restoring the trusted storage database from a backup, ensure that the following prerequisites are met:
- The
JAVA_HOMEenvironment variable is set to the directory where the Java runtime environment is installed on the license server host. - The
TRUSTED_STORAGE_DIRenvironment variable is set to /var/opt/flexnetls/nvidia/, which is the directory that contains the trusted storage database files.
- Change to the license-server-installation-dir/server directory.
- license-server-installation-dir
- The directory in which the license server software is installed. The default license server installation directory is /opt/flexnetls/nvidia.
For example:
$ cd /opt/flexnetls/nvidia/server
- Run the command to restore the database.
$ flexnetls --restore-database
The database is restored to the location defined in the TRUSTED_STORAGE_DIR environment variable.
6.5.2. Deleting the Trusted Storage Database
Deleting the trusted storage database clears all information about license assignments and allocations.
After deleting the trusted storage database, reinstall your licenses on the license server as explained in Installing a License.
6.5.2.1. Deleting the Trusted Storage Database on Windows
- Close any web browser windows that are accessing the license server.
- Stop the FlexNet License Server - nvidia service.
- Start Task Manager and in the Windows Task Manager window that opens, click the Services button.
- In the Services window that opens, context-click FlexNet License Server - nvidia and from the menu that pops up, choose Stop.
- Delete all files in the %SystemDrive%:\Windows\ServiceProfiles\NetworkService\flexnetls\nvidia folder, which contains the trusted storage database files.
- Start the FlexNet License Server - nvidia service.
- Start Task Manager and in the Windows Task Manager window that opens, click the Services button.
- In the Services window that opens, context-click FlexNet License Server - nvidia and from the menu that pops up, choose Start.
6.5.2.2. Deleting the Trusted Storage Database on Linux
This task requires system administrator privileges.
- Close any web browser windows that are accessing the license server.
- Stop the flexnetls-nvidia service.
# sudo systemctl stop flexnetls-nvidia.service
- Delete all files in the /var/opt/flexnetls/nvidia/ directory, which contains the trusted storage database files.
# sudo \rm -rf /var/opt/flexnetls/nvidia/*
- Start the flexnetls-nvidia service.
# sudo systemctl start flexnetls-nvidia.service
6.6. Issues when the License Server Is Used with Security Software
When the license server is used with security software, such as a firewall or antivirus software, issues may occur if the security software blocks certain applications or functionality.
The following issues are examples of the kinds of issues that may occur if security software blocks certain applications or functionality:
- Failure of the license server to start
- Access violation exceptions
- Core dumps by the JRE
To determine whether security software is causing these issues, test your license server setup with the security software disabled or removed. If disabling or removing the security software resolves the issue, consider one of the following long-term fixes:
- If your organization's software security policies allow, add an exception rule for the license server application.
- Otherwise, contact NVIDIA Enterprise Support for assistance in determining the root cause of the issue. When you contact NVIDIA Enterprise Support, provide a detailed description of the symptoms of the issue and the exact versions of any security software that you are using on the license server host.
You can uninstall the NVIDIA vGPU software License Server when it is no longer required.
7.1. Uninstalling the NVIDIA vGPU Software License Server on Windows
- Start the license server uninstaller.
You can start the license server uninstaller from Windows Control Panel, Windows Explorer, or a Command Prompt window.
If you start the license server uninstaller from Windows Control Panel or Windows Explorer, how it runs depends on the mode in which license server software was installed. If the license server software was installed in console mode, the uninstaller runs in silent mode. Otherwise, the Configure License Server dialog box opens.
To avoid the possibility of running the license server installer in silent mode, start it from a Command Prompt window.
- In Windows Control Panel, open the Programs and Features pane, select License Server from the publisher NVIDIA, and click Uninstall/Change.
Figure 32. Starting the Uninstaller from Windows Control Panel

- In Windows Explorer, open the license server installation directory and double-click the Change License Server Installation application.
The default license server installation folder is %SystemDrive%:\NVIDIA\LicenseServer.
- In a Command Prompt window, change to the license server installation directory and start the license server installer in interactive console mode.
The default license server installation folder is %SystemDrive%:\NVIDIA\LicenseServer.
C:\NVIDIA\LicenseServer>"Change License Server Installation.exe" -i console
- In Windows Control Panel, open the Programs and Features pane, select License Server from the publisher NVIDIA, and click Uninstall/Change.
- If the Configure License Server dialog box opens, ensure that the Uninstall Product option is selected and click Next.
Figure 33. Running the License Server Uninstaller on Windows

- When prompted, confirm that you want to uninstall the license server and specify whether you want to uninstall Apache Tomcat.
7.2. Uninstalling the NVIDIA vGPU Software License Server on Linux
- Start the license server uninstaller.
- Change to the license server installation directory. The default license server installation directory is /opt/flexnetls/nvidia.
[nvidia@localhost ~]$ cd /opt/flexnetls/nvidia
- As root, run the Change License Server Installation command.
[nvidia@localhost ~]$ sudo ./Change\ License\ Server\ Installation
If the license server software was installed in console mode, the uninstaller runs in console mode. Otherwise, the Configure License Server window opens.
- Change to the license server installation directory. The default license server installation directory is /opt/flexnetls/nvidia.
- If the Configure License Server window opens, ensure that the Uninstall Product option is selected and click Next.
Figure 34. Running the License Server Uninstaller on Linux
- When prompted, confirm that you want to uninstall the license server.
The nvidialsadmin utility provides options for administering the license server from the command line.
Options are available for the following administrative operations:
- Maintaining the license server
- Managing administrative security
- Viewing features installed on the license server
- Monitoring license distribution to clients
A.1. Running the nvidialsadmin Utility
The nvidialsadmin utility is distributed as the nvidialsadmin.bat batch file on Windows and as the nvidialsadmin.sh shell script on Linux.
Before attempting to run the nvidialsadmin utility, ensure that the JAVA_HOME environment variable is set to the folder where the Java runtime environment is installed on the license server host.
Run the nvidialsadmin utility in a Windows or Linux command shell from the folder that contains the nvidialsadmin.bat batch file or the nvidialsadmin.sh shell script.
The nvidialsadmin utility is contained in the folder license-server-installation-folder/enterprise.
- license-server-installation-folder
- The folder in which the license server software is installed.
The default folders for the Windows and Linux platforms are as follows:
- Windows: %SystemDrive%:\NVIDIA\LicenseServer\enterprise
- Linux: /opt/flexnetls/nvidia/enterprise
You must run the nvidialsadmin utility from the folder that contains the nvidialsadmin.bat batch file or the nvidialsadmin.sh shell script. If you try to run the utility from another folder by specifying the path to the utility either in the PATH variable or on the command line, the attempt fails and the following error message is displayed:
Error: Unable to access jarfile nvidialsadmin.jar
A.2. Setting the License Server Base URL for the nvidialsadmin Utility
All nvidialsadmin commands require the base URL of the license server.
The format of the base URL of the license server is as follows:
scheme://address:port/api/version/instances/~
- scheme
-
The URL scheme, which is either
httporhttps. - address
-
The address of the license server, which can be a fully-qualified domain name such as
gridlicense1.example.com, or an IP address such as10.31.20.45. - port
-
The port number through which the nvidialsadmin utility accesses the licence server. The default depends on whether scheme is
httporhttps.- For
http, the default is 7070. - For
https, the default is 443.
- For
- version
- The API version of the license server, for example, 1.0.
The following examples show the different ways of specifying the address of the license server in the base URL:
- Fully-qualified domain name:
-
http://gridlicense1.example.com:7070/api/1.0/instances/~ -
https://gridlicense1.example.com:443/api/1.0/instances/~
-
- IP address:
-
http://10.31.20.45:7070/api/1.0/instances/~ -
https://10.31.20.45:443/api/1.0/instances/~
-
Set the license server base URL for the nvidialsadmin utility in one of the following ways:
- Globally for all nvidialsadmin commands by specifying the
FLEXNETLS_BASEURLenvironment variable - Individually in each nvidialsadmin command by setting the -server option
A.3. Getting Help for the nvidialsadmin Utility
For details about the nvidialsadmin utility and its options, get help information for the utility by entering the following command in a command shell on the license server host:
nvidialsadmin -help
A.4. Authenticating with the License Server
When administrative security is enabled for the license server, the -authorize option with your credentials must be the first option that you specify in any nvidialsadmin command.
- To provide your password in the command, specify the credentials as follows:
nvidialsadmin -authorize username password
- To be prompted for your password and avoid typing the password in clear text in the command, provide the -passwordConsoleInput option .
nvidialsadmin -authorize username -passwordConsoleInput
- username
- Your user name for authenticating with the license server.
- password
- Your password for authenticating with the license server.
If you specify the wrong credentials more than three times, your license server user account is blocked for 10 minutes and a message similar to the following example is displayed:
            Too many failed logins for user admin on instance WX0EDD7ALYMN.
Logins will be blocked for 10 minutes
A.5. Checking the Status of the License Server
You can perform a status check to confirm that the license server is running correctly.
This check tells you whether the license server is active and provides additional information, such as:
- Version information for the license server
- The URLs for the main license server and, if HA is configured for the license server, the back-up license server
Perform this task in a command shell on the license server host.
For clarity, required options for authenticating the administrator user and specifying the license server URL are omitted from this example.
Run the nvidialsadmin utility with the -status option.
            nvidialsadmin  -status
Copyright (c) 2015-2018 Flexera LLC. All Rights Reserved.

(version) Version            : 2018.09
(buildVersion) Build Version : 237146

The server is in active state.

Server: http://localhost:7070/ active
Backup Server: Not configured
A.6. Getting General Configuration Information for the License Server
You can get general informaton about the configuration of the license server, such as the IP address and host name of the server.
Perform this task in a command shell on the license server host.
For clarity, required options for authenticating the administrator user and specifying the license server URL are omitted from this example.
Run the nvidialsadmin utility with the -config option and set the -filter option to general.
            nvidialsadmin -config -filter general
General License Server Information
-----------------------------------
(license_server_url) IP                  : 127.0.0.1
(host_name) Host Name                    : localhost
(publisher_name) Publisher Name          : nvidia
(host_id) Binding ID                     : ETHERNET (482AE30D8299)
(license_server_port) Port               : 7070
(licensing.backup.uri)                   : Not Configured
-----------------------------------
A.7. Listing Features Installed on the License Server
Perform this task in a command shell on the license server host.
For clarity, required options for authenticating the administrator user and specifying the license server URL are omitted from this example.
Run the nvidialsadmin utility with the -features option.
            nvidialsadmin -features
================================================================================
Name              Count           Version         Type              Expiration
================================================================================

Quadro-Virtual-DWS 75000           5.0             CONCURRENT        permanent

Total number of features : 1
A.8. Listing the Distribution of License Server Features
Perform this task in a command shell on the license server host.
For clarity, required options for authenticating the administrator user and specifying the license server URL are omitted from this example.
Run the nvidialsadmin utility with the -licenses and -verbose options.
            nvidialsadmin -licenses -verbose
===================================================================================
Feature ID    Feature Name         Feature Version   Feature Count Used/Available
===================================================================================
1             vGPU-virtual               3.0                 0/25
2             Quadro-Virtual-DWS         5.0                 1/24
===================================================================================

Device Information:

-------------------------------------------------------------
Device Name                   Feature Registered(Used Count)
-------------------------------------------------------------
5C5F67C3836D                         Quadro-Virtual-DWS(1)
===================================================================================

        Total feature count           : 50
        Total feature count used      : 1
        Total uncounted features      : 0
===================================================================================
Notice
ALL NVIDIA DESIGN SPECIFICATIONS, REFERENCE BOARDS, FILES, DRAWINGS, DIAGNOSTICS, LISTS, AND OTHER DOCUMENTS (TOGETHER AND SEPARATELY, "MATERIALS") ARE BEING PROVIDED "AS IS." NVIDIA MAKES NO WARRANTIES, EXPRESSED, IMPLIED, STATUTORY, OR OTHERWISE WITH RESPECT TO THE MATERIALS, AND EXPRESSLY DISCLAIMS ALL IMPLIED WARRANTIES OF NONINFRINGEMENT, MERCHANTABILITY, AND FITNESS FOR A PARTICULAR PURPOSE.
Information furnished is believed to be accurate and reliable. However, NVIDIA Corporation assumes no responsibility for the consequences of use of such information or for any infringement of patents or other rights of third parties that may result from its use. No license is granted by implication of otherwise under any patent rights of NVIDIA Corporation. Specifications mentioned in this publication are subject to change without notice. This publication supersedes and replaces all other information previously supplied. NVIDIA Corporation products are not authorized as critical components in life support devices or systems without express written approval of NVIDIA Corporation.
HDMI
HDMI, the HDMI logo, and High-Definition Multimedia Interface are trademarks or registered trademarks of HDMI Licensing LLC.
OpenCL
OpenCL is a trademark of Apple Inc. used under license to the Khronos Group Inc.
Trademarks
NVIDIA, the NVIDIA logo, NVIDIA GRID, vGPU, Pascal, Quadro, and Tesla are trademarks or registered trademarks of NVIDIA Corporation in the U.S. and other countries. Other company and product names may be trademarks of the respective companies with which they are associated.
Third-Party Software
This NVIDIA product contains third party software that is made available under their respective software licenses. Apache Tomcat (https://tomcat.apache.org/download-80.cgi) is provided under the following terms: Copyright 2015 NVIDIA Corporation Licensed under the Apache License, Version 2.0 (the "License"); you may not use this file except in compliance with the License. You may obtain a copy of the License at http://www.apache.org/licenses/LICENSE-2.0 Unless required by applicable law or agreed to in writing, software distributed under the License is distributed on an "AS IS" BASIS, WITHOUT WARRANTIES OR CONDITIONS OF ANY KIND, either express or implied. See the License for the specific language governing permissions and limitations under the License.