BMC Management Network Interface#
This documentation describes the IGX BMC network default configuration and steps to change the configuration. Read this documentation carefully if you need to change the network configuration, because you can only access IGX BMC through the network, and if you configure the network interface incorrectly you can lose your access to the BMC.
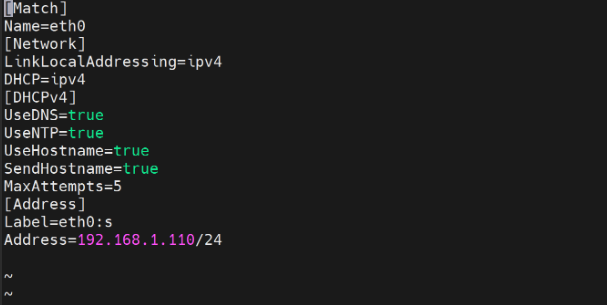
This is a default network configuration, which supports DHCP + STATIC network access simultaneously.
Default network configuration stored in /etc/systemd/network/00-bmc-eth0.network.
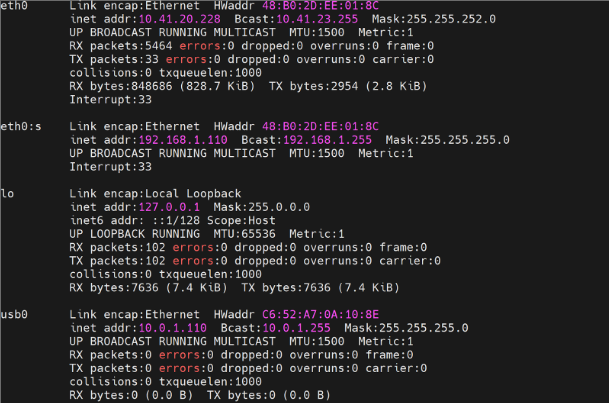
The following is the BMC network configuration in the ifconfig command.
eth0 shows the dynamic IP which is 10.41.20.228, and
eth0:s shows the static IP which is 192.168.1.110.
eth0 is active if Ethernet RJ45 port connected with DHCP server, and
ethO:s is active if Ethernet RJ45 port is connected with the PC/Platform.
Access the network configuration from the BMC Web UI#
Use the following procedure to access the network configuration from The BMC Web User Interface.
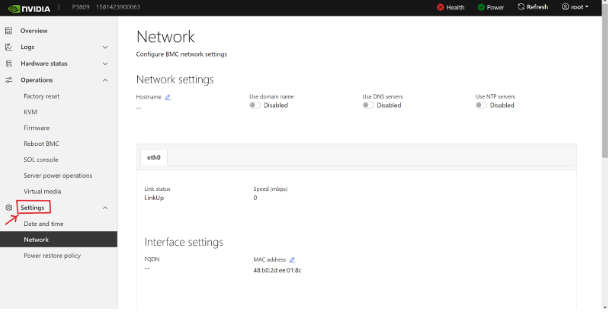
In the BMC Web UI, go to Settings, and then click Network.
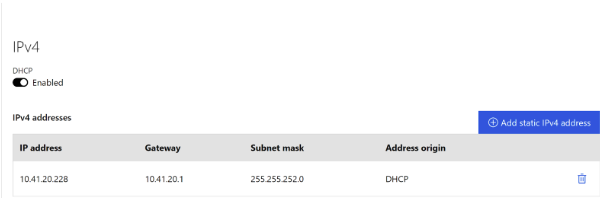
Scroll to IPv4. The IPv4 address of the IP from which you logged into the BMC Wub UI appears. If BMC ethernet is connected with DHCP network then can see DHCP IP here, otherwise connected with static node then can see static IP(192.168.1.110) only here.
Change the network configuration#
We don’t recommend that you change the network configuration because by default, both DHCP + STATIC are supported. If you need to switch the scenario then BMC UI only supports these cases, documented following.
Change static IP for new connection, while on DHCP network to access BMC.
Add more static IP in same subnet mask, while on static network to access BMC.
Switch to DHCP, while on static network to access BMC.
Change static IP for new connection, while on DHCP network to access BMC#
To add the static IPv4 address, click on the Blue color “Add static IPv4 address” box and then enter the “IP address” , “Gateway” and “Subnet mask”, then click on the “Add” button.
1IP address : 192.168.1.111
2Gateway : 192.168.1.1
3Subnet mask : 255.255.255.0

Now Reload the webUI page, you will observe that the connection has been lost as you have added the new static IP address.
Connect to the compatible static network, And access the webUI from static host with above added static IP
Add more static IP in same subnet mask, while on static network to access BMC#
To add the static IPv4 address, click on the Blue color “Add static IPv4 address” box and then enter the “IP address” , “Gateway” and “Subnet mask”, then click on the “Add” button.
1IP address : 192.168.1.120
2Gateway : 192.168.1.1
3Subnet mask : 255.255.255.0
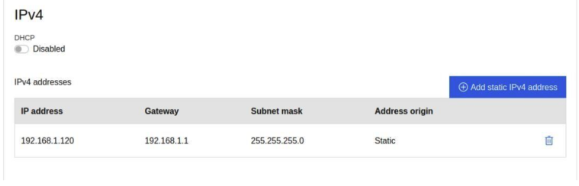
Now Reload the webUI page, you will observe that the connection has been lost as you have added the new static IP address.
Connect to the compatible static network, And access the webUI page from static host with above added static IP
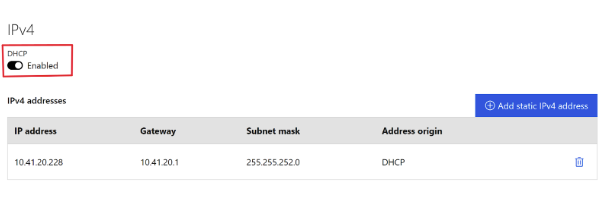
Switch to DHCP, while on static network to access BMC#
If have changed the default network configuration changed to the static IP only by adding new static IP, can change back to the DHCP by enabling it from webUI
Enable the DHCP as shown in below image while accessing webUI from static IP, then reconnect BMC with DHCP network and access the webUI again
After that look into the devices against MAC addresses in DHCP server/Router, Ex: For Ubuntu DHCP server, Restart the DHCP server and check IP under “DHCP-lease-list” command
Accessing Network Configuration using IPMITOOL#
Change/Set static IP using ipmitool IPMI tool can change the static IP by executing below command in a single command, Need to run this command in a single line only,
1ipmitool lan set 1 ipsrc static; ipmitool lan set 1 ipaddr 192.168.1.110; ipmitool lan set 1 defgw ipaddr 192.168.1.1; ipmitool lan set 1 netmask 255.255.255.0
Enable DHCP mode using IPMITOOL#
A IPMI tool can change the mode to dynamic IP using the below command if you need to switch from a static network.
1ipmitool lan set 1 ipsrc dhcp
After that look into the devices against MAC addresses in DHCP server/Router, Ex: For Ubuntu DHCP server, Restart the DHCP server and check IP under “DHCP-lease-list” command
Available Network IPMI Commands#
Function |
Command |
Description |
|
|---|---|---|---|
1 |
Change mode to DHCP |
ipmitool lan set 1 ipsrc <mode>
For example: ipmitool lan set 1 ipsrc dhcp
|
Sets LAN channel 1 IP config mode to DHCP which corresponds to network interface eth0. |
2 |
Add IPv4 address |
ipmitool lan set 1 ipaddr <IP Address>
ipmitool lan set 1 defgw ipaddr <IP Address>
ipmitool lan set 1 netmask <Netmask>
|
Adds IPv4 address, default gateway, and netmask to the network interface eth0. |
3 |
Change mode to Static |
ipmitool lan set 1 ipsrc <mode>
ipmitool lan set 1 ipaddr <IP Address>
ipmitool lan set 1 defgw ipaddr <IP Address>
ipmitool lan set 1 netmask <Netmask>
Example: ipmitool lan set 1 ipsrc static; ipmitool lan set 1 ipaddr
192.168.1.110; ipmitool lan set 1 defgw ipaddr 192.168.1.1;
ipmitool lan set 1 netmask 255.255.255.0
NOTE: The above command must be run only in a single line. |
Sets LAN channel 1 IP config mode to static which corresponds to LAN port 5 on the back panel. |
4 |
Get IPv4 config |
ipmitool lan print 1
|
Gets IPv4 network config for channel 1 which corresponds to the network interface eth0. |
5 |
Set IPv6 address |
ipmitool lan6 set 1 nolock static_addr 0 enable <IPv6 address> 64
|
Adds IPv6 address to the network interface eth0. |
6 |
Get IPv6 config |
ipmitool lan6 print 1
|
Gets IPv6 network config for channel 1 which corresponds to the network interface eth0. |