Docker Setup#
Docker brings reproducible, containerized workflows to Jetson, giving you seamless access to the GPU without sacrificing speed or flexibility.
Do you need Docker?#
If you fall into the following categories, you want/need to install Docker:
- You want to run NGC and other containers that’s pre-built for Jetson.
e.g. You want to use
jetson-containers.
You want to manage multiple software stack configurations for your development (Container-based Development).
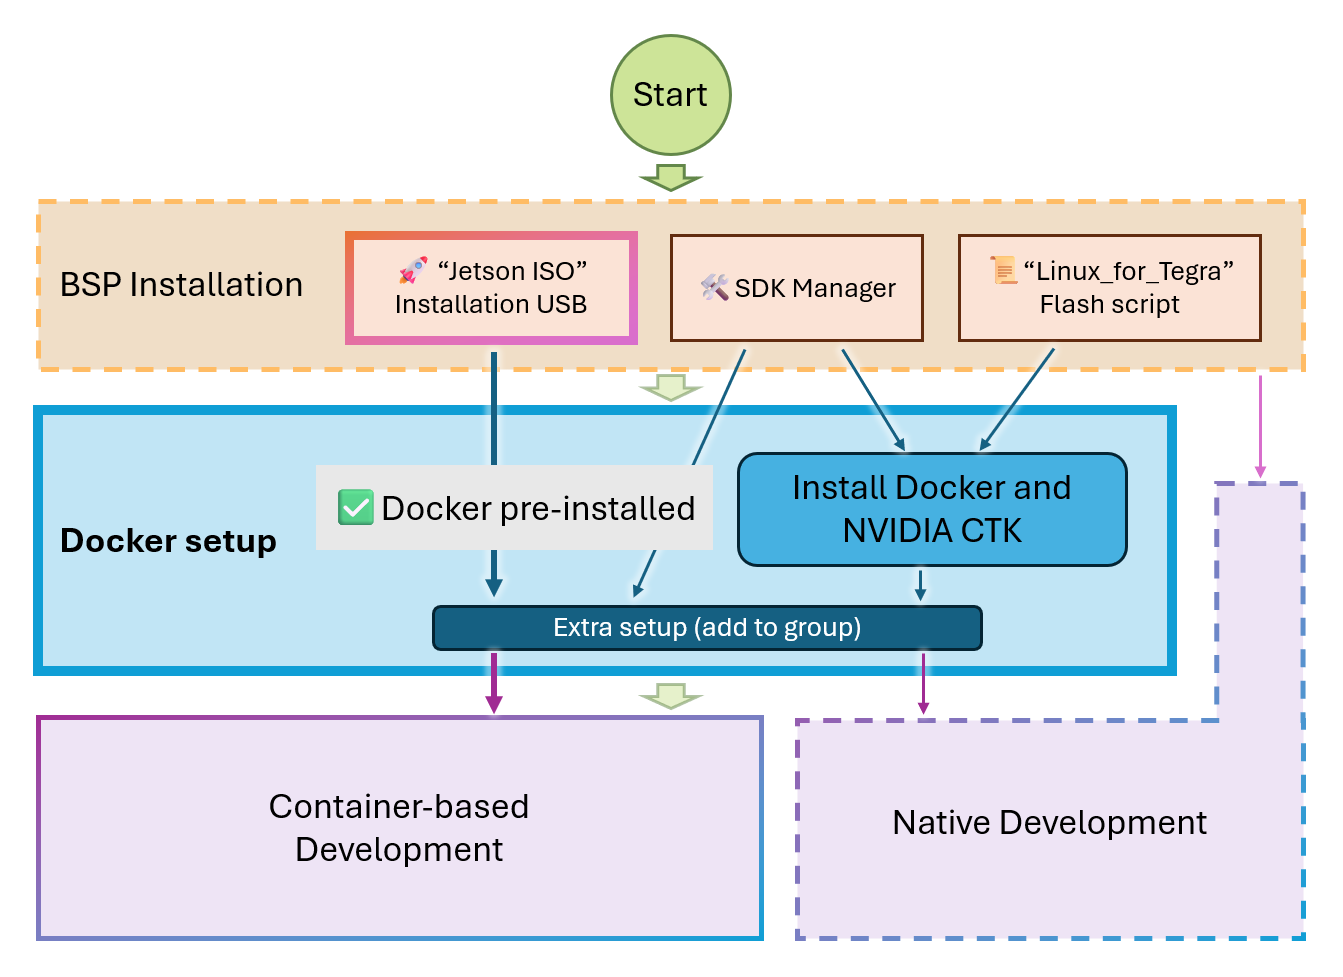
Docker Setup Flow#
To summarize the options and steps, the following diagram shows the flow of the Docker setup process.
Step 1: Install Docker and NVIDIA Container Toolkit#
This step is only needed if you flashed BSP using “Linux_for_Tegra” flash script or flashed BSP using SDK Manager
Note
You can skip this step if you installed Jetson BSP with “Jetson USB” installation USB stick method.
First, install NVIDIA Container Toolkit (CTK) using the JetPack SDK ATP repository.
sudo apt-get update
sudo apt install -y nvidia-container curl
Then, download and install Docker from Docker website. (not from Ubuntu APT repository)
curl https://get.docker.com | sh && sudo systemctl --now enable docker
sudo nvidia-ctk runtime configure --runtime=docker
Lastly, restart Docker service to make sure the configuration is applied.
sudo systemctl daemon-reload && sudo systemctl restart docker
Step 2: Rest of the Docker Setup#
Add the default runtime to the Docker daemon configuration file, so that we don’t need to specify --runtime nvidia every time we run a container.
sudo apt install -y jq
sudo jq '. + {"default-runtime": "nvidia"}' /etc/docker/daemon.json | \
    sudo tee /etc/docker/daemon.json.tmp && \
    sudo mv /etc/docker/daemon.json.tmp /etc/docker/daemon.json
Let’s make sure you have the following in your /etc/docker/daemon.json file.
$ cat /etc/docker/daemon.json
{
  "runtimes": {
    "nvidia": {
      "args": [],
      "path": "nvidia-container-runtime"
    }
  },
  "default-runtime": "nvidia"
}
It’s also recommended to add your username ($USER) to the docker group to avoid using sudo to run Docker commands.
sudo usermod -aG docker $USER
newgrp docker
After that, you may need to restart your terminal/session to apply the changes.
Docker Setup Test#
Example 1: Run PyTorch container#
docker run --rm -it \
    -v "$PWD":/workspace \
    -w /workspace \
    nvcr.io/nvidia/pytorch:25.08-py3
Once in the container, you can test PyTorch with GPU.
python3 <<'EOF'
import torch
print("PyTorch version:", torch.__version__)
print("CUDA available:", torch.cuda.is_available())
if torch.cuda.is_available():
    print("GPU name:", torch.cuda.get_device_name(0))
    x = torch.rand(10000, 10000, device="cuda")
    print("Tensor sum:", x.sum().item())
EOF
You should see something like this:
PyTorch version: 2.8.0a0+34c6371d24.nv25.08
CUDA available: True
GPU name: NVIDIA Thor
Tensor sum: 50001728.0
🚑 Docker Setup Troubleshooting#
Error: permission denied#
If you see the following error:
permission denied while trying to connect to the Docker daemon socket at unix:///var/run/docker.sock: Get "http://%2Fvar%2Frun%2Fdocker.sock/v1.51/containers/json": dial unix /var/run/docker.sock: connect: permission denied
It’s most likely that you did not or failed to add your username ($USER) to the docker group.
Solution 1: Add your username to the docker group#
Execute the following commands to add your username to the docker group, and then restart your terminal/session to apply the changes,
sudo usermod -aG docker $USER
newgrp docker
Solution 2: Use sudo#
Or, for now, you execute docker command with sudo.
sudo docker info