Install and Configure NetQ#
NetQ NvLink (previously NMX-M) provides a single interface for management and telemetry collection of NVLink switches. NetQ is deployed on Kubernetes, along with the other components that make up Mission Control.
NetQ Kubernetes Setup#
NetQ Permanent License Generation and Application Guide#
When installing NetQ, the system receives an evaluation license valid for 60 days. When the evaluation license expires, REST API access is blocked until a new license is applied.
Generating a License File#
Before you generate the license file, you need to do the following:
Prepare a list of servers with the MAC address of each server on which you plan to install the NetQ software.
Have access to the NVIDIA Licensing Portal (NLP) with valid credentials.
To generate the license file, use the following steps:
Access the NVIDIA Licensing Portal
Go to the NVIDIA Licensing Portal (NLP).
Log in using your credentials.
Navigate to Network Entitlements
Click on the Network Entitlements tab.
You’ll see a list of all your software product serial licenses, license information, and status.
Select and Activate License
Select the license you want to activate.
Click on the “Actions” button.
Configure MAC Addresses
In the MAC Address field, enter the MAC address of the delegated license-registered host.
If applicable, in the HA MAC Address field, enter your High Availability (HA) server MAC address.
Note: If you have more than one NIC installed on a UFM Server, use any of the MAC addresses.
Generate and Download License
Click on Generate License File to create the license key file for the software.
Click on Download License File and save it on your local computer.
Important Notes about License Regeneration#
When you regenerate a license, you need to keep the following in mind:
If you replace your NIC or server, repeat the process of generating the license to set new MAC addresses.
You can only regenerate a license two times.
To regenerate the license after that, contact NVIDIA Sales Administration at enterprisesupport@nvidia.com.
Download the NetQ install package#
The NetQ install package can be downloaded from the NVIDIA Licensing Portal (NLP).
Downloading NetQ#
To download the package, use the following steps:
Go to the NVIDIA Licensing Portal (NLP) and log in using your credentials.
Click on Software Downloads, filter the product family to NetQ, find the relevant version, and download the Appliance platform package.
Click on Download.
Save the file on your local drive.
Click Close.
Copy the .tar.gz file to the BCM head node:
rsync -azP <path-to-tar.gz-file> root@bcm11-head-01:/root
To download the Debian packages, use the following link: https://edge.urm.nvidia.com/artifactory/sw-nbu-netq-debian/pool/netq-5.1/
Find and download the relevant apps and agents packages for Ubuntu 24 (ub24) and the relevant CPU architecture (arm or amd).
Installing NetQ#
This section describes how to install NetQ on a BCM-managed Kubernetes cluster.
Prerequisites#
Kubernetes 1.34 is installed
Nginx ingress is installed
Three nodes with the minimum hardware requirements (4TB disk space, 512GB Free RAM, Core count 48)
An IP address that is reserved (to be used as Virtual IP)
Note
The prerequisite checks verify free memory and disk space. If your environment meets the requirements but the check fails (for example, when disk space is available on a non-default mount point such as /local), you can pass the --skip-netq-prerequisites-checks flag to cm-kubernetes-setup to bypass these checks. Verify that the system meets the required CPU core count, memory, and disk space before doing so.
Installation#
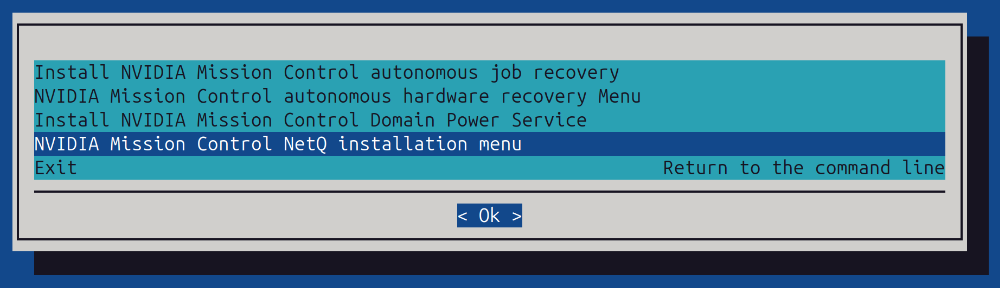
Start the installation wizard using the cm-mission-control-setup command.
Select the NetQ installation here:
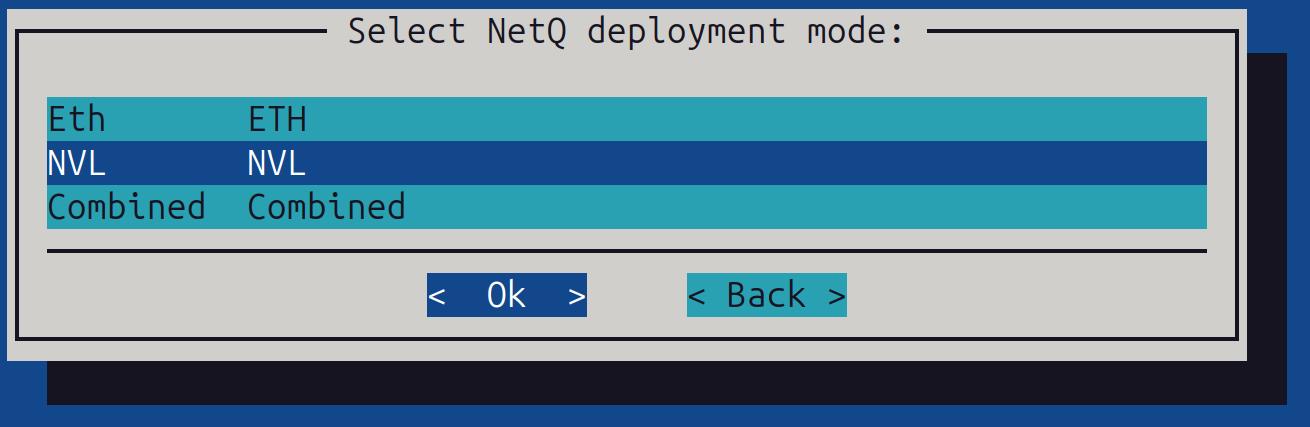
Select the NetQ deployment mode: Choose the NVL Mode.
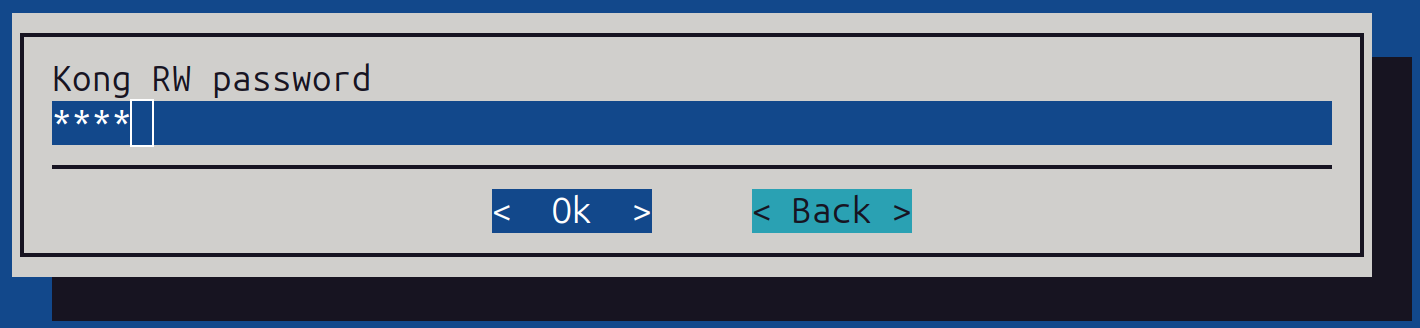
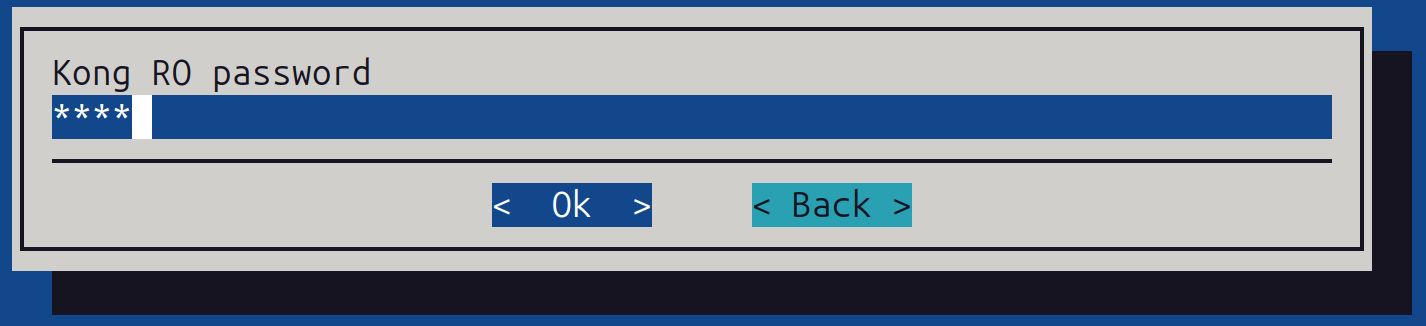
Set Kong (NMX Api) username and password:
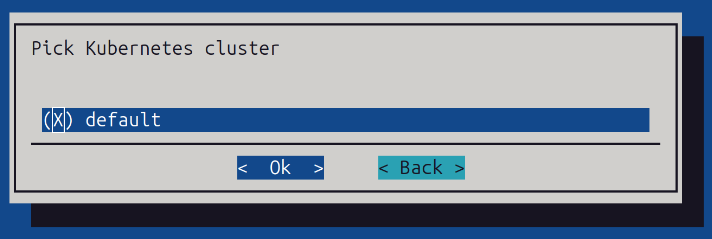
Choose the related Kubernetes cluster:
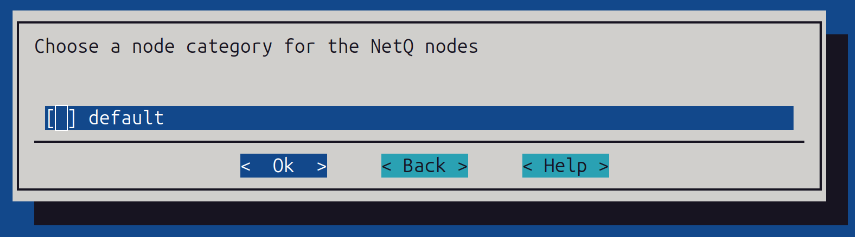
Choose the node category for the nodes where NetQ will be installed (usually the category for k8s-admin control plane nodes):
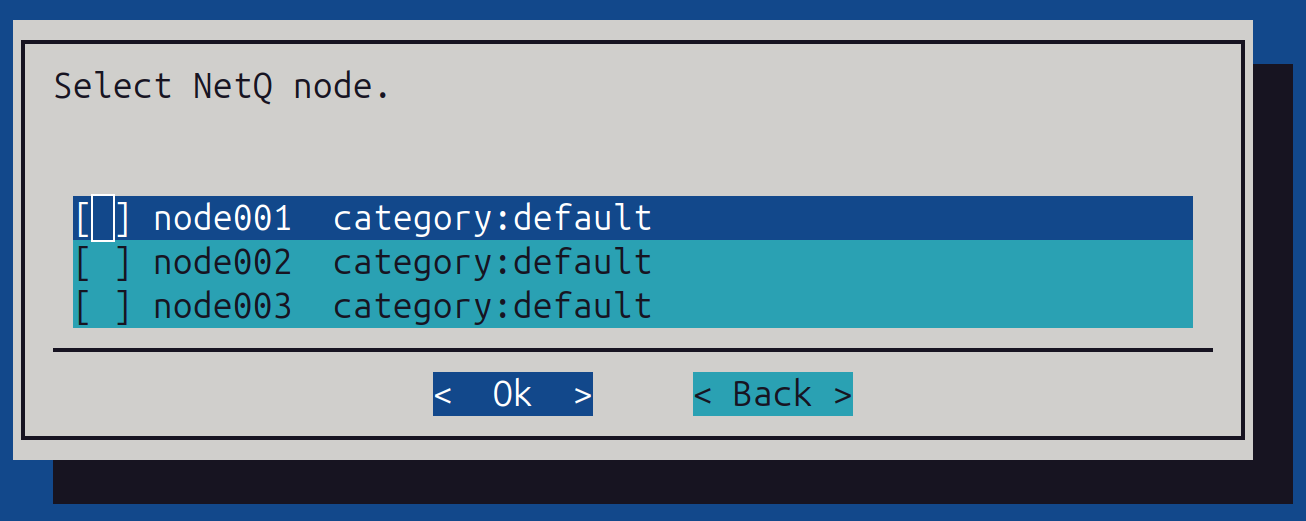
If left empty, you can also choose 3 nodes:
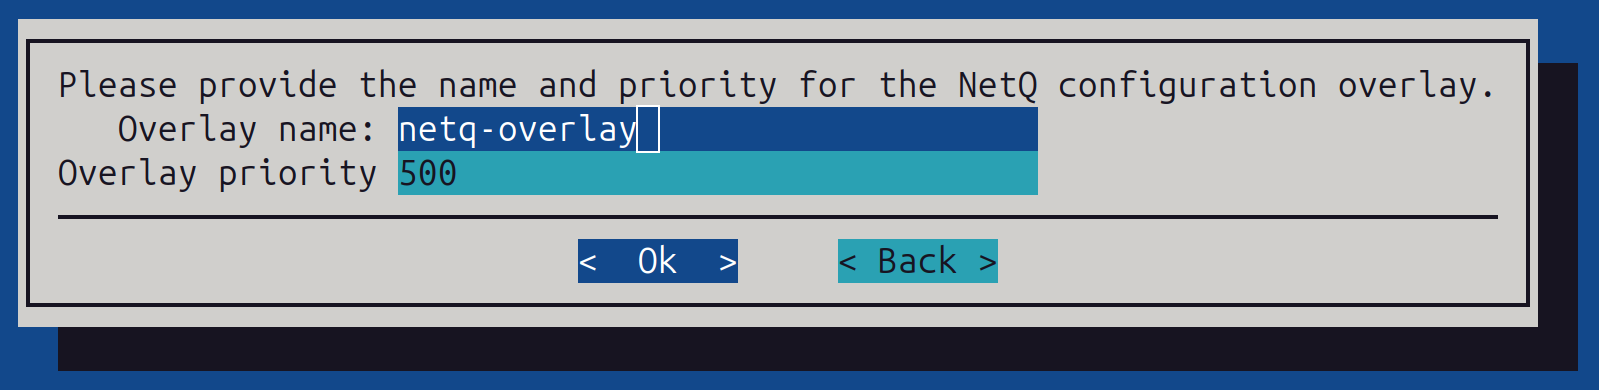
Provide the NetQ overlay name and priority (in most cases ‘default’ can be used):
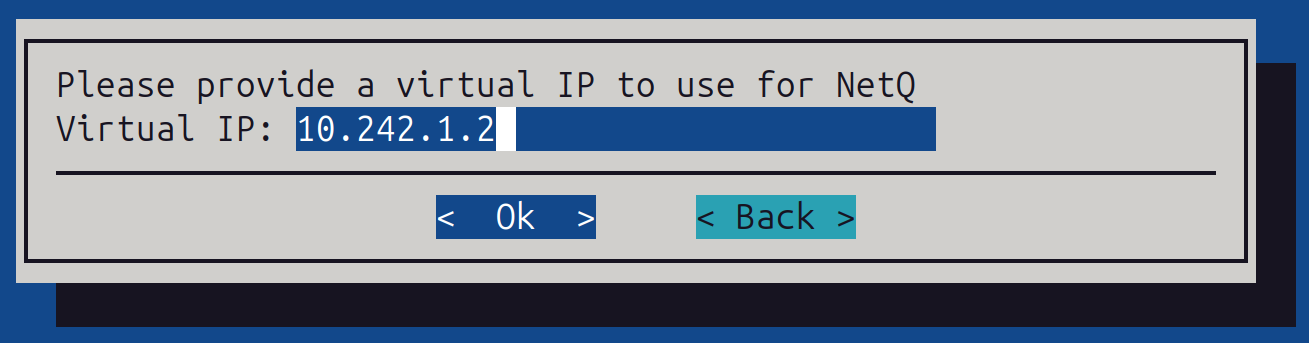
Provide a Virtual IP for the Cluster - An unused IP address allocated from the same subnet assigned to the default interface for your master and worker nodes.
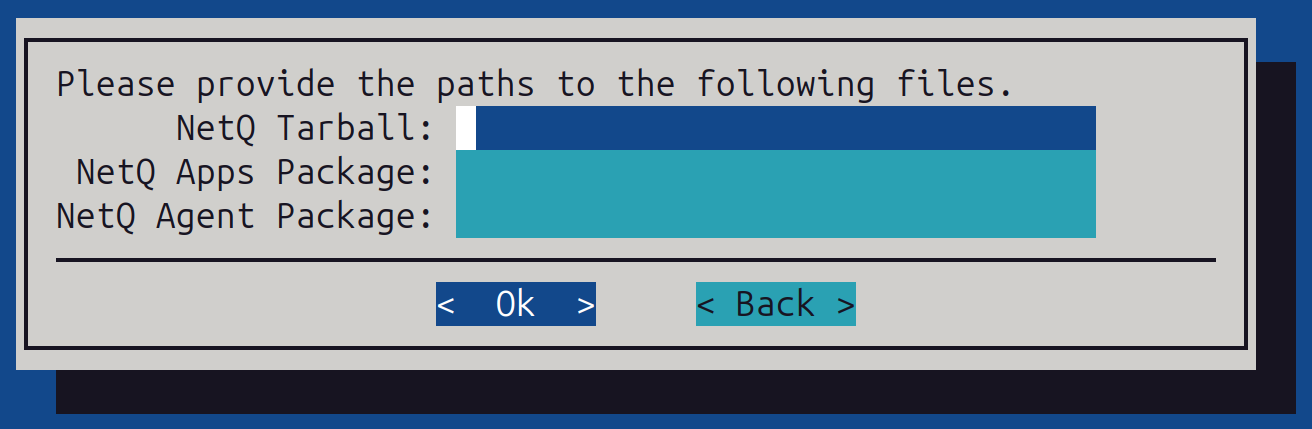
Provide the paths to the NetQ tarball and debians:
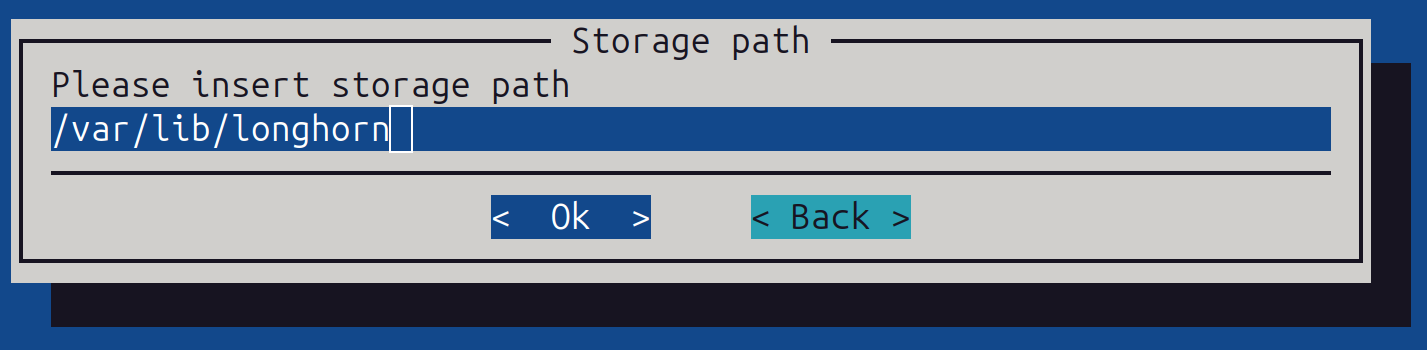
Choose the storage path for Longhorn (replicated storage system). This must be a path with at least 4 TB of available space. On the k8s-admin node, run df -H to check storage availability; /local/longhorn may be a suitable option.
Save and deploy:
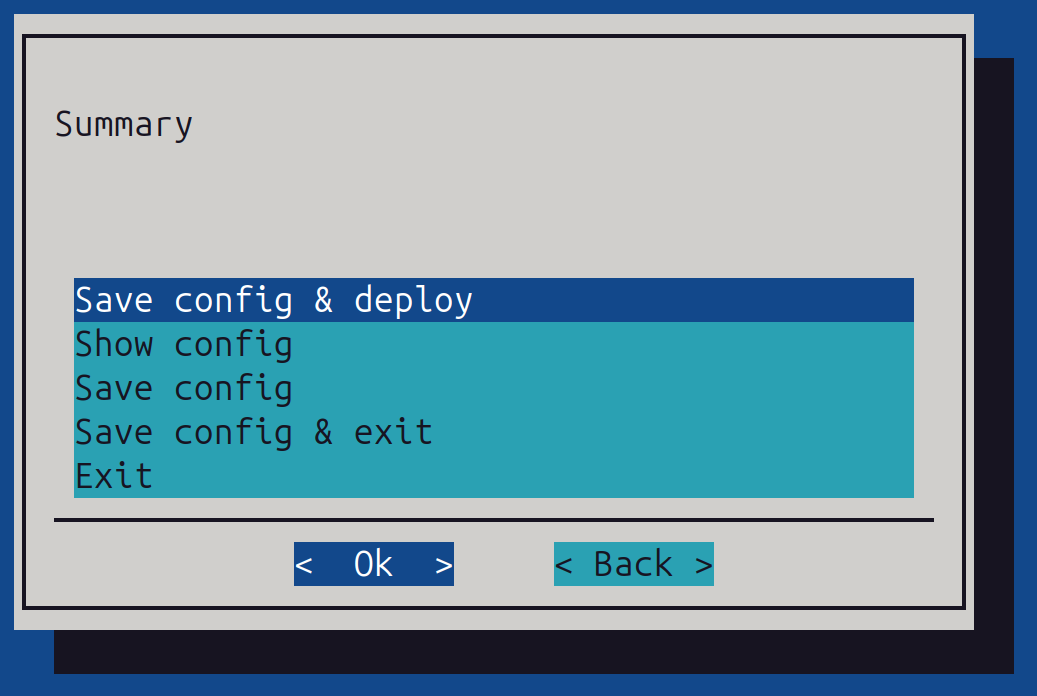
Then allow the installation to run to completion.
Configure Longhorn to not be a default storageclass#
After installation of NetQ, the default behavior is to set Longhorn as a default storageclass. We only want to use Longhorn for the NetQ components and not for storage.
To configure Longhorn to not be a default storageclass, use the following steps:
Get the current storageclasses:
kubectl get storageclass
NAME                      PROVISIONER                                      RECLAIMPOLICY   VOLUMEBINDINGMODE      ALLOWVOLUMEEXPANSION   AGE
local-path (default)      cluster.local/local-path-provisioner             Delete          WaitForFirstConsumer   true                   25h
longhorn (default)        driver.longhorn.io                               Delete          Immediate              true                   24h
longhorn-no-replication   driver.longhorn.io                               Delete          Immediate              true                   24h
longhorn-static           driver.longhorn.io                               Delete          Immediate              true                   24h
shoreline-local-path-sc   cluster.local/shoreline-local-path-provisioner   Delete          WaitForFirstConsumer   true                   18h
Run the following code to patch the Longhorn storageclass:
kubectl patch storageclass longhorn -p '{"metadata": {"annotations":{"storageclass.kubernetes.io/is-default-class":"false"}}}'


kubectl get storageclass
NAME                      PROVISIONER                                      RECLAIMPOLICY   VOLUMEBINDINGMODE      ALLOWVOLUMEEXPANSION   AGE
local-path (default)      cluster.local/local-path-provisioner             Delete          WaitForFirstConsumer   true                   26h
longhorn                  driver.longhorn.io                               Delete          Immediate              true                   25h
longhorn-no-replication   driver.longhorn.io                               Delete          Immediate              true                   25h
longhorn-static           driver.longhorn.io                               Delete          Immediate              true                   25h
shoreline-local-path-sc   cluster.local/shoreline-local-path-provisioner   Delete          WaitForFirstConsumer   true                   19h
Post-Installation Validation#
Run the command:
kubectl get pods -A
Ensure all pods are in a Running or Complete state.
Connect to:
https://<Virtual IP>:30443/nmx/swag/index.html
Use the rw-user or ro-user credentials and the password set during the installation.
Uninstall NetQ#
Run cm-mission-control-setup and select the “NVIDIA Mission Control NetQ uninstallation” option (this option appears if NetQ is installed).
The wizard prompts for confirmation.
Note
Manually delete files in the Longhorn directory after the uninstallation on all nodes where NetQ ran.
NetQ NvLink Configuration#
This section describes how to configure NetQ NvLink with NMX-C and NMX-T.
Configure the NetQ API IP Address#
Apply the following workaround to configure the correct NetQ API IP address that NVLink switches use to communicate with NetQ.
Modify the ConfigMap named
switch-worker-service-configin thenetq-nvlnamespace:kubectl --kubeconfig=/root/.kube/config-k8s-admin edit configmap switch-worker-service-config -n netq-nvl
Add the
dev-modesection undercapabilitieswith the head node IP address. This IP address must be reachable from the switches and is typically the out-of-band IP for the HAbond1interface of the head node.Before change:
apiVersion: v1
data:
  switch-worker.yaml: |-
    nmxmgr:
      admin-addr: localhost:9010
      capabilities:
        http-handler:
          enabled: true
      http-addr: :9085
After change:
apiVersion: v1
data:
  switch-worker.yaml: |-
    nmxmgr:
      admin-addr: localhost:9010
      capabilities:
        http-handler:
          enabled: true
        dev-mode:
          enabled: true
          ip-address: <head-node-api-ip>:30443
      http-addr: :9085
Restart the
switch-workerpods in thenetq-nvlnamespace:kubectl --kubeconfig=/root/.kube/config-k8s-admin -n netq-nvl rollout restart deployment switch-worker
Installing Certificates and Configuring NMX-C and NMX-T on NVLink Switch#
First, validate which NVLink switches have been selected as leaders using cmsh.
To list active leaders (denoted as “Active”), use the following command:
cmsh -c "device; nvfabricinfo"
Example output:
Domain Active Switches
-------- --------------- -------------------------------
A05 a05-p1-nvsw-01 a05-p1-nvsw-01..a05-p1-nvsw-09
A06 a06-p1-nvsw-01 a06-p1-nvsw-01..a06-p1-nvsw-09
A07 a07-p1-nvsw-01 a07-p1-nvsw-01..a07-p1-nvsw-09
B05 b05-p1-nvsw-01 b05-p1-nvsw-01..b05-p1-nvsw-09
B06 b06-p1-nvsw-01 b06-p1-nvsw-01..b06-p1-nvsw-09
B07 b07-p1-nvsw-01 b07-p1-nvsw-01..b07-p1-nvsw-09
B08 b08-p1-nvsw-01 b08-p1-nvsw-01..b08-p1-nvsw-09
A script is provided as part of the installation package that generates certificates for mTLS authentication between the NVLink switch leader and the NetQ NvLink deployment.
Run the script located at /opt/netq-admin/nvl/scripts/create-certificate.sh as the root user. When prompted, provide a certificate name (typically the switch’s hostname or IP address):
nvidia@ubuntu:~$ su
root@ubuntu:/home/nvidia# /opt/netq-admin/nvl/scripts/create-certificate.sh example
certificate.cert-manager.io/example-certificate created
Certificate is ready after 10 seconds.
Extracting secret data to local files…
Files created:
-rw-r--r-- 1 root root 1094 May 29 11:57 example-ca.crt
-rw-r--r-- 1 root root 1424 May 29 11:57 example-tls.crt
-rw-r--r-- 1 root root 3243 May 29 11:57 example-tls.key
-rw------- 1 root root 3907 May 29 11:57 example-tls.p12
Done.
To copy the generated certificates to the NVLink switch leader, use the following command:
scp a06-p1-nvsw-01-ca.crt a06-p1-nvsw-01-tls.p12 admin@a06-p1-nvsw-01:/home/admin
Then, SSH onto the NVLink switch leader and enable NMX-Controller (NMX-C) and NMX-Telemetry (NMX-T) apps:
ssh admin@a06-p1-nvsw-01 "nv action update cluster apps nmx-controller manager enabled; nv action update cluster apps nmx-telemetry manager enabled"
Example output:
NVOS switch
admin@a06-p1-nvsw-01s password:
Action executing ...
Cluster Manager Port updated successfully
Action succeeded
Action executing ...
Cluster Manager Port updated successfully
Action succeeded
To install the previously generated certificates by importing them through the NVLink switch leader, use the following command:
ssh admin@a06-p1-nvsw-01 "nv action import system security certificate nmxm-cert uri-bundle file:///home/admin/a06-p1-nvsw-01-tls.p12; nv action import system security ca-certificate manager-ca-cert uri file:///home/admin/a06-p1-nvsw-01-ca.crt"
Example output:
NVOS switch
admin@a06-p1-nvsw-01s password:
Action executing ...
Succeeded in importing X.509 entity certificate `nmxm-cert`.
NOTE: Certificate `nmxm-cert` is self-signed.
Action succeeded
Action executing ...
Succeeded in importing X.509 CA certificate `manager-ca-cert`.
Action succeeded
To enable the services and enable mTLS, use the following command:
ssh admin@a06-p1-nvsw-01 "nv action update cluster apps nmx-controller manager ca-certificate manager-ca-cert; nv action update cluster apps nmx-telemetry manager ca-certificate manager-ca-cert; nv action update cluster apps nmx-controller manager certificate nmxm-cert; nv action update cluster apps nmx-telemetry manager certificate nmxm-cert; nv action update cluster apps nmx-controller manager encryption mtls; nv action update cluster apps nmx-telemetry manager encryption mtls"
Example output:
NVOS switch
admin@a06-p1-nvsw-01s password:
Action executing ...
Cluster Manager CA Cert updated successfully
Action succeeded
Action executing ...
Cluster Manager CA Cert updated successfully
Action succeeded
Action executing ...
Cluster Manager Cert updated successfully
Action succeeded
Action executing ...
Cluster Manager Cert updated successfully
Action succeeded
Action executing ...
Cluster Manager Encryption updated successfully
Action succeeded
Action executing ...
Cluster Manager Encryption updated successfully
Action succeeded
To restart NMX-C and NMX-T services, use the following command:
ssh admin@a06-p1-nvsw-01 "nv action stop cluster apps nmx-telemetry; nv action start cluster apps nmx-telemetry; nv action stop cluster apps nmx-controller; nv action start cluster apps nmx-controller"
Example output:
NVOS switch
admin@a06-p1-nvsw-01s password:
Action executing ...
Running app stop command: nmx-telemetry
Action executing ...
App has been successfully stopped
Action succeeded
Action executing ...
Running app start command: nmx-telemetry
Action executing ...
App has been successfully started
Action succeeded
Action executing ...
Running app stop command: nmx-controller
Action executing ...
App has been successfully stopped
Action succeeded
Action executing ...
Running app start command: nmx-controller
Action executing ...
App has been successfully started
Action succeeded
NetQ’s primary method of interaction is through its REST API. Use curl for the next steps to add the NVLink switch services.
With the Kubernetes cluster installed by BCM, traffic is directed to the head nodes by default. Nginx running on the head nodes proxies requests to Kubernetes nodes running ingress-nginx. For this reason, the examples use curl to https://master/nmx.
In the POST payload, include the IP address of the leader switch you’re configuring. Find this using cmsh. For example, to find the leader switch for rack A06:
cmsh -c "device; use a06-p1-nvsw-01; get ip"
Example output:
7.241.3.31
To add the NVLink switch leader’s NMX-C to NetQ, make a POST request to the /v1/services endpoint:
curl -sk -X POST 'https://master/nmx/v1/services' -u rw-user:rw-password --header 'Content-Type: application/json' \
--data '{
"Name": "a06-p1-nvsw-01",
"Description": "a06-p1-nvsw-01",
"ServiceType": "CONTROLLER",
"ServiceConnectionInformation": {
  "Address": "7.241.3.31",
  "PortNumber": 9370
}
}'
Example response:
{
  "Address": "7.241.3.31",
  "Description": "a06-p1-nvsw-01",
  "ID": "68703777cf6f5852a7316906",
  "Name": "a06-p1-nvsw-01",
  "PortNumber": 9370,
  "ServiceType": "CONTROLLER",
  "Status": "IN_PROGRESS",
  "StatusInfo": "",
  "Version": ""
}
Verify that this was successful by making a GET request to the /v1/services endpoint:
curl -sk -X GET 'https://master/nmx/v1/services/68703777cf6f5852a7316906' -u rw-user:rw-password --header 'Content-Type: application/json' | jq .
Example response:
{
  "Address": "7.241.3.31",
  "ApplicationUUID": "c9bd7a13-ccb2-4a90-95ff-9dcf5e9038bc",
  "ClusterDomainUUID": "c2b42a4c-e407-4f98-af6a-8c96823a807e",
  "Description": "a06-p1-nvsw-01",
  "ID": "68703777cf6f5852a7316906",
  "Name": "a06-p1-nvsw-01",
  "PortNumber": 9370,
  "RegisteredAt": "2025-07-10T21:58:15.908Z",
  "ServiceType": "CONTROLLER",
  "Status": "UP",
  "StatusInfo": "",
  "UpSince": "2025-07-10T21:58:15.908Z",
  "Version": "1.2.0_2025-06-07_10-33"
}
To add the NVLink switch leader’s NMX-T to NetQ, make a POST request to the /v1/services endpoint:
curl -sk -X POST 'https://master/nmx/v1/services' -u rw-user:rw-password --header 'Content-Type: application/json' \
--data '{
"Name": "a06-p1-nvsw-01",
"Description": "a06-p1-nvsw-01",
"ServiceType": "TELEMETRY",
"ServiceConnectionInformation": {
  "Address": "7.241.3.31",
  "PortNumber": 9351
}
}'
Example response:
{
  "Address": "7.241.3.31",
  "Description": "a06-p1-nvsw-01",
  "ID": "6870386b8c7b451eeafddfda",
  "Name": "a06-p1-nvsw-01",
  "PortNumber": 9351,
  "ServiceType": "TELEMETRY",
  "Status": "IN_PROGRESS",
  "StatusInfo": "",
  "Version": ""
}
Verify that this was successful by making a GET request to the /v1/services endpoint, using the ID from the prior response:
curl -sk -X GET 'https://master/nmx/v1/services/6870386b8c7b451eeafddfda' -u rw-user:rw-password --header 'Content-Type: application/json' | jq .
Example response:
{
  "Address": "7.241.3.31",
  "ApplicationUUID": "6c164aa5-2aa7-4789-9587-31b79dc62897",
  "ClusterDomainUUID": "c2b42a4c-e407-4f98-af6a-8c96823a807e",
  "Description": "a06-p1-nvsw-01",
  "ID": "6870386b8c7b451eeafddfda",
  "Name": "a06-p1-nvsw-01",
  "PortNumber": 9351,
  "RegisteredAt": "2025-07-10T22:02:19.865Z",
  "ServiceType": "TELEMETRY",
  "Status": "UP",
  "StatusInfo": "",
  "UpSince": "2025-07-10T22:02:19.865Z",
  "Version": "1.1.3"
}
NetQ provides a Prometheus exporter interface for collected metrics. Use this to validate that NetQ is working with the newly added NVLink switch leader:
curl -sk "https://master/nmx/v1/metrics?id=$(curl -sk -X GET 'https://master/nmx/v1/services/6870386b8c7b451eeafddfda' -u rw-user:rw-password --header 'Content-Type: application/json' | jq -r '.ClusterDomainUUID')" \
-u rw-user:rw-password \
| head -n 20
Example output:
diag_supply_voltage{domain_id="c2b42a4c-e407-4f98-af6a-8c96823a807e",node_guid="0x330aa4e54b8d4c2d",Port="11"} 0 1752185097534
diag_supply_voltage{Port="11",domain_id="c2b42a4c-e407-4f98-af6a-8c96823a807e",node_guid="0x2c5eab0300ca6700"} 0 1752185097534
diag_supply_voltage{domain_id="c2b42a4c-e407-4f98-af6a-8c96823a807e",node_guid="0x9f6028016bbe9123",Port="11"} 0 1752185097534
diag_supply_voltage{node_guid="0x2c5eab0300ca6720",Port="29",domain_id="c2b42a4c-e407-4f98-af6a-8c96823a807e"} 0 1752185097534
diag_supply_voltage{Port="5",domain_id="c2b42a4c-e407-4f98-af6a-8c96823a807e",node_guid="0x2bad4538ad47b824"} 0 1752185097534
Configure NMX-C and NMX-T Using the BringUp API#
As an alternative to manually registering services, you can use the BringUp API to automate the configuration of NMX-Controller (NMX-C) and NMX-Telemetry (NMX-T) on NVLink switch leaders.
Before proceeding, ensure that the dev-mode workaround described in Configure the NetQ API IP Address has been applied.
Generate the Fabric Manager Configuration#
Identify the NVLink switch leader using
cmsh:cmsh -c "device; nvfabricinfo"
Example output:
Domain   Active           Switches
-------- ---------------- ---------------------------------
A02      a02-p01-nvsw-01  a02-p01-nvsw-01..a02-p01-nvsw-09
Log in to the leader switch and generate the
fm_configfile:nv action generate sdn config apps nmx-controller type fm_config
The file is generated in the
/host/cluster_infra/app_config/nmx-controller/fm_config/directory. Verify the contents:cd /host/cluster_infra/app_config/nmx-controller/fm_config/ cat nmx-controller_fm_config_*
Example output:
FABRIC_MODE_RESTART=0
LOG_LEVEL=4
LOG_FILE_NAME=/logs/fabricmanager.log
MNNVL_ENABLE_DEFAULT_PARTITION=1
LOG_FILE_MAX_SIZE=1024
MNNVL_DEFAULT_RESILIENCY_MODE=2
MNNVL_ENABLED=1
LOG_USE_SYSLOG=0
FM_CMD_BIND_INTERFACE=127.0.0.1
MNNVL_DEFAULT_PARTITION_TYPE=2
MNNVL_TOPOLOGY=gb200_nvl72r1_c2g4_topology
FM_CMD_PORT_NUMBER=6666
LOG_MAX_ROTATE_COUNT=3
GFM_WAIT_TIMEOUT_SEC=360
TOPOLOGY_FILE_PATH=/usr/share/nvidia/nvswitch
LOG_APPEND_TO_LOG=1
Copy the
fm_configfile to the machine from which you run the BringUp API.
Run the BringUp API#
Create a switch profile by making a POST request to the
/v1/switch-profilesendpoint:curl -sk -X POST 'https://master/nmx/v1/switch-profiles' \ -u rw-user:<password> \ --header 'Content-Type: application/json' \ --data '{ "Name": "<switch-profile-name>", "Username": "admin", "Password": "<switch-admin-password>" }'
Note the returned profile ID for use in the next step.
Run the BringUp API by making a POST request to the
/v1/bring-upendpoint with thefm_configfile, the switch IP address, and the profile ID:curl -sk -X POST 'https://master/nmx/v1/bring-up' \ -u rw-user:<password> \ -H 'accept: application/json' \ -H 'Content-Type: multipart/form-data' \ -F 'FmConfig=@fm_config' \ -F 'Switches={ "Address": "<leader-switch-ip>", "ProfileID": "<switch-profile-id>" }'
Example response:
{
  "operationId": "694397a52b7a95e3326a8236"
}
Note the returned
operationIdto monitor the progress.Monitor the BringUp progress by making a GET request to the
/v1/bring-up/<operation-id>endpoint:curl -sk -X GET 'https://master/nmx/v1/bring-up/<operation-id>' \ -u rw-user:<password> \ -H 'accept: application/json' | jq .
Example response when completed:
{
  "CreatedAt": "2025-12-18T21:07:12.556Z",
  "ID": "69446d002b7a95e3326a823c",
  "Status": "completed",
  "Switches": [
    {
      "Address": "10.102.174.31",
      "CurrentStep": "Registration response",
      "NMX-Controller-ID": "69446da0eb5f783b17626696",
      "NMX-Telemetry-ID": "69446da1eb5f783b17626698",
      "StartedAt": "2025-12-18T21:07:12.692Z",
      "Status": "completed",
      "StatusDetails": "bring-up completed successfully",
      "UpdatedAt": "2025-12-18T21:09:53.695Z"
    }
  ],
  "UpdatedAt": "2025-12-18T21:09:53.704Z"
}
Note
If you receive the error
this switch is already configured with NMX services, disable the existing NMX configuration on the switch before retrying:nv set cluster state disable nv conf apply
Verify that NMX-C and NMX-T services are registered by making a GET request to the
/v1/servicesendpoint:curl -sk -X GET 'https://master/nmx/v1/services' \ -u rw-user:<password> \ --header 'Content-Type: application/json' | jq .
Both the Controller and Telemetry services should appear with a
StatusofUP:[ { "Address": "10.102.174.31", "ApplicationUUID": "2c8aff55-eace-4aed-a0de-03ff4290e019", "ClusterDomainUUID": "a868ae12-3336-47d9-82cc-85febb8ed722", "Description": "auto registered during bring-up", "ID": "69446da1eb5f783b17626698", "Name": "TELEMETRY-10.102.174.31-auto-registered", "PortNumber": 9351, "ServiceType": "TELEMETRY", "Status": "UP" }, { "Address": "10.102.174.31", "ApplicationUUID": "a2293d91-cba5-4ee6-9f34-cac5ada187fe", "ClusterDomainUUID": "a868ae12-3336-47d9-82cc-85febb8ed722", "Description": "auto registered during bring-up", "ID": "69446da0eb5f783b17626696", "Name": "CONTROLLER-10.102.174.31-auto-registered", "PortNumber": 9370, "ServiceType": "CONTROLLER", "Status": "UP" } ]
Apply a Permanent NetQ NvLink License#
To apply a permanent NetQ NvLink license, follow these steps:
Download the License and the License Update Script#
You need to download two files: the license file and the license update script.
Log in to the NVIDIA Application Hub. From the top menu, select Support > Licensing Portal.
Download the license.
Next, download the
license-update.shscript. Select Software Downloads from the side menu.In the search field above the table, enter NetQ.
Locate and download the latest NetQ License Update file.
Copy the
license-update.shscript to the/opt/netq-admin/nvl/scriptsdirectory.
Apply a New License#
Create the
/opt/netq-admin/nvl/licensesdirectory.Upload the new license file to
/opt/netq-admin/nvl/licenses.Run the following script on one of the NetQ nodes:
/opt/netq-admin/nvl/scripts/license-update.sh
When prompted, select the first option: Apply new license (replace existing).
Select the license file and confirm that the new license details are correct.
The script concurrently applies the new license and replaces the previous one.
Receive License Alerts#
If you have configured a webhook receiver, you will receive a notification when your license is about to expire or has already expired. These notifications are sent every 24 hours until the license status is updated.