Usage & Configuration
Reference Web App
Default URL: http://<IP_address>:30000
VST deployment can be verified using a web-based application binary. Please note: at this point the web-based application is only available for Chrome browser running on Linux, Windows or MacOS. The UI can be accessed on any viewing machine on local subnet. The following instructions refer to same host. Substitute ‘localhost’ with IP address of your viewing machine.
Launch Chrome browser
In the address bar enter
http://<IP_address>:<port_number>A notice regarding connection privacy is likely to be displayed. If you see it, use ‘Advanced’ button to accept the risks. If no such button is displayed, type ‘
thisisnotsafe’ while browser is in focus to reveal login UI. Use ‘admin’ for both username and password.
The VST web-based UI allows for seamless and hassle-free discovery of most ONVIF-S compliant cameras.
Although a relatively short list of models are guaranteed to work with VST release, any fully ONVIF-S compliant camera you might already have purchased should work with this release as well. Contact us if your cameras are not working.
VST will auto-discover, and attempt to communicate with any ONVIF-S camera attached downstream of the host. Once discovered, VST will attempt to communicate with the camera, to retrieve its settings and parameters, and populate the web UI.
There is a good chance that your camera has been secured by a custom username and password prior to the first VST use. In such a case (even though the camera would be discovered) VST might not be able to communicate with it immediately.
This short guide will explain how to ensure that you can see live and recorded content from new or previously used ONVIF-S cameras.
Dashboard
Open a web browser (Chrome is required for best video streaming experience) at http://<IP_address>:<port>. Enter admin for username and password when prompted. The following page will be displayed upon successful login:
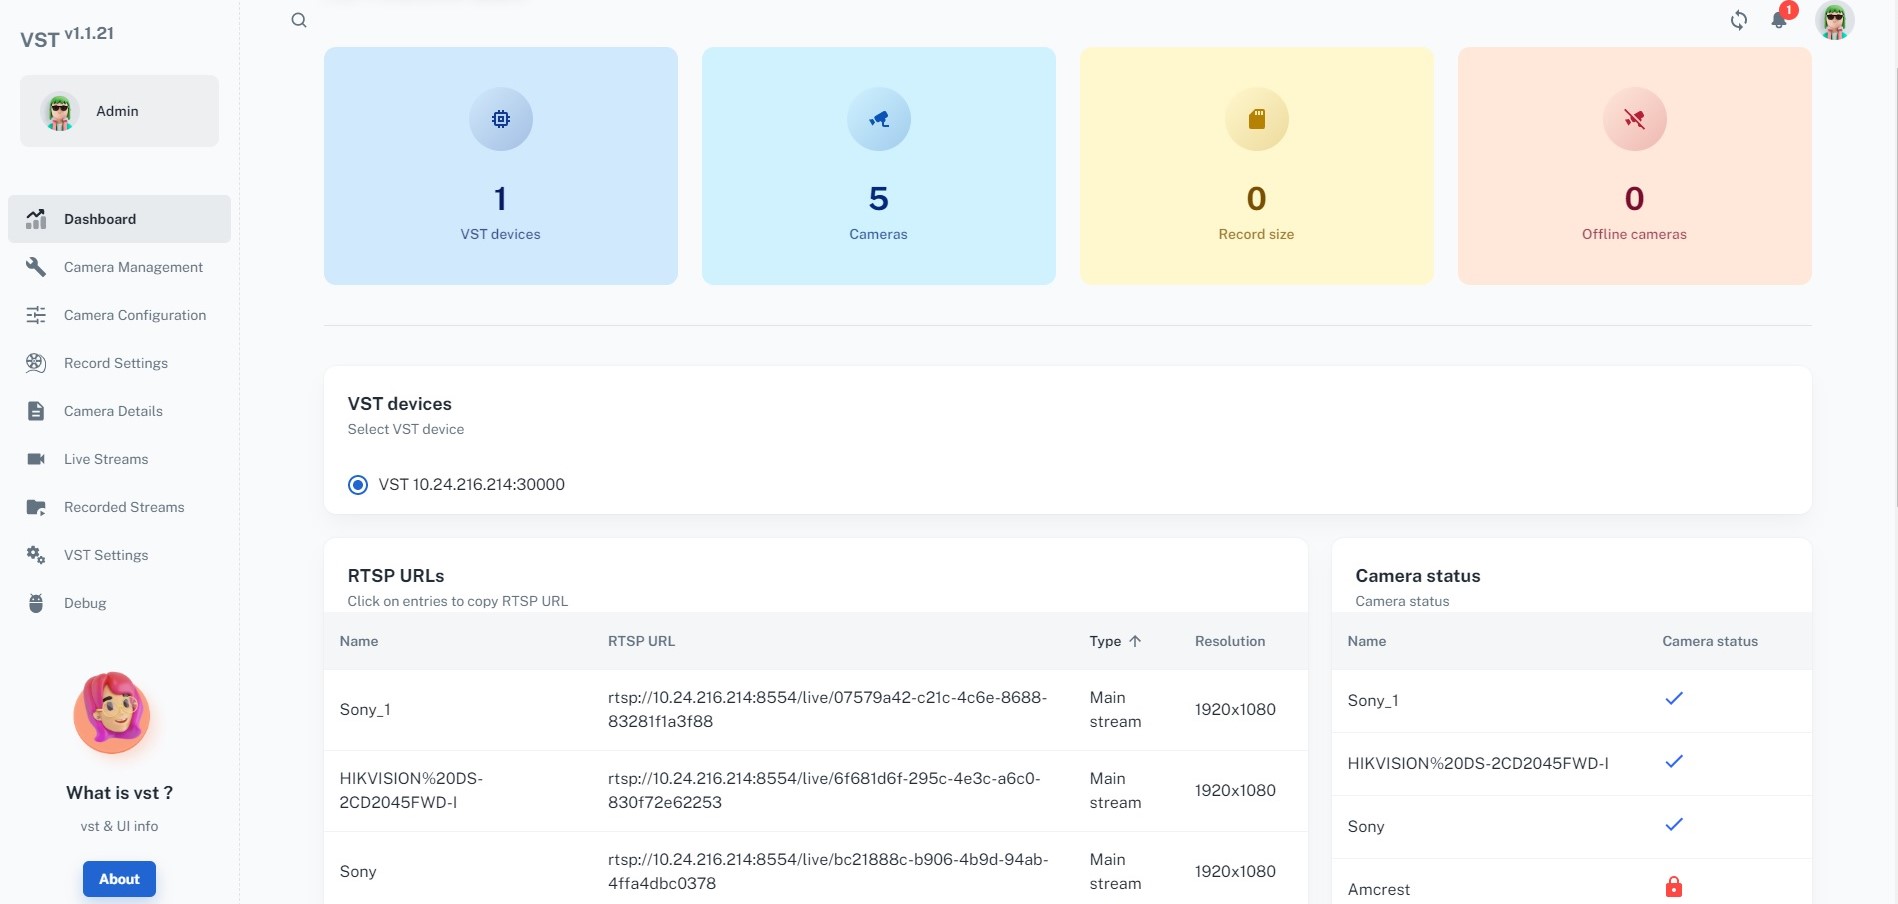
As the page opens, it shows overall health of VST, information about VST Devices, Camera discovered, Record Size. Also, it shows the vital information about cameras such as Record Status, Camera Status etc.,
Note
User options like Home, Profile, Settings, etc., are not implemented in current release.
Camera management
Cameras that had been discovered will be listed. If VST discovered the camera, but was not able to communicate with it, the camera status indicates a lock icon. If the lock icon appears, navigate to ‘Camera Management’ tab, and click on ‘Camera Credentials’ section as displayed in the following image:
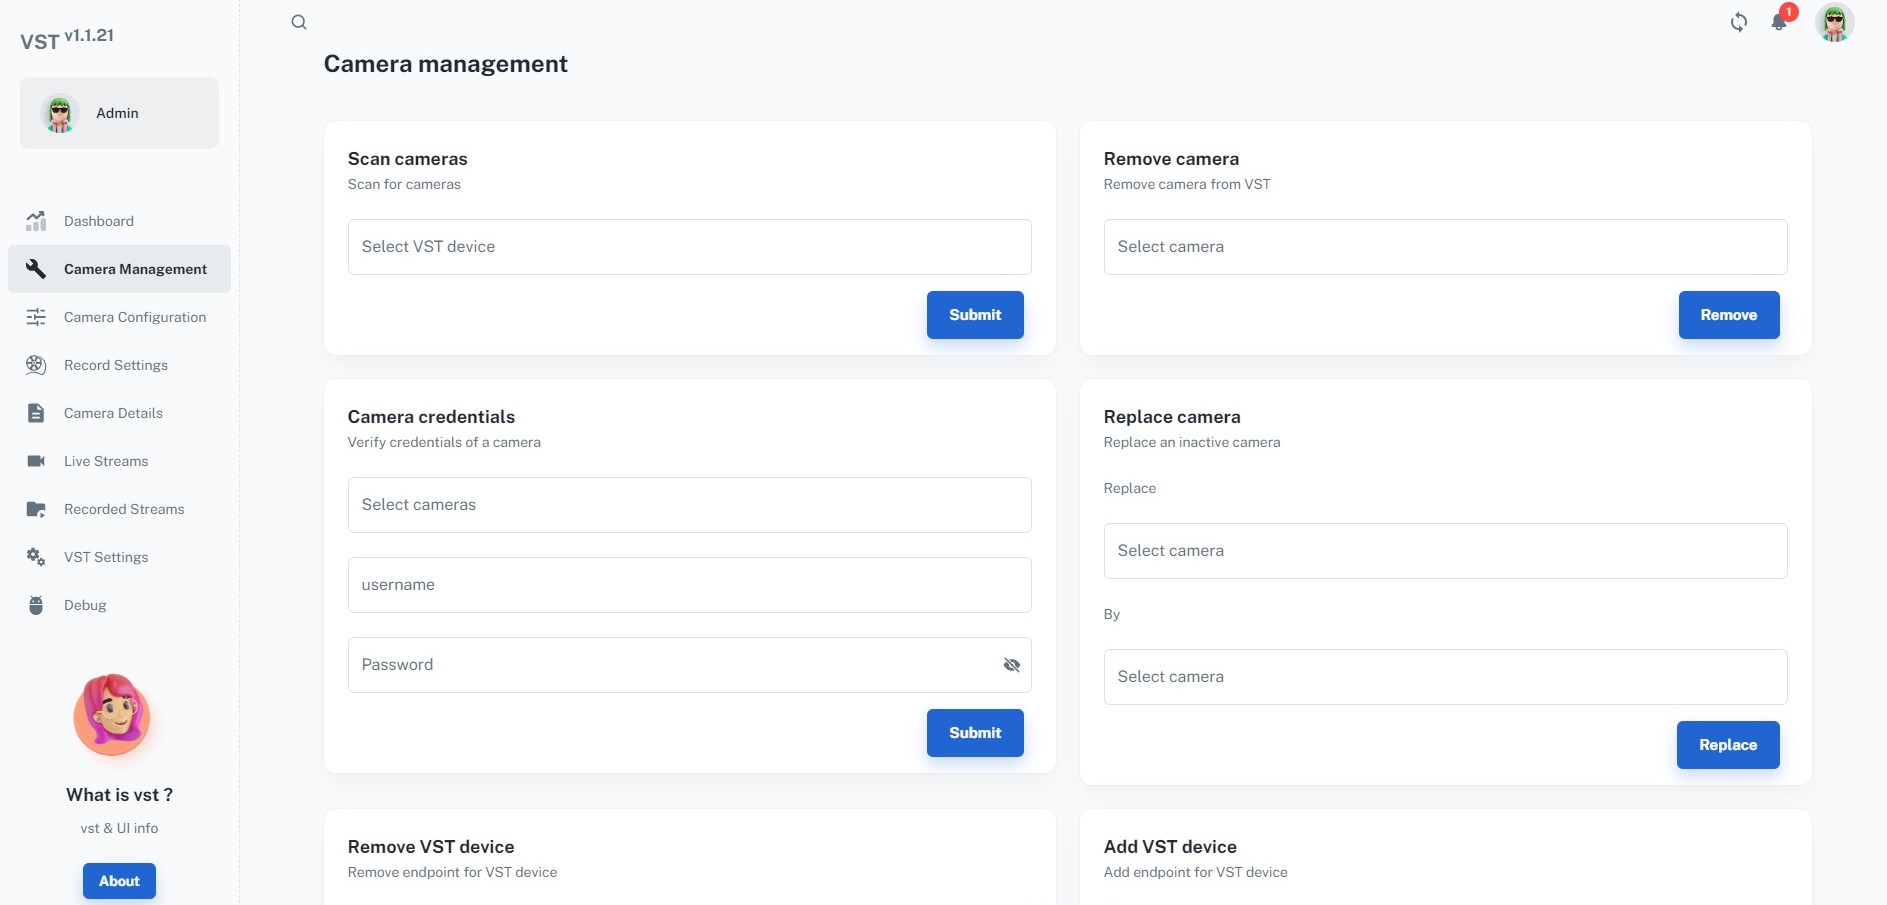
Click on the ‘Select cameras’ drop down list, and select the camera that cannot be streamed from. Then input that camera’s username and password, and click ‘Submit’. An instantaneous message box will confirm if your credentials are valid. Repeat the same procedure for all cameras that cannot be streamed from.
It should now be possible to stream from all the cameras attached to VST.
If you do not remember your camera’s custom username or password, you might need to perform a hardware factory reset for that camera, re-start VST, and consult that camera’s guide to set its username and password again.
VST is now aware of usernames and passwords for all cameras, and is ready to stream live video from the auto-discovered ONVIF-S sources.
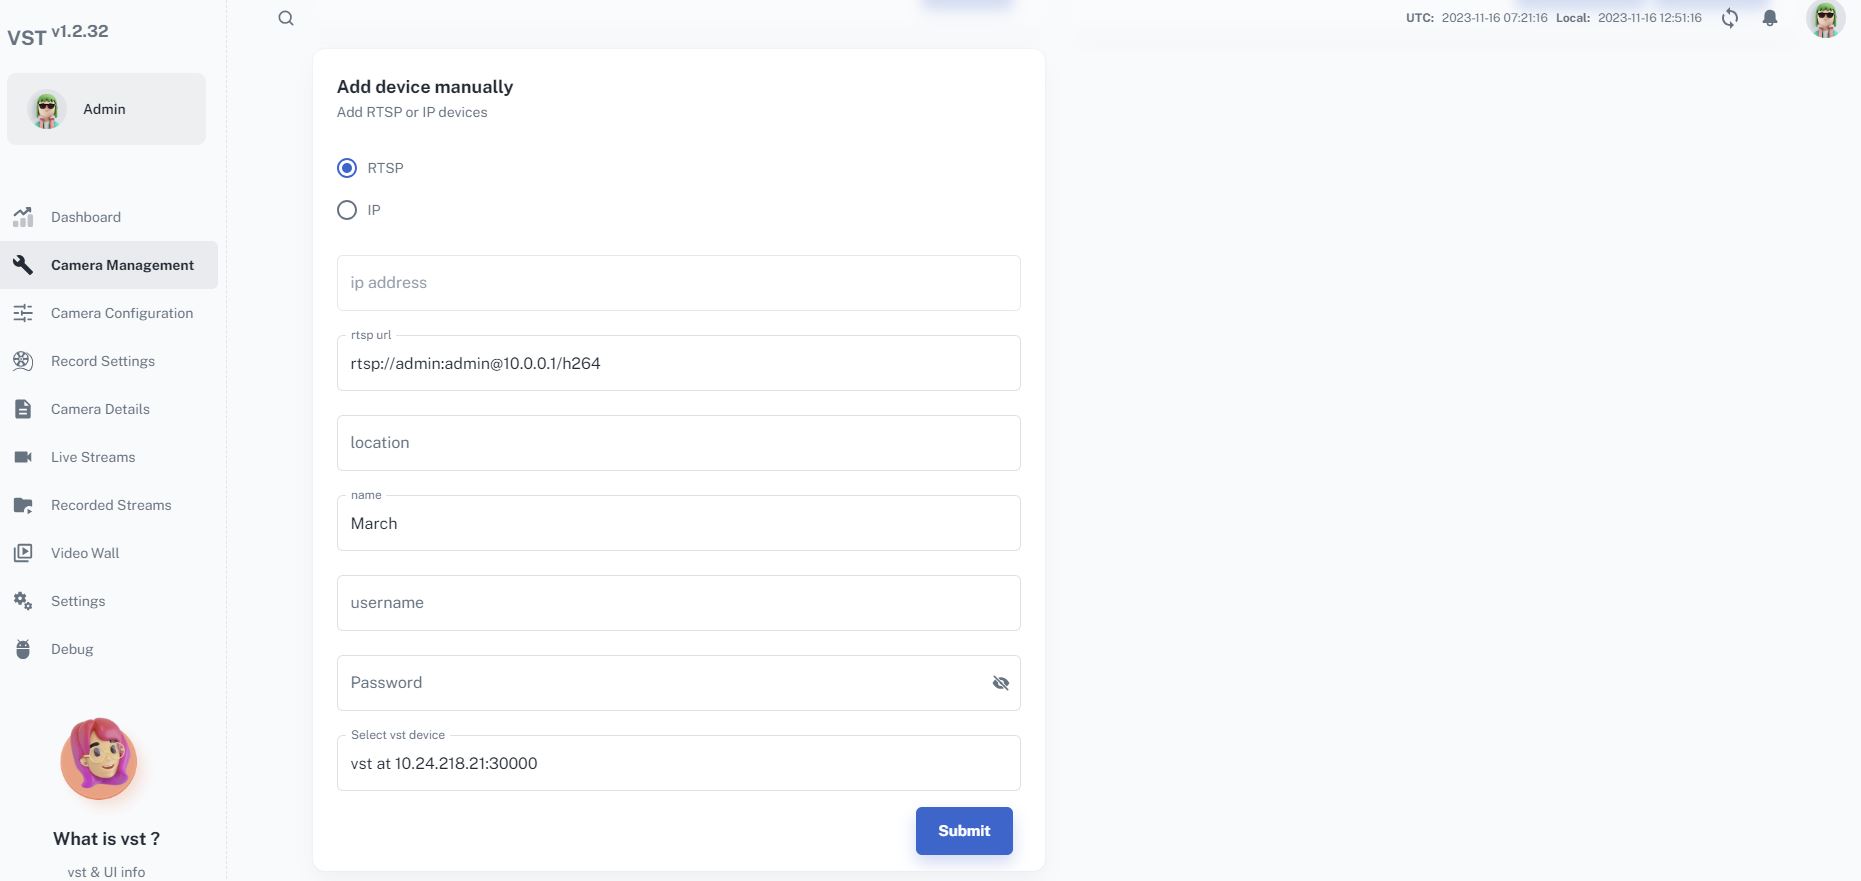
Add cameras
To manually add camera into VST, navigate to Camera Management tab, and go to Add device manually option. To Add ONVIF compliant camera using IP option click on IP button then provide ip address, username, password fields. Remaining fields are optional. If you want to add direcly RTSP url, click on RTSP option and provide RTSP url, username, password. You can see a screen as displayed in the following image:
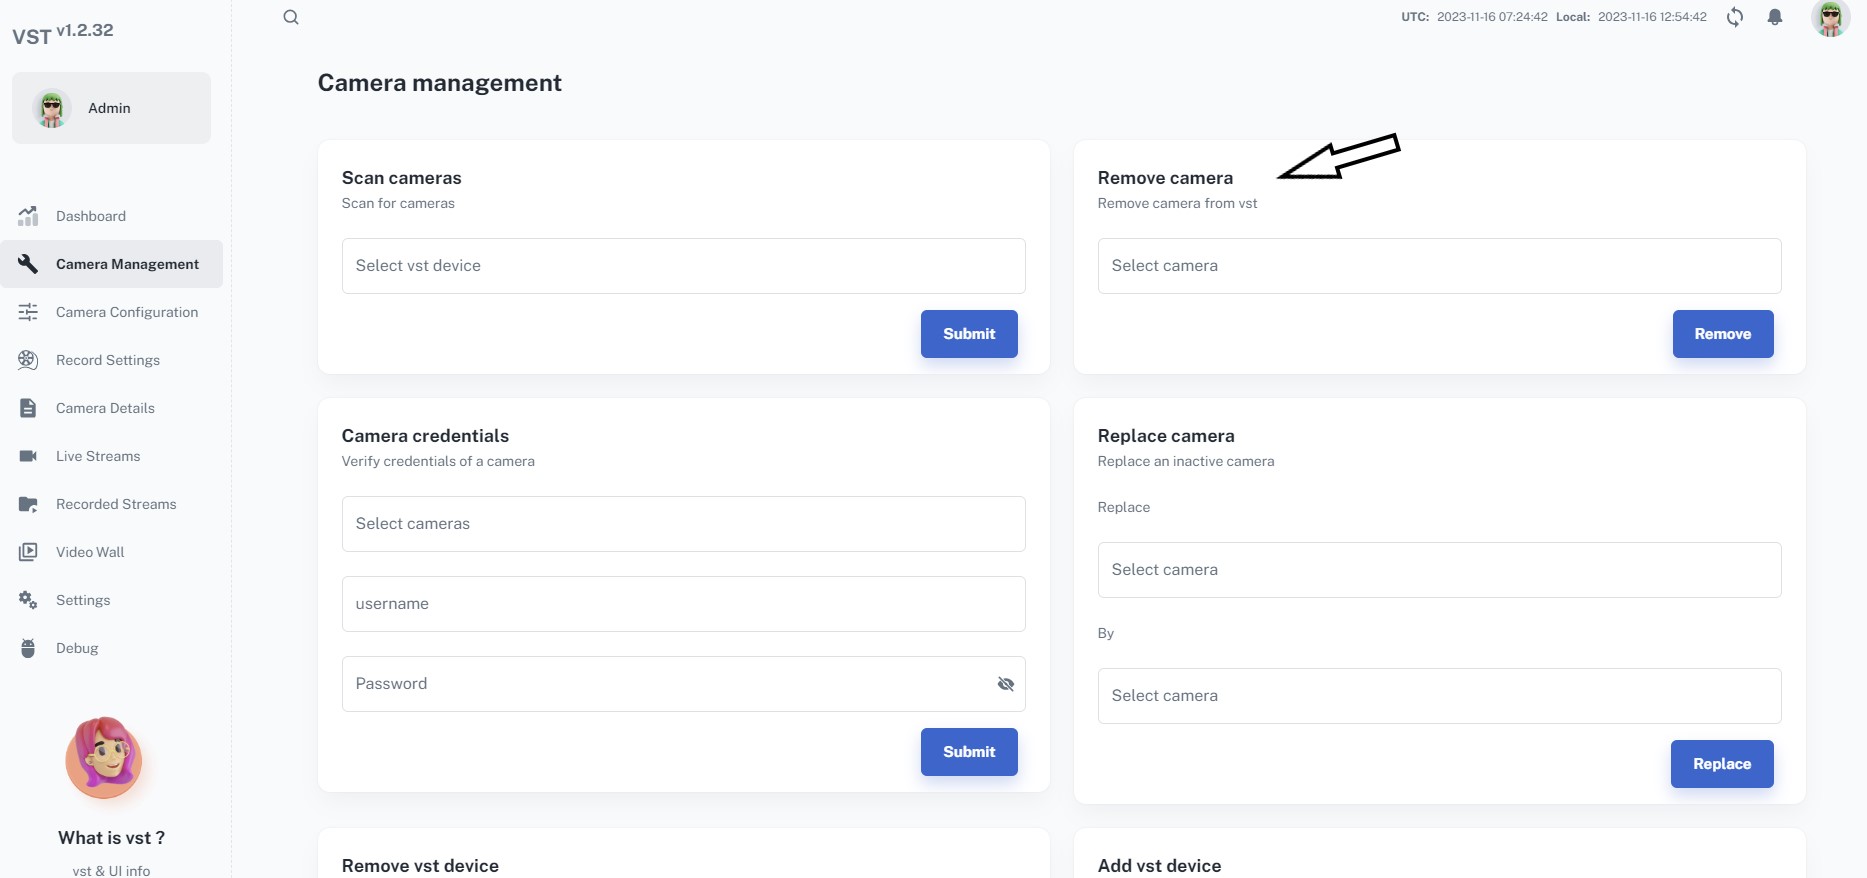
Remove cameras
To remove the camera from VST, navigate to Camera Management tab, and go to Remove camera option. Select the camera from dropdown list and click on Remove button as displayed in the following image:
Live streams
Navigate back to the Live Streams tab, click on the center drop-down list, and select the first camera on the list. A black rectangle will appear on the UI, and the camera’s IP address will be displayed on top of the drop-down list. Repeat the same with up to max cameras supported. You should see a screen similar to the following:
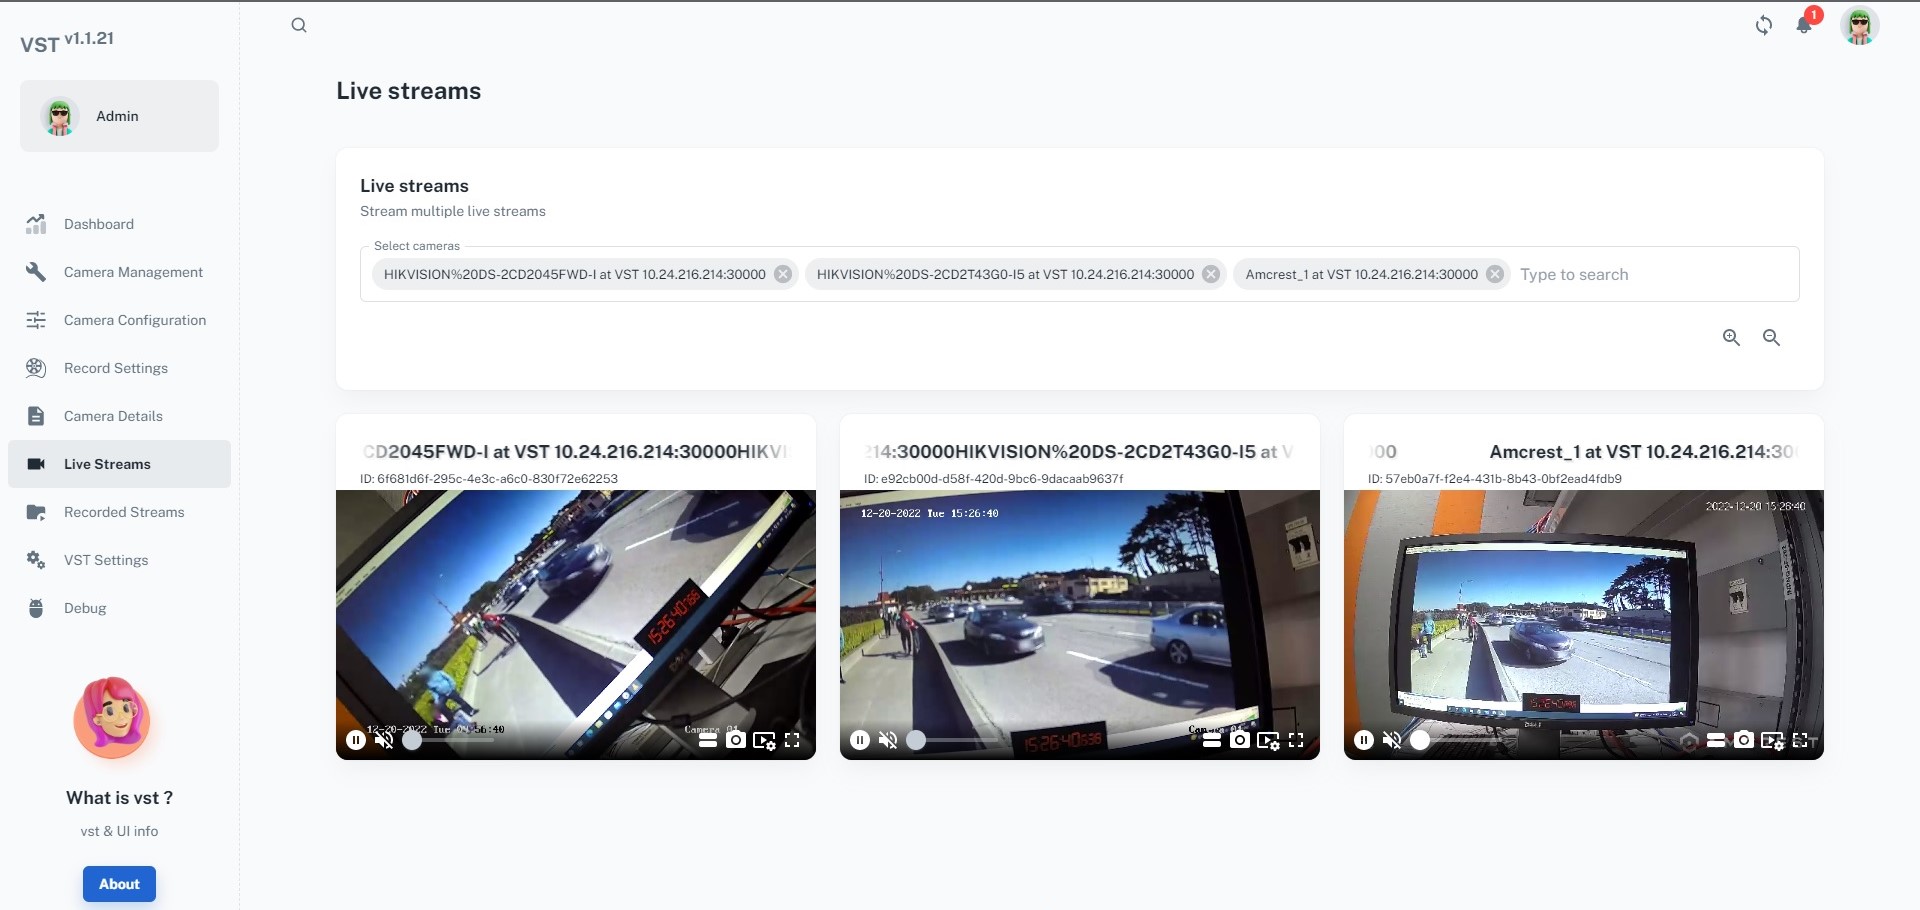
From here on, you can control each of the video streams independently. Click on each triangle to see live video from your camera.
Note
It can take a few seconds for the VST to commence live streaming. If you see a constantly revolving crescent for a prolonged amount of time - please try to restart the browser.
VST has been tested extensively with Chrome and we are aware of existing problems while streaming through alternative browsers.
Recording management
Setting
Now that you are able to stream live video, it is time to try out recording. Navigate to the Record Setting tab, and select camera from drop down list:
Note
All recordings will be saved to your local storage; older recordings will be overwritten with newer ones automatically should VST run out of the disk space.
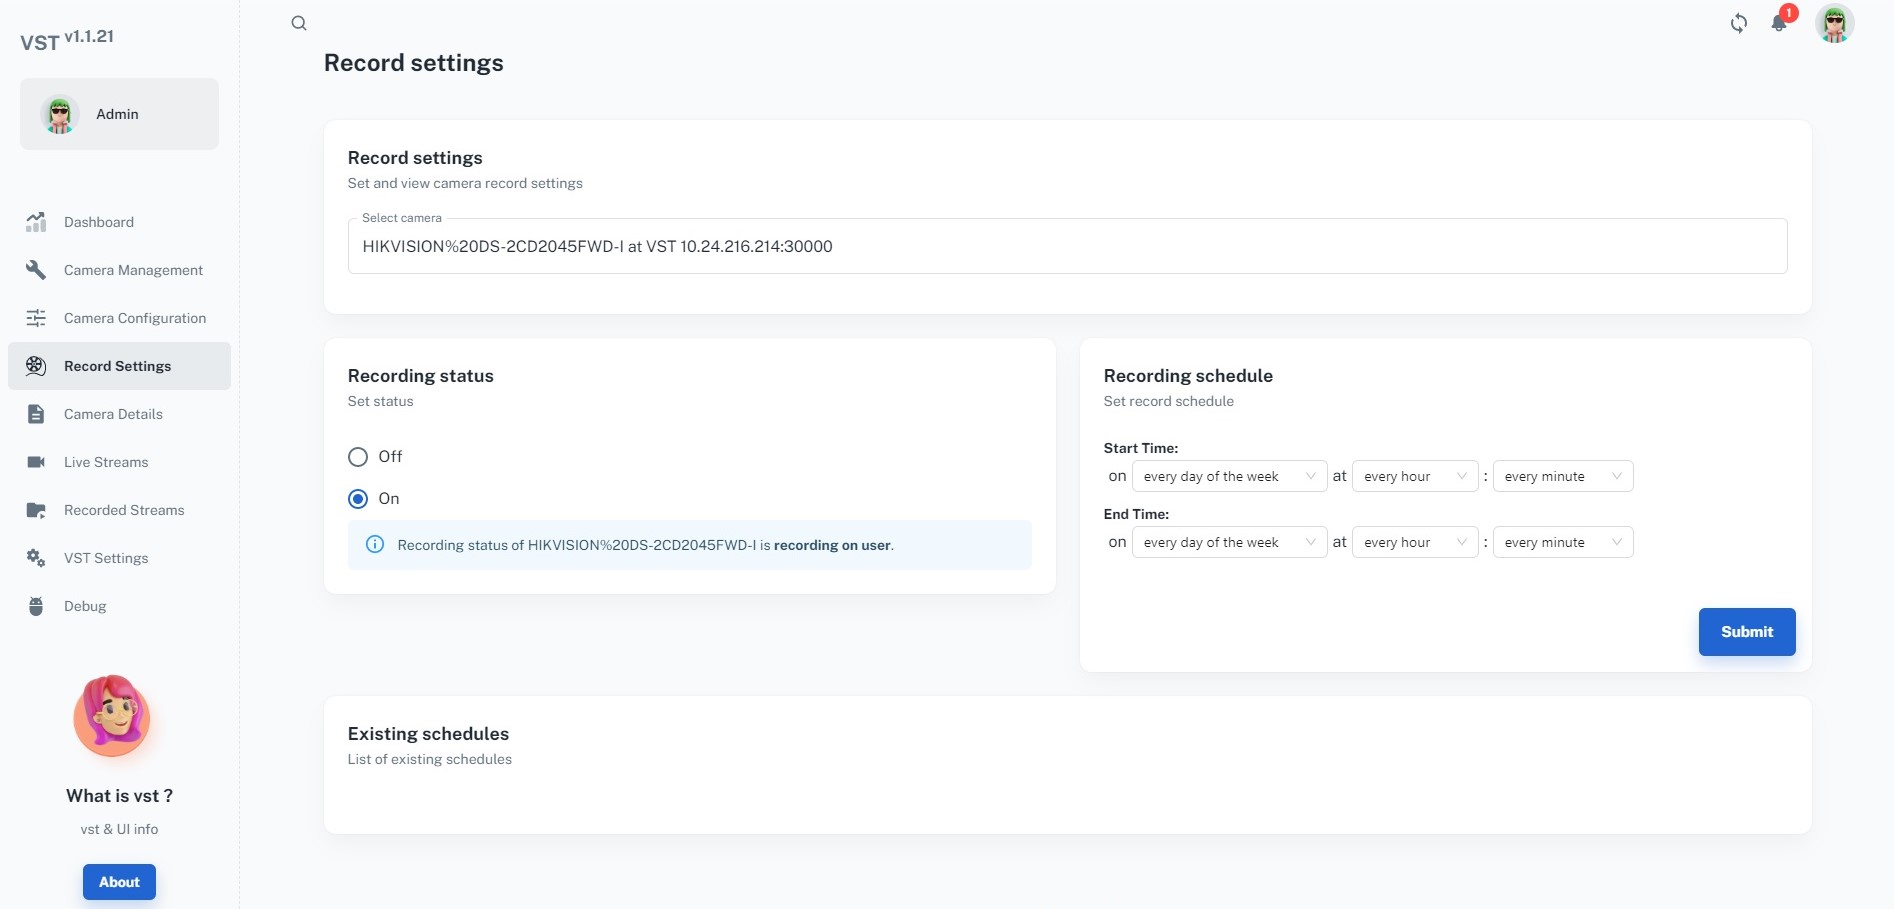
You can select a particular camera from the drop down list and set recording of that camera only.
Each camera can be assigned a separate recording schedule.
Click on the Live Streams tab again, and verify a red dot is displayed at the top right of the live video.
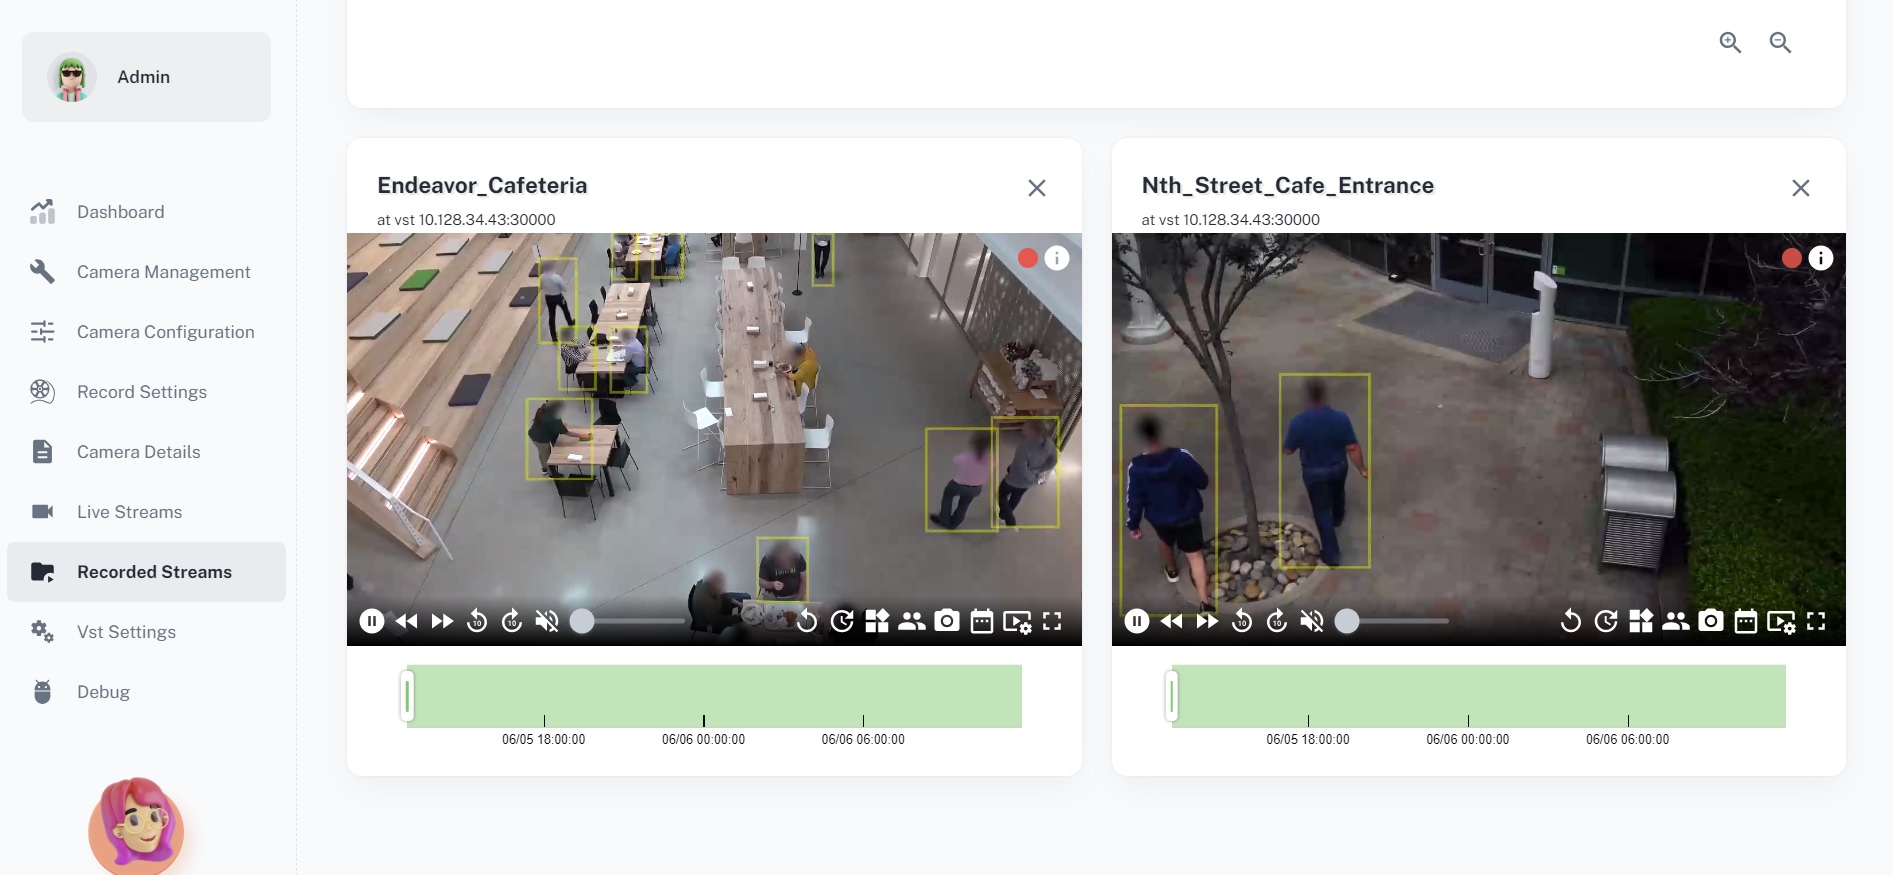
Click on the Recorded Streams tab, you can use a scrubber at the bottom of the video stream to go back in time and play back the recorded content for cameras the recordings are available.
Click back on the Live Streams tab to go back to view the live feeds.
Recorded videos will be stored at directory set to ‘“video_path”’ config parameter in ‘“storage_config_file”’ (Storage Config.) config parameter in ‘vst_config.json’ file and default video directory path is located at installation path inside ‘vst_video’ directory.
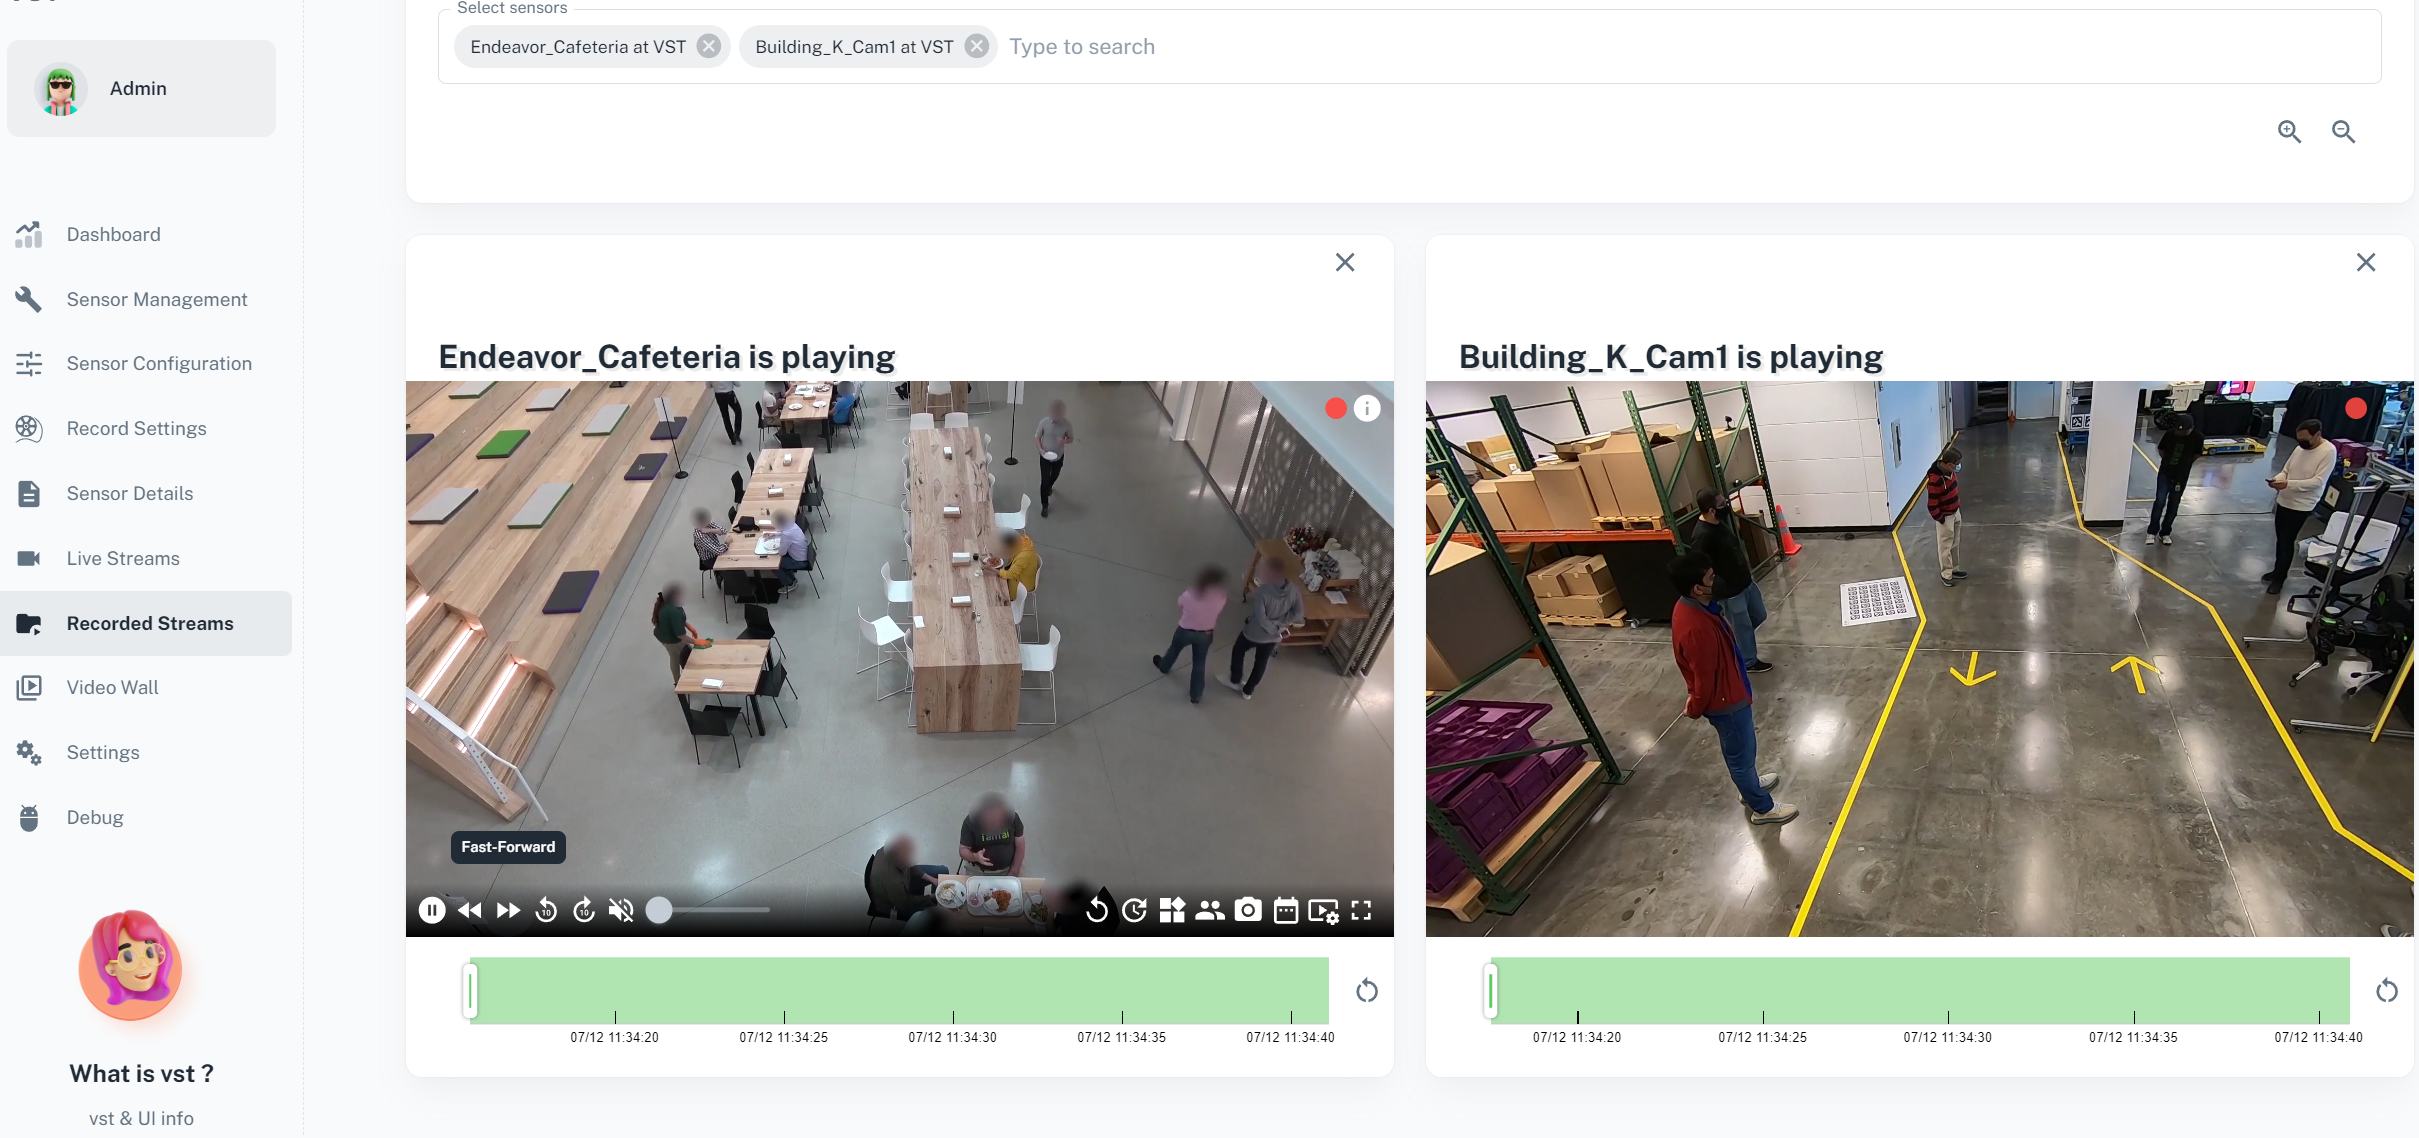
Playback recordings
Now that you are able to record video, it is time to try out recorded playback feature of VST. To playback the recordings, navigate to Recorded Streams tab and select a video stream.
Some options:
It provides options such as pause, fast playback 2x,4x,8x etc.
Snapshot option to take screenshot of currently playing frame.
Other options like overlay, time-range playback, quality selection etc.
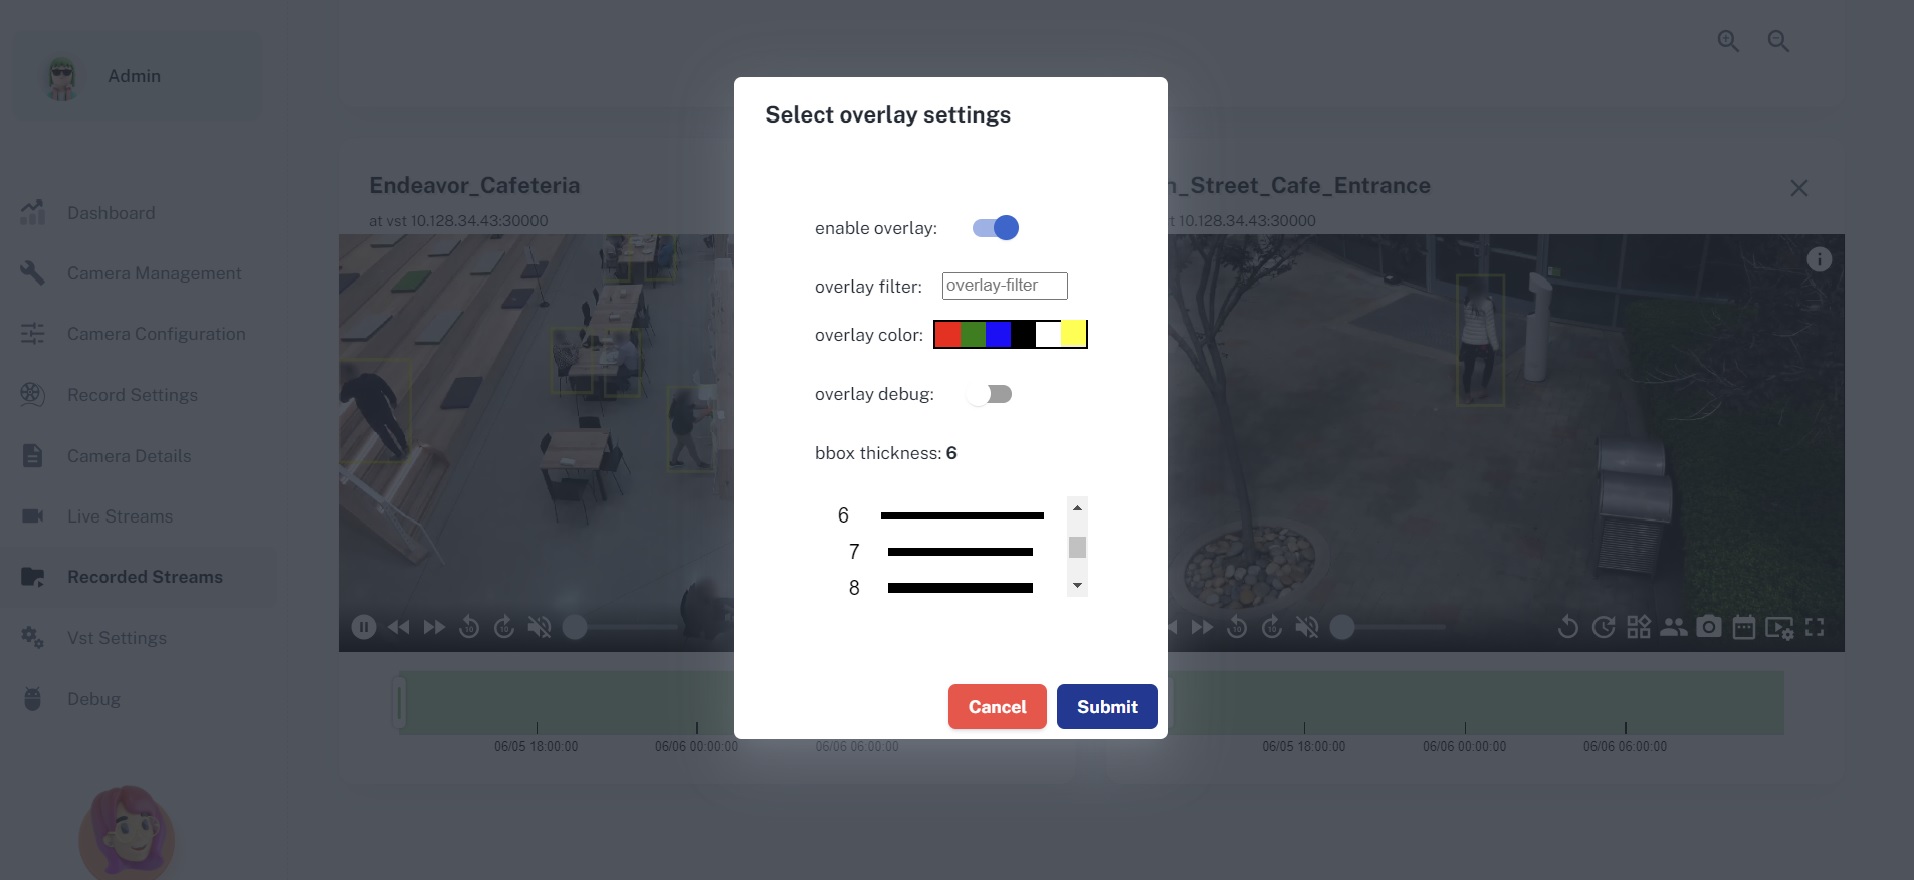
Playback overlay
Now that you are able to record video, it is time to try out Overlay Feature of VST. To enable bounding boxes on the video, navigate to Recorded Streams tab and select a video stream then select overlay option from the video player and enable it.
Some options:
Provide comma-separated object-ids in overlay filter section to draw bounding boxes for specific objects. You can get the object-ids from Elasticsearch metadata.
Select overlay color for bounding boxes color.
Enable/Disable overlay debug for information about timestamps and object count.
Select thickness for bounding boxes thickness.
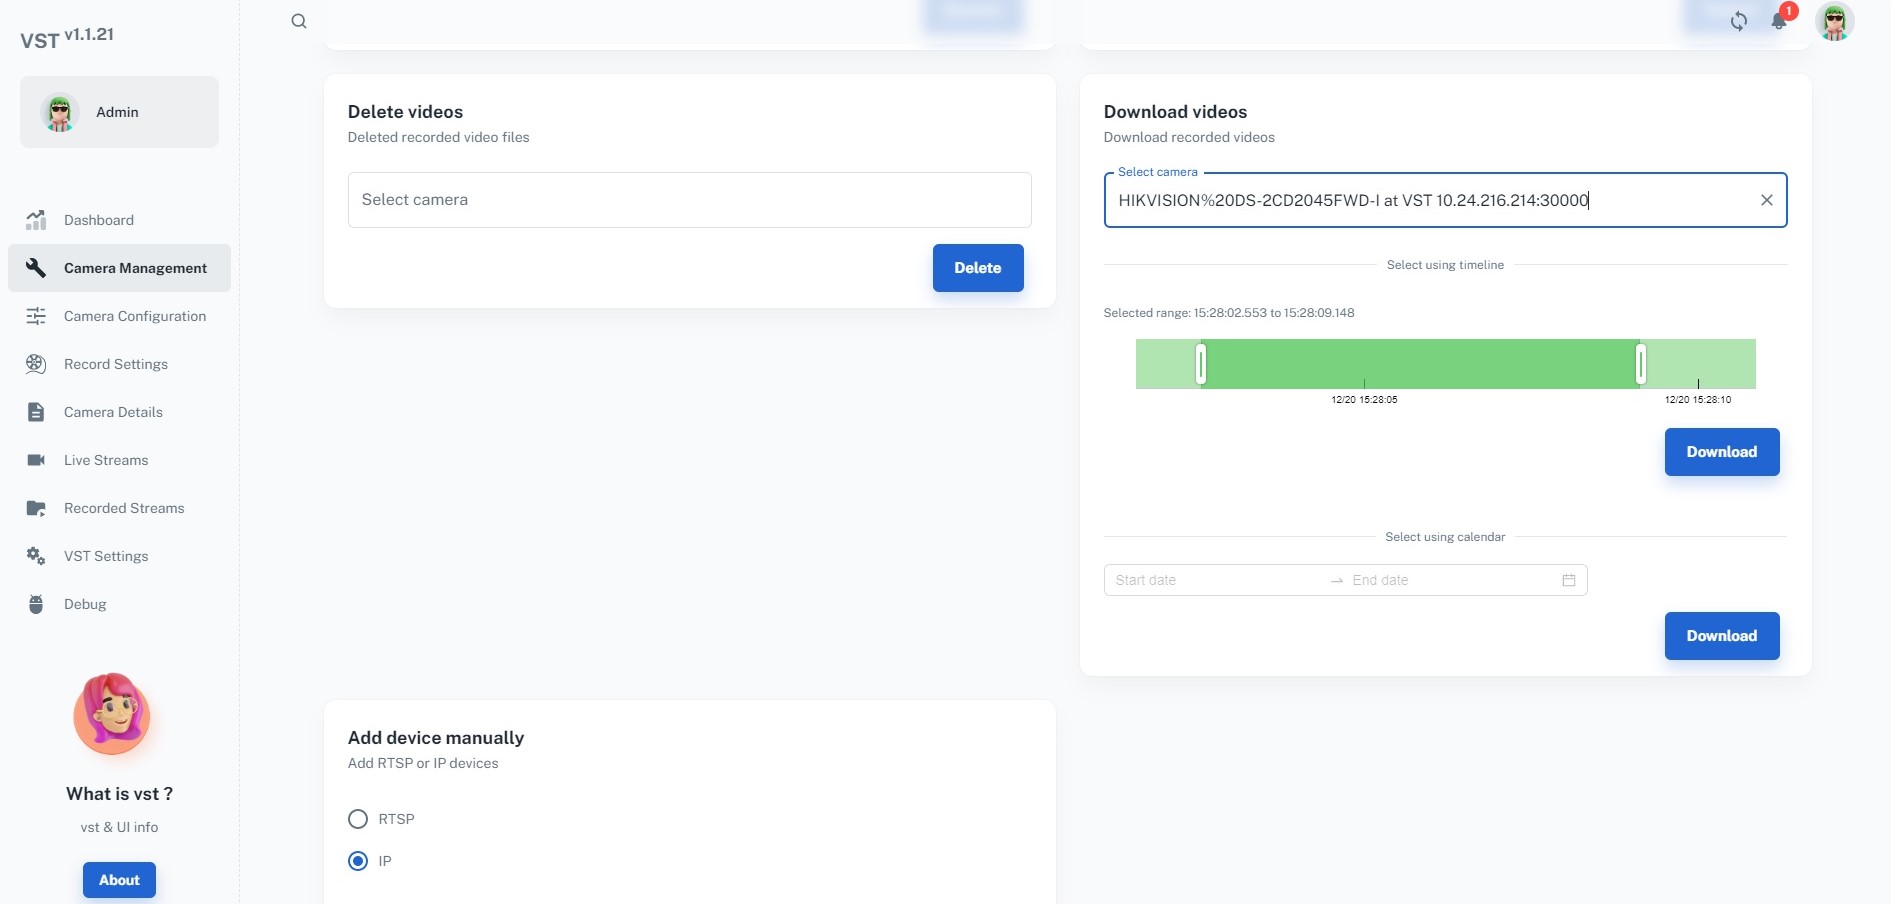
Download recordings
To download recorded video, select Download videos option in Camera Management tab. Then choose the device and corresponding timeline.
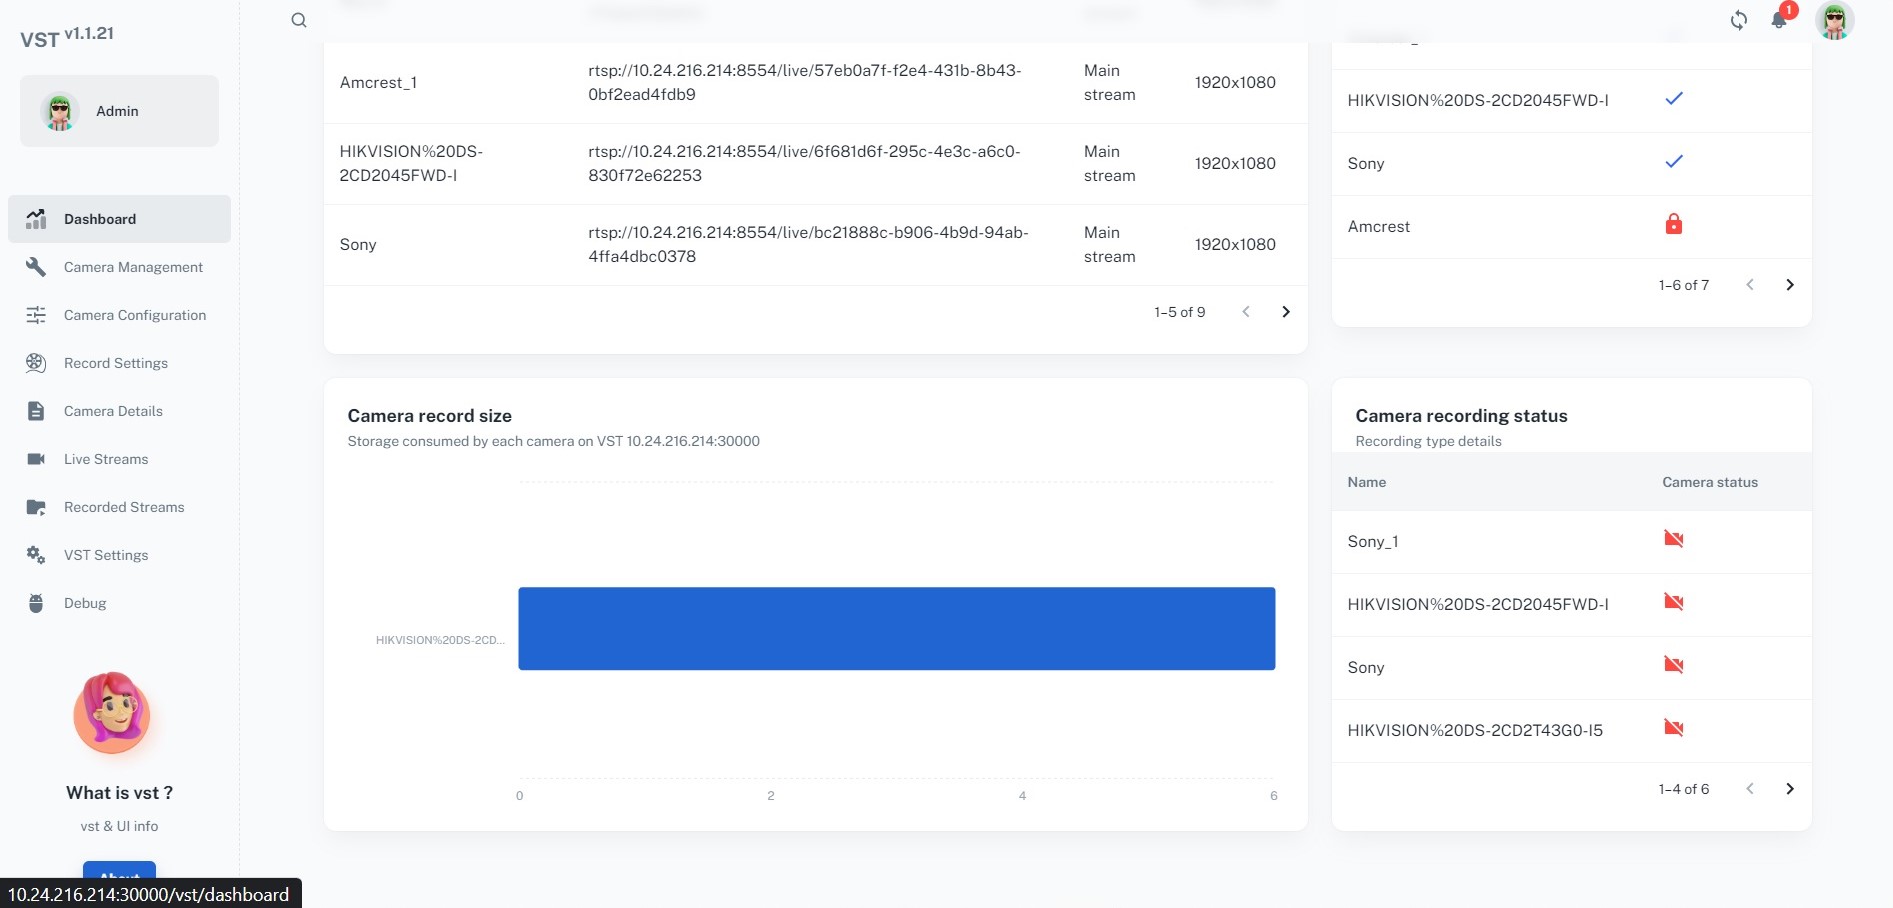
Storage utilization
You can examine the amount of disk space used by clicking on Dashboard tab:
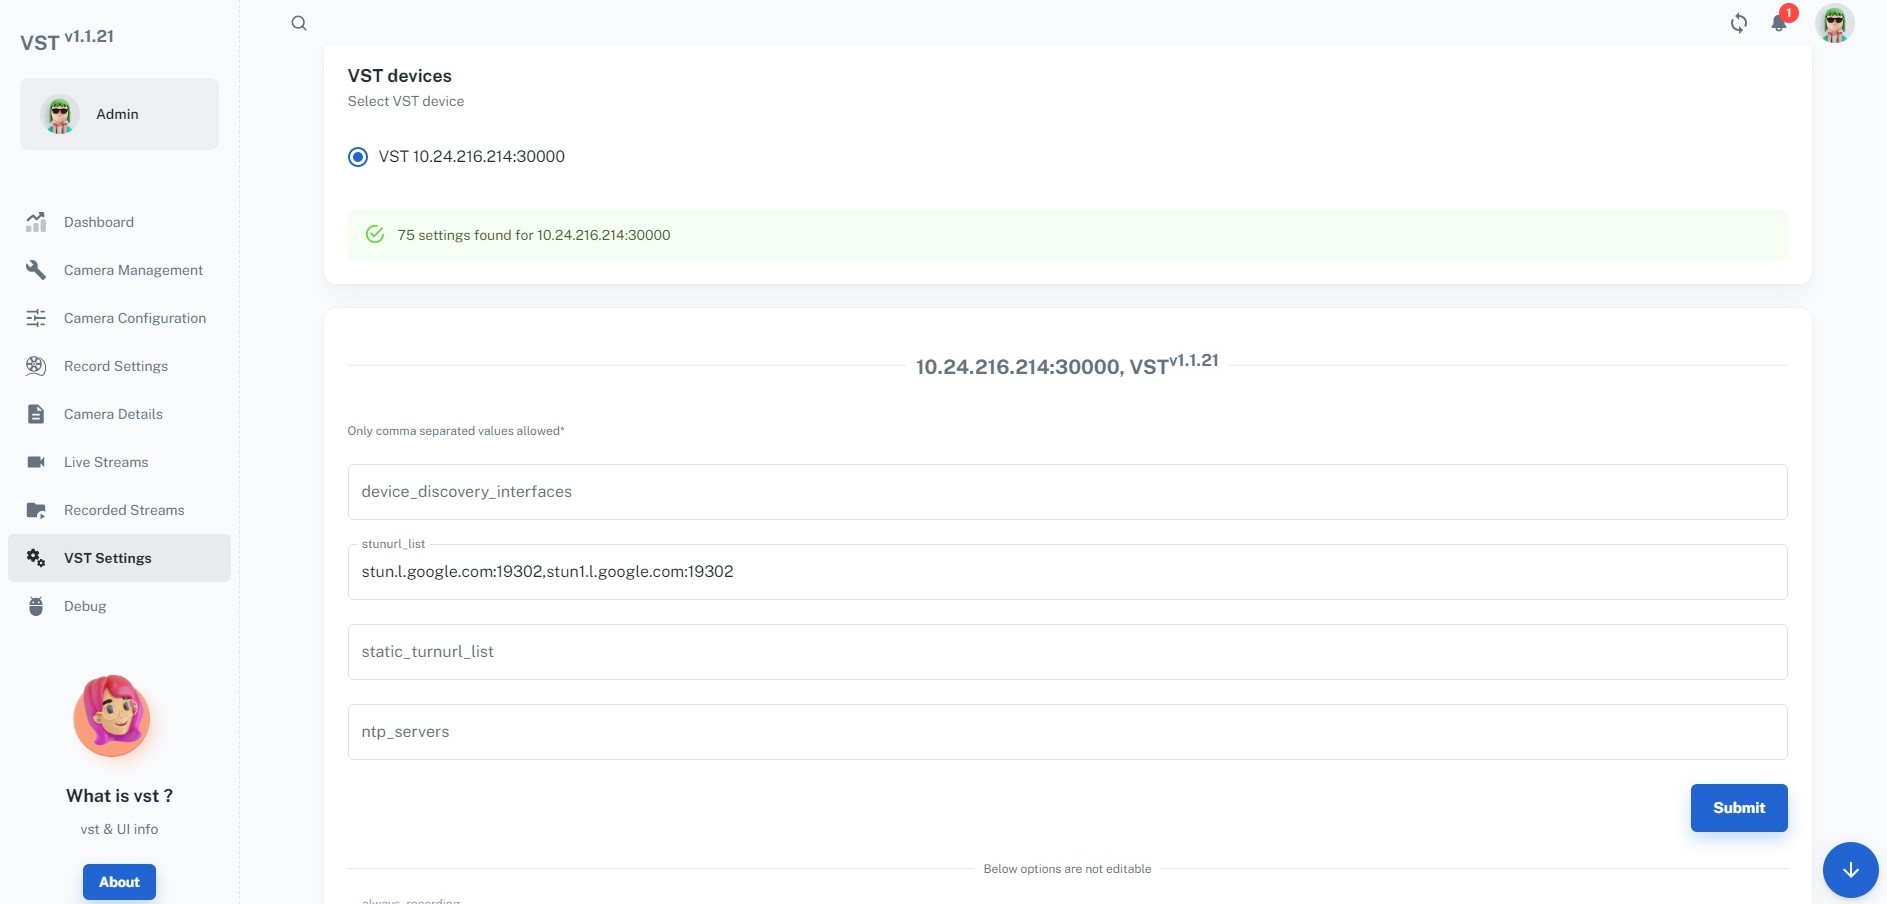
Configuration
The active VST configuration can be viewed from the VST Settings tab:
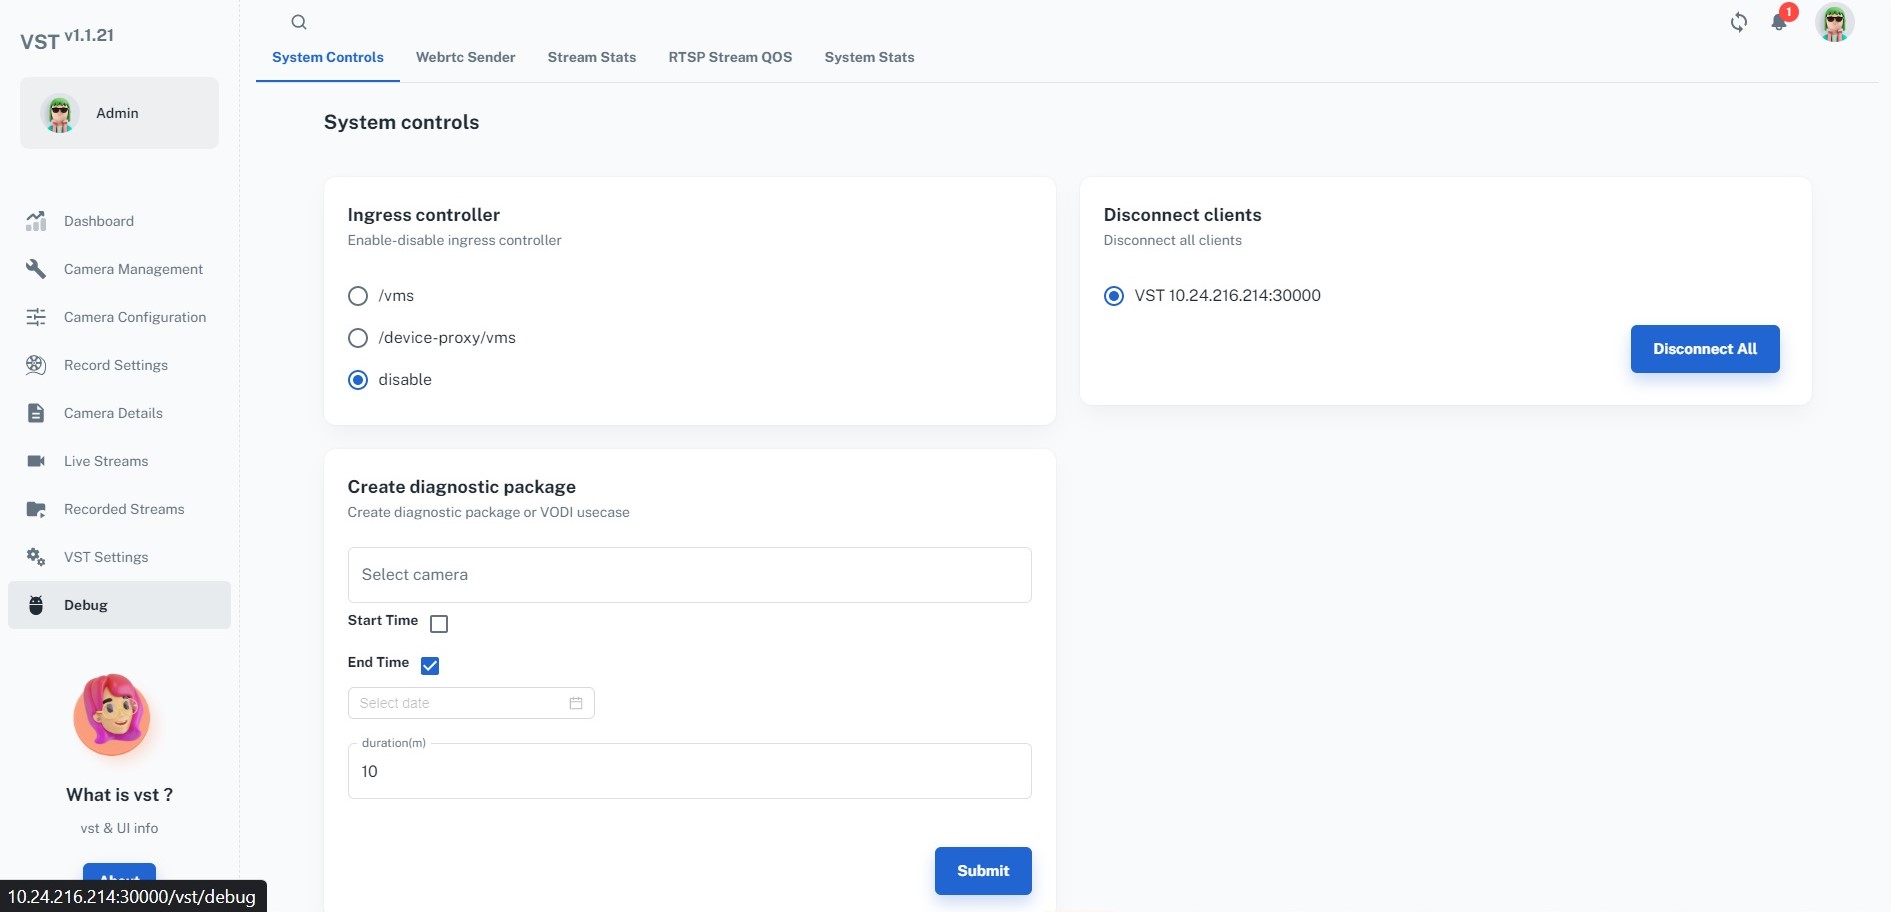
Debug
Finally, the Debug tab will allow you to create and examine a debug package. It will come handy if you ever need to contact us. Enjoy the VST experience!
Refer to the Components & Customization for comprehensive list of APIs and its usage.
Remote Access Options
Installation of STUN / TURN Server
Installation and configuration of these servers are mandatory for WebRTC streaming. Below are the NAT type requirements for STUN/TURN:
Case |
NAT types |
STUN/TURN requirement |
|---|---|---|
1 |
Symmetric to Symmetric |
TURN |
2 |
Symmetric to Port-Restricted Cone |
TURN |
3 |
Symmetric to Address-Restricted Cone |
STUN (but probably not reliable) |
4 |
Symmetric to Full Cone |
STUN |
5 |
Everything else |
STUN |
Depending on your network type, you may choose to install STUN and/or TURN servers:
You can set the STUN server using
stunurlconfig parameter.You can set the TURN server using
turnurlconfig parameter.
VST web UI is verified with coturn server. To install, run the following command:
sudo apt-get install coturn
Note
TURN server is not mandatory, this is required only if Client and Server are in different networks.
Setup & Deployment
VST configuration details can be found here: VST Config.
VST Storage Config details can be found here: Storage Config.
RTSP streams config file details can be found here: RTSP Stream Config.
Using Docker Container
Copy all VST related configs in one single directory.
Modify VST configs as per requirement.
Run the docker command either with auto-discovery mode or with predefined RTSP streams.
Camera auto-discovery mode (ONVIF auto-discovery):
sudo docker run -it -v <absolute_host_path_of_configs_dir>/:/home/vst/vst_release/configs/ --net=host --gpus all nvcr.io/rxczgrvsg8nx/vst-1-0/vst:v1.2.35_x86_64 --vstConfigFile /home/vst/vst_release/configs/vst_config.json
Pre-defined RTSP Streams mode. Modify
rtsp_streams.jsonto add predefined RTSP urls & toggle param"enabled": true:sudo docker run -it -v <absolute_host_path_of_configs_dir>/:/home/vst/vst_release/configs/ --net=host --gpus all -e ADAPTOR=vst_rtsp nvcr.io/rxczgrvsg8nx/vst-1-0/vst:v1.2.35_x86_64 --vstConfigFile /home/vst/vst_release/configs/vst_config.json --rtspStreamsFile /home/vst/vst_release/configs/rtsp_streams.json
To get the latest container version, refer here: https://registry.ngc.nvidia.com/orgs/rxczgrvsg8nx/teams/vst-1-0/containers/vst/tags.
Using Helm Charts
Download VST Helm chart:
helm fetch https://helm.ngc.nvidia.com/rxczgrvsg8nx/vst-1-0/charts/vst-1.0.28.tgz --username='$oauthtoken' --password=<YOUR API KEY>
Install Helm chart:
# with default config parameters
    helm install <name> <latest-version>

# with customized config parameters
    helm install <name> <latest-version> -f command-values.yaml
Sample format of
command-values.yaml. Edit as per your requirement:vms: imagePullSecrets: - name: ngc-docker-reg-secret configs: vst_config.json: network: server_domain_name: stunurl_list: - stun.l.google.com:19302 # List of turnUrls with static credentials. Example - admin:admin@10.0.0.1:3478 static_turnurl_list: [] # List of coturn turnUrls with secret. Example - 10.0.0.1:3478:secret_key use_coturn_auth_secret: false coturn_turnurl_list_with_secret: # Twilio account details userId & auth_token. use_twilio_stun_turn: false twilio_account_sid: "" twilio_auth_token: "" # Camera to VST streaming, UDP option might not work due to firewall. Disable if no firewall. rtsp_streaming_over_tcp: true # If true then forward camera/nvstreamer ntp time to clients otherwise forward vst ntp time use_sensor_ntp_time: false data: device_name: "VST" device_location: "" gpu_indices: [0] always_recording: true use_software_path: false use_webrtc_inbuilt_encoder: "" notifications: enable_notification: false # supported - redis, kafka use_message_broker: "kafka" # Redis stream name message_broker_topic: mdx_notification message_broker_payload_key: "sensor" redis_server_env_var: REDIS_SVC_SERVICE_HOST:9092 kafka_server_address: mdx-kafka-cluster-kafka-brokers:9092 overlay: video_metadata_server: "mdx-elasticsearch-cluster-master-headless:9200/mdx-raw*" video_metadata_query_batch_size_num_frames: 300 use_video_metadata_protobuf: true security: use_https: false use_http_digest_authentication: false use_rtsp_authentication: false nv_org_id: "" nv_ngc_key: "" vst_storage.json: total_video_storage_size_MB: 100000 # Below are default container paths which are mapped to host volumes data_path: "/opt/vmounts/vst-data/" video_path: "/opt/vmounts/video-data/" # Choose adaptor type between vst_rtsp, onvif, remote. Default adaptor is vst_rtsp adaptor_config.json: vst: # This adaptor used to pick pre-defined RTSP URLs from rtsp_streams.json file - enabled: true control_adaptor_lib_path: prebuilts/arch/rtsp_streams.so id: 6cdec7d7-0f30-450c-a78a-756c3e132fd3 name: vst_rtsp need_recording: true need_rtsp_server: true type: vst # This adaptor used to auto discover the onvif cameras - enabled: false control_adaptor_lib_path: prebuilts/arch/onvif_client.so discovery_adaptor_lib_path: prebuilts/arch/onvif_discovery.so id: 044bc643-33c5-479a-b988-10d0bbc4e05c name: onvif need_recording: true need_rtsp_server: true type: vst # This adaptor used in edge to cloud use-case. Enable this adaptor at the cloud side - enabled: false control_adaptor_lib_path: prebuilts/arch/libremotedevice.so id: 780bd844-5d1c-11ee-8c99-0242ac120002 name: remote need_recording: true need_rtsp_server: true type: vst # Known RTSP URLs can be provided statically in below config. Make sure vst_rtsp adaptor is selected. rtsp_streams.json: streams: - enabled: false stream_in: rtsp://admin:admin@10.0.0.1/h264 name: Camera_1 - enabled: false stream_in: rtsp://nvstreamer-nvstreamer-svc:31554/nvstream/opt/vmounts/streamer-videos/Building_K_Cam1.mp4 name: Building_K_Cam1
To get the latest Helm Chart version, refer here: https://registry.ngc.nvidia.com/orgs/rxczgrvsg8nx/teams/vst-1-0/helm-charts/vst.
For more context on configuration, when the microservice is used:
In the Multi-Camera Tracking app, please refer to its Operation Parameters section.
In the Occupancy Analytics app, please refer to its Operation Parameters section.
In the Few-Shot Product Recognition app, please refer to its Operation Parameters section.
VST Config
Following table describes the parameters in VST config file, which should be provided as command-line option deploying helm chart:
VST config file Key
Description
Typical Value
network
Section to define all Network related parameters
“http_port”
HTTP port number for accessing VST webservices
“30000”
“server_domain_name”
Server domain name
“vst-service”
“stunurl_list”
STUN server address
[“stun.l.google.com:19302”]
“static_turnurl_list”
TURN server address
[]
“coturn_turnurl_list_with_secret”
Coturn Turnurl list with secret
[]
“use_coturn_auth_secret”
Enable/Disable Coturn Auth secret
FALSE
“use_twilio_stun_turn”
Enable/Disable Twilio
FALSE
“twilio_account_sid”
Twilio Account Sid
“”
“twilio_auth_token”
Auth token for Twilio
“”
“ntp_servers”
NTP server address
[“time.google.com”]
“use_sensor_ntp_time”
If true then forward camera/nvstreamer ntp time in SR reports to the clients. Otherwise provide current ntp time in SR report.
TRUE
“max_webrtc_out_connections”
Max number of webrtc output connections at a given time
8
“max_webrtc_in_connections”
Max number of webrtc input connections at a given time
1
“webservice_access_control_list”
An Access Control List allows restrictions to be put on the list of IP addresses which have access to the web server. The ACL is a comma separated list of IP subnets, where each subnet is pre-pended by either a - or a + sign. A plus sign means allow, where a minus sign means deny. If a subnet mask is omitted, such as -1.2.3.4, this means to deny only that single IP address.
“+10.42.0.0/32”
“rtsp_server_port”
User given rtsp port number
8554
“rtsp_preferred_network_iface”
Preferred network interface for RTSP streaming
“eth1”
“rtsp_in_base_udp_port_num”
RTSP UDP Port Number
-1
“rtsp_out_base_udp_port_num”
RTSP UDP Port Number
-1
“rtsp_streaming_over_tcp”
Enable / Disable RTSP Streaming over TCP
FALSE
“rtsp_server_reclamation_client_timeout_sec”
Timeout for RTSP Server reclamation client
10
“stream_monitor_interval_secs”
Stream Monitor interval in seconds
2
“udp_latency_ms”
Latency for UDP connection in millisecond
200
“udp_drop_on_latency”
Enable/Disable UDP frame drop
FALSE
“webrtc_latency_ms”
Latency for webrtc in milliseconds
500
“enable_frame_drop”
Enable/Disable frame drop
TRUE
“webrtc_max_birate”
Maximum bitrate for Webrtc camera
10000
“webrtc_min_birate”
Minimum bitrate for Webrtc camera
2000
“webrtc_start_birate”
Start bitrate for Webrtc camera
4000
“webrtc_peer_conn_timeout_sec”
Timeout duration in seconds for peer connection establishment
10
“enable_grpc”
Enable/Disable GRPC server
FALSE
“grpc_server_port”
GRPC server port
“50051”
“webrtc_in_audio_sender_max_bitrate”
webrtc in audio sender maximum bitrate
128000
“webrtc_in_video_degradation_preference”
webrtc in video degradation preference
“resolution”
“webrtc_in_video_sender_max_framerate”
webrtc in video sender maximum framerate
30
“remote_vst_address”
Cloud VST Address
13.0.0.1:30000
“webrtc_port_range”
Min and Max Port Range for webRTC
“{min”:0 “max”:0}”””
“enable_websocket_pingpong”
Enable/Disable websocket ping pong messages
FALSE
“websocket_keep_alive_ms”
Timeout for websocket to keep alive
5000
onvif
Section to define all ONVIF related parameters
device_discovery_timeout_secs”
Device discovery timeout to receive probe match message from device
10
“onvif_request_timeout_secs”
Timeout to receive ONVIF command response from device
10
“device_discovery_freq_secs”
device discovery frequency in secs
5
“device_discovery_interfaces”
Network interface for device discovery e.g eth0, eth1
[]
“max_devices_supported”
Limiting maximum number of devices
8
“default_bitrate_kbps”
Default value of bitrate setting on device
8000
“default_framerate”
Default value of framerate setting on device
30
“default_resolution”
Default value of resolution setting on device
“1920x1080”
“default_max_gov_length”
Default value of GOV length setting on device
60
data
Section to define all VST data related parameters
“storage_config_file”
Path to storage configuration JSON file
./configs/vst_storage.json
“storage_threshold_percentage”
% value of storage occupancy when aging policy triggers
95
“storage_monitoring_frequency_secs”
Monitor storage usage with frequency in seconds
2
“nv_streamer_directory_path”
Directory to store files in nvstreamer
“/home/vst/vst_release/vst_data/”
“nv_streamer_loop_playback”
Enable/Disable looping in nvstreamer
FALSE
“nv_streamer_seekable”
Enable/Disable seeking in nvstreamer
FALSE
“nv_streamer_max_upload_file_size_MB”
Maximum file upload size in nvstreamer
10000
“nv_streamer_media_container_supported”
Media containers supported in nvstreamer
[“mp4”,”mkv”]
“nv_streamer_rtsp_server_output_buffer_size_kb”
Buffer size for RTSP server output in KB
800
“nv_streamer_metadata_container_supported
Metadata containers supported in nvstreamer
[“json”]
“supported_video_codecs”
Video codec supported for video recording
[“h264”,”h265”]
“supported_audio_codecs”
Audio codec supported for audio recording and decode
[“pcmu”,”pcma”,”mpeg4-generic”]
“enable_aging_policy”
Enable/Disable aging policy of video files
TRUE
“max_video_download_size_MB”
Limiting the maximum video download size
1000
“always_recording”
Enable/Disable always ON recording
FALSE
“use_software_path”
Enable allows processing on CPU otherwise on GPU
FALSE
“webrtc_in_fixed_resolution”
Fixed resolution for webrtc input stream
“1280x720”
“webrtc_in_max_framerate”
Maximum framerate for webrtc input stream
30
“webrtc_in_video_bitrate_thresold_percentage”
webrtc input video bitrate thresold percentage
50
“webrtc_in_passthrough”
webrtc input without transcode
TRUE
“webrtc_sender_quality”
webrtc input quality
“pass_through”
“enable_rtsp_server_frameid_support”
Enable frameid support for rtsp in nvstreamer
TRUE
“gpu_indices”
GPU indices
[]
“webrtc_out_enable_insert_sps_pps”
webRTC Out Enable / Disable SPS PPS insertion
TRUE
“webrtc_out_set_iframe_interval”
webRTC Out set I-Frame Interval
30
“webrtc_out_set_idr_interval”
webRTC Out set IDR Interval
256
“webrtc_out_min_drc_interval”
webRTC Out minimum interval between DRC requests
5
“device_name”
Device Name for edge VST
“VST_EDGE”
“device_location”
Device Location for edge VST
“6th_Floor”
“enable_dec_low_latency_mode”
Enable/Disable low latency in decoder
FALSE
notifications
Section to define all Notifications related parameters
“enable_notification”
Enable notification of device events on message broker
FALSE
“use_message_broker”
Message Broker to use (Kafka/Redis)
“kafka”
“message_broker_topic”
Topic/event used in message broker
“vst.event”
“redis_server_env_var”
Redis server address:port
REDIS_SVC_SERVICE_HOST:6379
“kafka_server_address”
Kafka server address and port
“10.0.0.1:9092”
debug
Section to define all Debug related parameters
“enable_perf_logging”
Enable/Disable perf logging
TRUE
“enable_qos_monitoring”
Enable/Disable QOS logging
TRUE
“qos_logfile_path”
OS log file path
/root/vst_release/webroot/log/
“qos_data_capture_interval_sec”
QOS log capture interval
1
“qos_data_publish_interval_sec”
QOS log publish interval
5
“enable_gst_debug_probes”
Enable/Disable gstreamer probes
TRUE
“enable_prometheus”
Enable/Disable stats update on prometheus
FALSE
“prometheus_port”
prometheus port number
8080
“enable_highlighting_logs”
Enable certain logs highlighting by special colors
TRUE
“enable_debug_apis”
Enable/Disable Debug apis
TRUE
“dump_webrtc_input_stats”
Enable/Disable webRTC IN stats
FALSE
“enable_frameid_in_webrtc_stream”
Enable/Disable frameid in webRTC Stream
FALSE
overlay
Section to define all overlay related parameters
“video_metadata_server”
Server to fetch Metadata from
“10.0.0.1:9200/mdx-raw*”
“video_metadata_query_batch_size_num_frames”
Size of metadata to fetch
300
“use_video_metadata_protobuf”
Use Protobuf spec for metadata parsing
TRUE
security
Section to define all security related parameters
“use_https”
Enable/Disable https
TRUE
“use_rtsp_authentication”
Enable/Disable RTSP proxy stream authentication
TRUE
“use_http_digest_authentication”
Enable/Disable HTTP user authentication
TRUE
“nv_org_id”
NGC ORG ID
ngc_org_id
“nv_ngc_key”
NGC Key
ngc_key
Storage Config
Following table describes the parameters in VST storage config file:
VST storage config file Key
Description
Typical Value
“data_path”
Path where VST related data files are created
“/opt/vmounts/vst-data/”
“video_path”
Path to root folder where recorded videos to be stored
“/opt/vmounts/video-data/”
“total_video_storage_size_MB”
Total size available to store recorded videos
10000
RTSP Stream Config
Following table describes the parameters in RTSP Streams config file:
RTSP Streams config file Key
Description
Typical Value
streams
Array of streams in JSON format
“”
“enabled”
Enable / Disable stream
TRUE / FALSE
“stream_in”
Actual RTSP URL of camera
“rtsp://admin:admin@10.xx.xx.xx/h264””””
“name”
Stream Name
Camera_Front_Door
Frequently Asked Questions
Refer to the VST FAQ for more information.