System Maintenance
This chapter contains the installations and un-installation instructions of the following customer replaceable units.
Skyway is equipped with two replaceable power supply units (PSU) that work in a redundant configuration. The figure below shows the power side of the system which includes a hot-swap PSU.
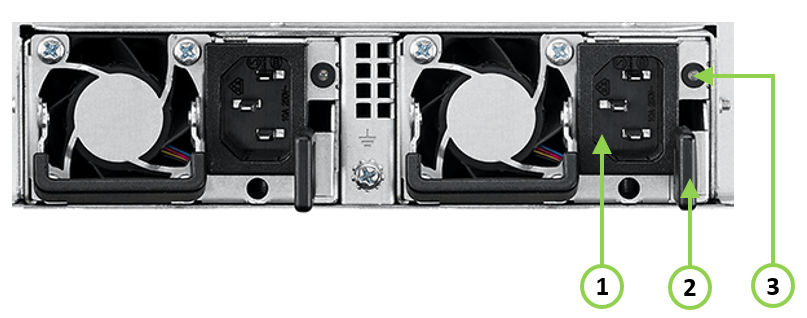
Item | Description |
1 | Power Socket |
2 | Extraction handle |
3 | PSU Status LEDs |
Extracting and Inserting the Power Supply Unit
The power supply is only hot-swappable if you have a redundant system with two power supplies installed. If there is only one power supply installed, before removing or replacing the power supply, first take the appliance out of service, turn off all peripheral devices connected to the system, turn off the system by pressing the power button, and unplug the AC power cord from the system or wall outlet.
The PSU can be replaced in case it fails.

To extract the PSU, do the following:
Step 1. If a filler panel is installed, remove the filler panel.
Step 2. If a PSU is installed, grab the handle with your thumb pointing toward the latch. Push the latch with your thumb towards the handle while you pull the PSU out of the appliance.
To insert a PSU, do the following:
Step 1. Make sure the mating connector of the new unit is free of any dirt and/or obstacles.
Do not run the appliance with openings due to missing parts. This may cause overheating due to improper airflow.
Step 2. Insert the PSU by sliding it into the opening, until a slight resistance is felt.
Step 3. Continue pressing the PSU until it seats completely. The latch will snap into place, confirming proper installation.
Step 4. Insert the power cord into the supply connector.
Step 5. Insert the other end of the power cord into an outlet of the correct voltage.
To disassemble the appliance from the rack, do the following:
Step 1. Shut down the appliance.
Step 2. Unplug and remove all connectors.
Step 3. Unplug all power cords.
Step 4. Remove the ground wire.
Step 5. Unscrew the 2 center bolts from inside the handles.
Step 6. Slide the appliance from the rack.
Step 7. Remove the rail slides from the rack.
To install the slide rail, do the following:
Please refer to Slide Rail Installation section.