Installing Azure Local and vGPU Configuration#
Note
Disclaimer
The content regarding GPU partitioning in this guide has been sourced from Azure documentation. For the most current and detailed information, please refer to the official Azure documentation.
Installing Azure Local#
To install Azure Local, follow the instructions from the Azure documentation.
GPU partitioning (or vGPU) allows multiple virtual machines (VMs) to share a single physical GPU. Each VM receives a dedicated portion of the GPU rather than access to the entire device. This feature utilizes the Single Root IO Virtualization (SR-IOV) interface, ensuring a hardware-backed security boundary and predictable performance for each VM. Secure partitioning prevents unauthorized access between VMs, making it ideal for workloads like virtual desktop infrastructure (VDI), AI, and ML inferencing. GPU partitioning can significantly reduce the total cost of ownership for your infrastructure.
Make sure to complete all the prerequisites before you begin to use the GPU partitioning feature.
Once you have your Azure Local cluster setup, it’s time to provision your GPU-enabled virtual machines.
When To Use GPU Partitioning?#
Use GPU partitioning for workloads that don’t require a full GPU, such as VDI, AI, and ML inferencing. This technique maximizes hardware utilization and reduces overall infrastructure costs.
You can also define advanced setting values for memory-mapped IO (MMIO) spaces to determine resource requirements for a single GPU. For Example:
VDI Applications: Distributed edge customers often run both basic productivity applications, such as Microsoft Office, and graphics-heavy visualization workloads in their VDI environments, which require GPU acceleration. To achieve the necessary GPU acceleration, you can use either Discrete Device Assignment (DDA) or GPU partitioning. GPU partitioning allows you to create multiple partitions on a single physical GPU and assign each partition to a virtual machine (VM) hosting a VDI environment. This approach helps you achieve the desired density and scale the number of supported users significantly, maximizing resource utilization while delivering acceptable performance for individual users.
Inference with ML: In retail stores and manufacturing plants, running inference at the edge requires GPU support. Using GPU partitioning, you can run multiple ML models in parallel on the same GPU but within separate physical partitions. This allows you to get quick, actionable results before sending data to the cloud for further analysis and retraining of ML models. Unlike DDA, where an entire physical GPU is assigned to a single VM, GPU partitioning optimizes GPU usage by enabling multiple inferencing applications to run simultaneously, thus fully utilizing the GPU’s capabilities.
GPU partitioning offers a flexible and efficient way to meet the demanding requirements of VDI and ML inferencing workloads, ensuring that your infrastructure is both cost-effective and scalable.
Verify GPU Driver Installation#
Make sure to install the GPU drivers on every server of the cluster. For more information, see NVIDIA vGPU documentation. Follow these steps to verify if the GPU driver is installed and partitionable using Windows Admin Center:
Launch Windows Admin Center and make sure the GPUs extension is already installed. For instructions on how to install the GPUs extensions in Windows Admin Center, see Installing an extension.
Select Cluster Manager from the top dropdown menu and connect to your cluster.
From the Settings menu, select Extensions > GPUs.
The GPUs tab on the GPU page displays an inventory of all the servers and the physical GPUs that are installed on each server.
Check the Assigned status column for each GPU for all the servers. The Assigned status column can have one of these statuses:
Ready for DDA assignment.: Indicates that the GPU is designated for DDA assignment and cannot be utilized for GPU partitioning.
Partitioned. Indicates that the GPU is partitionable.
Paravirtualization. Indicates that the GPU has the partitioned driver capability installed but SR-IOV on the server isn’t enabled.
Not assignable. Indicates that the GPU isn’t assignable.
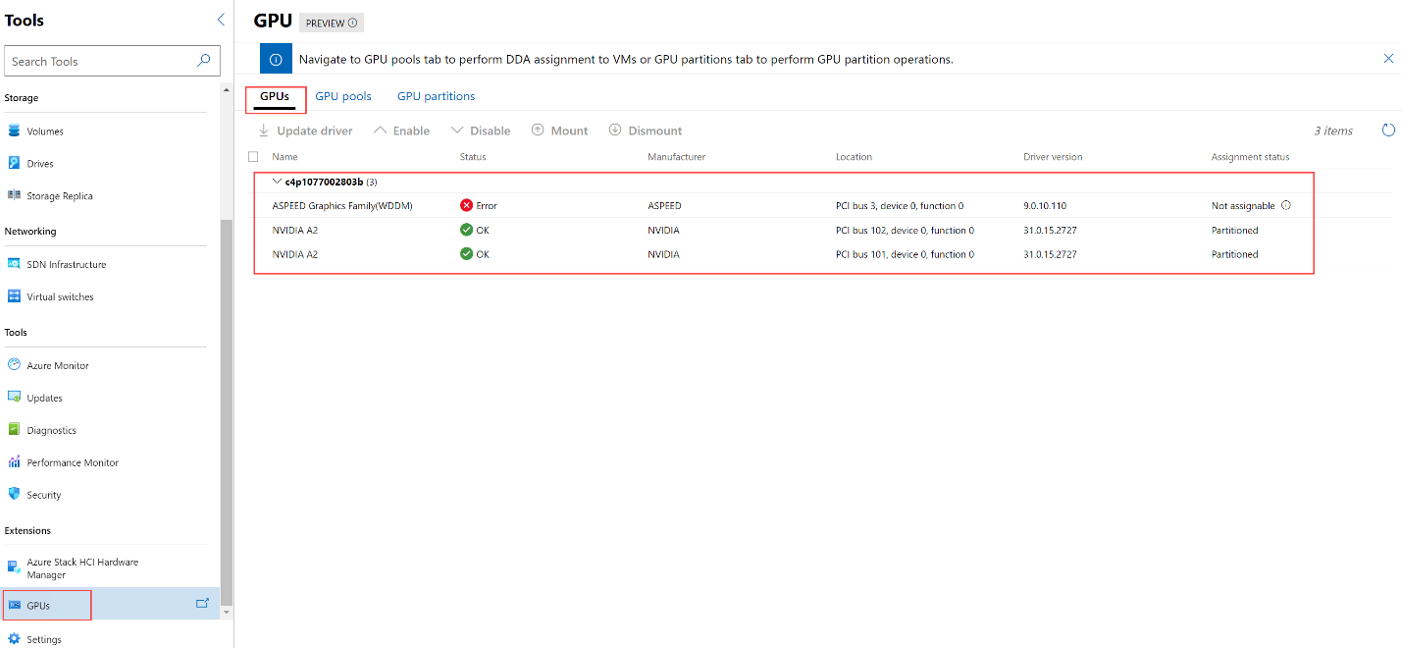
Proceed further in the GPU partitioning workflow only if the Assigned status column shows Partitioned for the GPUs in all the servers in your cluster.
Configure GPU Partition Count#
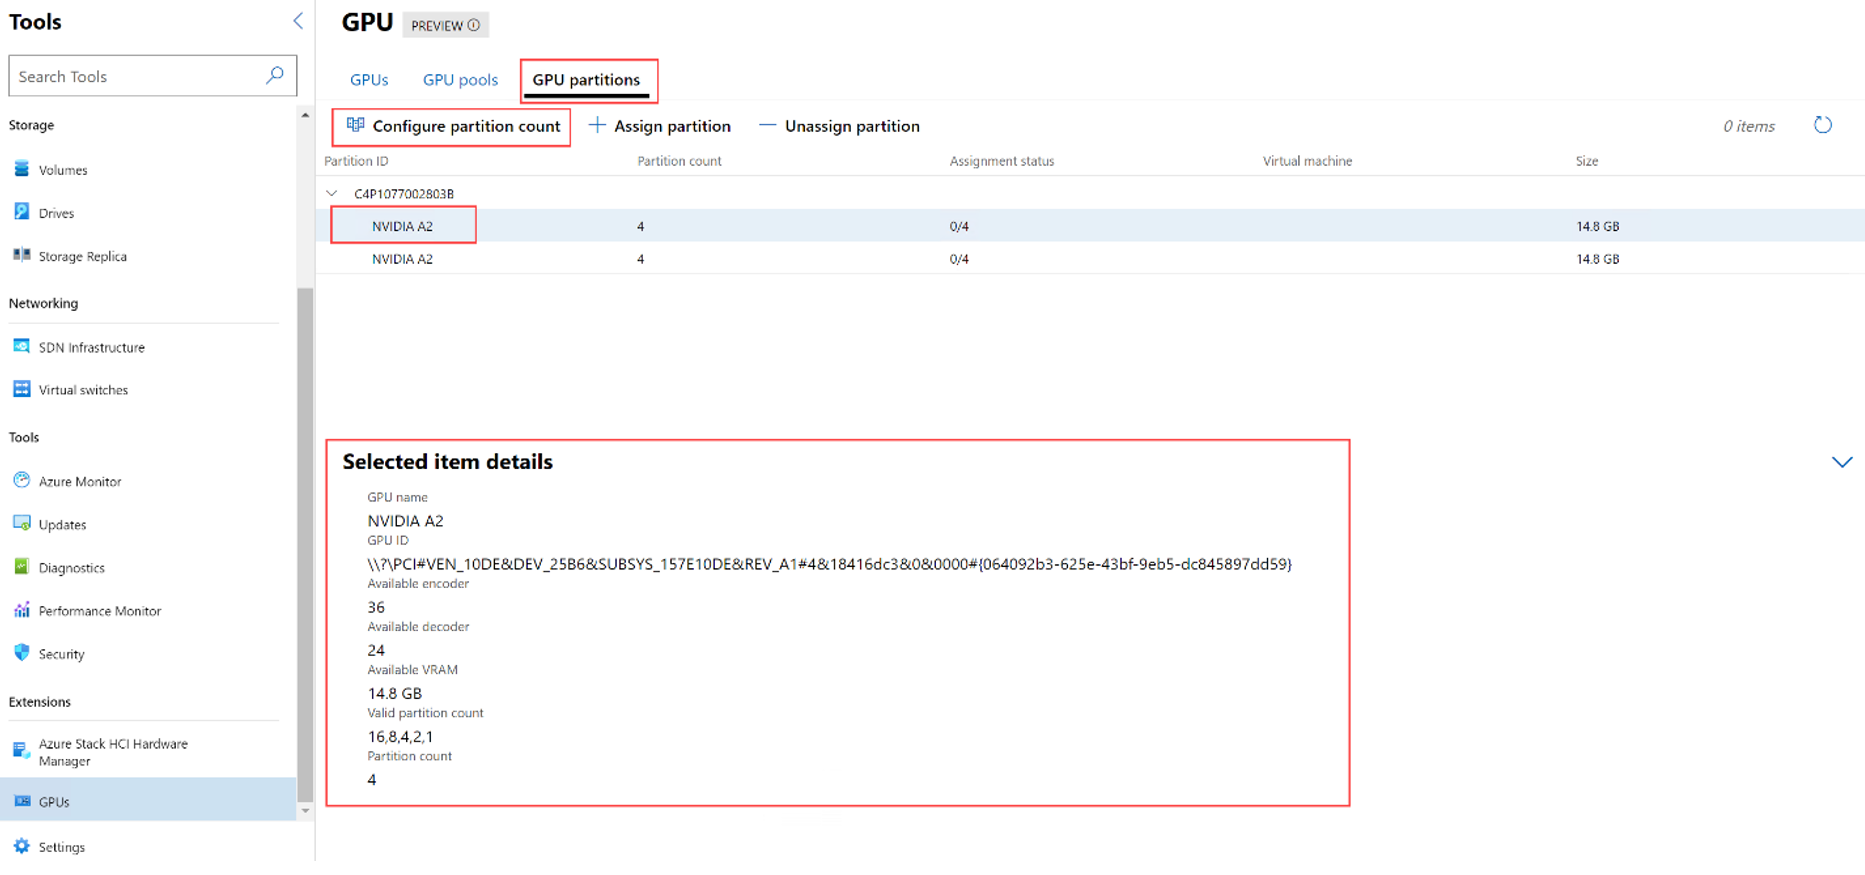
Select the GPU partitions tab to configure partition counts.
To view detailed information, select either a GPU or a GPU partition. The details will appear in the bottom section of the page under Selected Item Details. When you select a GPU, it shows the GPU name, GPU ID, available encoder and decoder resources, available VRAM, valid partition count, and current partition count. When you select a GPU partition, it displays the partition ID, VM ID, instance path, partition VRAM, partition encode, and partition decode.
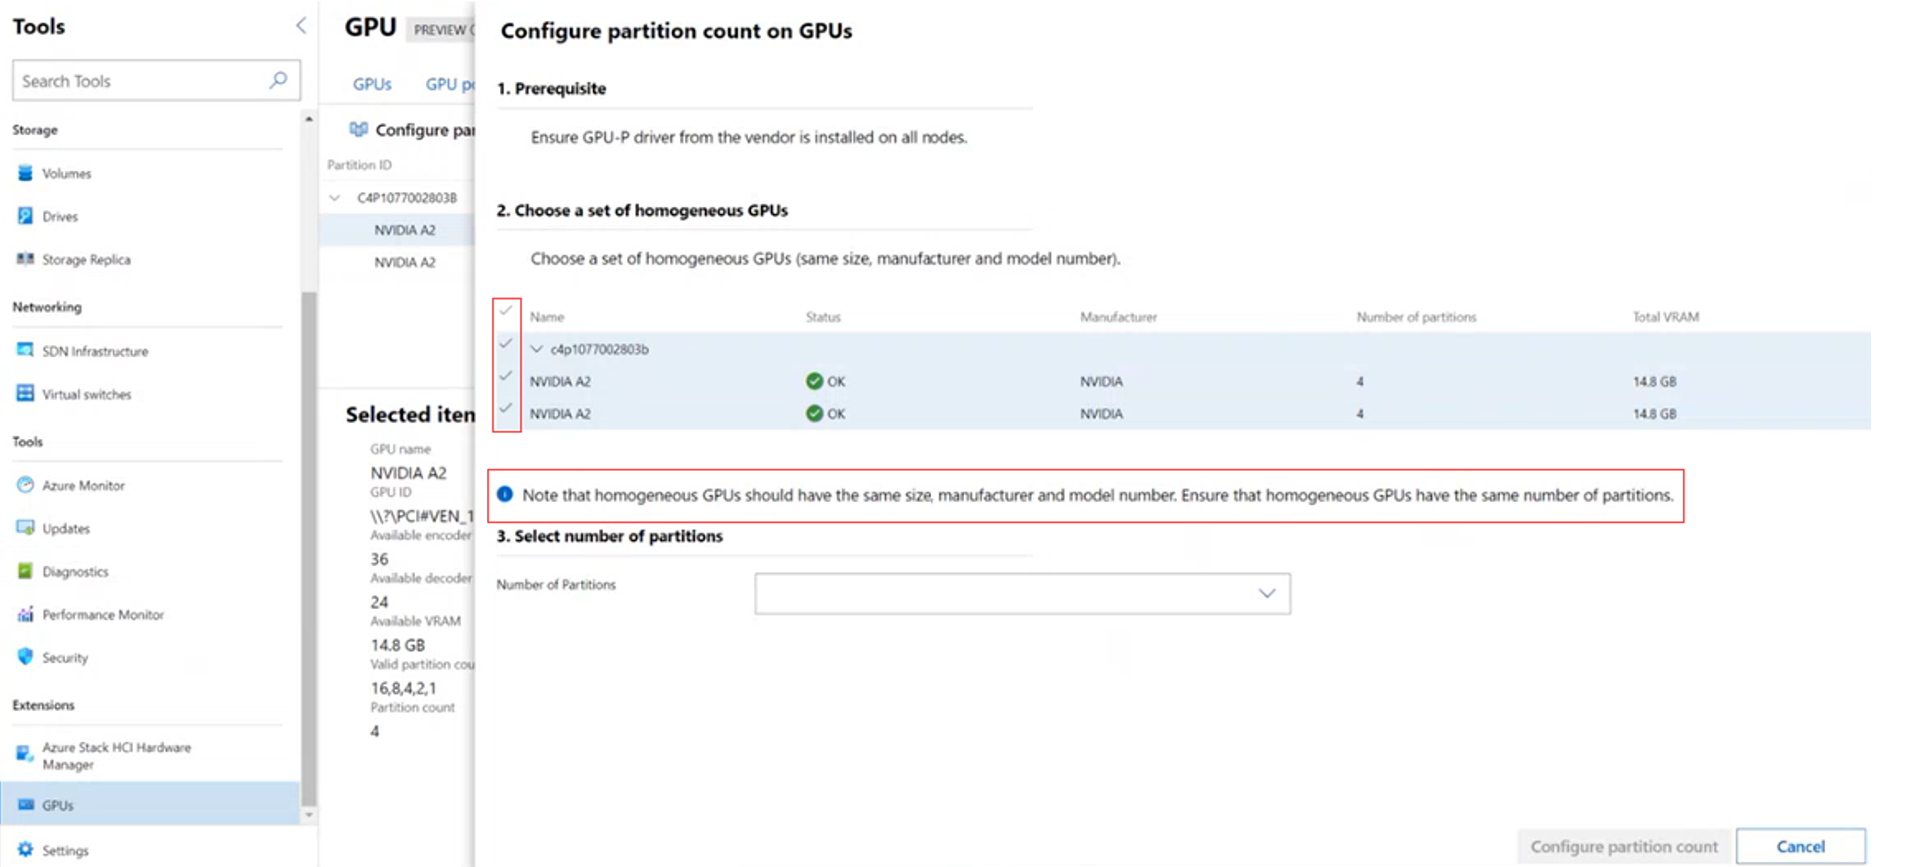
Select Configure partition count. The Configure partition count on GPUs page is displayed. For each server, it displays the GPU devices installed on them.
Select a set of homogeneous GPUs. By default, Windows Admin Center automatically selects a set of homogenous GPUs if it detects one, as shown in the following screenshot:
After you select a homogeneous set of GPUs, select the partition count from the Number of Partitions dropdown list. This list automatically populates the partition counts configured by NVIDIA. The counts displayed in the list can vary depending on the type of GPU you selected.
Select Configure partition count.
After the partition count is configured, Windows Admin Center notifies you that the partition count is successfully configured and displays the GPU partitions tab again. You can see the new partition count for the GPU partition under the Partition count column.
Assign GPU Partition to a VM#
You must save your workloads before assigning partitions.
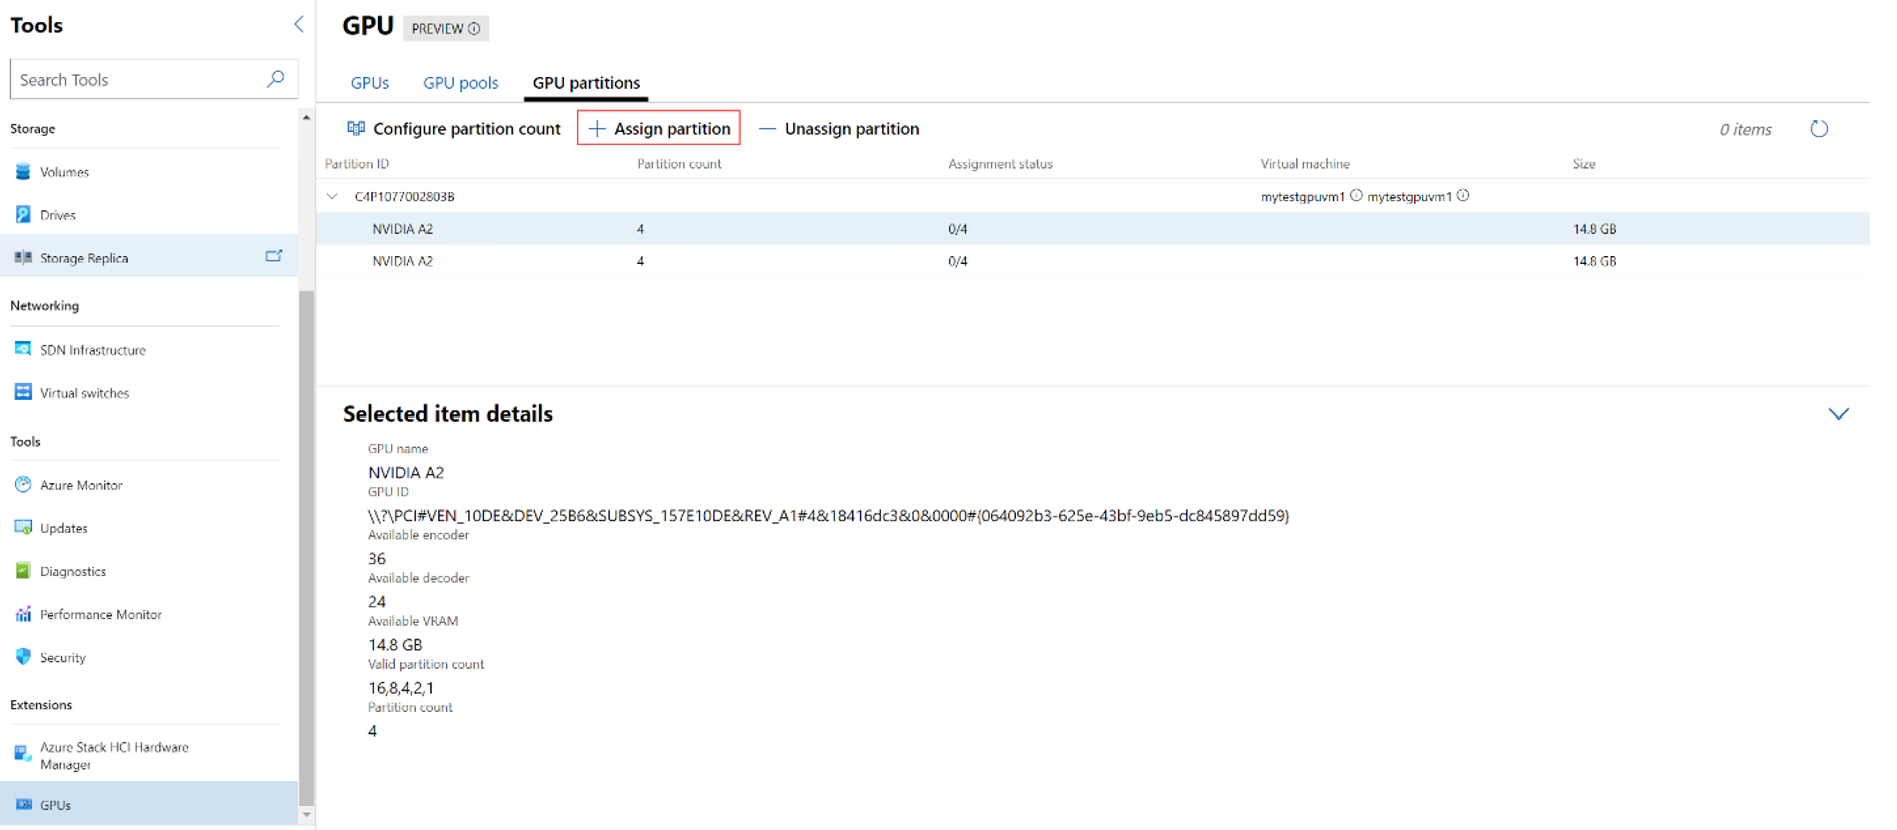
On the GPU partitions tab, select + Assign partition.
From Choose the server list, select the server where the VM resides. This list displays all the servers in your cluster.
Search for and select the VM to assign the GPU partition to. The list automatically populates the VMs that reside on the server that you selected in step 2.
If a GPU partition is already assigned to a VM, that VM appears as grayed out.
Select all the VMs at once by selecting the Select All checkbox.
Select the available VRAM options. The value in this field must match the size of the partition count that you configured.
(Optional, but recommended) Select the Configure offline action for force shutdown checkbox if you want your VM to be highly available and failover if its host server goes down.
Select Assign partition. This assigns a partition of the selected VRAM size to the selected VM on the selected host server.
You should now be ready to power on a vGPU-enabled VM.
Unassign a Partition from a VM#
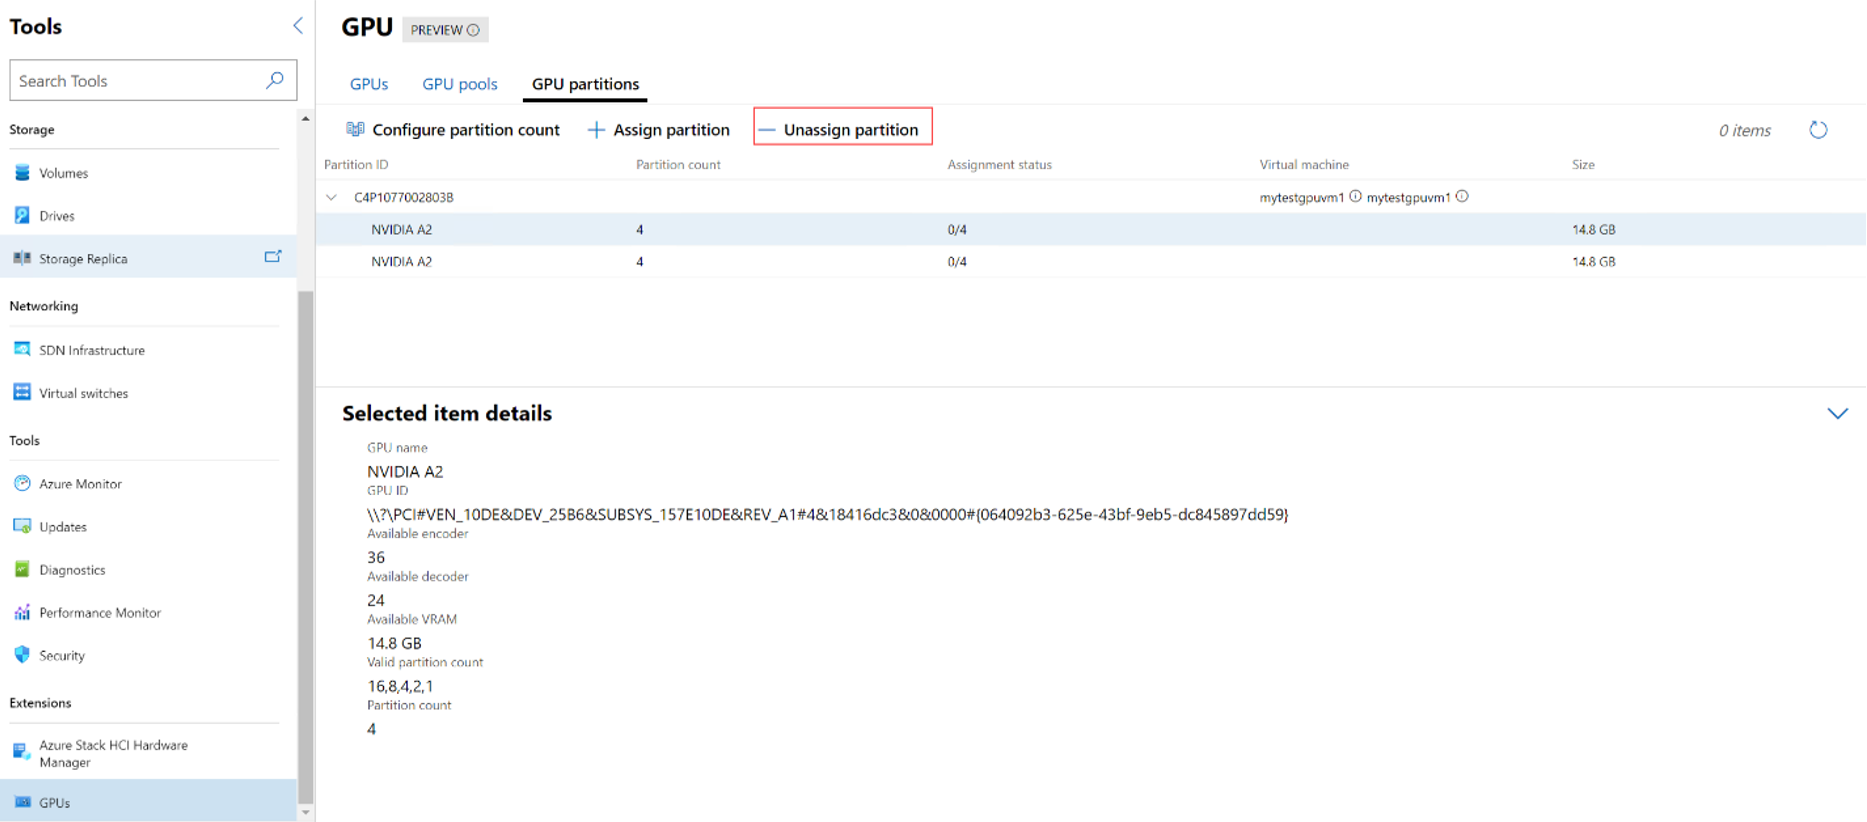
On the GPU partitions tab, select the GPU partition that you want to unassign.
Select - Unassign partition.
From Choose the server list, select the server that has the GPU partition that you want to unassign.
From Choose virtual machine to unassign partition from list, search, or select the VM to unassign the partition from.
Select Unassign partition.
Note
Note: If your VM is currently turned on or running, Windows Admin Center automatically turns it off first, unassigns the partition, and then automatically turns it on.
Using GPU-enabled Instances with Clustered VMs#
You can also use GPU-enabled instances with clustered VMs. Clustered VMs can take advantage of GPU acceleration, and clustering capabilities such as high availability via failover. Live migrating VMs is currently supported.
Prepare the Cluster and Assign a VM to a GPU Resource Pool#
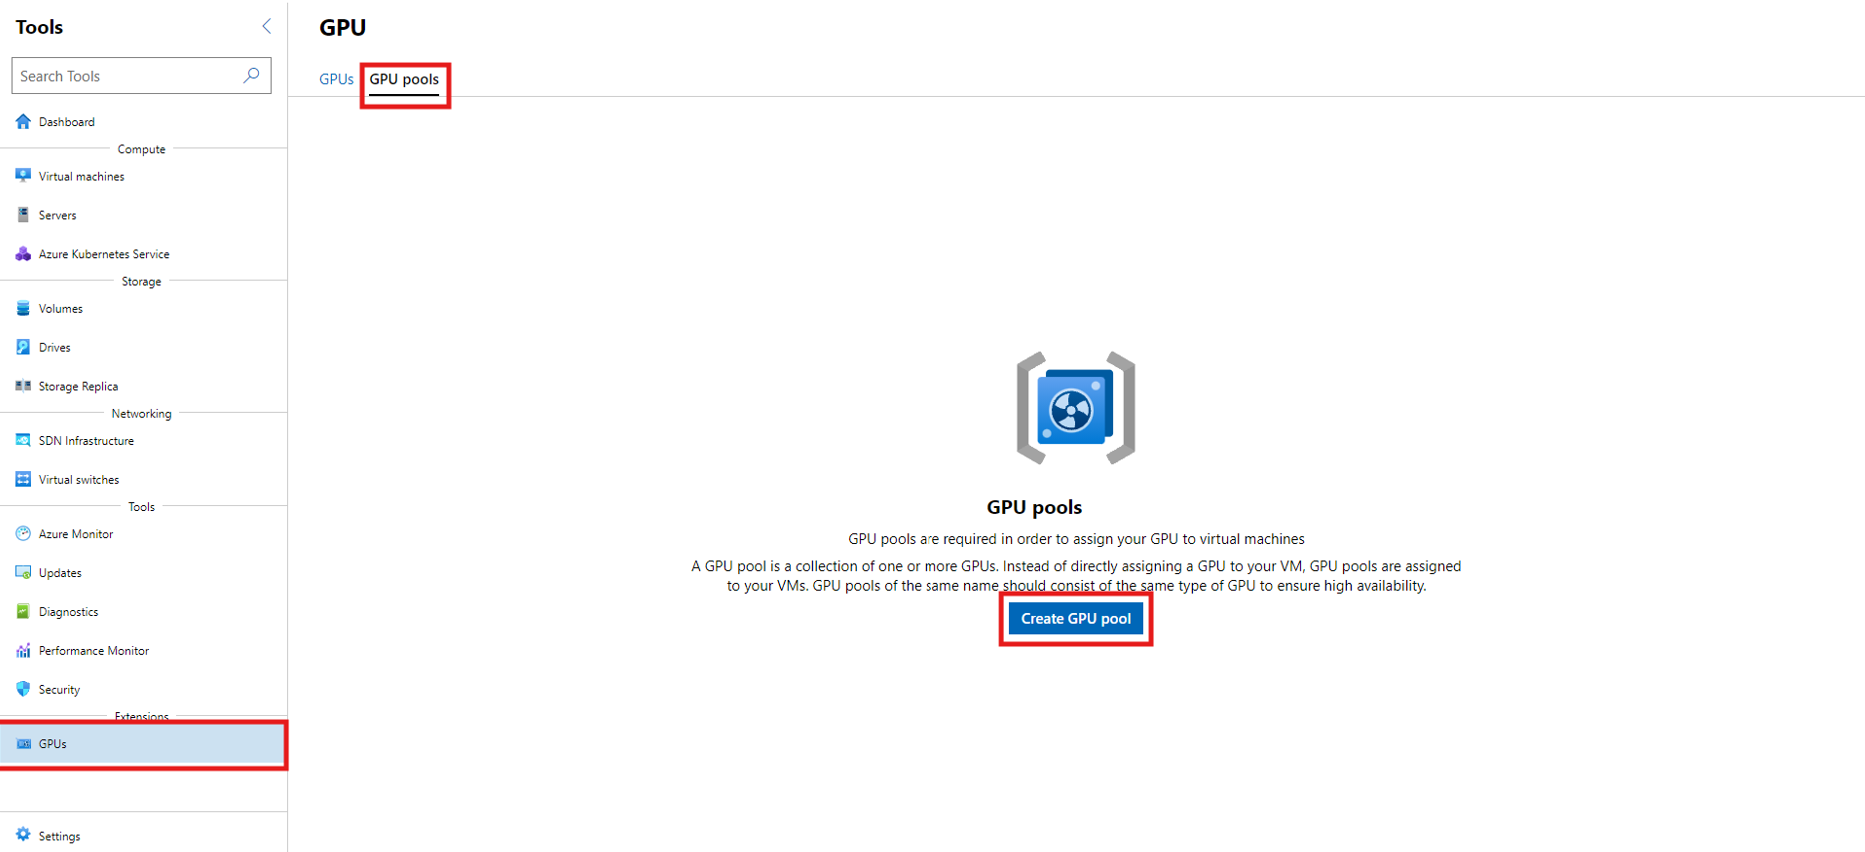
On the Tools menu, under Extensions, select GPUs to open the tool.
On the tool’s main page, select the GPU pools tab, and then select Create GPU pool.
On the New GPU pool page, specify the following and then select Save:
Server name
GPU pool name
GPUs that you want to add to the pool
After the process completes, you’ll receive a success prompt that shows the name of the new GPU pool and the host server.
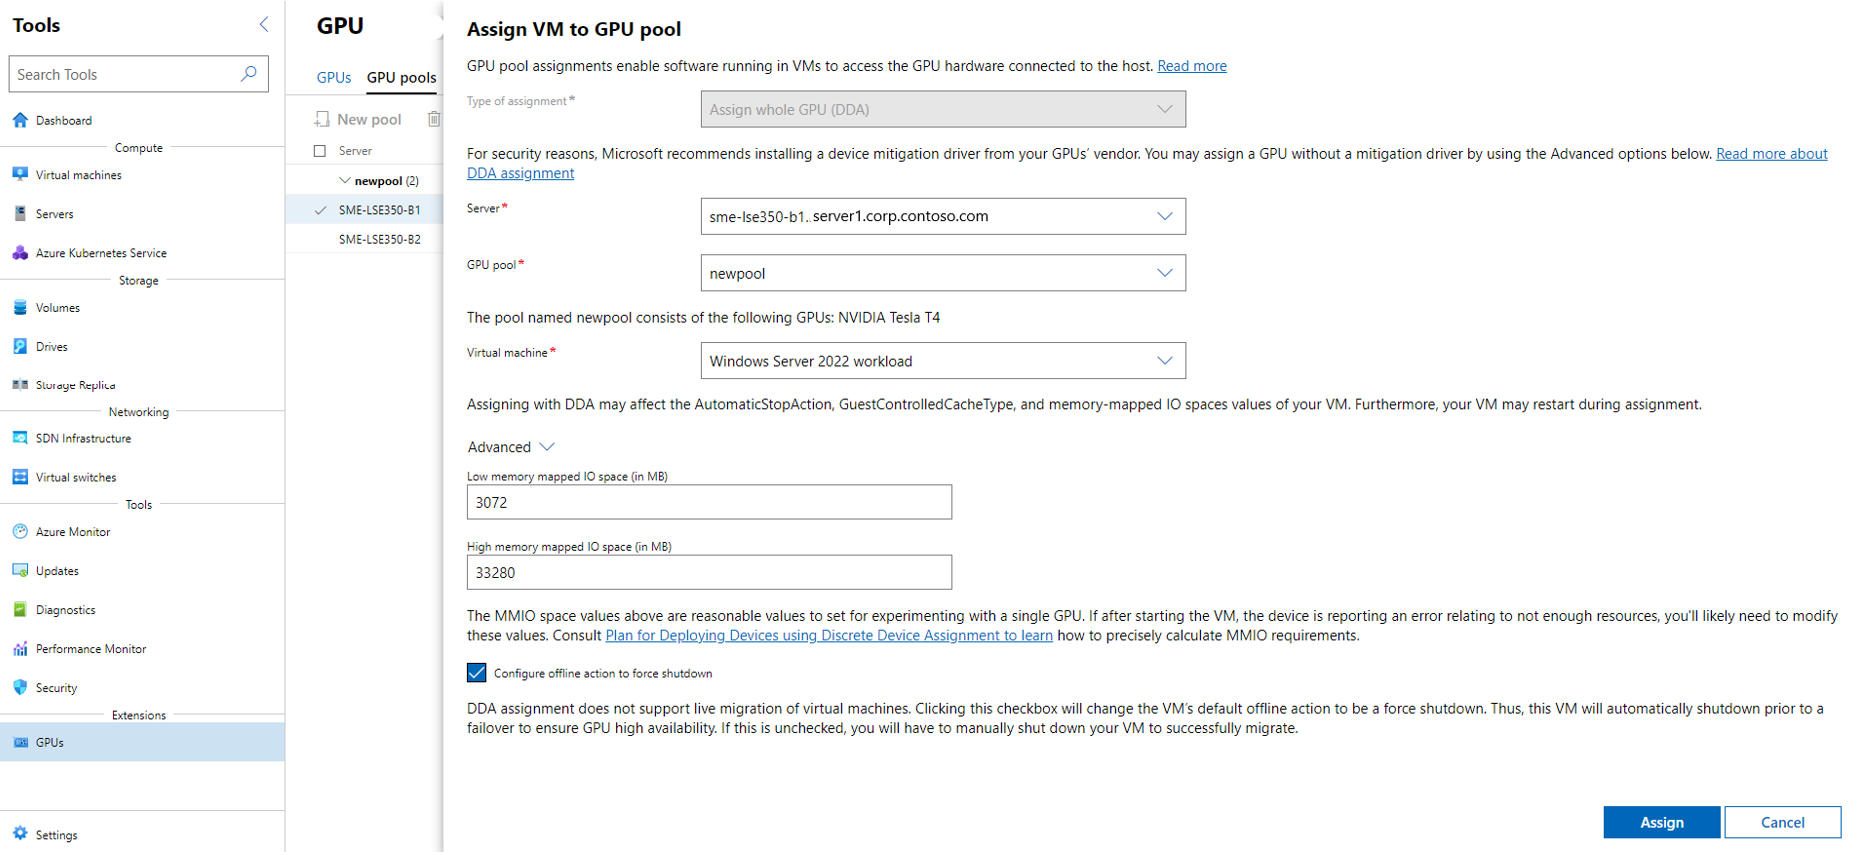
On the Assign VM to GPU pool page, specify the following and then select Assign:
After the process completes, you’ll receive a confirmation prompt that shows you successfully assigned the GPU from the GPU resource pool to the VM, which displays under Assigned VMs.
Unassign a VM from a GPU resource pool#
This step is used to remove a VM from using a GPU-enabled instance in a clustered environment. If you no longer require a clustered VM to utilize GPU resources, follow these steps:
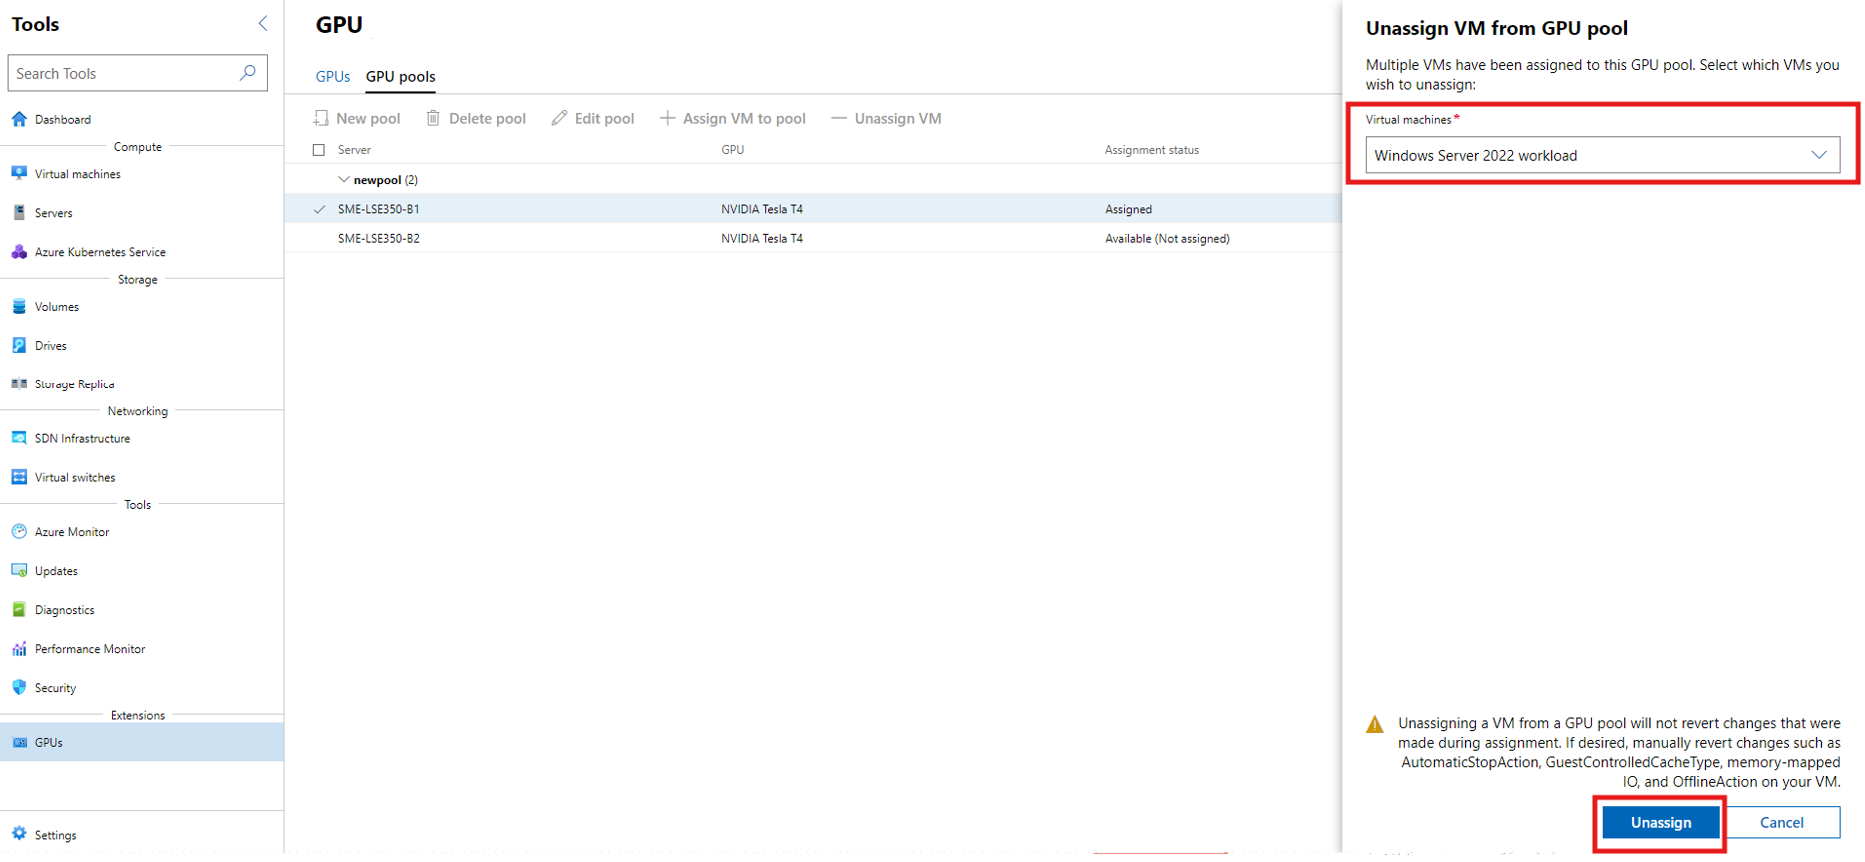
On the GPU pools tab, select the GPU that you want to unassign, and then select Unassign VM.
On the Unassign VM from GPU pool page, in the Virtual machines list box, specify the name of the VM, and then select Unassign.
After the process completes, you’ll receive a success prompt that the VM has been unassigned from the GPU pool, and under Assignment status the GPU shows Available (Not assigned).
Live Migration With GPU Partitioning#
You can now migrate VMs on Azure Local; for the different migration options, see this overview.
