Installing Azure Stack HCI
Disclaimer
The content regarding Azure Stack HCI Deployment in this guide has been sourced from Azure documentation. For the most current and detailed information, please refer to the official Azure documentation.
Azure Stack HCI is a hyper-converged infrastructure (HCI) solution designed to accommodate both Windows and Linux virtual machines (VMs) or containerized workloads, along with their storage needs. Serving as a hybrid product, it establishes connectivity between on-premises systems and Azure, facilitating access to cloud-based services, and providing monitoring and management capabilities.
You need to prepare your Active Directory environment before deploying Azure Stack HCI. Active Directory requirements for Azure Stack HCI include:
A dedicated Organization Unit (OU).
Group policy inheritance that is blocked for the applicable Group Policy Object (GPO).
A user account that has all rights to the OU in the Active Directory.
Download and install the AsHciADArtifactsPreCreationTool module, version 2402, from the PowerShell Gallery. Run the following command from the folder where the module is located:
Install-Module AsHciADArtifactsPreCreationTool -Repository PSGallery -Force
A pop-up requiring you to install the NuGet provider should appear. Click “Yes” to install it.

Another pop-up may appear, indicating that the modules are from an untrusted repository. Click “Yes to all” to allow the installation to proceed.

When you prepare Active Directory, you create a dedicated Organizational Unit (OU) to place the Azure Stack HCI related objects such as deployment users.
To create a dedicated OU, follow these steps:
Sign in to a computer that is joined to your Active Directory domain.
Run PowerShell as administrator.
Run the following command to create the dedicated OU.
New-HciAdObjectsPreCreation -AzureStackLCMUserCredential(Get-Credential) -AsHciOUName "<OU name or distinguished name including the domain components>"
A pop-up should appear. When prompted, provide the username and password for the deployment.
The username should not include the domain name, for example, contoso username. The username must be between 1 to 64 characters and only contain letters, numbers, hyphens, and underscores and may not start with a hyphen or number.
Make sure that the password meets complexity and length requirements. Use a password that is at least 12 characters long and contains: a lowercase character, an uppercase character, a numeral, and a special character.
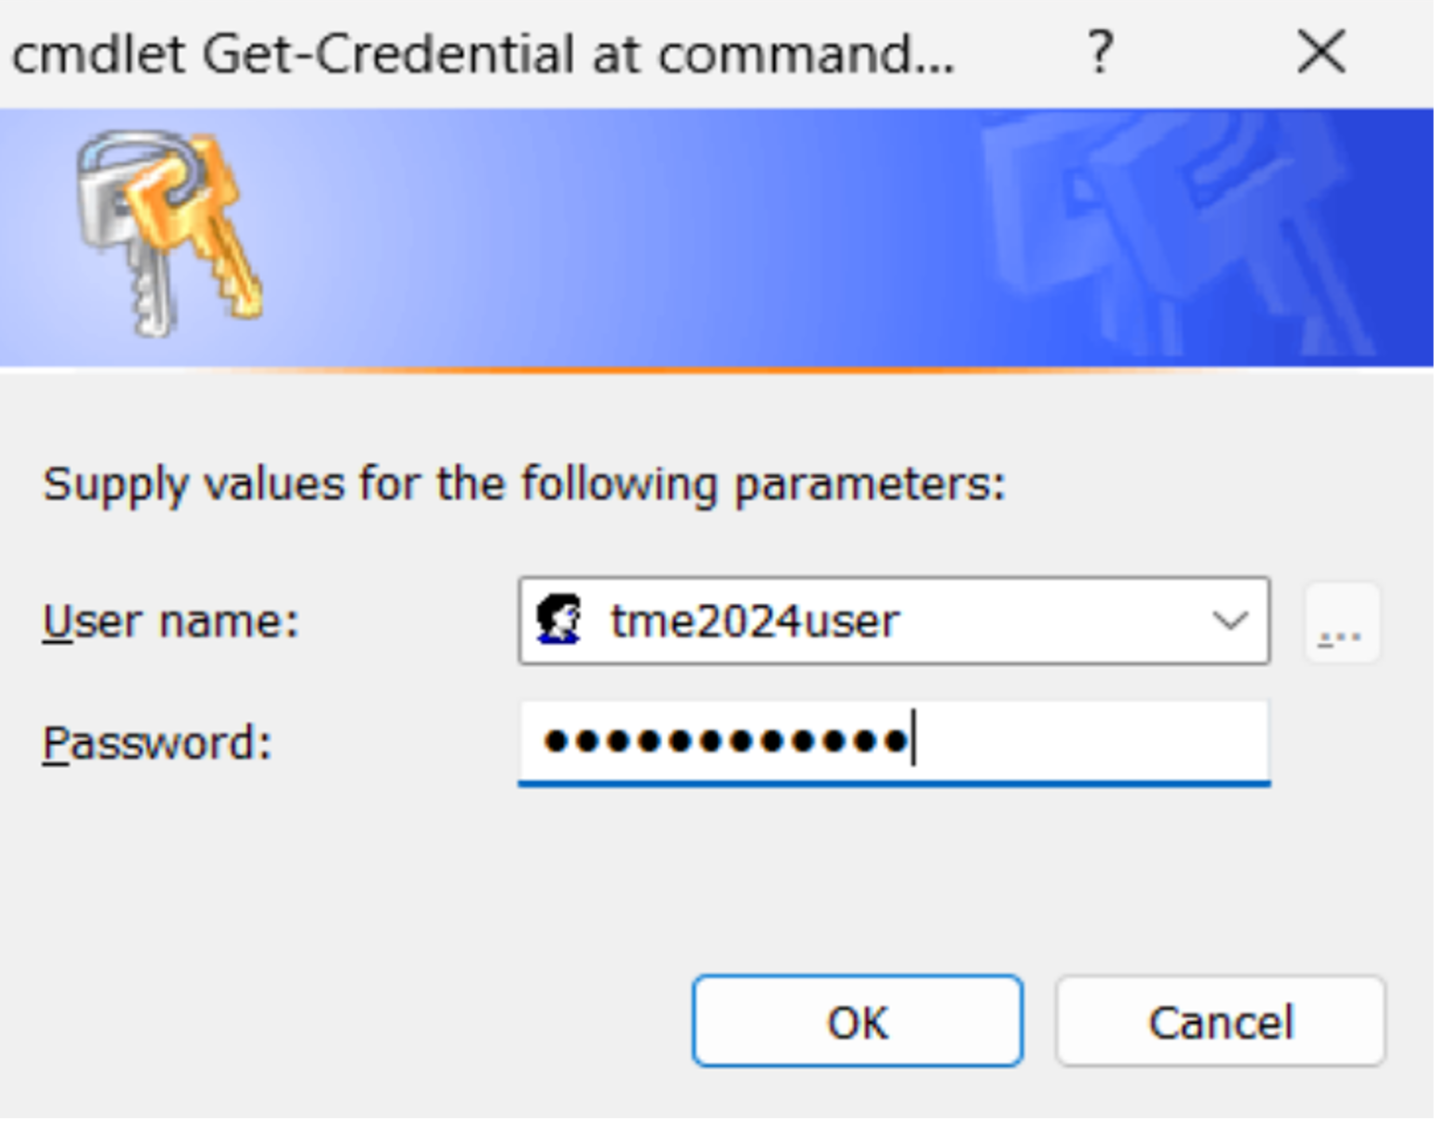
Here is a sample output from a successful completion of the script:
            PS C:\work> $user = "tme2024user"
PS C:\work> $credential = New-Object
System.Management.Automation.PSCredential ($user, $password)
PS C:\work> New-HciAdObjectsPreCreation -AzureStackLCMUserCredential
$credential -AsHciOUName
"OU=tme2024,DC=PLab8,DC=nttest,DC=microsoft,DC=com"
PS C:\work>
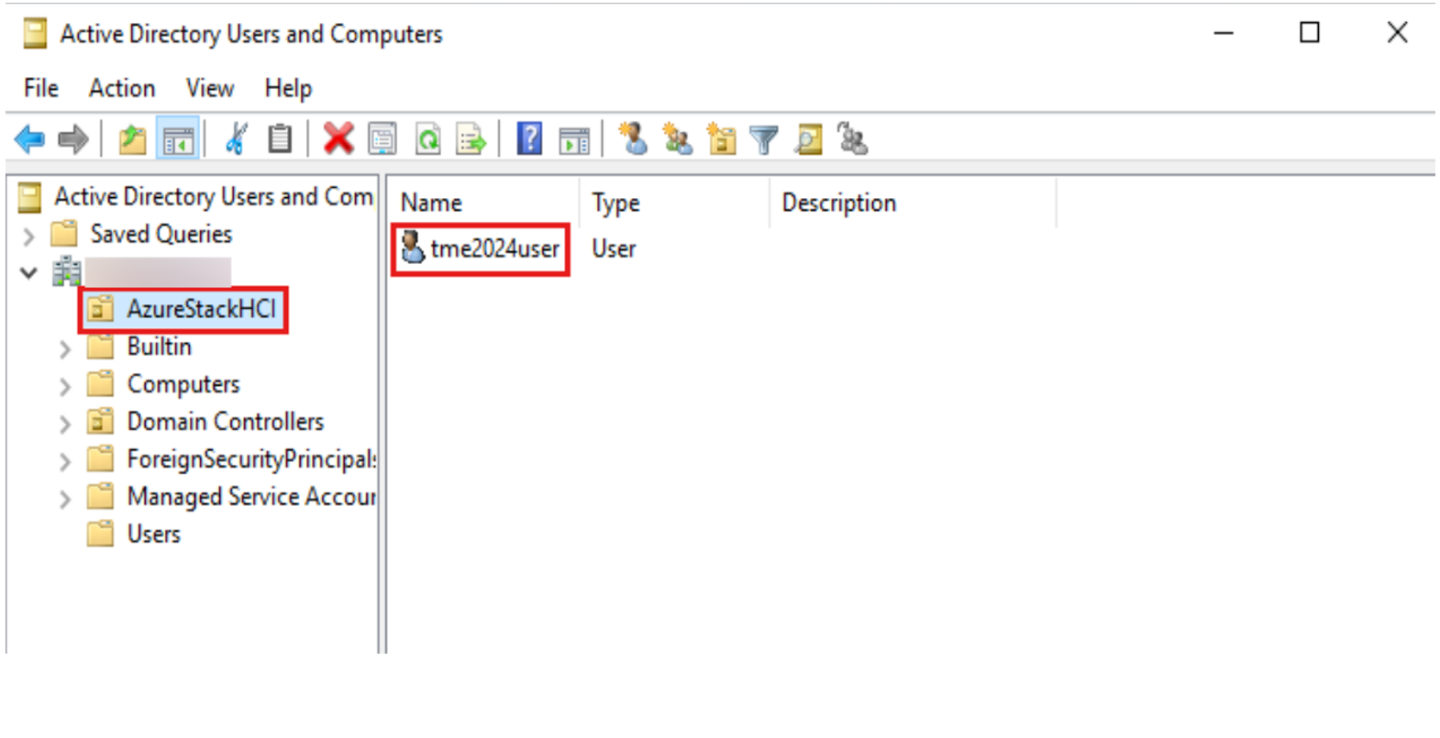
Verify that the OU is created. If using a Windows Server client, go to Server Manager > Tools > Active Directory Users and Computers.
An OU with the specified name should be created and within that OU, you’ll see the deployment user.
The first step in deploying Azure Stack HCI, version 23H2 is to download Azure Stack HCI software from the Azure portal. If you’ve purchased Azure Stack HCI Integrated System solution hardware from the Azure Stack HCI Catalog through your preferred Microsoft hardware partner, the Azure Stack HCI software should be pre-installed.
If not already signed in, sign in to the Azure portal with your Azure account credentials.
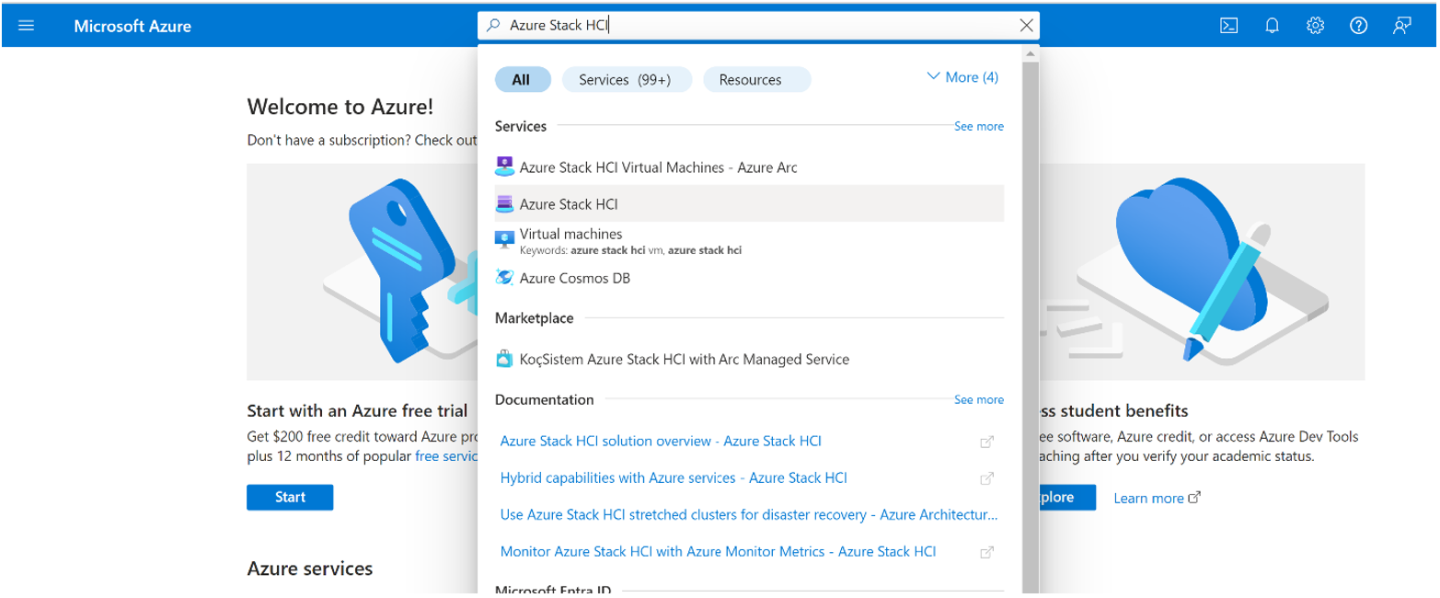
In the Azure portal search bar at the top, enter Azure Stack HCI. Select Azure Stack HCI under the Services category.
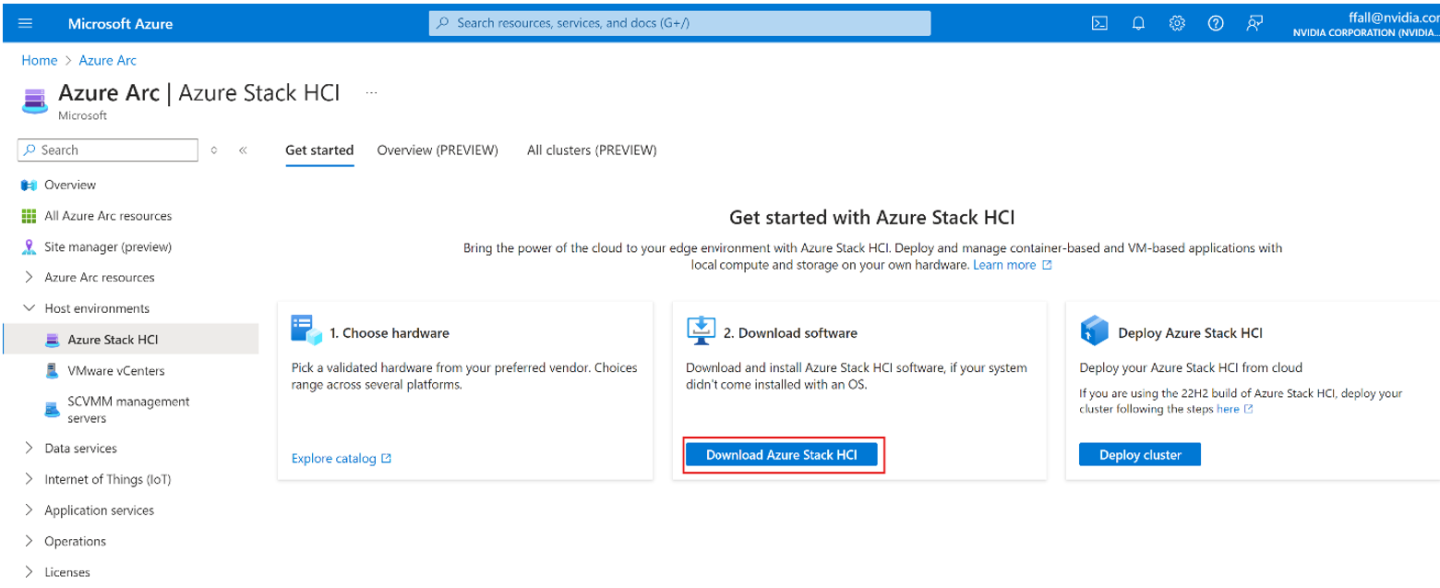
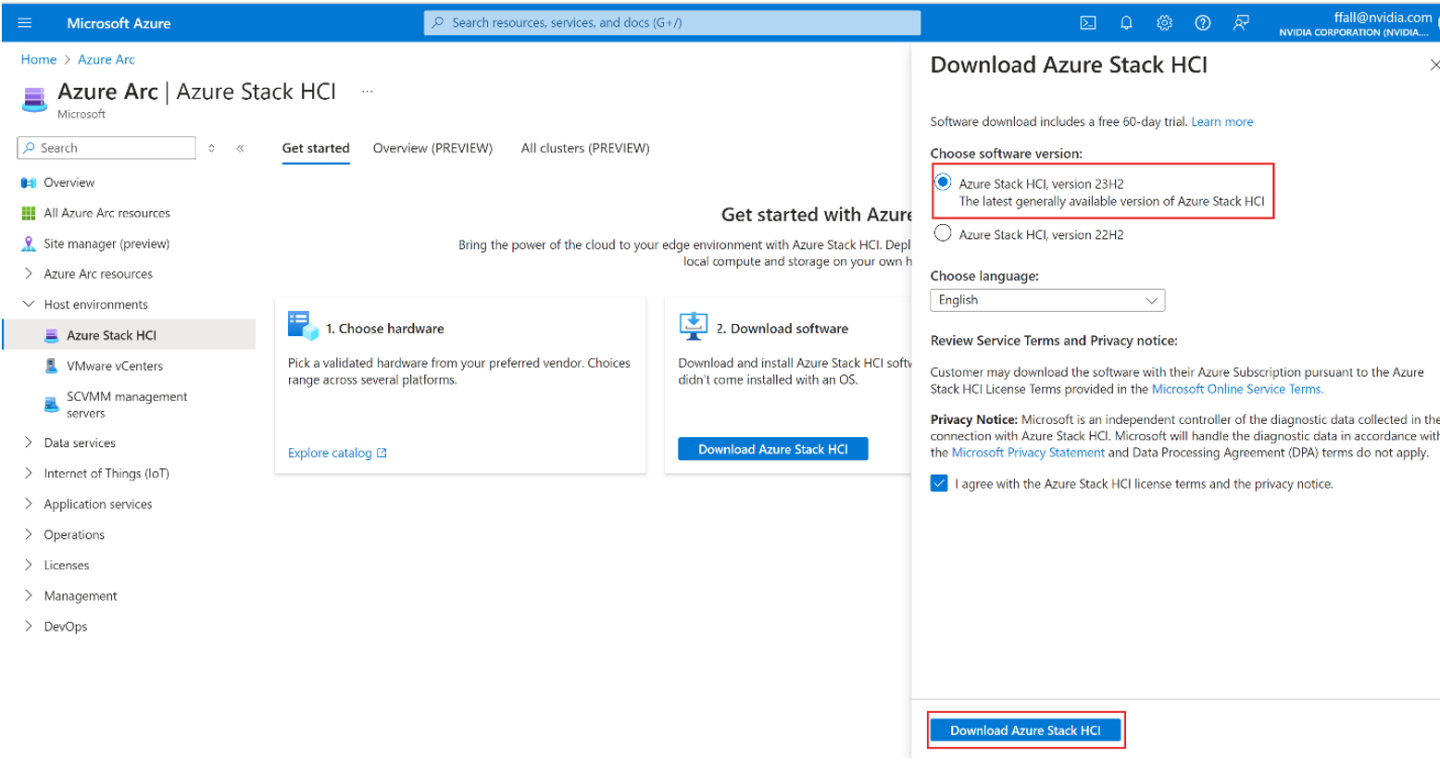
You should be redirected to the Get started page with the Get started tab selected by default. On the Get started tab, under the Download software tile, select Download Azure Stack HCI.
On the Download Azure Stack HCI page on the right, do the following:
Choose the desired software version. By default, the latest generally available version of Azure Stack HCI is preselected.
From the dropdown list, select your preferred language. Opt for English to procure the English version of the software.
Use the ISO for the language you wish to install in. You should download a VHDX only if you are performing virtual deployments. To download the VHDX in English, select English VHDX from the dropdown list.
Select the “Azure Stack HCI, version 23H2” option.
Review service terms and privacy notice.
Checkmark the license terms and privacy notice checkbox.
Proceed by clicking the “Download Azure Stack HCI” button. This initiates the download process.
The next steps are to boot the servers and install the OS.
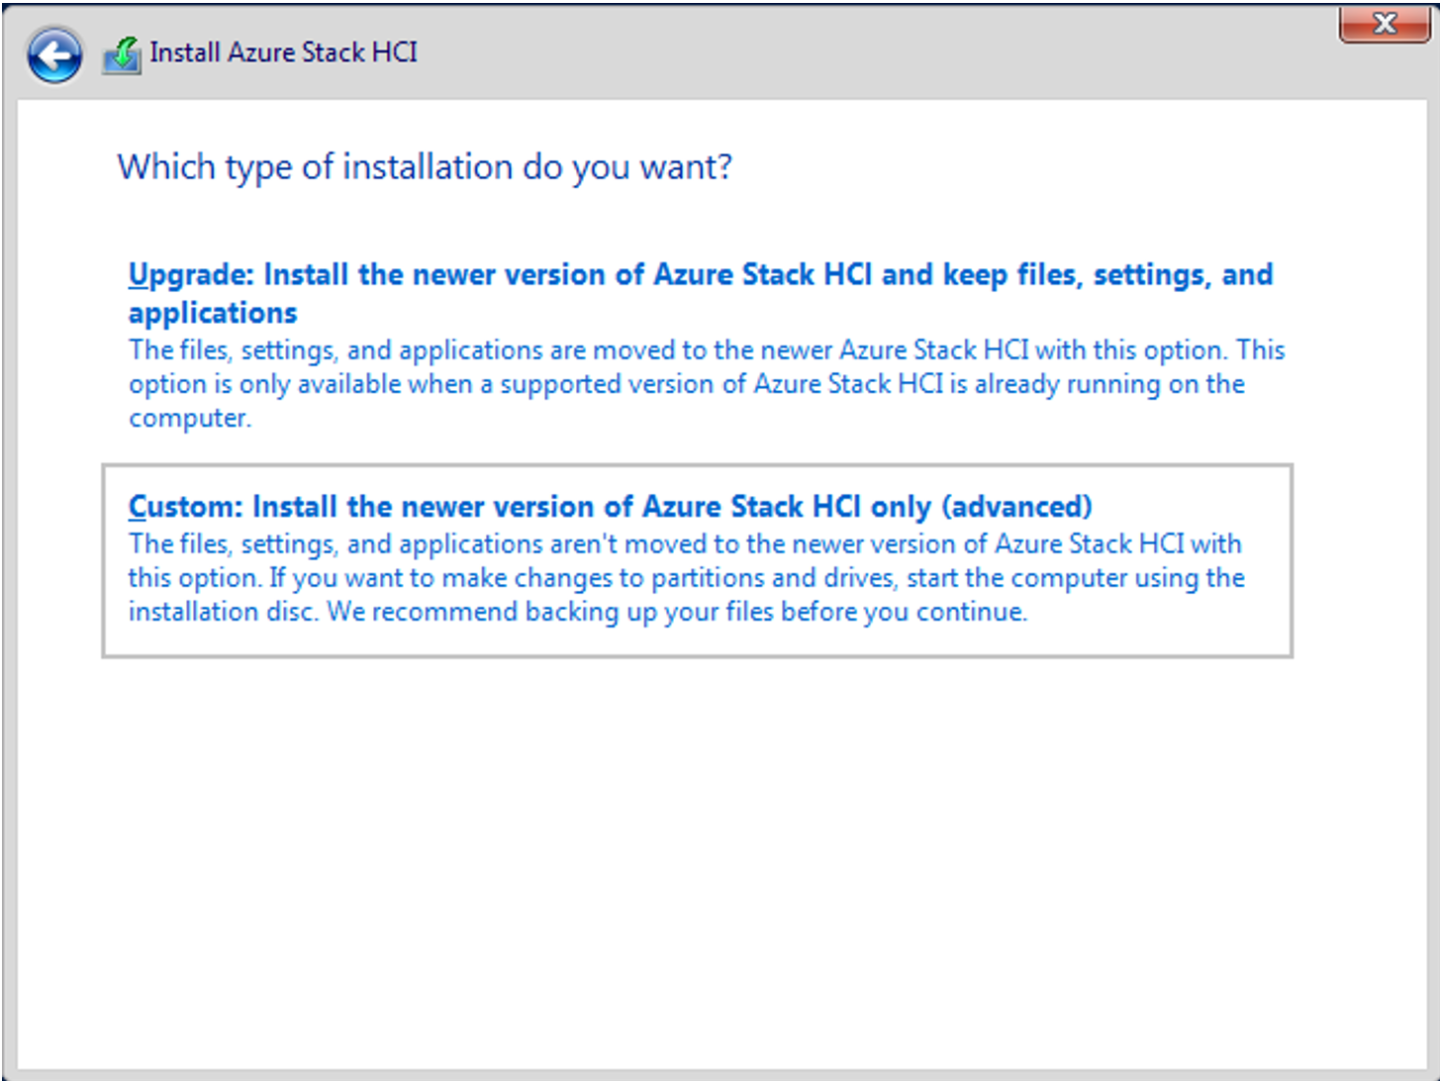
Start the Install Azure Stack HCI wizard on the system drive of the server where you want to install the operating system.
When prompted the type of installation you want, select Custom: Install the newer version of Azure Stack HCI only (advanced).
At the Administrator command prompt, confirm the password change for the user by selecting Ok before logging into the operating system, and then press Enter.
When prompted to enter a new credential for Administrator at the Enter new credential for Administrator prompt, input a new password, then press Enter to proceed.

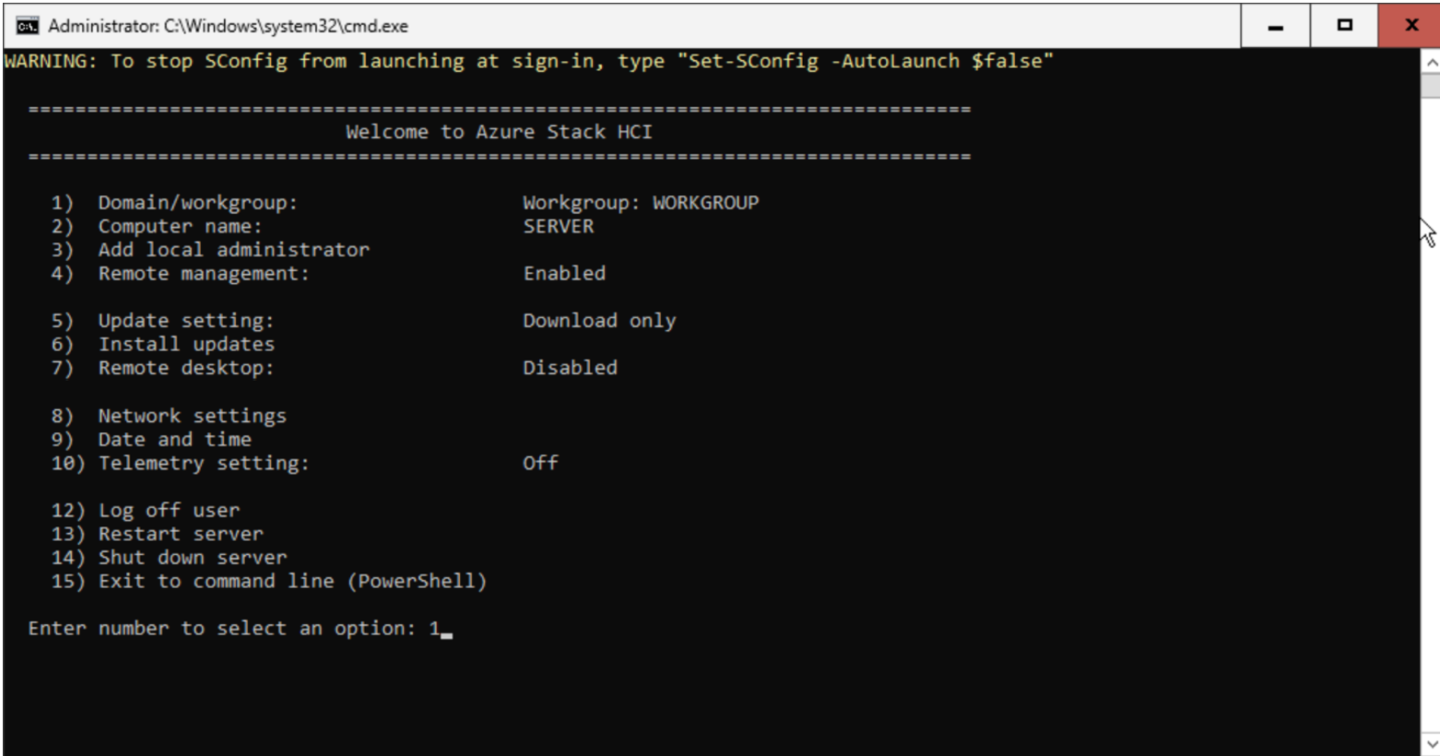
Follow these steps to configure the operating system using SConfig:
Install the latest drivers and firmware following the manufacturer’s instructions. Utilize SConfig to run driver installation apps, and restart servers after installation.
Configure networking as per your environment. You can configure the following optional settings:
Configure VLAN IDs for the management network. For more information, see Management VLAN ID and Management VLAN ID with a virtual switch.
Configure DHCP for the management network. For more information, see DHCP IP assignment.
Configure a proxy server. For more information, see Configure proxy settings for Azure Stack HCI, version 23H2.
Use the Network Settings option in SConfig to configure a default valid gateway and a DNS server. Set DNS to the DNS of the domain you’re joining.
Ensure a valid time server is configured on each server. Verify time source status using the following command:
w32tm /query /status
Set a valid time source using the following command:
w32tm /config /manualpeerlist:"pool.ntp.org" /syncfromflags:manual /update
Confirm that the time is successfully synchronizing using the new time server:
w32tm /query /status
Once the server is domain joined, it synchronizes its time from the PDC emulator.
(Optional) Enable RDP and access each server through RDP for simplified configuration.
Clean all the non-OS drives for each server that you intend to deploy. Remove any virtual media that have been used when installing the OS. Also, validate that no other root drives exist.
Restart the servers.
Set the local administrator credentials to be identical across all servers.
Use the Domain/Workgroup settings option to register to your domain.
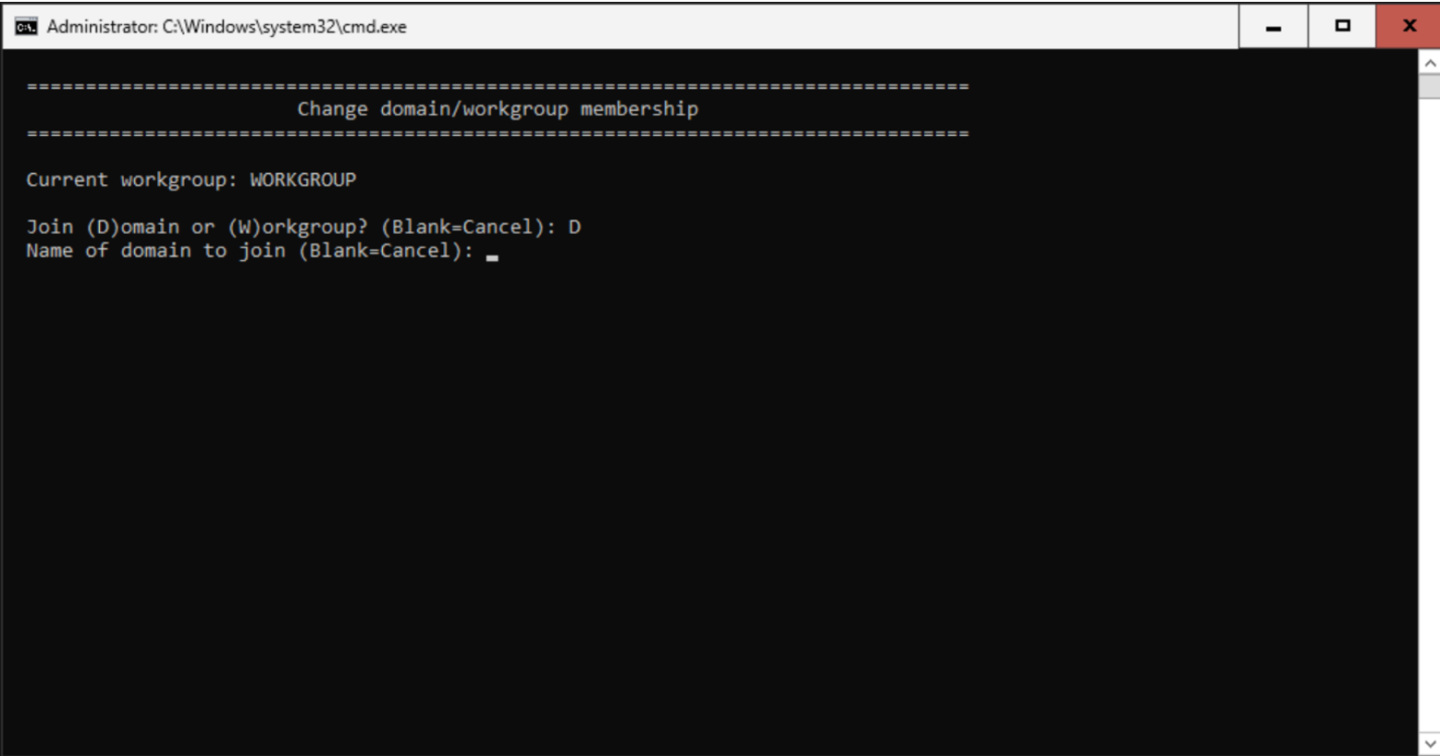
Type ‘D’ to join a Domain, then enter the name of the domain you’ve created.
Enter your username and password.
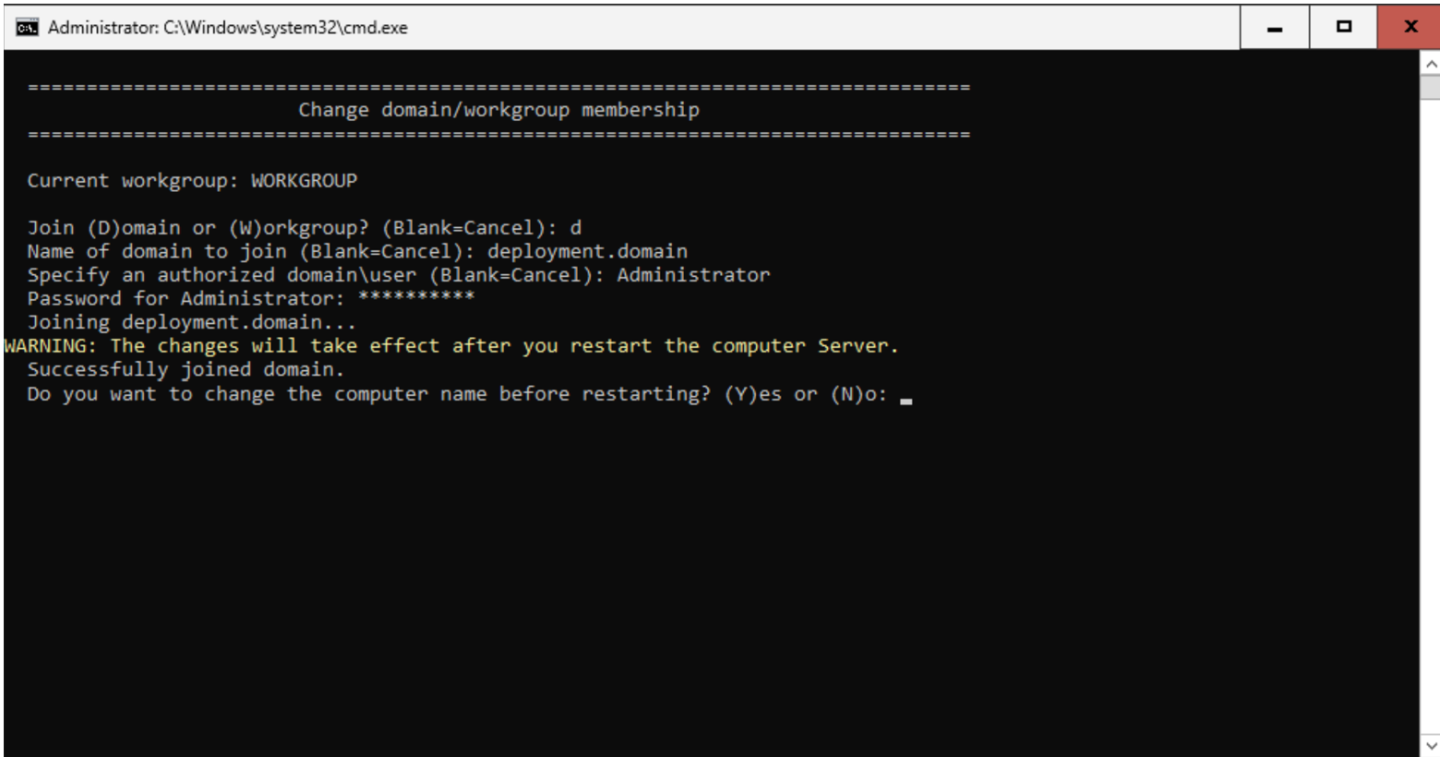
After entering your username and password, your Azure Stack HCI OS instance will be successfully registered to the domain, enabling seamless integration into your Active Directory environment.
Install the Hyper-V role. Run the following command on each server of the cluster:
Enable-WindowsOptionalFeature -Online -FeatureName Microsoft-Hyper-V -All
Your servers will restart.
Install the Arc registration script from PSGallery.
In PowerShell, use the following commands:
Register PSGallery as a trusted repo.
Register-PSRepository -Default -InstallationPolicy Trusted
Install Arc registration script from PSGallery.
Install-Module AzsHCI.ARCinstaller

Install the required PowerShell modules in your node for registration.
            Install-Module Az.Accounts -Force
Install-Module Az.ConnectedMachine -Force
Install-Module Az.Resources -Force
Set the parameters.
Define the subscription where you want to register your server as Arc device.
$Subscription = "YourSubscriptionID"
Define the resource group where you want to register your server as Arc device. A resource group is created if one doesn’t exist.
$RG = "YourResourceGroupName"
Define the region you will use to register your server as Arc device. See the Supported that can be used.
$Region = "eastus"
Define the tenant you will use to register your server as Arc device. To find your tenant ID, in the Azure portal go to Microsoft Entra ID > Properties, then scroll down to the Tenant ID section and you can find your tenant ID.
$Tenant = "YourTenantID"
Connect to your Azure account and set the subscription. You’ll need to open a browser on the client that you’re using to connect to the server and open this page: https://microsoft.com/devicelogin and enter the provided code in the Azure CLI output to authenticate. Get the access token and account ID for the registration.
Connect to your Azure account and Subscription.
Connect-AzAccount -SubscriptionId $Subscription -TenantId $Tenant -DeviceCode
Get the Access Token for the registration.
$ARMtoken = (Get-AzAccessToken).Token
Get the Account ID for the registration.
$id = (Get-AzContext).Account.Id
Run the Arc registration script. The script takes a few minutes to run. If you’re accessing the internet via a proxy server, you need to pass the -proxy parameter and provide the proxy server as http://<Proxy server FQDN or IP address>:Port when running the script.
Invoke-AzStackHciArcInitialization -SubscriptionID $Subscription -ResourceGroup $RG -TenantID $Tenant -Region $Region -Cloud "AzureCloud" -ArmAccessToken $ARMtoken -AccountID $id
After the script completes successfully on all the servers, verify that:
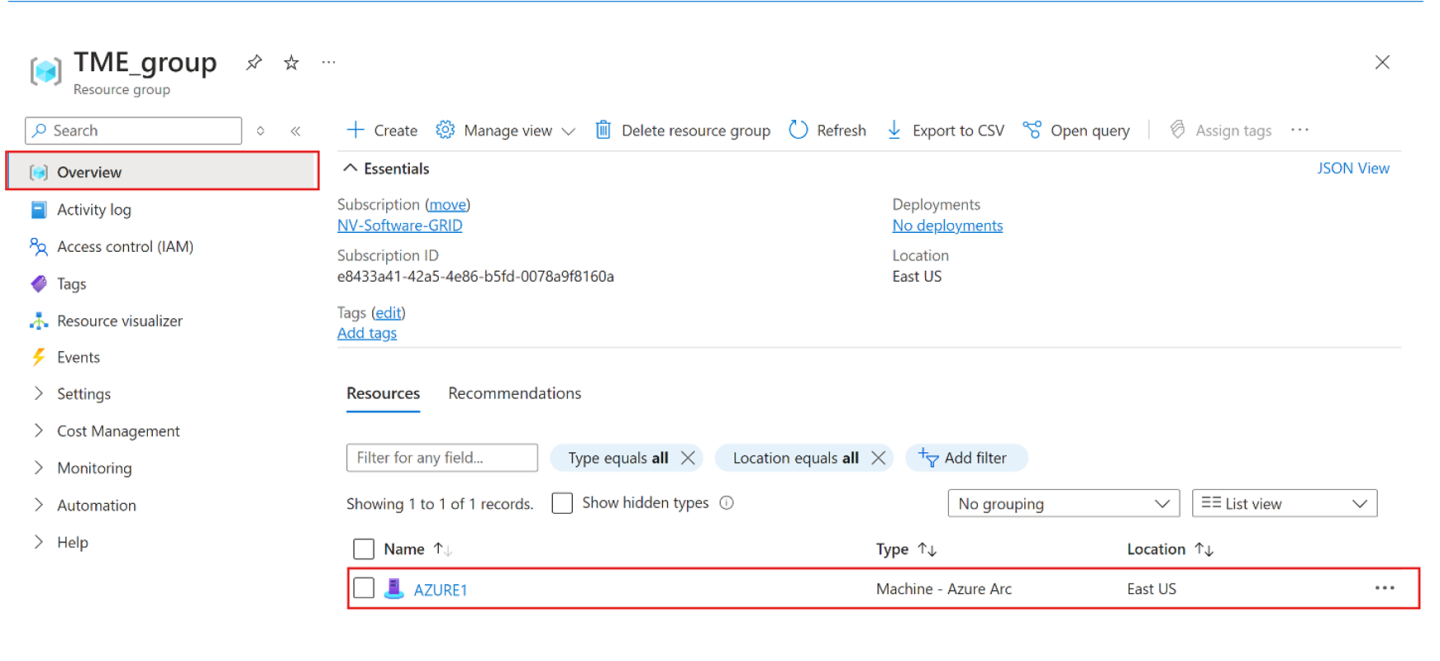
Your servers are registered with Arc. Go to the Azure portal and then go to the resource group associated with the registration. The servers appear within the specified resource group as Machine - Azure Arc type resources.
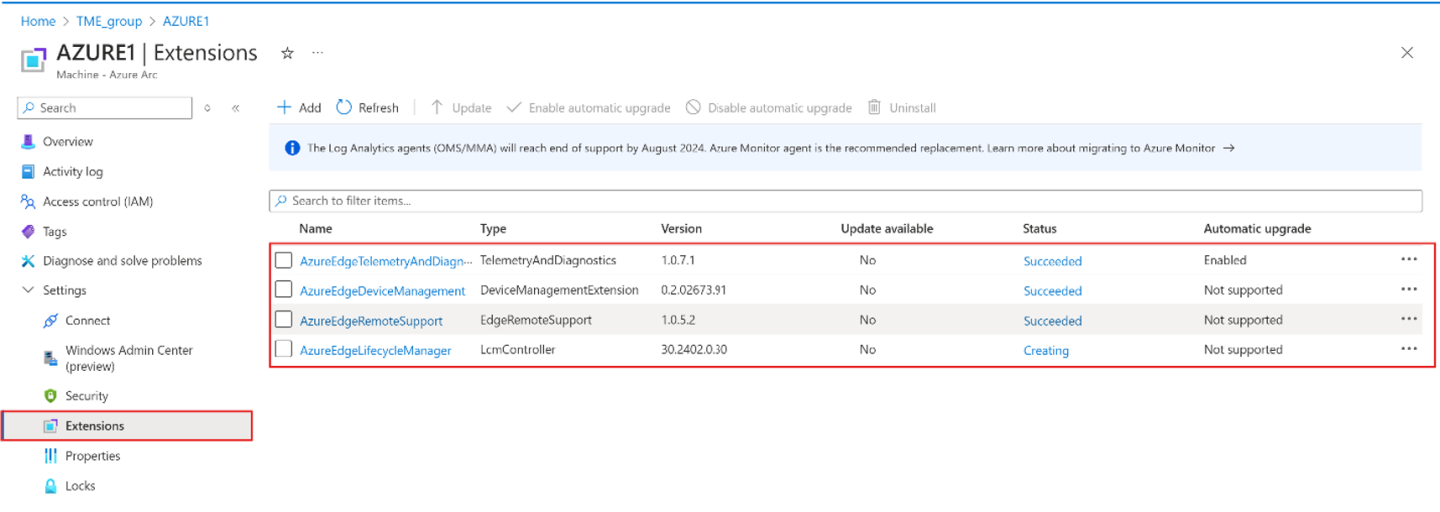
The mandatory Azure Stack HCI extensions are installed on your servers. From the resource group, select the registered server. Then under Settings go to the Extensions. The mandatory extensions show up in the right pane.
To assign Azure permissions for deployment from the Azure portal your subscription owner needs to:
In the Azure portal, go to the subscription used to register the servers. In the left pane, select Access control (IAM). In the right pane, select + Add and from the dropdown list, select Add role assignment and give you the following role permissions:
Azure Stack HCI Administrator
Cloud Application Administrator
Reader
Then following the same steps, assign the following permissions:
Key Vault Data Access Administrator: This permission is required to manage data plane permissions to the key vault used for deployment.
Key Vault Secrets Officer: This permission is required to read and write secrets in the key vault used for deployment.
Key Vault Contributor: This permission is required to create the key vault used for deployment.
Storage Account Contributor: This permission is required to create the storage account used for deployment.
You can now go to Role assignments in the right pane and verify that you have all the configured roles.
Create a Service Principal for Arc Resource Bridge (ARB)
Sign in Microsoft Entra admin center.
Browse to Identity > Applications > App registrations then select New registration. Provide a Name for the application, then select a Supported account type and Register.
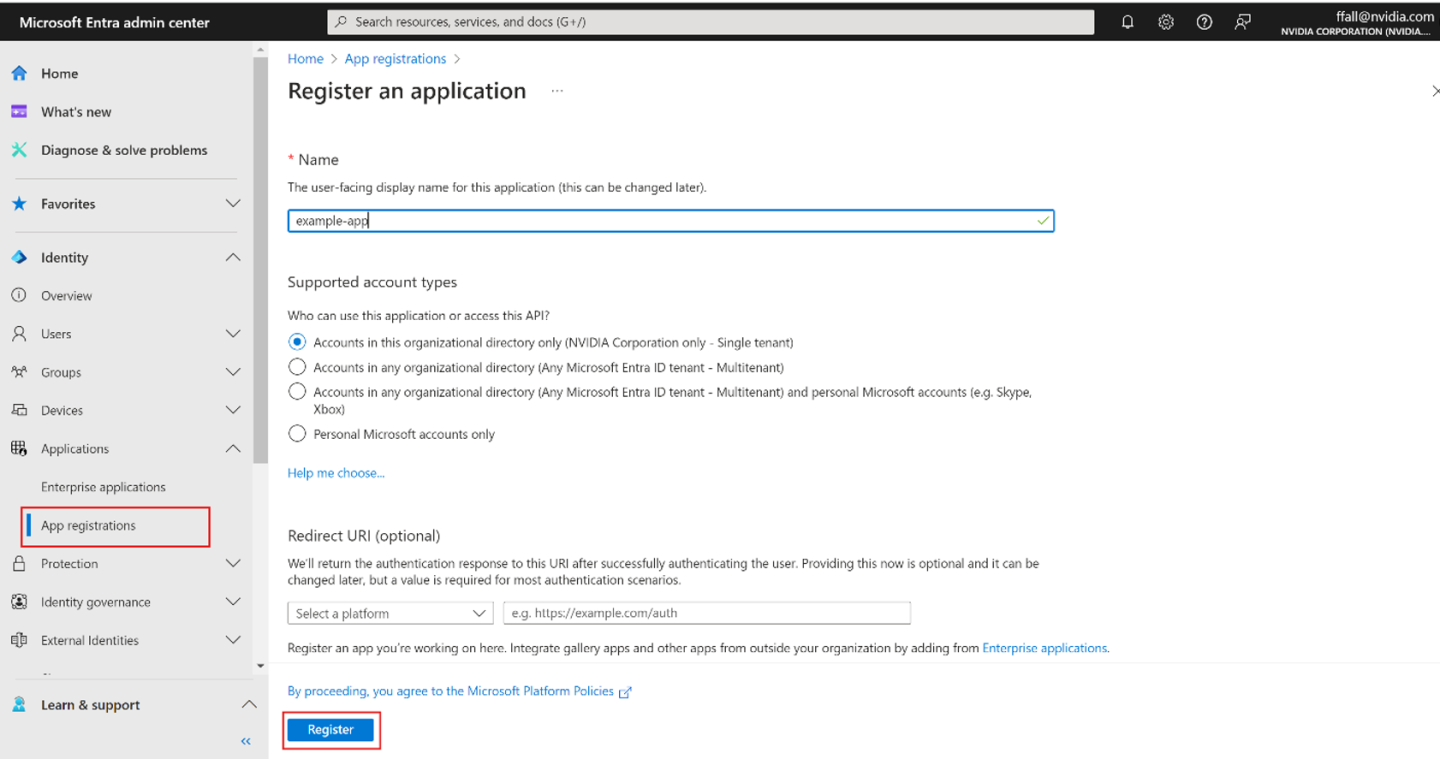
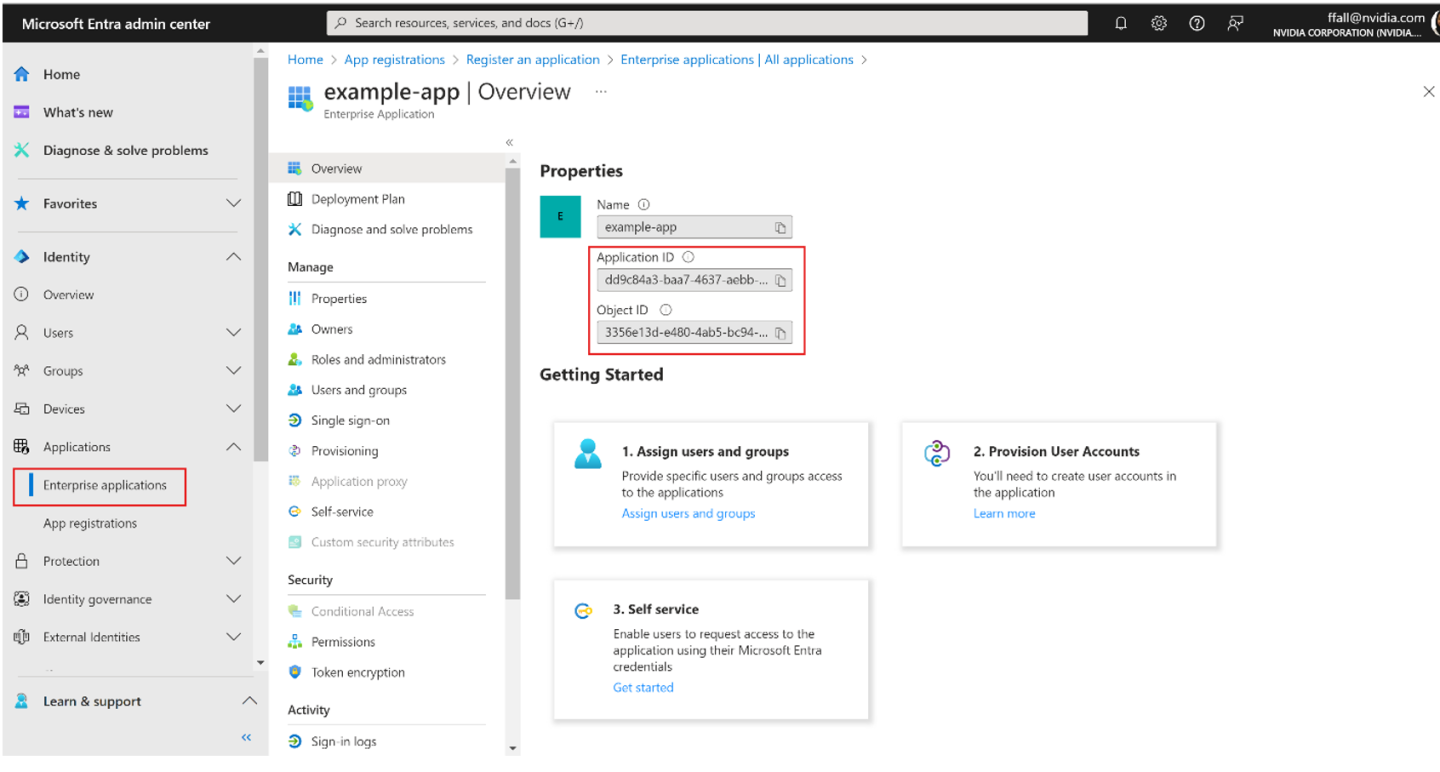
Go to the Enterprise applications page. Search for the Service Principal (SPN) you created and select the SPN.
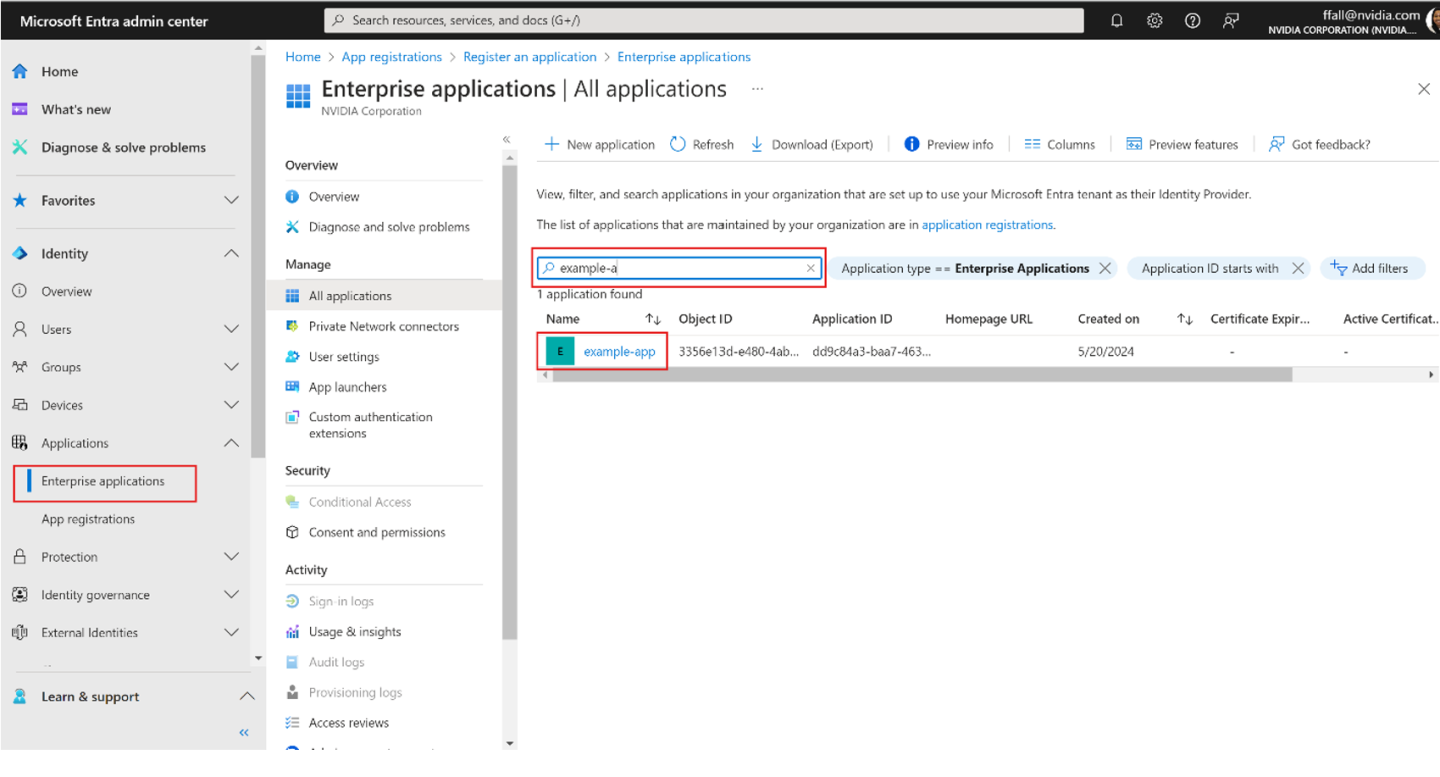
Copy the Application (client) ID and the Object ID for this service principal. The Application (client) ID will be used against the arbDeploymentAppID parameter and the Object ID against the arbDeploymentSPNObjectID parameter in the Resource Manager template.
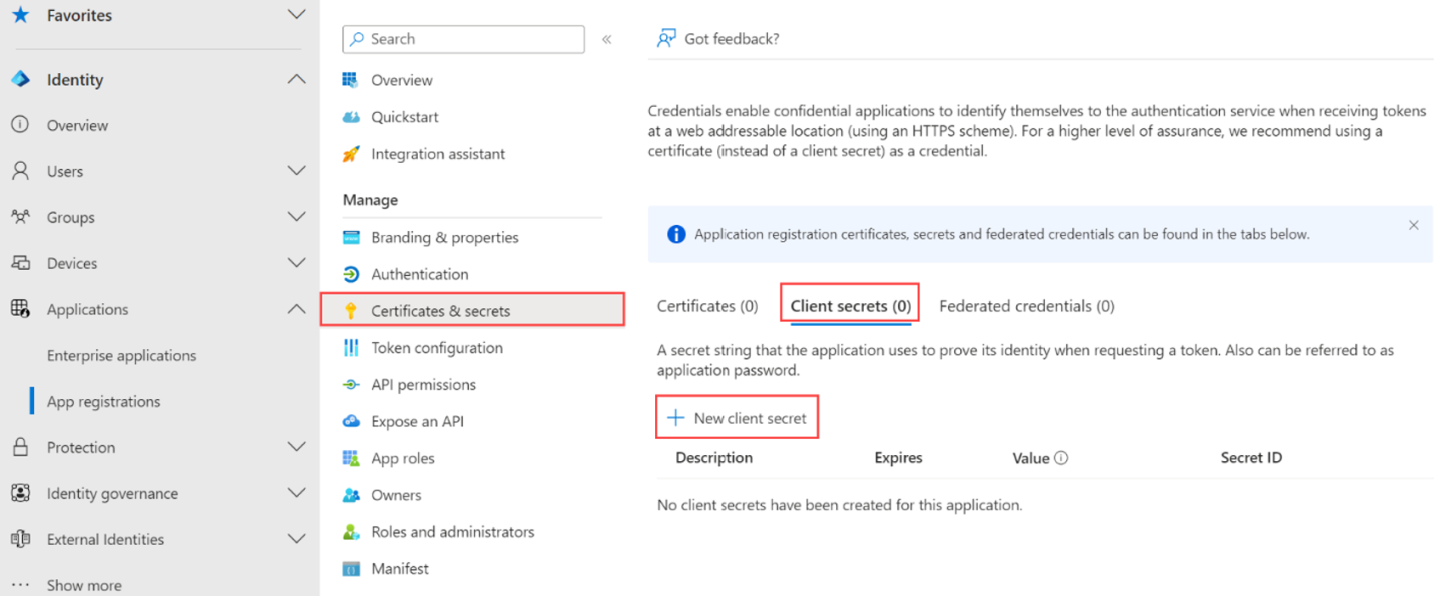
Create a Client Secret for ARB Service Principal
Go to the application registration that you created and browse to Certificates & secrets > Client secrets. Select + New Client secret.
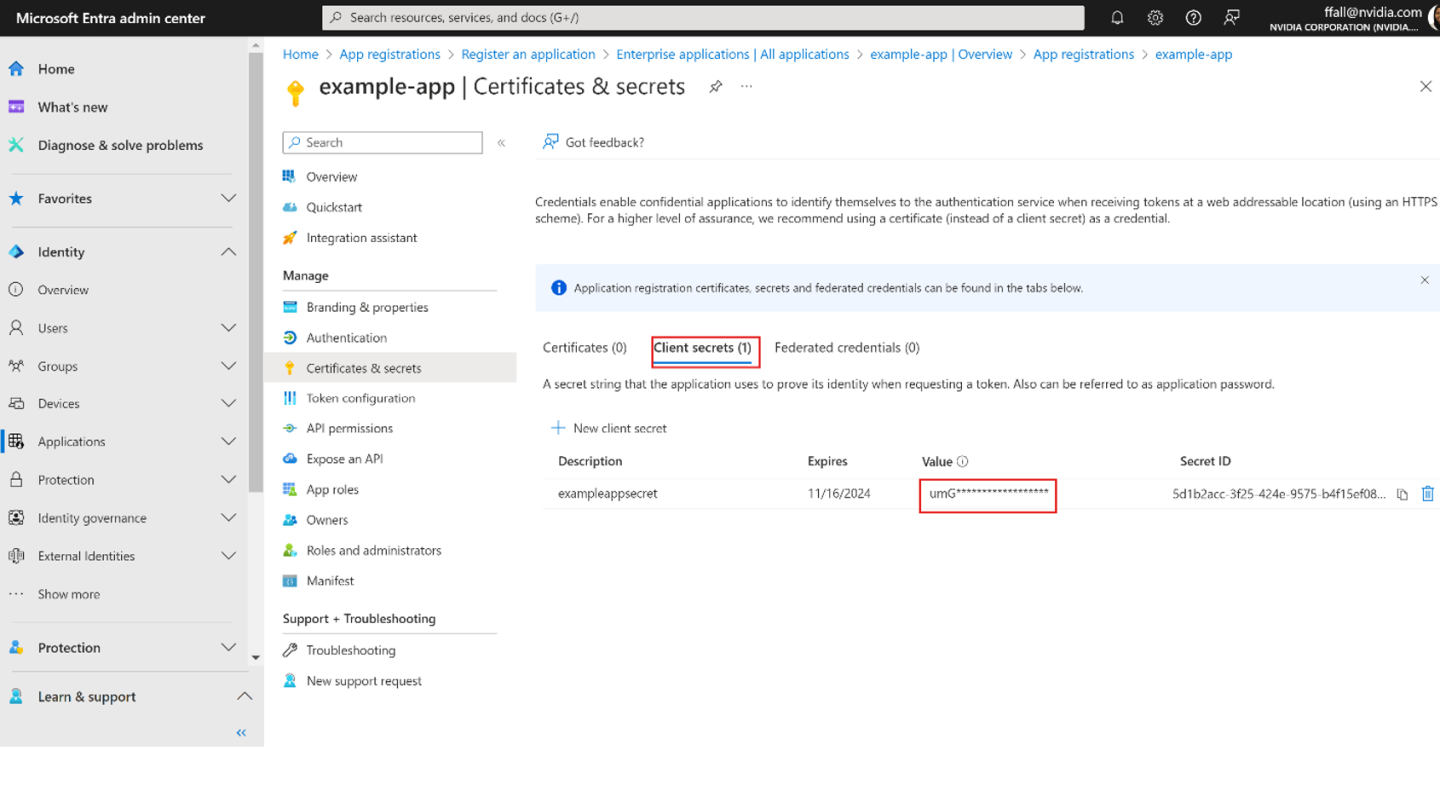
Add a Description for the client secret and provide a timeframe when it Expires. Select Add. Copy the client secret value as it will be used against the arbDeploymentAppSecret parameter in the Resource Manager template.
Get the Object Id for Azure Stack HCI Resource Provider
In the Azure portal, search for Microsoft Entra ID. Go to the Overview tab and search for Microsoft.AzureStackHCI Resource Provider.
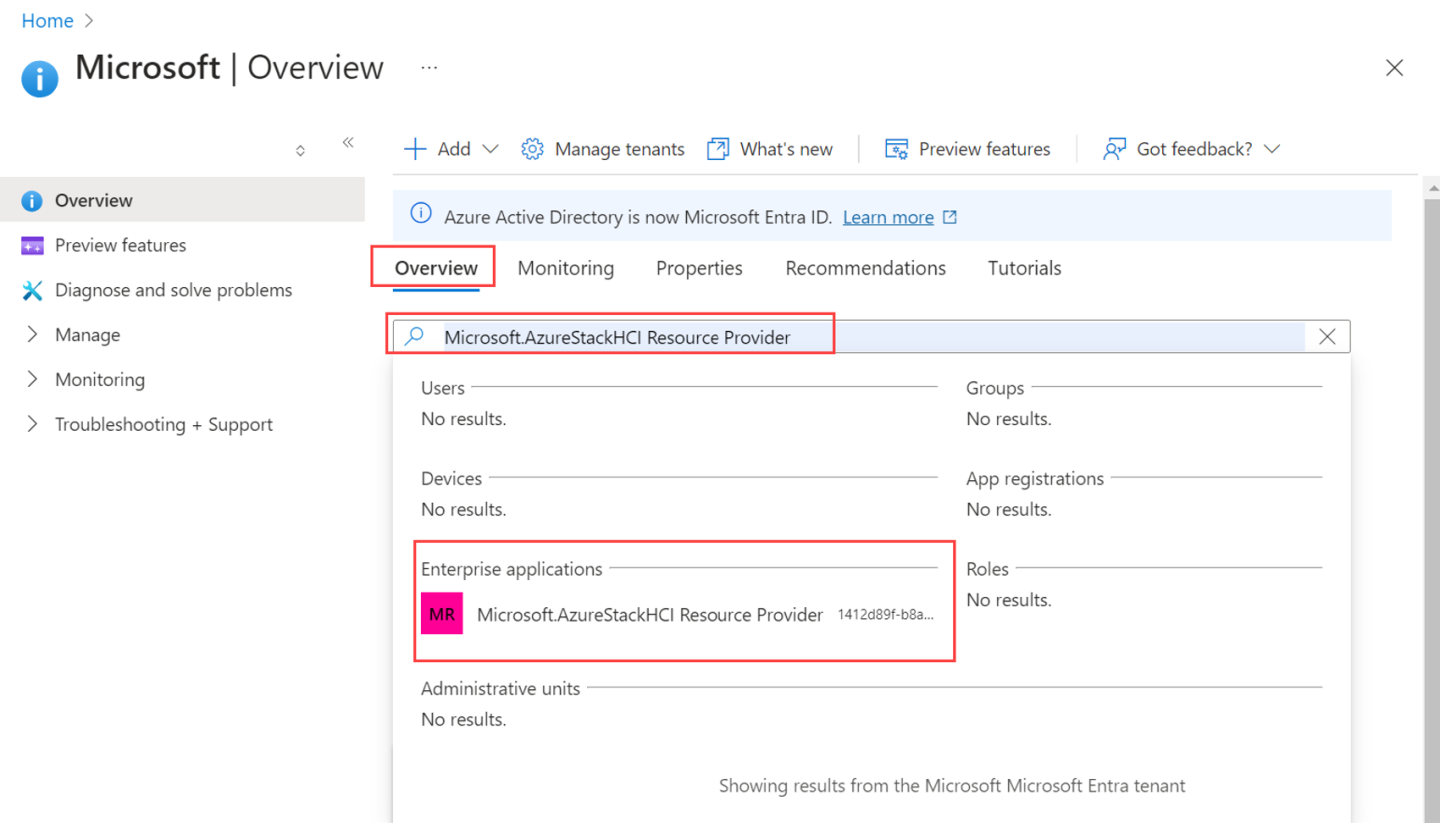
Select the SPN that is listed and copy the Object ID. The Object ID will be used against the hciResourceProviderObjectID parameter in the Resource Manager template.
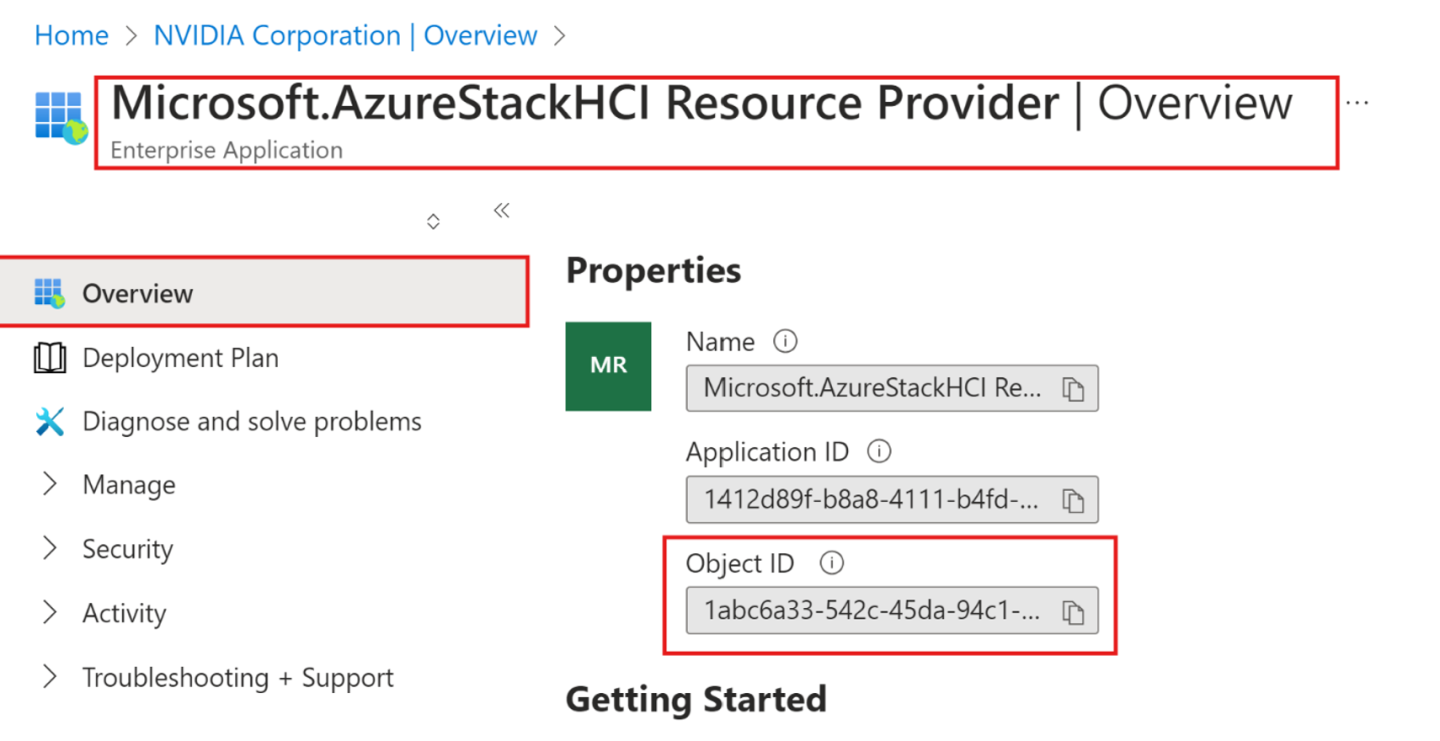
Deploy Using Azure Resource Manager Template
In the Azure portal, go to Home and select + Create a resource.

Select Create under Template deployment (deploy using custom templates).
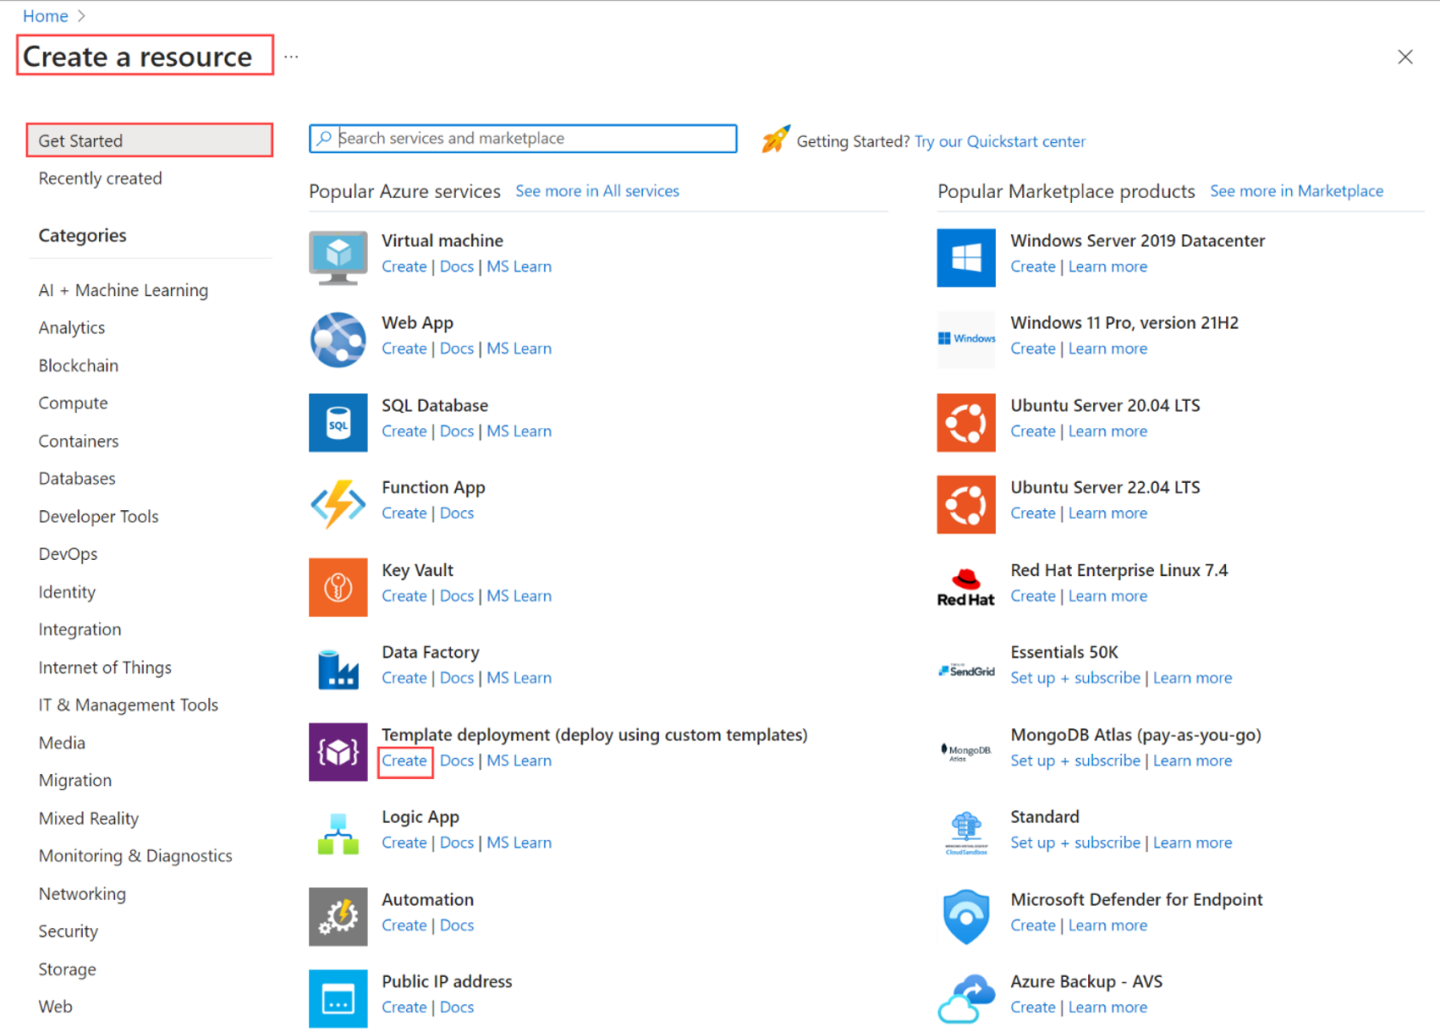
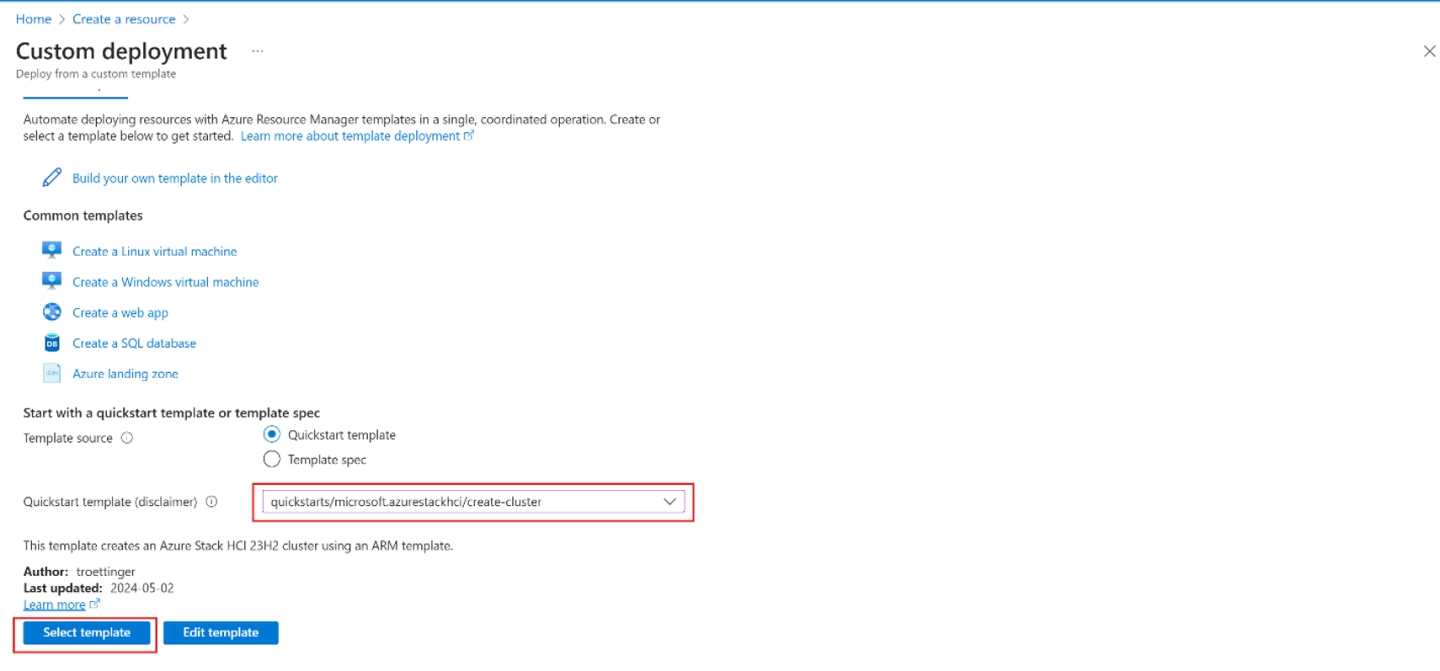
Near the bottom of the page, find Start with a quickstart template or template spec section. Select Quickstart template option.
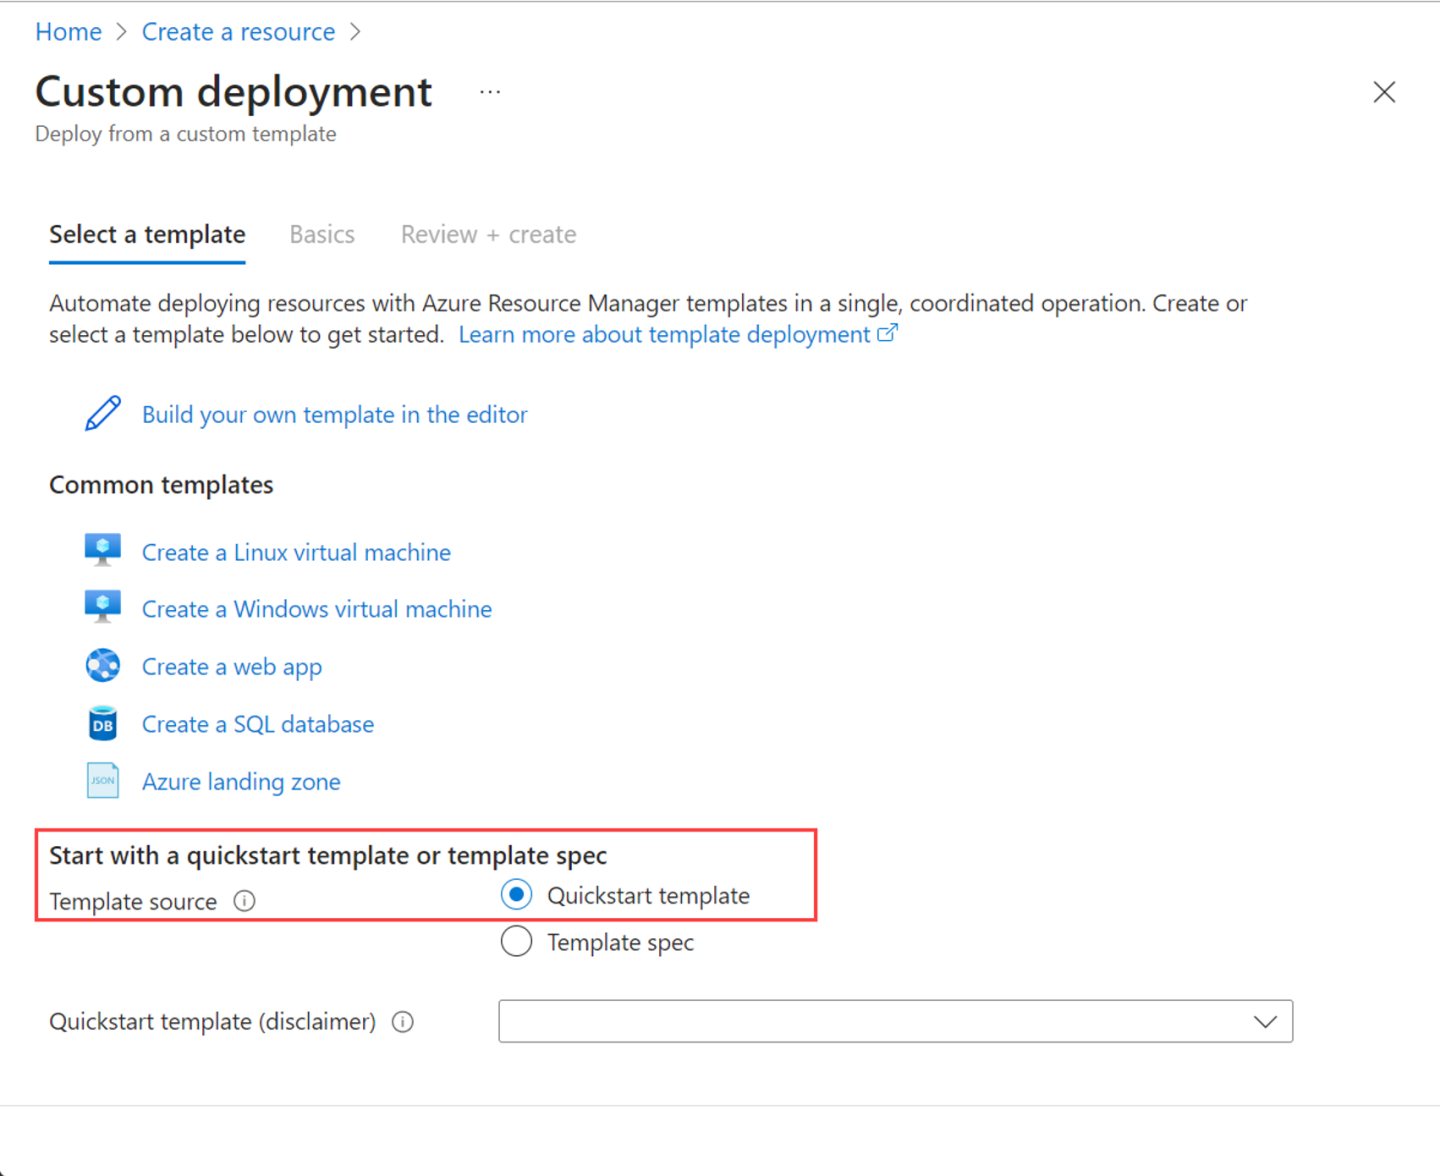
Use the Quickstart template (disclaimer) field to filter for the appropriate template. Type quickstarts/microsoft.azurestackhci/create-cluster for the filter. When finished, Select template.
On the Basics tab, you see the C**ustom deployment** page. You can select the various parameters through the dropdown list or select Edit parameters.
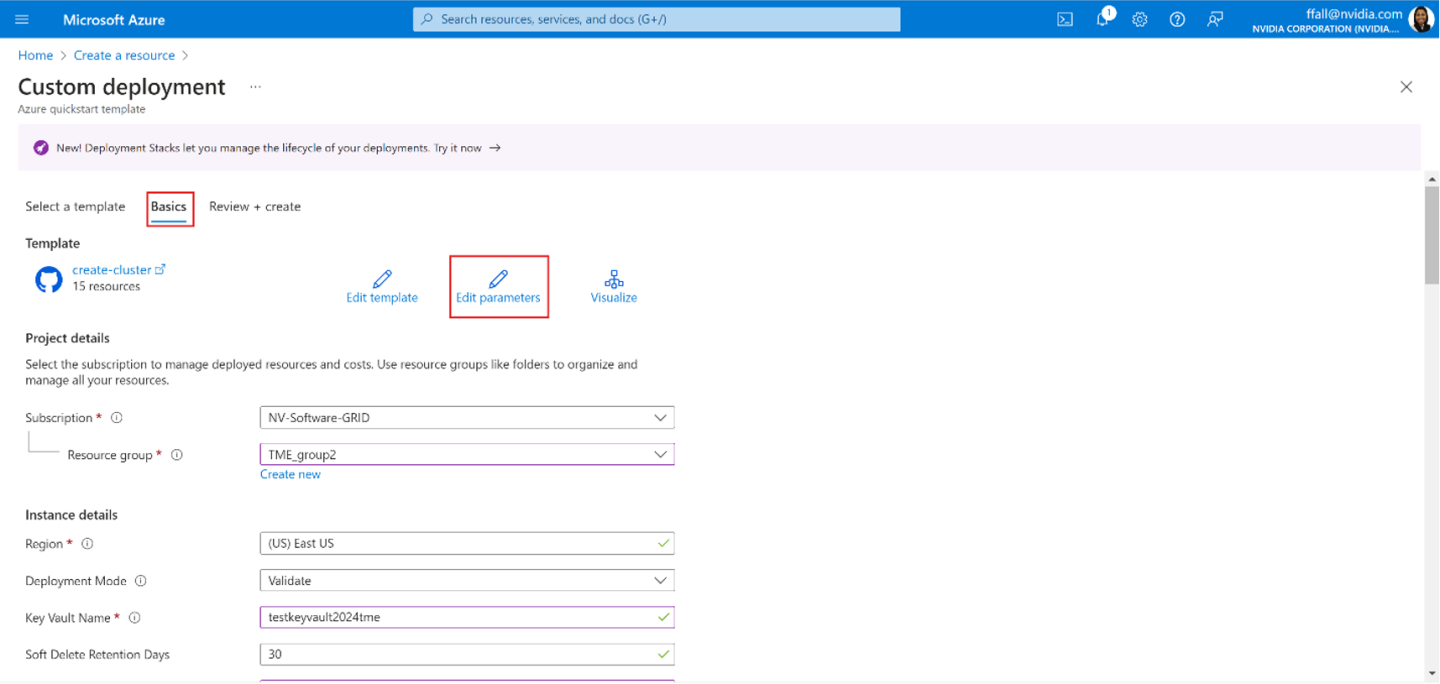
Edit parameters such as network intent or storage network intent. Once the parameters are all filled out, Save the parameters file.
Select the appropriate resource group for your environment.
Scroll to the bottom, and confirm that Deployment Mode = Validate.
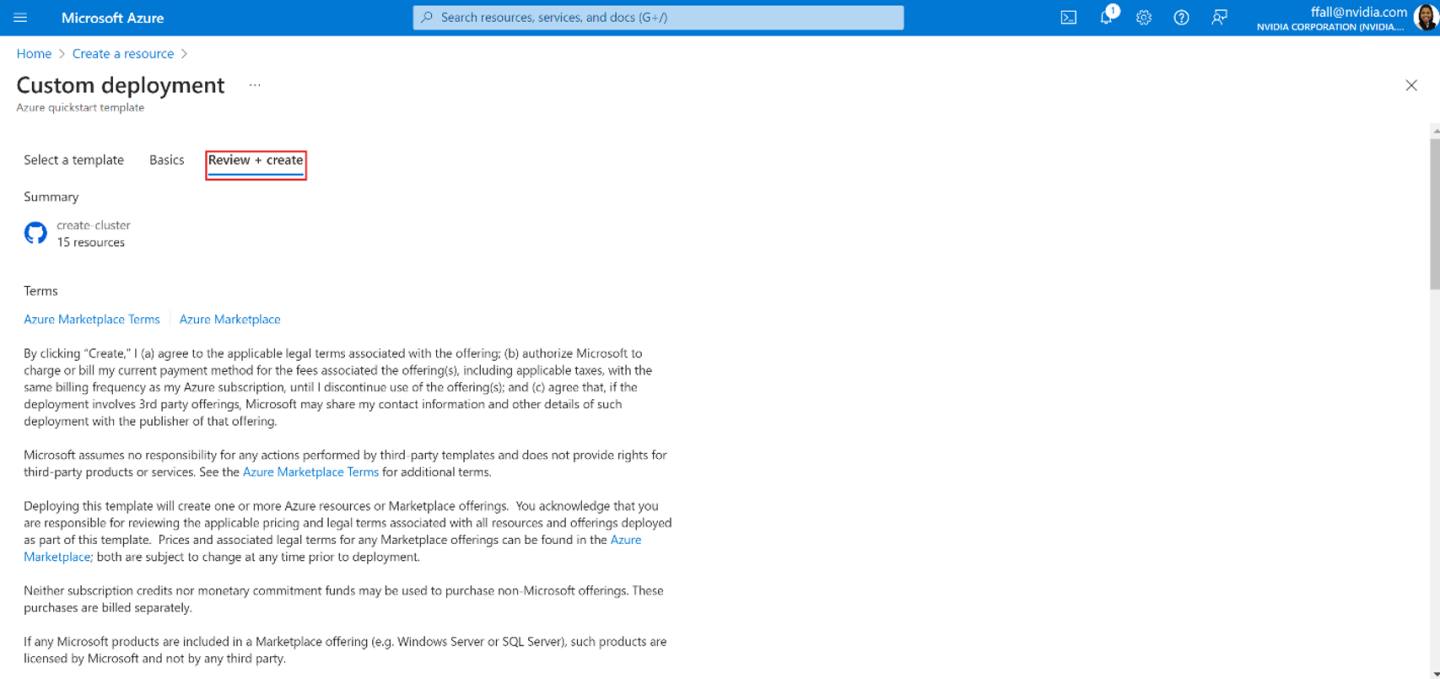
Select Review + create.
On the Review + Create tab, select Create. This creates the remaining prerequisite resources and validates the deployment. Validation takes about 10 minutes to complete.
Once validation is complete, select Redeploy.

On the Custom deployment screen, select Edit parameters. Load up the previously saved parameters and select Save.
At the bottom of the workspace, change the final value in the JSON from Validate to Deploy, where Deployment Mode = Deploy.

Verify that all the fields for the Resource Manager deployment template are filled in by the Parameters JSON.
Select the appropriate resource group for your environment.
Scroll to the bottom, and confirm that Deployment Mode = Deploy.
Select Review + create.
Select Create. This begins deployment, using the existing prerequisite resources that were created during the Validate step.
In a new browser window, navigate to the resource group for your environment. Select the cluster resource and then go to Deployments. Refresh the page to monitor the deployment progress from the first server (also known as the seed server, which is the initial server where the cluster is deployed). The entire deployment process takes between 2.5 and 3 hours, with several steps requiring 40-50 minutes or more. The most time-consuming step is Deploy Moc and ARB Stack, which takes 40-45 minutes. Upon completion, the task at the top will update with the status and end time.