Deployment Guide#
Virtual Machine (VM) Configuration#
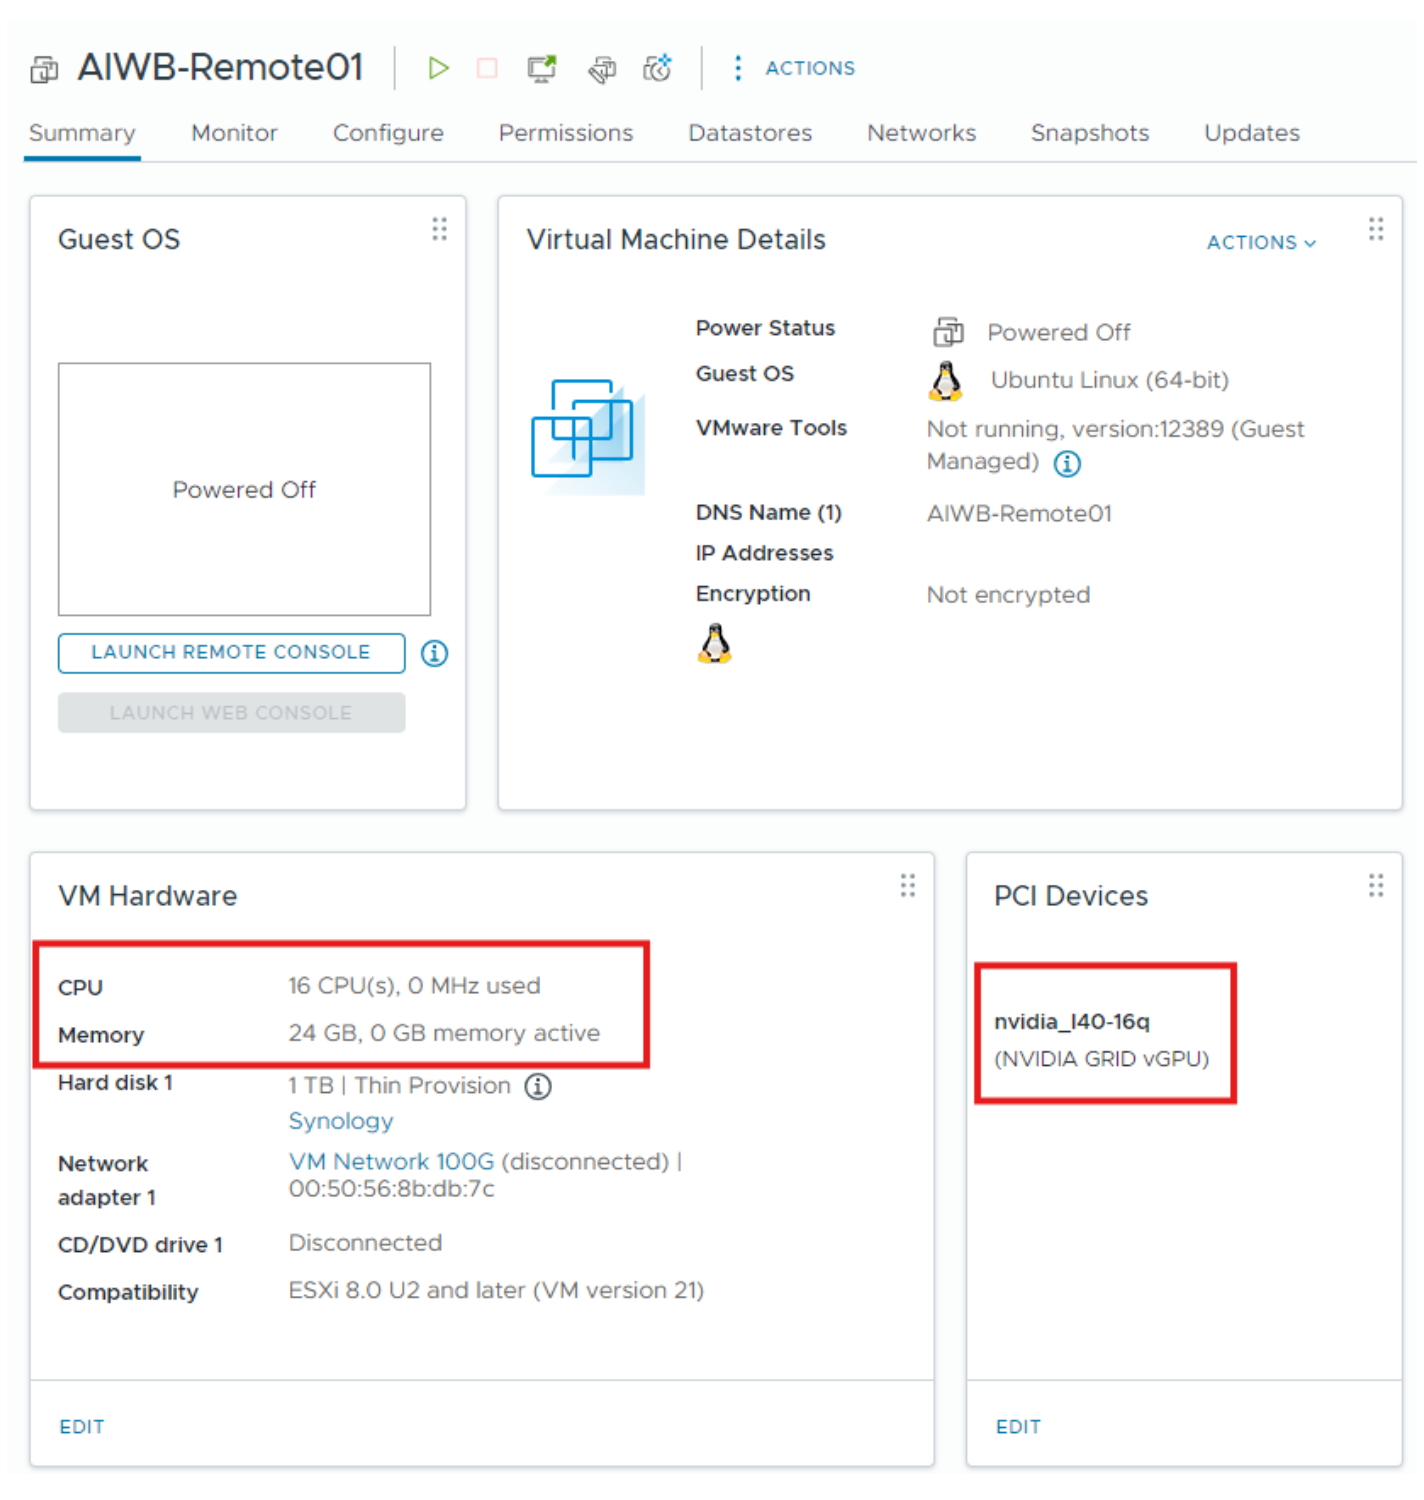
Set up a Linux VM in vCenter with the following configuration:
vCPU - 16 CPU
Memory - 24 GB
vGPU Profile - 16Q
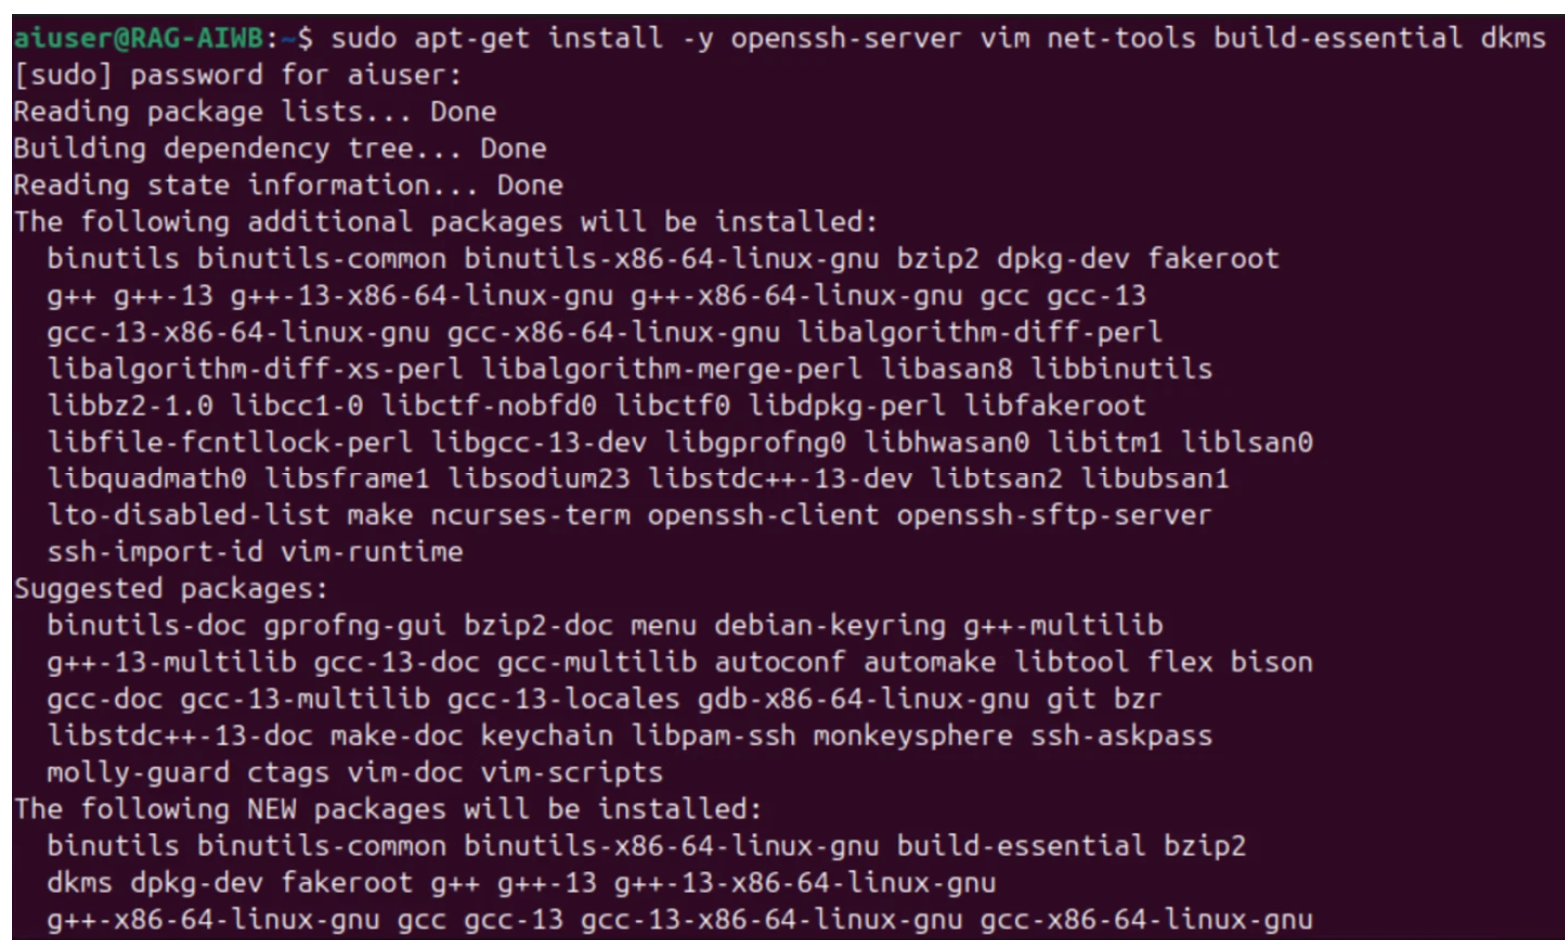
Install Ubuntu and set up the necessary dependencies listed below:
open-vm-tool (reboot required after installation)
openssh-server
vim
net-tools
build-essential
dkms
fuse3
libfuse2
Blacklist nouveau driver
$ sudo vim /etc/modprobe.d/blacklist.conf
$ blacklist nouveau
$ options nouveau modeset=0

Update initramfs, then reboot.
$ sudo update-initramfs -u
$ sudo reboot
Install your preferred remoting protocol (i.e., NoMachine, Horizon, VNC). The rest of this guide will use NoMachine as the remote protocol.
Download and install NVIDIA vGPU software.
$ sudo chmod +x nvidia-linux-grid-xxx_xxx.xx.xx_amd64.deb
$ sudo dpkg -i nvidia-linux-grid-xxx_xxx.xx.xx_amd64.deb
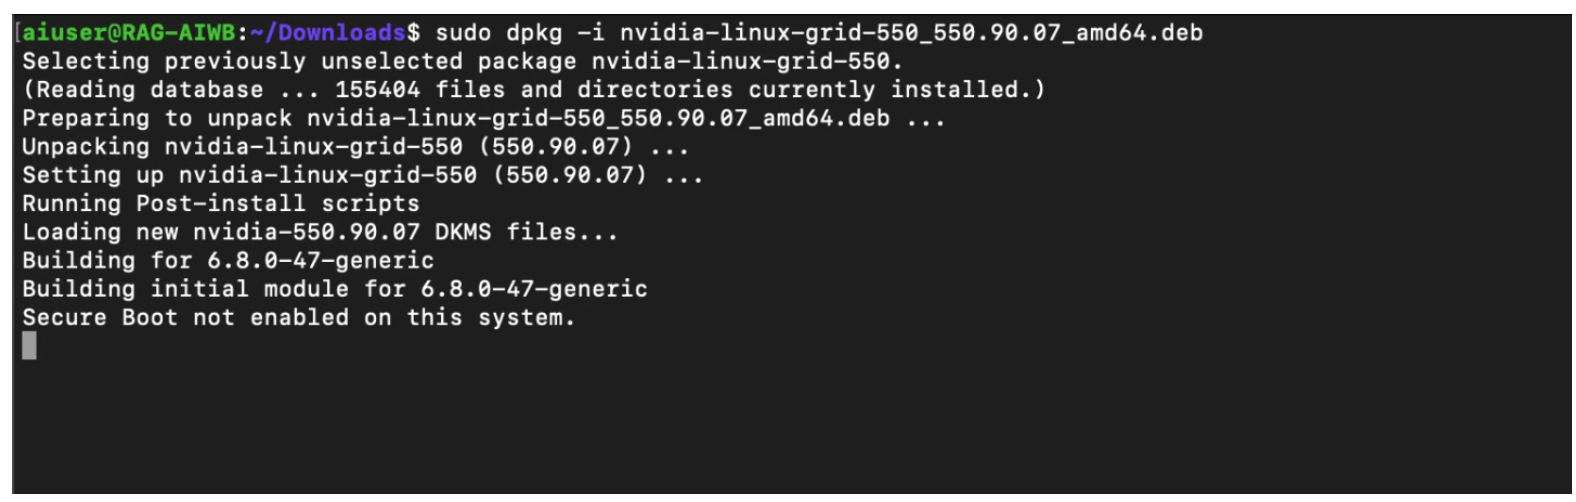
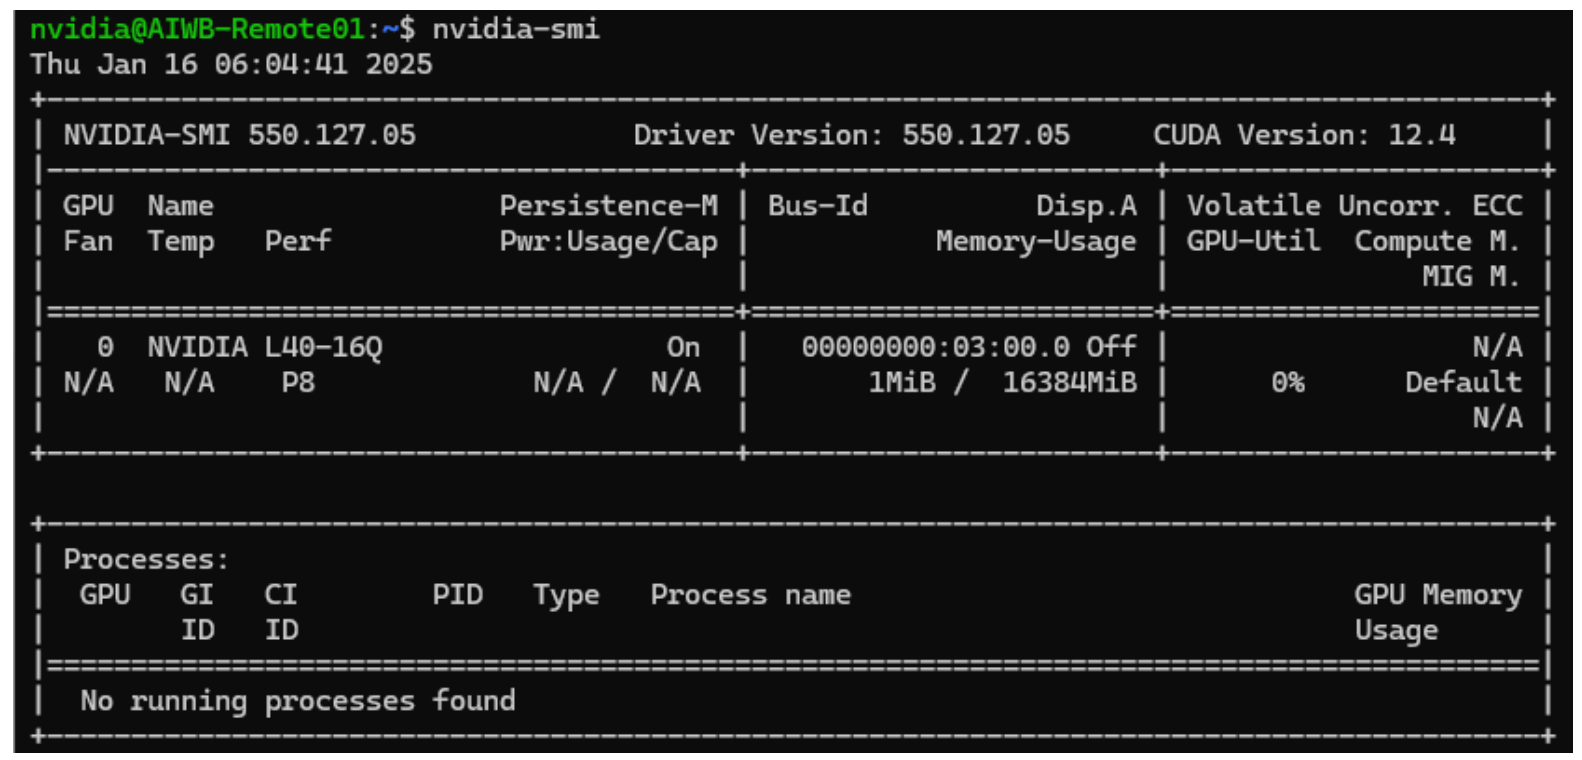
Once the driver utility has completed installation, reboot, then run the nvidia-smi command to verify the driver has been installed correctly.
At this point, the VM setup is complete. Next, install AI Workbench on the Ubuntu VW. AI Workbench can be downloaded from the NVIDIA website. The installation guide for Ubuntu can be found here.
Note
After you update AI Workbench on your local computer, you must also update any connected remote locations. For details, see Update AI Workbench on a Remote Computer.
Llamafactory Application Deployment#
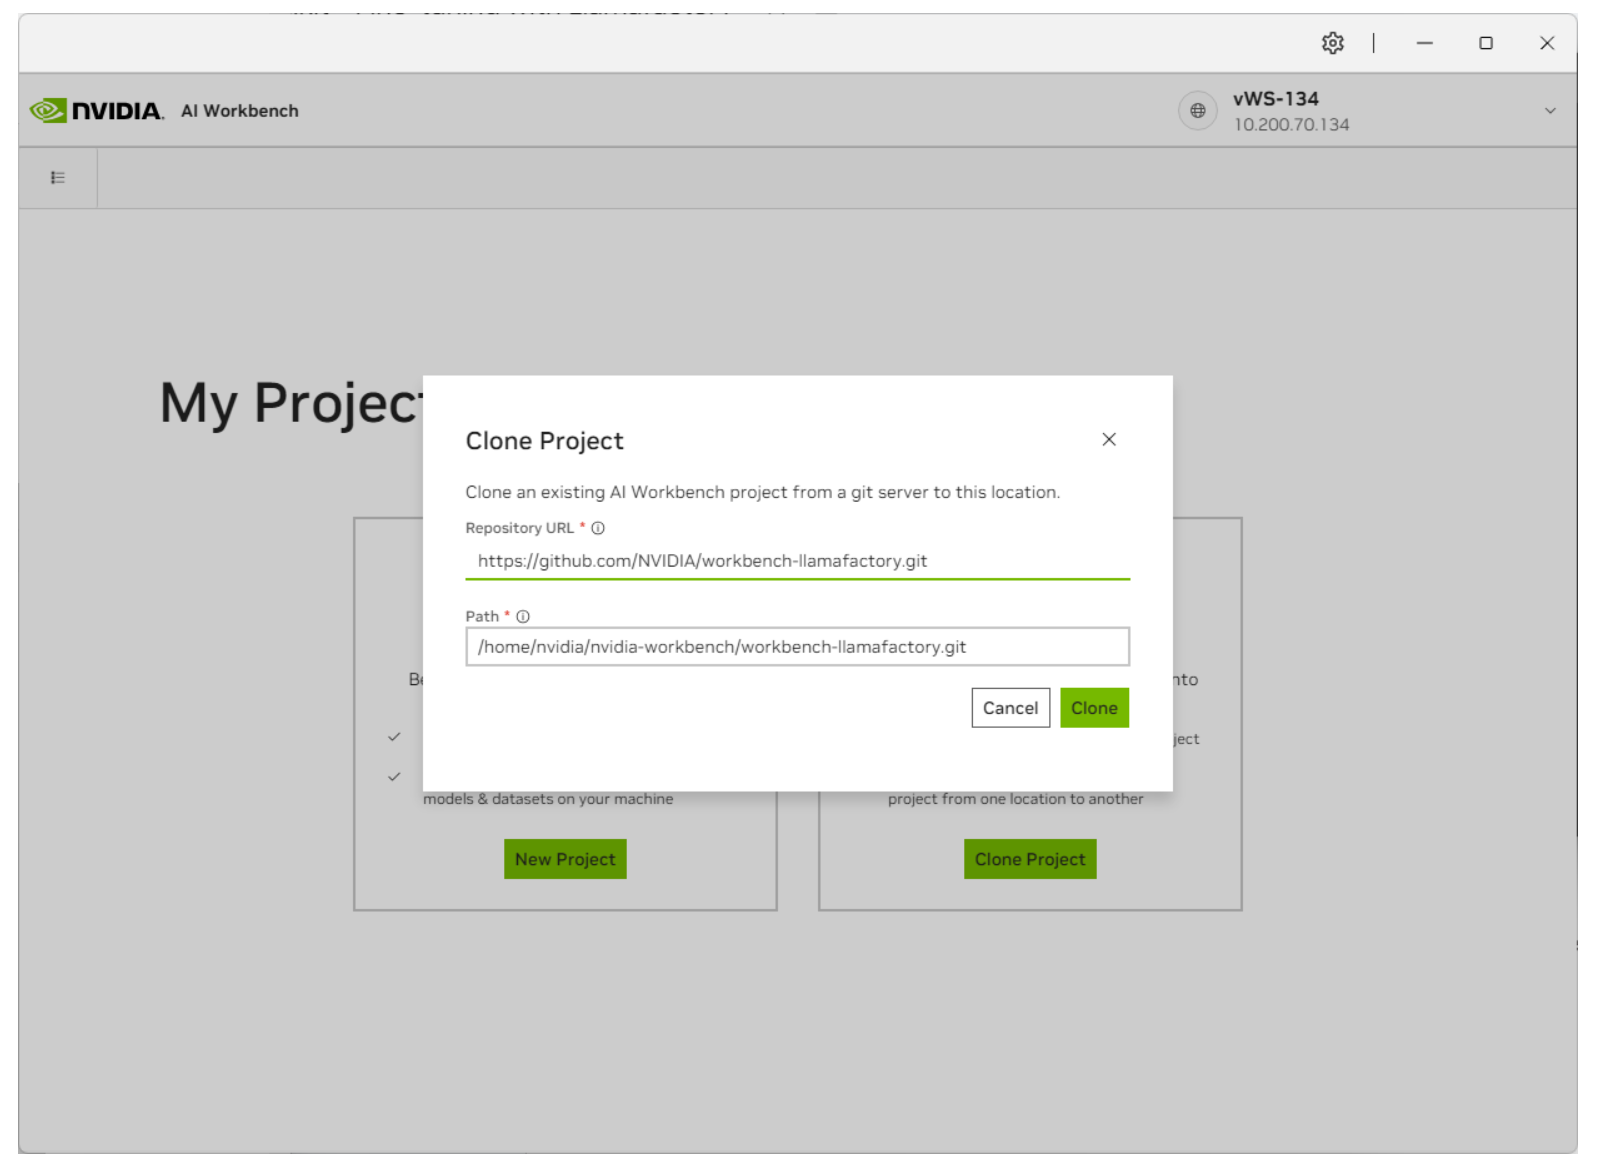
Clone the Llamafactory Project from GitHub. In AI Workbench, select Clone Project, then enter the repository URL to start the cloning process.
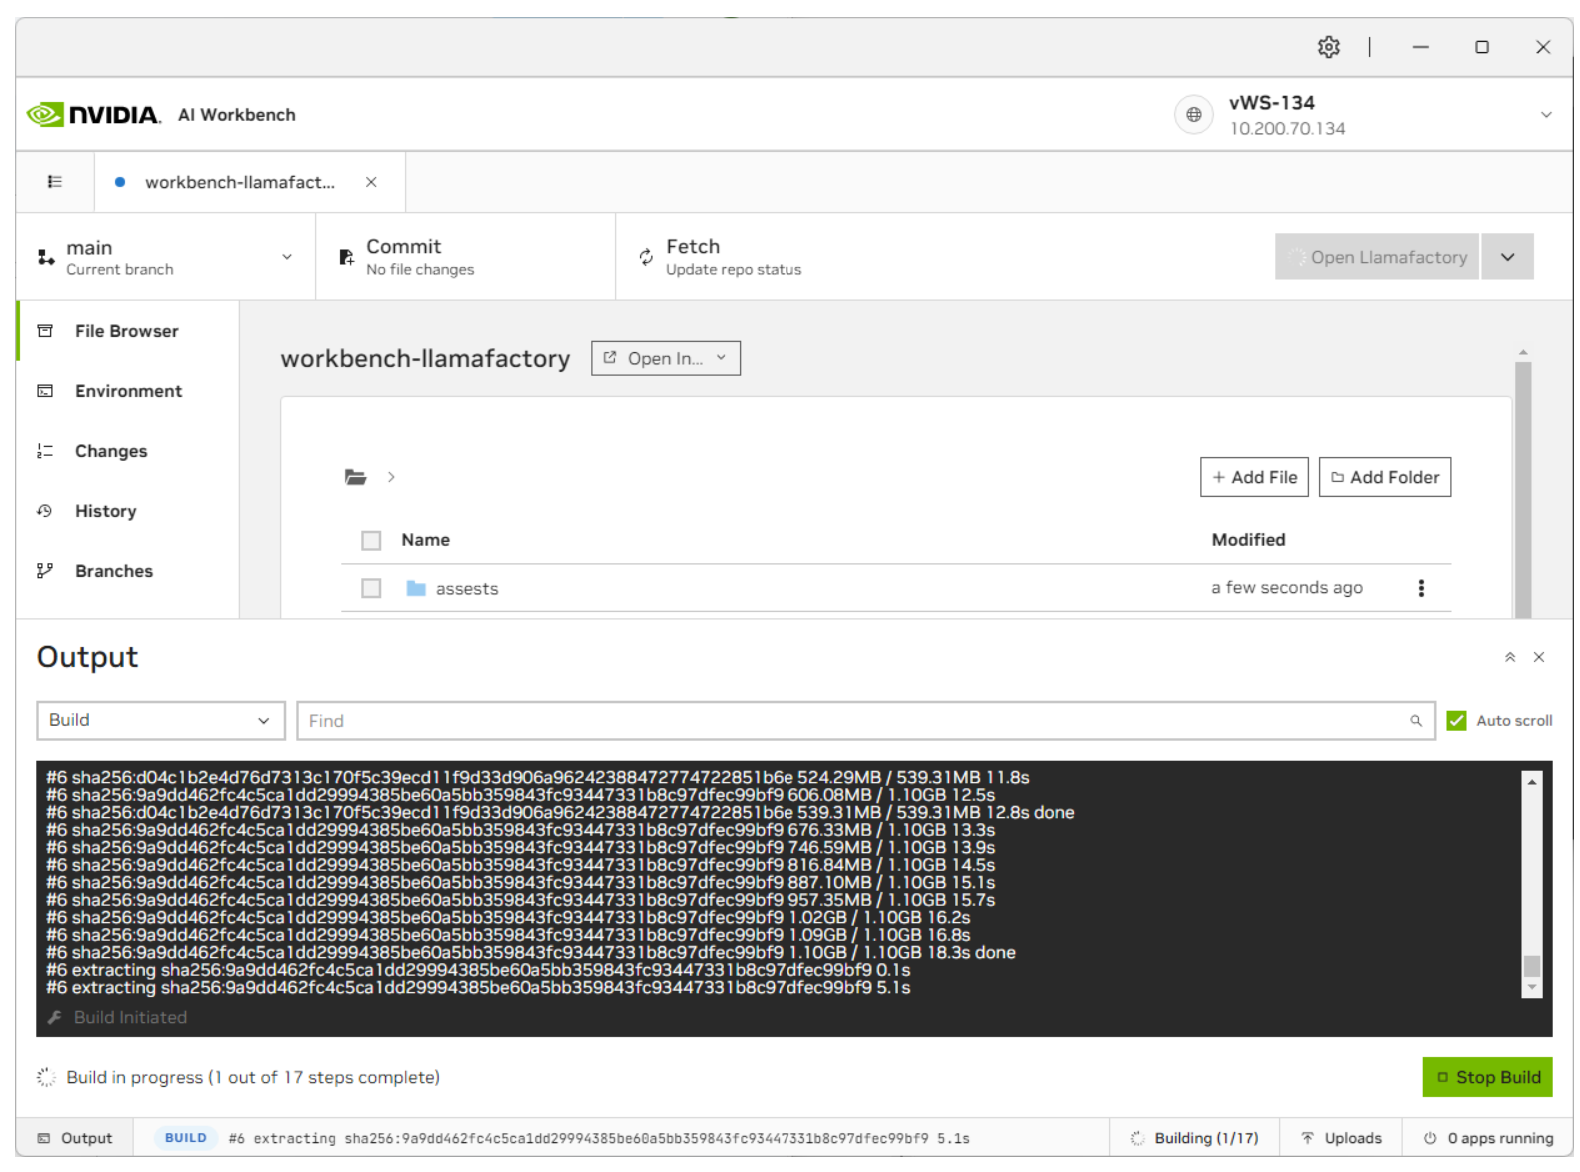
AI Workbench will take a few moments to pull down the repository. You can view the progress by clicking on the bottom status bar.
Once the build is completed, click the Environment tab on the left and scroll down to Secrets. This guide will also utilize Llama-3-8B, a gated LLM. Create a HuggingFace account and request access to the LLM. Once done, you must create a new entry named
HUGGING_FACE_HUB_TOKENunder Environment and enter your Huggingface Access Token.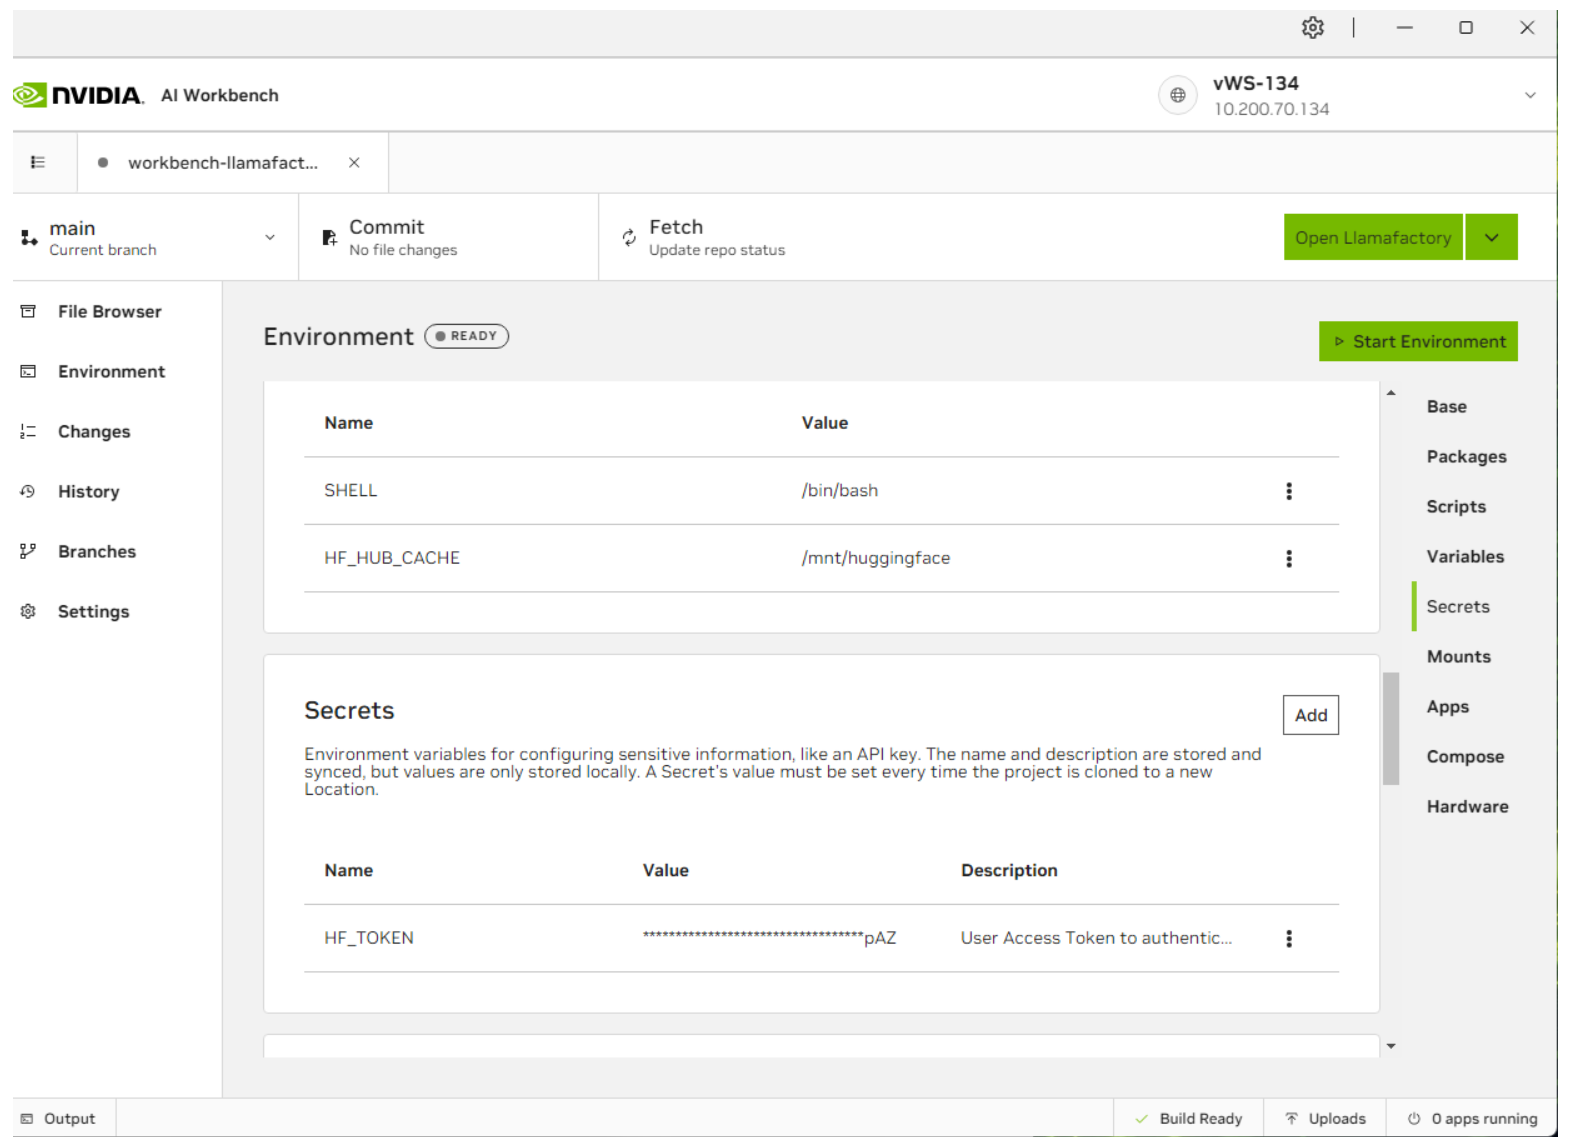
Once the secret has been entered, click Start Environment on the top right. This will start the container service for this model.
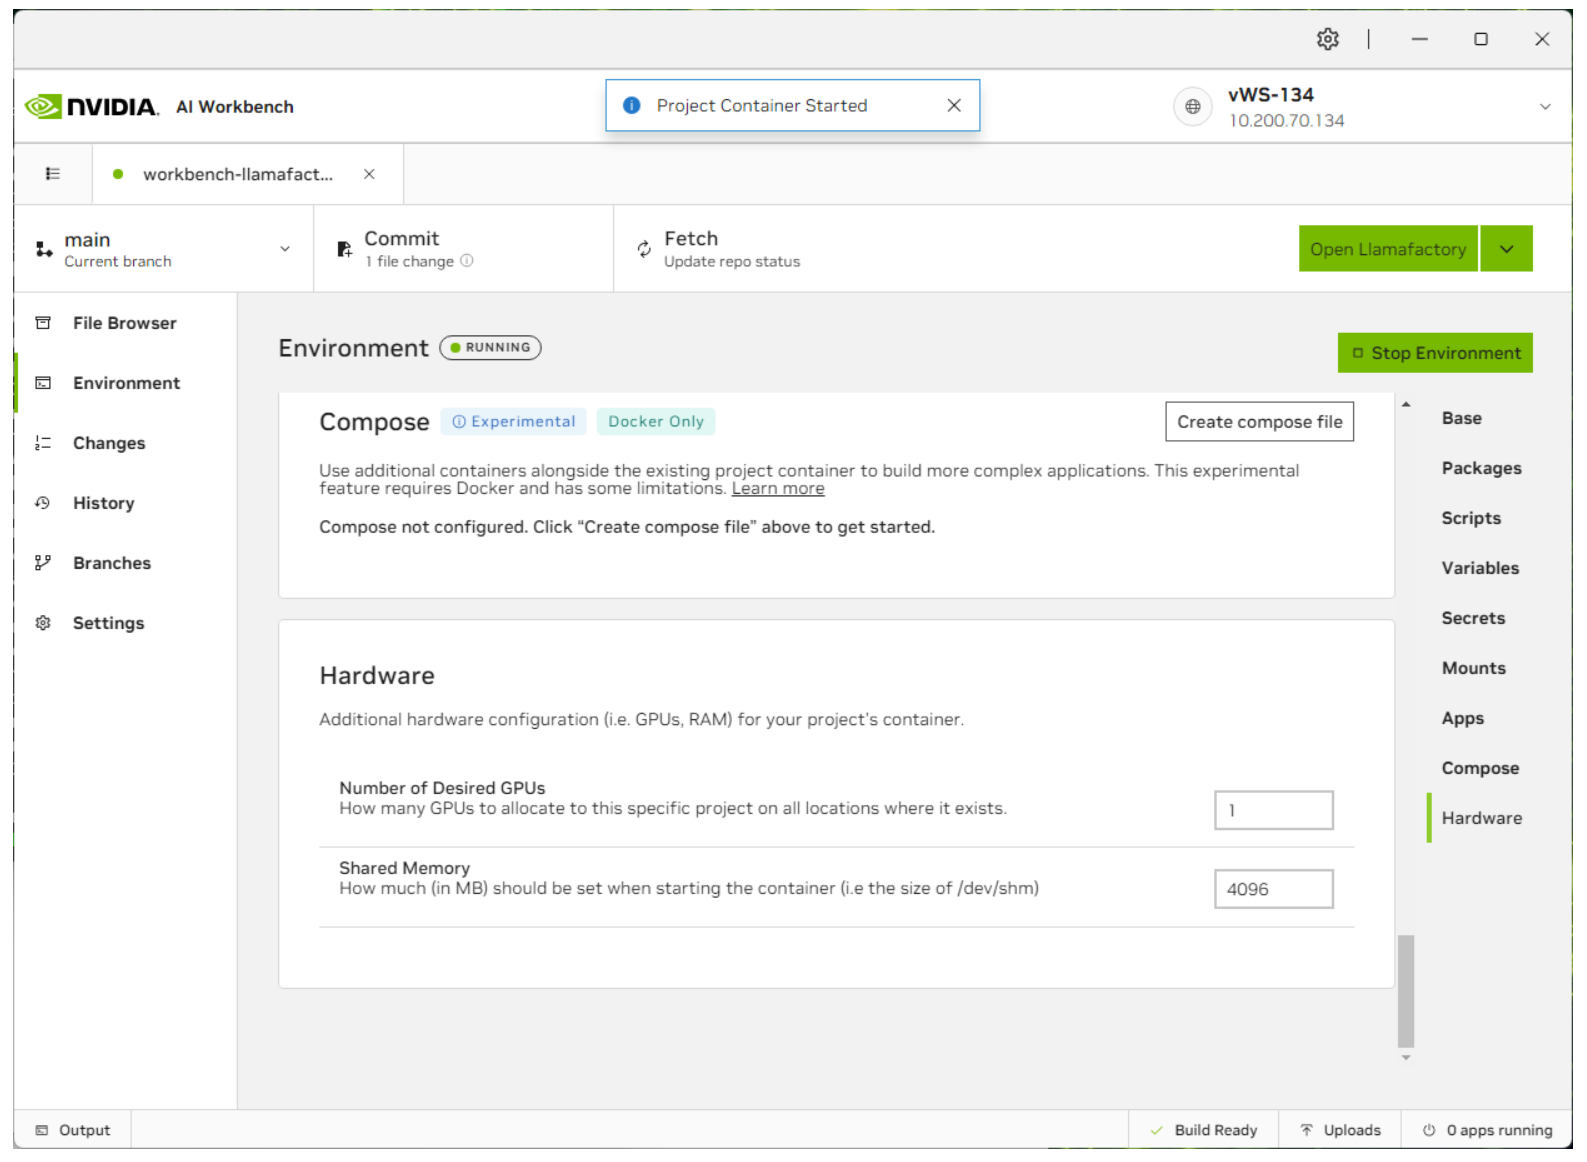
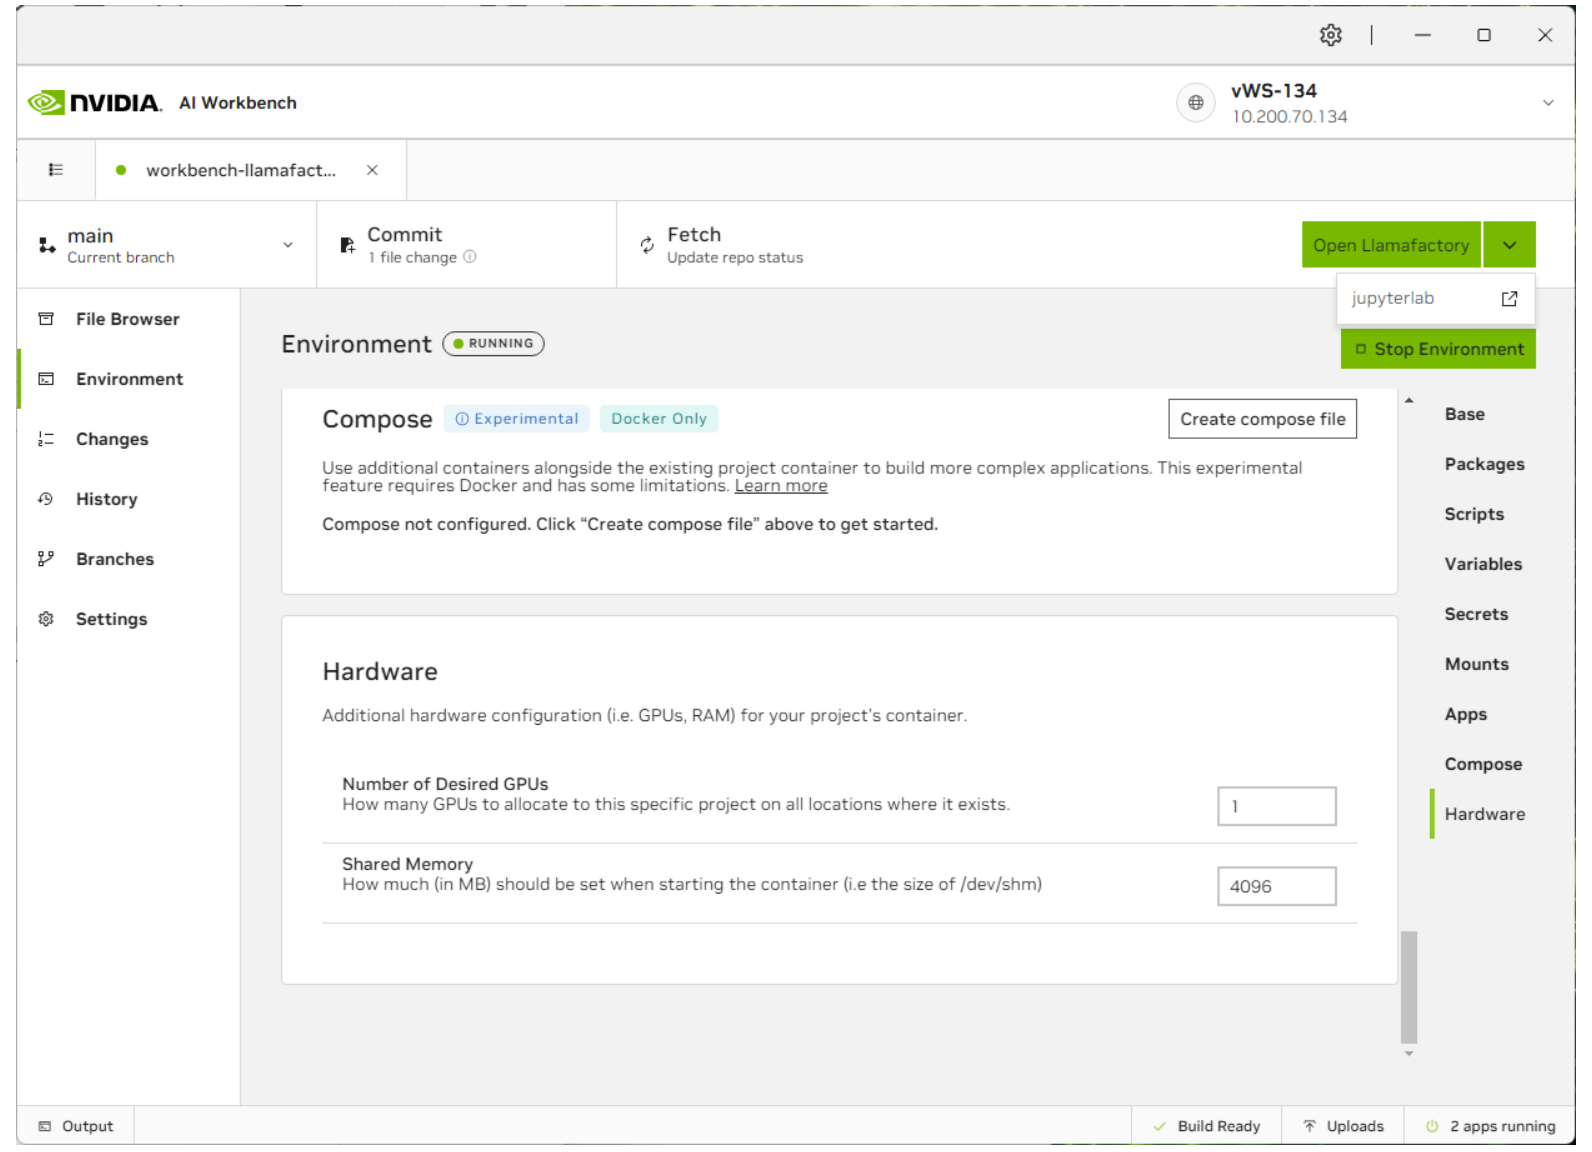
Now that the container is started, select jupyterlab to configure the project or Open Llamafactory to start the Llamafactory UI. You can also bring up the status of each application by clicking on the status bar at the bottom right.
Customize the Llamafactory Deployment#
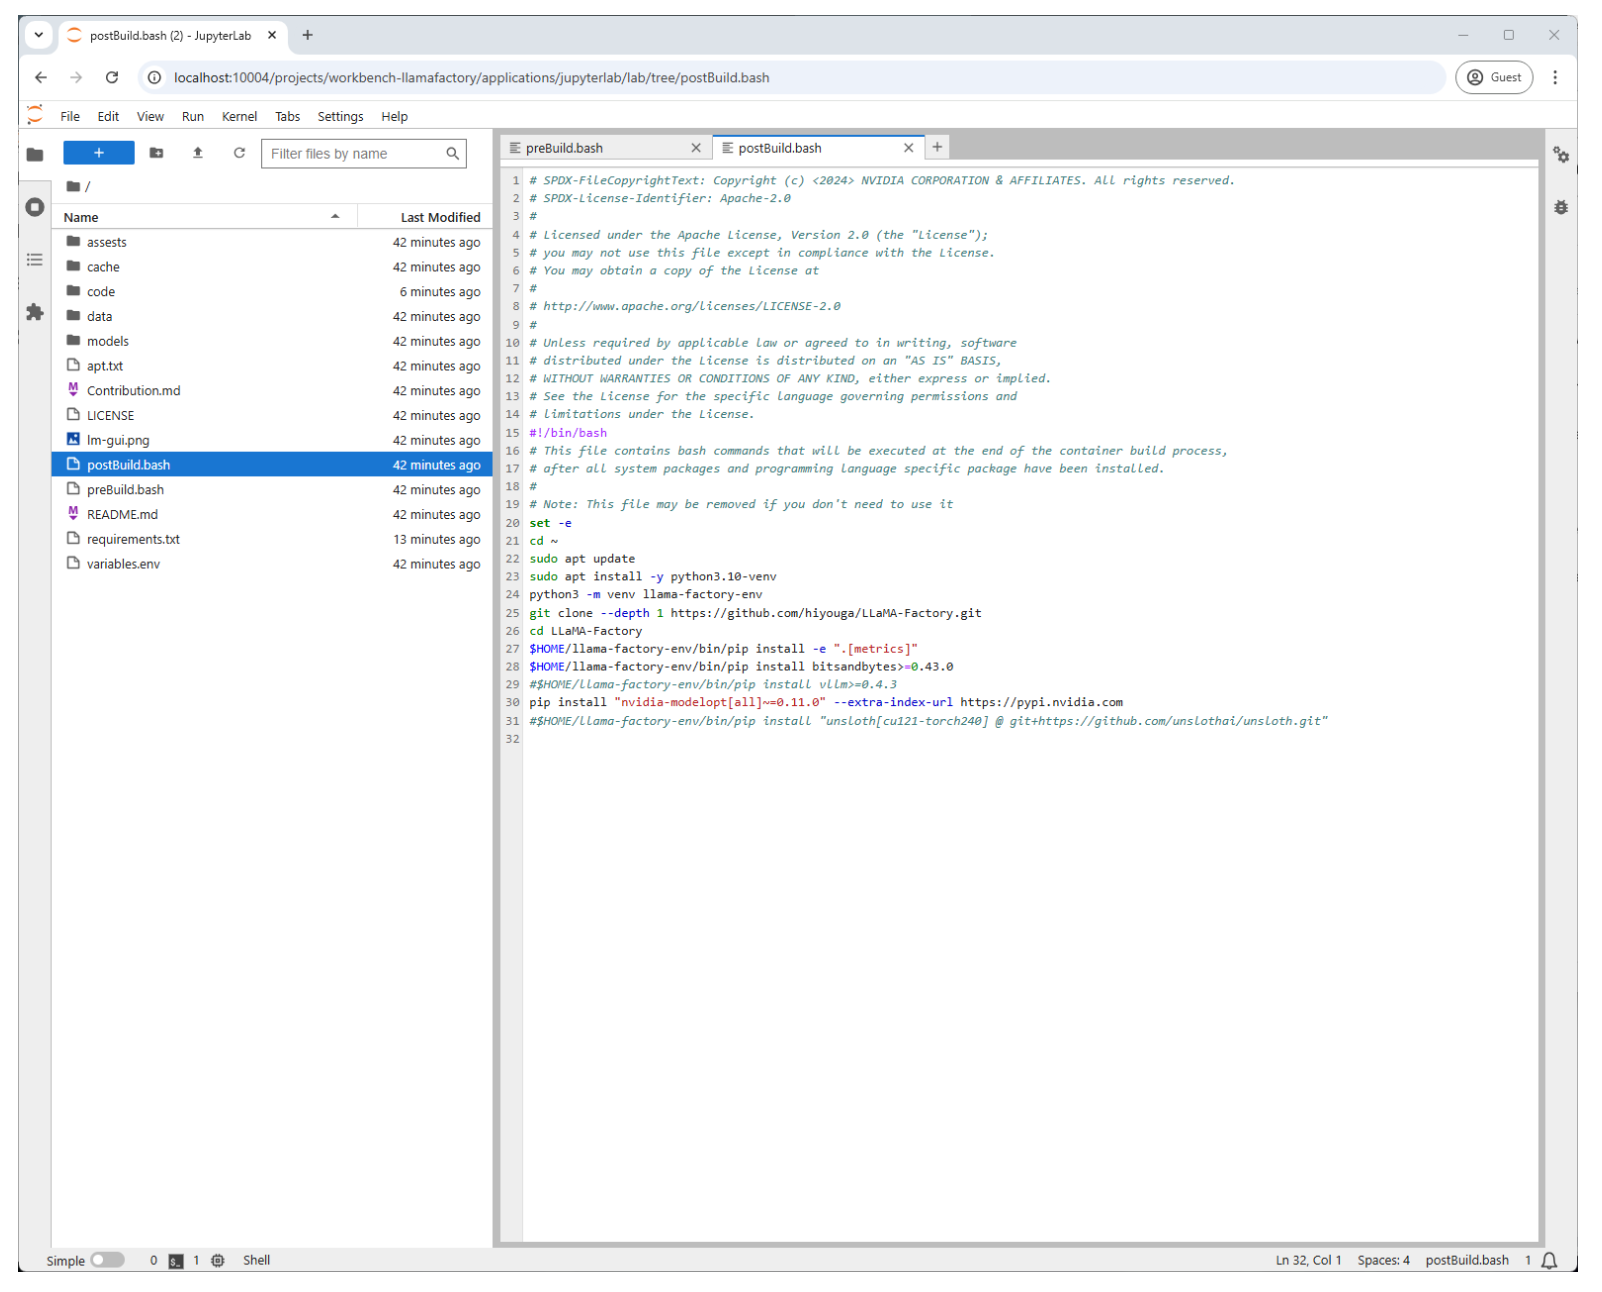
With AI Workbench, you can easily use the Jupyter Notebook function to alter and customize the Llamafactory application. In the following screenshot, we can include other libraries tools to assist with our custom fine-tuning projects.
Note
If you have updated the postinstall.sh file or any of the others to include new libraries or tools, you will need to rebuild the project.
Parameter-Efficient Fine-Tuning with Llamafactory#
Overview of Parameter-Efficient Fine-Tuning (PEFT)#
PEFT adjusts only a subset of parameters in a pre-trained model, optimizing resource usage and reducing costs. Techniques like Quantized Low-Rank Adaptation (QLoRA) combine 4-bit quantization and LoRA for efficient fine-tuning. Llamafactory supports full precision (None), 8-bit, and 4-bit quantization:
None: Highest accuracy but requires significant memory.
8-bit: Balanced performance and efficiency.
4-bit: Best for memory-constrained setups with minor accuracy trade-offs.
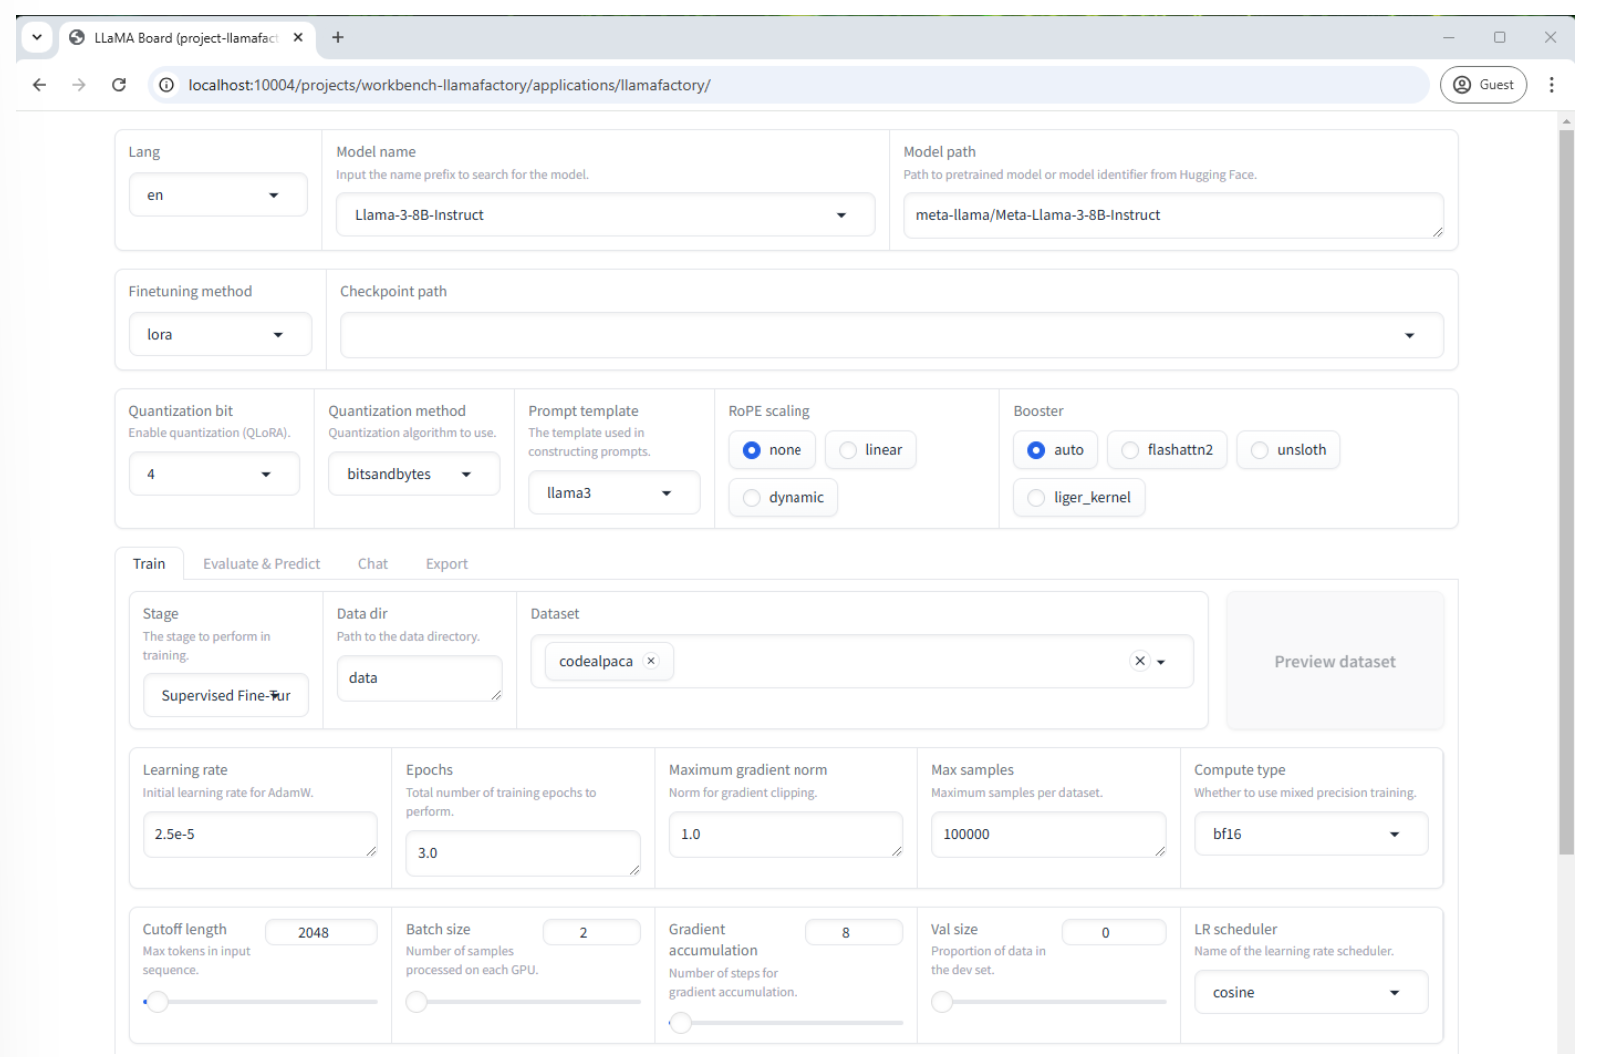
Once the Open Llamafactory button is clicked, you will be presented with the Llamafactory UI. From here we can start our fine-tuning process.
We will be pulling down the Meta/Llama-3-8b-instruct model from Hugging Face and fine-tuning it with the Codealpaca dataset. This dataset is used to train LLMs, like Llama-3-8b-instruct, to generate code and includes tens of thousands of coding examples. A company could also create their own dataset, based on their proprietary code and coding standards. This would ensure as developers chatted with the fine-tuned model, it would generate code based on the company’s standards.
Since we are utilizing a 16q profile, we will need to use QLoRA and a 4-bit quantization to be able to fine-tune the model with the amount of vGPU memory we have. While setting quantization to 4-bit does allow us to run fine-tuning in scenarios where we have less vGPU memory, it does come at the cost of accuracy and precision.
If you choose to use a different LLM, Quantization bit or vGPU Profile, you can review the details in the Sizing section for recommended configurations.
In the Llamafactory UI, set these fields to the following:
Model name: Llama-3-8B-Instruct (this will auto-populate the Model path field)
Finetuning method: lora
Quantization bit: 4
Prompt template: llama3
Dataset: codealpaca
Learning rate: 2.5e-5
Max samples: 5000
Here is a bit more detail on the options we selected:
Model name: This is the pre-trained LLM that we are using to fine-tune (Llama-3-8Bi-instruct)
Finetuning method - There are three fine-tuning methods available:
Full - This method adjusts all the parameters in the LLM. While this will give us the best results, it requires the most time, effort and resources to complete
Freeze - Only the parameters in specific layers of the LLM are adjusted, while others are “frozen.” This offers the best balance between performance and efficiency.
LoRA (Low-Rank Adaptation) - This is a parameter-efficient fine-tuning technique. Instead of modifying the original model’s weights directly, LoRA adds small “adapter” layers to inject new information.
Quantization bit - This refers to the number of bits used to represent the weights of the LLM. Llamafactory provides three options. Note that if either 8-bit or 4-bit are selected in combination with a fine-tuning method of LoRa, this is referred to as QLoRA. The key concept in QLoRA is to reduce the memory footprint of the model for efficient fine-tuning. This allows for fine-tuning larger LLMs on GPUs that have less memory.
None - This indicates that quantization will not be used and the model weight will be kept at its original precision. In the case of Llama-3-8B-instruct, this would be 16-bit.
8-bit - Provides a balance between memory savings and preserving model accuracy.
4-bit - Offers the most significant memory savings, enabling you to fine-tune very large models.
Trade-offs:
Accuracy: Quantization can sometimes lead to a slight decrease in model accuracy, especially with lower bit values like 4-bit. However, QLoRA is designed to minimize this impact.
Performance: Quantized models can sometimes run faster due to reduced memory access times.
Prompt template - This can be thought of as a pre-designed form or fill-in-the-blanks structure used to guide an LLM’s response. It helps you provide clear instructions and context to the model to get more consistent and relevant outputs. Matching a prompt template to the LLM will give the best possible results.
Dataset - They provide the examples that the LLM learns from. We are using Codealpaca, which is a dataset used to help train or fine-tune LLMs for code-related tasks.
Learning rate - This field determines how much the model’s weights are adjusted during each step of the learning process. A higher learning rate may allow the model to learn fast but comes at the cost of instability and less accurate results. A lower learning rate will take longer but lead to more accurate results. Typically, 2.5e-5 is a safe starting point.
Max samples - This is the maximum amount of training samples that we will use from the Codealpaca dataset. Typically, this number is set low and gradually increased. This can help speed up the training time and use fewer resources, like memory. It can also help prevent over lifting or having the model be too specialized in the training data and not generalize well to new data.
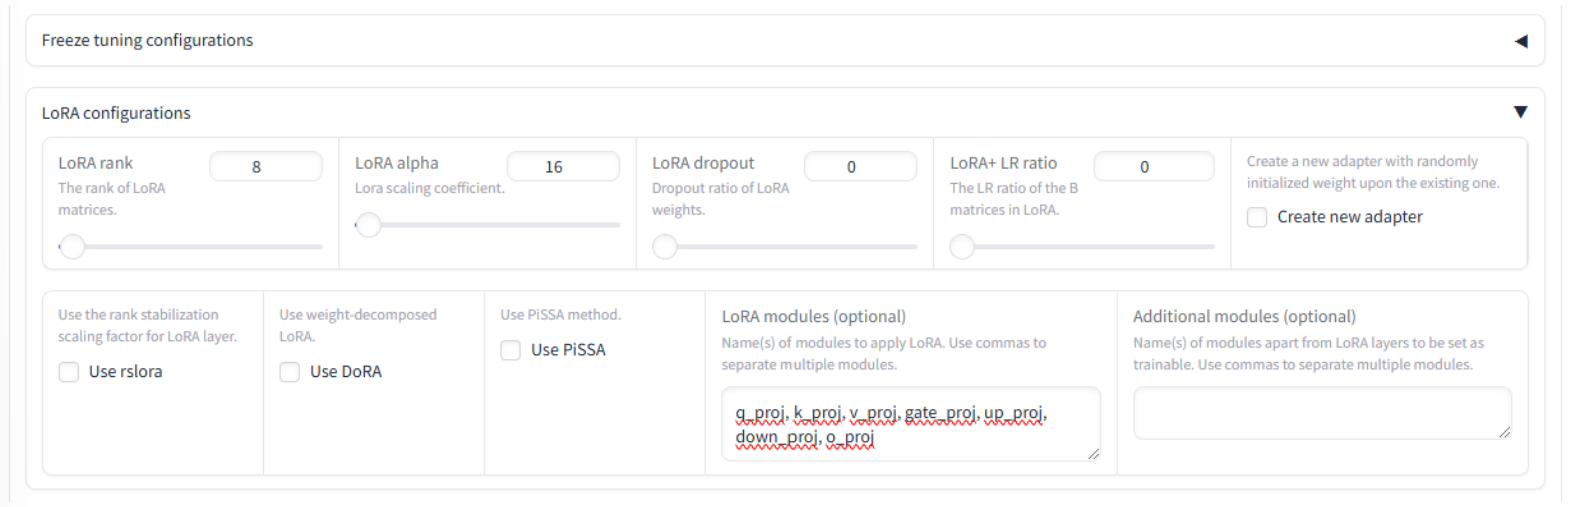
Expand the LoRA configurations and update the LoRA modules (optional) field to include
q_proj, k_proj, v_proj, gate_proj, up_proj, down_proj, o_projThese projection modules help the model focus on the most important information and learn complex relationships between words and concepts.
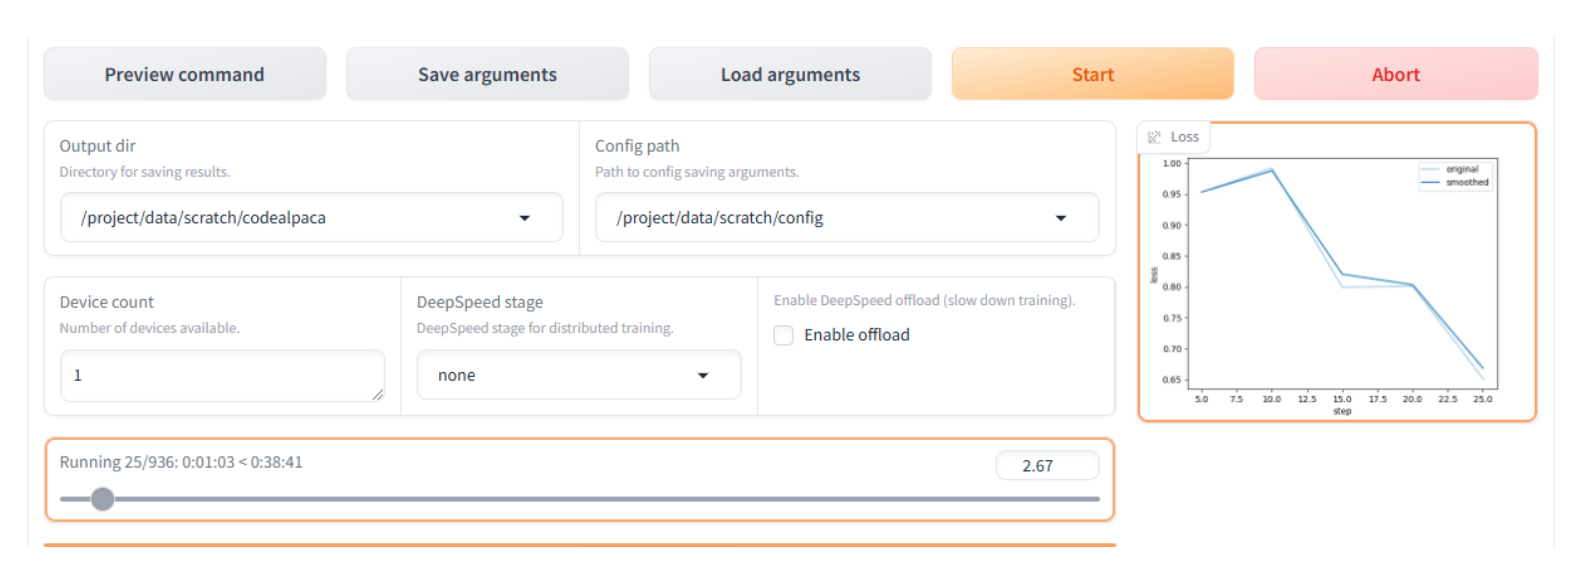
Scroll down to the bottom of the page and update these fields:
Output dir:
/project/data/scratch/codealpacaConfig path:
/project/data/scratch/config
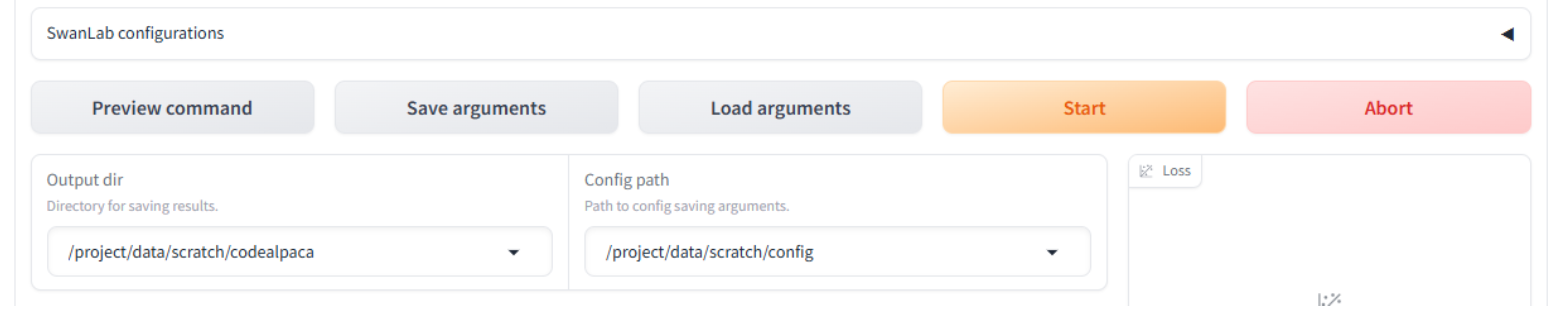
Click the Preview command button to preview the command Llamafactory will use to initiate training.
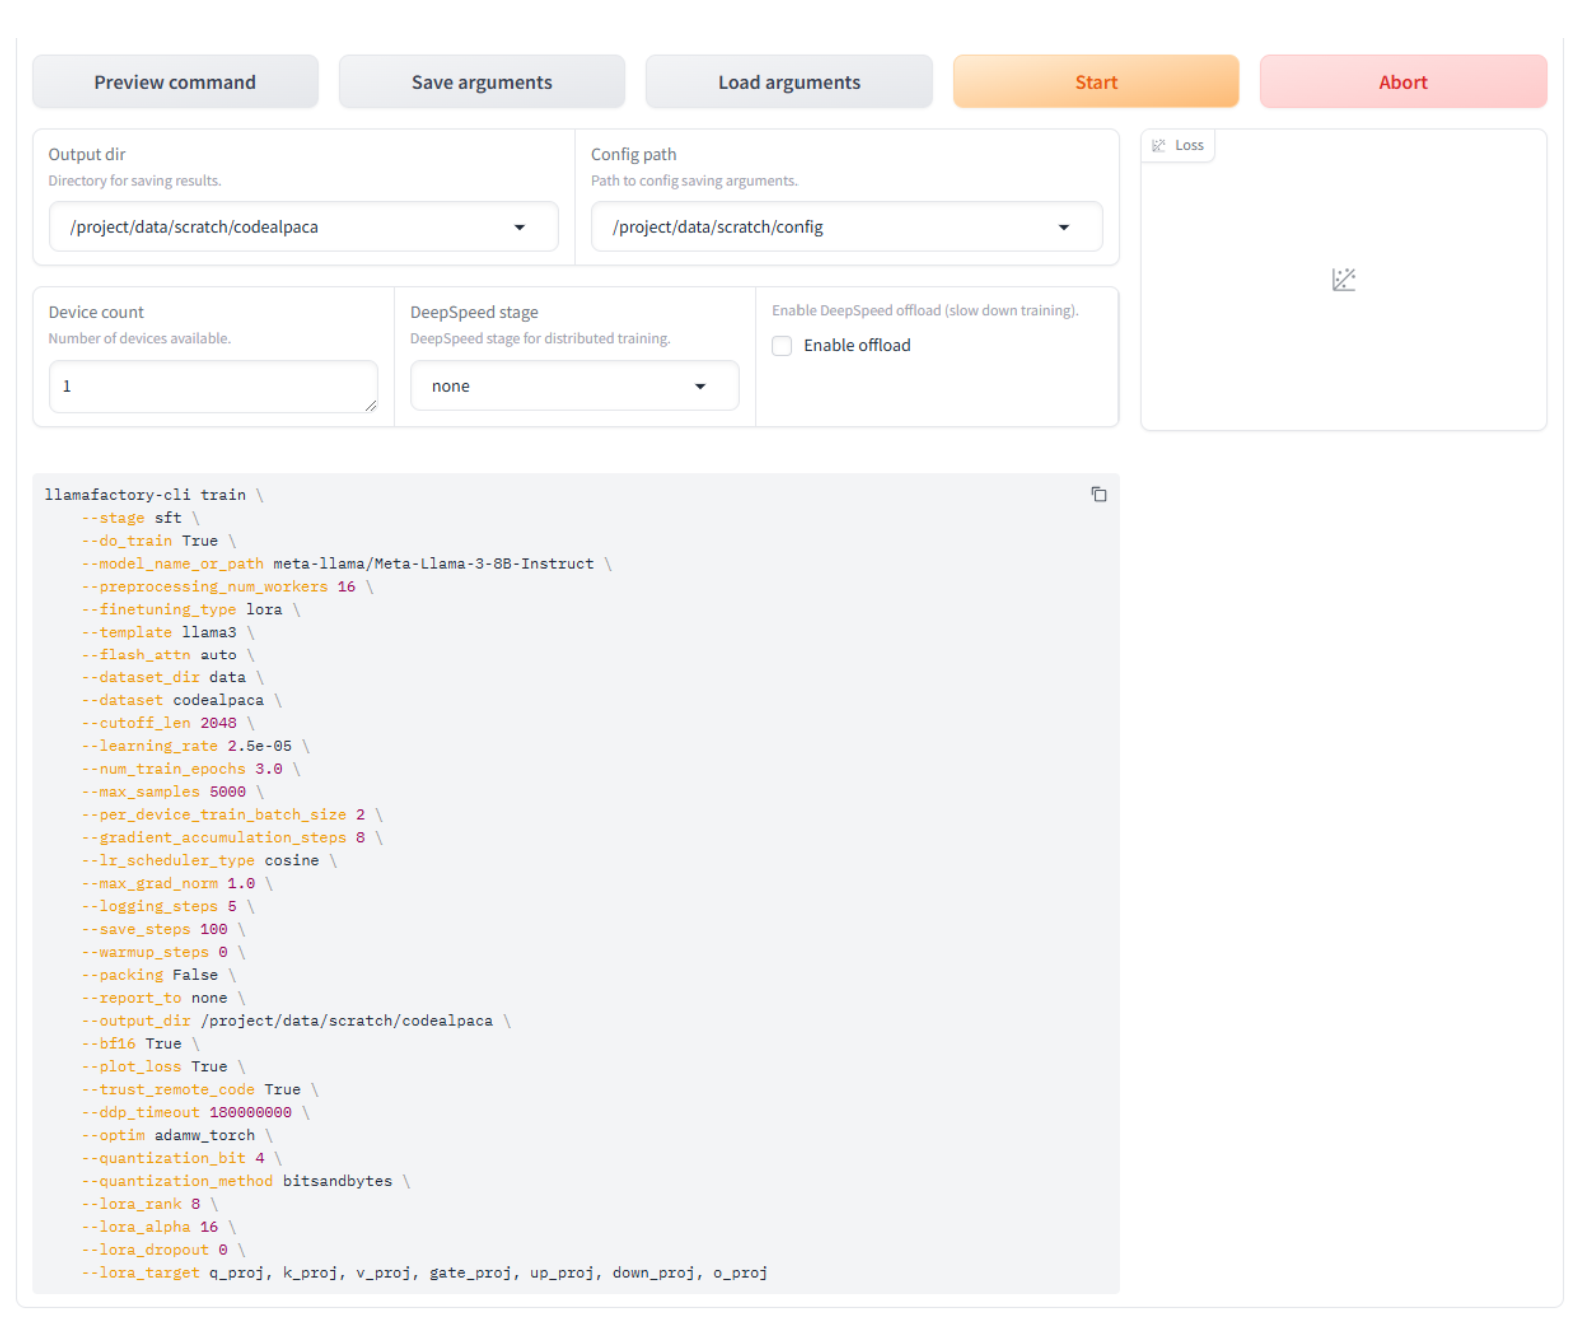
Now that everything is configured, we are ready to fine-tune the model. Click the Start button to begin the process.
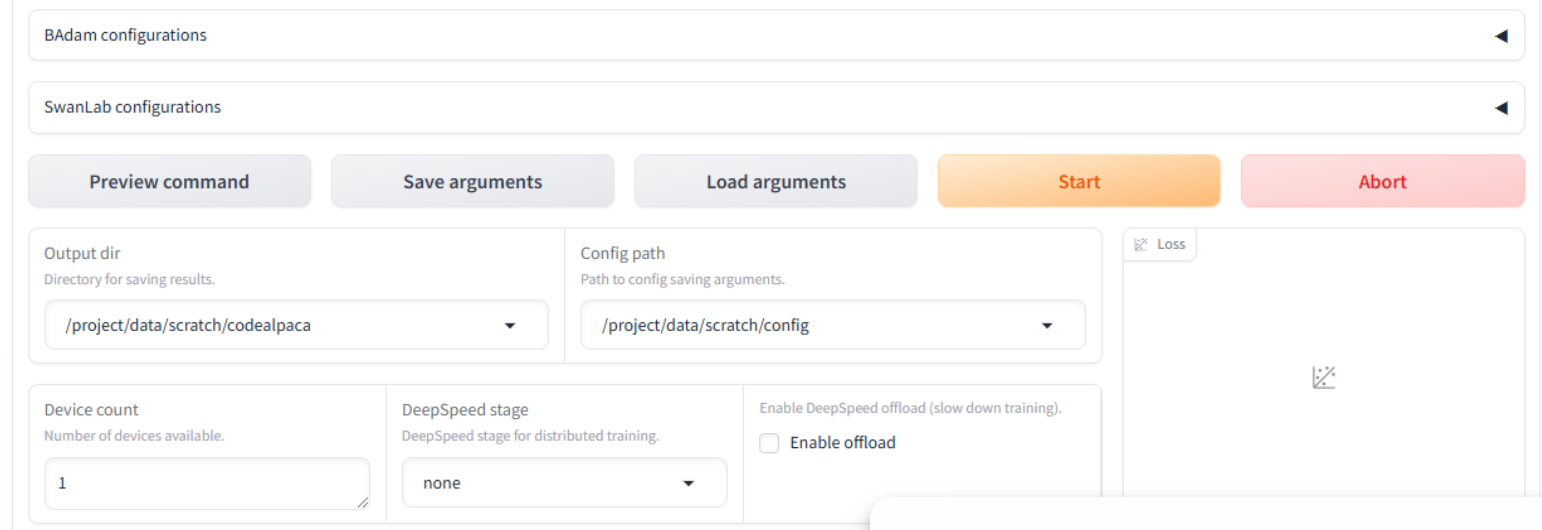
Depending on your internet connection, downloading the Llama3-8b-instruct model (16GB) may take up to 90 minutes. You can view the progress by using the bottom status bar in the AI Workbench window.
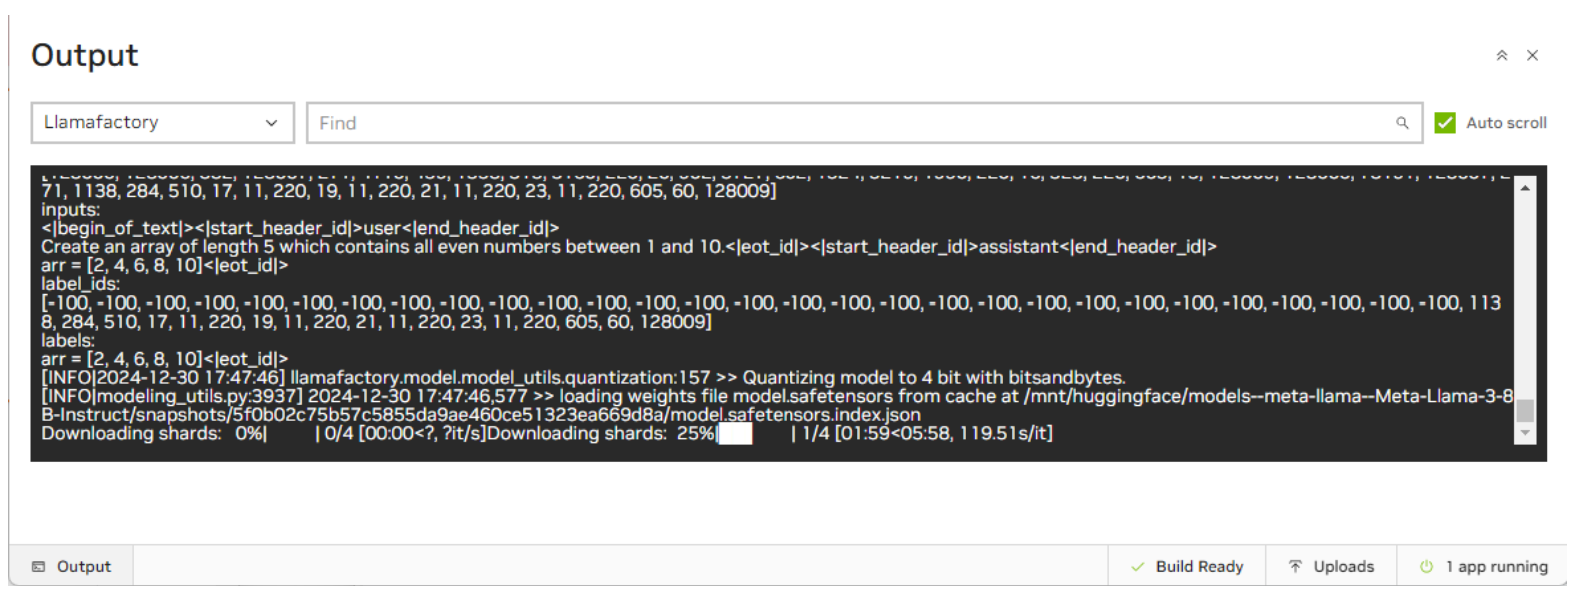
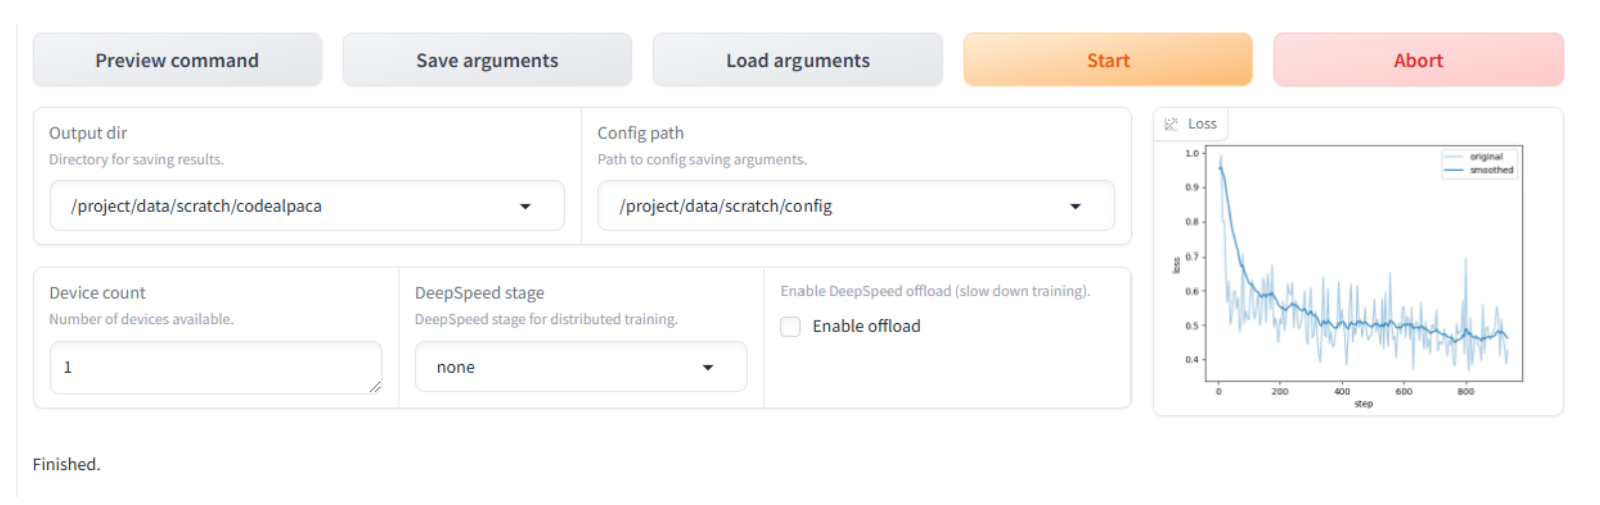
The fine-tuning process will take roughly 30 to 40 minutes to complete, depending on the code set, model size, quantization, VM sizing, etc. The UI will display the status and a loss function plot to provide insight into the process.
When the fine-tuning is complete, you will see Finished in the scrolling log at the bottom.
Evaluating the Model#
Now that fine-tuning the model has been completed, we can evaluate the model using the built-in chat function.
Click on the Chat tab and verify or update these settings:
Quantization bit is still set to 4 (be sure to select the same quantization bit you chose when fine-tuning).
Checkpoint path:
/project/data/scratch/codealpaca

Click the Load model button and wait for it to complete.

Once the model has loaded, you can interact with the model by asking questions in the Input… box. The dataset we used to fine-tune the model specializes in coding and programming. You can ask the model questions about programming languages and syntax or have it write a program for you. As an example, type in the following and click the Submit button:
Write a python program that prompts the user for a temperature and then asks them if they would like to convert it to Fahrenheit or Celsius.
The chatbot will respond with Python code based on the request we made.
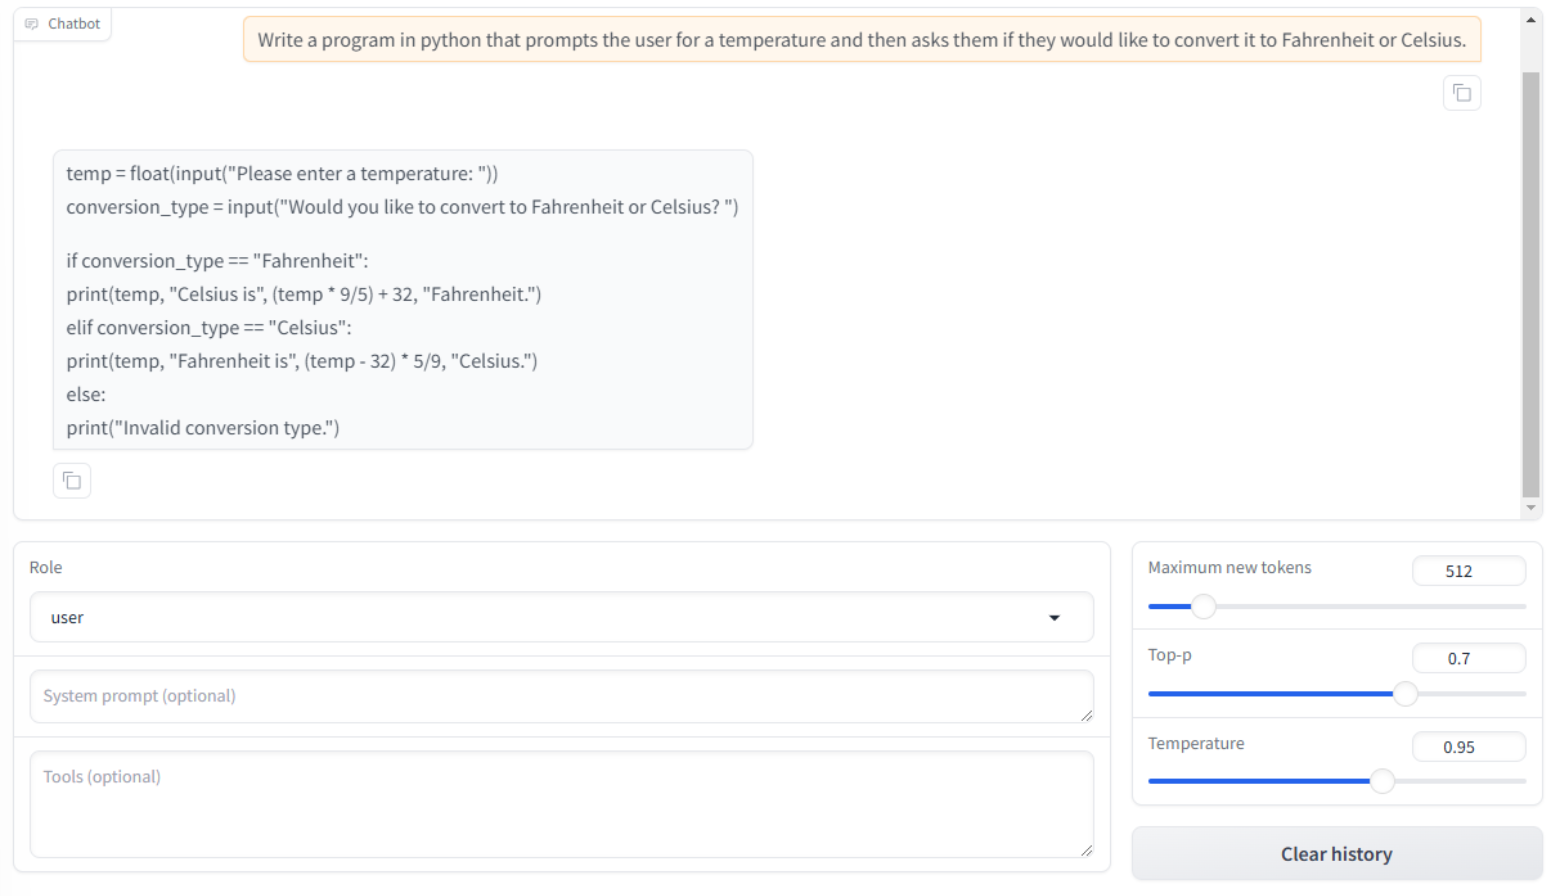
The chatbot will respond with Python code based on the request we made.
You will notice three settings underneath the chat window. You can adjust these settings until you achieve your desired response.
Maximum new tokens - This determines how many new tokens can be generated when a response is produced. This will set the limit for the length of the generated text.
Top-p - This is also referred to as nucleus sampling and is a parameter that controls the diversity and creativity of text generation during inference. With a higher Top-p, you will see more creative and diverse responses, but they may be less relevant or coherent. With a lower Top-p, you will see more focused and predictable responses, but they may be more repetitive.
Temperature - This setting controls how much randomness or unpredictability is introduced into the generated text.
Temperature = 0 - the model will select the most likely word every time, providing the most predictable output
Temperature = 1 - the original probabilities are used and provide a balance between creativity and focus
Temperature > 1 - the model is more likely to choose unexpected and creative words, potentially leading to a more creative but less coherent response.
The other evaluations are vLLM-OpenAI and GenAI Perf. Merged checkpoints can be deployed via vLLM-OpenAI containers and benchmarked using GenAI Perf.