NVIDIA AI Enterprise Quick Start Guide
Minimal instructions for installing and configuring NVIDIA AI Enterprise.
About this Guide
NVIDIA AI Enterprise Quick Start Guide provides minimal instructions for installing and configuring NVIDIA AI Enterprise on a single node and for configuring a Cloud License Service (CLS) instance. If you need complete instructions, are using multiple nodes, or are using Delegated License Service (DLS) instances to serve licenses, refer to NVIDIA AI Enterprise User Guide and NVIDIA License System User Guide.
1. Getting NVIDIA AI Enterprise
After your order for NVIDIA AI Enterprise is processed, you will receive an order confirmation message from NVIDIA. This message contains information that you need for getting NVIDIA AI Enterprise from the NVIDIA Licensing Portal. To log in to the NVIDIA Licensing Portal, you must have an NVIDIA Enterprise Account.
1.1. Before You Begin
Before following the procedures in this guide, ensure that the following prerequisites are met:
- You have a server platform that is capable of hosting your chosen hypervisor and NVIDIA GPUs that support NVIDIA AI Enterprise.
- One or more NVIDIA GPUs that support NVIDIA AI Enterprise is installed in your server platform.
- A supported virtualization software stack is installed according to the instructions in the software vendor's documentation.
- A virtual machine (VM) running a supported guest operating system (OS) is configured in your chosen hypervisor.
For information about supported hardware and software, and any known issues for this release of NVIDIA AI Enterprise, refer to NVIDIA AI Enterprise Release Notes.
1.2. Your Order Confirmation Message
After your order for NVIDIA AI Enterprise is processed, you will receive an order confirmation message to which your NVIDIA Entitlement Certificate is attached.
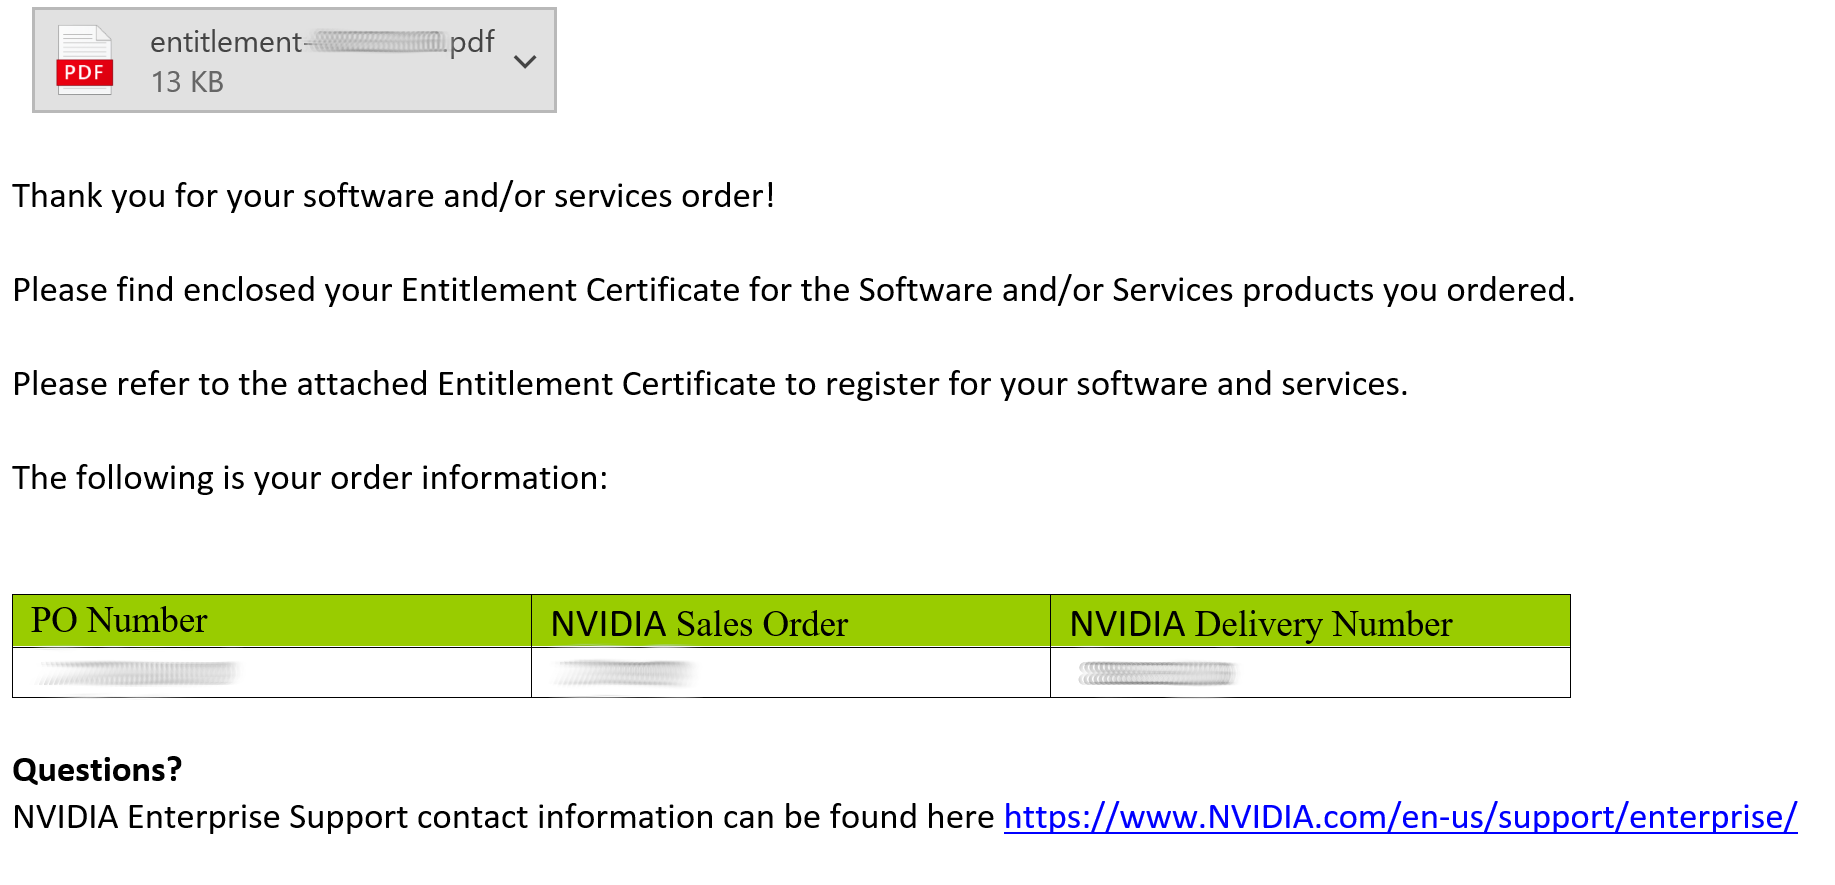
Your NVIDIA Entitlement Certificate contains your product activation keys.
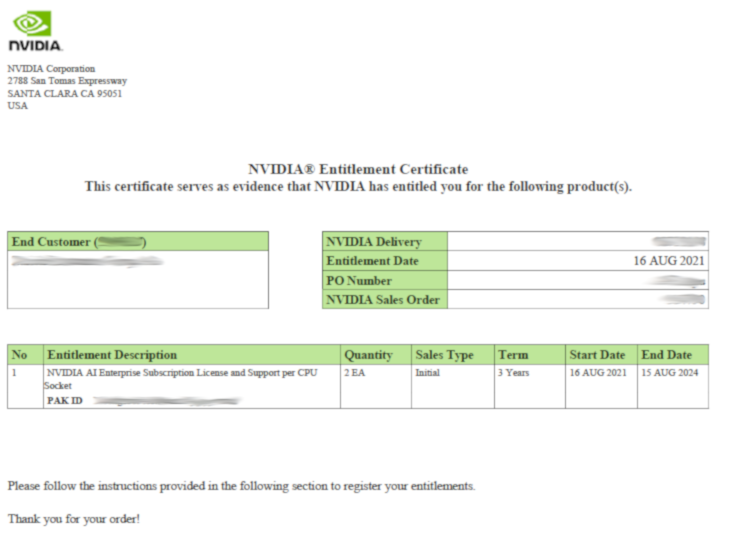
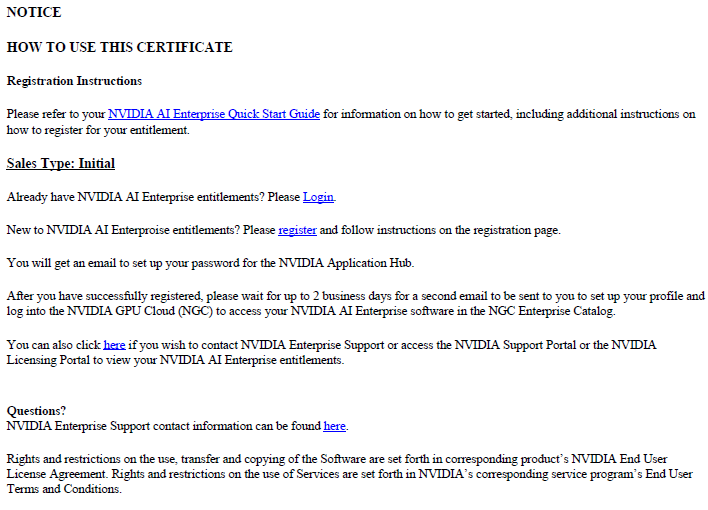
Your NVIDIA Entitlement Certificate also provides instructions for using the certificate.
1.3. NVIDIA Enterprise Account Requirements
To get NVIDIA AI Enterprise, you must have a suitable NVIDIA Enterprise Account for accessing your licenses.
- If you do not have an account, follow the Register link in the instructions for using the certificate to create your account. For details, refer to Creating your NVIDIA Enterprise Account.
- If you have an account that was created for an evaluation license and you
want to access licenses that you purchased, follow the
Register link in the instructions for using the
certificate to create an account for your purchased licenses. You can choose
to create a separate account for your purchased licenses or link your existing
account for an evaluation license to the account for your purchased licenses.
- To create a separate account for your purchased licenses, follow the instructions in Creating your NVIDIA Enterprise Account, specifying a different e-mail address than the address with which you created your existing account.
- To link your existing account for an evaluation license to the account for your purchased licenses, follow the instructions in Linking an Evaluation Account to an NVIDIA Enterprise Account for Purchased Licenses, specifying the e-mail address with which you created your existing account.
- If you already have a suitable NVIDIA Enterprise Account for accessing your licenses, follow the Login link in the instructions for using the certificate to log in to the NVIDIA Enterprise Application Hub, go to the NVIDIA Licensing Portal, and download your NVIDIA AI Enterprise. For details, refer to Downloading NVIDIA AI Enterprise.
1.4. Creating your NVIDIA Enterprise Account
If you do not have an NVIDIA Enterprise Account, you must create an account to be able to log in to the NVIDIA Licensing Portal.
If you already have an account, skip this task and go to Downloading NVIDIA AI Enterprise.
However, if you have an account that was created for an evaluation license and you want to access licenses that you purchased, you must repeat the registration process when you receive your purchased licenses. You can choose to create a separate account for your purchased licenses or link your existing account for an evaluation license to the account for your purchased licenses.
- To create a separate account for your purchased licenses, perform this task, specifying a different e-mail address than the address with which you created your existing account.
- To link your existing account for an evaluation license to the account for your purchased licenses, follow the instructions in Linking an Evaluation Account to an NVIDIA Enterprise Account for Purchased Licenses, specifying the e-mail address with which you created your existing account.
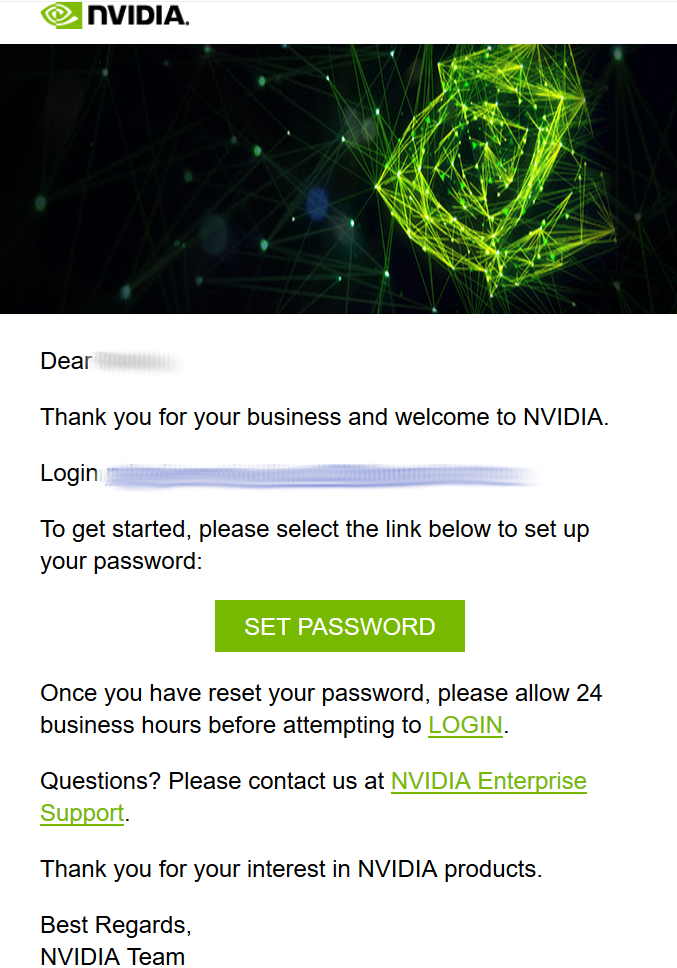
- In the instructions for using your NVIDIA Entitlement Certificate, follow the Register link.
- Fill out the form on the NVIDIA Enterprise Account
Registration page and click Register.
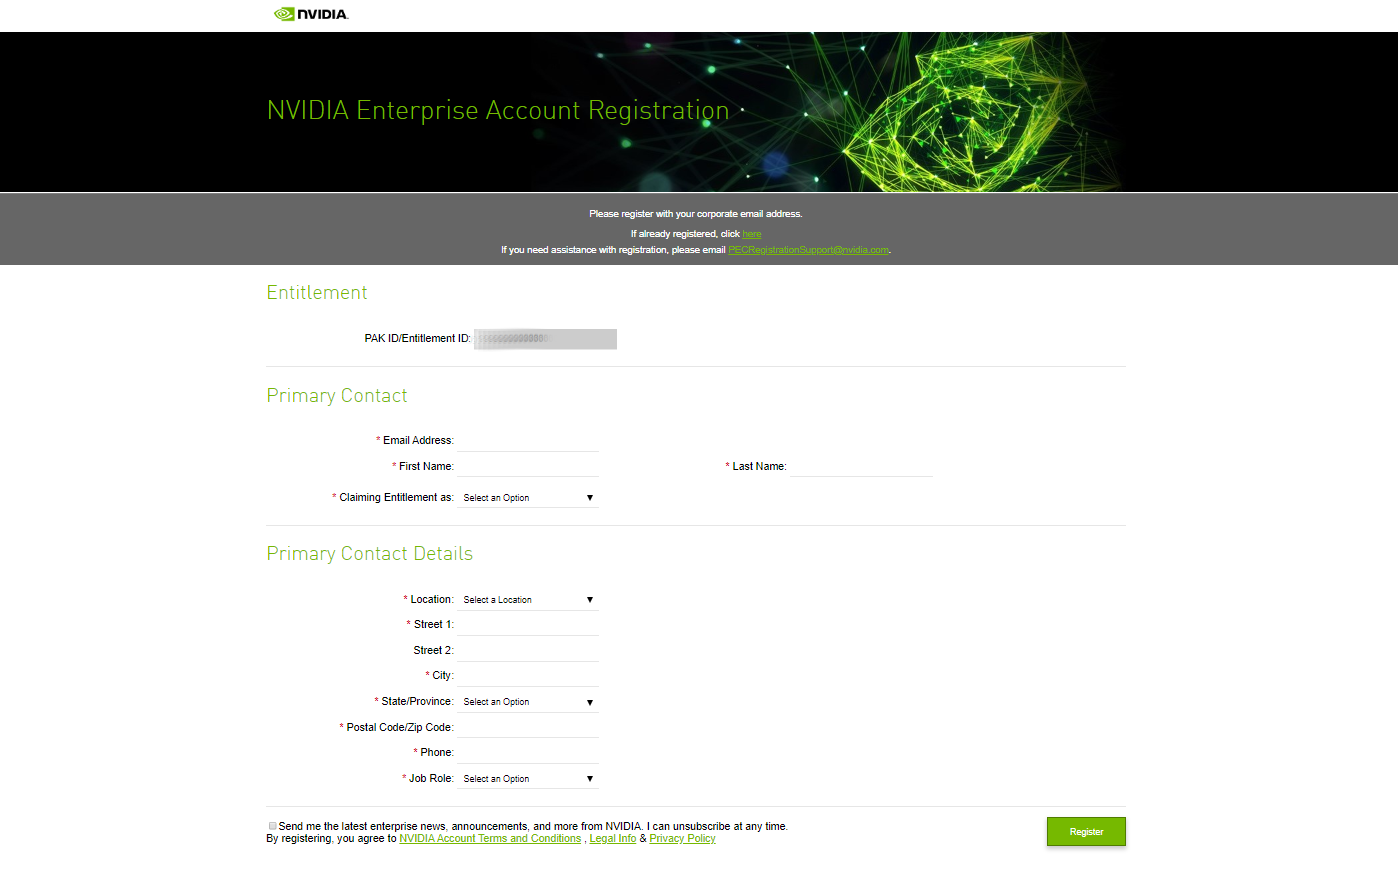
A message confirming that an account has been created appears, and an e-mail instructing you to set your NVIDIA password is sent to the e-mail address you provided. - Open the e-mail instructing you to set your password and click SET
PASSWORD.
 Note: After you have set your password during the initial registration process, you will be able to log in to your account within 15 minutes. However, it may take up to 24 business hours for your entitlement to appear in your account.
For your account security, the SET PASSWORD link in this e-mail is set to expire in 24 hours.
- Enter and re-enter your new password, and click SUBMIT.

A message confirming that your password has been set successfully appears.
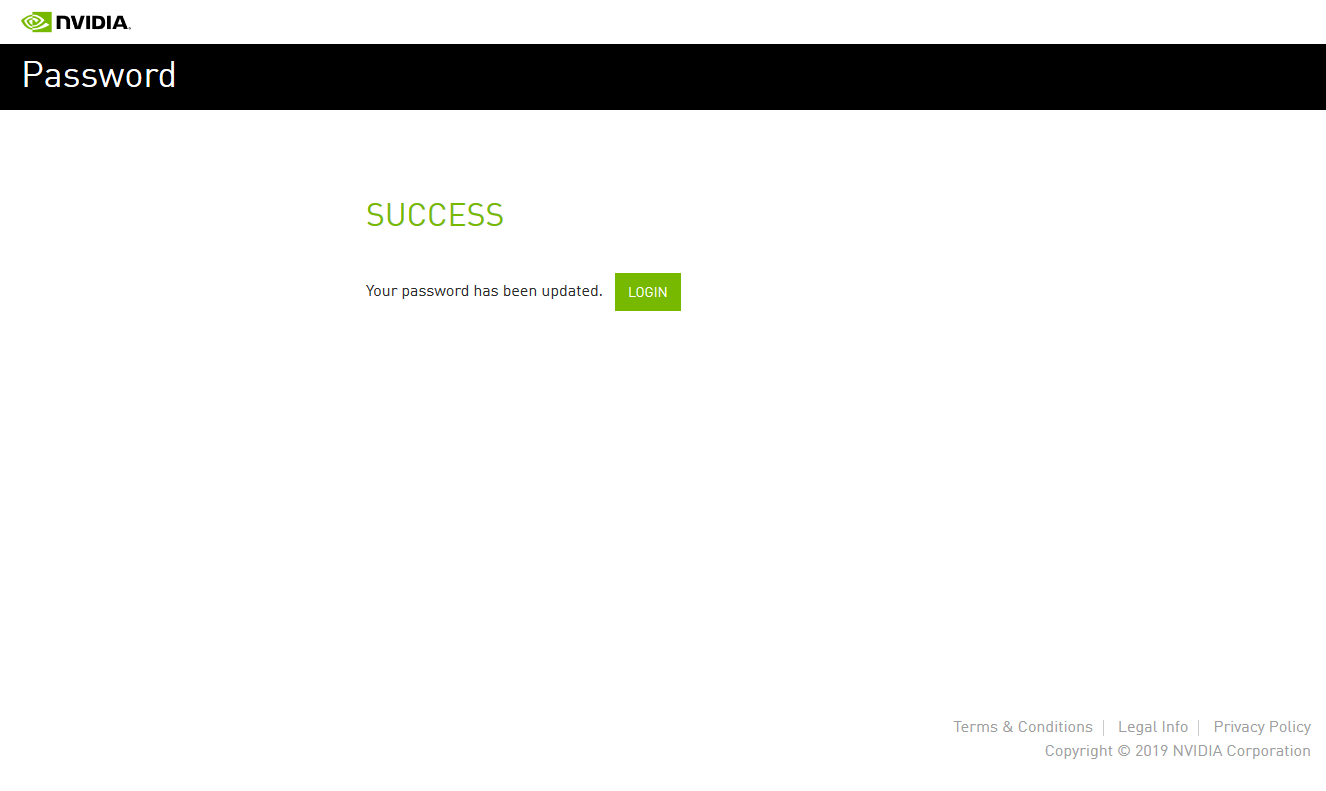
You are then automatically directed to log in to the NVIDIA Licensing Portal with your new password.
1.5. Linking an Evaluation Account to an NVIDIA Enterprise Account for Purchased Licenses
If you want to create a separate account for your purchased licenses, follow the instructions in Creating your NVIDIA Enterprise Account, specifying a different e-mail address than the address with which you created your existing account.
- In the instructions for using the NVIDIA Entitlement Certificate for your purchased licenses, follow the Register link.
- Fill out the form on the NVIDIA Enterprise Account
Registration page, specifying the e-mail address with which you
created your existing account, and click Register.
- When a message stating that your e-mail address is already linked to an
evaluation account is displayed, click LINK TO NEW
ACCOUNT.

1.6. Downloading NVIDIA AI Enterprise
- Visit the NVIDIA Enterprise Application Hub by following the Login link in the instructions for using your NVIDIA Entitlement Certificate or when prompted after setting the password for your NVIDIA Enterprise Account.
- When prompted, provide your e-mail address and password, and click
LOGIN.
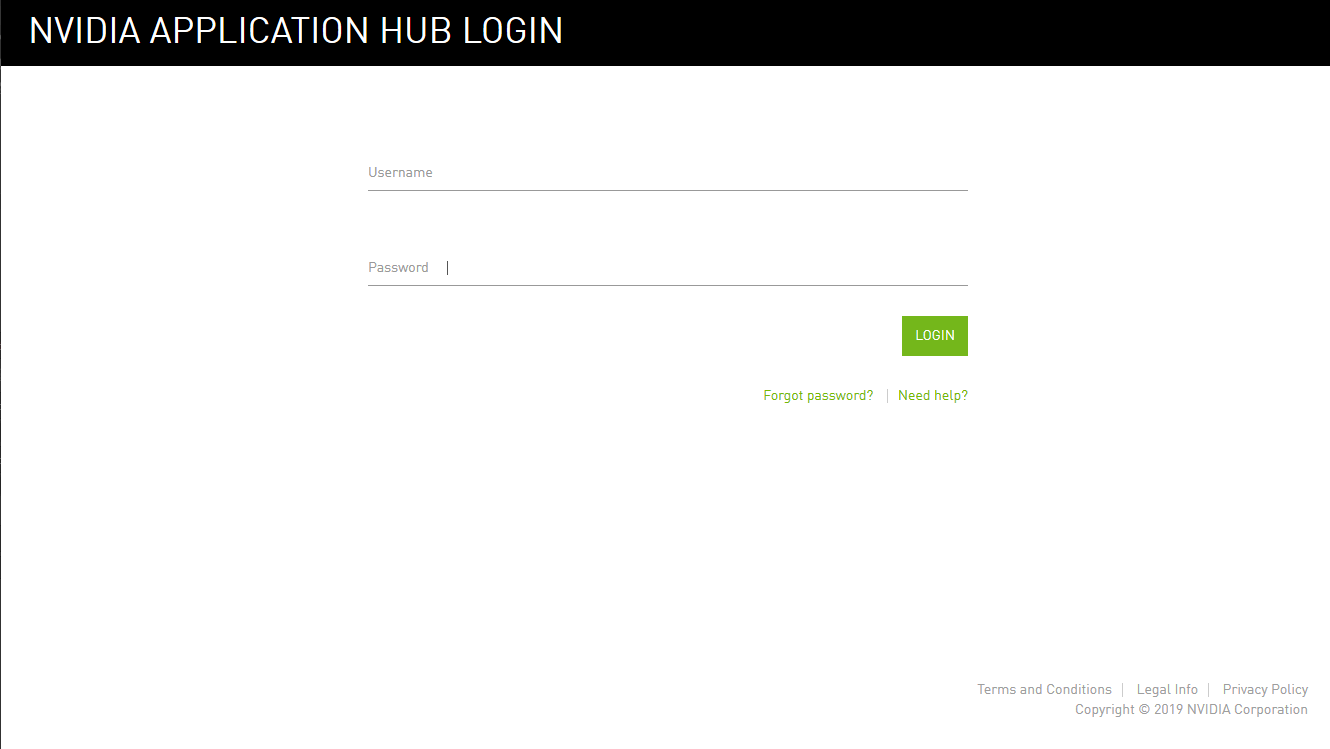
- On the NVIDIA APPLICATION HUB page that opens, click
NVIDIA LICENSING PORTAL.
The NVIDIA Licensing Portal dashboard page opens.
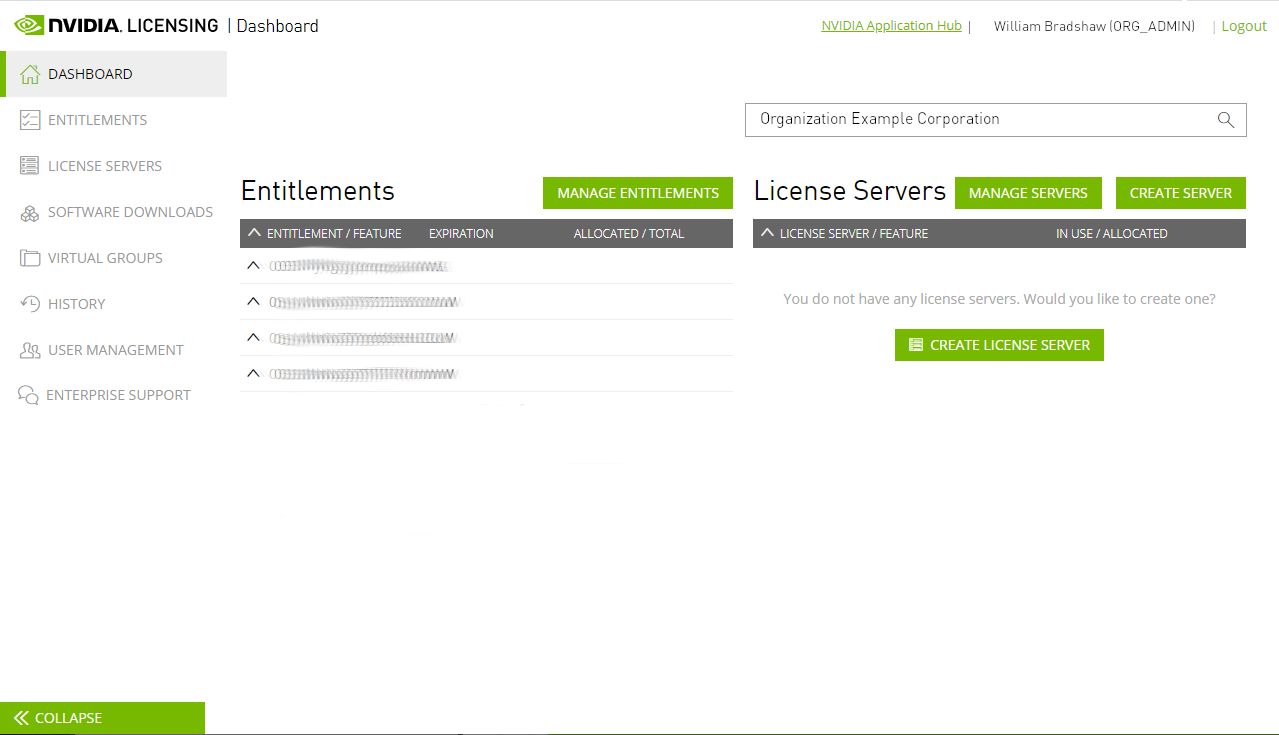 Note: Your entitlement might not appear on the NVIDIA Licensing Portal dashboard page until 24 business hours after you set your password during the initial registration process.
 - In the NVIDIA Licensing Portal dashboard page opens, click the down
arrow next to each entitlement listed to view details of the NVIDIA AI Enterprise
that you purchased.
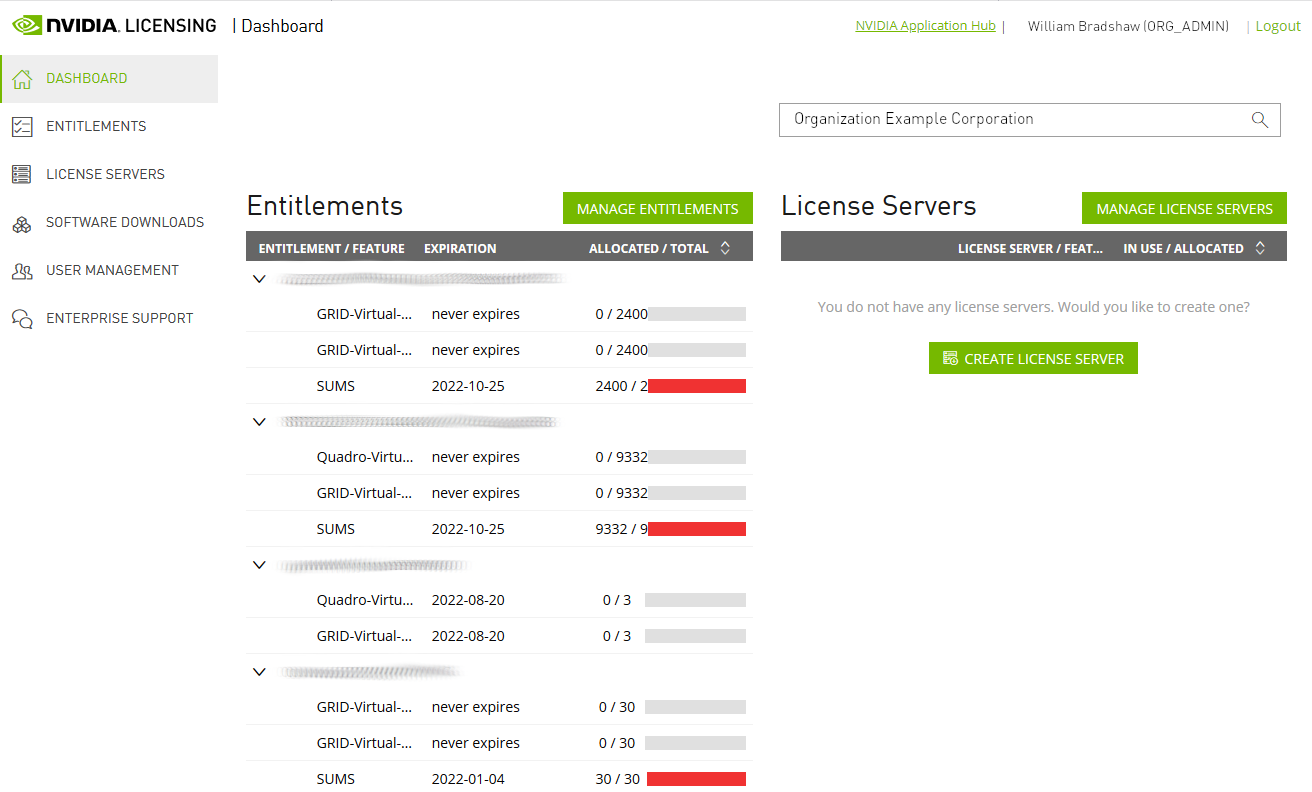
- In the left navigation pane of the NVIDIA Licensing Portal dashboard, click SOFTWARE DOWNLOADS.
- On the Product Download page that opens, set the Product Family option to NVAIE and follow the Download link for NVIDIA AI Enterprise.
- When prompted to accept the license for the software that you are downloading, click AGREE & DOWNLOAD.
- When the browser asks what it should do with the file, select the option to save the
file.
After the download starts, a pop-up window opens for you to download any additional software that you might need for your NVIDIA AI Enterprise deployment.
- In the pop-up window, follow the links to download any
additional software that you need for your NVIDIA AI Enterprise deployment.
- If you are using Delegated License Service (DLS) instances to serve licenses, follow the link to DLS 1.0 for your chosen hypervisor, for example, DLS 1.0 for VMware vSphere. For information about installing and configuring DLS instances, refer to NVIDIA License System User Guide.
2. Accessing the Enterprise Catalog and the NGC Private Registry
2.1. The Enterprise Catalog
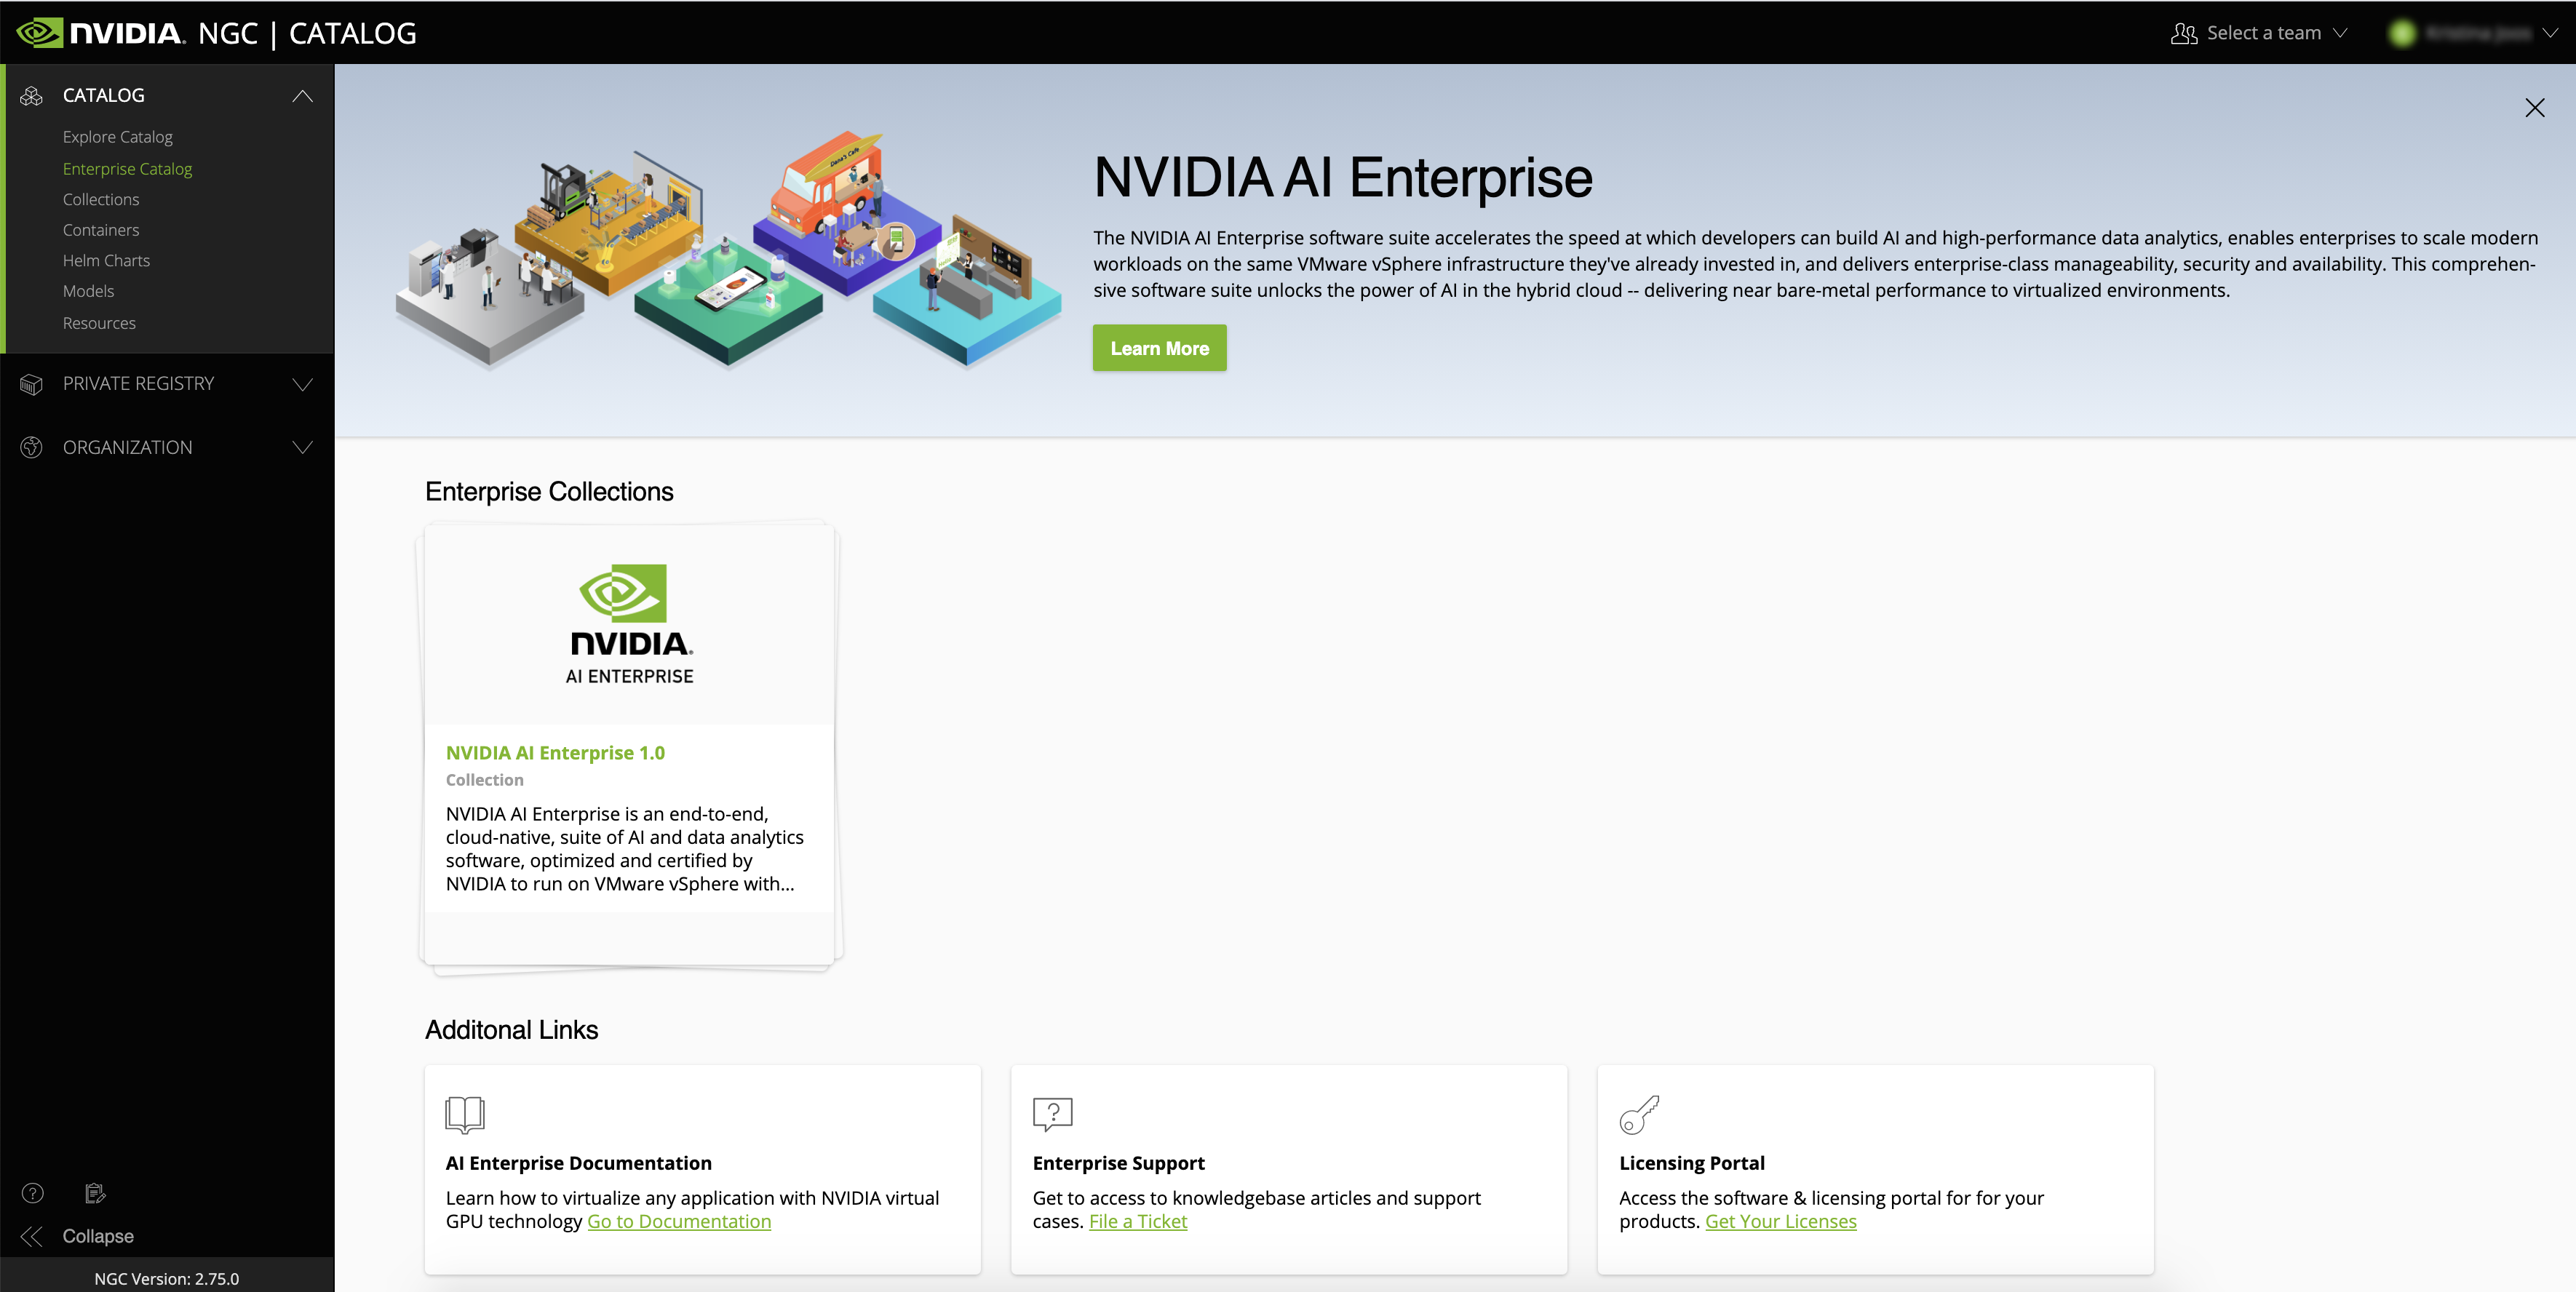
The NVIDIA AI Enterprise Software Suite is distributed through the Enterprise Catalog. After you access the Enterprise Catalog, you will see the NVIDIA AI Enterprise Software Suite collection. Detailed documentation makes it easy to utilize the software, and if additional support is required, users can submit the ticket directly from the portal.
2.1.1. Setting Up Your Access to the Enterprise Catalog
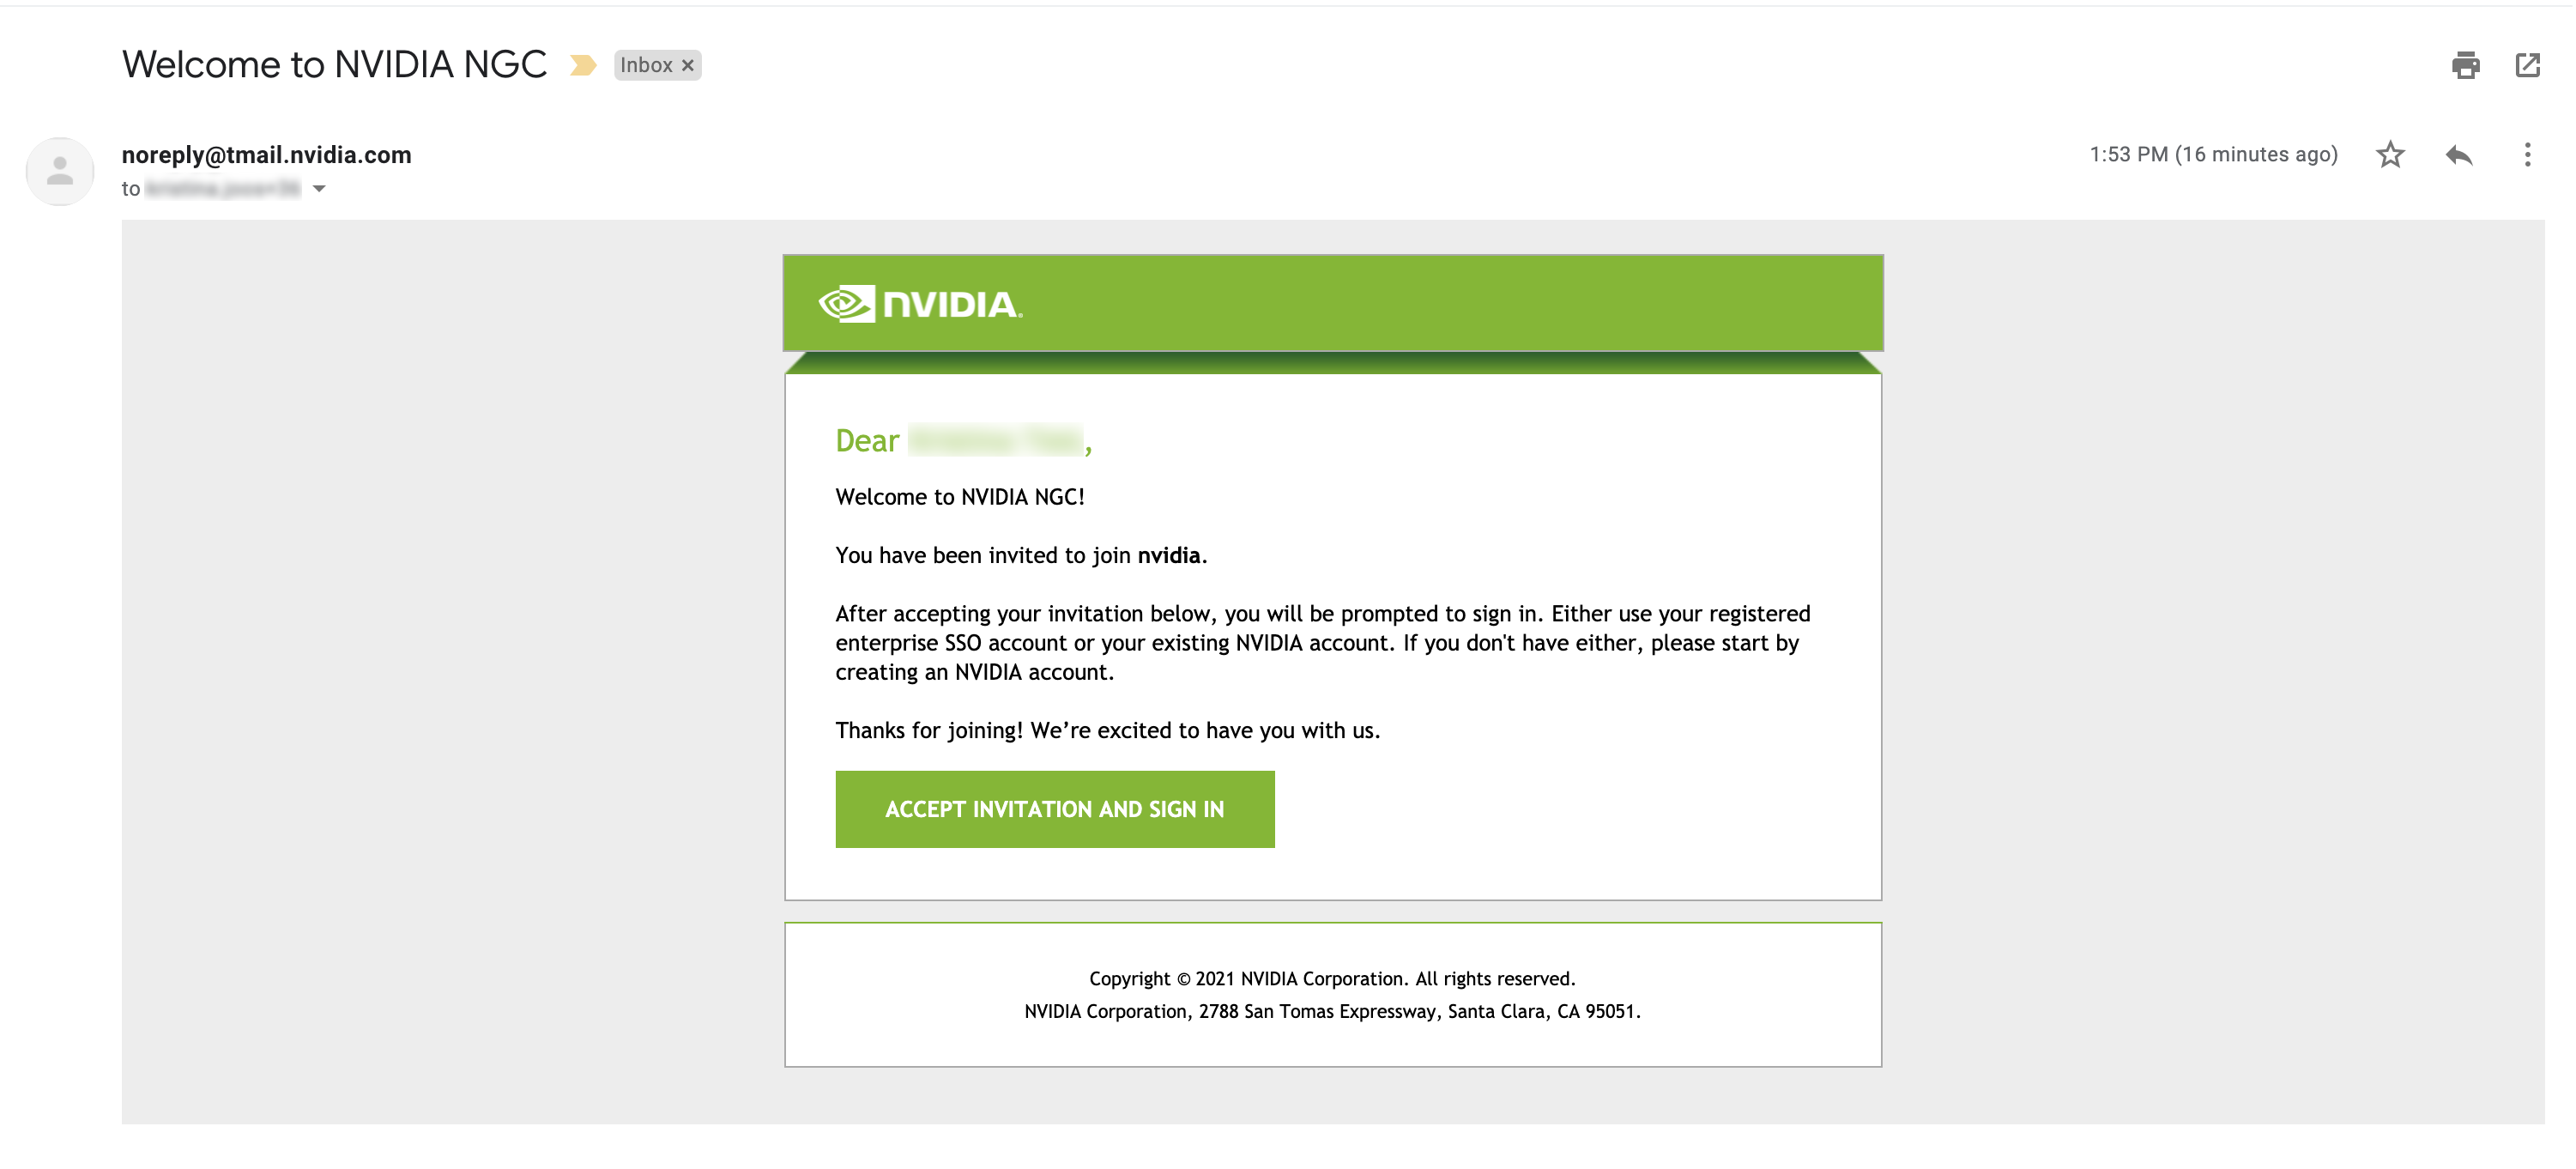
- After your access was set up, you will receive a welcome email that invites you to continue the login process. Click on Activate Account.
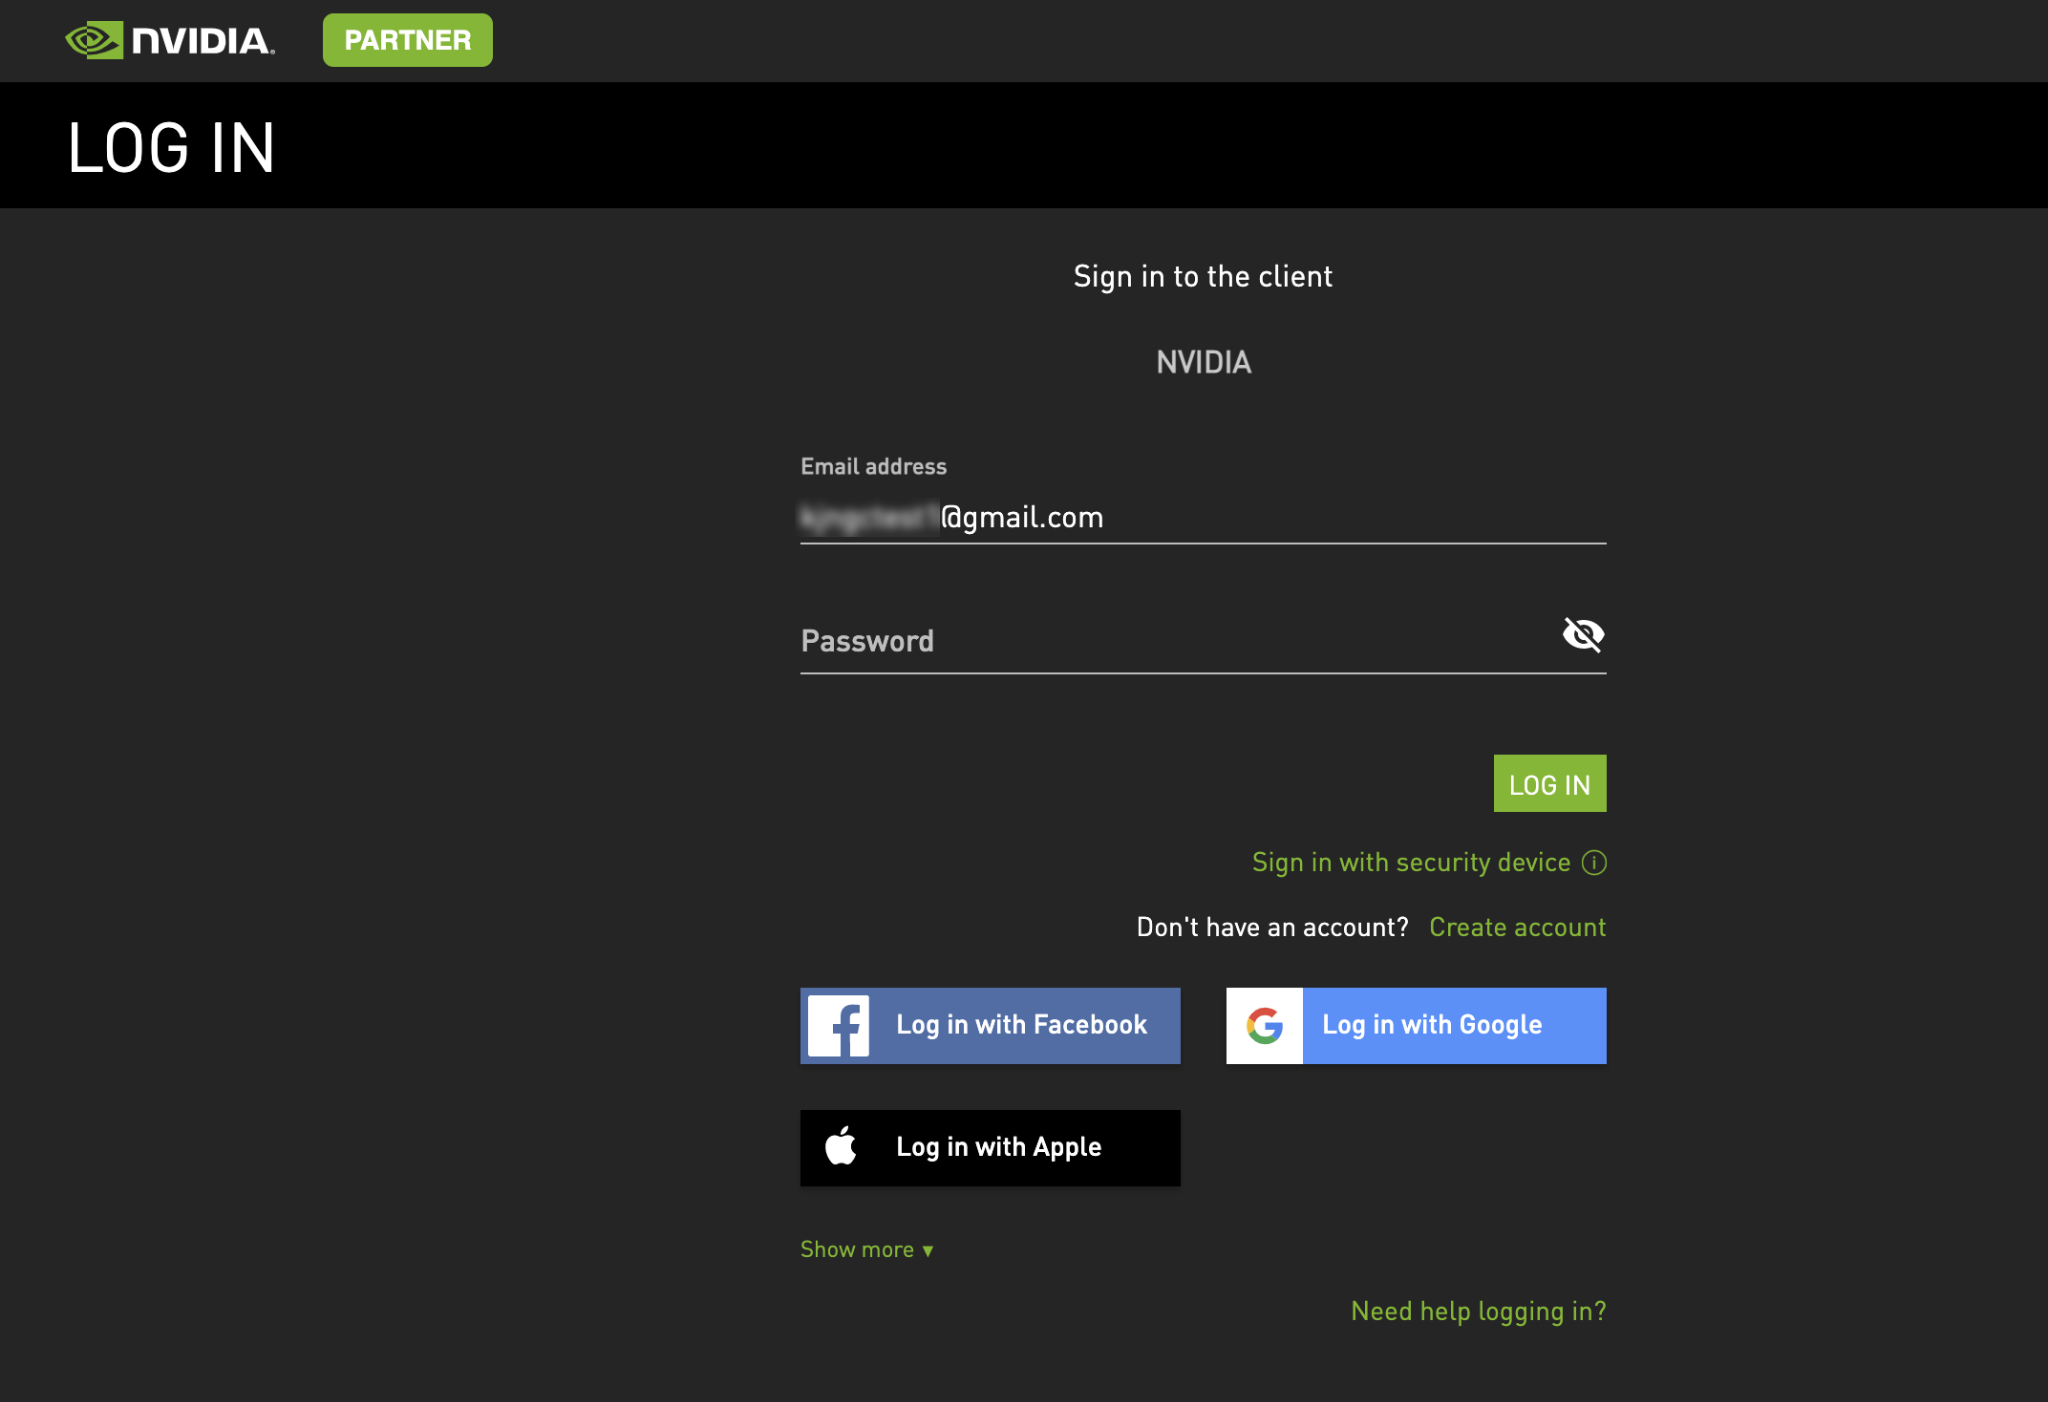
- Click on Create Account to create a new NVIDIA account. If you
already have an existing NVIDIA account linked to this email address, login
here.
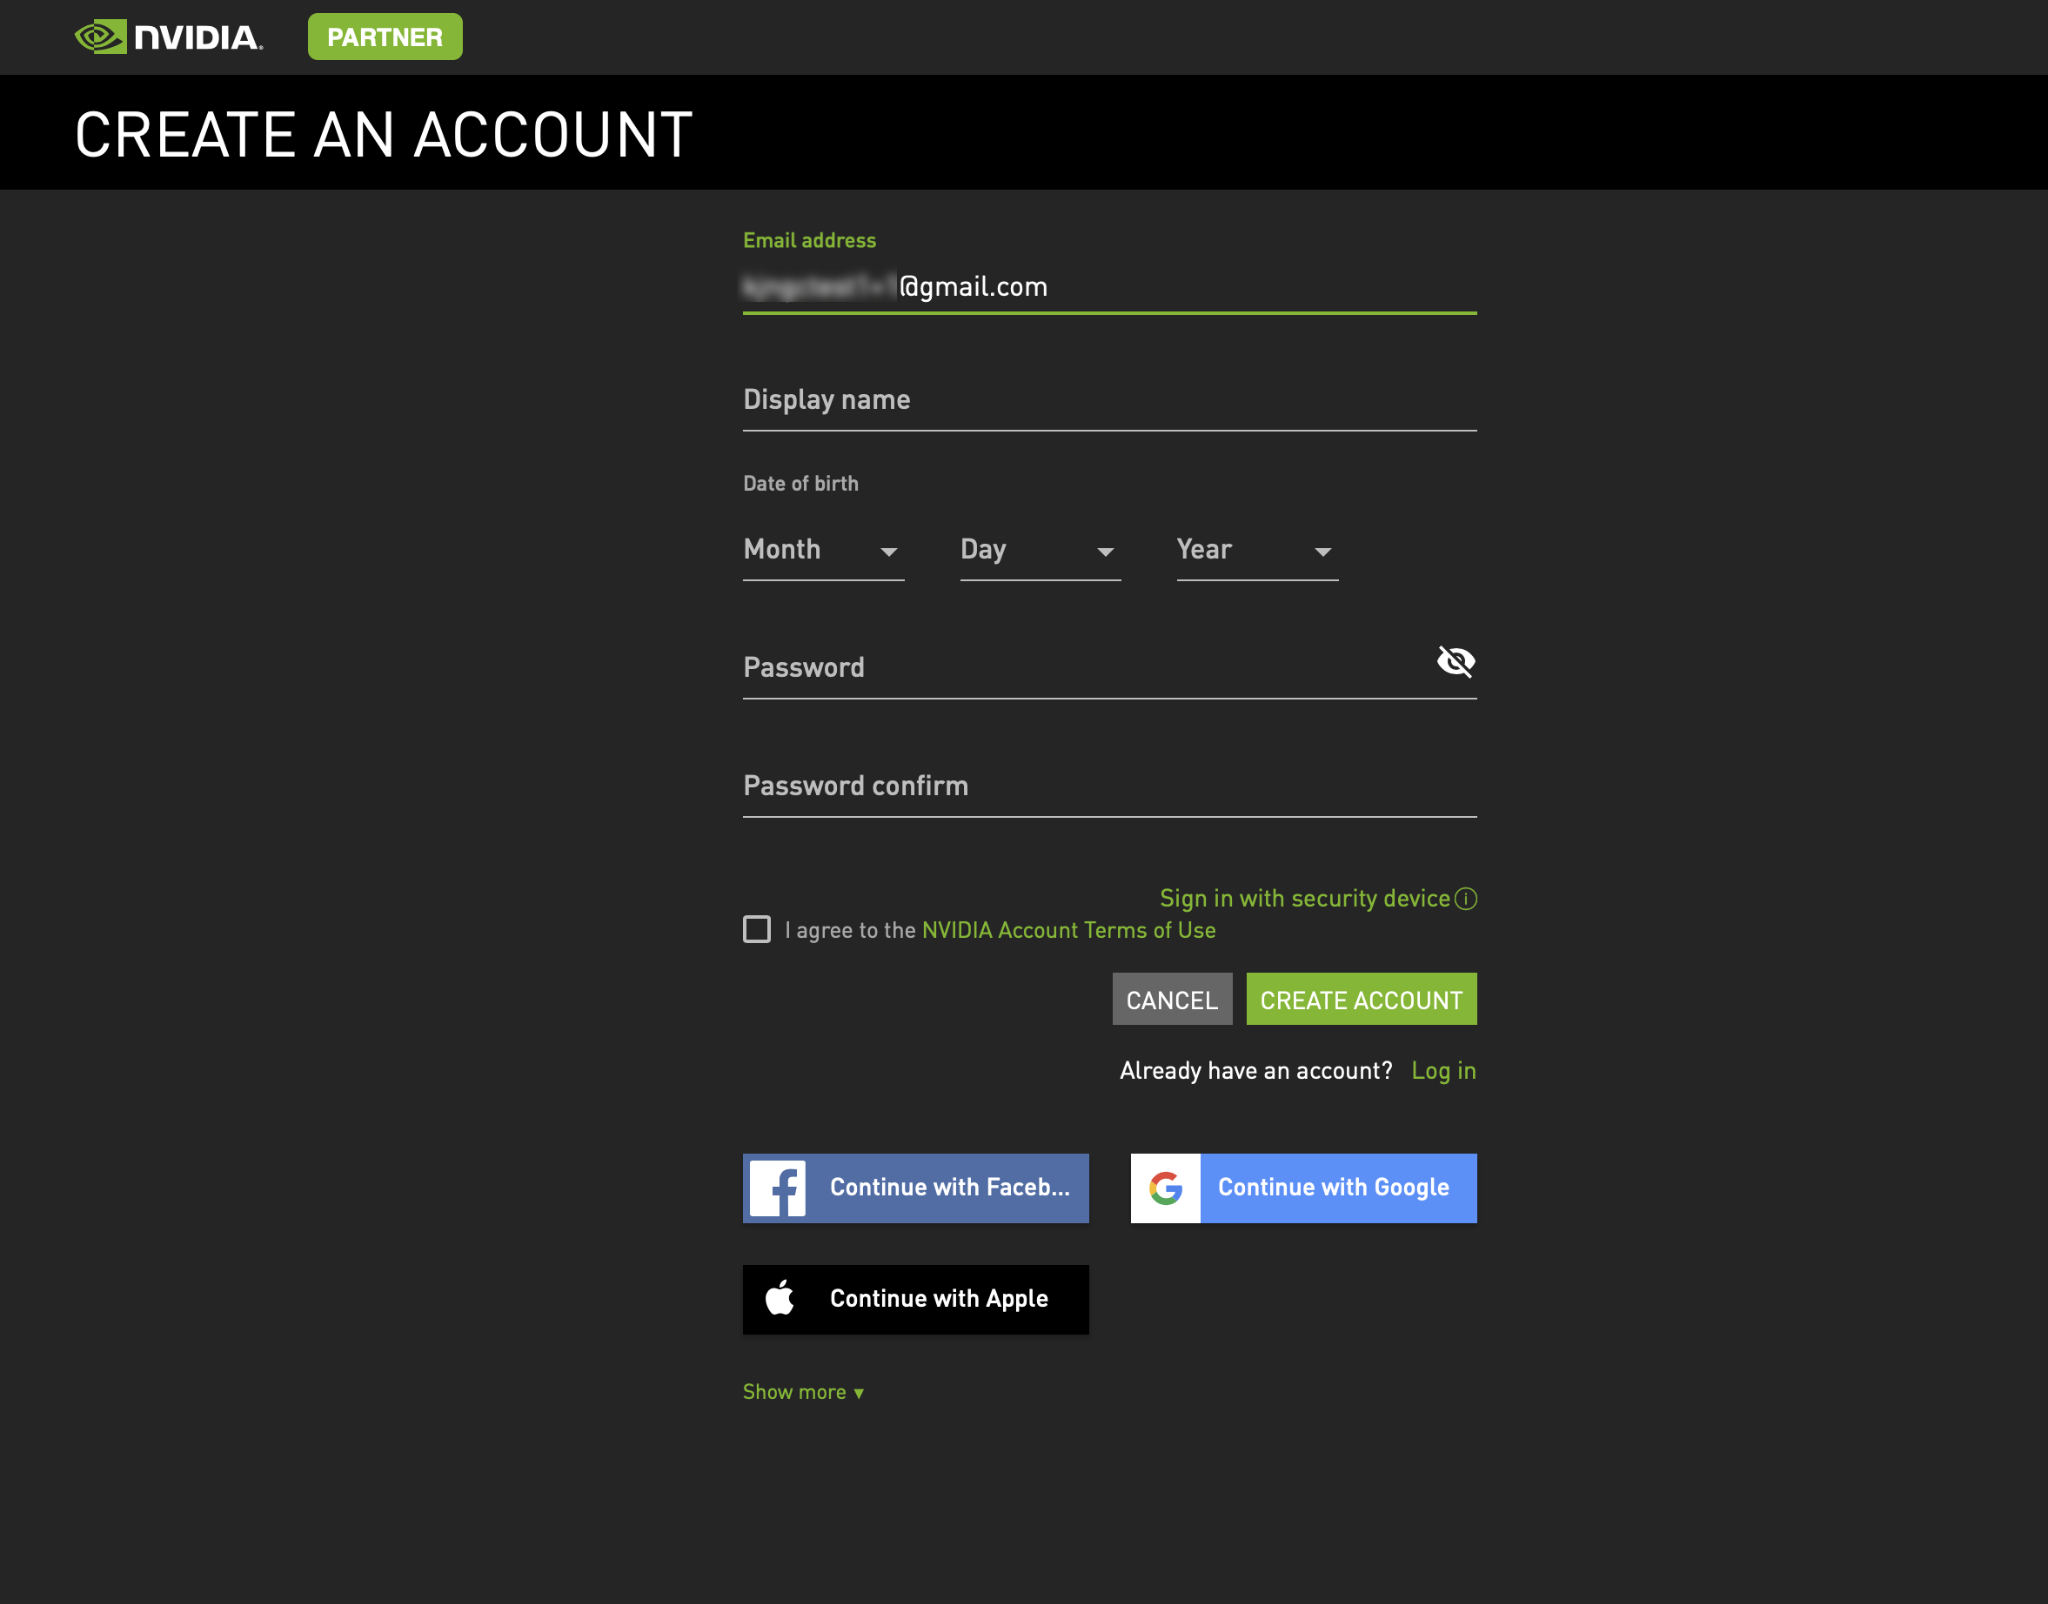
- Provide account details and accept the NVIDIA Account Terms of Use. Click on
Create Account.
- To complete your profile, you are asked to verify your account.
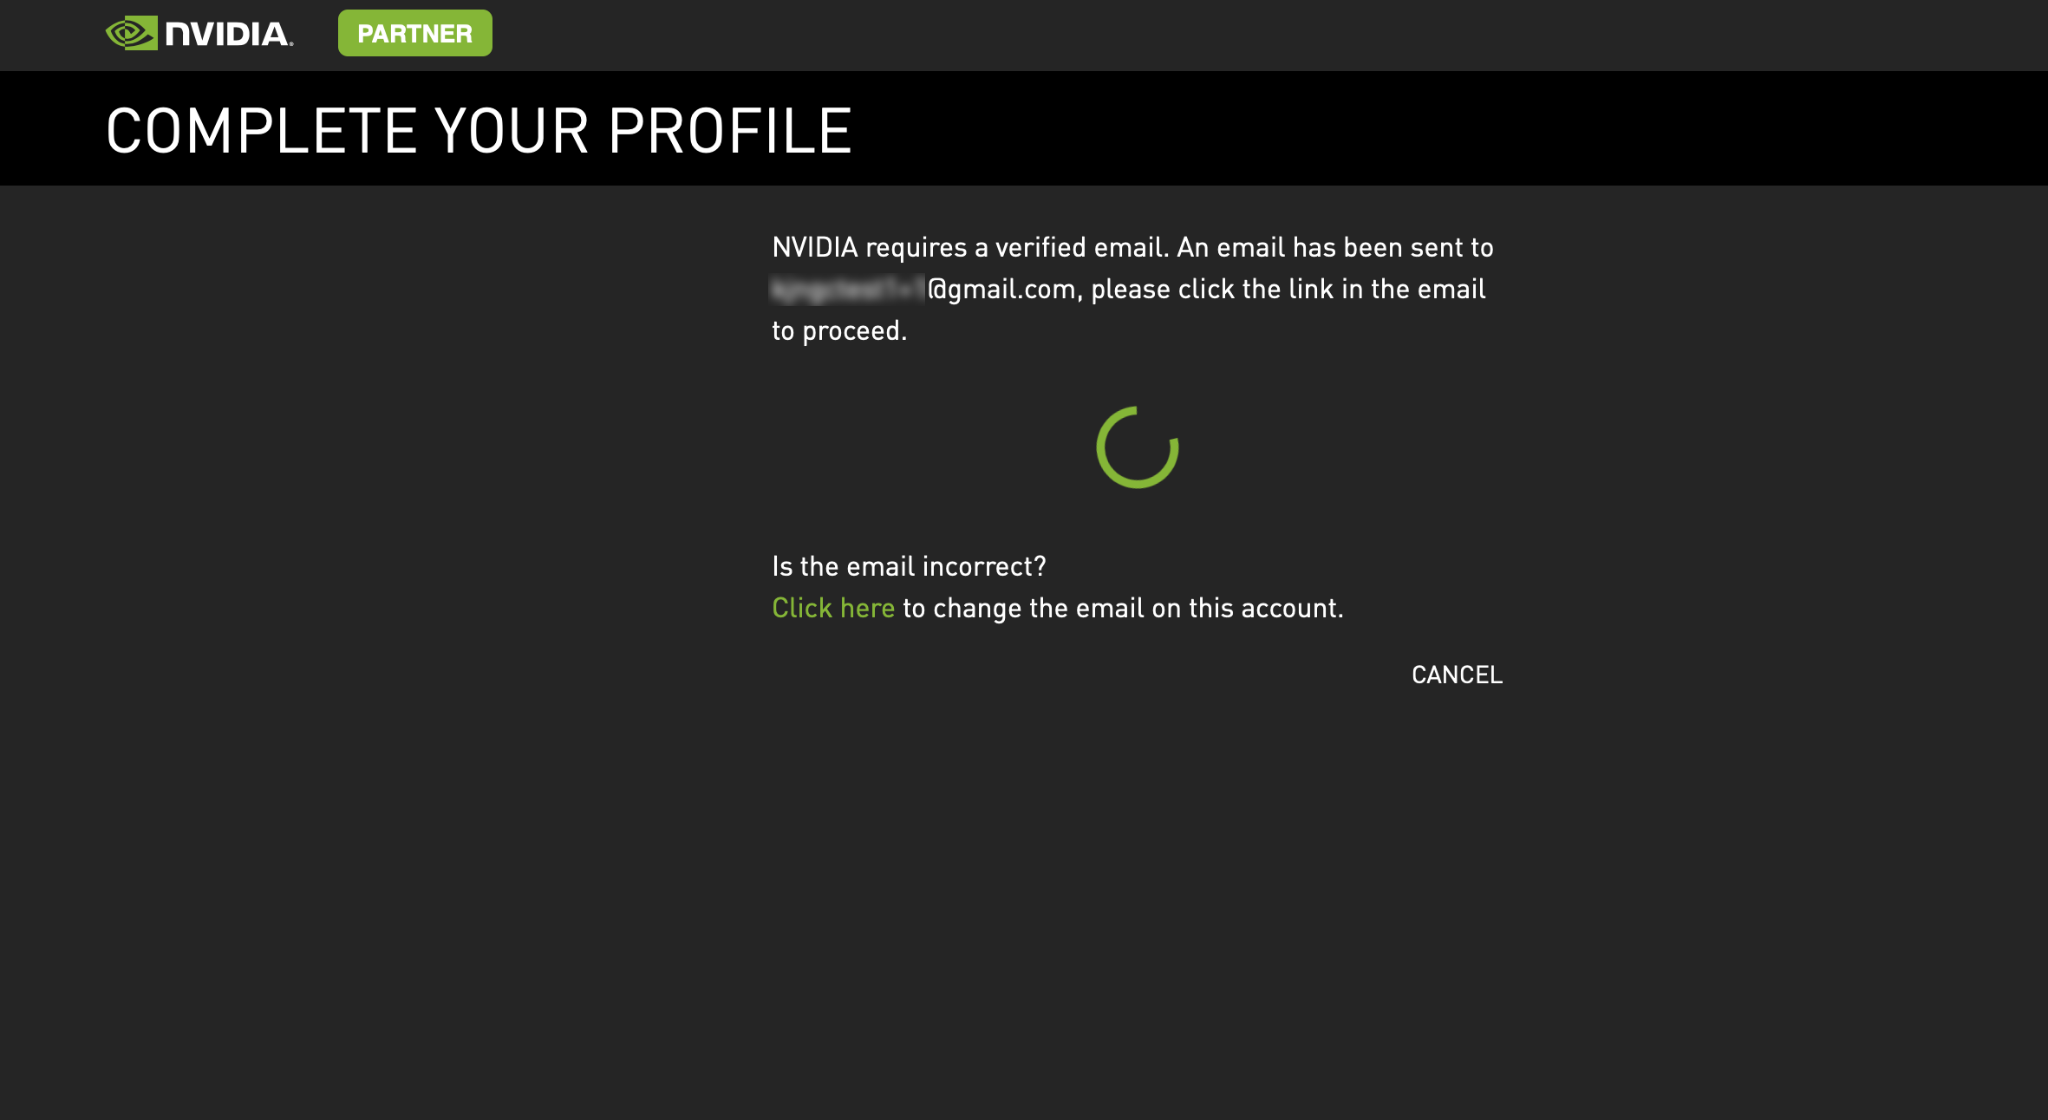
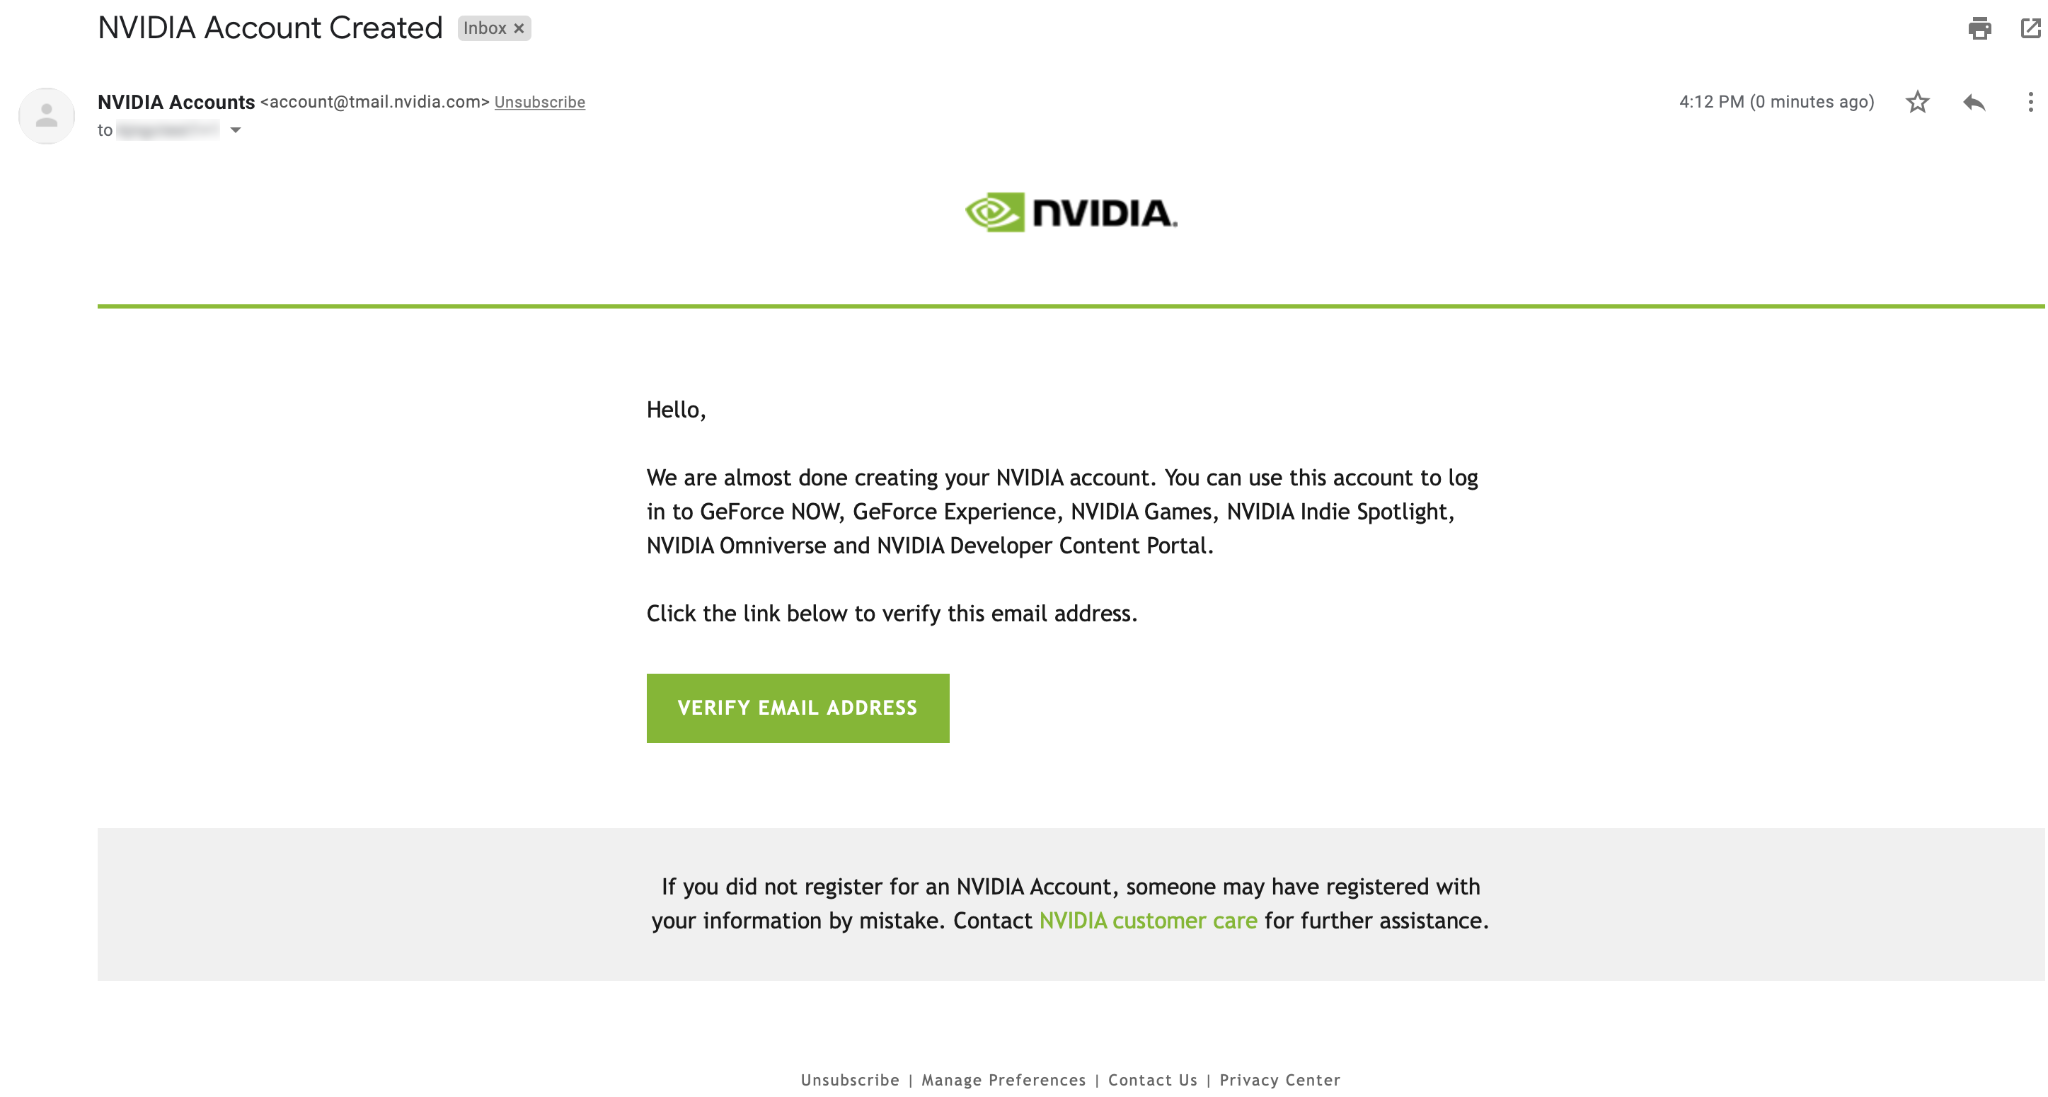
- Go to your email inbox, open the “NVIDIA Account Created” email, and click on
Verify Email Address.
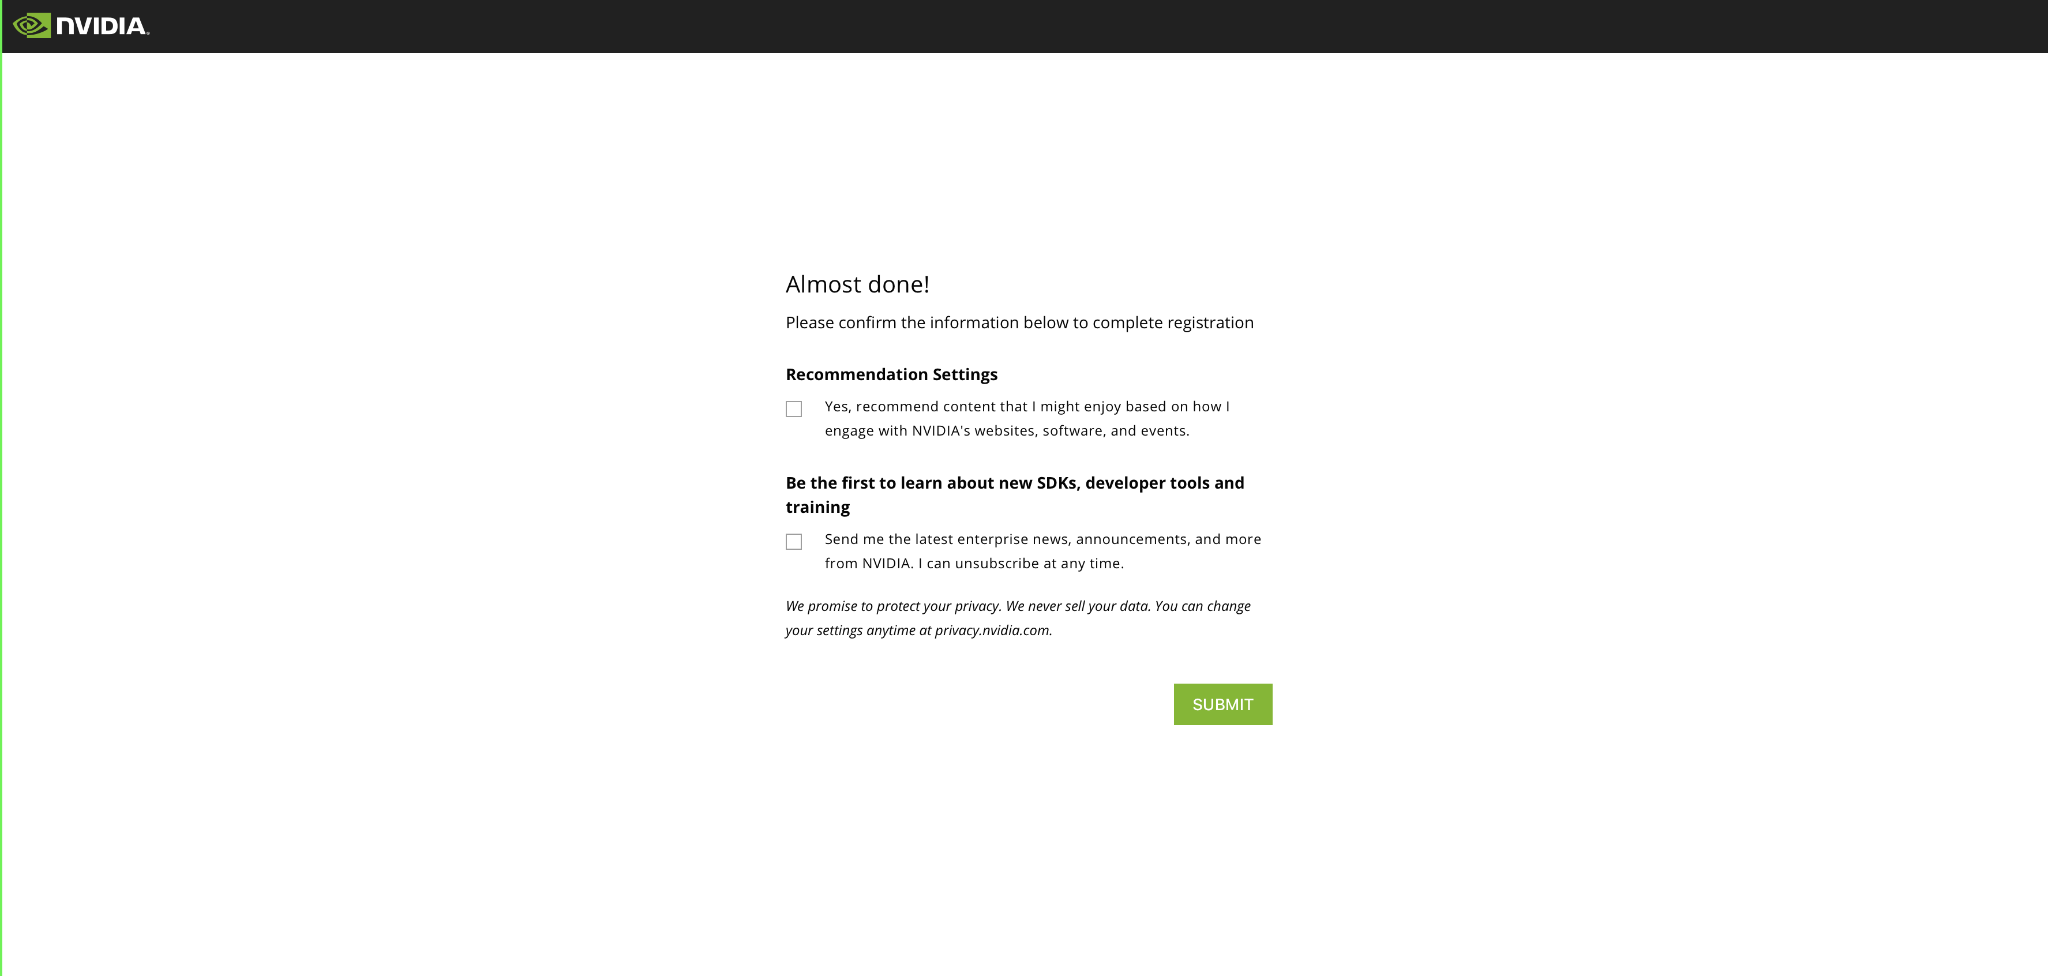
- You are redirected to the following screen. Set your recommendation settings.
Click Submit.
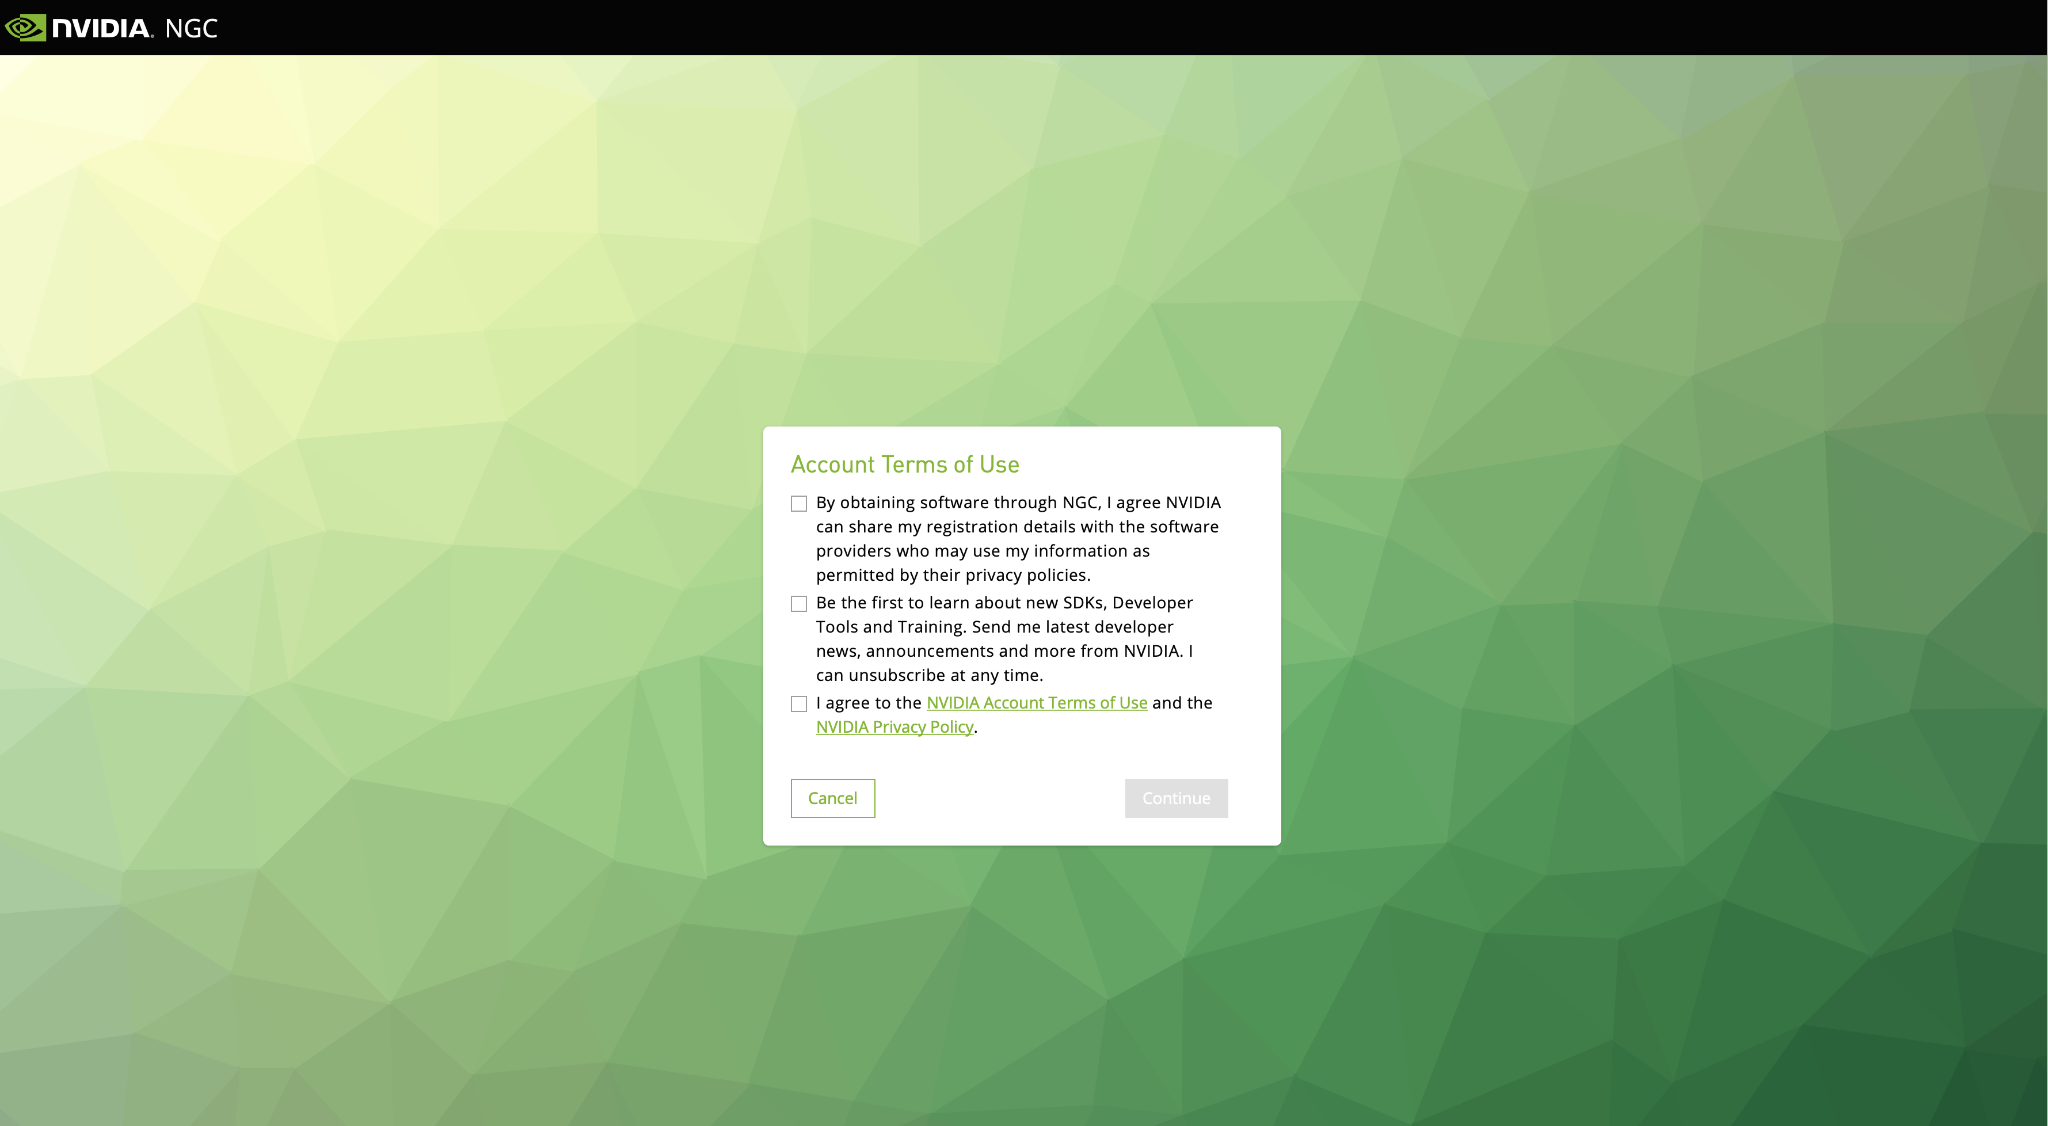
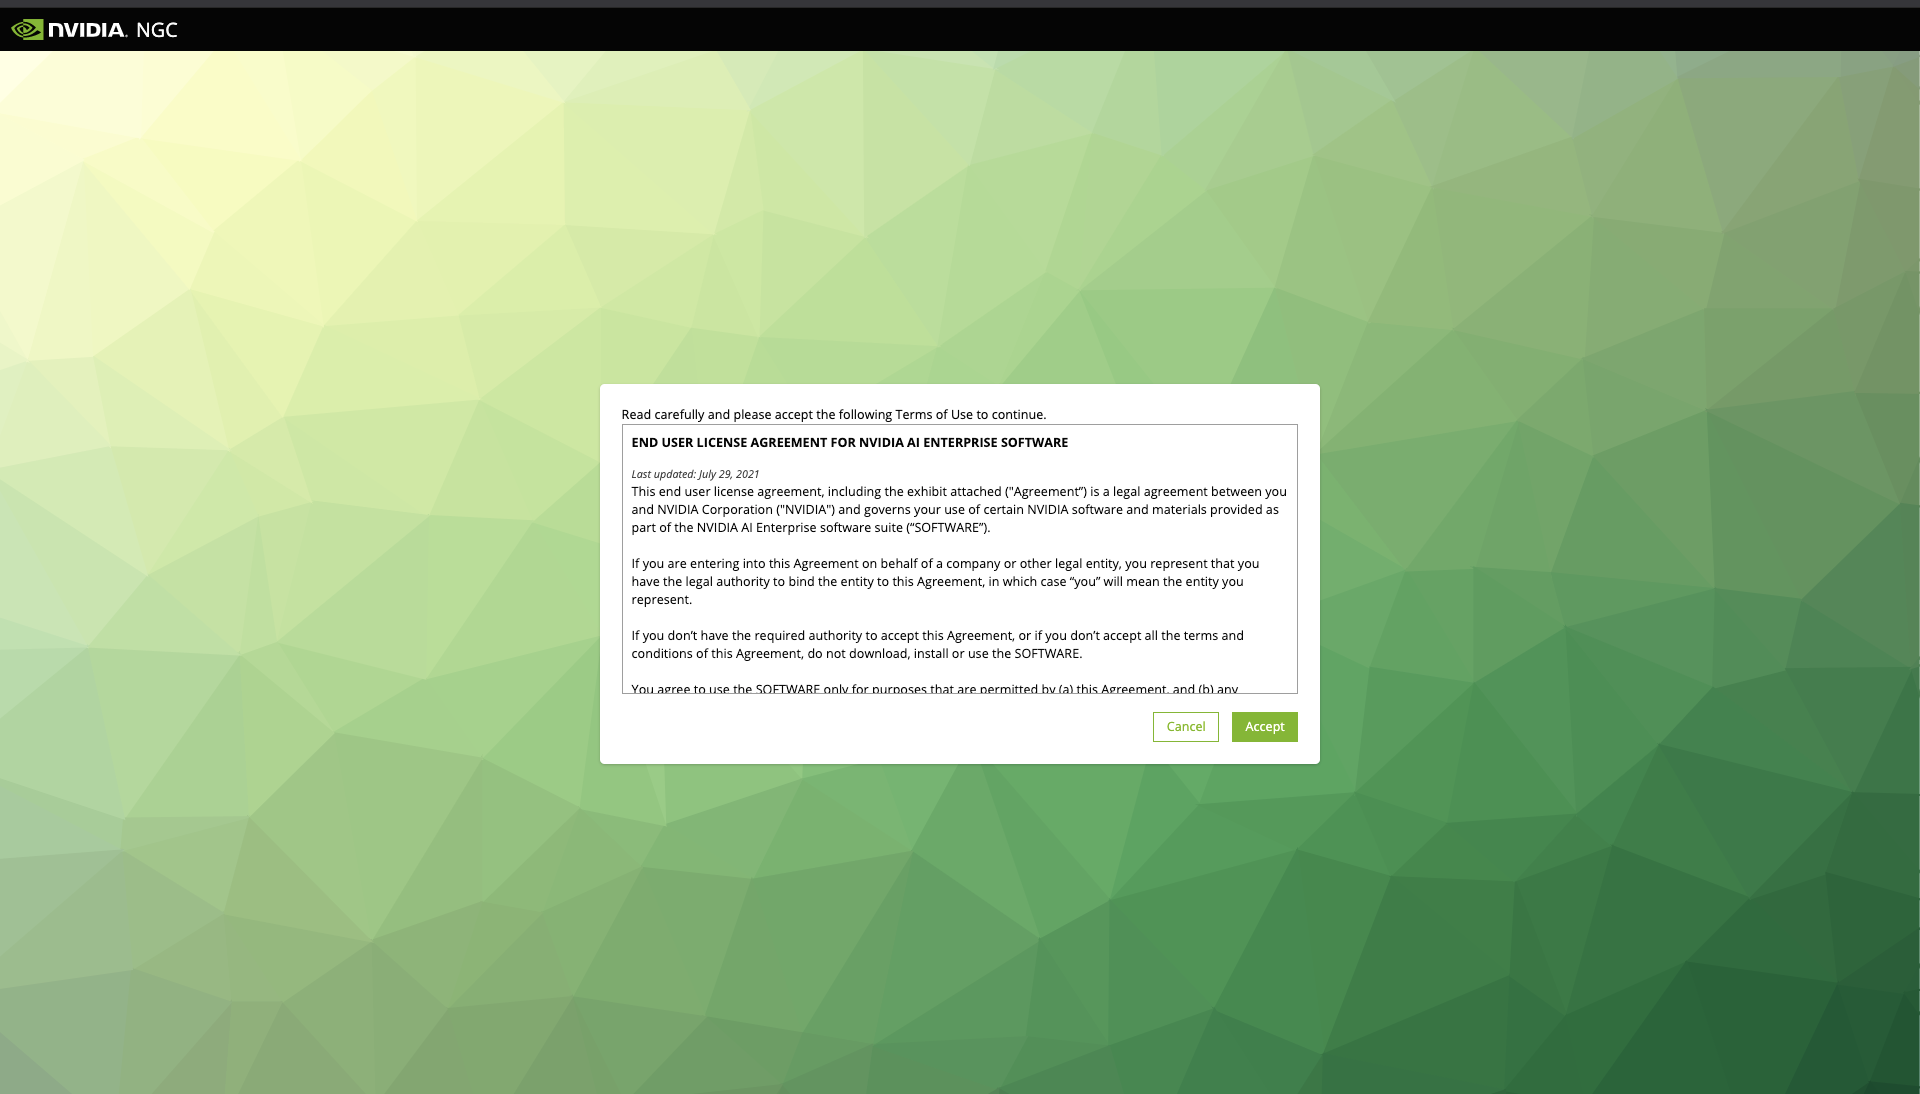
- Review and accept the NVIDIA Account Terms of Use and the NVIDIA
Privacy Policy.
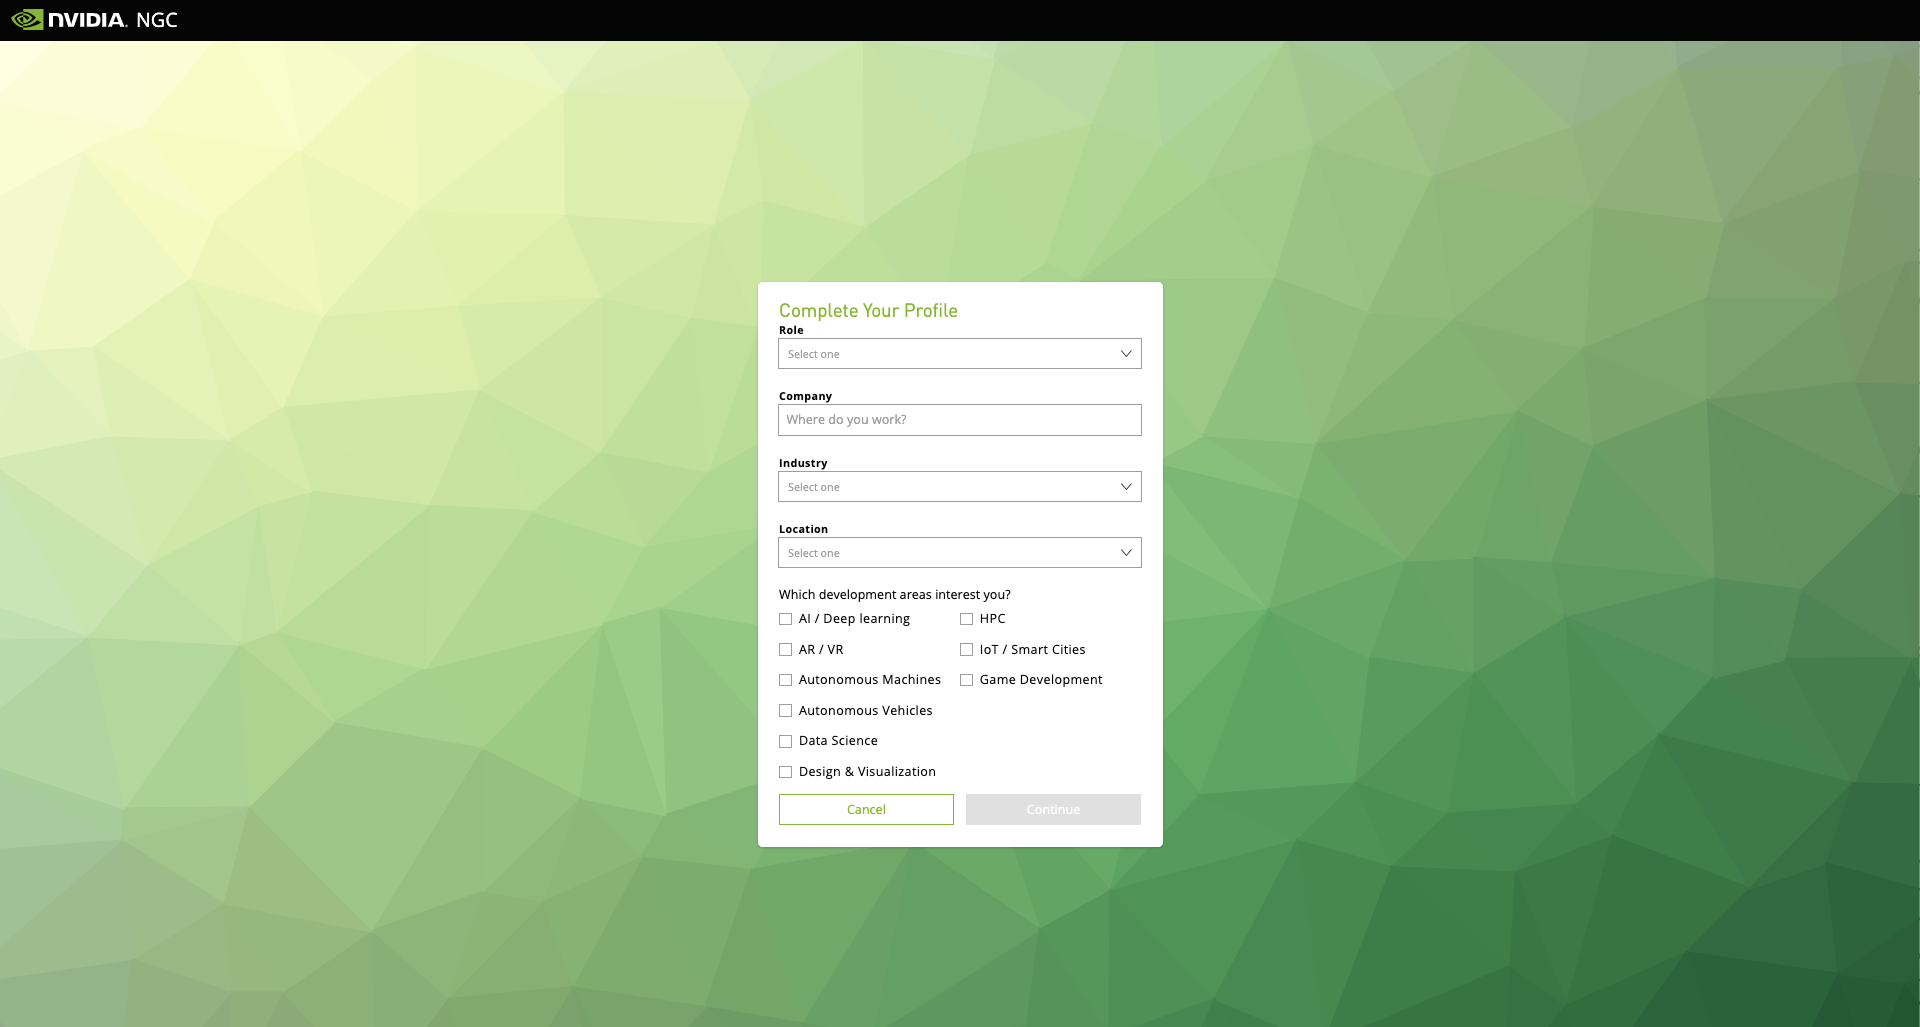
- Complete your profile by providing the information below. Click
Continue.
- Review and Accept the NVIDIA GPU Cloud Terms of Use and Consent.

- Review and Accept the NVIDIA AI Enterprise Terms of Use.
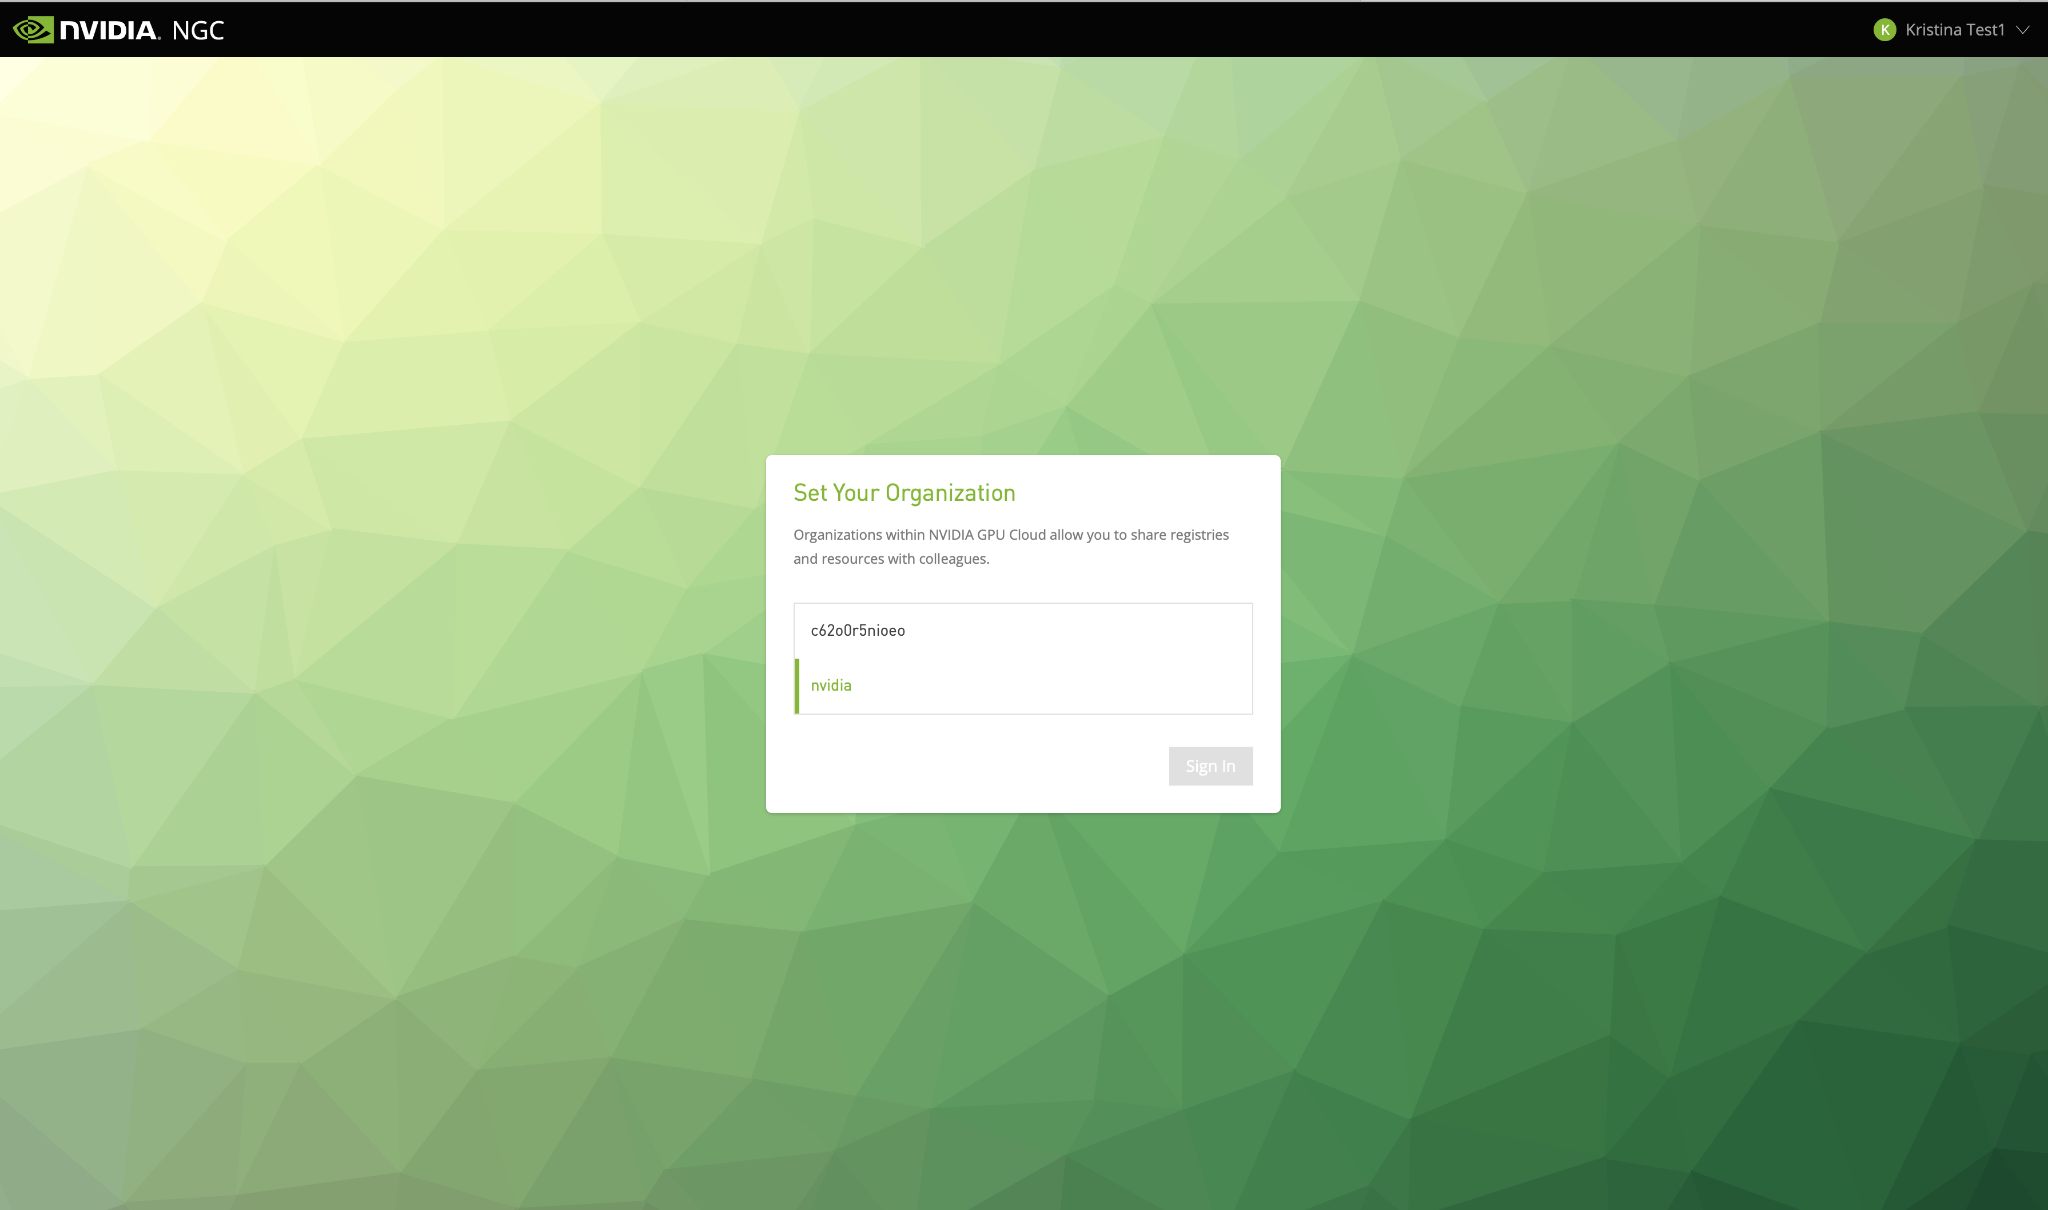
- If asked, set your organization. The name of your organization was defined
while setting up your Private Registry. Click Sign In.
- Welcome to the Enterprise Catalog.
2.1.2. Downloading Software from the Enterprise Catalog
2.1.2.1. Accessing the NVIDIA AI Enterprise Collection
- Go to https://ngc.nvidia.com/catalog/enterprise
and, if prompted, log in. Click on the NVIDIA AI Enterprise
Collection.
- Click on the Entities tab to review all the software assets part of the
NVIDIA AI Enterprise stack.
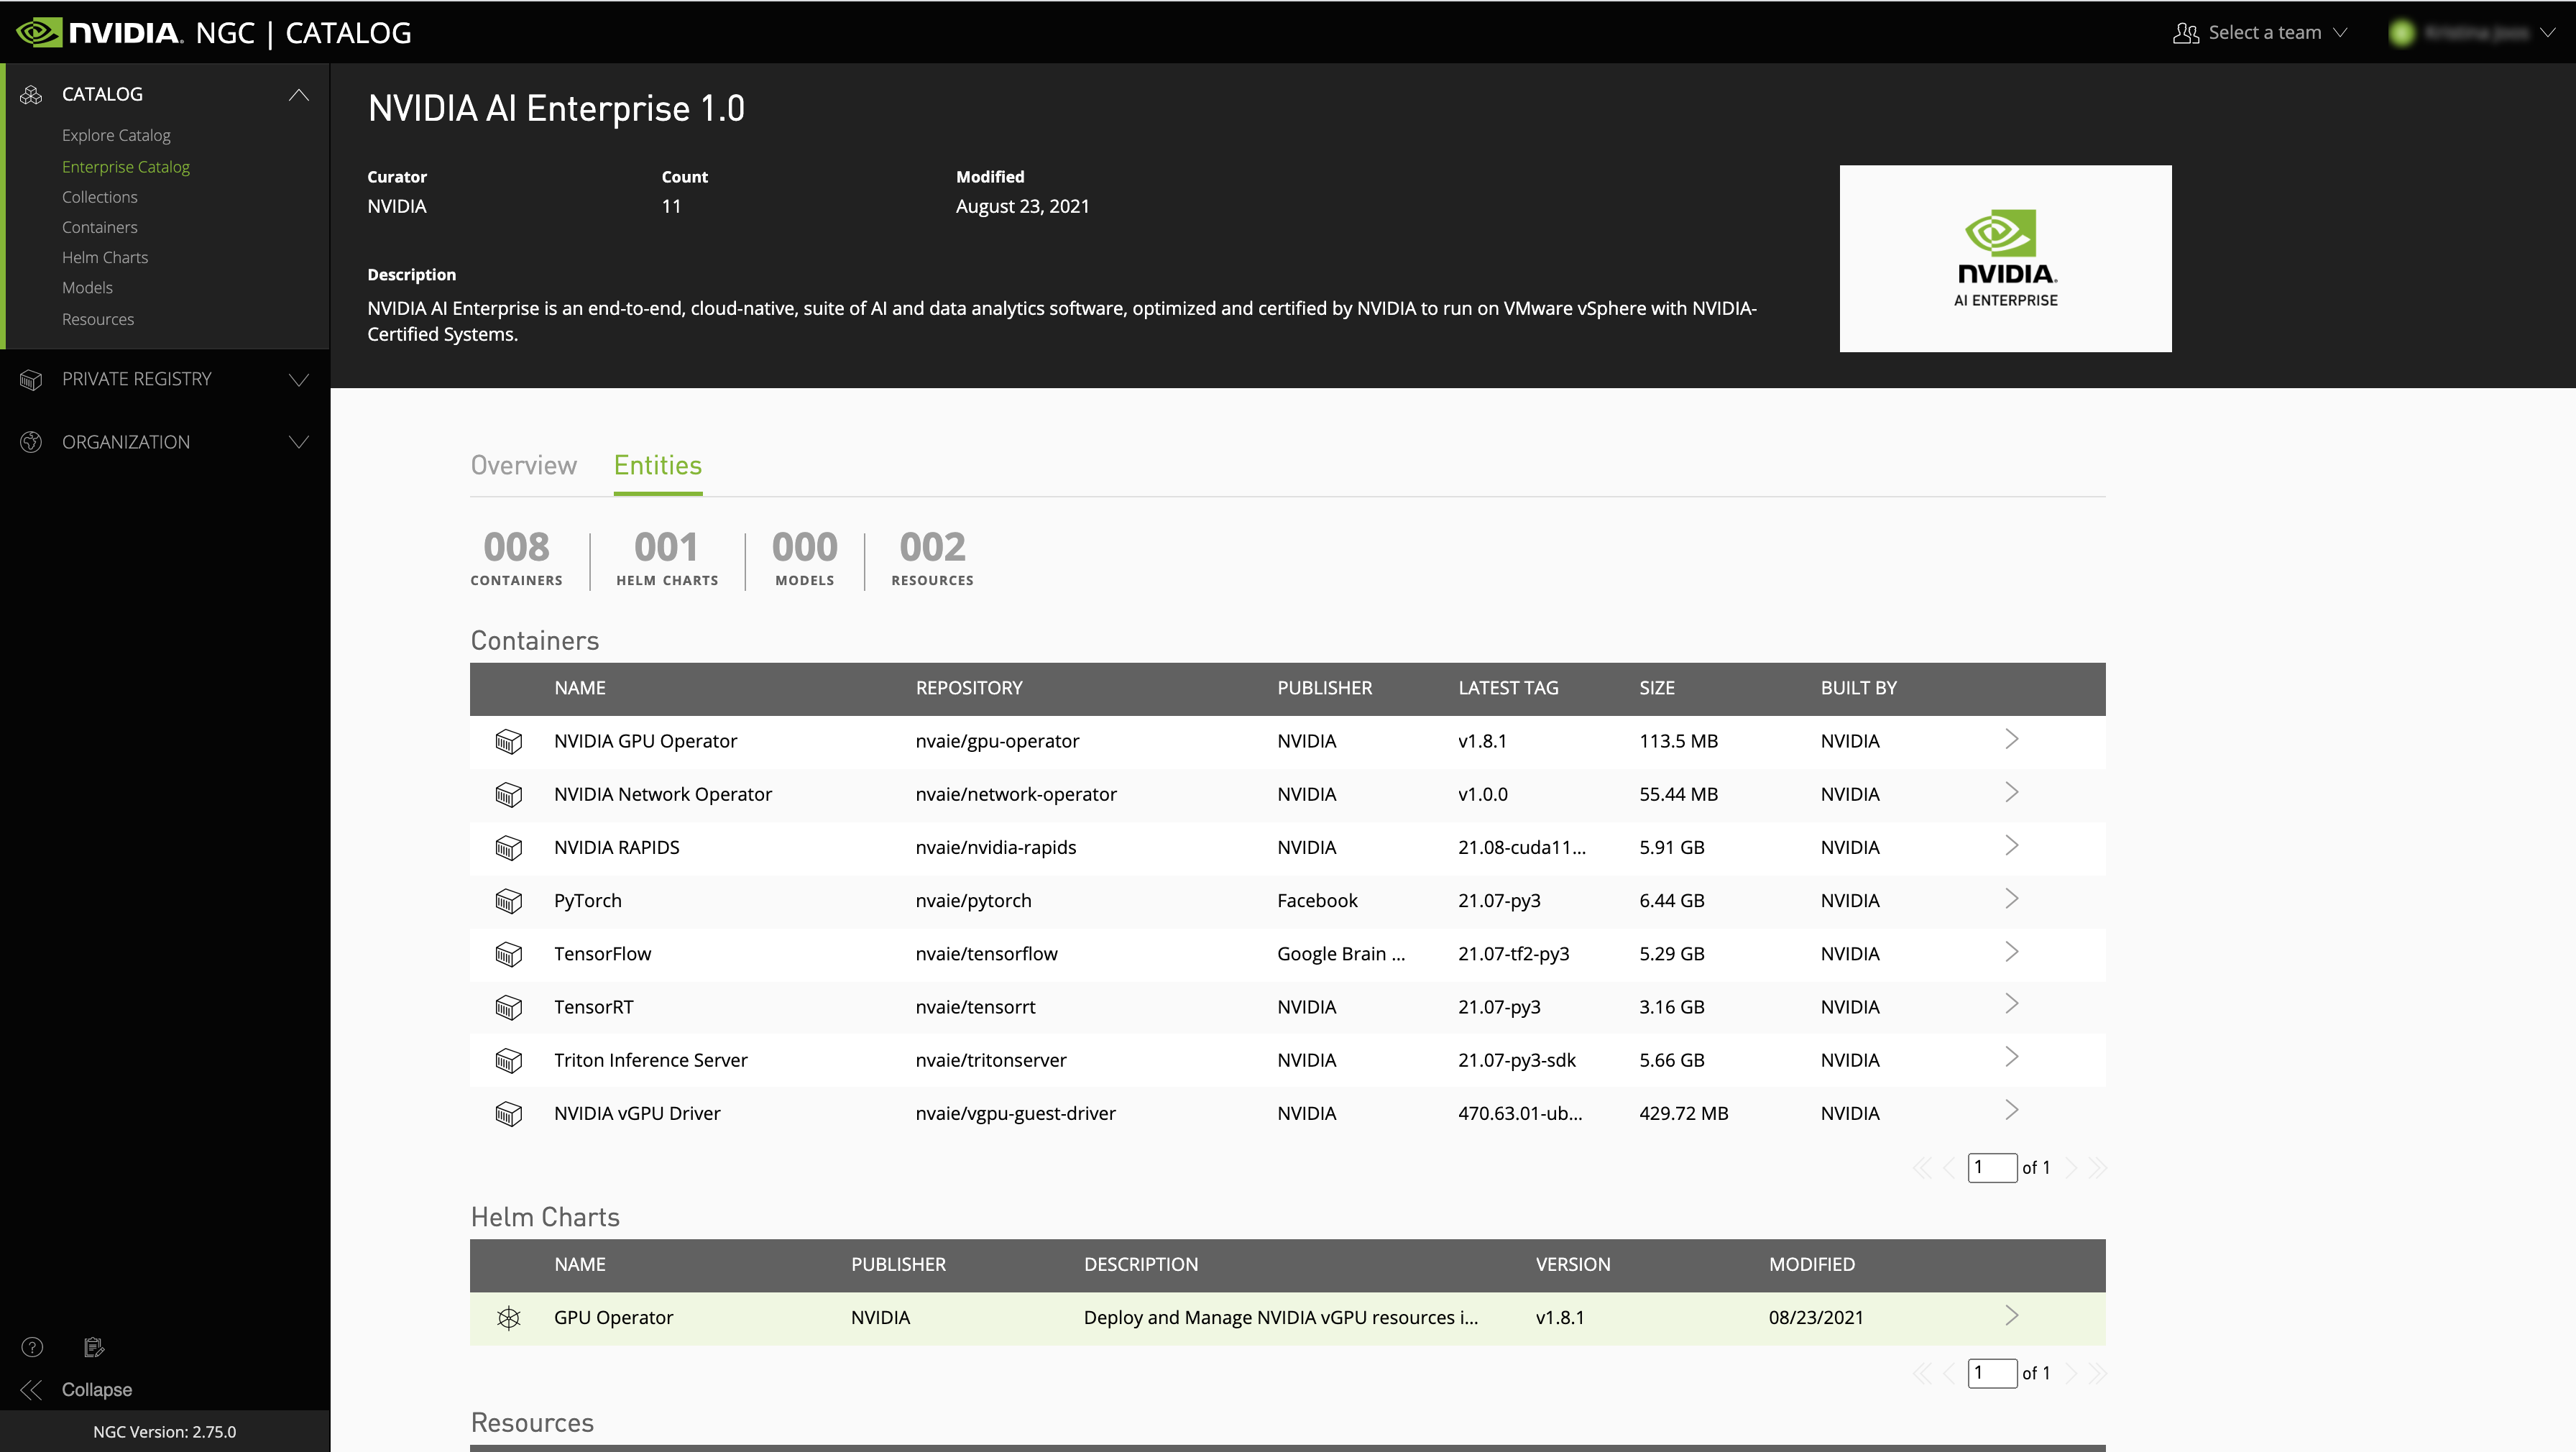
- Click on the software asset you are interested in to learn more or download
the software in the entities view.
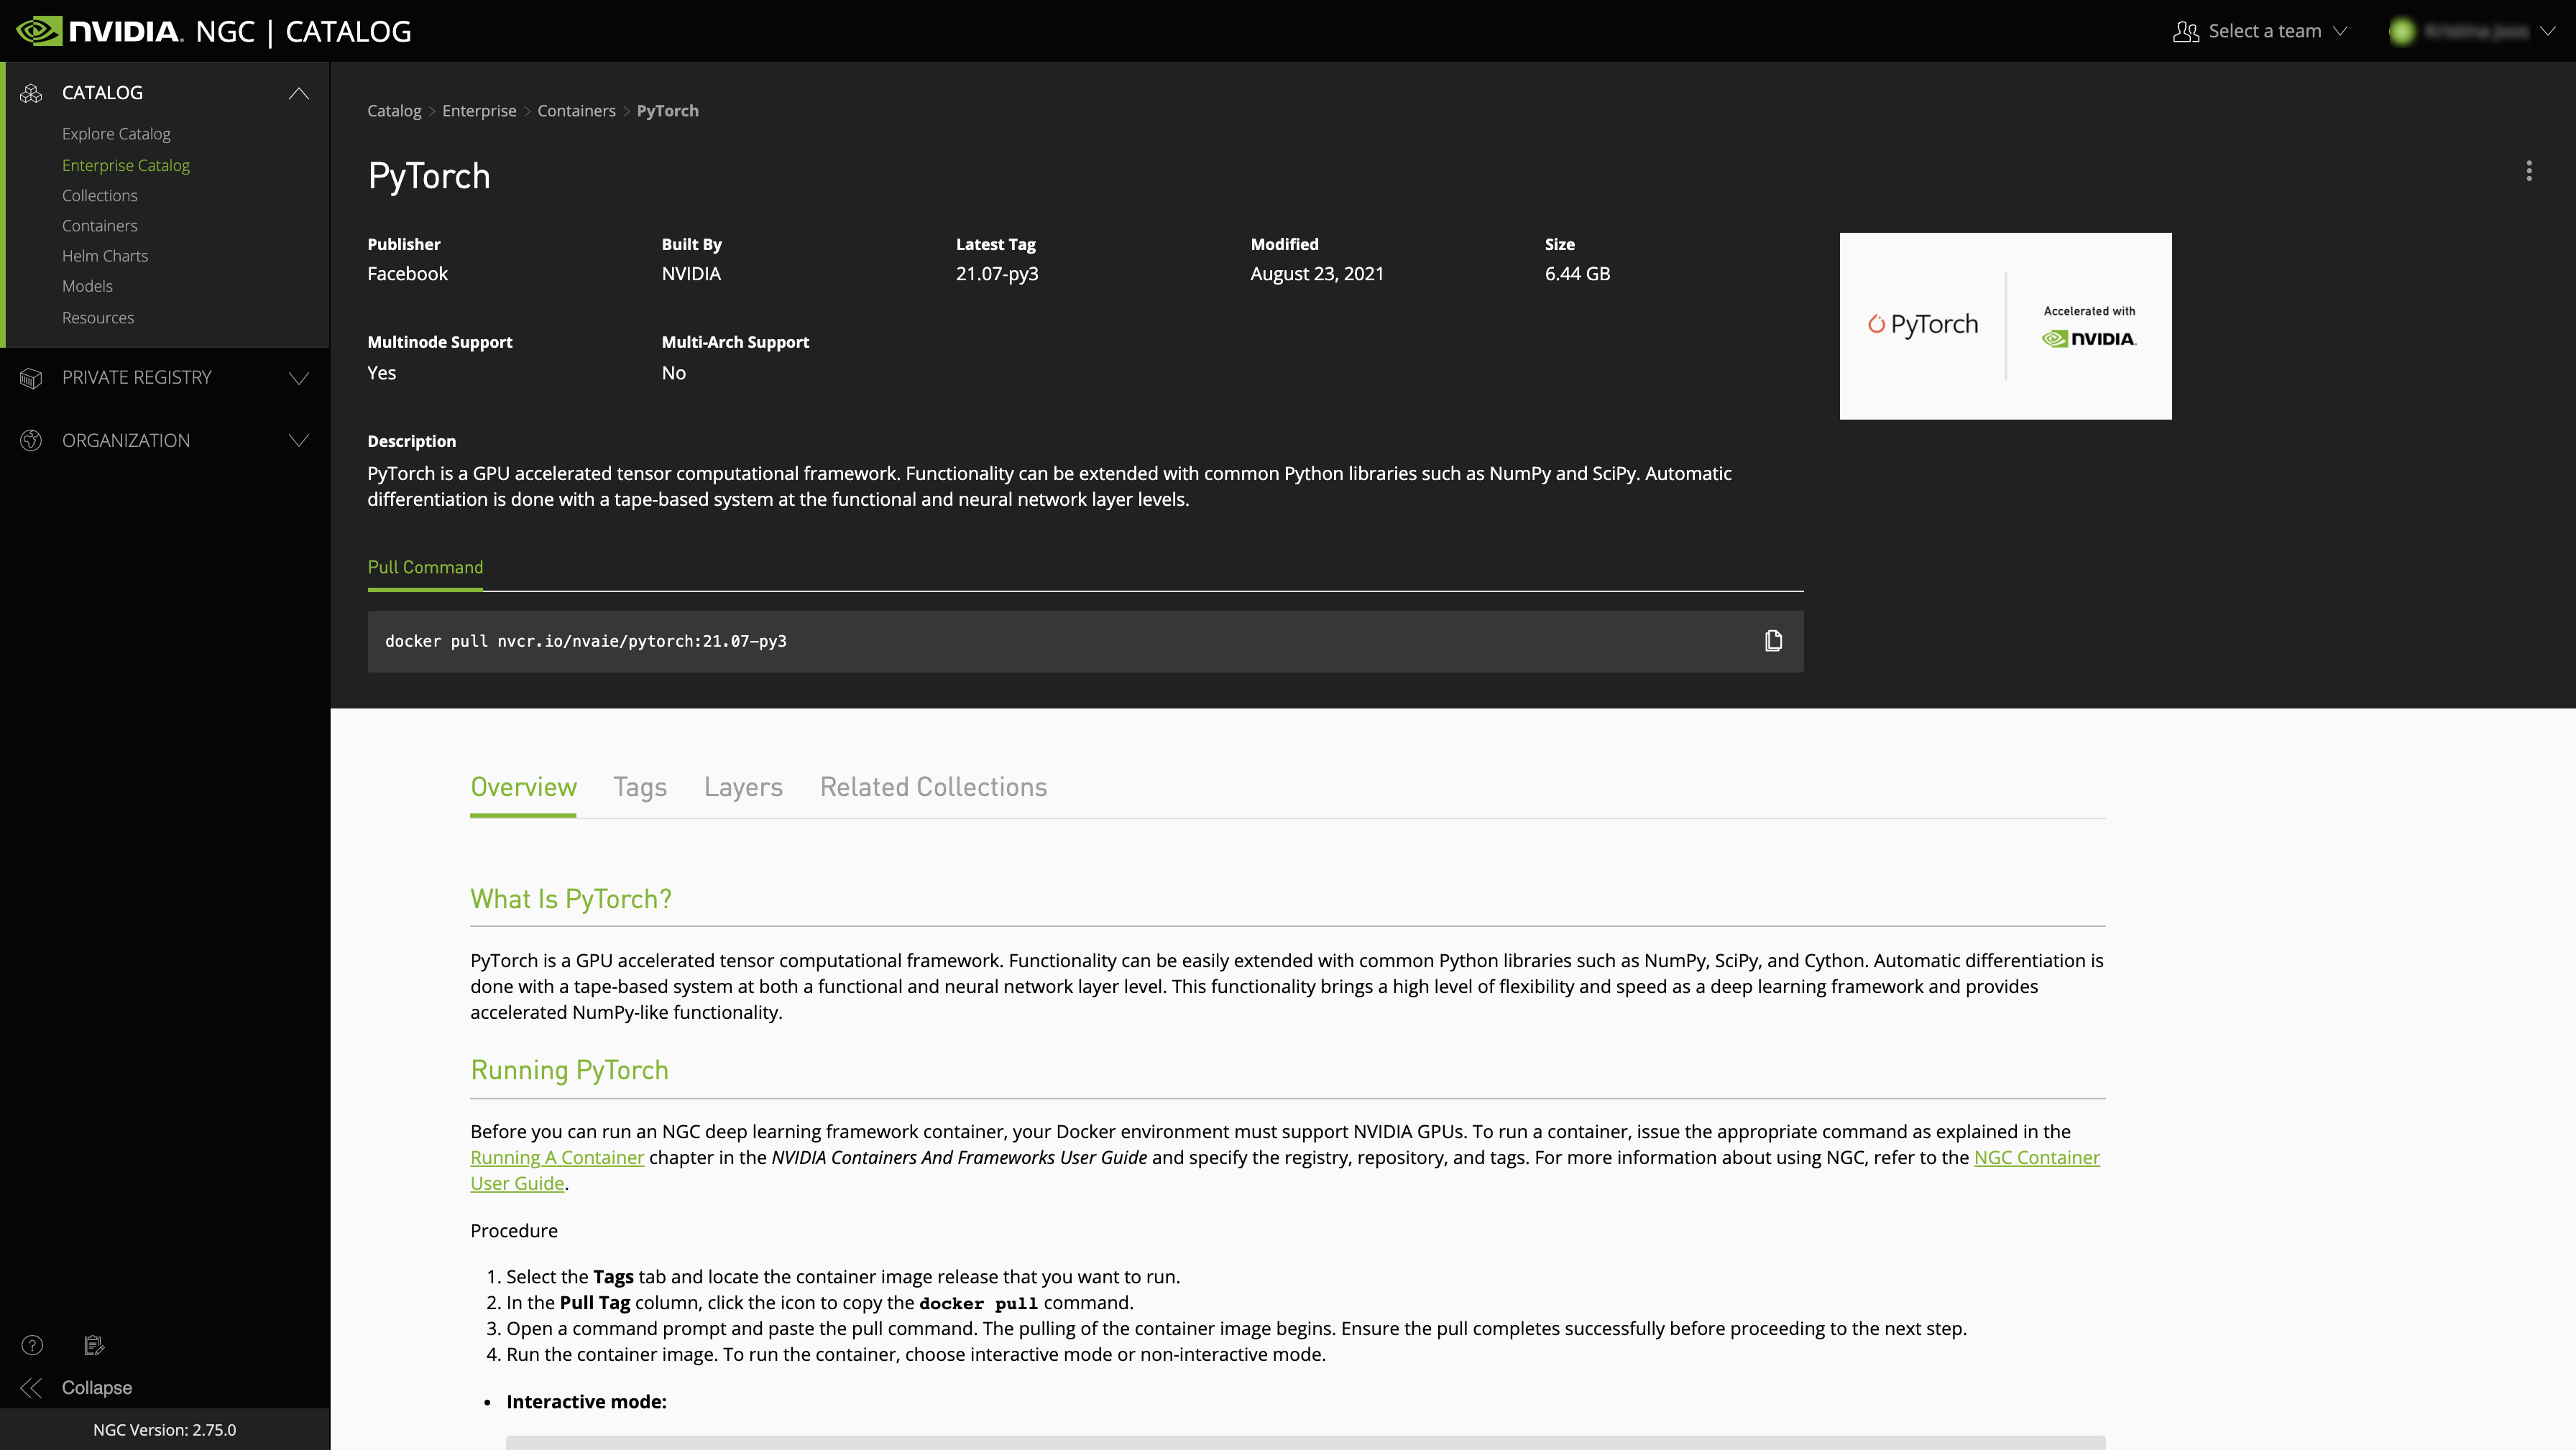
2.1.2.2. Container Images
- Generate your API key.
- Access the Enterprise Catalog Container Registry.
- Log in to the NGC container registry.
sudo docker login nvcr.io
- When prompted for your username, enter the text $oauthtoken.
Username: $oauthtoken
- When prompted for your password, enter your NGC API key.
Password: my-api-key
- Log in to the NGC container registry.
- For each AI or data science application that you are interested in, load the container.
sudo docker pull nvcr.io/nvaie/tensorflow:21.02-tf2-py3
2.1.2.3. Helm Charts
- Go to the Enterprise Catalog.
- Click on the NVIDIA AI Enterprise Collection.
- Go to the Entities tab and select the Helm chart you are interested in.
- Here is how you download a Helm chart from the Enterprise Catalog.
2.1.2.4. Resources
- Go to the Enterprise Catalog.
- Click on the NVIDIA AI Enterprise Collection.
- Go to the Entities tab and select the Resource you are interested in. You can either download the Resource directly from the UI or use the displayed wget or CLI commands.
2.1.3. Adding Additional Users from Your Organization to the Enterprise Catalog (Admins Only)
- Make sure you are signed in.
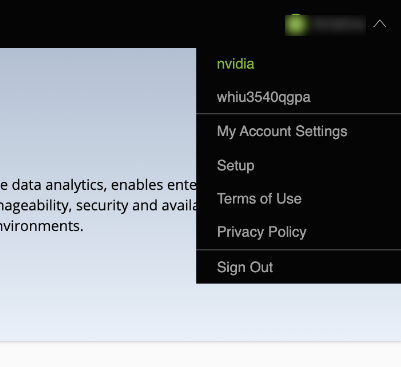
- Make sure to select your company's organization from the user menu on the top
right.
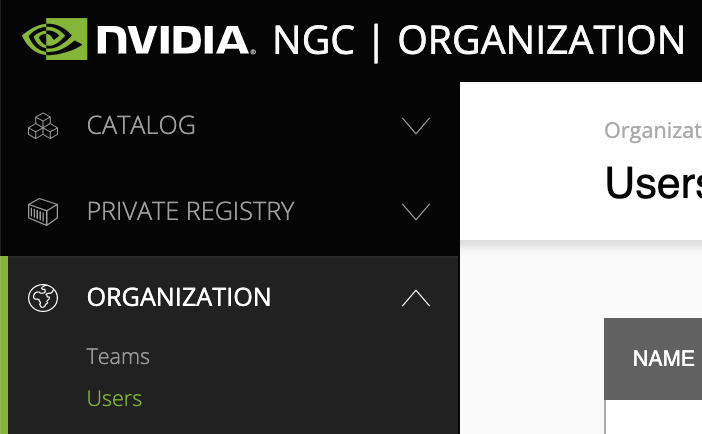
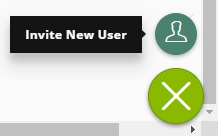
- On the left side menu, select Organization and click on Users,
then click the + icon at the bottom of the screen and then
click the Invite New User icon.
- Provide the name and email address of the user you would like to add.
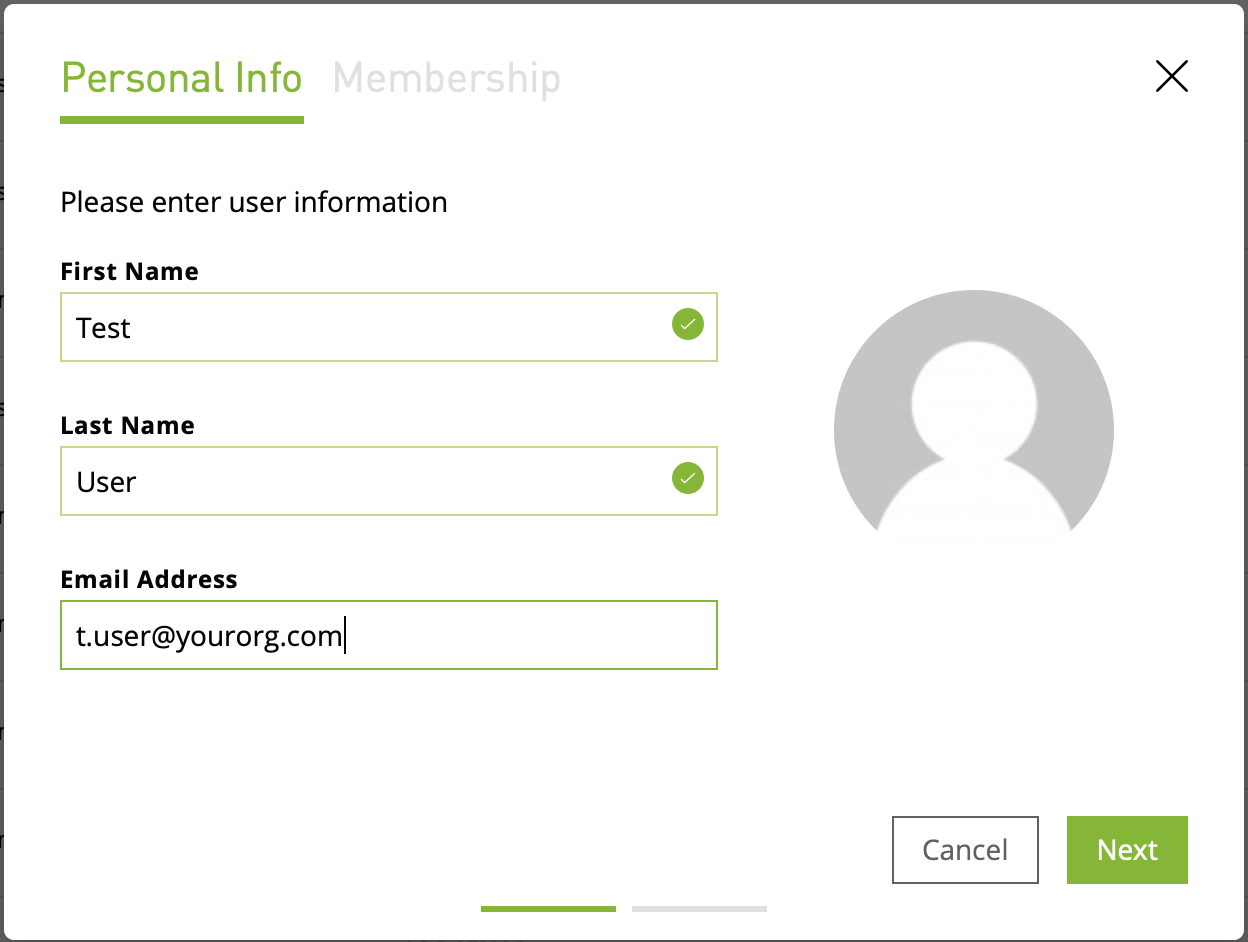
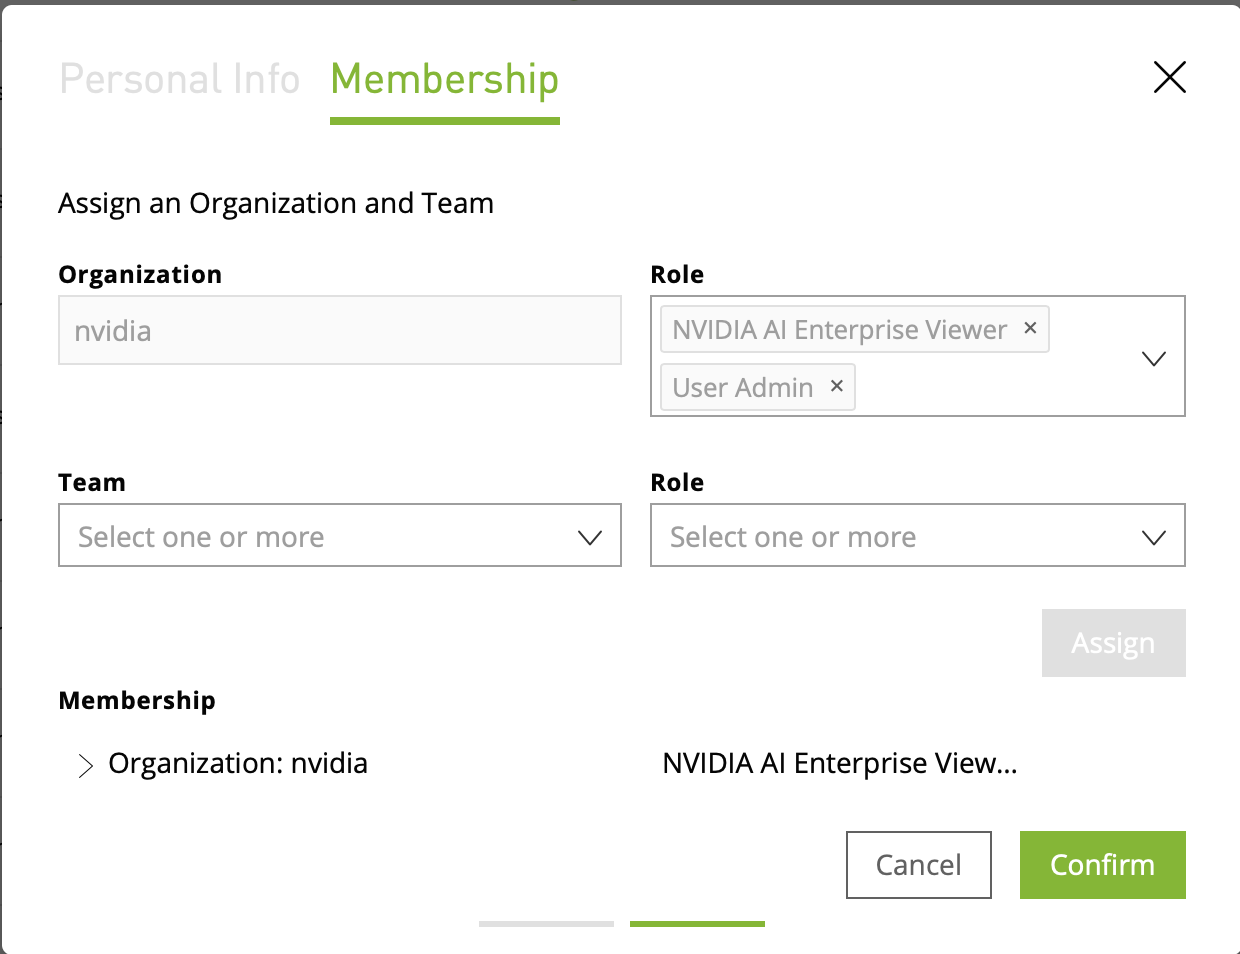
- Provision user roles for the new user:
- To give the new user access to the entities in the Enterprise Catalog,
provide them with the user role NVIDIA AI Enterprise
Viewer.
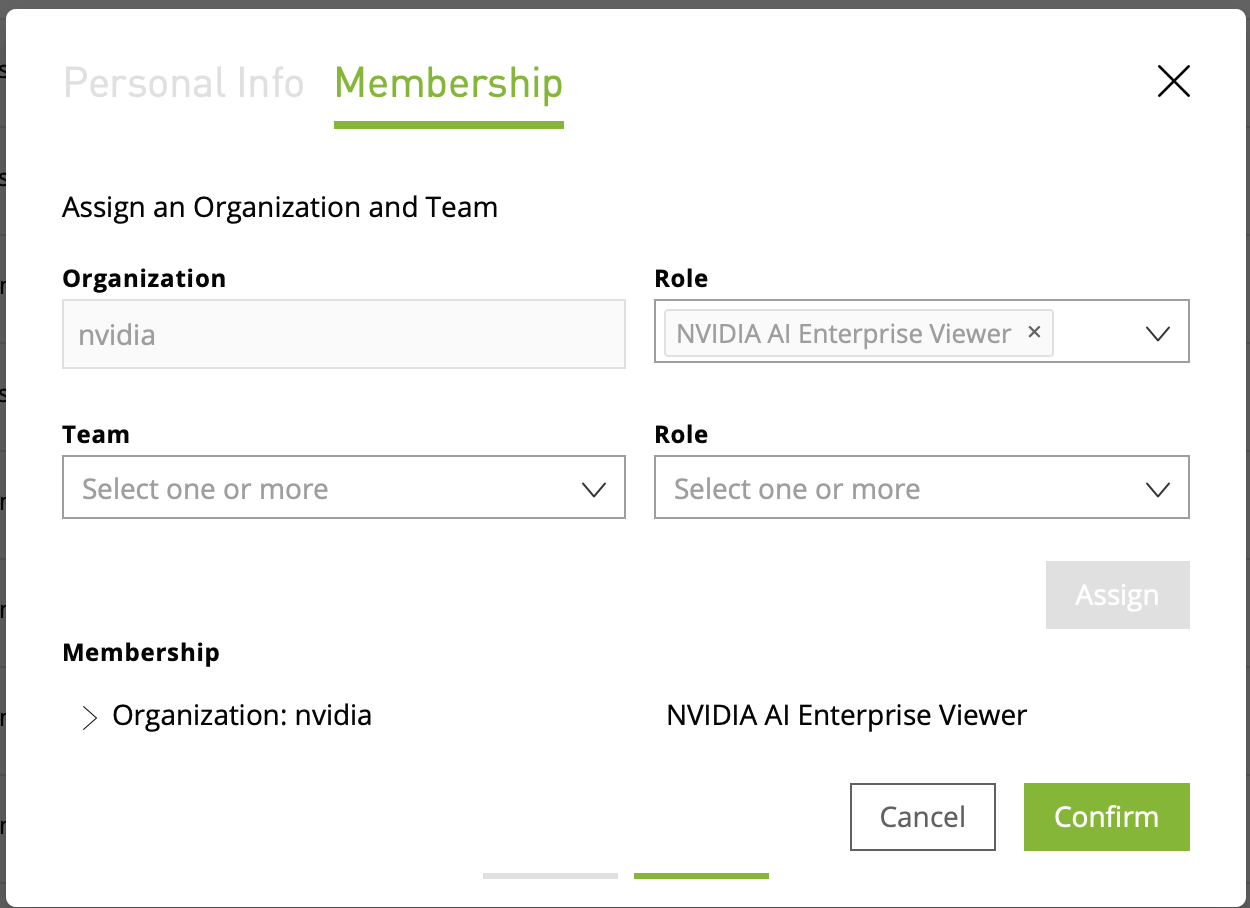
- To make them an admin that can add additional users to the Enterprise
Catalog, provision the user roles: NVIDIA AI Enterprise Viewer
and User Admin.
- To give the user access to your organization’s Private Registry, see
Accessing Your NGC Private Registry. Provisioning access to the
Enterprise Catalog and your organization’s Private Registry can be done
in one or two steps.
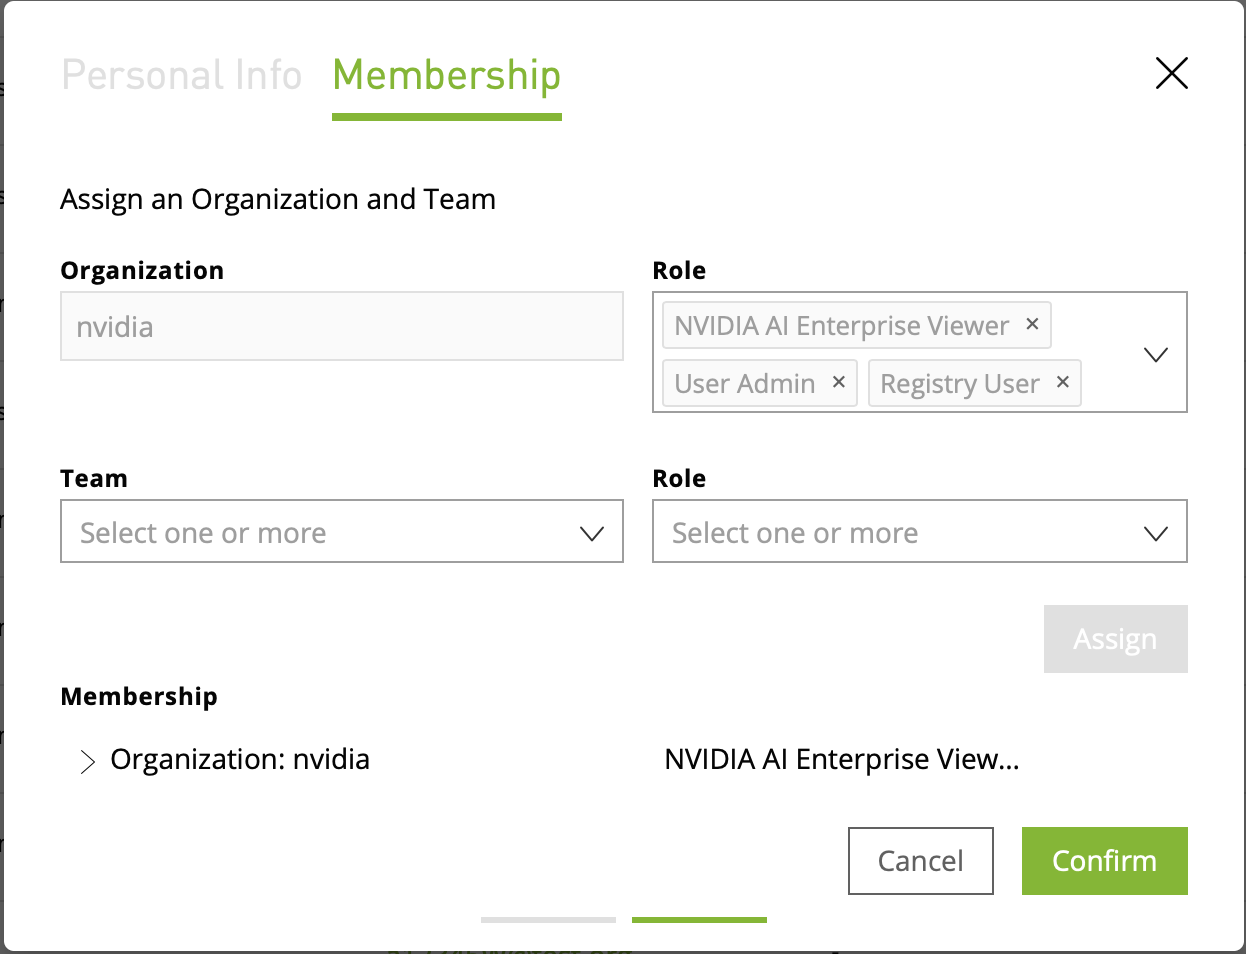
- To give the new user access to the entities in the Enterprise Catalog,
provide them with the user role NVIDIA AI Enterprise
Viewer.
2.2. The NGC Private Registry
As an NVIDIA AI Enterprise user, you have exclusive access to your organization’s own NGC Private Registry, which gives authorized users within your organization privileges to store your company’s proprietary software and tools, including custom models, frameworks, and helm charts, in one location.
The complete NGC Private Registry user guide can be found here.
2.2.1. Accessing Your NGC Private Registry
- To access your NGC Private Registry, sign in with your NGC Account.
- In the top right corner, click your user account icon and select the orgname.
- To view artifacts in your NGC Private Registry, select Private Registry
in the left-hand menu.
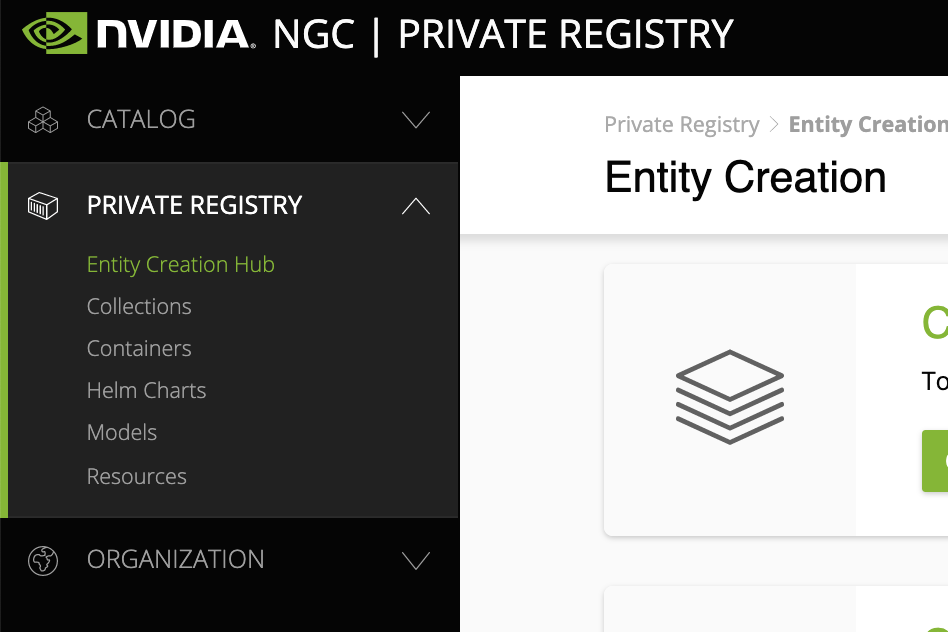
- You can access the content of the NGC Private Registry by selecting one of the entity types (Collections, Containers, Helm Charts, Models, Resources).
- To upload entities to your NGC Private Registry, click on Entity Creation Hub.
2.2.2. Managing Teams and Users
As an admin, you can add users to your organization’s NGC Private Registry and create teams within the NGC Private Registry.
Before adding users and teams, familiarize yourself with the following definitions of each role here.
2.2.2.1. Creating Teams
Creating teams allows users to share images within a team while keeping them invisible to other teams in the same organization. Only organization administrators can create teams.
Here is how you create a team.
2.2.2.2. Creating Users
As the organization administrator, you must create user accounts to allow others to use the NGC container registry within the organization.
Here is how you create a new user.
3. Installing Your NVIDIA AI Enterprise License Server and License Files
The NVIDIA License System is used to serve a pool of floating licenses to licensed NVIDIA software products. The NVIDIA License System is configured with licenses obtained from the NVIDIA Licensing Portal.
3.1. Introduction to NVIDIA Software Licensing
To activate licensed functionalities, a licensed client must obtain a software license when it is booted.
A client with a network connection obtains a license by leasing it from a NVIDIA License System service instance. The service instance serves the license to the client over the network from a pool of floating licenses obtained from the NVIDIA Licensing Portal. The license is returned to the service instance when the licensed client no longer requires the license.
3.2. Creating a License Server on the NVIDIA Licensing Portal
To be able to allot licenses to an NVIDIA License System instance, you must create at least one license server on the NVIDIA Licensing Portal. Creating a license server defines the set of licenses to be allotted.
- In the NVIDIA Licensing Portal, navigate to the organization or virtual
group for which you want to create the license server.
- If you are not already logged in, log in to the NVIDIA Enterprise Application Hub and click NVIDIA LICENSING PORTAL to go to the NVIDIA Licensing Portal.
- Optional: If your assigned roles give you access to multiple virtual groups, click View settings at the top right of the page and in the My Info window that opens, select the virtual group from the Virtual Group drop-down list, and close the My Info window.
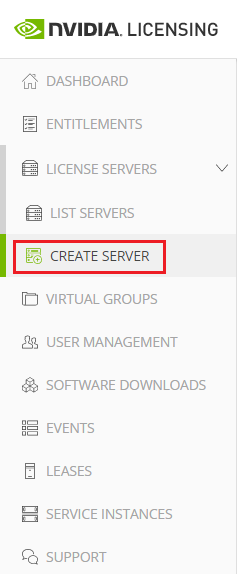
- In the left navigation pane of the NVIDIA Licensing Portal dashboard,
expand LICENSE SERVER and click CREATE
SERVER. The Create License Server wizard is started.
The Create License Server wizard opens.
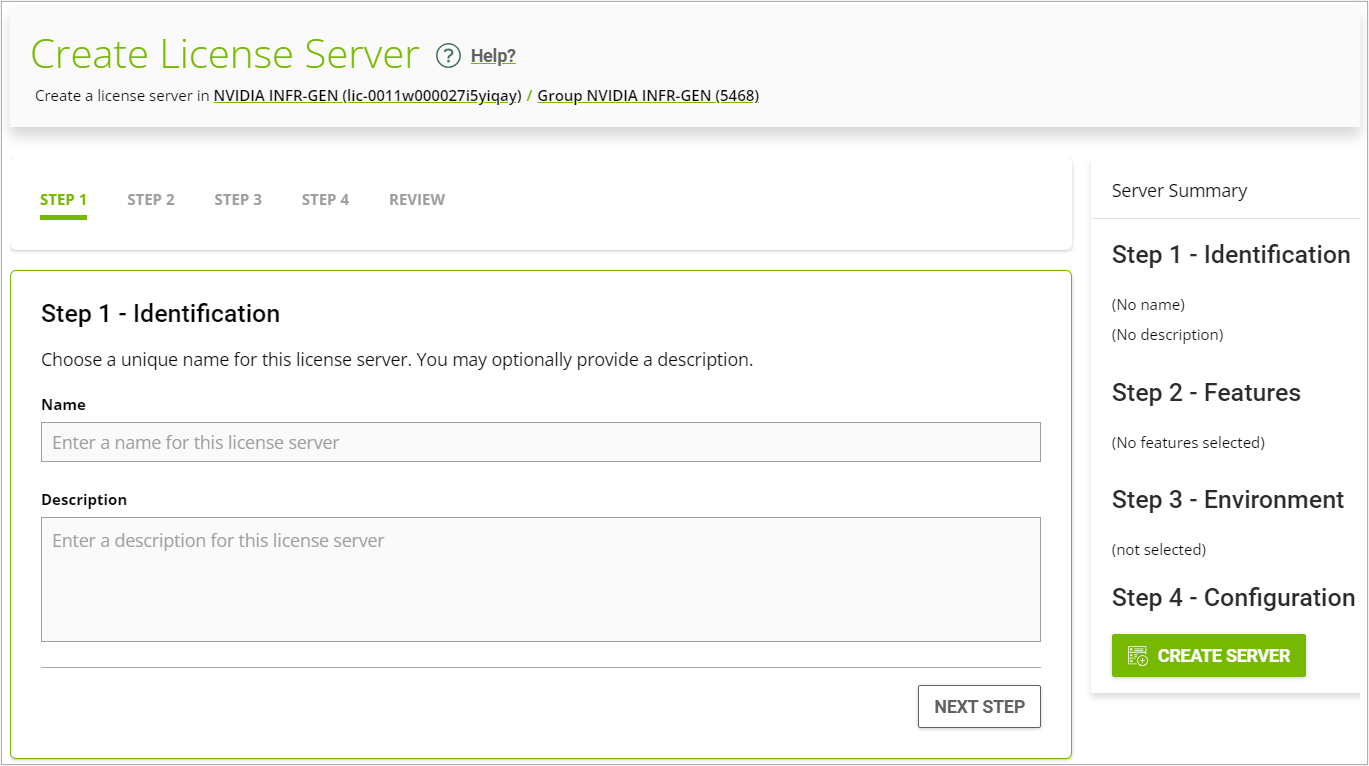
- On the Create License Server page of the wizard, step through the configuration
requirements to provide the details of your license server.
- Step 1 – Identification: In the Name field, enter your choice of name for the license server and in the Description field, enter a text description of the license server. The description is required and will be displayed on the details page for the license server that you are creating.
- Step 2 – Features: Select one or more available features from your entitlements to allot to this license server.
- Step 3 - Environment: Select Cloud (CLS) or On-Premises (DLS) to install this license server. To make the selection after the license server has been created, select the Deferred option.
- Step 4 – Configuration: From the Leasing
mode drop-down list, select one of the following leasing modes:
- Standard Networked Licensing
- Select this mode to simplify the management of licenses on a license server that supports networked licensing. In this mode, no additional configuration of the licenses on the server is required.
- Advanced Networked Licensing
- Select this mode if you require control over the management of licenses on a license server that supports networked licensing. This mode requires additional configuration to create license pools and fulfillment conditions on the server.
- Node-Locked Licensing
- Select this mode only if the license server will serve clients that
cannot obtain a license from a remote license server over a network connection.
In this mode, the clients obtain a node-locked license from a file installed
locally on the client system.
CAUTION:This mode requires additional work to create the license file to be installed locally and to return licenses when the client is shut down. If this mode is set, the mode of the license server cannot be changed.
- Click REVIEW SUMMARY to review the configuration summary before creating the license server.
- On the Create License Server page, from the Step 4 – Configuration menu, click the CREATE SERVER option to create this license server. Alternatively, you can click CREATE SERVER on the Server Summary page.
3.3. Creating a CLS Instance on the NVIDIA Licensing Portal
When you create a CLS instance, the instance is automatically registered with the NVIDIA Licensing Portal. This task is only necessary if you are not using the default CLS instance.
- If you are not already logged in, log in to the NVIDIA Enterprise Application Hub and click NVIDIA LICENSING PORTAL to go to the NVIDIA Licensing Portal.
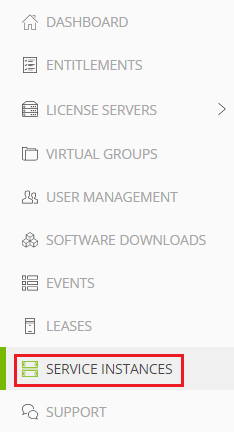
- In the left navigation pane of the NVIDIA Licensing Portal
dashboard, click SERVICE INSTANCES.
- On the Service Instances page, from the Actions menu, choose Create
cloud (CLS) instance.
The Create cloud (CLS) instance pop-up window opens.
- Provide the details of your cloud service instance.
- In the Name field, enter your choice of name for the service instance.
- In the Description field, enter a text description of the service instance. This description is required and will be displayed on the Service Instances page when the entry for service instance that you are creating is expanding.
- Click CREATE CLS INSTANCE.
3.4. Binding a License Server to a Service Instance
- In the NVIDIA Licensing Portal, navigate to the organization or
virtual group to which the license server
belongs.
- If you are not already logged in, log in to the NVIDIA Enterprise Application Hub and click NVIDIA LICENSING PORTAL to go to the NVIDIA Licensing Portal.
- Optional: If your assigned roles give you access to multiple virtual groups, click View settings at the top right of the page and in the My Info window that opens, select the virtual group from the Virtual Group drop-down list, and close the My Info window.
- In the left navigation pane of the NVIDIA Licensing Portal dashboard, expand LICENSE SERVERS and click LIST SERVERS.
- In the list of license servers on the License Servers page that opens, from the Actions menu for the license server, choose Bind.
- In the Bind Service Instance pop-up window that opens, select the service instance to which you want to bind the license server and click BIND. The Bind Service Instance pop-up window confirms that the license server has been bound to the service instance.
3.5. Installing a License Server on a CLS Instance
- In the NVIDIA Licensing Portal, navigate to the organization or
virtual group for which you want to install the license server.
- If you are not already logged in, log in to the NVIDIA Enterprise Application Hub and click NVIDIA LICENSING PORTAL to go to the NVIDIA Licensing Portal.
- Optional: If your assigned roles give you access to multiple virtual groups, click View settings at the top right of the page and in the My Info window that opens, select the virtual group from the Virtual Group drop-down list, and close the My Info window.
- In the left navigation pane of the NVIDIA Licensing Portal dashboard, expand LICENSE SERVER and click LIST SERVERS.
- In the list of license servers on the License Servers page that opens, click the name of the license server that you want to install.
- In the License Server Details page that opens, from the Actions menu, choose Install.
- In the Install License Server pop-up window that opens, click INSTALL SERVER.
3.6. Generating a Client Configuration Token for a CLS Instance
- Log in to the NVIDIA Enterprise Application Hub and click NVIDIA LICENSING PORTAL to go to the NVIDIA Licensing Portal.
- If your assigned roles give you access to multiple virtual groups, select the virtual group for which you are managing licenses from the list of virtual groups at the top right of the NVIDIA Licensing Portal dashboard.
- In the left navigation pane, click SERVICE
INSTANCES.
- On the Service Instances page that opens, from the Actions menu for the CLS instance for which you want to generate a client configuration token, choose Generate client configuration token.
- In the Generate Client Configuration Token pop-up window
that opens, select the references that you want to include in the client
configuration token.
- From the list of scope references, select the scope references that you
want to include.
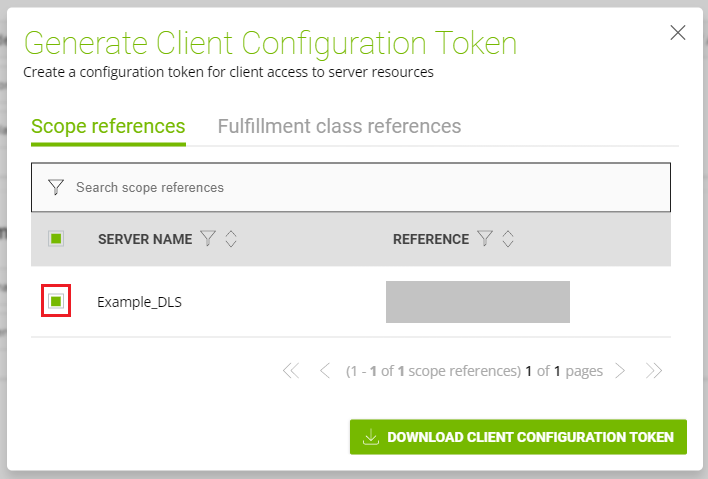
You must select at least one scope reference.
Each scope reference specifies the license server that will fulfil a license request.
- Optional: Click the Fulfillment class references tab, and
from the list of fulfillment class references, select the fulfillment
class references that you want to include.
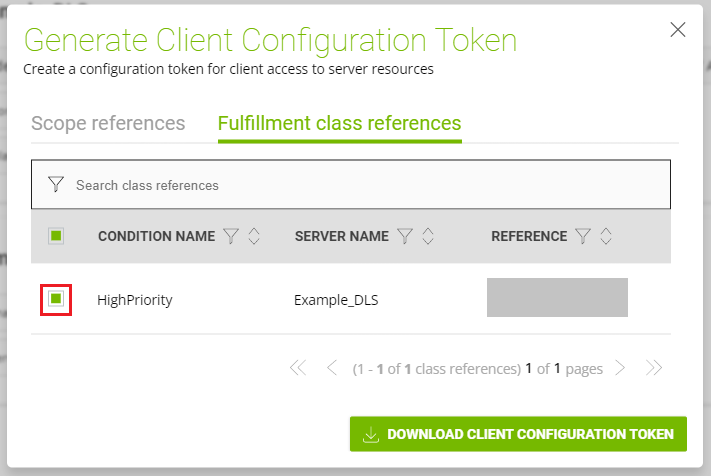
Including fulfillment class references is optional. - Optional: In the Expiration section, select an expiration date for the client configuration token. If you do not select a date, the default token expiration time is 12 years.
- Click DOWNLOAD CLIENT CONFIGURATION TOKEN.
- From the list of scope references, select the scope references that you
want to include.
4. Installing and Configuring NVIDIA vGPU Manager
Before installing and configuring NVIDIA vGPU Manager, ensure that a VM running a supported guest OS is configured in your chosen hypervisor.
The factory settings of some supported GPU boards are incompatible with NVIDIA AI Enterprise. Before configuring NVIDIA AI Enterprise on these GPU boards, you must configure the boards to change these settings.
4.1. Switching the Mode of a GPU that Supports Multiple Display Modes
Some GPUs support displayless and display-enabled modes but must be used in NVIDIA AI Enterprise deployments in displayless mode.
The GPUs listed in the following table support multiple display modes. As shown in the table, some GPUs are supplied from the factory in displayless mode, but other GPUs are supplied in a display-enabled mode.
| GPU | Mode as Supplied from the Factory |
|---|---|
| NVIDIA A40 | Displayless |
| NVIDIA RTX A5000 | Display enabled |
| NVIDIA RTX A6000 | Display enabled |
A GPU that is supplied from the factory in displayless mode, such as the NVIDIA A40 GPU, might be in a display-enabled mode if its mode has previously been changed.
To change the mode of a GPU that supports multiple display modes, use the displaymodeselector tool, which you can request from the NVIDIA Display Mode Selector Tool page on the NVIDIA Developer website.
Only the following GPUs support the displaymodeselector tool:
- NVIDIA A40
- NVIDIA RTX A5000
- NVIDIA RTX A6000
Other GPUs that support NVIDIA AI Enterprise do not support the displaymodeselector tool and, unless otherwise stated, do not require display mode switching.
4.2. Installing the NVIDIA Virtual GPU Manager on VMware vSphere
- The ZIP archive that contains NVIDIA AI Enterprise has been downloaded from the NVIDIA Licensing Portal.
- The NVIDIA Virtual GPU Manager package has been extracted from the downloaded ZIP archive.
- Copy the NVIDIA Virtual GPU Manager package file to the ESXi host.
- Put the ESXi host into maintenance mode.
$ esxcli system maintenanceMode set –-enable true
- Run the esxcli command to install the NVIDIA Virtual GPU Manager
from the package file.
$ esxcli software vib install -d /vmfs/volumes/datastore/software-component.zip
- datastore
- The name of the VMFS datastore to which you copied the software component.
- software-component
- The name of the file that contains the NVIDIA Virtual GPU Manager package in the form of a software component. Ensure that you specify the file that was extracted from the downloaded ZIP archive. For example, for VMware vSphere 7.0.2, software-component is NVD.NVIDIA_bootbank_NVIDIA-VMware_470.161.02-1OEM.702.0.0.8169922-offline_bundle-build-number.
- Exit maintenance mode.
$ esxcli system maintenanceMode set –-enable false
- Reboot the ESXi host.
$ reboot
- Verify that the NVIDIA kernel driver can successfully communicate with the
physical GPUs in your system by running the nvidia-smi command without
any options.
$ nvidia-smi
If successful, the nvidia-smi command lists all the GPUs in your system.
4.3. Disabling and Enabling ECC Memory
Some GPUs that support NVIDIA AI Enterprise support error correcting code (ECC) memory with NVIDIA vGPU. ECC memory improves data integrity by detecting and handling double-bit errors. However, not all GPUs, vGPU types, and hypervisor software versions support ECC memory with NVIDIA vGPU.
On GPUs that support ECC memory with NVIDIA vGPU, ECC memory is supported with C-series and Q-series vGPUs, but not with A-series and B-series vGPUs. Although A-series and B-series vGPUs start on physical GPUs on which ECC memory is enabled, enabling ECC with vGPUs that do not support it might incur some costs.
On physical GPUs that do not have HBM2 memory, the amount of frame buffer that is usable by vGPUs is reduced. All types of vGPU are affected, not just vGPUs that support ECC memory.
The effects of enabling ECC memory on a physical GPU are as follows:
- ECC memory is exposed as a feature on all supported vGPUs on the physical GPU.
- In VMs that support ECC memory, ECC memory is enabled, with the option to disable ECC in the VM.
- ECC memory can be enabled or disabled for individual VMs. Enabling or disabling ECC memory in a VM does not affect the amount of frame buffer that is usable by vGPUs.
GPUs based on the Pascal GPU architecture and later GPU architectures support ECC memory with NVIDIA vGPU. To determine whether ECC memory is enabled for a GPU, run nvidia-smi -q for the GPU.
Tesla M60 and M6 GPUs support ECC memory when used without GPU virtualization, but NVIDIA vGPU does not support ECC memory with these GPUs. In graphics mode, these GPUs are supplied with ECC memory disabled by default.
Some hypervisor software versions do not support ECC memory with NVIDIA vGPU.
If you are using a hypervisor software version or GPU that does not support ECC memory with NVIDIA vGPU and ECC memory is enabled, NVIDIA vGPU fails to start. In this situation, you must ensure that ECC memory is disabled on all GPUs if you are using NVIDIA vGPU.
4.3.1. Disabling ECC Memory
If ECC memory is unsuitable for your workloads but is enabled on your GPUs, disable it. You must also ensure that ECC memory is disabled on all GPUs if you are using NVIDIA vGPU with a hypervisor software version or a GPU that does not support ECC memory with NVIDIA vGPU. If your hypervisor software version or GPU does not support ECC memory and ECC memory is enabled, NVIDIA vGPU fails to start.
Where to perform this task depends on whether you are changing ECC memory settings for a physical GPU or a vGPU.
- For a physical GPU, perform this task from the hypervisor host.
- For a vGPU, perform this task from the VM to which the vGPU is
assigned.
Note: ECC memory must be enabled on the physical GPU on which the vGPUs reside.
- Use nvidia-smi to list the status of all physical GPUs or
vGPUs, and check for ECC noted as enabled.
# nvidia-smi -q

==============NVSMI LOG==============

Timestamp                           : Mon Dec 26 18:36:45 2022
Driver Version                      : 470.161.02

Attached GPUs                       : 1
GPU 0000:02:00.0

[...]

    Ecc Mode
        Current                     : Enabled
        Pending                     : Enabled

[...]
- Change the ECC status to off for each GPU for which ECC is enabled.
- If you want to change the ECC status to off for all GPUs on your host machine or vGPUs assigned to the VM, run this
command:
# nvidia-smi -e 0
- If you want to change the ECC status to off for a specific GPU or
vGPU, run this
command:
# nvidia-smi -i id -e 0
id is the index of the GPU or vGPU as reported by nvidia-smi.
This example disables ECC for the GPU with index 0000:02:00.0.
# nvidia-smi -i 0000:02:00.0 -e 0
- If you want to change the ECC status to off for all GPUs on your host machine or vGPUs assigned to the VM, run this
command:
- Reboot the host or restart the VM.
- Confirm that ECC is now disabled for the GPU or vGPU.
# nvidia—smi —q

==============NVSMI LOG==============

Timestamp                           : Mon Dec 26 18:37:53 2022
Driver Version                      : 470.161.02

Attached GPUs                       : 1
GPU 0000:02:00.0
[...]

    Ecc Mode
        Current                     : Disabled
        Pending                     : Disabled

[...]
4.3.2. Enabling ECC Memory
If ECC memory is suitable for your workloads and is supported by your hypervisor software and GPUs, but is disabled on your GPUs or vGPUs, enable it.
Where to perform this task depends on whether you are changing ECC memory settings for a physical GPU or a vGPU.
- For a physical GPU, perform this task from the hypervisor host.
- For a vGPU, perform this task from the VM to which the vGPU is
assigned.
Note: ECC memory must be enabled on the physical GPU on which the vGPUs reside.
- Use nvidia-smi to list the status of all physical GPUs or vGPUs, and
check for ECC noted as disabled.
# nvidia-smi -q

==============NVSMI LOG==============

Timestamp                           : Mon Dec 26 18:36:45 2022
Driver Version                      : 470.161.02

Attached GPUs                       : 1
GPU 0000:02:00.0

[...]

    Ecc Mode
        Current                     : Disabled
        Pending                     : Disabled

[...]
- Change the ECC status to on for each GPU or vGPU for which ECC is enabled.
- If you want to change the ECC status to on for all GPUs on your host machine or
vGPUs assigned to the VM, run this
command:
# nvidia-smi -e 1
- If you want to change the ECC status to on for a specific GPU or vGPU, run this
command:
# nvidia-smi -i id -e 1
id is the index of the GPU or vGPU as reported by nvidia-smi.
This example enables ECC for the GPU with index 0000:02:00.0.
# nvidia-smi -i 0000:02:00.0 -e 1
- If you want to change the ECC status to on for all GPUs on your host machine or
vGPUs assigned to the VM, run this
command:
- Reboot the host or restart the VM.
- Confirm that ECC is now enabled for the GPU or vGPU.
# nvidia—smi —q

==============NVSMI LOG==============

Timestamp                           : Mon Dec 26 18:37:53 2022
Driver Version                      : 470.161.02

Attached GPUs                       : 1
GPU 0000:02:00.0
[...]

    Ecc Mode
        Current                     : Enabled
        Pending                     : Enabled

[...]
4.4. Changing the Default Graphics Type in VMware vSphere
Before changing the default graphics type, ensure that the ESXi host is running and that all VMs on the host are powered off.
- Log in to vCenter Server by using the vSphere Web Client.
- In the navigation tree, select your ESXi host and click the Configure tab.
- From the menu, choose Graphics and then click the Host Graphics tab.
- On the Host Graphics tab, click Edit.
- In the Edit Host Graphics Settings dialog box that opens,
select Shared Direct and click
OK.
After you click OK, the default graphics type changes to Shared Direct.
- Click the Graphics Devices tab to verify the configured
type of each physical GPU on which you want to configure vGPU.
The configured type of each physical GPU must be Shared Direct. For any
physical GPU for which the configured type is Shared, change the configured type
as follows:
- On the Graphics Devices tab, select the physical GPU and click the Edit icon.
- In the Edit Graphics Device Settings dialog box that opens, select Shared Direct and click OK.
- Restart the ESXi host or stop and restart nv-hostengine on
the ESXi host.
To stop and restart nv-hostengine, perform these steps:
- Stop nv-hostengine.
[root@esxi:~] nv-hostengine -t
- Wait for 1 second to allow nv-hostengine to stop.
- Start nv-hostengine.
[root@esxi:~] nv-hostengine -d
- Stop nv-hostengine.
- In the Graphics Devices tab of the VMware vCenter Web UI, confirm that the active type and the configured type of each physical GPU are Shared Direct.
4.5. Configuring a vSphere VM with NVIDIA vGPU
VM console in vSphere Web Client will become active again once the vGPU parameters are removed from the VM’s configuration.
- Open the vCenter Web UI.
- In the vCenter Web UI, right-click the VM and choose Edit Settings.
- Click the Virtual Hardware tab.
- In the New device list, select Shared PCI Device and click Add. The PCI device field should be auto-populated with NVIDIA GRID vGPU.
- From the GPU Profile drop-down menu, choose the type of vGPU you want to configure and click OK.
- Ensure that VMs running vGPU have all their memory reserved:
- Select Edit virtual machine settings from the vCenter Web UI.
- Expand the Memory section and click Reserve all guest memory (All locked).
After you have configured a vSphere VM with a vGPU, start the VM. VM console in vSphere Web Client is not supported in this vGPU release. Therefore, use VMware Horizon or VNC to access the VM’s desktop.
5. Installing and Licensing NVIDIA AI Enterprise Components Required in a Guest VM
5.1. Installing the NVIDIA AI Enterprise Graphics Driver on Linux from a Debian Package
- Copy the NVIDIA AI Enterprise Linux driver package, for example nvidia-linux-grid-470_470.161.03_amd64.deb, to the guest VM where you are installing the driver.
- Log in to the guest VM as a user with sudo privileges.
- Open a command shell and change to the directory that contains the NVIDIA AI Enterprise Linux driver package.
- From the command shell, run the command to install the package.
$ sudo apt-get install ./nvidia-linux-grid-470_470.161.03_amd64.deb - Verify that the NVIDIA driver is operational.
- Reboot the system and log in.
- After the system has rebooted, confirm that you can see your NVIDIA vGPU device in the output from the
nvidia-smi command.
$ nvidia-smi
5.2. Configuring a Licensed Client
A client with a network connection obtains a license by leasing it from a NVIDIA License System service instance. The service instance serves the license to the client over the network from a pool of floating licenses obtained from the NVIDIA Licensing Portal. The license is returned to the service instance when the licensed client no longer requires the license.
The graphics driver creates a default location in which to store the client configuration token on the client.
The process for configuring a licensed client is the same for CLS and DLS instances but depends on the OS that is running on the client.
5.2.1. Configuring a Licensed Client on Linux with Default Settings
Perform this task from the client.
- As root, open the file /etc/nvidia/gridd.conf in a
plain-text editor, such as vi.
$ sudo vi /etc/nvidia/gridd.conf
Note: You can create the /etc/nvidia/gridd.conf file by copying the supplied template file /etc/nvidia/gridd.conf.template. - Add the FeatureType configuration parameter to the file
/etc/nvidia/gridd.conf on a new line as
FeatureType="value".
value depends on the type of the GPU assigned to the licensed client that you are configuring.
GPU Type Value NVIDIA vGPU 1. NVIDIA AI Enterprise automatically selects the correct type of license based on the vGPU type. Physical GPU The feature type of a GPU in pass-through mode or a bare-metal deployment: - 0: NVIDIA Virtual Applications
- 2: NVIDIA RTX Virtual Workstation
- 4: NVIDIA Virtual Compute Server
Note: You can also perform this step from NVIDIA X Server Settings. Before using NVIDIA X Server Settings to perform this step, ensure that this option has been enabled as explained in NVIDIA AI Enterprise Client Licensing User Guide.This example shows how to configure a licensed Linux client for .
# /etc/nvidia/gridd.conf.template - Configuration file for NVIDIA Grid Daemon
…
# Description: Set Feature to be enabled
# Data type: integer
# Possible values:
# 0 => for unlicensed state
# 1 => for NVIDIA vGPU
# 2 => for NVIDIA RTX Virtual Workstation
# 4 => for NVIDIA Virtual Compute Server
FeatureType=
...
- Copy the client configuration token to the /etc/nvidia/ClientConfigToken directory.
- Ensure that the file access modes of the client configuration token allow the
owner to read, write, and execute the token, and the group and others only to
read the token.
- Determine the current file access modes of the client configuration
token.
# ls -l client-configuration-token-directory
- If necessary, change the mode of the client configuration token to
744.
# chmod 744 client-configuration-token-directory/client_configuration_token_*.tok
- client-configuration-token-directory
- The directory to which you copied the client configuration token in the previous step.
- Determine the current file access modes of the client configuration
token.
- Save your changes to the /etc/nvidia/gridd.conf file and close the file.
- Restart the nvidia-gridd service.
The NVIDIA service on the client should now automatically obtain a license from the CLS or DLS instance.
5.2.2. Verifying the NVIDIA AI Enterprise License Status of a Licensed Client
After configuring a client with an NVIDIA AI Enterprise license, verify the license status by displaying the licensed product name and status.
To verify the license status of a licensed client, run nvidia-smi with the –q or --query option from the licensed client, not the hypervisor host. If the product is licensed, the expiration date is shown in the license status.
nvidia-smi -q
==============NVSMI LOG==============

Timestamp                           : Wed Mar 31 01:49:28 2020
Driver Version                      : 440.88
CUDA Version                        : 10.0

Attached GPUs                       : 1
GPU 00000000:00:08.0
    Product Name                    : Tesla T4
    Product Brand                   : Grid
    Display Mode                    : Enabled
    Display Active                  : Disabled
    Persistence Mode                : N/A
    Accounting Mode                 : Disabled
    Accounting Mode Buffer Size     : 4000
    Driver Model
        Current                     : WDDM
        Pending                     : WDDM
    Serial Number                   : 0334018000638
    GPU UUID                        : GPU-ba2310b6-95d1-802b-f96f-5865410fe517
    Minor Number                    : N/A
    VBIOS Version                   : 90.04.21.00.01
    MultiGPU Board                  : No
    Board ID                        : 0x8
    GPU Part Number                 : 699-2G183-0200-100
    Inforom Version
        Image Version               : G183.0200.00.02
        OEM Object                  : 1.1
        ECC Object                  : 5.0
        Power Management Object     : N/A
    GPU Operation Mode
        Current                     : N/A
        Pending                     : N/A
    GPU Virtualization Mode
        Virtualization mode         : Pass-Through
    vGPU Software Licensed Product
        Product Name                : NVIDIA Virtual Compute Server
        License Status              : Licensed (Expiry: 2021-11-13 18:29:59 GMT)
    …
    …
5.3. Installing NVIDIA Container Toolkit
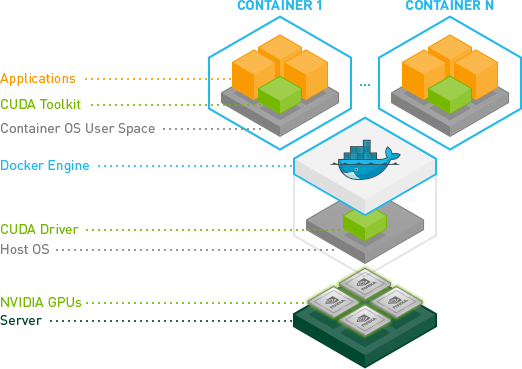
Ensure that the following software is installed in the guest VM:
- Docker 20.10 for your Linux distribution. For instructions, refer to Install Docker Engine on Ubuntu in the Docker product manuals.
- The NVIDIA AI Enterprise graphics driver. For instructions, refer to Installing the NVIDIA AI Enterprise Graphics Driver on Linux from a Debian Package.
- Set up the GPG key and configure apt to use NVIDIA Container Toolkit packages in the file
/etc/apt/sources.list.d/nvidia-docker.list.
$ distribution=$(. /etc/os-release;echo $ID$VERSION_ID)
$ curl -s -L https://nvidia.github.io/nvidia-docker/gpgkey | sudo apt-key add -
$ curl -s -L https://nvidia.github.io/nvidia-docker/$distribution/nvidia-docker.list | sudo tee /etc/apt/sources.list.d/nvidia-docker.list
- Download information from all configured sources about the latest versions of the
packages and install the nvidia-container-toolkit package.
$ sudo apt-get update && sudo apt-get install -y nvidia-container-toolkit
- Restart the Docker service.
$ sudo systemctl restart docker
5.4. Verifying the Installation of NVIDIA Container Toolkit
- Run the nvidia-smi command contained in the latest official
NVIDIA CUDA Toolkit image.
$ docker run --gpus all nvidia/cuda:11.0-base nvidia-smi
- Start a GPU-enabled container on any two available GPUs.
$ docker run --gpus 2 nvidia/cuda:11.0-base nvidia-smi
- Start a GPU-enabled container on two specific GPUs identified by their index
numbers.
$ docker run --gpus '"device=1,2"' nvidia/cuda:10.0-base nvidia-smi
- Start a GPU-enabled container on two specific GPUs with one GPU identified by
its UUID and the other GPU identified by its index number.
$ docker run --gpus '"device=UUID-ABCDEF,1"' nvidia/cuda:11.0-base nvidia-smi
- Specify a GPU capability for the container.
$ docker run --gpus all,capabilities=utility nvidia/cuda:11.0-base nvidia-smi
5.5. Installing Software Distributed as Container Images
Ensure that you have completed the following tasks in NGC Private Registry User Guide:
For each AI or data science application that you are interested in, load the container as explained in Uploading an NVIDIA Container Image onto Your System in NGC Private Registry User Guide.
The following table lists the Docker pull command for downloading the container for each application or framework.
| Application or Framework | Docker pull Command |
|---|---|
| NVIDIA TensorRT | docker pull nvcr.io/nvaie/tensorrt-1-4:21.08-nvaie1.4-py3 |
| NVIDIA Triton Inference Server | docker pull nvcr.io/nvaie/tritonserver-1-4:21.08-nvaie1.4-py3-sdk |
| NVIDIA Triton Inference Server | docker pull nvcr.io/nvaie/tritonserver-1-4:21.08-nvaie1.4-py3-min |
| NVIDIA Triton Inference Server | docker pull nvcr.io/nvaie/tritonserver-1-4:21.08-nvaie1.4-py3 |
| PyTorch | docker pull nvcr.io/nvaie/pytorch-1-4:21.08-nvaie1.4-py3 |
| RAPIDS | docker pull nvcr.io/nvaie/nvidia-rapids-1-4:21.08-cuda11.4-ubuntu20.04-py3.8-nvaie1.4 |
| TensorFlow 1 | docker pull nvcr.io/nvaie/tensorflow-1-4:21.08-nvaie1.4-tf1-py3 |
| TensorFlow 2 | docker pull nvcr.io/nvaie/tensorflow-1-4:21.08-nvaie1.4-tf2-py3 |
The following table lists the Docker pull commands for downloading other software that is distributed as NGC container images through the NVIDIA Enterprise Catalog.
| Other Software | Docker pull Command |
|---|---|
| GPU Operator | docker pull nvcr.io/nvaie/gpu-operator-1-4:v22.9.0 |
| Network Operator | docker pull nvcr.io/nvaie/network-operator-1-4:v1.4.0 |
| vGPU Guest Driver, Ubuntu | docker pull nvcr.io/nvaie/vgpu-guest-driver-1-4:470.161.03-ubuntu20.04 |
5.6. Running ResNet-50 with TensorRT
- Launch the NVIDIA TensorRT container image on all vGPUs in
interactive mode, specifying that the container will be deleted when it is
stopped.
$ sudo docker run --gpus all -it --rm nvcr.io/nvaie/tensorrt:21.07-py3
- From within the container runtime, change to the directory that contains test
data for the ResNet-50 convolutional neural network.
# cd /workspace/tensorrt/data/resnet50
- Run the ResNet-50 convolutional neural network with FP32, FP16, and INT8
precision and confirm that each test is completed with the result
PASSED.
- To run ResNet-50 with the default FP32 precision, run this
command:
# trtexec --duration=90 --workspace=1024 --percentile=99 --avgRuns=100 \
--deploy=ResNet50_N2.prototxt --batch=1 --output=prob
- To run ResNet-50 with FP16 precision, add the --fp16
option:
# trtexec --duration=90 --workspace=1024 --percentile=99 --avgRuns=100 \
--deploy=ResNet50_N2.prototxt --batch=1 --output=prob --fp16
- To run ResNet-50 with INT8 precision, add the --int8
option:
# trtexec --duration=90 --workspace=1024 --percentile=99 --avgRuns=100 \
--deploy=ResNet50_N2.prototxt --batch=1 --output=prob --int8
- To run ResNet-50 with the default FP32 precision, run this
command:
- Press Ctrl+P, Ctrl+Q to exit the container runtime and return to the Linux command shell.
5.7. Running ResNet-50 with TensorFlow
- Launch the TensorFlow 1 container image on all vGPUs in interactive
mode, specifying that the container will be deleted when it is stopped.
$ sudo docker run --gpus all -it --rm \
nvcr.io/nvaie/tensorflow:21.07-tf1-py3
- From within the container runtime, change to the directory that contains test
data for cnn example.
# cd /workspace/nvidia-examples/cnn
- Run the ResNet-50 training test with FP16 precision.
# python resnet.py --layers 50 -b 64 -i 200 -u batch --precision fp16
- Confirm that all operations on the application are performed correctly and that a set of results is reported when the test is completed.
- Press Ctrl+P, Ctrl+Q to exit the container runtime and return to the Linux command shell.
6. Additional Information
The following table provides links to additional information about each application or framework in NVIDIA AI Enterprise.
| Application or Framework | Additional Information |
|---|---|
| TensorFlow | |
| PyTorch | PyTorch Release Notes |
| NVIDIA Triton Inference Server | Triton Inference Server Documentation on Github |
| NVIDIA TensorRT | NVIDIA TensorRT Documentation |
| RAPIDS | RAPIDS Docs on the RAPIDS project site |
| Other Software | Additional Information |
|---|---|
| NVIDIA GPU Operator | NVIDIA GPU Operator Documentation |
| NVIDIA Network Operator | NVIDIA Network Operator Documentation |
Notices
Notice
This document is provided for information purposes only and shall not be regarded as a warranty of a certain functionality, condition, or quality of a product. NVIDIA Corporation (“NVIDIA”) makes no representations or warranties, expressed or implied, as to the accuracy or completeness of the information contained in this document and assumes no responsibility for any errors contained herein. NVIDIA shall have no liability for the consequences or use of such information or for any infringement of patents or other rights of third parties that may result from its use. This document is not a commitment to develop, release, or deliver any Material (defined below), code, or functionality.
NVIDIA reserves the right to make corrections, modifications, enhancements, improvements, and any other changes to this document, at any time without notice.
Customer should obtain the latest relevant information before placing orders and should verify that such information is current and complete.
NVIDIA products are sold subject to the NVIDIA standard terms and conditions of sale supplied at the time of order acknowledgement, unless otherwise agreed in an individual sales agreement signed by authorized representatives of NVIDIA and customer (“Terms of Sale”). NVIDIA hereby expressly objects to applying any customer general terms and conditions with regards to the purchase of the NVIDIA product referenced in this document. No contractual obligations are formed either directly or indirectly by this document.
NVIDIA products are not designed, authorized, or warranted to be suitable for use in medical, military, aircraft, space, or life support equipment, nor in applications where failure or malfunction of the NVIDIA product can reasonably be expected to result in personal injury, death, or property or environmental damage. NVIDIA accepts no liability for inclusion and/or use of NVIDIA products in such equipment or applications and therefore such inclusion and/or use is at customer’s own risk.
NVIDIA makes no representation or warranty that products based on this document will be suitable for any specified use. Testing of all parameters of each product is not necessarily performed by NVIDIA. It is customer’s sole responsibility to evaluate and determine the applicability of any information contained in this document, ensure the product is suitable and fit for the application planned by customer, and perform the necessary testing for the application in order to avoid a default of the application or the product. Weaknesses in customer’s product designs may affect the quality and reliability of the NVIDIA product and may result in additional or different conditions and/or requirements beyond those contained in this document. NVIDIA accepts no liability related to any default, damage, costs, or problem which may be based on or attributable to: (i) the use of the NVIDIA product in any manner that is contrary to this document or (ii) customer product designs.
No license, either expressed or implied, is granted under any NVIDIA patent right, copyright, or other NVIDIA intellectual property right under this document. Information published by NVIDIA regarding third-party products or services does not constitute a license from NVIDIA to use such products or services or a warranty or endorsement thereof. Use of such information may require a license from a third party under the patents or other intellectual property rights of the third party, or a license from NVIDIA under the patents or other intellectual property rights of NVIDIA.
Reproduction of information in this document is permissible only if approved in advance by NVIDIA in writing, reproduced without alteration and in full compliance with all applicable export laws and regulations, and accompanied by all associated conditions, limitations, and notices.
THIS DOCUMENT AND ALL NVIDIA DESIGN SPECIFICATIONS, REFERENCE BOARDS, FILES, DRAWINGS, DIAGNOSTICS, LISTS, AND OTHER DOCUMENTS (TOGETHER AND SEPARATELY, “MATERIALS”) ARE BEING PROVIDED “AS IS.” NVIDIA MAKES NO WARRANTIES, EXPRESSED, IMPLIED, STATUTORY, OR OTHERWISE WITH RESPECT TO THE MATERIALS, AND EXPRESSLY DISCLAIMS ALL IMPLIED WARRANTIES OF NONINFRINGEMENT, MERCHANTABILITY, AND FITNESS FOR A PARTICULAR PURPOSE. TO THE EXTENT NOT PROHIBITED BY LAW, IN NO EVENT WILL NVIDIA BE LIABLE FOR ANY DAMAGES, INCLUDING WITHOUT LIMITATION ANY DIRECT, INDIRECT, SPECIAL, INCIDENTAL, PUNITIVE, OR CONSEQUENTIAL DAMAGES, HOWEVER CAUSED AND REGARDLESS OF THE THEORY OF LIABILITY, ARISING OUT OF ANY USE OF THIS DOCUMENT, EVEN IF NVIDIA HAS BEEN ADVISED OF THE POSSIBILITY OF SUCH DAMAGES. Notwithstanding any damages that customer might incur for any reason whatsoever, NVIDIA’s aggregate and cumulative liability towards customer for the products described herein shall be limited in accordance with the Terms of Sale for the product.
VESA DisplayPort
DisplayPort and DisplayPort Compliance Logo, DisplayPort Compliance Logo for Dual-mode Sources, and DisplayPort Compliance Logo for Active Cables are trademarks owned by the Video Electronics Standards Association in the United States and other countries.
HDMI
HDMI, the HDMI logo, and High-Definition Multimedia Interface are trademarks or registered trademarks of HDMI Licensing LLC.
Trademarks
NVIDIA, the NVIDIA logo, NVIDIA Maxwell, NVIDIA Pascal, NVIDIA Turing, NVIDIA Volta, Quadro, and Tesla are trademarks or registered trademarks of NVIDIA Corporation in the U.S. and other countries. Other company and product names may be trademarks of the respective companies with which they are associated.