NVIDIA AI Enterprise User Guide
Documentation for administrators that explains how to install and configure NVIDIA AI Enterprise.
1. Introduction to NVIDIA AI Enterprise
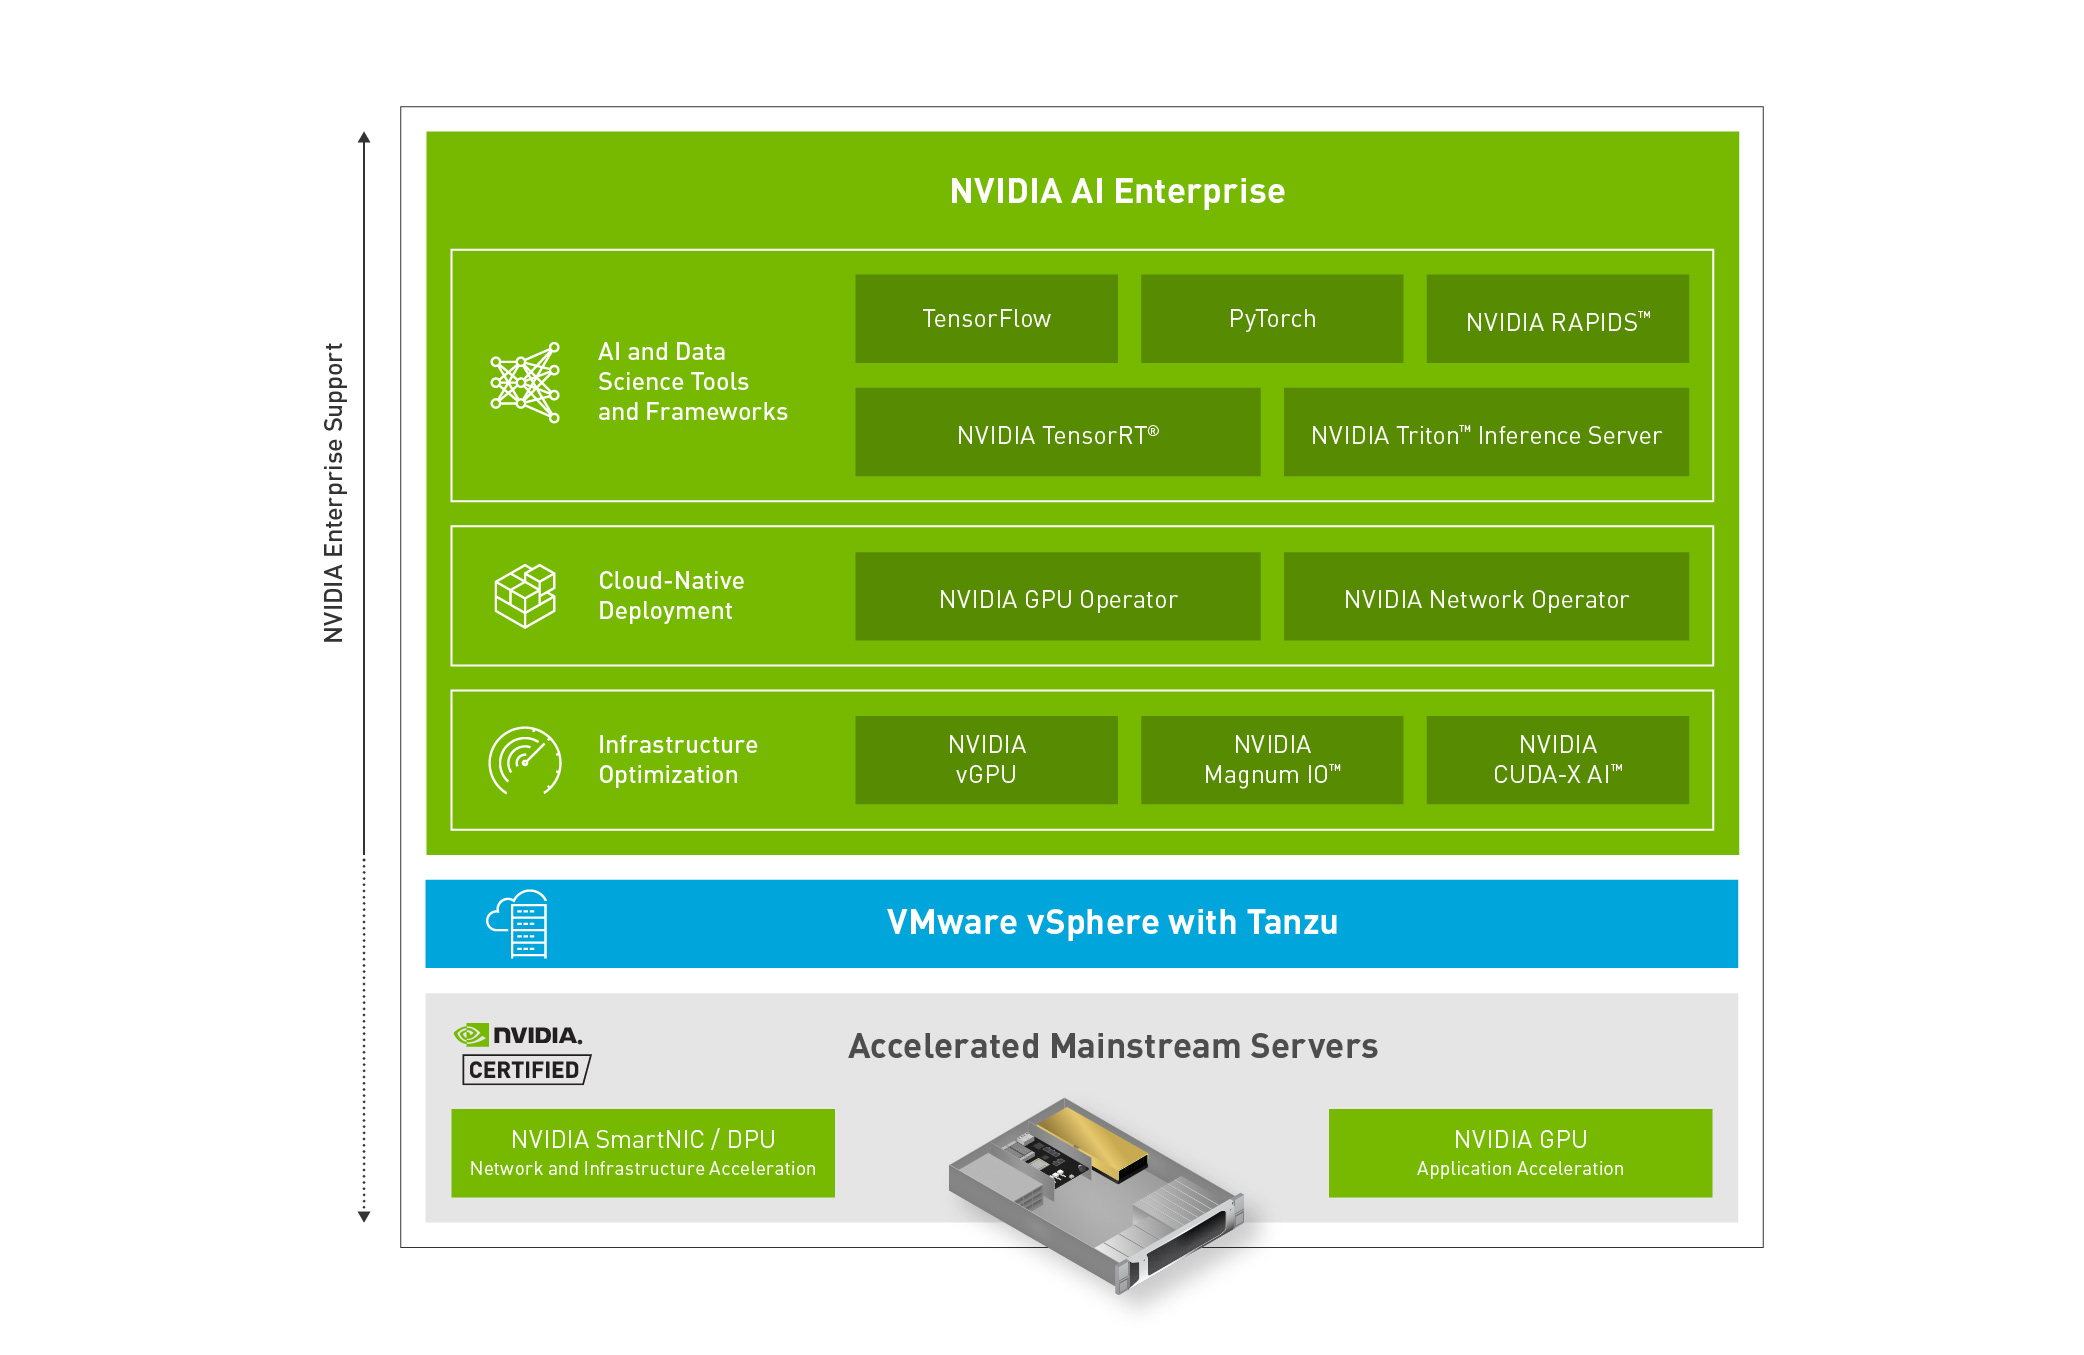
NVIDIA® AI Enterprise is a software suite that enables rapid deployment, management, and scaling of AI workloads in the modern hybrid cloud. It provides AI and data science applications and frameworks that are optimized and exclusively certified by NVIDIA to run on VMware vSphere with NVIDIA-Certified Systems.
1.1. NVIDIA AI Enterprise Software Architecture
The software in the NVIDIA AI Enterprise suite is organized into separate layers for infrastructure optimization software, cloud native deployment software, and AI and data science frameworks.
The content of these layers is as follows:
- Infrastructure optimization software:
- NVIDIA virtual GPU (vGPU) software
- NVIDIA CUDA Toolkit
- NVIDIA Magnum IO™ software stack for accelerated data centers
- Cloud native deployment software:
- NVIDIA GPU Operator
- NVIDIA Network Operator
- AI and data science frameworks:
- TensorFlow
- PyTorch
- NVIDIA Triton Inference Server
- NVIDIA TensorRT
- RAPIDS
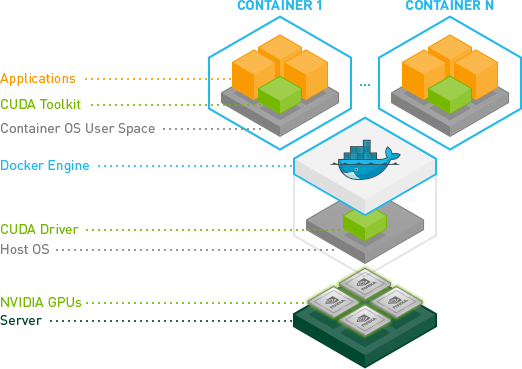
The AI and data science frameworks are delivered as container images. Containerized software can be run directly with a tool such as Docker.
1.2. Prerequisites for Using NVIDIA AI Enterprise
Before proceeding, ensure that these prerequisites are met:
- You have a system that meets the requirements in NVIDIA AI Enterprise Release Notes.
- One or more supported NVIDIA GPUs are installed in your system.
- If you are using an NVIDIA A100 GPU, the following BIOS settings are enabled on your system:
- Single Root I/O Virtualization (SR-IOV)
- VT-d/IOMMU - Enabled
- The following software is installed according to the instructions in the VMware documentation:
- VMware vSphere Hypervisor ESXi
- VMware vCenter Server
- A VM to be enabled with NVIDIA vGPU is created with the virtual
hardware resources in the following table.
Resource Requirements vCPUs 16 RAM 64 GB Storage 500 GB thin provisioned virtual disk NIC VMXNet3 NIC connected to network - A supported guest OS is installed in the VM.
For optimum performance, set options in your server configuration as follows:
- Enable the following options:
- Hyperthreading
- Memory Mapped I/O above 4 GB (if applicable)
- Set the Power Setting or System Profile option to High Performance.
- If applicable, set CPU Performance to Enterprise or High Throughput.
2. Installing and Configuring NVIDIA Virtual GPU Manager
The process for installing and configuring NVIDIA Virtual GPU Manager depends on the hypervisor that you are using. After you complete this process, you can install the display drivers for your guest OS and license any NVIDIA AI Enterprise licensed products that you are using.
2.1. About NVIDIA Virtual GPUs
2.1.1. NVIDIA vGPU Architecture
The high-level architecture of NVIDIA vGPU is illustrated in Figure 1. Under the control of the NVIDIA Virtual GPU Manager running under the hypervisor, NVIDIA physical GPUs are capable of supporting multiple virtual GPU devices (vGPUs) that can be assigned directly to guest VMs.
Guest VMs use NVIDIA vGPUs in the same manner as a physical GPU that has been passed through by the hypervisor: an NVIDIA driver loaded in the guest VM provides direct access to the GPU for performance-critical fast paths, and a paravirtualized interface to the NVIDIA Virtual GPU Manager is used for non-performant management operations.
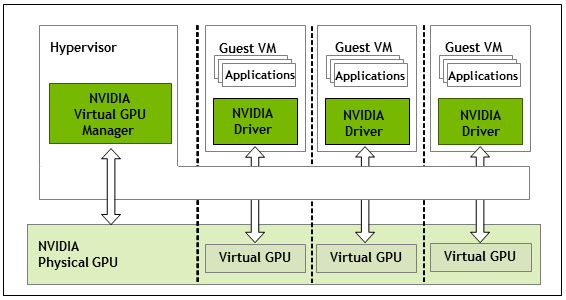
Each NVIDIA vGPU is analogous to a conventional GPU, having a fixed amount of GPU framebuffer, and one or more virtual display outputs or "heads". The vGPU’s framebuffer is allocated out of the physical GPU’s framebuffer at the time the vGPU is created, and the vGPU retains exclusive use of that framebuffer until it is destroyed.
Depending on the physical GPU, different types of vGPU can be created on the vGPU:
- On all GPUs that support NVIDIA AI Enterprise, time-sliced vGPUs can be created.
- Additionally, on GPUs that support the Multi-Instance GPU (MIG) feature, MIG-backed vGPUs can be created. The MIG feature is introduced on GPUs that are based on the NVIDIA Ampere GPU architecture.
2.1.1.1. Time-Sliced NVIDIA vGPU Internal Architecture
A time-sliced vGPU is a vGPU that resides on a physical GPU that is not partitioned into multiple GPU instances. All time-sliced vGPUs resident on a GPU share access to the GPU’s engines including the graphics (3D), video decode, and video encode engines.
In a time-sliced vGPU, processes that run on the vGPU are scheduled to run in series. Each vGPU waits while other processes run on other vGPUs. While processes are running on a vGPU, the vGPU has exclusive use of the GPU's engines. You can change the default scheduling behavior as explained in Changing Scheduling Behavior for Time-Sliced vGPUs.
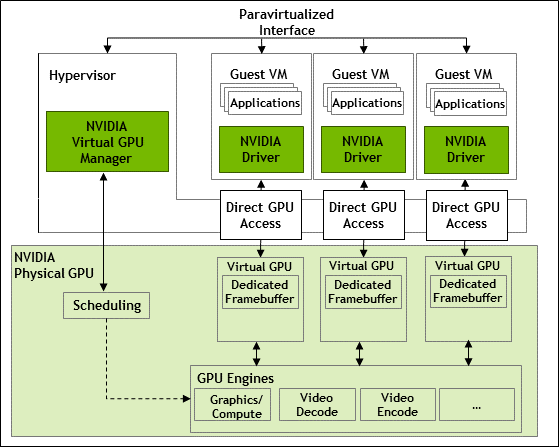
2.1.1.2. MIG-Backed NVIDIA vGPU Internal Architecture
A MIG-backed vGPU is a vGPU that resides on a GPU instance in a MIG-capable physical GPU. Each MIG-backed vGPU resident on a GPU has exclusive access to the GPU instance’s engines, including the compute and video decode engines.
In a MIG-backed vGPU, processes that run on the vGPU run in parallel with processes running on other vGPUs on the GPU. Process run on all vGPUs resident on a physical GPU simultaneously.

2.1.2. About Virtual GPU Types
The number of physical GPUs that a board has depends on the board. Each physical GPU can support several different types of virtual GPU (vGPU). vGPU types have a fixed amount of frame buffer, number of supported display heads, and maximum resolutions. They are grouped into different series according to the different classes of workload for which they are optimized. Each series is identified by the last letter of the vGPU type name.
| Series | Optimal Workload |
|---|---|
| C-series | Compute-intensive server workloads, such as artificial intelligence (AI), deep learning, or high-performance computing (HPC)1, 2 |
The number after the board type in the vGPU type name denotes the amount of frame buffer that is allocated to a vGPU of that type. For example, a vGPU of type A16-4C is allocated 4096 Mbytes of frame buffer on an NVIDIA A16 board.
Due to their differing resource requirements, the maximum number of vGPUs that can be created simultaneously on a physical GPU varies according to the vGPU type. For example, an NVDIA A16 board can support up to 4 A16-4C vGPUs on each of its two physical GPUs, for a total of 16 vGPUs, but only 2 A16-8C vGPUs, for a total of 8 vGPUs.
When enabled, the frame-rate limiter (FRL) limits the maximum frame rate in frames per second (FPS) for C-series vGPUs to 60 FPS.
By default, the FRL is enabled for all GPUs. The FRL is disabled when the vGPU scheduling behavior is changed from the default best-effort scheduler on GPUs that support alternative vGPU schedulers. For details, see Changing Scheduling Behavior for Time-Sliced vGPUs. On vGPUs that use the best-effort scheduler, the FRL can be disabled as explained in the release notes for your chosen hypervisor at NVIDIA AI Enterprise Documentation.
For details of the virtual GPU types available from each supported GPU, see Virtual GPU Types for Supported GPUs.
2.1.3. Valid Virtual GPU Configurations on a Single GPU
Valid vGPU configurations on a single GPU depend on whether the vGPUs are time sliced or, on GPUs that support MIG, are MIG-backed.
2.1.3.1. Valid Time-Sliced Virtual GPU Configurations on a Single GPU
This release of NVIDIA vGPU supports only homogeneous time-sliced virtual GPUs. At any given time, the virtual GPUs resident on a single physical GPU must be all of the same type.
However, this restriction doesn’t extend across physical GPUs on the same card. Different physical GPUs on the same card may host different types of virtual GPU at the same time, provided that the vGPU types on any one physical GPU are the same.
- A configuration with A16-16C vGPUs on GPU 0 and GPU 1, A16-8C vGPUs on GPU 2, and A16-4C vGPUs on GPU3 is valid.
- A configuration with a mixture of A16-8C vGPUs and A16-4C vGPUs on GPU0 is invalid.
2.1.3.2. Valid MIG-Backed Virtual GPU Configurations on a Single GPU
This release of NVIDIA vGPU supports both homogeneous and mixed MIG-backed virtual GPUs based on the underlying GPU instance configuration.
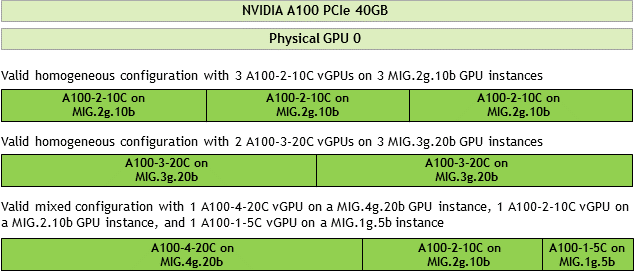
For example, an NVIDIA A100 PCIe 40GB card has one physical GPU, and can support several types of virtual GPU. Figure 4 shows the following examples of valid homogeneous and mixed MIG-backed virtual GPU configurations on NVIDIA A100 PCIe 40GB.
- A valid homogeneous configuration with 3 A100-2-10C vGPUs on 3 MIG.2g.10b GPU instances
- A valid homogeneous configuration with 2 A100-3-20C vGPUs on 3 MIG.3g.20b GPU instances
- A valid mixed configuration with 1 A100-4-20C vGPU on a MIG.4g.20b GPU instance, 1 A100-2-10C vGPU on a MIG.2.10b GPU instance, and 1 A100-1-5C vGPU on a MIG.1g.5b instance
2.2. Switching the Mode of a GPU that Supports Multiple Display Modes
Some GPUs support displayless and display-enabled modes but must be used in NVIDIA AI Enterprise deployments in displayless mode.
The GPUs listed in the following table support multiple display modes. As shown in the table, some GPUs are supplied from the factory in displayless mode, but other GPUs are supplied in a display-enabled mode.
| GPU | Mode as Supplied from the Factory |
|---|---|
| NVIDIA A40 | Displayless |
| NVIDIA RTX A5000 | Display enabled |
| NVIDIA RTX A6000 | Display enabled |
A GPU that is supplied from the factory in displayless mode, such as the NVIDIA A40 GPU, might be in a display-enabled mode if its mode has previously been changed.
To change the mode of a GPU that supports multiple display modes, use the displaymodeselector tool, which you can request from the NVIDIA Display Mode Selector Tool page on the NVIDIA Developer website.
Only the following GPUs support the displaymodeselector tool:
- NVIDIA A40
- NVIDIA RTX A5000
- NVIDIA RTX A6000
Other GPUs that support NVIDIA AI Enterprise do not support the displaymodeselector tool and, unless otherwise stated, do not require display mode switching.
2.3. Installing and Configuring the NVIDIA Virtual GPU Manager for VMware vSphere
You can use the NVIDIA Virtual GPU Manager for VMware vSphere to set up a VMware vSphere VM to use NVIDIA vGPU or VMware vSGA. The vGPU Manager vSphere Installation Bundles (VIBs) for VMware vSphere 6.5 and later provide vSGA and vGPU functionality in a single VIB. For VMware vSphere 6.0, vSGA and vGPU functionality are provided in separate vGPU Manager VIBs.
Some servers, for example, the Dell R740, do not configure SR-IOV capability if the SR-IOV SBIOS setting is disabled on the server. If you are using the Tesla T4 GPU with VMware vSphere on such a server, you must ensure that the SR-IOV SBIOS setting is enabled on the server.
However, with any server hardware, do not enable SR-IOV in VMware vCenter Server for the Tesla T4 GPU. If SR-IOV is enabled in VMware vCenter Server for T4, VMware vCenter Server lists the status of the GPU as needing a reboot. You can ignore this status message.
Requirements for Configuring NVIDIA vGPU in a DRS Cluster
You can configure a VM with NVIDIA vGPU on an ESXi host in a VMware Distributed Resource Scheduler (DRS) cluster. However, you must ensure that the automation level of the cluster supports VMs configured with NVIDIA vGPU:
- For any supported VMware vSphere release, set the automation level to Manual.
- For VMware vSphere 6.7 Update 1 or later, set the automation level to Partially Automated or Manual.
For more information about these settings, see Edit Cluster Settings in the VMware documentation.
2.3.1. Installing the NVIDIA Virtual GPU Manager Package for vSphere
- The ZIP archive that contains NVIDIA AI Enterprise has been downloaded from the NVIDIA Licensing Portal.
- The NVIDIA Virtual GPU Manager package has been extracted from the downloaded ZIP archive.
- Copy the NVIDIA Virtual GPU Manager package file to the ESXi host.
- Put the ESXi host into maintenance mode.
$ esxcli system maintenanceMode set –-enable true
- Use the esxcli command to install the vGPU Manager package.
For more information about the esxcli command, see esxcli software Commands in the VMware vSphere
documentation.
[root@esxi:~] esxcli software vib install -d /vmfs/volumes/datastore/software-component.zip
- datastore
- The name of the VMFS datastore to which you copied the software component.
- software-component
- The name of the file that contains the NVIDIA Virtual GPU Manager package in the form of a software component. Ensure that you specify the file that was extracted from the downloaded ZIP archive. For example, for VMware vSphere 7.0.2, software-component is NVD.NVIDIA_bootbank_NVIDIA-VMware_470.161.02-1OEM.702.0.0.8169922-offline_bundle-build-number.
- Exit maintenance mode.
$ esxcli system maintenanceMode set –-enable false
- Reboot the ESXi host.
$ reboot
2.3.2. Verifying the Installation of the NVIDIA AI Enterprise Package for vSphere
- Verify that the NVIDIA AI Enterprise package installed and loaded correctly by checking for the NVIDIA kernel
driver in the list of kernel loaded modules.
[root@esxi:~] vmkload_mod -l | grep nvidia
nvidia                   5    8420
- If the NVIDIA driver is not listed in the output, check dmesg for any load-time errors reported by the driver.
- Verify that the NVIDIA kernel driver can successfully communicate with the NVIDIA physical GPUs in your system by running the nvidia-smi command. The nvidia-smi command is described in more detail in NVIDIA System Management Interface nvidia-smi.
[root@esxi:~] nvidia-smi
Fri Dec 23 17:56:22 2024
+------------------------------------------------------+
| NVIDIA-SMI 470.161.02   Driver Version: 470.161.02   |
|-------------------------------+----------------------+----------------------+
| GPU  Name        Persistence-M| Bus-Id        Disp.A | Volatile Uncorr. ECC |
| Fan  Temp  Perf  Pwr:Usage/Cap|         Memory-Usage | GPU-Util  Compute M. |
|===============================+======================+======================|
|   0  Tesla M60           On   | 00000000:05:00.0 Off |                  Off |
| N/A   25C    P8    24W / 150W |     13MiB /  8191MiB |      0%      Default |
+-------------------------------+----------------------+----------------------+
|   1  Tesla M60           On   | 00000000:06:00.0 Off |                  Off |
| N/A   24C    P8    24W / 150W |     13MiB /  8191MiB |      0%      Default |
+-------------------------------+----------------------+----------------------+
|   2  Tesla M60           On   | 00000000:86:00.0 Off |                  Off |
| N/A   25C    P8    25W / 150W |     13MiB /  8191MiB |      0%      Default |
+-------------------------------+----------------------+----------------------+
|   3  Tesla M60           On   | 00000000:87:00.0 Off |                  Off |
| N/A   28C    P8    24W / 150W |     13MiB /  8191MiB |      0%      Default |
+-------------------------------+----------------------+----------------------+

+-----------------------------------------------------------------------------+
| Processes:                                                       GPU Memory |
|  GPU       PID   Type   Process name                             Usage      |
|=============================================================================|
|  No running processes found                                                 |
+-----------------------------------------------------------------------------+
2.3.3. Configuring VMware vMotion with vGPU for VMware vSphere
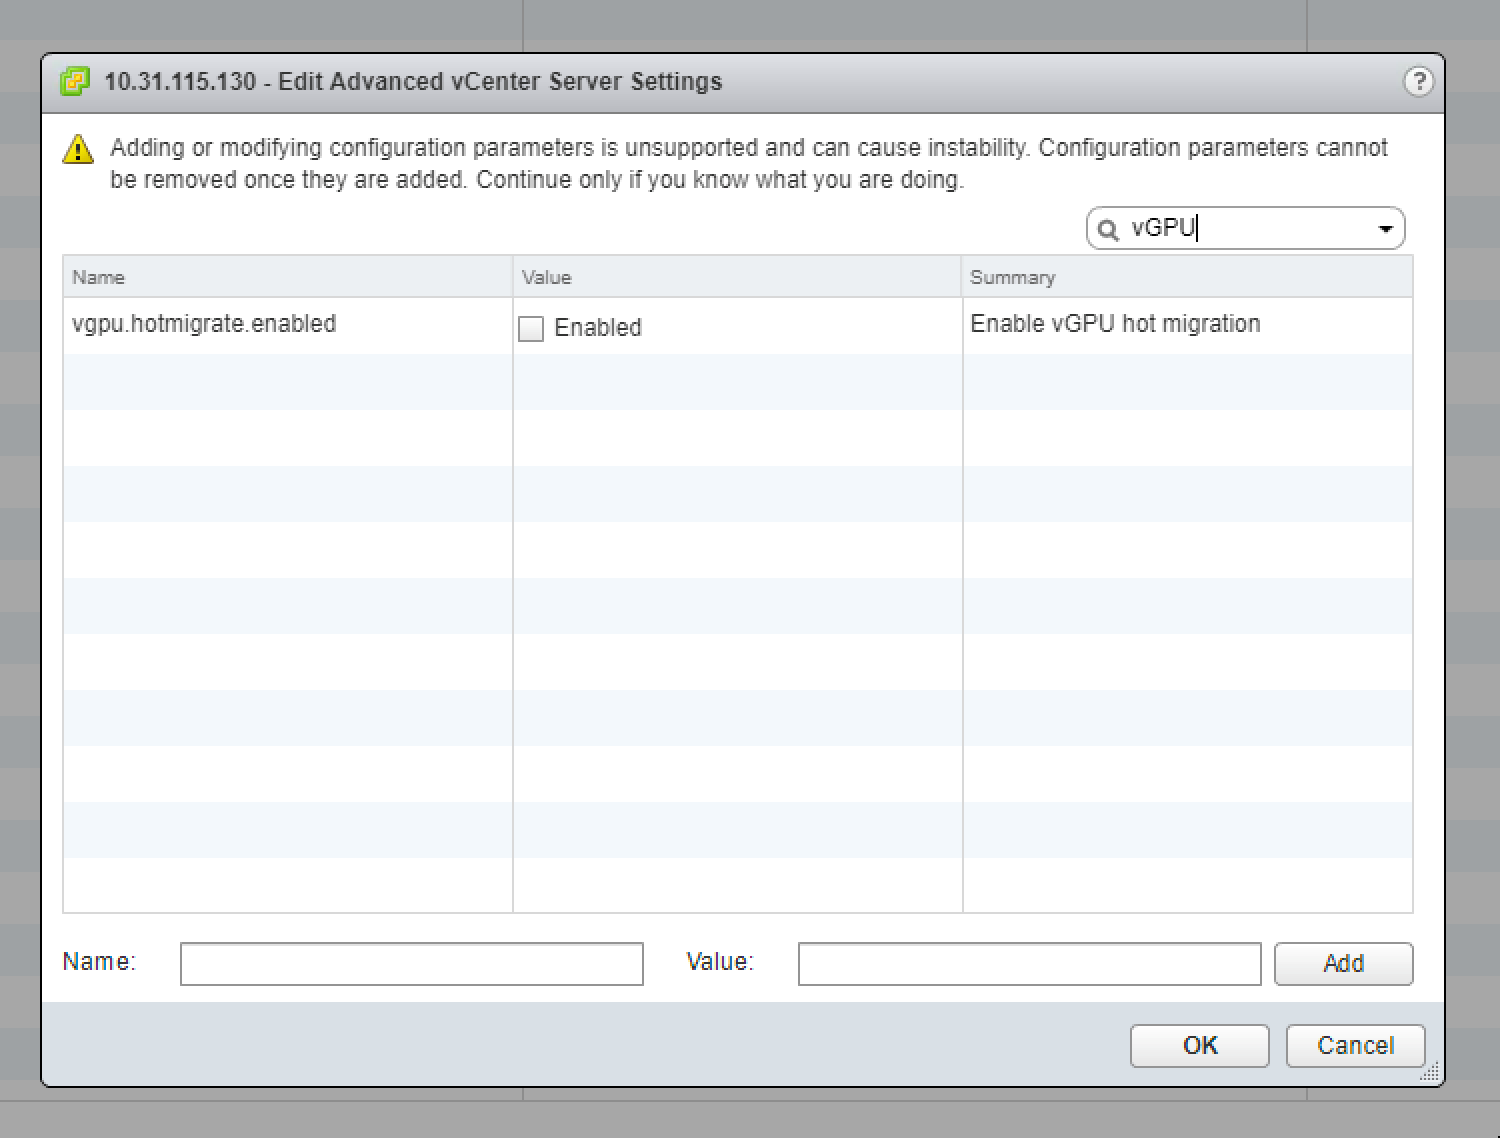
NVIDIA AI Enterprise supports vGPU migration, which includes VMware vMotion and suspend-resume, for VMs that are configured with vGPU. To enable VMware vMotion with vGPU, an advanced vCenter Server setting must be enabled. However, suspend-resume for VMs that are configured with vGPU is enabled by default.
- Log in to vCenter Server by using the vSphere Web Client.
- In the Hosts and Clusters view, select the
vCenter Server instance.Note: Ensure that you select the vCenter Server instance, not the vCenter Server VM.
- Click the Configure tab.
- In the Settings section, select Advanced Settings and click Edit.
- In the Edit Advanced vCenter Server Settings window that opens, type vGPU in the search field.
- When the vgpu.hotmigrate.enabled setting appears, set
the Enabled option and click
OK.
2.3.4. Changing the Default Graphics Type in VMware vSphere
The vGPU Manager VIBs for VMware vSphere provide vSGA and vGPU functionality in a single VIB. After this VIB is installed, the default graphics type is Shared, which provides vSGA functionality. To enable vGPU support for VMs in VMware vSphere, you must change the default graphics type to Shared Direct. If you do not change the default graphics type, VMs to which a vGPU is assigned fail to start and the following error message is displayed:
The amount of graphics resource available in the parent resource pool is insufficient for the operation.
Change the default graphics type before configuring vGPU. Output from the VM console in the VMware vSphere Web Client is not available for VMs that are running vGPU.
Before changing the default graphics type, ensure that the ESXi host is running and that all VMs on the host are powered off.
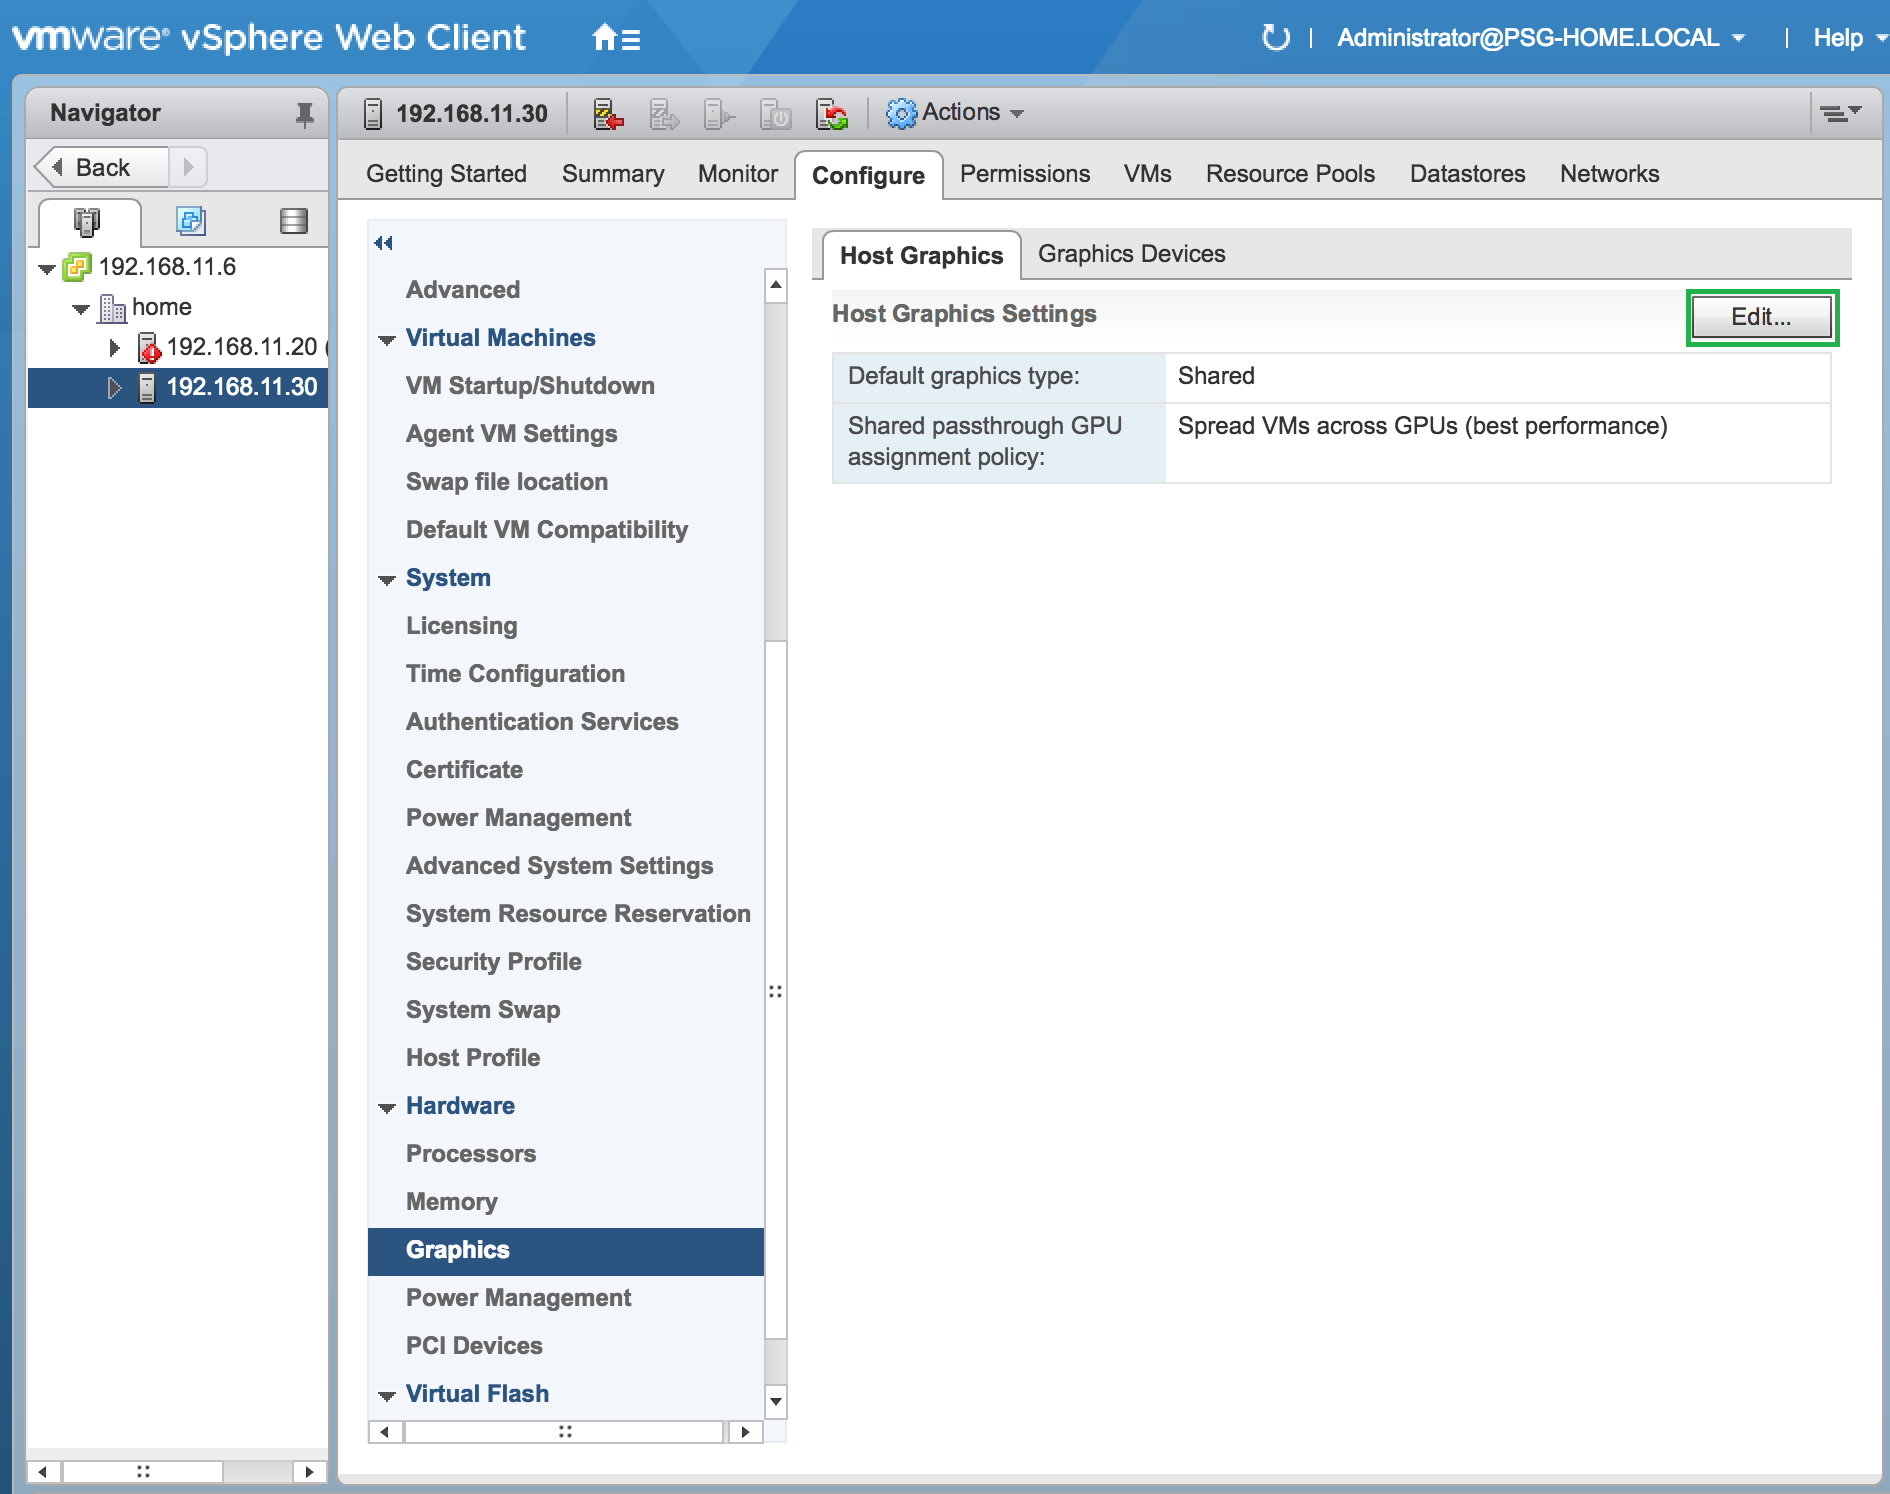
- Log in to vCenter Server by using the vSphere Web Client.
- In the navigation tree, select your ESXi host and click the Configure tab.
- From the menu, choose Graphics and then click the Host Graphics tab.
- On the Host Graphics tab, click
Edit.Figure 5. Shared default graphics type
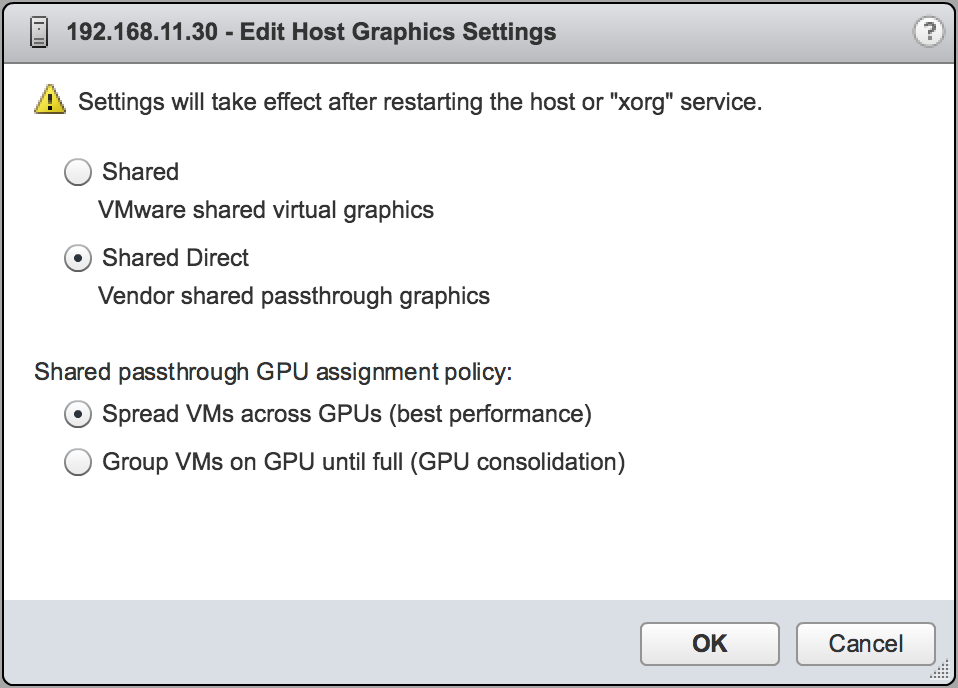
- In the Edit Host Graphics Settings dialog box that opens,
select Shared Direct and click
OK.
Note: In this dialog box, you can also change the allocation scheme for vGPU-enabled VMs. For more information, see Modifying GPU Allocation Policy on VMware vSphere.
After you click OK, the default graphics type changes to Shared Direct.
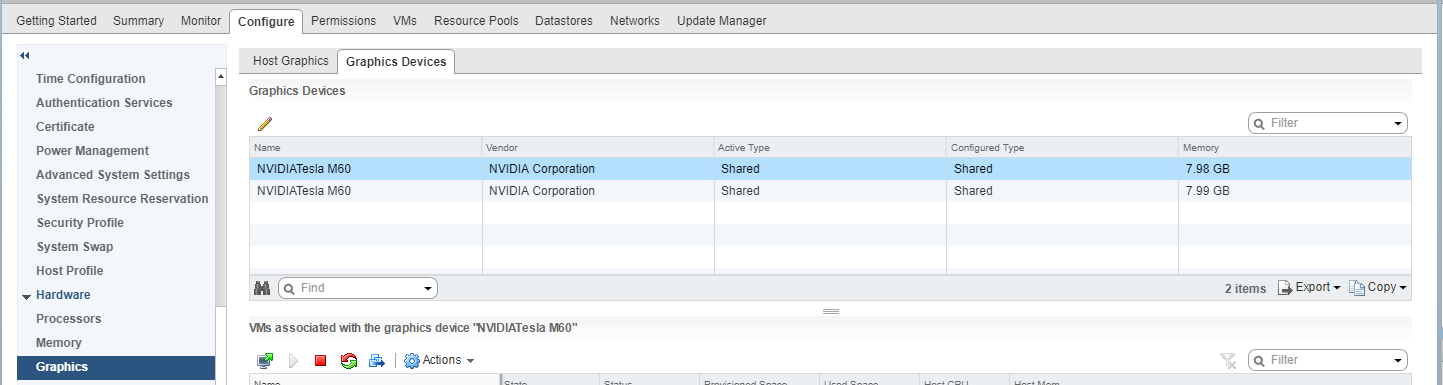
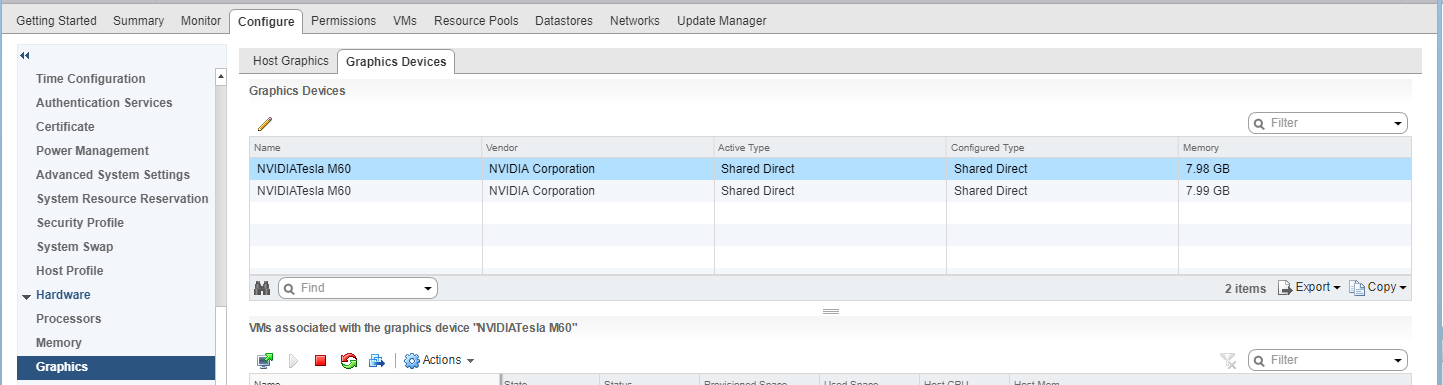
- Click the Graphics Devices tab to verify the configured
type of each physical GPU on which you want to configure vGPU.
The configured type of each physical GPU must be Shared Direct. For any
physical GPU for which the configured type is Shared, change the configured type
as follows:
- On the Graphics Devices tab, select the physical
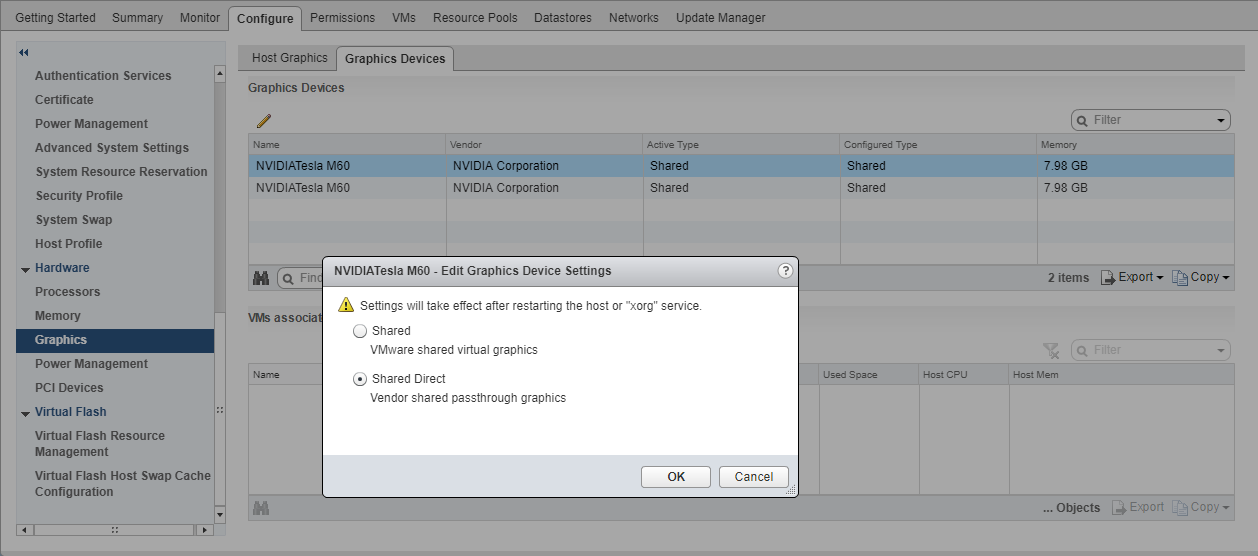
GPU and click the Edit icon.Figure 7. Shared graphics type
- In the Edit Graphics Device Settings dialog box
that opens, select Shared Direct and click
OK.Figure 8. Graphics device settings for a physical GPU
- On the Graphics Devices tab, select the physical
GPU and click the Edit icon.
- Restart the ESXi host or stop and restart nv-hostengine on
the ESXi host.
To stop and restart nv-hostengine, perform these steps:
- Stop nv-hostengine.
[root@esxi:~] nv-hostengine -t
- Wait for 1 second to allow nv-hostengine to stop.
- Start nv-hostengine.
[root@esxi:~] nv-hostengine -d
- Stop nv-hostengine.
- In the Graphics Devices tab of the VMware vCenter Web
UI, confirm that the active type and the configured type of each physical GPU
are Shared Direct.Figure 9. Shared direct graphics type
After changing the default graphics type, configure vGPU as explained in Configuring a vSphere VM with NVIDIA vGPU.
See also the following topics in the VMware vSphere documentation:
2.3.5. Configuring a GPU for MIG-Backed vGPUs
To support GPU instances with NVIDIA vGPU, a GPU must be configured with MIG mode enabled and GPU instances must be created and configured on the physical GPU. Optionally, you can create compute instances within the GPU instances. If you don't create compute instances within the GPU instances, they can be added later for individual vGPUs from within the guest VMs.
Ensure that the following prerequisites are met:
- The NVIDIA Virtual GPU Manager is installed on the hypervisor host.
- You have root user privileges on your hypervisor host machine.
- You have determined which GPU instances correspond to the vGPU types of the
MIG-backed vGPUs that you will create.
To get this information, consult the table of MIG-backed vGPUs for your GPU in Virtual GPU Types for Supported GPUs.
- The GPU is not being used by any other processes, such as CUDA applications, monitoring applications, or the nvidia-smi command.
2.3.5.1. Enabling MIG Mode for a GPU
Perform this task in your hypervisor command shell.
- Open a command shell as the root user on your hypervisor host machine. On all supported hypervisors, you can use secure shell (SSH) for this purpose. Individual hypervisors may provide additional means for logging in. For details, refer to the documentation for your hypervisor.
- Determine whether MIG mode is enabled.
Use the nvidia-smi command for this purpose. By default,
MIG mode is disabled.
This example shows that MIG mode is disabled on GPU 0.
Note: In the output from nvidia-smi, the NVIDIA A100 HGX 40GB GPU is referred to as A100-SXM4-40GB.$ nvidia-smi -i 0 +-----------------------------------------------------------------------------+ | NVIDIA-SMI 470.161.02 Driver Version: 470.161.02 CUDA Version: 11.4 | |-------------------------------+----------------------+----------------------+ | GPU Name Persistence-M| Bus-Id Disp.A | Volatile Uncorr. ECC | | Fan Temp Perf Pwr:Usage/Cap| Memory-Usage | GPU-Util Compute M. | | | | MIG M. | |===============================+======================+======================| | 0 A100-SXM4-40GB On | 00000000:36:00.0 Off | 0 | | N/A 29C P0 62W / 400W | 0MiB / 40537MiB | 6% Default | | | | Disabled | +-------------------------------+----------------------+----------------------+
- If MIG mode is disabled, enable it.
$ nvidia-smi -i [gpu-ids] -mig 1
- gpu-ids
- A comma-separated list of GPU indexes, PCI bus IDs or UUIDs that specifies the GPUs on which you want to enable MIG mode. If gpu-ids is omitted, MIG mode is enabled on all GPUs on the system.
This example enables MIG mode on GPU 0.
$ nvidia-smi -i 0 -mig 1
Enabled MIG Mode for GPU 00000000:36:00.0
All done.
Note: If the GPU is being used by another process, this command fails and displays a warning message that MIG mode for the GPU is in the pending enable state. In this situation, stop all processes that are using the GPU and retry the command. - VMware vSphere ESXi only: Reboot the hypervisor host.
- Query the GPUs on which you enabled MIG mode to confirm that MIG mode is
enabled.
This example queries GPU 0 for the PCI bus ID and MIG mode in comma-separated values (CSV) format.
$ nvidia-smi -i 0 --query-gpu=pci.bus_id,mig.mode.current --format=csv
pci.bus_id, mig.mode.current
00000000:36:00.0, Enabled
2.3.5.2. Disabling MIG Mode for One or More GPUs
If a GPU that you want to use for time-sliced vGPUs or GPU pass through has previously been configured for MIG-backed vGPUs, disable MIG mode on the GPU.
Ensure that the following prerequisites are met:
- The NVIDIA Virtual GPU Manager is installed on the hypervisor host.
- You have root user privileges on your hypervisor host machine.
- The GPU is not being used by any other processes, such as CUDA applications, monitoring applications, or the nvidia-smi command.
Perform this task in your hypervisor command shell.
- Open a command shell as the root user on your hypervisor host machine. You can use secure shell (SSH) for this purpose.
- Determine whether MIG mode is disabled.
Use the nvidia-smi command for this purpose. By default,
MIG mode is disabled, but might have previously been enabled.
This example shows that MIG mode is enabled on GPU 0.
Note: In the output from output from nvidia-smi, the NVIDIA A100 HGX 40GB GPU is referred to as A100-SXM4-40GB.$ nvidia-smi -i 0 +-----------------------------------------------------------------------------+ | NVIDIA-SMI 470.161.02 Driver Version: 470.161.02 CUDA Version: 11.4 | |-------------------------------+----------------------+----------------------+ | GPU Name Persistence-M| Bus-Id Disp.A | Volatile Uncorr. ECC | | Fan Temp Perf Pwr:Usage/Cap| Memory-Usage | GPU-Util Compute M. | | | | MIG M. | |===============================+======================+======================| | 0 A100-SXM4-40GB Off | 00000000:36:00.0 Off | 0 | | N/A 29C P0 62W / 400W | 0MiB / 40537MiB | 6% Default | | | | Enabled | +-------------------------------+----------------------+----------------------+
- If MIG mode is enabled, disable it.
$ nvidia-smi -i [gpu-ids] -mig 0
- gpu-ids
- A comma-separated list of GPU indexes, PCI bus IDs or UUIDs that specifies the GPUs on which you want to disable MIG mode. If gpu-ids is omitted, MIG mode is disabled on all GPUs on the system.
This example disables MIG mode on GPU 0.
$ sudo nvidia-smi -i 0 -mig 0
Disabled MIG Mode for GPU 00000000:36:00.0
All done.
- Confirm that MIG mode was disabled.
Use the nvidia-smi command for this purpose.
This example shows that MIG mode is disabled on GPU 0.
$ nvidia-smi -i 0
+-----------------------------------------------------------------------------+
| NVIDIA-SMI 470.161.02   Driver Version: 470.161.02  CUDA Version:  11.4     |
|-------------------------------+----------------------+----------------------+
| GPU  Name        Persistence-M| Bus-Id        Disp.A | Volatile Uncorr. ECC |
| Fan  Temp  Perf  Pwr:Usage/Cap|         Memory-Usage | GPU-Util  Compute M. |
|                               |                      |               MIG M. |
|===============================+======================+======================|
|   0  A100-SXM4-40GB      Off  | 00000000:36:00.0 Off |                    0 |
| N/A   29C    P0    62W / 400W |      0MiB / 40537MiB |      6%      Default |
|                               |                      |             Disabled |
+-------------------------------+----------------------+----------------------+
2.3.6. Configuring a vSphere VM with NVIDIA vGPU
To support applications and workloads that are compute or graphics intensive, you can add multiple vGPUs to a single VM.
For details about which VMware vSphere versions and NVIDIA vGPUs support the assignment of multiple vGPUs to a VM, see NVIDIA AI Enterprise Release Notes.
If you upgraded to VMware vSphere 6.7 Update 3 from an earlier version and are using VMs that were created with that version, change the VM compatibility to vSphere 6.7 Update 2 and later. For details, see Virtual Machine Compatibility in the VMware documentation.
If you are adding multiple vGPUs to a single VM, perform this task for each vGPU that you want to add to the VM.
VM console in vSphere Web Client will become active again once the vGPU parameters are removed from the VM’s configuration.
- Open the vCenter Web UI.
- In the vCenter Web UI, right-click the VM and choose Edit Settings.
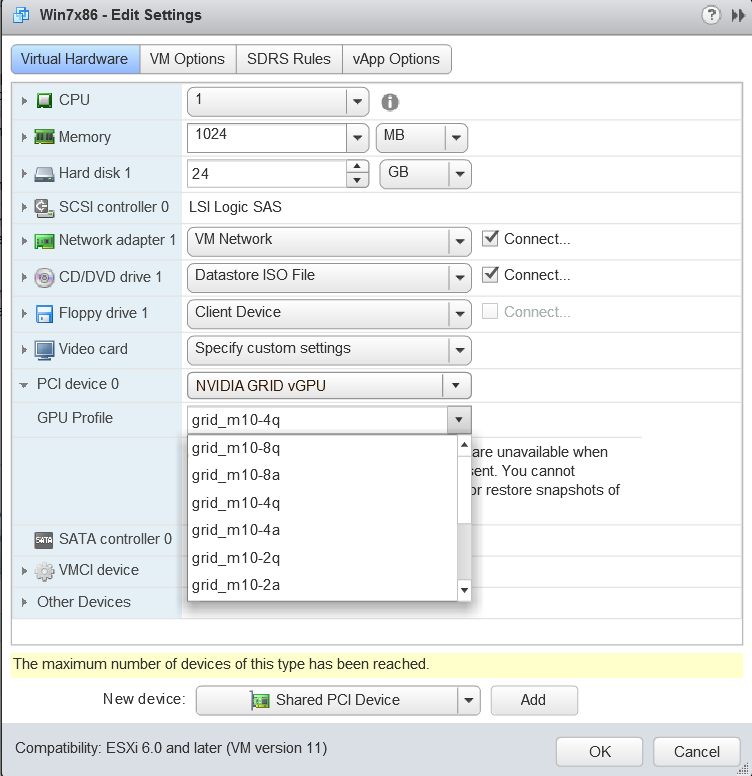
- Click the Virtual Hardware tab.
- In the New device list, select Shared PCI Device and click Add. The PCI device field should be auto-populated with NVIDIA GRID vGPU.
- From the GPU Profile drop-down menu, choose the type of vGPU you want to configure and click OK.
- Ensure that VMs running vGPU have all their memory reserved:
- Select Edit virtual machine settings from the vCenter Web UI.
- Expand the Memory section and click Reserve all guest memory (All locked).
After you have configured a vSphere VM with a vGPU, start the VM. VM console in vSphere Web Client is not supported in this vGPU release. Therefore, use VMware Horizon or VNC to access the VM’s desktop.
After the VM has booted, install the NVIDIA AI Enterprise graphics driver as explained in Installing and Licensing NVIDIA AI Enterprise Components Required in a Guest VM.
2.3.7. Setting vGPU Plugin Parameters on VMware vSphere
Plugin parameters for a vGPU control the behavior of the vGPU, such as the frame rate limiter (FRL) configuration in frames per second or whether console virtual network computing (VNC) for the vGPU is enabled. The VM to which the vGPU is assigned is started with these parameters. If parameters are set for multiple vGPUs assigned to the same VM, the VM is started with the parameters assigned to each vGPU.
- In the vSphere Client, browse to the VM to which the vGPU is assigned.
- Context-click the VM and choose Edit Settings.
- In the Edit Settings window, click the VM Options tab.
- From the Advanced drop-down list, select Edit Configuration.
- In the Configuration Parameters dialog box, click Add Row.
- In the Name field, type the parameter name
pciPassthruvgpu-id.cfg.parameter,
in the Value field type the parameter value, and click
OK.
- vgpu-id
- A positive integer that identifies the vGPU assigned to a VM. For
the first vGPU assigned to a VM, vgpu-id is
0. For example, if two vGPUs are assigned
to a VM and you are setting a plugin parameter for both vGPUs, set
the following parameters:
- pciPassthru0.cfg.parameter
- pciPassthru1.cfg.parameter
- parameter
- The name of the vGPU plugin parameter that you want to set. For example, the name of the vGPU plugin parameter for enabling unified memory is enable_uvm.
2.4. Disabling and Enabling ECC Memory
Some GPUs that support NVIDIA AI Enterprise support error correcting code (ECC) memory with NVIDIA vGPU. ECC memory improves data integrity by detecting and handling double-bit errors. However, not all GPUs, vGPU types, and hypervisor software versions support ECC memory with NVIDIA vGPU.
On GPUs that support ECC memory with NVIDIA vGPU, ECC memory is supported with C-series and Q-series vGPUs, but not with A-series and B-series vGPUs. Although A-series and B-series vGPUs start on physical GPUs on which ECC memory is enabled, enabling ECC with vGPUs that do not support it might incur some costs.
On physical GPUs that do not have HBM2 memory, the amount of frame buffer that is usable by vGPUs is reduced. All types of vGPU are affected, not just vGPUs that support ECC memory.
The effects of enabling ECC memory on a physical GPU are as follows:
- ECC memory is exposed as a feature on all supported vGPUs on the physical GPU.
- In VMs that support ECC memory, ECC memory is enabled, with the option to disable ECC in the VM.
- ECC memory can be enabled or disabled for individual VMs. Enabling or disabling ECC memory in a VM does not affect the amount of frame buffer that is usable by vGPUs.
GPUs based on the Pascal GPU architecture and later GPU architectures support ECC memory with NVIDIA vGPU. To determine whether ECC memory is enabled for a GPU, run nvidia-smi -q for the GPU.
Tesla M60 and M6 GPUs support ECC memory when used without GPU virtualization, but NVIDIA vGPU does not support ECC memory with these GPUs. In graphics mode, these GPUs are supplied with ECC memory disabled by default.
Some hypervisor software versions do not support ECC memory with NVIDIA vGPU.
If you are using a hypervisor software version or GPU that does not support ECC memory with NVIDIA vGPU and ECC memory is enabled, NVIDIA vGPU fails to start. In this situation, you must ensure that ECC memory is disabled on all GPUs if you are using NVIDIA vGPU.
2.4.1. Disabling ECC Memory
If ECC memory is unsuitable for your workloads but is enabled on your GPUs, disable it. You must also ensure that ECC memory is disabled on all GPUs if you are using NVIDIA vGPU with a hypervisor software version or a GPU that does not support ECC memory with NVIDIA vGPU. If your hypervisor software version or GPU does not support ECC memory and ECC memory is enabled, NVIDIA vGPU fails to start.
Where to perform this task depends on whether you are changing ECC memory settings for a physical GPU or a vGPU.
- For a physical GPU, perform this task from the hypervisor host.
- For a vGPU, perform this task from the VM to which the vGPU is
assigned.
Note: ECC memory must be enabled on the physical GPU on which the vGPUs reside.
- Use nvidia-smi to list the status of all physical GPUs or
vGPUs, and check for ECC noted as enabled.
# nvidia-smi -q

==============NVSMI LOG==============

Timestamp                           : Mon Dec 26 18:36:45 2022
Driver Version                      : 470.161.02

Attached GPUs                       : 1
GPU 0000:02:00.0

[...]

    Ecc Mode
        Current                     : Enabled
        Pending                     : Enabled

[...]
- Change the ECC status to off for each GPU for which ECC is enabled.
- If you want to change the ECC status to off for all GPUs on your host machine or vGPUs assigned to the VM, run this
command:
# nvidia-smi -e 0
- If you want to change the ECC status to off for a specific GPU or
vGPU, run this
command:
# nvidia-smi -i id -e 0
id is the index of the GPU or vGPU as reported by nvidia-smi.
This example disables ECC for the GPU with index 0000:02:00.0.
# nvidia-smi -i 0000:02:00.0 -e 0
- If you want to change the ECC status to off for all GPUs on your host machine or vGPUs assigned to the VM, run this
command:
- Reboot the host or restart the VM.
- Confirm that ECC is now disabled for the GPU or vGPU.
# nvidia—smi —q

==============NVSMI LOG==============

Timestamp                           : Mon Dec 26 18:37:53 2022
Driver Version                      : 470.161.02

Attached GPUs                       : 1
GPU 0000:02:00.0
[...]

    Ecc Mode
        Current                     : Disabled
        Pending                     : Disabled

[...]
2.4.2. Enabling ECC Memory
If ECC memory is suitable for your workloads and is supported by your hypervisor software and GPUs, but is disabled on your GPUs or vGPUs, enable it.
Where to perform this task depends on whether you are changing ECC memory settings for a physical GPU or a vGPU.
- For a physical GPU, perform this task from the hypervisor host.
- For a vGPU, perform this task from the VM to which the vGPU is
assigned.
Note: ECC memory must be enabled on the physical GPU on which the vGPUs reside.
- Use nvidia-smi to list the status of all physical GPUs or vGPUs, and
check for ECC noted as disabled.
# nvidia-smi -q

==============NVSMI LOG==============

Timestamp                           : Mon Dec 26 18:36:45 2022
Driver Version                      : 470.161.02

Attached GPUs                       : 1
GPU 0000:02:00.0

[...]

    Ecc Mode
        Current                     : Disabled
        Pending                     : Disabled

[...]
- Change the ECC status to on for each GPU or vGPU for which ECC is enabled.
- If you want to change the ECC status to on for all GPUs on your host machine or
vGPUs assigned to the VM, run this
command:
# nvidia-smi -e 1
- If you want to change the ECC status to on for a specific GPU or vGPU, run this
command:
# nvidia-smi -i id -e 1
id is the index of the GPU or vGPU as reported by nvidia-smi.
This example enables ECC for the GPU with index 0000:02:00.0.
# nvidia-smi -i 0000:02:00.0 -e 1
- If you want to change the ECC status to on for all GPUs on your host machine or
vGPUs assigned to the VM, run this
command:
- Reboot the host or restart the VM.
- Confirm that ECC is now enabled for the GPU or vGPU.
# nvidia—smi —q

==============NVSMI LOG==============

Timestamp                           : Mon Dec 26 18:37:53 2022
Driver Version                      : 470.161.02

Attached GPUs                       : 1
GPU 0000:02:00.0
[...]

    Ecc Mode
        Current                     : Enabled
        Pending                     : Enabled

[...]
3. Installing and Licensing NVIDIA AI Enterprise Components Required in a Guest VM
3.1. Installing NVIDIA AI Enterprise Software Components by Using Kubernetes
Perform this task if you are using one of the following combinations of guest operating system and container platform:
-
Ubuntu with Kubernetes
- If you are using Kubernetes, ensure that:
- Kubernetes is installed in the VM.
- NVIDIA vGPU Manager is installed.
- NVIDIA vGPU License Server with licenses is installed.
- Helm is installed.
- You have generated your NGC API key for accessing the NVIDIA Enterprise Collection at the URL provided to you by NVIDIA.
3.1.1. Installing and Licensing the NVIDIA vGPU Software Graphics Driver by Using NVIDIA GPU Operator
Installation of the NVIDIA AI Enterprise GPU Operator is documented at:
3.1.2. Transforming Container Images for AI and Data Science Applications and Frameworks into Kubernetes Pods
The AI and data science applications and frameworks are distributed as NGC container images through the NGC private registry. If you are using Kubernetes or Red Hat OpenShift, you must transform each image that you want to use into a Kubernetes pod. Each container image contains the entire user-space software stack that is required to run the application or framework, namely, the CUDA libraries, cuDNN, any required Magnum IO components, TensorRT, and the framework.
3.2. Install NVIDIA AI Enterprise Software Components by Using Docker
Perform this task if you are using Ubuntu with Docker.
3.2.1. Installing and Licensing the NVIDIA vGPU Software Graphics Driver Natively
Perform this task in the guest VM.
- Install the vGPU software graphics driver for Linux on the VM that you downloaded from the NVIDIA Licensing Portal.
- License the NVIDIA vGPU.
- Install NVIDIA Container Toolkit.
3.2.2. Installing AI and Data Science Applications and Frameworks by Using Docker
The AI and data science applications and frameworks are distributed as NGC container images through the NGC private registry. Each container image contains the entire user-space software stack that is required to run the application or framework, namely, the CUDA libraries, cuDNN, any required Magnum IO components, TensorRT, and the framework.
Ensure that you have completed the following tasks in NGC Private Registry User Guide:
For each AI or data science application that you are interested in, load the container as explained in Uploading an NVIDIA Container Image onto Your System in NGC Private Registry User Guide.
The following table lists the Docker pull command for downloading the container for each application or framework.
| Application or Framework | Docker pull Command |
|---|---|
| NVIDIA TensorRT | docker pull nvcr.io/nvaie/tensorrt-1-4:21.08-nvaie1.4-py3 |
| NVIDIA Triton Inference Server | docker pull nvcr.io/nvaie/tritonserver-1-4:21.08-nvaie1.4-py3-sdk |
| NVIDIA Triton Inference Server | docker pull nvcr.io/nvaie/tritonserver-1-4:21.08-nvaie1.4-py3-min |
| NVIDIA Triton Inference Server | docker pull nvcr.io/nvaie/tritonserver-1-4:21.08-nvaie1.4-py3 |
| PyTorch | docker pull nvcr.io/nvaie/pytorch-1-4:21.08-nvaie1.4-py3 |
| RAPIDS | docker pull nvcr.io/nvaie/nvidia-rapids-1-4:21.08-cuda11.4-ubuntu20.04-py3.8-nvaie1.4 |
| TensorFlow 1 | docker pull nvcr.io/nvaie/tensorflow-1-4:21.08-nvaie1.4-tf1-py3 |
| TensorFlow 2 | docker pull nvcr.io/nvaie/tensorflow-1-4:21.08-nvaie1.4-tf2-py3 |
The following table lists the Docker pull commands for downloading other software that is distributed as NGC container images through the NGC private registry.
| Other Software | Docker pull Command |
|---|---|
| GPU Operator | docker pull nvcr.io/nvaie/gpu-operator-1-4:v22.9.0 |
| Network Operator | docker pull nvcr.io/nvaie/network-operator-1-4:v1.4.0 |
| vGPU Guest Driver, Ubuntu | docker pull nvcr.io/nvaie/vgpu-guest-driver-1-4:470.161.03-ubuntu20.04 |
3.3. Installing and Licensing NVIDIA AI Enterprise Components Natively
3.3.1. Installing the NVIDIA AI Enterprise Graphics Driver on Linux from a Debian Package
- Copy the NVIDIA AI Enterprise Linux driver package, for example nvidia-linux-grid-470_470.161.03_amd64.deb, to the guest VM where you are installing the driver.
- Log in to the guest VM as a user with sudo privileges.
- Open a command shell and change to the directory that contains the NVIDIA AI Enterprise Linux driver package.
- From the command shell, run the command to install the package.
$ sudo apt-get install ./nvidia-linux-grid-470_470.161.03_amd64.deb - Verify that the NVIDIA driver is operational.
- Reboot the system and log in.
- After the system has rebooted, confirm that you can see your NVIDIA vGPU device in the output from the
nvidia-smi command.
$ nvidia-smi
3.3.2. Prerequisites for Configuring a Licensed Client of NVIDIA License System
A client with a network connection obtains a license by leasing it from a NVIDIA License System service instance. The service instance serves the license to the client over the network from a pool of floating licenses obtained from the NVIDIA Licensing Portal. The license is returned to the service instance when the licensed client no longer requires the license.
- The NVIDIA AI Enterprise graphics driver is installed on the client.
- The client configuration token that you want to deploy on the client has been created from the NVIDIA Licensing Portal or the DLS as explained in NVIDIA License System User Guide.
- The client configuration token that you want to deploy on the client has been created from the NVIDIA Licensing Portal or the DLS as explained in NVIDIA License System User Guide.
- Ports 443 and 80 in your firewall or proxy must be open to allow HTTPS
traffic between a service instance and its the licensed clients. These ports
must be open for both CLS instances and DLS instances.
Note: For DLS releases before DLS 1.1, ports 8081 and 8082 were also required to be open to allow HTTPS traffic between a DLS instance and its licensed clients. Although these ports are no longer required, they remain supported for backward compatibility.
The graphics driver creates a default location in which to store the client configuration token on the client.
The process for configuring a licensed client is the same for CLS and DLS instances but depends on the OS that is running on the client.
3.3.2.1. Configuring a Licensed Client on Linux with Default Settings
Perform this task from the client.
- As root, open the file /etc/nvidia/gridd.conf in a
plain-text editor, such as vi.
$ sudo vi /etc/nvidia/gridd.conf
Note: You can create the /etc/nvidia/gridd.conf file by copying the supplied template file /etc/nvidia/gridd.conf.template. - Add the FeatureType configuration parameter to the file
/etc/nvidia/gridd.conf on a new line as
FeatureType="value".
value depends on the type of the GPU assigned to the licensed client that you are configuring.
GPU Type Value NVIDIA vGPU 1. NVIDIA AI Enterprise automatically selects the correct type of license based on the vGPU type. Physical GPU The feature type of a GPU in pass-through mode or a bare-metal deployment: - 0: NVIDIA Virtual Applications
- 2: NVIDIA RTX Virtual Workstation
- 4: NVIDIA Virtual Compute Server
Note: You can also perform this step from NVIDIA X Server Settings. Before using NVIDIA X Server Settings to perform this step, ensure that this option has been enabled as explained in NVIDIA GRID Client Licensing User Guide.This example shows how to configure a licensed Linux client for .
# /etc/nvidia/gridd.conf.template - Configuration file for NVIDIA Grid Daemon
…
# Description: Set Feature to be enabled
# Data type: integer
# Possible values:
# 0 => for unlicensed state
# 1 => for NVIDIA vGPU
# 2 => for NVIDIA RTX Virtual Workstation
# 4 => for NVIDIA Virtual Compute Server
FeatureType=
...
- Copy the client configuration token to the /etc/nvidia/ClientConfigToken directory.
- Ensure that the file access modes of the client configuration token allow the
owner to read, write, and execute the token, and the group and others only to
read the token.
- Determine the current file access modes of the client configuration
token.
# ls -l client-configuration-token-directory
- If necessary, change the mode of the client configuration token to
744.
# chmod 744 client-configuration-token-directory/client_configuration_token_*.tok
- client-configuration-token-directory
- The directory to which you copied the client configuration token in the previous step.
- Determine the current file access modes of the client configuration
token.
- Save your changes to the /etc/nvidia/gridd.conf file and close the file.
- Restart the nvidia-gridd service.
The NVIDIA service on the client should now automatically obtain a license from the CLS or DLS instance.
3.3.2.2. Verifying the NVIDIA AI Enterprise License Status of a Licensed Client
After configuring a client with an NVIDIA AI Enterprise license, verify the license status by displaying the licensed product name and status.
To verify the license status of a licensed client, run nvidia-smi with the –q or --query option from the licensed client, not the hypervisor host. If the product is licensed, the expiration date is shown in the license status.
nvidia-smi -q
==============NVSMI LOG==============

Timestamp                           : Wed Mar 31 01:49:28 2020
Driver Version                      : 440.88
CUDA Version                        : 10.0

Attached GPUs                       : 1
GPU 00000000:00:08.0
    Product Name                    : Tesla T4
    Product Brand                   : Grid
    Display Mode                    : Enabled
    Display Active                  : Disabled
    Persistence Mode                : N/A
    Accounting Mode                 : Disabled
    Accounting Mode Buffer Size     : 4000
    Driver Model
        Current                     : WDDM
        Pending                     : WDDM
    Serial Number                   : 0334018000638
    GPU UUID                        : GPU-ba2310b6-95d1-802b-f96f-5865410fe517
    Minor Number                    : N/A
    VBIOS Version                   : 90.04.21.00.01
    MultiGPU Board                  : No
    Board ID                        : 0x8
    GPU Part Number                 : 699-2G183-0200-100
    Inforom Version
        Image Version               : G183.0200.00.02
        OEM Object                  : 1.1
        ECC Object                  : 5.0
        Power Management Object     : N/A
    GPU Operation Mode
        Current                     : N/A
        Pending                     : N/A
    GPU Virtualization Mode
        Virtualization mode         : Pass-Through
    vGPU Software Licensed Product
        Product Name                : NVIDIA Virtual Compute Server
        License Status              : Licensed (Expiry: 2021-11-13 18:29:59 GMT)
    …
    …
3.3.3. Installing NVIDIA Container Toolkit
Ensure that the following software is installed in the guest VM:
- Docker 20.10 for your Linux distribution. For instructions, refer to Install Docker Engine on Ubuntu in the Docker product manuals.
- The NVIDIA AI Enterprise graphics driver. For instructions, refer to Installing the NVIDIA AI Enterprise Graphics Driver on Linux from a Debian Package.
- Set up the GPG key and configure apt to use NVIDIA Container Toolkit packages in the file
/etc/apt/sources.list.d/nvidia-docker.list.
$ distribution=$(. /etc/os-release;echo $ID$VERSION_ID)
$ curl -s -L https://nvidia.github.io/nvidia-docker/gpgkey | sudo apt-key add -
$ curl -s -L https://nvidia.github.io/nvidia-docker/$distribution/nvidia-docker.list | sudo tee /etc/apt/sources.list.d/nvidia-docker.list
- Download information from all configured sources about the latest versions of the
packages and install the nvidia-container-toolkit package.
$ sudo apt-get update && sudo apt-get install -y nvidia-container-toolkit
- Restart the Docker service.
$ sudo systemctl restart docker
3.3.4. Verifying the Installation of NVIDIA Container Toolkit
- Run the nvidia-smi command contained in the latest official
NVIDIA CUDA Toolkit image.
$ docker run --gpus all nvidia/cuda:11.0-base nvidia-smi
- Start a GPU-enabled container on any two available GPUs.
$ docker run --gpus 2 nvidia/cuda:11.0-base nvidia-smi
- Start a GPU-enabled container on two specific GPUs identified by their index
numbers.
$ docker run --gpus '"device=1,2"' nvidia/cuda:10.0-base nvidia-smi
- Start a GPU-enabled container on two specific GPUs with one GPU identified by
its UUID and the other GPU identified by its index number.
$ docker run --gpus '"device=UUID-ABCDEF,1"' nvidia/cuda:11.0-base nvidia-smi
- Specify a GPU capability for the container.
$ docker run --gpus all,capabilities=utility nvidia/cuda:11.0-base nvidia-smi
3.3.5. Installing Software Distributed as Container Images
Ensure that you have completed the following tasks in NGC Private Registry User Guide:
For each AI or data science application that you are interested in, load the container as explained in Uploading an NVIDIA Container Image onto Your System in NGC Private Registry User Guide.
The following table lists the Docker pull command for downloading the container for each application or framework.
| Application or Framework | Docker pull Command |
|---|---|
| NVIDIA TensorRT | docker pull nvcr.io/nvaie/tensorrt-1-4:21.08-nvaie1.4-py3 |
| NVIDIA Triton Inference Server | docker pull nvcr.io/nvaie/tritonserver-1-4:21.08-nvaie1.4-py3-sdk |
| NVIDIA Triton Inference Server | docker pull nvcr.io/nvaie/tritonserver-1-4:21.08-nvaie1.4-py3-min |
| NVIDIA Triton Inference Server | docker pull nvcr.io/nvaie/tritonserver-1-4:21.08-nvaie1.4-py3 |
| PyTorch | docker pull nvcr.io/nvaie/pytorch-1-4:21.08-nvaie1.4-py3 |
| RAPIDS | docker pull nvcr.io/nvaie/nvidia-rapids-1-4:21.08-cuda11.4-ubuntu20.04-py3.8-nvaie1.4 |
| TensorFlow 1 | docker pull nvcr.io/nvaie/tensorflow-1-4:21.08-nvaie1.4-tf1-py3 |
| TensorFlow 2 | docker pull nvcr.io/nvaie/tensorflow-1-4:21.08-nvaie1.4-tf2-py3 |
The following table lists the Docker pull commands for downloading other software that is distributed as NGC container images through the NVIDIA Enterprise Catalog.
| Other Software | Docker pull Command |
|---|---|
| GPU Operator | docker pull nvcr.io/nvaie/gpu-operator-1-4:v22.9.0 |
| Network Operator | docker pull nvcr.io/nvaie/network-operator-1-4:v1.4.0 |
| vGPU Guest Driver, Ubuntu | docker pull nvcr.io/nvaie/vgpu-guest-driver-1-4:470.161.03-ubuntu20.04 |
3.3.6. Running ResNet-50 with TensorRT
- Launch the NVIDIA TensorRT container image on all vGPUs in
interactive mode, specifying that the container will be deleted when it is
stopped.
$ sudo docker run --gpus all -it --rm nvcr.io/nvaie/tensorrt:21.07-py3
- From within the container runtime, change to the directory that contains test
data for the ResNet-50 convolutional neural network.
# cd /workspace/tensorrt/data/resnet50
- Run the ResNet-50 convolutional neural network with FP32, FP16, and INT8
precision and confirm that each test is completed with the result
PASSED.
- To run ResNet-50 with the default FP32 precision, run this
command:
# trtexec --duration=90 --workspace=1024 --percentile=99 --avgRuns=100 \
--deploy=ResNet50_N2.prototxt --batch=1 --output=prob
- To run ResNet-50 with FP16 precision, add the --fp16
option:
# trtexec --duration=90 --workspace=1024 --percentile=99 --avgRuns=100 \
--deploy=ResNet50_N2.prototxt --batch=1 --output=prob --fp16
- To run ResNet-50 with INT8 precision, add the --int8
option:
# trtexec --duration=90 --workspace=1024 --percentile=99 --avgRuns=100 \
--deploy=ResNet50_N2.prototxt --batch=1 --output=prob --int8
- To run ResNet-50 with the default FP32 precision, run this
command:
- Press Ctrl+P, Ctrl+Q to exit the container runtime and return to the Linux command shell.
3.3.7. Running ResNet-50 with TensorFlow
- Launch the TensorFlow 1 container image on all vGPUs in interactive
mode, specifying that the container will be deleted when it is stopped.
$ sudo docker run --gpus all -it --rm \
nvcr.io/nvaie/tensorflow:21.07-tf1-py3
- From within the container runtime, change to the directory that contains test
data for cnn example.
# cd /workspace/nvidia-examples/cnn
- Run the ResNet-50 training test with FP16 precision.
# python resnet.py --layers 50 -b 64 -i 200 -u batch --precision fp16
- Confirm that all operations on the application are performed correctly and that a set of results is reported when the test is completed.
- Press Ctrl+P, Ctrl+Q to exit the container runtime and return to the Linux command shell.
3.3.8. Optional: Updating NVIDIA Container Toolkit for a MIG-Enabled vGPU
- Set up the GPG key and configure apt to use NVIDIA Container Toolkit packages in the file
/etc/apt/sources.list.d/nvidia-docker.list.
$ curl -s -L https://nvidia.github.io/nvidia-docker/gpgkey | sudo apt-key add - \ && distribution=$(. /etc/os-release;echo $ID$VERSION_ID) \ && curl -s -L https://nvidia.github.io/nvidia-docker/$distribution/nvidia-docker.list | sudo tee /etc/apt/sources.list.d/nvidia-docker.list \ && sudo apt-get update - Install the NVIDIA Container Toolkit packages and the
packages on which it depends, and restart Docker.
$ sudo apt-get install -y nvidia-docker2 \ && sudo systemctl restart docker - Test the installation of the NVIDIA Container Toolkit on the
VM.
sudo docker run –runtime=nvidia -e NVIDIA_VISIBLE_DEVICES=mig-device nvidia/cuda nvidia-smi
- mig-device
- The ID of the MIG-enabled vGPU in one of the following formats:
- MIG-gpu-uuid/gpu-instance-id/compute-instance-id
- gpu-uuid
- The UUID of the physical GPU, for example, GPU-786035d5-1e85-11b2-9fec-ac9c9a792daf.
- gpu-instance-id
- The index number the GPU instance on which the vGPU resides, for example, 0 for the first GPU instance.
- compute-instance-id
- The index number of the compute instance within the GPU instance, for example, 0 for the first compute instance.
This example sets NVIDIA_VISIBLE_DEVICES for compute instance 0 on a MIG-enabled vGPU on GPU instance 0 of the physical GPU with UUID GPU-786035d5-1e85-11b2-9fec-ac9c9a792daf.
NVIDIA_VISIBLE_DEVICES=MIG-GPU-786035d5-1e85-11b2-9fec-ac9c9a792daf/0/0
- gpu-device-index:mig-device-index
- gpu-device-index
- The index number the physical GPU.
- mig-device-index
- The index number the GPU instance.
- MIG-gpu-uuid/gpu-instance-id/compute-instance-id
4. Configuring Multinode Scaling
Multinode scaling improves the performance of applications and frameworks, such as PyTorch and Tensorflow, that can run in a cluster of multiple hypervisor hosts.
Perform the tasks for configuring multinode scaling before performing the tasks in Getting Started with NVIDIA AI Enterprise.
The procedures for configuring switches and NICs apply to NVIDIA Mellanox NICs and switches. If you are using other makes of NICs and switches, consult the vendor's documentation for the products that you are using.
You are free to choose how to run your training jobs in a cluster. For information about the cluster architecture that can be used to run BERT training jobs, see Multi-node BERT User Guide.
4.1. Hardware and VM Configuration Requirements for Multinode Scaling
If you are configuring multinode scaling, your hardware and VM configuration must meet some specific requirements in addition to the requirements for a single node.
4.1.1. Hardware Requirements for Multinode Scaling
In addition to the requirements for a single node, the hardware used for multinode scaling must meet the following requirements:
-
An Ethernet NIC that supports RoCE is required in each VM used for multinode scaling. For best performance, NVIDIA recommends the NVIDIA® Mellanox® ConnectX®-6 Dx.
-
The hypervisor hosts must be connected to a network switch that supports RoCE. For best performance, NVIDIA recommends the NVIDIA Mellanox Spectrum switch.
-
One GPU is required for each VM.
For best performance, NVIDIA recommends the NVIDIA A100 GPU.
-
Each GPU on each hypervisor host must be paired with a NIC in the same NUMA node.
4.1.2. VM Requirements for Multinode Scaling
In addition to meeting the requirements for using C-Series vCS vGPUs, each VM used for multinode scaling must be assigned an RoCE NIC PCIe device.
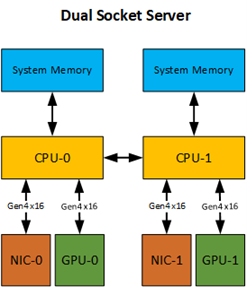
4.2. Configuring NUMA Affinity for the VMs
To ensure that your multinode setup performs adequately, each GPU on each hypervisor host must be paired with a NIC in the same NUMA node. If a GPU is not paired with a NIC in the same NUMA node, reconfigure your server hardware to ensure that this prerequisite is met.
Examples of how to configure NUMA affinity for the VMs in a two-socket server are provided for the following configurations:.
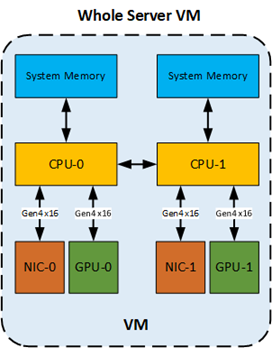
- Whole-server VM with two GPUs and two NICs across both NUMA nodes
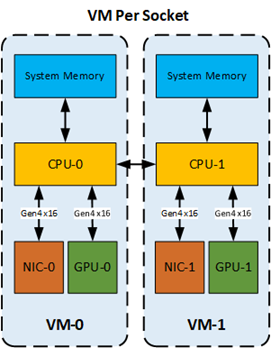
- Per-socket VM with one GPU and one NIC paired on a single NUMA node
The hardware configuration of the server is as follows:
4.2.1. Configuring NUMA Affinity for a Whole-Server VM with Two GPUs and Two NICs Across Both NUMA Nodes
The allocation of hardware resources to a VM that is assigned the whole server is as follows:
- Determine the NUMA node to which the GPUs and NICs are attached.
- Determine the NUMA node to which the GPUs are attached.
$ esxcli hardware pci list | grep -A 30 -B 10 NVIDIA
- Determine the NUMA node to which the NICs are attached.
$ esxcli hardware pci list | grep -A 30 -B 10 Mellanox
The following output describes two GPUs. One GPU is attached to NUMA node 0 and the other GPU is attached to NUMA node 1.
#GPU 1
0000:37:00.0
   Address: 0000:37:00.0
   Segment: 0x0000
   Bus: 0x37
   Slot: 0x00
   Function: 0x0
   VMkernel Name: vmgfx0
   Vendor Name: NVIDIA Corporation
   Device Name: NVIDIAA100-PCIE-40GB
   Configured Owner: VMkernel
   Current Owner: VMkernel
   Vendor ID: 0x10de
   Device ID: 0x20f1
   SubVendor ID: 0x10de
   SubDevice ID: 0x145f
   Device Class: 0x0302
   Device Class Name: 3D controller
   Programming Interface: 0x00
   Revision ID: 0xa1
   Interrupt Line: 0xff
   IRQ: 255
   Interrupt Vector: 0x00
   PCI Pin: 0x00
   Spawned Bus: 0x00
   Flags: 0x3001
   Module ID: 50
   Module Name: nvidia
   Chassis: 0
   Physical Slot: 2
   Slot Description: PCI-E Slot 2
   Device Layer Bus Address: s00000002.00
   Passthru Capable: true
   Parent Device: PCI 0:54:0:0
   Dependent Device: PCI 0:55:0:0
   Reset Method: Bridge reset
   FPT Sharable: true
   NUMA Node: 0
   Extended Device ID: 0
   Extended Device Name:

#GPU 2
0000:86:00.0
   Address: 0000:86:00.0
   Segment: 0x0000
   Bus: 0x86
   Slot: 0x00
   Function: 0x0
   VMkernel Name: vmgfx1
   Vendor Name: NVIDIA Corporation
   Device Name: NVIDIAA100-PCIE-40GB
   Configured Owner: VMkernel
   Current Owner: VMkernel
   Vendor ID: 0x10de
   Device ID: 0x20f1
   SubVendor ID: 0x10de
   SubDevice ID: 0x145f
   Device Class: 0x0302
   Device Class Name: 3D controller
   Programming Interface: 0x00
   Revision ID: 0xa1
   Interrupt Line: 0xff
   IRQ: 255
   Interrupt Vector: 0x00
   PCI Pin: 0x00
   Spawned Bus: 0x00
   Flags: 0x3001
   Module ID: 50
   Module Name: nvidia
   Chassis: 0
   Physical Slot: 5
   Slot Description: PCI-E Slot 5
   Device Layer Bus Address: s00000005.00
   Passthru Capable: true
   Parent Device: PCI 0:133:0:0
   Dependent Device: PCI 0:134:0:0
   Reset Method: Bridge reset
   FPT Sharable: true
   NUMA Node: 1
   Extended Device ID: 0
   Extended Device Name:
- Determine the NUMA node to which the GPUs are attached.
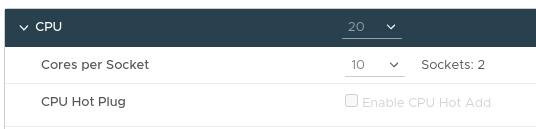
- Set up vCPUs for the VM so that the VM has two sockets with the vCPU cores evenly divided between the sockets.
- With two GPUs and NICs in the VM across NUMA nodes, set the NUMA affinity in the VM configuration to include both NUMA nodes
0 and 1.
numa.nodeAffinity = 0,1
4.2.2. Configuring NUMA Affinity for a Per-Socket VM with One GPU and One NIC on a Single NUMA Node
The allocation of hardware resources to the VMs that are each assigned one socket in a server is as follows:
- Determine the NUMA node to which the GPUs and NICs are attached.
- Determine the NUMA node to which the GPUs are attached.
$ esxcli hardware pci list | grep -A 30 -B 10 NVIDIA
- Determine the NUMA node to which the NICs are attached.
$ esxcli hardware pci list | grep -A 30 -B 10 Mellanox
The following output describes a GPU that is attached to NUMA node 0.
0000:3b:02.3
   Address: 0000:3b:02.3
   Segment: 0x0000
   Bus: 0x3b
   Slot: 0x02
   Function: 0x3
   VMkernel Name: PF_0.59.0_VF_15
   Vendor Name: NVIDIA Corporation
   Device Name: NVIDIAA100-PCIE-40GB
   Configured Owner:
   Current Owner: VMkernel
   Vendor ID: 0x10de
   Device ID: 0x20f1
   SubVendor ID: 0x10de
   SubDevice ID: 0x0000
   Device Class: 0x0302
   Device Class Name: 3D controller
   Programming Interface: 0x00
   Revision ID: 0xa1
   Interrupt Line: 0xff
   IRQ: 255
   Interrupt Vector: 0x00
PCI Pin: 0xff
   Spawned Bus: 0x00
   Flags: 0x0001
   Module ID: 54
   Module Name: nvidia
   Chassis: 0
   Physical Slot: -1
   Slot Description:
   Device Layer Bus Address: s00000001.00.vf15
   Passthru Capable: true
   Parent Device: PCI 0:58:0:0
   Dependent Device: PCI 0:59:2:3
   Reset Method: Function reset
   FPT Sharable: true
   NUMA Node: 0
   Extended Device ID: 65535
   Extended Device Name:
- Determine the NUMA node to which the GPUs are attached.
- For each GPU that you want to pair with a NIC, set the NUMA affinity in the VM configuration to the NUMA node to which the
NIC and the GPU in the pair belong.
numa.nodeAffinity = numa-node-value
4.3. Configuring RoCE on the NVIDIA Mellanox Spectrum Switch
The NVIDIA Mellanox Spectrum switch must be able to run RDMA over Converged Ethernet (RoCE) over a lossless network in DSCP-based QoS mode.
- Use secure shell (SSH) to log in to the switch. To obtain the username and password for logging in to the switch, consult the documentation for the switch.
- Set the mode of the switch to RoCE.
switch (config) # roce
- Create an isolated vLAN.
switch (config) # interface vlan vlan-id
The vLAN context is entered automatically after the vLAN is created.
The following example creates a vLAN with the identifier 111.
switch (config) # interface vlan 111
switch (config vlan 111) #
- Exit the vLAN context.
switch (config vlan 111) # exit
- Place the NVIDIA ConnectX NICs into the created vLAN as access ports.
switch (config) # interface ethernet port-range switchport access vlan-id
This example puts four NVIDIA ConnectX NICs into the vLAN with the identifier 111 as access ports 1/1 - 1/4.
switch (config) # interface ethernet 1/1-1/4 switchport access vlan 111
- Set the maximum transmission unit (MTU) frame size to 9216.
- Disable all the ports related to the interface.
switch (config) # interface ethernet port-range shutdown
- Set the MTU frame size for the NVIDIA ConnectX NICs in the created vLAN to 9216.
switch (config) # interface ethernet port-range mtu 9216
- Enable all the ports related to the interface.
switch (config) # interface ethernet port-range no shutdown
- Disable all the ports related to the interface.
- If your switch is running Cumulus Linux, enable RoCE with Cumulus Linux.
4.4. Enabling GPUDirect Technology for Peer-to-Peer Connections
Enabling GPUDirect® Technology for peer-to-peer connections involves enabling Address Translation Services (ATS) in the VMware ESXi VMkernel and modifying Access Control Services (ACS) settings for the VM.
- As root, log in to the hypervisor host.
- Update the VMkernel settings.
- Enable Address Translation Services (ATS) in the boot options.
[root@localhost:~] esxcli system settings kernel set -s atsSupport -v TRUE
- Reboot the hypervisor host.
- Confirm that ATS is enabled.
[root@localhost:~] esxcli system settings kernel list -o atsSupport
Name       Type Configured Runtime Default Description
---------- ---- ---------- ------- ------- -----------
atsSupport Bool TRUE       TRUE    FALSE   Enable Support for PCIe
                                           ATS.
- Enable Address Translation Services (ATS) in the boot options.
- Update the VM configuration.
- Set the option to enable peer-to-peer connections.
pciPassthru.allowP2P=true
- Set the option to relax ACS settings for peer-to-peer connections.
pciPassthru.RelaxACSforP2P=true
When this option is set, VMware vSphere ESXi locates an ATS-capable pass-through device, finds its parent switch or root port, and enables the ACS Direct Translated bit.
- Set the option to enable peer-to-peer connections.
4.5. Installing the Mellanox OFED Driver
- Install the default version of python.
$ sudo apt install python
- Download the compressed tar archive that contains the driver.
$ wget \
https://content.mellanox.com/ofed/MLNX_OFED-5.2-2.2.0.0/\
MLNX_OFED_LINUX-5.2-2.2.0.0-ubuntu20.04-x86_64.tgz
- Extract the contents of the compressed tar archive that contains the driver.
$ tar xvf MLNX_OFED_LINUX-5.2-2.2.0.0-ubuntu20.04-x86_64.tgz
- Change to the MLNX_OFED_LINUX-5.2-2.2.0.0-ubuntu20.04-x86_64 directory.
$ cd MLNX_OFED_LINUX-5.2-2.2.0.0-ubuntu20.04-x86_64
- Run the script that installs the driver.
$ sudo ./mlnxofedinstall
During the installation process, OFED detects the ConnectX-6 NICs and updates the firmware.
- When the installation is complete, confirm that the versions of OFED are correct.
- Determine the OFED version.
$ dpkg -l | grep mlnx-ofed
- Determine the firmware version.
$ cat /sys/class/infiniband/mlx5*/fw_ver
If the firmware is not updated, download the latest firmware, update the firmware manually, and install the Mellanox OFED driver again.
- Determine the OFED version.
- Load the installed driver.
$ sudo /etc/init.d/openibd restart
4.6. Enabling ATS on the NVIDIA ConnectX-6 DX NICs in a VM
- Change the ATS configuration to enabled on each guest VM on the hypervisor host.
- Start Mellanox software tools.
$ sudo mst start
- Determine whether ATS is enabled.
$ sudo mlxconfig -d /dev/mst/mt4123_pciconf0 query | grep -i ATS
If the installed version of the firmware supports ATS, output similar to the following example is displayed.
ATS_ENABLED False(0)
If no output is displayed, the installed version of the firmware does not support ATS. In this situation, update to a version of the firmware that supports ATS.
- If ATS is disabled, enable it.
$sudo mlxconfig -d /dev/mst/mt4123_pciconf0 set ATS_ENABLED=true
Device #1:
----------
Device type:    ConnectX6
Name:           MCX653105A-HDA_Ax
Description:    ConnectX-6 VPI adapter card; HDR IB (200Gb/s) and 200GbE; single-port QSFP56; PCIe4.0 x16; tall bracket; ROHS R6
Device:        /dev/mst/mt4123_pciconf0

Configurations:           Next Boot   	New
ATS_ENABLED               False(0)    	True(1)
Apply new Configuration? (y/n) [n] : y
Applying... Done!
-I- Please reboot machine to load new configurations.
- Start Mellanox software tools.
- After changing the ATS configuration to enabled on each guest VM on the node, turn off the power to the VMware vSphere ESXi
host and turn the power back on again.Note:
To apply the changed ATS configuration setting, you must turn off the power to the VMware vSphere ESXi host and turn the power back on again. Rebooting the host is insufficient to apply this change.
- Start VMware vCenter Server on the hypervisor host.
- For each VM on the node, perform the following steps:
- Turn on the power to the VM.
- Start Mellanox software tools.
$ sudo mst start
- Determine whether ATS is enabled.
$ sudo mlxconfig -d /dev/mst/mt4123_pciconf0 query | grep -i ATS
If the installed version of the firmware supports ATS, output similar to the following example is displayed.
ATS_ENABLED True(1)
- Obtain detailed information about all PCI buses and devices in the VM and confirm that the ATS capability of Mellanox ConnectX-6
device is shown as Enable+.
$ sudo lspci -vvv
...
        Capabilities: [480 v1] Address Translation Service (ATS)
                ATSCap: Invalidate Queue Depth: 00
                ATSCtl: Enable+, Smallest Translation Unit: 00
...
4.7. Building and Installing the NVIDIA Peer Memory Driver
- If necessary, install the latest stable upstream version of Git.
- Add the ppa:git-core/ppa repository to your list of package sources.
$ sudo add-apt-repository ppa:git-core/ppa
- Download information from all configured sources about the latest versions of the packages.
$ sudo apt update
- Install the git package.
$ sudo apt install git
- Add the ppa:git-core/ppa repository to your list of package sources.
- Clone the Mellanox nv_peer_memory Git repository.
$ git clone https://github.com/Mellanox/nv_peer_memory.git
- Change to the nv_peer_memory directory.
$ cd nv_peer_memory/
- Build the NVIDIA peer memory driver software.
$ ./build_module.sh
- Change to the /tmp directory.
$ cd /tmp/
- Extract the NVIDIA peer memory driver software from the compressed tar archive that the build process created.
$ tar xzf /tmp/nvidia-peer-memory_1.1.orig.tar.gz
- Change to the nvidia-peer-memory-1.1 directory.
$ cd nvidia-peer-memory-1.1/
- Build the NVIDIA peer memory driver package.
$ dpkg-buildpackage -us -uc
- Change to the parent of the current working directory.
$ cd ..
- Install the driver package that you built.
$ sudo dpkg -i nvidia-peer-memory_1.1-0_all.deb
5. Modifying a VM's NVIDIA vGPU Configuration
You can modify a VM's NVIDIA vGPU configuration by removing the NVIDIA vGPU configuration from a VM or by modifying GPU allocation policy.
5.1. Removing a VM’s NVIDIA vGPU Configuration
Remove a VM’s NVIDIA vGPU configuration when you no longer require the VM to use a virtual GPU.
5.1.1. Removing a vSphere VM’s vGPU Configuration
- Select Edit settings after right-clicking on the VM in the vCenter Web UI.
- Select the Virtual Hardware tab.
- Mouse over the PCI Device entry showing NVIDIA GRID vGPU and click on the (X) icon to mark the device for removal.
- Click OK to remove the device and update the VM settings.
5.2. Modifying GPU Allocation Policy
VMware vSphere supports the breadth first and depth-first GPU allocation policies for vGPU-enabled VMs.
- breadth-first
- The breadth-first allocation policy attempts to minimize the number of vGPUs running on each physical GPU. Newly created vGPUs are placed on the physical GPU that can support the new vGPU and that has the fewest vGPUs already resident on it. This policy generally leads to higher performance because it attempts to minimize sharing of physical GPUs, but it may artificially limit the total number of vGPUs that can run.
- depth-first
- The depth-first allocation policy attempts to maximize the number of vGPUs running on each physical GPU. Newly created vGPUs are placed on the physical GPU that can support the new vGPU and that has the most vGPUs already resident on it. This policy generally leads to higher density of vGPUs, particularly when different types of vGPUs are being run, but may result in lower performance because it attempts to maximize sharing of physical GPUs.
By default, VMware vSphere ESXi uses the breadth-first allocation policy.
If the default GPU allocation policy does not meet your requirements for performance or density of vGPUs, you can change it.
5.2.1. Modifying GPU Allocation Policy on VMware vSphere
Before using the vSphere Web Client to change the allocation scheme, ensure that the ESXi host is running and that all VMs on the host are powered off.
- Log in to vCenter Server by using the vSphere Web Client.
- In the navigation tree, select your ESXi host and click the Configure tab.
- From the menu, choose Graphics and then click the Host Graphics tab.
- On the Host Graphics tab, click
Edit.Figure 11. Breadth-first allocation scheme setting for vGPU-enabled VMs
- In the Edit Host Graphics Settings dialog box that opens, select
these options and click OK.
- If not already selected, select Shared Direct.
- Select Group VMs on GPU until full.
Figure 12. Host graphics settings for vGPU
After you click OK, the default graphics type changes to Shared Direct and the allocation scheme for vGPU-enabled VMs is breadth-first.
Figure 13. Depth-first allocation scheme setting for vGPU-enabled VMs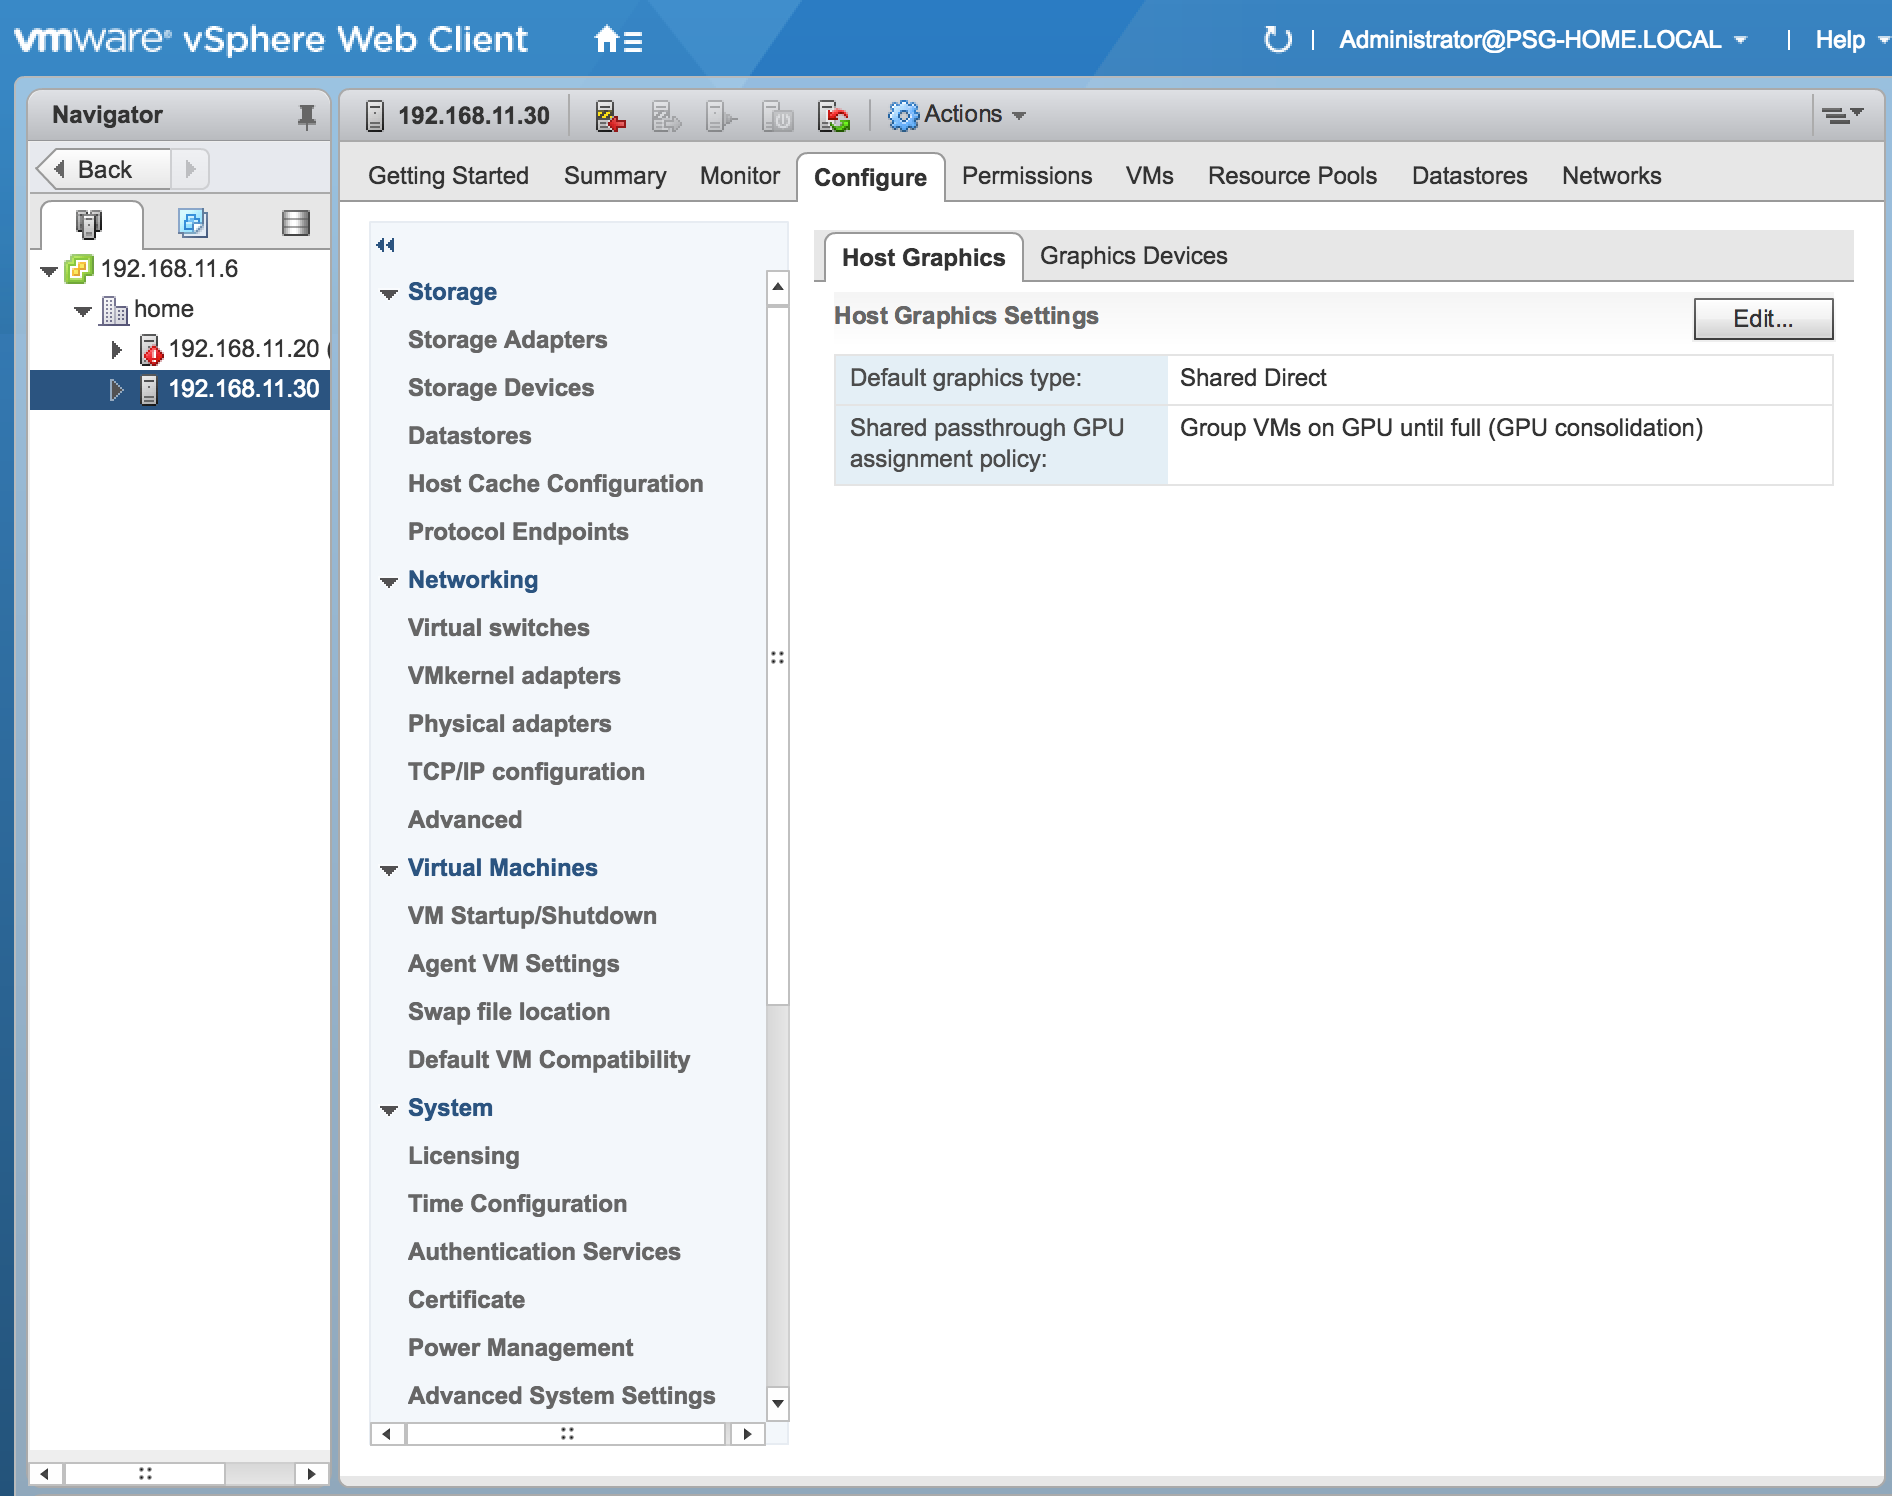
- Restart the ESXi host or the Xorg service on the host.
5.3. Migrating a VM Configured with vGPU
On some hypervisors, NVIDIA AI Enterprise supports migration of VMs that are configured with vGPU.
- The VM is configured with vGPU.
- The VM is running.
- The VM obtained a suitable vGPU license when it was booted.
- The destination host has a physical GPU of the same type as the GPU where the vGPU currently resides.
- ECC memory configuration (enabled or disabled) on both the source and destination hosts must be identical.
- The GPU topologies (including NVLink widths) on both the source and destination hosts must be identical.
- Unified memory
- Debuggers
- Profilers
After migration, the vGPU type of the vGPU remains unchanged.
The time required for migration depends on the amount of frame buffer that the vGPU has. Migration for a vGPU with a large amount of frame buffer is slower than for a vGPU with a small amount of frame buffer.
5.3.1. Migrating a VM Configured with vGPU on VMware vSphere
NVIDIA AI Enterprise supports VMware vMotion for VMs that are configured with vGPU. VMware vMotion enables you to move a running virtual machine from one physical host machine to another host with very little disruption or downtime. For a VM that is configured with vGPU, the vGPU is migrated with the VM to an NVIDIA GPU on the other host. The NVIDIA GPUs on both host machines must be of the same type.
Perform this task in the VMware vSphere web client by using the Migration wizard.
- Your hosts are correctly configured for VMware vMotion. See Host Configuration for vMotion in the VMware documentation.
- The prerequisites listed for all supported hypervisors in Migrating a VM Configured with vGPU are met.
- NVIDIA vGPU migration is configured. See Configuring VMware vMotion with vGPU for VMware vSphere.
- Context-click the VM and from the menu that opens, choose Migrate.
- For the type of migration, select Change compute resource only and click Next. If you select Change both compute resource and storage, the time required for the migration increases.
- Select the destination host and click Next. The destination host must have a physical GPU of the same type as the GPU where the vGPU currently resides. Furthermore, the physical GPU must be capable of hosting the vGPU. If these requirements are not met, no available hosts are listed.
- Select the destination network and click Next.
- Select the migration priority level and click Next.
- Review your selections and click Finish.
If NVIDIA vGPU migration is not configured, any attempt to migrate a VM with an NVIDIA vGPU fails and a window containing the following error message is displayed:
Compatibility Issue/Host
Migration was temporarily disabled due to another
migration activity.
vGPU hot migration is not enabled.
The window appears as follows:
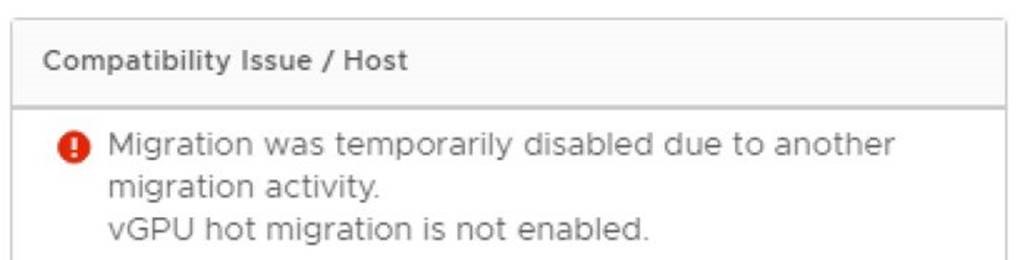
If you see this error, configure NVIDIA vGPU migration as explained in Configuring VMware vMotion with vGPU for VMware vSphere.
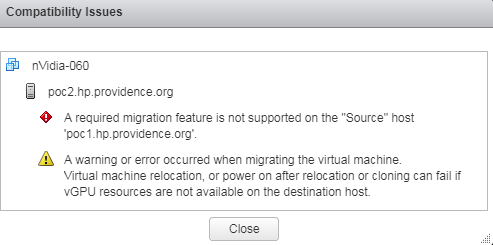
If your version of VMware vSpehere ESXi does not support vMotion for VMs configured with NVIDIA vGPU, any attempt to migrate a VM with an NVIDIA vGPU fails and a window containing the following error message is displayed:
Compatibility Issues
...
A required migration feature is not supported on the "Source" host 'host-name'.

A warning or error occurred when migrating the virtual machine.
Virtual machine relocation, or power on after relocation or cloning can fail if
vGPU resources are not available on the destination host.
The window appears as follows:
For details about which VMware vSphere versions, NVIDIA GPUs, and guest OS releases support suspend and resume, see NVIDIA AI Enterprise Release Notes.
5.3.2. Suspending and Resuming a VM Configured with vGPU on VMware vSphere
NVIDIA AI Enterprise supports suspend and resume for VMs that are configured with vGPU.
Perform this task in the VMware vSphere web client.
- To suspend a VM, context-click the VM that you want to suspend, and from the context menu that pops up, choose .
- To resume a VM, context-click the VM that you want to resume, and from the context menu that pops up, choose .
5.4. Modifying a MIG-Backed vGPU's Configuration
If compute instances weren't created within the GPU instances when the GPU was configured for MIG-backed vGPUs, you can add the compute instances for an individual vGPU from within the guest VM. If you want to replace the compute instances that were created when the GPU was configured for MIG-backed vGPUs, you can delete them before adding the compute instances from within the guest VM.
Ensure that the following prerequisites are met:
- You have root user privileges in the guest VM.
- The GPU instance is not being used by any other processes, such as CUDA applications, monitoring applications, or the nvidia-smi command.
Perform this task in a guest VM command shell.
- Open a command shell as the root user in the guest VM. You can use secure shell (SSH) for this purpose.
- List the available GPU instance.
$ nvidia-smi mig -lgi
+----------------------------------------------------+
| GPU instances:                                     |
| GPU   Name          Profile  Instance   Placement  |
|                       ID       ID       Start:Size |
|====================================================|
|   0  MIG 2g.10gb       0        0          0:8     |
+----------------------------------------------------+
- Optional: If compute instances were created when the GPU was configured for MIG-backed
vGPUs that you no longer require, delete them.
$ nvidia-smi mig -dci -ci compute-instance-id -gi gpu-instance-id
- compute-instance-id
- The ID of the compute instance that you want to delete.
- gpu-instance-id
- The ID of the GPU instance from which you want to delete the compute instance.
Note: If the GPU instance is being used by another process, this command fails. In this situation, stop all processes that are using the GPU instance and retry the command.This example deletes compute instance 0 from GPU instance 0 on GPU 0.
$ nvidia-smi mig -dci -ci 0 -gi 0
Successfully destroyed compute instance ID  0 from GPU  0 GPU instance ID  0
- List the compute instance profiles that are available for your GPU
instance.
$ nvidia-smi mig -lcip
This example shows that one MIG 2g.10gb compute instance or two MIG 1c.2g.10gb compute instances can be created within the GPU instance.$ nvidia-smi mig -lcip +-------------------------------------------------------------------------------+ | Compute instance profiles: | | GPU GPU Name Profile Instances Exclusive Shared | | Instance ID Free/Total SM DEC ENC OFA | | ID CE JPEG | |===============================================================================| | 0 0 MIG 1c.2g.10gb 0 2/2 14 1 0 0 | | 2 0 | +-------------------------------------------------------------------------------+ | 0 0 MIG 2g.10gb 1* 1/1 28 1 0 0 | | 2 0 | +-------------------------------------------------------------------------------+
- Create the compute instances that you need within the available GPU
instance.
Create each compute instance individually by running the following command.
$ nvidia-smi mig -cci compute-instance-profile-id -gi gpu-instance-id
- compute-instance-profile-id
- The compute instance profile ID that specifies the compute instance.
- gpu-instance-id
- The GPU instance ID that specifies the GPU instance within which you want to create the compute instance.
Note: If the GPU instance is being used by another process, this command fails. In this situation, stop all processes that are using the GPU and retry the command.This example creates a MIG 2g.10gb compute instance on GPU instance 0.
$ nvidia-smi mig -cci 1 -gi 0
Successfully created compute instance ID  0 on GPU  0 GPU instance ID  0 using profile MIG 2g.10gb (ID  1)
This example creates two MIG 1c.2g.10gb compute instances on GPU instance 0 by running the same command twice.$ nvidia-smi mig -cci 0 -gi 0 Successfully created compute instance ID 0 on GPU 0 GPU instance ID 0 using profile MIG 1c.2g.10gb (ID 0) $ nvidia-smi mig -cci 0 -gi 0 Successfully created compute instance ID 1 on GPU 0 GPU instance ID 0 using profile MIG 1c.2g.10gb (ID 0)
- Verify that the compute instances were created within the GPU instance.
Use the nvidia-smi command for this purpose.
This example confirms that a MIG 2g.10gb compute instance was created on GPU instance 0.
nvidia-smi
Mon Dec 26 19:01:24 2022
+-----------------------------------------------------------------------------+
| NVIDIA-SMI 470.161.02   Driver Version: 470.161.02  CUDA Version:  11.4     |
|-------------------------------+----------------------+----------------------+
| GPU  Name        Persistence-M| Bus-Id        Disp.A | Volatile Uncorr. ECC |
| Fan  Temp  Perf  Pwr:Usage/Cap|         Memory-Usage | GPU-Util  Compute M. |
|                               |                      |               MIG M. |
|===============================+======================+======================|
|   0  GRID A100X-2-10C     On  | 00000000:00:08.0 Off |                   On |
| N/A   N/A    P0    N/A /  N/A |   1058MiB / 10235MiB |     N/A      Default |
|                               |                      |              Enabled |
+-------------------------------+----------------------+----------------------+

+-----------------------------------------------------------------------------+
| MIG devices:                                                                |
+------------------+----------------------+-----------+-----------------------+
| GPU  GI  CI  MIG |         Memory-Usage |        Vol|         Shared        |
|      ID  ID  Dev |           BAR1-Usage | SM     Unc| CE  ENC  DEC  OFA  JPG|
|                  |                      |        ECC|                       |
|==================+======================+===========+=======================|
|  0    0   0   0  |   1058MiB / 10235MiB | 28      0 |  2   0    1    0    0 |
|                  |      0MiB /  4096MiB |           |                       |
+------------------+----------------------+-----------+-----------------------+

+-----------------------------------------------------------------------------+
| Processes:                                                                  |
|  GPU   GI   CI        PID   Type   Process name                  GPU Memory |
|        ID   ID                                                   Usage      |
|=============================================================================|
|  No running processes found                                                 |
+-----------------------------------------------------------------------------+
This example confirms that two MIG 1c.2g.10gb compute instances were created on GPU instance 0.
$ nvidia-smi
Mon Dec 26 19:01:24 2022
+-----------------------------------------------------------------------------+
| NVIDIA-SMI 470.161.02   Driver Version: 470.161.02  CUDA Version:  11.4     |
|-------------------------------+----------------------+----------------------+
| GPU  Name        Persistence-M| Bus-Id        Disp.A | Volatile Uncorr. ECC |
| Fan  Temp  Perf  Pwr:Usage/Cap|         Memory-Usage | GPU-Util  Compute M. |
|                               |                      |               MIG M. |
|===============================+======================+======================|
|   0  GRID A100X-2-10C     On  | 00000000:00:08.0 Off |                   On |
| N/A   N/A    P0    N/A /  N/A |   1058MiB / 10235MiB |     N/A      Default |
|                               |                      |              Enabled |
+-------------------------------+----------------------+----------------------+

+-----------------------------------------------------------------------------+
| MIG devices:                                                                |
+------------------+----------------------+-----------+-----------------------+
| GPU  GI  CI  MIG |         Memory-Usage |        Vol|         Shared        |
|      ID  ID  Dev |           BAR1-Usage | SM     Unc| CE  ENC  DEC  OFA  JPG|
|                  |                      |        ECC|                       |
|==================+======================+===========+=======================|
|  0    0   0   0  |   1058MiB / 10235MiB | 14      0 |  2   0    1    0    0 |
|                  |      0MiB /  4096MiB |           |                       |
+------------------+                      +-----------+-----------------------+
|  0    0   1   1  |                      | 14      0 |  2   0    1    0    0 |
|                  |                      |           |                       |
+------------------+----------------------+-----------+-----------------------+

+-----------------------------------------------------------------------------+
| Processes:                                                                  |
|  GPU   GI   CI        PID   Type   Process name                  GPU Memory |
|        ID   ID                                                   Usage      |
|=============================================================================|
|  No running processes found                                                 |
+-----------------------------------------------------------------------------+
5.5. Enabling Unified Memory for a vGPU
Unified memory is disabled by default. If used, you must enable unified memory individually for each vGPU that requires it by setting a vGPU plugin parameter. How to enable unified memory for a vGPU depends on the hypervisor that you are using.
5.5.1. Enabling Unified Memory for a vGPU on VMware vSphere
On VMware vSphere, enable unified memory by setting the pciPassthruvgpu-id.cfg.enable_uvm configuration parameter in advanced VM attributes.
In advanced VM attributes, set the pciPassthruvgpu-id.cfg.enable_uvm vGPU plugin parameter for the vGPU to 1 as explained in Setting vGPU Plugin Parameters on VMware vSphere.
- vgpu-id
- A positive integer that identifies the vGPU assigned to a VM. For the first vGPU assigned to a VM, vgpu-id is 0. For example, if two vGPUs are assigned to a VM and you are enabling unified memory for both vGPUs, set pciPassthru0.cfg.enable_uvm and pciPassthru1.cfg.enable_uvm to 1.
5.6. Enabling NVIDIA CUDA Toolkit Development Tools for NVIDIA vGPU
By default, NVIDIA CUDA Toolkit development tools are disabled on NVIDIA vGPU. If used, you must enable NVIDIA CUDA Toolkit development tools individually for each VM that requires them by setting vGPU plugin parameters. One parameter must be set for enabling NVIDIA CUDA Toolkit debuggers and a different parameter must be set for enabling NVIDIA CUDA Toolkit profilers.
5.6.1. Enabling NVIDIA CUDA Toolkit Debuggers for NVIDIA vGPU
By default, NVIDIA CUDA Toolkit debuggers are disabled. If used, you must enable them for each vGPU VM that requires them by setting a vGPU plugin parameter. How to set the parameter to enable NVIDIA CUDA Toolkit debuggers for a vGPU VM depends on the hypervisor that you are using.
You can enable NVIDIA CUDA Toolkit debuggers for any number of VMs configured with vGPUs on the same GPU. When NVIDIA CUDA Toolkit debuggers are enabled for a VM, the VM cannot be migrated.
Perform this task for each VM for which you want to enable NVIDIA CUDA Toolkit debuggers.
Enabling NVIDIA CUDA Toolkit Debuggers for NVIDIA vGPU on on VMware vSphere
Ensure that the VM for which you want to enable NVIDIA CUDA Toolkit debuggers is powered off.
In advanced VM attributes, set the pciPassthruvgpu-id.cfg.enable_debugging vGPU plugin parameter for the vGPU that is assigned to the VM to 1 as explained in Setting vGPU Plugin Parameters on VMware vSphere.
- vgpu-id
- A positive integer that identifies the vGPU assigned to the VM. For the first vGPU assigned to a VM, vgpu-id is 0. For example, if two vGPUs are assigned to a VM and you are enabling debuggers for both vGPUs, set pciPassthru0.cfg.enable_debugging and pciPassthru1.cfg.enable_debugging to 1.
The setting of this parameter is preserved after a guest VM is restarted. However, this parameter is reset to its default value after the hypervisor host is restarted.
5.6.2. Enabling NVIDIA CUDA Toolkit Profilers for NVIDIA vGPU
By default, only GPU workload trace is enabled. If you want to use all NVIDIA CUDA Toolkit profiler features that NVIDIA vGPU supports, you must enable them for each vGPU VM that requires them.
5.6.2.1. Supported NVIDIA CUDA Toolkit Profiler Features
You can enable the following NVIDIA CUDA Toolkit profiler features for a vGPU VM:
- NVIDIA Nsight™ Compute
- NVIDIA Nsight Systems
- CUDA Profiling Tools Interface (CUPTI)
5.6.2.2. Clock Management for a vGPU VM for Which NVIDIA CUDA Toolkit Profilers Are Enabled
Clocks are not locked for periodic sampling use cases such as NVIDIA Nsight Systems profiling.
Clocks are locked for multipass profiling such as:
- NVIDIA Nsight Compute kernel profiling
- CUPTI range profiling
Clocks are locked automatically when profiling starts and are unlocked automatically when profiling ends.
5.6.2.3. Limitations on the Use of NVIDIA CUDA Toolkit Profilers with NVIDIA vGPU
The following limitations apply when NVIDIA CUDA Toolkit profilers are enabled for NVIDIA vGPU:
- NVIDIA CUDA Toolkit profilers can be used on only one VM at a time.
- Multiple CUDA contexts cannot be profiled simultaneously.
- Profiling data is collected separately for each context.
- A VM for which NVIDIA CUDA Toolkit profilers are enabled cannot be migrated.
Because NVIDIA CUDA Toolkit profilers can be used on only one VM at a time, you should enable them for only one VM assigned a vGPU on a GPU. However, NVIDIA AI Enterprise cannot enforce this requirement. If NVIDIA CUDA Toolkit profilers are enabled on more than one VM assigned a vGPU on a GPU, profiling data is collected only for the first VM to start the profiler.
5.6.2.4. Enabling NVIDIA CUDA Toolkit Profilers for a vGPU VM
You enable NVIDIA CUDA Toolkit profilers for a vGPU VM by setting a vGPU plugin parameter. How to set the parameter to enable NVIDIA CUDA Toolkit profilers for a vGPU VM depends on the hypervisor that you are using.
Perform this task for the VM for which you want to enable NVIDIA CUDA Toolkit profilers.
Enabling NVIDIA CUDA Toolkit Profilers for NVIDIA vGPU on on VMware vSphere
Ensure that the VM for which you want to enable NVIDIA CUDA Toolkit profilers is powered off.
In advanced VM attributes, set the pciPassthruvgpu-id.cfg.enable_profiling vGPU plugin parameter for the vGPU that is assigned to the VM to 1 as explained in Setting vGPU Plugin Parameters on VMware vSphere.
- vgpu-id
- A positive integer that identifies the vGPU assigned to the VM. For the first vGPU assigned to a VM, vgpu-id is 0. For example, if two vGPUs are assigned to a VM and you are enabling profilers for the second vGPU, set pciPassthru1.cfg.enable_profiling to 1.
The setting of this parameter is preserved after a guest VM is restarted. However, this parameter is reset to its default value after the hypervisor host is restarted.
6. Monitoring GPU Performance
NVIDIA AI Enterprise enables you to monitor the performance of physical GPUs and virtual GPUs from the hypervisor and from within individual guest VMs.
6.1. NVIDIA System Management Interface nvidia-smi
NVIDIA System Management Interface, nvidia-smi, is a command-line tool that reports management information for NVIDIA GPUs.
The nvidia-smi tool is included in the following packages:
- NVIDIA Virtual GPU Manager package for each supported hypervisor
- NVIDIA driver package for each supported guest OS
The scope of the reported management information depends on where you run nvidia-smi from:
-
From a hypervisor command shell, such as the VMware ESXi host shell, nvidia-smi reports management information for NVIDIA physical GPUs and virtual GPUs present in the system.
-
From a guest VM, nvidia-smi retrieves usage statistics for vGPUs or pass-through GPUs that are assigned to the VM.
6.2. Using nvidia-smi to Monitor GPU Performance from a Hypervisor
You can get management information for the NVIDIA physical GPUs and virtual GPUs present in the system by running nvidia-smi from a hypervisor command shell such as the Citrix Hypervisor dom0 shell or the VMware ESXi host shell.
Without a subcommand, nvidia-smi provides management information for physical GPUs. To examine virtual GPUs in more detail, use nvidia-smi with the vgpu subcommand.
From the command line, you can get help information about the nvidia-smi tool and the vgpu subcommand.
| Help Information | Command |
|---|---|
| A list of subcommands supported by the nvidia-smi tool. Note that not all subcommands apply to GPUs that support NVIDIA AI Enterprise. | nvidia-smi -h |
| A list of all options supported by the vgpu subcommand. | nvidia-smi vgpu –h |
6.2.1. Getting a Summary of all Physical GPUs in the System
To get a summary of all physical GPUs in the system, along with PCI bus IDs, power state, temperature, current memory usage, and so on, run nvidia-smi without additional arguments.
Each vGPU instance is reported in the Compute processes section, together with its physical GPU index and the amount of frame-buffer memory assigned to it.
In the example that follows, three vGPUs are running in the system: One vGPU is running on each of the physical GPUs 0, 1, and 2.
[root@vgpu ~]# nvidia-smi
Fri Dec 23 09:26:18 2024
+-----------------------------------------------------------------------------+
| NVIDIA-SMI 470.161.02               Driver Version: 470.161.02              |
|-------------------------------+----------------------+----------------------+
| GPU  Name        Persistence-M| Bus-Id        Disp.A | Volatile Uncorr. ECC |
| Fan  Temp  Perf  Pwr:Usage/Cap|         Memory-Usage | GPU-Util  Compute M. |
|===============================+======================+======================|
|   0  Tesla M60           On   | 0000:83:00.0     Off |                  Off |
| N/A   31C    P8    23W / 150W |   1889MiB /  8191MiB |      7%      Default |
+-------------------------------+----------------------+----------------------+
|   1  Tesla M60           On   | 0000:84:00.0     Off |                  Off |
| N/A   26C    P8    23W / 150W |    926MiB /  8191MiB |      9%      Default |
+-------------------------------+----------------------+----------------------+
|   2  Tesla M10           On   | 0000:8A:00.0     Off |                  N/A |
| N/A   23C    P8    10W /  53W |   1882MiB /  8191MiB |     12%      Default |
+-------------------------------+----------------------+----------------------+
|   3  Tesla M10           On   | 0000:8B:00.0     Off |                  N/A |
| N/A   26C    P8    10W /  53W |     10MiB /  8191MiB |      0%      Default |
+-------------------------------+----------------------+----------------------+
|   4  Tesla M10           On   | 0000:8C:00.0     Off |                  N/A |
| N/A   34C    P8    10W /  53W |     10MiB /  8191MiB |      0%      Default |
+-------------------------------+----------------------+----------------------+
|   5  Tesla M10           On   | 0000:8D:00.0     Off |                  N/A |
| N/A   32C    P8    10W /  53W |     10MiB /  8191MiB |      0%      Default |
+-------------------------------+----------------------+----------------------+
+-----------------------------------------------------------------------------+
| Processes:                                                       GPU Memory |
|  GPU       PID  Type  Process name                               Usage      |
|=============================================================================|
|    0     11924  C+G   /usr/lib64/xen/bin/vgpu                       1856MiB |
|    1     11903  C+G   /usr/lib64/xen/bin/vgpu                        896MiB |
|    2     11908  C+G   /usr/lib64/xen/bin/vgpu                       1856MiB |
+-----------------------------------------------------------------------------+
[root@vgpu ~]#
6.2.2. Getting a Summary of all vGPUs in the System
To get a summary of the vGPUs currently that are currently running on each physical GPU in the system, run nvidia-smi vgpu without additional arguments.
[root@vgpu ~]# nvidia-smi vgpu
Fri Dec 23 09:27:06 2024
+-----------------------------------------------------------------------------+
| NVIDIA-SMI 470.161.02               Driver Version: 470.161.02              |
|-------------------------------+--------------------------------+------------+
| GPU  Name                     | Bus-Id                         | GPU-Util   |
|      vGPU ID    Name          | VM ID    VM Name               | vGPU-Util  |
|===============================+================================+============|
|   0  Tesla M60                | 0000:83:00.0                   |   7%       |
|      11924      GRID M60-2Q   | 3        Win7-64 GRID test 2   |       6%   |
+-------------------------------+--------------------------------+------------+
|   1  Tesla M60                | 0000:84:00.0                   |   9%       |
|      11903      GRID M60-1B   | 1        Win8.1-64 GRID test 3 |       8%   |
+-------------------------------+--------------------------------+------------+
|   2  Tesla M10                | 0000:8A:00.0                   |  12%       |
|      11908      GRID M10-2Q   | 2        Win7-64 GRID test 1   |      10%   |
+-------------------------------+--------------------------------+------------+
|   3  Tesla M10                | 0000:8B:00.0                   |   0%       |
+-------------------------------+--------------------------------+------------+
|   4  Tesla M10                | 0000:8C:00.0                   |   0%       |
+-------------------------------+--------------------------------+------------+
|   5  Tesla M10                | 0000:8D:00.0                   |   0%       |
+-------------------------------+--------------------------------+------------+
[root@vgpu ~]#
6.2.3. Getting vGPU Details
To get detailed information about all the vGPUs on the platform, run nvidia-smi vgpu with the –q or --query option.
To limit the information retrieved to a subset of the GPUs on the platform, use the –i or --id option to select one or more GPUs.
[root@vgpu ~]# nvidia-smi vgpu -q -i 1
GPU 00000000:86:00.0
    Active vGPUs              : 1
    vGPU ID                   : 3251634178
        VM ID                 : 1
        VM Name               : Win7
        vGPU Name             : GRID M60-8Q
        vGPU Type             : 22
        vGPU UUID             : b8c6d0e1-d167-11e8-b8c9-55705e5a54a6
        Guest Driver Version  : 411.81
        License Status        : Unlicensed
        Accounting Mode       : Disabled
        Accounting Buffer Size: 4000
        Frame Rate Limit      : 3 FPS
        FB Memory Usage       :
            Total             : 8192 MiB
            Used              : 675 MiB
            Free              : 7517 MiB
        Utilization           :
            Gpu               : 3 %
            Memory            : 0 %
            Encoder           : 0 %
            Decoder           : 0 %
        Encoder Stats         :
            Active Sessions   : 0
            Average FPS       : 0
            Average Latency   : 0
        FBC Stats             :
            Active Sessions   : 1
            Average FPS       : 227
            Average Latency   : 4403
[root@vgpu ~]#
6.2.4. Monitoring vGPU engine usage
To monitor vGPU engine usage across multiple vGPUs, run nvidia-smi vgpu with the –u or --utilization option.
For each vGPU, the usage statistics in the following table are reported once every second. The table also shows the name of the column in the command output under which each statistic is reported.
| Statistic | Column |
|---|---|
| 3D/Compute | sm |
| Memory controller bandwidth | mem |
| Video encoder | enc |
| Video decoder | dec |
Each reported percentage is the percentage of the physical GPU’s capacity that a vGPU is using. For example, a vGPU that uses 20% of the GPU’s graphics engine’s capacity will report 20%.
To modify the reporting frequency, use the –l or --loop option.
To limit monitoring to a subset of the GPUs on the platform, use the –i or --id option to select one or more GPUs.
[root@vgpu ~]# nvidia-smi vgpu -u
# gpu    vgpu    sm   mem   enc   dec
# Idx      Id     %     %     %     %
    0   11924     6     3     0     0
    1   11903     8     3     0     0
    2   11908    10     4     0     0
    3       -     -     -     -     -
    4       -     -     -     -     -
    5       -     -     -     -     -
    0   11924     6     3     0     0
    1   11903     9     3     0     0
    2   11908    10     4     0     0
    3       -     -     -     -     -
    4       -     -     -     -     -
    5       -     -     -     -     -
    0   11924     6     3     0     0
    1   11903     8     3     0     0
    2   11908    10     4     0     0
    3       -     -     -     -     -
    4       -     -     -     -     -
    5       -     -     -     -     -
^C[root@vgpu ~]#
6.2.5. Monitoring vGPU engine usage by applications
To monitor vGPU engine usage by applications across multiple vGPUs, run nvidia-smi vgpu with the –p option.
For each application on each vGPU, the usage statistics in the following table are reported once every second. Each application is identified by its process ID and process name. The table also shows the name of the column in the command output under which each statistic is reported.
| Statistic | Column |
|---|---|
| 3D/Compute | sm |
| Memory controller bandwidth | mem |
| Video encoder | enc |
| Video decoder | dec |
Each reported percentage is the percentage of the physical GPU’s capacity used by an application running on a vGPU that resides on the physical GPU. For example, an application that uses 20% of the GPU’s graphics engine’s capacity will report 20%.
To modify the reporting frequency, use the –l or --loop option.
To limit monitoring to a subset of the GPUs on the platform, use the –i or --id option to select one or more GPUs.
[root@vgpu ~]# nvidia-smi vgpu -p
# GPU    vGPU process        process   sm  mem  enc  dec
# Idx      Id      Id           name    %    %    %    %
    0   38127    1528        dwm.exe    0    0    0    0
    1   37408    4232  DolphinVS.exe   32   25    0    0
    1  257869    4432    FurMark.exe   16   12    0    0
    1  257969    4552    FurMark.exe   48   37    0    0
    0   38127    1528        dwm.exe    0    0    0    0
    1   37408    4232  DolphinVS.exe   16   12    0    0
    1  257911     656  DolphinVS.exe   32   24    0    0
    1  257969    4552    FurMark.exe   48   37    0    0
    0   38127    1528        dwm.exe    0    0    0    0
    1  257869    4432    FurMark.exe   38   30    0    0
    1  257911     656  DolphinVS.exe   19   14    0    0
    1  257969    4552    FurMark.exe   38   30    0    0
    0   38127    1528        dwm.exe    0    0    0    0
    1  257848    3220    Balls64.exe   16   12    0    0
    1  257869    4432    FurMark.exe   16   12    0    0
    1  257911     656  DolphinVS.exe   16   12    0    0
    1  257969    4552    FurMark.exe   48   37    0    0
    0   38127    1528        dwm.exe    0    0    0    0
    1  257911     656  DolphinVS.exe   32   25    0    0
    1  257969    4552    FurMark.exe   64   50    0    0
    0   38127    1528        dwm.exe    0    0    0    0
    1   37408    4232  DolphinVS.exe   16   12    0    0
    1  257911     656  DolphinVS.exe   16   12    0    0
    1  257969    4552    FurMark.exe   64   49    0    0
    0   38127    1528        dwm.exe    0    0    0    0
    1   37408    4232  DolphinVS.exe   16   12    0    0
    1  257869    4432    FurMark.exe   16   12    0    0
    1  257969    4552    FurMark.exe   64   49    0    0
[root@vgpu ~]#
6.2.6. Monitoring Encoder Sessions
To monitor the encoder sessions for processes running on multiple vGPUs, run nvidia-smi vgpu with the –es or --encodersessions option.
For each encoder session, the following statistics are reported once every second:
- GPU ID
- vGPU ID
- Encoder session ID
- PID of the process in the VM that created the encoder session
- Codec type, for example, H.264 or H.265
- Encode horizontal resolution
- Encode vertical resolution
- One-second trailing average encoded FPS
- One-second trailing average encode latency in microseconds
To modify the reporting frequency, use the –l or --loop option.
To limit monitoring to a subset of the GPUs on the platform, use the –i or --id option to select one or more GPUs.
[root@vgpu ~]# nvidia-smi vgpu -es
# GPU    vGPU Session Process   Codec       H       V Average     Average
# Idx      Id      Id      Id    Type     Res     Res     FPS Latency(us)
    1   21211       2    2308   H.264    1920    1080     424        1977
    1   21206       3    2424   H.264    1920    1080       0           0
    1   22011       1    3676   H.264    1920    1080     374        1589
    1   21211       2    2308   H.264    1920    1080     360         807
    1   21206       3    2424   H.264    1920    1080     325        1474
    1   22011       1    3676   H.264    1920    1080     313        1005
    1   21211       2    2308   H.264    1920    1080     329        1732
    1   21206       3    2424   H.264    1920    1080     352        1415
    1   22011       1    3676   H.264    1920    1080     434        1894
    1   21211       2    2308   H.264    1920    1080     362        1818
    1   21206       3    2424   H.264    1920    1080     296        1072
    1   22011       1    3676   H.264    1920    1080     416        1994
    1   21211       2    2308   H.264    1920    1080     444        1912
    1   21206       3    2424   H.264    1920    1080     330        1261
    1   22011       1    3676   H.264    1920    1080     436        1644
    1   21211       2    2308   H.264    1920    1080     344        1500
    1   21206       3    2424   H.264    1920    1080     393        1727
    1   22011       1    3676   H.264    1920    1080     364        1945
    1   21211       2    2308   H.264    1920    1080     555        1653
    1   21206       3    2424   H.264    1920    1080     295         925
    1   22011       1    3676   H.264    1920    1080     372        1869
    1   21211       2    2308   H.264    1920    1080     326        2206
    1   21206       3    2424   H.264    1920    1080     318        1366
    1   22011       1    3676   H.264    1920    1080     464        2015
    1   21211       2    2308   H.264    1920    1080     305        1167
    1   21206       3    2424   H.264    1920    1080     445        1892
    1   22011       1    3676   H.264    1920    1080     361         906
    1   21211       2    2308   H.264    1920    1080     353        1436
    1   21206       3    2424   H.264    1920    1080     354        1798
    1   22011       1    3676   H.264    1920    1080     373        1310
^C[root@vgpu ~]#
6.2.7. Listing Supported vGPU Types
To list the virtual GPU types that the GPUs in the system support, run nvidia-smi vgpu with the –s or --supported option.
To limit the retrieved information to a subset of the GPUs on the platform, use the –i or --id option to select one or more GPUs.
[root@vgpu ~]# nvidia-smi vgpu -s -i 0
GPU 0000:83:00.0
    GRID M60-0B
    GRID M60-0Q
    GRID M60-1A
    GRID M60-1B
    GRID M60-1Q
    GRID M60-2A
    GRID M60-2Q
    GRID M60-4A
    GRID M60-4Q
    GRID M60-8A
    GRID M60-8Q
[root@vgpu ~]#
To view detailed information about the supported vGPU types, add the –v or --verbose option:
[root@vgpu ~]# nvidia-smi vgpu -s -i 0 -v   | less
GPU 00000000:83:00.0
    vGPU Type ID              : 0xb
        Name                  : GRID M60-0B
        Class                 : NVS
        Max Instances         : 16
        Device ID             : 0x13f210de
        Sub System ID         : 0x13f21176
        FB Memory             : 512 MiB
        Display Heads         : 2
        Maximum X Resolution  : 2560
        Maximum Y Resolution  : 1600
        Frame Rate Limit      : 45 FPS
        GRID License          : GRID-Virtual-PC,2.0;GRID-Virtual-WS,2.0;GRID-Virtual-WS-Ext,2.0;Quadro-Virtual-DWS,5.0
    vGPU Type ID              : 0xc
        Name                  : GRID M60-0Q
        Class                 : Quadro
        Max Instances         : 16
        Device ID             : 0x13f210de
        Sub System ID         : 0x13f2114c
        FB Memory             : 512 MiB
        Display Heads         : 2
        Maximum X Resolution  : 2560
        Maximum Y Resolution  : 1600
        Frame Rate Limit      : 60 FPS
        GRID License          : GRID-Virtual-WS,2.0;GRID-Virtual-WS-Ext,2.0;Quadro-Virtual-DWS,5.0
    vGPU Type ID              : 0xd
        Name                  : GRID M60-1A
        Class                 : NVS
        Max Instances         : 8
…
[root@vgpu ~]#
6.2.8. Listing the vGPU Types that Can Currently Be Created
To list the virtual GPU types that can currently be created on GPUs in the system, run nvidia-smi vgpu with the –c or --creatable option.
This property is a dynamic property that varies for each GPU depending on whether MIG mode is enabled for the GPU.
- If MIG mode is not enabled for the GPU, or if the GPU does not support
MIG, this property reflects the number and type of vGPUs that are already
running on the GPU.
- If no vGPUs are running on the GPU, all vGPU types that the GPU supports are listed.
- If one or more vGPUs are running on the GPU, but the GPU is not fully loaded, only the type of the vGPUs that are already running is listed.
- If the GPU is fully loaded, no vGPU types are listed.
- If MIG mode is enabled for the GPU, the result reflects the number and type of
GPU instances on which no vGPUs are already running.
- If no GPU instances have been created, no vGPU types are listed.
- If GPU instances have been created, only the vGPU types that correspond to GPU instances on which no vGPU is running are listed.
- If a vGPU is running on every GPU instance, no vGPU types are listed.
To limit the retrieved information to a subset of the GPUs on the platform, use the –i or --id option to select one or more GPUs.
[root@vgpu ~]# nvidia-smi vgpu -c -i 0
GPU 0000:83:00.0
    GRID M60-2Q
[root@vgpu ~]#
To view detailed information about the vGPU types that can currently be created, add the –v or --verbose option.
6.3. Monitoring GPU Performance from a Guest VM
You can use monitoring tools within an individual guest VM to monitor the performance of vGPUs or pass-through GPUs that are assigned to the VM. The scope of these tools is limited to the guest VM within which you use them. You cannot use monitoring tools within an individual guest VM to monitor any other GPUs in the platform.
For a vGPU, only these metrics are reported in a guest VM:
- 3D/Compute
- Memory controller
- Video encoder
- Video decoder
- Frame buffer usage
Other metrics normally present in a GPU are not applicable to a vGPU and are reported as zero or N/A, depending on the tool that you are using.
6.3.1. Using nvidia-smi to Monitor GPU Performance from a Guest VM
In guest VMs, you can use the nvidia-smi command to retrieve statistics for the total usage by all applications running in the VM and usage by individual applications of the following resources:
- GPU
- Video encoder
- Video decoder
- Frame buffer
To use nvidia-smi to retrieve statistics for the total resource usage by all applications running in the VM, run the following command:
nvidia-smi dmon
To use nvidia-smi to retrieve statistics for resource usage by individual applications running in the VM, run the following command:
nvidia-smi pmon
7. Changing Scheduling Behavior for Time-Sliced vGPUs
NVIDIA GPUs implement a best effort vGPU scheduler that aims to balance performance across vGPUs. The best effort scheduler allows a vGPU to use GPU processing cycles that are not being used by other vGPUs. Under some circumstances, a VM running a graphics-intensive application may adversely affect the performance of graphics-light applications running in other VMs.
To address this issue with the best effort vGPU scheduler, NVIDIA GPUs additionally support equal share and fixed share vGPU schedulers. These schedulers impose a limit on GPU processing cycles used by a vGPU, which prevents graphics-intensive applications running in one VM from affecting the performance of graphics-light applications running in other VMs. On GPUs that support multiple vGPU schedulers, you can select the vGPU scheduler to use. You can also set the length of the time slice for the equal share and fixed share vGPU schedulers.
The best effort scheduler is the default scheduler for all supported GPU architectures.
7.1. Scheduling Policies for Time-Sliced vGPUs
In addition to the default best effort scheduler, GPUs based on NVIDIA GPU architectures after the Maxwell architecture support equal share and fixed share vGPU schedulers.
- Equal share scheduler
- The physical GPU is shared equally amongst the running vGPUs that reside on it. As vGPUs are added to or removed from a GPU, the share of the GPU's processing cycles allocated to each vGPU changes accordingly. As a result, the performance of a vGPU may increase as other vGPUs on the same GPU are stopped, or decrease as other vGPUs are started on the same GPU.
- Fixed share scheduler
- Each vGPU is given a fixed share of the physical GPU's processing cycles, the amount of which depends on the vGPU type, which in turn determines the maximum number of vGPUs per physical GPU. For example, the maximum number of T4-4C vGPUs per physical GPU is 4. When the scheduling policy is fixed share, each T4-4C vGPU is given one quarter, or 25%, the physical GPU's processing cycles. As vGPUs are added to or removed from a GPU, the share of the GPU's processing cycles allocated to each vGPU remains constant. As a result, the performance of a vGPU remains unchanged as other vGPUs are stopped or started on the same GPU.
7.2. Scheduler Time Slice for Time-Sliced vGPUs
When multiple VMs access the vGPUs on a single GPU, the GPU performs the work for each VM serially. The vGPU scheduler time slice represents the amount of time that the work of a VM is allowed to run on the GPU before it is preempted and the work of the next VM is performed.
For the equal share and fixed share vGPU schedulers, you can set the length of the time slice. The length of the time slice affects latency and throughput. The optimal length of the time slice depends the workload that the GPU is handling.
-
For workloads that require low latency, a shorter time slice is optimal. Typically, these workloads are applications that must generate output at a fixed interval, such as graphics applications that generate output at a frame rate of 60 FPS. These workloads are sensitive to latency and should be allowed to run at least once per interval. A shorter time slice reduces latency and improves responsiveness by causing the scheduler to switch more frequently between VMs.
- For workloads that require maximum throughput, a longer time slice is optimal. Typically, these workloads are applications that must complete their work as quickly as possible and do not require responsiveness, such as CUDA applications. A longer time slice increases throughput by preventing frequent switching between VMs.
7.3. RmPVMRL Registry Key
The RmPVMRL registry key controls the scheduling behavior for NVIDIA vGPUs by setting the scheduling policy and the length of the time slice.
Type
Dword
Contents
| Value | Meaning |
|---|---|
| 0x00 (default) | Best effort scheduler |
| 0x01 | Equal share scheduler with the default time slice length |
| 0x00TT0001 | Equal share scheduler with a user-defined time slice length TT |
| 0x11 | Fixed share scheduler with the default time slice length |
| 0x00TT0011 | Fixed share scheduler with a user-defined time slice length TT |
The default time slice length depends on the maximum number of vGPUs per physical GPU allowed for the vGPU type.
| Maximum Number of vGPUs | Default Time Slice Length |
|---|---|
| Less than or equal to 8 | 2 ms |
| Greater than 8 | 1 ms |
- TT
- Two hexadecimal digits in the range 01 to 1E that set the length of the time slice in
milliseconds (ms) for the equal share and fixed share schedulers. The minimum length is
1 ms and the maximum length is 30 ms.
If TT is 00, the length is set to the default length for the vGPU type.
If TT is greater than 1E, the length is set to 30 ms.
Examples
This example sets the vGPU scheduler to equal share scheduler with the default time slice length.
RmPVMRL=0x01
This example sets the vGPU scheduler to equal share scheduler with a time slice that is 3 ms long.
RmPVMRL=0x00030001
This example sets the vGPU scheduler to fixed share scheduler with the default time slice length.
RmPVMRL=0x11
This example sets the vGPU scheduler to fixed share scheduler with a time slice that is 24 (0x18) ms long.
RmPVMRL=0x00180011
7.4. Getting the Current Time-Sliced vGPU Scheduling Behavior for All GPUs
Get the current scheduling behavior before changing the scheduling behavior of one or more GPUs to determine if you need to change it or after changing it to confirm the change.
Perform this task in your hypervisor command shell.
- Open a command shell on your hypervisor host machine.
- Use the dmesg command to display messages from the kernel
that contain the strings NVRM and scheduler.
$ dmesg | grep NVRM | grep scheduler
The scheduling behavior is indicated in these messages by the following strings:
- BEST_EFFORT
- EQUAL_SHARE
- FIXED_SHARE
If the scheduling behavior is equal share or fixed share, the scheduler time slice in ms is also displayed.
This example gets the scheduling behavior of the GPUs in a system in which the behavior of one GPU is set to best effort, one GPU is set to equal share, and one GPU is set to fixed share.
$ dmesg | grep NVRM | grep scheduler
2020-10-05T02:58:08.928Z cpu79:2100753)NVRM: GPU at 0000:3d:00.0 has software scheduler DISABLED with policy BEST_EFFORT.
2020-10-05T02:58:09.818Z cpu79:2100753)NVRM: GPU at 0000:5e:00.0 has software scheduler ENABLED with policy EQUAL_SHARE.
NVRM: Software scheduler timeslice set to 1 ms.
2020-10-05T02:58:12.115Z cpu79:2100753)NVRM: GPU at 0000:88:00.0 has software scheduler ENABLED with policy FIXED_SHARE.
NVRM: Software scheduler timeslice set to 1 ms.
7.5. Changing the Time-Sliced vGPU Scheduling Behavior for All GPUs
Perform this task in your hypervisor command shell.
- Open a command shell on your hypervisor host machine.
- Set the RmPVMRL registry key to the value that sets the GPU
scheduling policy and the length of the time slice that you
want.
-
On VMware vSphere, use the esxcli set command.
# esxcli system module parameters set -m nvidia -p "NVreg_RegistryDwords=RmPVMRL=value"
- value
-
The value that sets the GPU scheduling policy and the length of the time slice that you want, for example:
- 0x01
- Sets the vGPU scheduling policy to equal share scheduler with the default time slice length.
- 0x00030001
- Sets the GPU scheduling policy to equal share scheduler with a time slice that is 3 ms long.
- 0x11
- Sets the vGPU scheduling policy to fixed share scheduler with the default time slice length.
- 0x00180011
- Sets the GPU scheduling policy to fixed share scheduler with a time slice that is 24 (0x18) ms long.
For all supported values, see RmPVMRL Registry Key.
-
- Reboot your hypervisor host machine.
7.6. Changing the Time-Sliced vGPU Scheduling Behavior for Select GPUs
Perform this task in your hypervisor command shell.
- Open a command shell on your hypervisor host machine.
- Use the lspci command to obtain the PCI domain and
bus/device/function (BDF) of each GPU for which you want to change the
scheduling behavior.
- On VMware vSphere, pipe the output of lspci to the
grep command to display information only for NVIDIA
GPUs.
# lspci | grep NVIDIA
The NVIDIA GPU listed in this example has the PCI domain 0000 and BDF 86:00.0.
0000:86:00.0 3D controller: NVIDIA Corporation GP104GL [Tesla P4] (rev a1)
- On VMware vSphere, pipe the output of lspci to the
grep command to display information only for NVIDIA
GPUs.
- Use the module parameter NVreg_RegistryDwordsPerDevice to set
the pci and RmPVMRL registry keys for each
GPU.
-
On VMware vSphere, use the esxcli set command.
# esxcli system module parameters set -m nvidia \
-p "NVreg_RegistryDwordsPerDevice=pci=pci-domain:pci-bdf;RmPVMRL=value\
[;pci=pci-domain:pci-bdf;RmPVMRL=value...]"
For each GPU, provide the following information:
- pci-domain
- The PCI domain of the GPU.
- pci-bdf
- The PCI device BDF of the GPU.
- value
-
The value that sets the GPU scheduling policy and the length of the time slice that you want, for example:
- 0x01
- Sets the GPU scheduling policy to equal share scheduler with the default time slice length.
- 0x00030001
- Sets the GPU scheduling policy to equal share scheduler with a time slice that is 3 ms long.
- 0x11
- Sets the GPU scheduling policy to fixed share scheduler with the default time slice length.
- 0x00180011
- Sets the GPU scheduling policy to fixed share scheduler with a time slice that is 24 (0x18) ms long.
For all supported values, see RmPVMRL Registry Key.
This example changes the scheduling behavior of a single GPU. The command sets the scheduling policy of the GPU at PCI domain 0000 and BDF 15:00.0 to fixed share scheduler with the default time slice length.
# esxcli system module parameters set -m nvidia -p \
"NVreg_RegistryDwordsPerDevice=pci=0000:15:00.0;RmPVMRL=0x11[;pci=0000:15:00.0;RmPVMRL=0x11]"
This example changes the scheduling behavior of a single GPU. The command sets the scheduling policy of the GPU at PCI domain 0000 and BDF 15:00.0 to fixed share scheduler with a time slice that is 24 (0x18) ms long.
# esxcli system module parameters set -m nvidia -p \
"NVreg_RegistryDwordsPerDevice=pci=0000:15:00.0;RmPVMRL=0x11[;pci=0000:15:00.0;RmPVMRL=0x00180011]"
-
- Reboot your hypervisor host machine.
7.7. Restoring Default Time-Sliced vGPU Scheduler Settings
Perform this task in your hypervisor command shell.
- Open a command shell on your hypervisor host machine.
- Unset the RmPVMRL registry key.
-
On VMware vSphere, set the module parameter to an empty string.
# esxcli system module parameters set -m nvidia -p "module-parameter="
- module-parameter
- The module parameter to set, which depends on whether the
scheduling behavior was changed for all GPUs or select GPUs:
- For all GPUs, set the NVreg_RegistryDwords module parameter.
- For select GPUs, set the NVreg_RegistryDwordsPerDevice module parameter.
For example, to restore default vGPU scheduler settings after they were changed for all GPUs, enter this command:
# esxcli system module parameters set -m nvidia -p "NVreg_RegistryDwords="
-
- Reboot your hypervisor host machine.
8. Troubleshooting
This chapter describes basic troubleshooting steps for NVIDIA vGPU and how to collect debug information when filing a bug report.
8.1. Known issues
Before troubleshooting or filing a bug report, review the release notes that accompany each driver release, for information about known issues with the current release, and potential workarounds.
8.2. Troubleshooting steps
If a vGPU-enabled VM fails to start, or doesn’t display any output when it does start, follow these steps to narrow down the probable cause.
8.2.1. Verifying the NVIDIA Kernel Driver Is Loaded
- Run the vmkload_mod command.
[root@esxi:~] vmkload_mod -l | grep nvidia
nvidia                   5    8420
- If the nvidia driver is not listed in the output, check dmesg for any load-time errors reported by the driver (see Examining NVIDIA kernel driver output).
8.2.2. Verifying that nvidia-smi works
If the NVIDIA kernel driver is correctly loaded on the physical GPU, run nvidia-smi and verify that all physical GPUs not currently being used for GPU pass-through are listed in the output. For details on expected output, see NVIDIA System Management Interface nvidia-smi.
If nvidia-smi fails to report the expected output, check dmesg for NVIDIA kernel driver messages.
8.2.3. Examining NVIDIA kernel driver output
Information and debug messages from the NVIDIA kernel driver are logged in kernel logs, prefixed with NVRM or nvidia.
Run dmesg and check for the NVRM and nvidia prefixes:
[root@xenserver ~]# dmesg | grep -E "NVRM|nvidia"
[   22.054928] nvidia: module license 'NVIDIA' taints kernel.
[   22.390414] NVRM: loading
[   22.829226] nvidia 0000:04:00.0: enabling device (0000 -> 0003)
[   22.829236] nvidia 0000:04:00.0: PCI INT A -> GSI 32 (level, low) -> IRQ 32
[   22.829240] NVRM: This PCI I/O region assigned to your NVIDIA device is invalid:
[   22.829241] NVRM: BAR0 is 0M @ 0x0 (PCI:0000:00:04.0)
[   22.829243] NVRM: The system BIOS may have misconfigured your GPU.
8.2.4. Examining NVIDIA Virtual GPU Manager Messages
Information and debug messages from the NVIDIA Virtual GPU Manager are logged to the hypervisor’s log files, prefixed with vmiop.
8.2.4.1. Examining VMware vSphere vGPU Manager Messages
Look in the vmware.log file for the vmiop prefix:
[root@esxi:~] grep vmiop /vmfs/volumes/datastore1/win7-vgpu-test1/vmware.log
2022-12-23T14:02:21.275Z| vmx| I120: DICT   pciPassthru0.virtualDev = "vmiop"
2022-12-23T14:02:21.344Z| vmx| I120: GetPluginPath testing /usr/lib64/vmware/plugin/libvmx-vmiop.so
2022-12-23T14:02:21.344Z| vmx| I120: PluginLdr_LoadShared: Loaded shared plugin libvmx-vmiop.so from /usr/lib64/vmware/plugin/libvmx-vmiop.so
2022-12-23T14:02:21.344Z| vmx| I120: VMIOP: Loaded plugin libvmx-vmiop.so:VMIOP_InitModule
2022-12-23T14:02:21.359Z| vmx| I120: VMIOP: Initializing plugin vmiop-display
2022-12-23T14:02:21.365Z| vmx| I120: vmiop_log: gpu-pci-id : 0000:04:00.0
2022-12-23T14:02:21.365Z| vmx| I120: vmiop_log: vgpu_type : quadro
2022-12-23T14:02:21.365Z| vmx| I120: vmiop_log: Framebuffer: 0x74000000
2022-12-23T14:02:21.365Z| vmx| I120: vmiop_log: Virtual Device Id: 0x11B0:0x101B
2022-12-23T14:02:21.365Z| vmx| I120: vmiop_log: ######## vGPU Manager Information: ########
2022-12-23T14:02:21.365Z| vmx| I120: vmiop_log: Driver Version: 470.161.02
2022-12-23T14:02:21.365Z| vmx| I120: vmiop_log: VGX Version: 13.5
2022-12-23T14:02:21.445Z| vmx| I120: vmiop_log: Init frame copy engine: syncing...
2022-12-23T14:02:37.031Z| vthread-12| I120: vmiop_log: ######## Guest NVIDIA Driver Information: ########
2022-12-23T14:02:37.031Z| vthread-12| I120: vmiop_log: Driver Version:
2022-12-23T14:02:37.031Z| vthread-12| I120: vmiop_log: VGX Version: 13.5
2022-12-23T14:02:37.093Z| vthread-12| I120: vmiop_log: Clearing BAR1 mapping
2022-12-26T23:39:55.726Z| vmx| I120: VMIOP: Shutting down plugin vmiop-display
[root@esxi:~]
8.3. Capturing configuration data by running nvidia-bug-report.sh
The nvidia-bug-report.sh script captures debug information into a gzip-compressed log file on the server.
Run nvidia-bug-report.sh from the VMware ESXi host shell.
9. Additional Information
The following table provides links to additional information about each application or framework in NVIDIA AI Enterprise.
| Application or Framework | Additional Information |
|---|---|
| TensorFlow | |
| PyTorch | PyTorch Release Notes |
| NVIDIA Triton Inference Server | Triton Inference Server Documentation on Github |
| NVIDIA TensorRT | NVIDIA TensorRT Documentation |
| RAPIDS | RAPIDS Docs on the RAPIDS project site |
| Other Software | Additional Information |
|---|---|
| NVIDIA GPU Operator | NVIDIA GPU Operator Documentation |
| NVIDIA Network Operator | NVIDIA Network Operator Documentation |
A. Virtual GPU Types for Supported GPUs
NVIDIA vGPU is available as a licensed product on supported NVIDIA GPUs. For a list of recommended server platforms and supported GPUs, consult the release notes for supported hypervisors at NVIDIA AI Enterprise Documentation.
A.1. NVIDIA A100 PCIe 40GB Virtual GPU Types
Physical GPUs per board: 1
MIG-Backed C-Series Virtual GPU Types for NVIDIA A100 PCIe 40GB
Required license edition: vCS or vWS
For details of GPU instance profiles, see NVIDIA Multi-Instance GPU User Guide.
| Virtual GPU Type | Intended Use Case | Frame Buffer (MB) | Maximum vGPUs per GPU | Slices per vGPU | Compute Instances per vGPU | Corresponding GPU Instance Profile |
|---|---|---|---|---|---|---|
| A100-7-40C | Training Workloads | 40960 | 1 | 7 | 7 | MIG 7g.40gb |
| A100-4-20C | Training Workloads | 20480 | 1 | 4 | 4 | MIG 4g.20gb |
| A100-3-20C | Training Workloads | 20480 | 2 | 3 | 3 | MIG 3g.20gb |
| A100-2-10C | Training Workloads | 10240 | 3 | 2 | 2 | MIG 2g.10gb |
| A100-1-5C | Inference Workloads | 5120 | 7 | 1 | 1 | MIG 1g.5gb |
| A100-1-5CME | Inference Workloads | 5120 | 1 | 1 | 1 | MIG 1g.5gb+me |
Time-Sliced C-Series Virtual GPU Types for NVIDIA A100 PCIe 40GB
Required license edition: vCS or vWS
These vGPU types support a single display with a fixed maximum resolution.
| Virtual GPU Type | Intended Use Case | Frame Buffer (MB) | Maximum vGPUs per GPU | Maximum vGPUs per Board | Maximum Display Resolution | Virtual Displays per vGPU |
|---|---|---|---|---|---|---|
| A100-40C | Training Workloads | 40960 | 1 | 1 | 4096×21601 | 1 |
| A100-20C | Training Workloads | 20480 | 2 | 2 | 4096×21601 | 1 |
| A100-10C | Training Workloads | 10240 | 4 | 4 | 4096×21601 | 1 |
| A100-8C | Training Workloads | 8192 | 5 | 5 | 4096×21601 | 1 |
| A100-5C | Inference Workloads | 5120 | 8 | 8 | 4096×21601 | 1 |
| A100-4C | Inference Workloads | 4096 | 10 | 10 | 4096×21601 | 1 |
A.2. NVIDIA A100 HGX 40GB Virtual GPU Types
Physical GPUs per board: 1
MIG-Backed C-Series Virtual GPU Types for NVIDIA A100 HGX 40GB
Required license edition: vCS or vWS
For details of GPU instance profiles, see NVIDIA Multi-Instance GPU User Guide.
| Virtual GPU Type | Intended Use Case | Frame Buffer (MB) | Maximum vGPUs per GPU | Slices per vGPU | Compute Instances per vGPU | Corresponding GPU Instance Profile |
|---|---|---|---|---|---|---|
| A100X-7-40C | Training Workloads | 40960 | 1 | 7 | 7 | MIG 7g.40gb |
| A100X-4-20C | Training Workloads | 20480 | 1 | 4 | 4 | MIG 4g.20gb |
| A100X-3-20C | Training Workloads | 20480 | 2 | 3 | 3 | MIG 3g.20gb |
| A100X-2-10C | Training Workloads | 10240 | 3 | 2 | 2 | MIG 2g.10gb |
| A100X-1-5C | Inference Workloads | 5120 | 7 | 1 | 1 | MIG 1g.5gb |
| A100X-1-5CME | Inference Workloads | 5120 | 1 | 1 | 1 | MIG 1g.5gb+me |
Time-Sliced C-Series Virtual GPU Types for NVIDIA A100 HGX 40GB
Required license edition: vCS or vWS
These vGPU types support a single display with a fixed maximum resolution.
| Virtual GPU Type | Intended Use Case | Frame Buffer (MB) | Maximum vGPUs per GPU | Maximum vGPUs per Board | Maximum Display Resolution | Virtual Displays per vGPU |
|---|---|---|---|---|---|---|
| A100X-40C | Training Workloads | 40960 | 1 | 1 | 4096×21601 | 1 |
| A100X-20C | Training Workloads | 20480 | 2 | 2 | 4096×21601 | 1 |
| A100X-10C | Training Workloads | 10240 | 4 | 4 | 4096×21601 | 1 |
| A100X-8C | Training Workloads | 8192 | 5 | 5 | 4096×21601 | 1 |
| A100X-5C | Inference Workloads | 5120 | 8 | 8 | 4096×21601 | 1 |
| A100X-4C | Inference Workloads | 4096 | 10 | 10 | 4096×21601 | 1 |
A.3. NVIDIA A100 PCIe 80GB Virtual GPU Types
Physical GPUs per board: 1
MIG-Backed C-Series Virtual GPU Types for NVIDIA A100 PCIe 80GB
Required license edition: vCS or vWS
For details of GPU instance profiles, see NVIDIA Multi-Instance GPU User Guide.
| Virtual GPU Type | Intended Use Case | Frame Buffer (MB) | Maximum vGPUs per GPU | Slices per vGPU | Compute Instances per vGPU | Corresponding GPU Instance Profile |
|---|---|---|---|---|---|---|
| A100D-7-80C | Training Workloads | 81920 | 1 | 7 | 7 | MIG 7g.80gb |
| A100D-4-40C | Training Workloads | 40960 | 1 | 4 | 4 | MIG 4g.40gb |
| A100D-3-40C | Training Workloads | 40960 | 2 | 3 | 3 | MIG 3g.40gb |
| A100D-2-20C | Training Workloads | 20480 | 3 | 2 | 2 | MIG 2g.20gb |
| A100D-1-10C | Training Workloads | 10240 | 7 | 1 | 1 | MIG 1g.10gb |
| A100D-1-10CME | Training Workloads | 10240 | 1 | 1 | 1 | MIG 1g.10gb+me |
Time-Sliced C-Series Virtual GPU Types for NVIDIA A100 PCIe 80GB
Required license edition: vCS or vWS
These vGPU types support a single display with a fixed maximum resolution.
| Virtual GPU Type | Intended Use Case | Frame Buffer (MB) | Maximum vGPUs per GPU | Maximum vGPUs per Board | Maximum Display Resolution | Virtual Displays per vGPU |
|---|---|---|---|---|---|---|
| A100D-80C | Training Workloads | 81920 | 1 | 1 | 4096×21601 | 1 |
| A100D-40C | Training Workloads | 40960 | 2 | 2 | 4096×21601 | 1 |
| A100D-20C | Training Workloads | 20480 | 4 | 4 | 4096×21601 | 1 |
| A100D-16C | Inference Workloads | 16384 | 5 | 5 | 4096×21601 | 1 |
| A100D-10C | Training Workloads | 10240 | 8 | 8 | 4096×21601 | 1 |
| A100D-8C | Training Workloads | 8192 | 10 | 10 | 4096×21601 | 1 |
| A100D-4C | Inference Workloads | 4096 | 20 | 20 | 4096×21601 | 1 |
A.4. NVIDIA A100 HGX 80GB Virtual GPU Types
Physical GPUs per board: 1
MIG-Backed C-Series Virtual GPU Types for NVIDIA A100 HGX 80GB
Required license edition: vCS or vWS
For details of GPU instance profiles, see NVIDIA Multi-Instance GPU User Guide.
| Virtual GPU Type | Intended Use Case | Frame Buffer (MB) | Maximum vGPUs per GPU | Slices per vGPU | Compute Instances per vGPU | Corresponding GPU Instance Profile |
|---|---|---|---|---|---|---|
| A100DX-7-80C | Training Workloads | 81920 | 1 | 7 | 7 | MIG 7g.80gb |
| A100DX-4-40C | Training Workloads | 40960 | 1 | 4 | 4 | MIG 4g.40gb |
| A100DX-3-40C | Training Workloads | 40960 | 2 | 3 | 3 | MIG 3g.40gb |
| A100DX-2-20C | Training Workloads | 20480 | 3 | 2 | 2 | MIG 2g.20gb |
| A100DX-1-10C | Training Workloads | 10240 | 7 | 1 | 1 | MIG 1g.10gb |
| A100DX-1-10CME | Training Workloads | 10240 | 1 | 1 | 1 | MIG 1g.10gb+me |
Time-Sliced C-Series Virtual GPU Types for NVIDIA A100 HGX 80GB
Required license edition: vCS or vWS
These vGPU types support a single display with a fixed maximum resolution.
| Virtual GPU Type | Intended Use Case | Frame Buffer (MB) | Maximum vGPUs per GPU | Maximum vGPUs per Board | Maximum Display Resolution | Virtual Displays per vGPU |
|---|---|---|---|---|---|---|
| A100DX-80C | Training Workloads | 81920 | 1 | 1 | 4096×21601 | 1 |
| A100DX-40C | Training Workloads | 40960 | 2 | 2 | 4096×21601 | 1 |
| A100DX-20C | Training Workloads | 20480 | 4 | 4 | 4096×21601 | 1 |
| A100DX-16C | Inference Workloads | 16384 | 5 | 5 | 4096×21601 | 1 |
| A100DX-10C | Training Workloads | 10240 | 8 | 8 | 4096×21601 | 1 |
| A100DX-8C | Training Workloads | 8192 | 10 | 10 | 4096×21601 | 1 |
| A100DX-4C | Inference Workloads | 4096 | 20 | 20 | 4096×21601 | 1 |
A.5. NVIDIA A40 Virtual GPU Types
C-Series Virtual GPU Types for NVIDIA A40
Required license edition: vCS or vWS
These vGPU types support a single display with a fixed maximum resolution.
| Virtual GPU Type | Intended Use Case | Frame Buffer (MB) | Maximum vGPUs per GPU | Maximum vGPUs per Board | Maximum Display Resolution | Virtual Displays per vGPU |
|---|---|---|---|---|---|---|
| A40-48C | Training Workloads | 49152 | 1 | 1 | 4096×21601 | 1 |
| A40-24C | Training Workloads | 24576 | 2 | 2 | 4096×21601 | 1 |
| A40-16C | Training Workloads | 16384 | 3 | 3 | 4096×21601 | 1 |
| A40-12C | Training Workloads | 12288 | 4 | 4 | 4096×21601 | 1 |
| A40-8C | Training Workloads | 8192 | 6 | 6 | 4096×21601 | 1 |
| A40-6C | Training Workloads | 6144 | 8 | 8 | 4096×21601 | 1 |
| A40-4C | Inference Workloads | 4096 | 122 | 12 | 4096×21601 | 1 |
A.6. NVIDIA A30 Virtual GPU Types
Physical GPUs per board: 1
MIG-Backed C-Series Virtual GPU Types for NVIDIA A30
Required license edition: vCS or vWS
For details of GPU instance profiles, see NVIDIA Multi-Instance GPU User Guide.
| Virtual GPU Type | Intended Use Case | Frame Buffer (MB) | Maximum vGPUs per GPU | Slices per vGPU | Compute Instances per vGPU | Corresponding GPU Instance Profile |
|---|---|---|---|---|---|---|
| A30-4-24C | Training Workloads | 24576 | 1 | 4 | 4 | MIG 4g.24gb |
| A30-2-12C | Training Workloads | 12288 | 2 | 2 | 2 | MIG 2g.12gb |
| A30-1-6C | Inference Workloads | 6144 | 4 | 1 | 1 | MIG 1g.6gb |
| A30-1-6CME | Inference Workloads | 6144 | 1 | 1 | 1 | MIG 1g.6gb+me |
Time-Sliced C-Series Virtual GPU Types for NVIDIA A30
Required license edition: vCS or vWS
These vGPU types support a single display with a fixed maximum resolution.
| Virtual GPU Type | Intended Use Case | Frame Buffer (MB) | Maximum vGPUs per GPU | Maximum vGPUs per Board | Maximum Display Resolution | Virtual Displays per vGPU |
|---|---|---|---|---|---|---|
| A30-24C | Training Workloads | 24576 | 1 | 1 | 4096×21601 | 1 |
| A30-12C | Training Workloads | 12288 | 2 | 2 | 4096×21601 | 1 |
| A30-8C | Training Workloads | 8192 | 3 | 3 | 4096×21601 | 1 |
| A30-6C | Inference Workloads | 6144 | 4 | 4 | 4096×21601 | 1 |
| A30-4C | Inference Workloads | 4096 | 6 | 6 | 4096×21601 | 1 |
A.7. NVIDIA A16 Virtual GPU Types
C-Series Virtual GPU Types for NVIDIA A16
Required license edition: vCS or vWS
These vGPU types support a single display with a fixed maximum resolution.
A.8. NVIDIA A10 Virtual GPU Types
C-Series Virtual GPU Types for NVIDIA A10
Required license edition: vCS or vWS
These vGPU types support a single display with a fixed maximum resolution.
| Virtual GPU Type | Intended Use Case | Frame Buffer (MB) | Maximum vGPUs per GPU | Maximum vGPUs per Board | Maximum Display Resolution | Virtual Displays per vGPU |
|---|---|---|---|---|---|---|
| A10-24C | Training Workloads | 24576 | 1 | 1 | 4096×21601 | 1 |
| A10-12C | Training Workloads | 12288 | 2 | 2 | 4096×21601 | 1 |
| A10-8C | Training Workloads | 8192 | 3 | 3 | 4096×21601 | 1 |
| A10-6C | Training Workloads | 6144 | 4 | 4 | 4096×21601 | 1 |
| A10-4C | Inference Workloads | 4096 | 6 | 6 | 4096×21601 | 1 |
A.9. NVIDIA RTX A6000 Virtual GPU Types
C-Series Virtual GPU Types for NVIDIA RTX A6000
Required license edition: vCS or vWS
These vGPU types support a single display with a fixed maximum resolution.
| Virtual GPU Type | Intended Use Case | Frame Buffer (MB) | Maximum vGPUs per GPU | Maximum vGPUs per Board | Maximum Display Resolution | Virtual Displays per vGPU |
|---|---|---|---|---|---|---|
| RTXA6000-48C | Training Workloads | 49152 | 1 | 1 | 4096×21601 | 1 |
| RTXA6000-24C | Training Workloads | 24576 | 2 | 2 | 4096×21601 | 1 |
| RTXA6000-16C | Training Workloads | 16384 | 3 | 3 | 4096×21601 | 1 |
| RTXA6000-12C | Training Workloads | 12288 | 4 | 4 | 4096×21601 | 1 |
| RTXA6000-8C | Training Workloads | 8192 | 6 | 6 | 4096×21601 | 1 |
| RTXA6000-6C | Training Workloads | 6144 | 8 | 8 | 4096×21601 | 1 |
| RTXA6000-4C | Inference Workloads | 4096 | 122 | 12 | 4096×21601 | 1 |
A.10. NVIDIA RTX A5000 Virtual GPU Types
C-Series Virtual GPU Types for NVIDIA RTX A5000
Required license edition: vCS or vWS
These vGPU types support a single display with a fixed maximum resolution.
| Virtual GPU Type | Intended Use Case | Frame Buffer (MB) | Maximum vGPUs per GPU | Maximum vGPUs per Board | Maximum Display Resolution | Virtual Displays per vGPU |
|---|---|---|---|---|---|---|
| RTXA5000-24C | Training Workloads | 24576 | 1 | 1 | 4096×21601 | 1 |
| RTXA5000-12C | Training Workloads | 12288 | 2 | 2 | 4096×21601 | 1 |
| RTXA5000-8C | Training Workloads | 8192 | 3 | 3 | 4096×21601 | 1 |
| RTXA5000-6C | Training Workloads | 6144 | 4 | 4 | 4096×21601 | 1 |
| RTXA5000-4C | Inference Workloads | 4096 | 6 | 6 | 4096×21601 | 1 |
A.11. Tesla T4 Virtual GPU Types
C-Series Virtual GPU Types for Tesla T4
Required license edition: vCS or vWS
These vGPU types support a single display with a fixed maximum resolution.
Notices
Notice
This document is provided for information purposes only and shall not be regarded as a warranty of a certain functionality, condition, or quality of a product. NVIDIA Corporation (“NVIDIA”) makes no representations or warranties, expressed or implied, as to the accuracy or completeness of the information contained in this document and assumes no responsibility for any errors contained herein. NVIDIA shall have no liability for the consequences or use of such information or for any infringement of patents or other rights of third parties that may result from its use. This document is not a commitment to develop, release, or deliver any Material (defined below), code, or functionality.
NVIDIA reserves the right to make corrections, modifications, enhancements, improvements, and any other changes to this document, at any time without notice.
Customer should obtain the latest relevant information before placing orders and should verify that such information is current and complete.
NVIDIA products are sold subject to the NVIDIA standard terms and conditions of sale supplied at the time of order acknowledgement, unless otherwise agreed in an individual sales agreement signed by authorized representatives of NVIDIA and customer (“Terms of Sale”). NVIDIA hereby expressly objects to applying any customer general terms and conditions with regards to the purchase of the NVIDIA product referenced in this document. No contractual obligations are formed either directly or indirectly by this document.
NVIDIA products are not designed, authorized, or warranted to be suitable for use in medical, military, aircraft, space, or life support equipment, nor in applications where failure or malfunction of the NVIDIA product can reasonably be expected to result in personal injury, death, or property or environmental damage. NVIDIA accepts no liability for inclusion and/or use of NVIDIA products in such equipment or applications and therefore such inclusion and/or use is at customer’s own risk.
NVIDIA makes no representation or warranty that products based on this document will be suitable for any specified use. Testing of all parameters of each product is not necessarily performed by NVIDIA. It is customer’s sole responsibility to evaluate and determine the applicability of any information contained in this document, ensure the product is suitable and fit for the application planned by customer, and perform the necessary testing for the application in order to avoid a default of the application or the product. Weaknesses in customer’s product designs may affect the quality and reliability of the NVIDIA product and may result in additional or different conditions and/or requirements beyond those contained in this document. NVIDIA accepts no liability related to any default, damage, costs, or problem which may be based on or attributable to: (i) the use of the NVIDIA product in any manner that is contrary to this document or (ii) customer product designs.
No license, either expressed or implied, is granted under any NVIDIA patent right, copyright, or other NVIDIA intellectual property right under this document. Information published by NVIDIA regarding third-party products or services does not constitute a license from NVIDIA to use such products or services or a warranty or endorsement thereof. Use of such information may require a license from a third party under the patents or other intellectual property rights of the third party, or a license from NVIDIA under the patents or other intellectual property rights of NVIDIA.
Reproduction of information in this document is permissible only if approved in advance by NVIDIA in writing, reproduced without alteration and in full compliance with all applicable export laws and regulations, and accompanied by all associated conditions, limitations, and notices.
THIS DOCUMENT AND ALL NVIDIA DESIGN SPECIFICATIONS, REFERENCE BOARDS, FILES, DRAWINGS, DIAGNOSTICS, LISTS, AND OTHER DOCUMENTS (TOGETHER AND SEPARATELY, “MATERIALS”) ARE BEING PROVIDED “AS IS.” NVIDIA MAKES NO WARRANTIES, EXPRESSED, IMPLIED, STATUTORY, OR OTHERWISE WITH RESPECT TO THE MATERIALS, AND EXPRESSLY DISCLAIMS ALL IMPLIED WARRANTIES OF NONINFRINGEMENT, MERCHANTABILITY, AND FITNESS FOR A PARTICULAR PURPOSE. TO THE EXTENT NOT PROHIBITED BY LAW, IN NO EVENT WILL NVIDIA BE LIABLE FOR ANY DAMAGES, INCLUDING WITHOUT LIMITATION ANY DIRECT, INDIRECT, SPECIAL, INCIDENTAL, PUNITIVE, OR CONSEQUENTIAL DAMAGES, HOWEVER CAUSED AND REGARDLESS OF THE THEORY OF LIABILITY, ARISING OUT OF ANY USE OF THIS DOCUMENT, EVEN IF NVIDIA HAS BEEN ADVISED OF THE POSSIBILITY OF SUCH DAMAGES. Notwithstanding any damages that customer might incur for any reason whatsoever, NVIDIA’s aggregate and cumulative liability towards customer for the products described herein shall be limited in accordance with the Terms of Sale for the product.
VESA DisplayPort
DisplayPort and DisplayPort Compliance Logo, DisplayPort Compliance Logo for Dual-mode Sources, and DisplayPort Compliance Logo for Active Cables are trademarks owned by the Video Electronics Standards Association in the United States and other countries.
HDMI
HDMI, the HDMI logo, and High-Definition Multimedia Interface are trademarks or registered trademarks of HDMI Licensing LLC.
Trademarks
NVIDIA, the NVIDIA logo, NVIDIA Maxwell, NVIDIA Pascal, NVIDIA Turing, NVIDIA Volta, Quadro, and Tesla are trademarks or registered trademarks of NVIDIA Corporation in the U.S. and other countries. Other company and product names may be trademarks of the respective companies with which they are associated.