Advanced GPU configuration (Optional)#
GPU Partitioning#
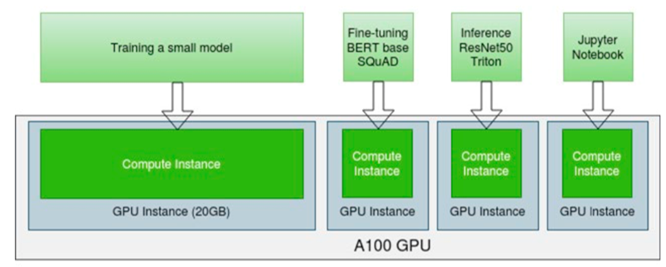
Compute workloads can benefit from using separate GPU partitions. The flexibility of GPU partitioning allows a single GPU to be shared and used by small, medium, and large-sized workloads. GPU partitions can be a valid option for executing Deep Learning workloads. An example is Deep Learning training and inferencing workflows, which utilize smaller datasets but are highly dependent on the size of the data/model, and users may need to decrease batch sizes.
The following graphic illustrates a GPU partitioning use case where multi-tenant, multiple users are sharing a single A100 (40GB). In this use case, a single A100 can be used for multiple workloads such as Deep Learning training, fine-tuning, inference, Jupiter Notebook, debugging, etc.
Using two different NVIDIA GPU technologies, GPUs are partitioned using either NVIDIA AI Enterprise software temporal partitioning or Multi-Instance GPU (MIG) spatial partitioning. Please refer to the GPU Partitioning technical brief to understand the differences.
NVIDIA AI Enterprise Software Partitioning#
Using NVIDIA AI Enterprise software partitioning, profiles assign custom amounts of dedicated GPU memory to virtual machines. NVIDIA AI Enterprise Host Software sets the correct amount of memory to meet the specific needs within the workflow for said VM. Every virtual machine has dedicated GPU memory and must be assigned accordingly, ensuring that it has the resources needed to handle the expected compute load.
NVIDIA AI Enterprise Host Software allows up to eight virtual machines to share each physical GPU by assigning the graphics resources of the available GPUs to virtual machines using a balanced approach. Depending on the number of GPUs within each line card, there can be multiple VM types assigned.
Profiles for NVIDIA AI Enterprise#
The profiles represent a very flexible deployment option of virtual GPUs, varying in size of GPU memory. The division of GPU memory defines the number of vGPUs that are possible per GPU.
C-series vGPU types are optimized for compute-intensive workloads. As a result, they support only a single display head at a maximum resolution of 4096×2160 and do not provide NVIDIA RTX graphics acceleration.
It is essential to consider which vGPU profile will be used within a deployment since this will ultimately determine how many vGPU backed VMs can be deployed.
Added in version 3.0.
VMware vShpere 8.0 introduced the ability to attach up to 8 vGPUs and 32 Pass-Through devices. Additionally, multiple heterogeneous full or fractional profiles can be attached to a single VM. Example from inside a VM.
nvidia@nvidia-demo:~$ nvidia-smi
Wed Nov 23 15:38:07 2022

+-----------------------------------------------------------------------------+
| NVIDIA-SMI 525.60       Driver Version: 525.60       CUDA Version: 12.0     |
|-------------------------------+----------------------+----------------------+
| GPU  Name        Persistence-M| Bus-Id        Disp.A | Volatile Uncorr. ECC |
| Fan  Temp  Perf  Pwr:Usage/Cap|         Memory-Usage | GPU-Util  Compute M. |
|                               |                      |               MIG M. |
|===============================+======================+======================|
|   0  GRID T4-4C          On   | 00000000:02:01.0 Off |                    0 |
| N/A   N/A    P8    N/A /  N/A |      0MiB /  4096MiB |      0%      Default |
|                               |                      |             Disabled |
+-------------------------------+----------------------+----------------------+
|   1  GRID T4-8C          On   | 00000000:02:02.0 Off |                    0 |
| N/A   N/A    P8    N/A /  N/A |      0MiB /  8192MiB |      0%      Default |
|                               |                      |             Disabled |
+-------------------------------+----------------------+----------------------+
|   2  GRID T4-16C         On   | 00000000:02:05.0 Off |                    0 |
| N/A   N/A    P8    N/A /  N/A |      0MiB / 16384MiB |      0%      Default |
|                               |                      |             Disabled |
+-------------------------------+----------------------+----------------------+
|   3  GRID T4-4C          On   | 00000000:02:06.0 Off |                    0 |
| N/A   N/A    P8    N/A /  N/A |      0MiB /  4096MiB |      0%      Default |
|                               |                      |             Disabled |
+-------------------------------+----------------------+----------------------+
|   4  GRID T4-8C          On   | 00000000:02:07.0 Off |                    0 |
| N/A   N/A    P8    N/A /  N/A |      0MiB /  8192MiB |      0%      Default |
|                               |                      |             Disabled |
+-------------------------------+----------------------+----------------------+
|   5  GRID T4-16C         On   | 00000000:02:08.0 Off |                    0 |
| N/A   N/A    P8    N/A /  N/A |      0MiB / 16384MiB |      0%      Default |
|                               |                      |             Disabled |
+-------------------------------+----------------------+----------------------+
+-----------------------------------------------------------------------------+
| Processes:                                                                  |
|  GPU   GI   CI        PID   Type   Process name                  GPU Memory |
|        ID   ID                                                   Usage      |
|=============================================================================|
|  No running processes found                                                 |
+-----------------------------------------------------------------------------+
Note
VMware vSphere versions prior to 8.0 allow for the below configuration only. Multiple heterogenous vGPU profiles are not allow and only up to 4 vGPUs can be attached to a single VM.
Warning
In NVIDIA AI Enterprise versions 2.x and earlier, with vSphere 7.0U3c or earlier, all the shared GPU resource must be assigned the same fractionalized vGPU profile. This means you cannot mix vGPU profiles on a single GPU using NVIDIA AI Enterprise software.
In the image below, the right side illustrates valid configurations in green, where VMs share a single GPU resource (GPU 1) on a T4 GPU, and all VMs are assigned homogenous profiles, such as 8GB, 4GB, or 16GB C profiles. Since there are two GPUs installed in the server, the other T4 (GPU 0) can be partitioned/fractionalized differently than GPU 1. An invalid configuration is shown in red, where a single GPU is shared using 8C and 4C profiles. Heterogenous profiles are not supported on vGPU, and VMs will not successfully power on.

Scheduling Policies#
NVIDIA AI Enterprise provides three GPU scheduling options to accommodate a variety of QoS requirements of customers. However, since AI Enterprise workloads are typically long-running operations, it is recommended to implement the Fixed Share or Equal Share scheduler for optimal performance.
Fixed share scheduling always guarantees the same dedicated quality of service. The fixed share scheduling policies guarantee equal GPU performance across all vGPUs sharing the same physical GPU.
Equal share scheduling provides equal GPU resources to each running VM. As vGPUs are added or removed, the share of GPU processing cycles allocated changes accordingly, resulting in performance to increase when utilization is low, and decrease when utilization is high.
Best effort scheduling provides consistent performance at a higher scale and therefore reduces the TCO per user. The best effort scheduler leverages a round-robin scheduling algorithm that shares GPU resources based on actual demand, resulting in optimal utilization of resources. This results in consistent performance with optimized user density. The best effort scheduling policy best utilizes the GPU during idle and not fully utilized times, allowing for optimized density and a good QoS.
Additional information regarding GPU scheduling can be found here.
RmPVMRL Registry Key#
The RmPVMRL registry key sets the scheduling policy for NVIDIA vGPUs.
Note
You can change the vGPU scheduling policy only on GPUs based on the Pascal, Volta, Turing, and Ampere architectures.
Type
Dword
Contents
Value |
Meaning |
|---|---|
0x00 (default) |
Best effort scheduler |
0x01 |
Equal share scheduler with the default time slice length |
0x00TT0001 |
Equal share scheduler with a user-defined time slice length TT |
0x11 |
Fixed share scheduler with the default time slice length |
0x00TT0011 |
Fixed share scheduler with a user-defined time slice length TT |
Examples
The default time slice length depends on the maximum number of vGPUs per physical GPU allowed for the vGPU type.
Maximum Number of vGPUs |
Default Time Slice Length |
|---|---|
Less than or equal to 8 |
2 ms |
Greater than 8 |
1 ms |
TT
Two hexadecimal digits in the range 01 to 1E set the time slice length in milliseconds (ms) for the equal share and fixed share schedulers. The minimum length is 1 ms, and the maximum length is 30 ms.
If TT is 00, the length is set to the default length for the vGPU type.
If TT is greater than 1E, the length is set to 30 ms.
Examples
This example sets the vGPU scheduler to equal share scheduler with the default time slice length.
RmPVMRL=0x01
This example sets the vGPU scheduler to equal share scheduler with a time slice that is 3 ms long.
RmPVMRL=0x00030001
This example sets the vGPU scheduler to a fixed share scheduler with the default time slice length.
RmPVMRL=0x11
This example sets the vGPU scheduler to a fixed share scheduler with a time slice 24 (0x18) ms long.
RmPVMRL=0x00180011
Changing the vGPU Scheduling Policy for All GPUs#
Perform this task in your hypervisor command shell.
Open a command shell as the root user on your hypervisor host machine. On all supported hypervisors, you can use a secure shell (SSH) for this purpose. Set the RmPVMRL registry key to the value that sets the GPU scheduling policy needed.
In the VMware vSphere SSH CLI, use the
esxcli setcommand.# esxcli system module parameters set -m nvidia -p "NVreg_RegistryDwords=RmPVMRL=value"Note
Where <value> is the value that sets the vGPU scheduling policy you want, for example:
0x01 - Equal Share Scheduler with the default time slice length
0x00030001 - Equal Share Scheduler with a time slice of 3 ms
0x011 - Fixed Share Scheduler with the default time slice length
0x00180011 - Fixed Share Scheduler with a time slice of 24 ms (0x18)
The default time slice length depends on the maximum number of vGPUs per physical GPU allowed for the vGPU type.
Maximum Number of vGPUs
Default Time Slice Length
Less than or equal to 8
2 ms
Greater than 8
1 ms
Reboot your hypervisor host machine.
Changing the vGPU Scheduling Policy for Select GPUs#
Perform this task in your hypervisor command shell:
Open a command shell as the root user on your hypervisor host machine. On all supported hypervisors, you can use a secure shell (SSH) for this purpose.
Use the
lspcicommand to obtain the PCI domain and bus/device/function (BDF) of each GPU for which you want to change the scheduling behavior.Pipe the output of
lspcito the grep command to display information only for NVIDIA GPUs.# lspci | grep NVIDIAThe NVIDIA GPUs listed in this example have the PCI domain 0000 and BDFs 85:00.0 and 86:00.0.
10000:85:00.0 VGA compatible controller: NVIDIA Corporation GM204GL [M60] (rev a1)
20000:86:00.0 VGA compatible controller: NVIDIA Corporation GM204GL [M60] (rev a1)
Use the module parameter
NVreg_RegistryDwordsPerDeviceto set the pci and RmPVMRL registry keys for each GPU.Use the
esxcli setcommand:# esxcli system module parameters set -m nvidia -p "NVreg_RegistryDwordsPerDevice=pci=pci-domain:pci-bdf;RmPVMRL=value [;pci=pci-domain:pci-bdf;RmPVMRL=value...]"For each GPU, provide the following information:
pci-domain
The PCI domain of the GPU.
pci-bdf
The PCI device BDF of the GPU.
value
0x00 - Sets the vGPU scheduling policy to Equal Share Scheduler with the default time slice length.
0x00030001 - Sets the vGPU scheduling policy to Equal Share Scheduler with a time slice that is 3ms long.
0x011 - Sets the vGPU scheduling policy to Fixed Share Scheduler with the default time slice length.
0x00180011 - Sets the vGPU scheduling policy to Fixed Share Scheduler with a time slice of 24 ms (0x18) long.
For all supported values, see RmPVMRL Registry Key.
Reboot your hypervisor host machine.
Restoring Default vGPU Scheduler Settings#
Perform this task in your hypervisor command shell.
Open a command shell as the root user on your hypervisor host machine. On all supported hypervisors, you can use a secure shell (SSH) for this purpose.
Unset the
RmPVMRLregistry key by setting the module parameter to an empty string.# esxcli system module parameters set -m nvidia -p "module-parameter="module-parameter
The module parameter to set, which depends on whether the scheduling behavior was changed for all GPUs or select GPUs:
For all GPUs, set the
NVreg_RegistryDwordsmodule parameter.For select GPUs, set the
NVreg_RegistryDwordsPerDevicemodule parameter.
For example, to restore default vGPU scheduler settings after they were changed for all GPUs, enter this command:
# esxcli system module parameters set -m nvidia -p "NVreg_RegistryDwords="Reboot your hypervisor host machine.
NVIDIA Multi-Instance GPU Configuration for vSphere#
The NVIDIA A100 Tensor Core GPU is based upon the NVIDIA Ampere architecture and accelerates compute workloads such as AI, data analytics, and HPC in the data center. MIG support on vGPUs began at the NVIDIA AI Enterprise Software 12 release, and gives users the flexibility to use the NVIDIA A100 in MIG mode or non-MIG mode. When the NVIDIA A100 is in non-MIG mode, NVIDIA vGPU software uses temporal partitioning and GPU time slice scheduling. MIG mode spatially partitions GPU hardware so that each MIG can be fully isolated with its streaming multiprocessors (SMs), high bandwidth, and memory. MIG can partition available GPU compute resources as well.
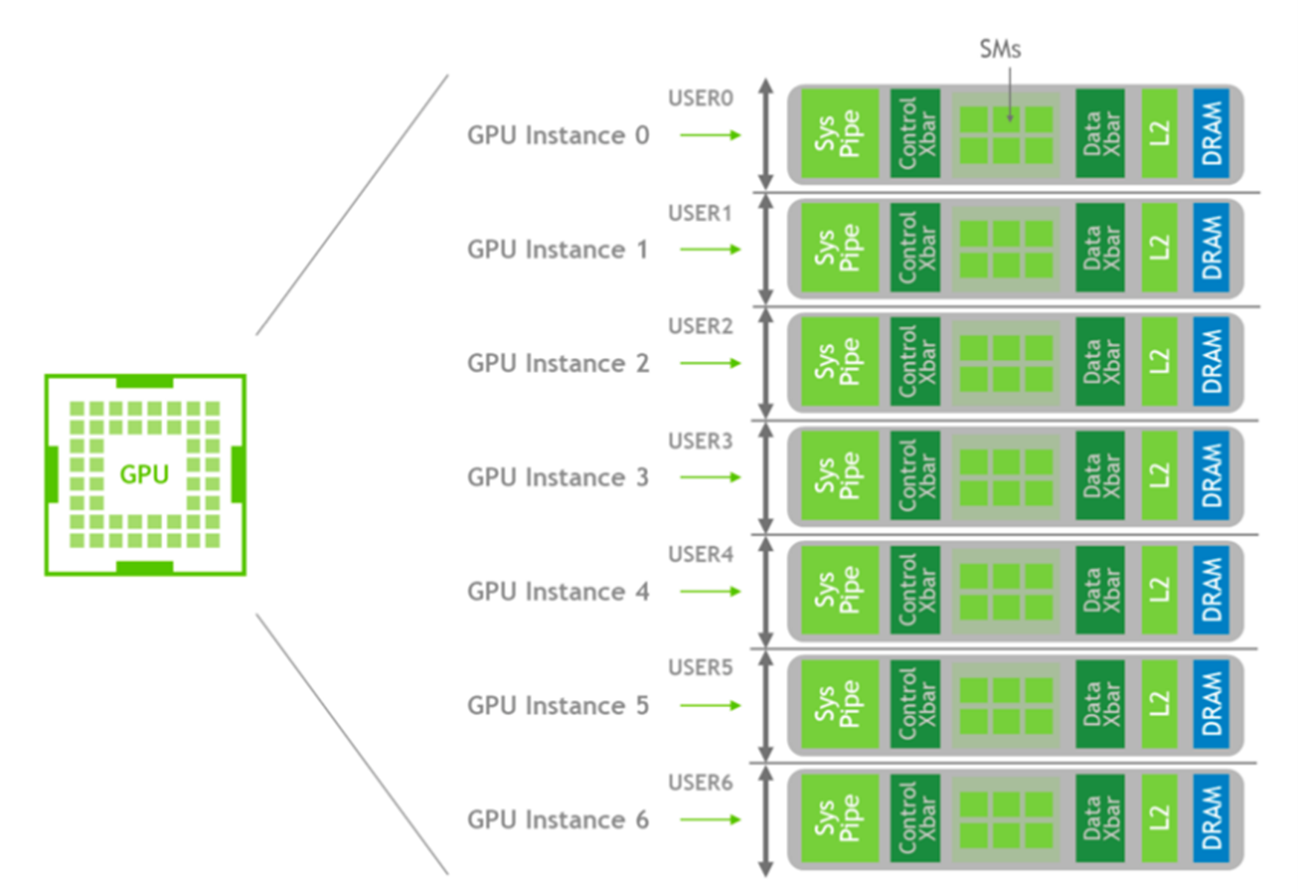
Each instance’s processors have separate and isolated paths through the entire memory system. The on-chip crossbar ports, L2 cache banks, memory controllers, and DRAM address buses are assigned uniquely to an individual instance. This ensures that a particular user’s workload can run with predictable throughput and latency, using the same L2 cache allocation and DRAM bandwidth, even if other tasks thrash their caches or saturate their DRAM interfaces.
A single NVIDIA A100-40GB has eight usable GPU memory slices, each with 5 GB of memory but only seven usable SM slices. There are seven SM slices, not eight, because some SMs cover operational overhead when MIG mode is enabled. MIG mode is configured (or reconfigured) using nvidia-smi and has profiles that you can choose to meet the needs of HPC, deep learning, or accelerated computing workloads.
In summary, MIG spatially partitions the NVIDIA GPU into separate GPU instances but provides benefits of reduced latency over vGPU temporal partitioning for compute workloads. The following tables summarize similarities and differences between A100 MIG capabilities and NVIDIA AI Enterprise software while also highlighting the additional flexibility when combined.
NVIDIA A100 MIG-Enabled (40GB) Virtual GPU Types |
NVIDIA A100 with MIG-Disabled (40GB)Virtual GPU Types |
|
|---|---|---|
GPU Partitioning |
Spatial (hardware) |
Temporal (software) |
Number of Partitions |
7 |
10 |
Compute Resources |
Dedicated |
Shared |
Compute Instance Partitioning |
Yes |
No |
Address Space Isolation |
Yes |
Yes |
Fault Tolerance |
Yes (highest quality) |
Yes |
Low Latency Response |
Yes (highest quality) |
Yes |
NVLink Support |
No |
Yes |
Multi-Tenant |
Yes |
Yes |
GPUDirect RDMA |
Yes (GPU instances) |
Yes |
Heterogeneous Profiles |
Yes |
No |
Management - Requires Super User |
Yes |
No |
One of the features introduced to vGPUs when VMs are using MIG-backed virtual GPUs is the ability to have differently sized (heterogeneous) partitioned GPU instances. The following table illustrates the 18 possible size combinations when NVIDIA A100 has MIG mode enabled.
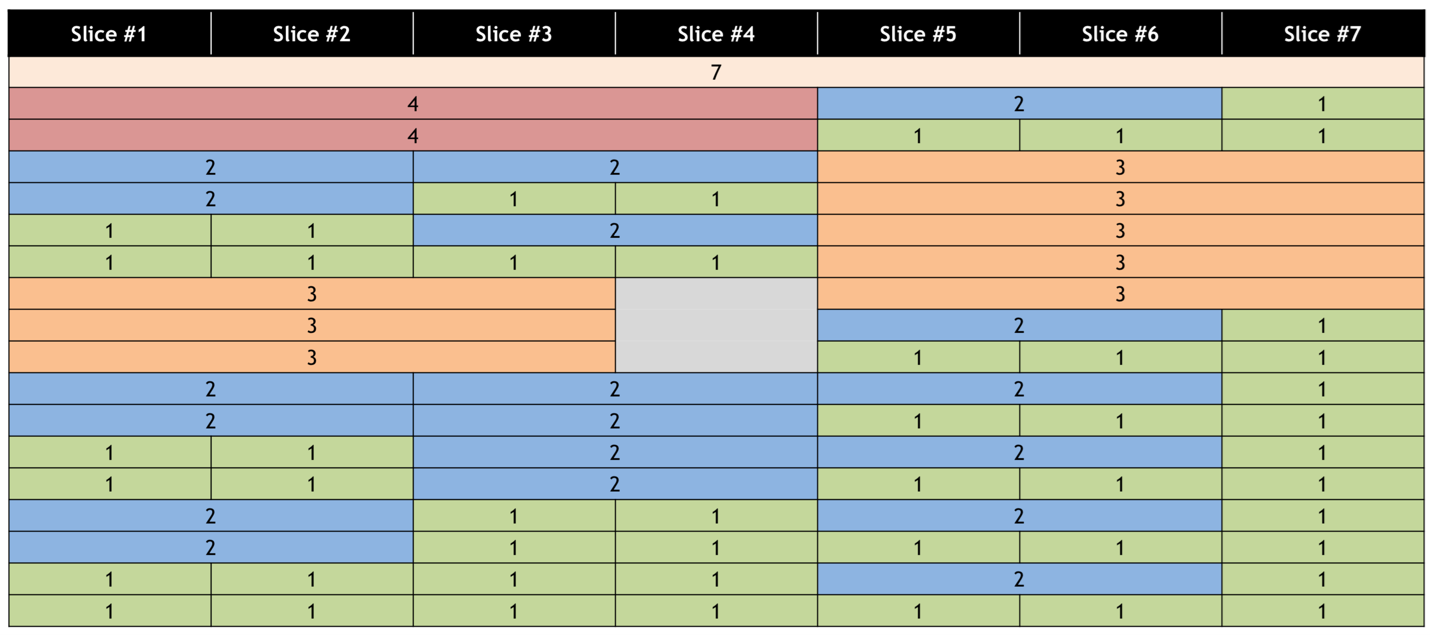
Note
When using vCS and MIG mode is enabled, the NVIDIA AI Enterprise software recognizes the MIG-backed vGPU resource as if it were a 1:1 or full GPU profile.
NVIDIA AI Enterprise software supports MIG only with Linux guest operating systems. To support GPU instances with NVIDIA vGPU, a GPU must be configured with MIG mode enabled. For more information, see Configuring a GPU for MIG-Backed vGPUs in the Virtual GPU Software Documentation. For general information about the MIG feature, see NVIDIA Multi-Instance GPU User Guide.
Terminology#
GPU Context#
A GPU context is analogous to a CPU process. It encapsulates all of the resources necessary to execute operations on the GPU, including distinct address space, memory allocations, etc. In addition, a GPU context has the following properties:
Fault isolation
Individual scheduling
Distinct address space
GPU Engine#
A GPU engine executes work on the GPU. The most commonly used engine is the Compute/Graphics engine, which executes the compute instructions. Other engines include the copy engine (CE), responsible for performing DMAs, NVDEC for video decoding, etc. Each engine can be scheduled independently and can execute work for different GPU contexts.
GPU Memory Slice#
A GPU memory slice is the smallest fraction of the A100 GPUs memory, including the corresponding memory controllers and cache. A GPU memory slice is roughly one-eighth of the total GPU memory resources, including capacity and bandwidth.
GPU SM Slice#
A GPU SM slice is the smallest fraction of the SMs on the A100 GPU. A GPU SM slice is roughly one-seventh of the total number of SMs available in the GPU when configured in MIG mode.
GPU Slice#
A GPU slice is the smallest fraction of the A100 GPU that combines a single GPU memory slice and a single GPU SM slice.
GPU Instance#
A GPU instance (GI) is a combination of GPU slices and GPU engines (DMAs, NVDECs, etc.). Anything within a GPU instance always shares all the GPU memory slices and other GPU engines, but its SM slices can be further subdivided into compute instances (CIs). A GPU instance provides memory QoS. Each GPU slice includes dedicated GPU memory resources that limit both the available capacity and bandwidth and provide memory QoS. Thus, each GPU memory slice gets one-eighth of the total GPU memory resources, and each GPU SM slice gets one-seventh of the total number of SMs.
Compute Instance#
A GPU instance can be subdivided into multiple compute instances. A compute instance (CI) contains a subset of the parent GPU instance’s SM slices and other GPU engines (DMAs, NVDECs, etc.). The CIs share memory and engines.
The number of slices that a GI (GPU Instance) can be created with is not arbitrary. The NVIDIA driver APIs provide several “GPU Instance Profiles,” and users can create GIs by specifying one of these profiles.
Multiple GIs can be created from a mix and match of these profiles on a given GPU, so long as enough slices are available to satisfy the request.
Profile Name |
Fraction of Memory |
Fraction of SMs |
Hardware Units |
Number of Instances Available |
|---|---|---|---|---|
MIG 1g.5gb |
1/8 |
1/7 |
0 NVDECs |
7 |
MIG 2g.10gb |
2/8 |
2/7 |
1 NVDECs |
3 |
MIG 3g.20gb |
4/8 |
3/7 |
2 NVDECs |
2 |
MIG 4g.20gb |
4/8 |
4/7 |
2 NVDECs |
1 |
MIG 7g.40gb |
Full |
7/7 |
5 NVDECs |
1 |
MIG Prerequisites#
The following prerequisites apply when using A100 in MIG mode.
Supported only on NVIDIA A100 products and associated systems using A100 (See the NVIDIA-Certified Systems.)
Requires CUDA 11 and NVIDIA AI Enterprise driver 450.73 or greater
Requires CUDA 11 supported Linux operating system distribution
VMware vSphere 7 Update 2
SR-IOV is enabled in BIOS Settings
MIG can is managed programmatically using NVIDIA Management Library (NVML) APIs or its command-line interface, nvidia-smi. Note that some of the nvidia-smi output in the following examples may be cropped to showcase the relevant sections of interest for brevity.
For more information on the MIG commands, see the nvidia-smi main page or enter the command.
nvidia-smi mig --help
Enable MIG Mode#
To support GPU instances with NVIDIA vGPU, a GPU must be configured with MIG mode enabled. In addition, GPU instances must be created and configured on the physical GPU before MIG Enablement and VM Configuration. Optionally, you can create compute instances within the GPU instances. If you do not create compute instances within the GPU instances, they can be added later for individual vGPUs from the guest VMs.
Ensure that the following prerequisites are met:
The NVIDIA AI Enterprise Host Software is installed on the hypervisor host.
General Prerequisites and MIG Prerequisites are met.
You have root user privileges on your hypervisor host machine.
The GPU is not configured for Passthrough in vCenter.
The GPU is not being used by any other processes, such as CUDA applications, monitoring applications, or the
nvidia-smicommand.
Open a command shell as the root user on your hypervisor host machine. You can use a secure shell (SSH) for this purpose.
Use the
nvidia-smicommand to determine whether MIG mode is enabled. By default, MIG mode is disabled. This example shows that MIG mode is disabled on GPU 0.1nvidia-smi -i 0 2+-----------------------------------------------------------------------------+ 3| NVIDIA-SMI 470.63 Driver Version: 470.63 CUDA Version: N/A | 4|-------------------------------+----------------------+----------------------+ 5| GPU Name Persistence-M| Bus-Id Disp.A | Volatile Uncorr. ECC | 6| Fan Temp Perf Pwr:Usage/Cap| Memory-Usage | GPU-Util Compute M. | 7| | | MIG M. | 8|===============================+======================+======================| 9| 0 A100-SXM4-40GB Off | 00000000:36:00.0 Off | 0 | 10| N/A 29C P0 62W / 400W | 0MiB / 40537MiB | 6% Default | 11| | | Disabled | 12+-------------------------------+----------------------+----------------------+
If MIG mode is disabled, enable it.
nvidia-smi -i [gpu-ids] -mig 1
gpu-ids
A comma-separated list of GPU indexes, PCI bus IDs, or UUIDs specifies the GPUs you want to enable MIG mode. If gpu-ids are omitted, MIG mode is enabled on all GPUs in the system.
This example enables MIG mode on GPU 0.
1nvidia-smi -i 0 -mig 1
2Enabled MIG Mode for GPU 00000000:36:00.0
3All done.
Note
If another process uses the GPU,
nvidia-smifails and displays a warning message that MIG mode for the GPU is in the pending enable state. In this situation, stop all processes that are using the GPU and retry the command.Next, reset the GPU.
nvidia-smi -i 0 –gpu-reset
Query the GPUs on which you enabled MIG mode to confirm that MIG mode is enabled.
This example queries GPU 0 for the PCI bus ID and MIG mode in comma-separated values (CSV) format.
1nvidia-smi -i 0 --query-gpu=pci.bus_id,mig.mode.current --format=csv
2pci.bus_id, mig.mode.current
300000000:36:00.0, Enabled
Note
VMware vSphere creates the GPU instances automatically when a VM is assigned.
VM Configuration with a GPU Instance#
To enable vGPU support and attach a GPU Instance for your virtual machine, you must edit the virtual machine settings.
Confirm that the VM is powered down.
Click the VM in the inventory window. Right-click the VM and select Edit Settings:

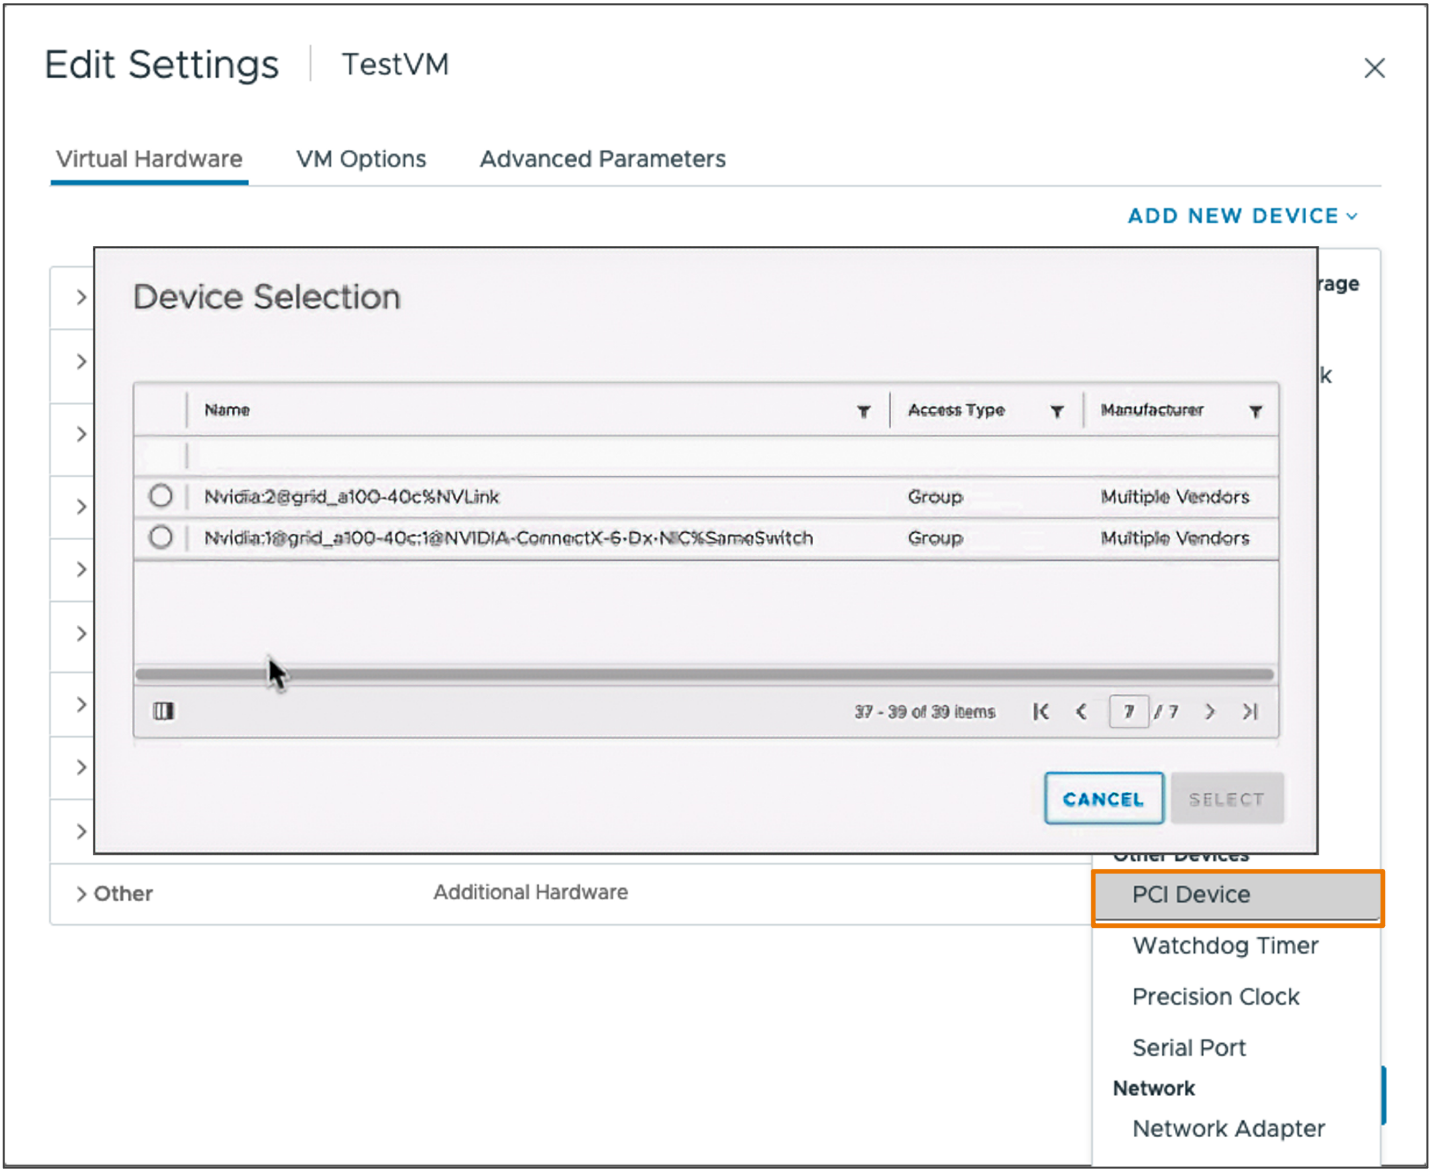
Click the Add New Device* button. Navigation displays a dropdown menu of device types. Select PCI Device:

Select PCI Device to continue. The new PCI device shows that an NVIDIA vGPU device has been added.

Expand the New PCI device, click the GPU Profile dropdown, and select the appropriate configuration.

Note
A standard compute profile consist of three components: grid_a100-40c. A MIG-specific vGPU profile has an extra digit that maps to the fraction section shown in the output of
nvidia-smi mig -lgip: **grid_a100-4-20c**.Click OK to complete the configuration.
Boot the VM with the MIG GPU Instance.
Important
nvidia-smidoes not support showing GPU utilization for MIG instances. However, it is supported with vGPU partitioning.
VM Configuration with a GPU Instance#
You can add the compute instances for an individual vGPU from within the guest VM. If you want to replace the compute instances created when the GPU was configured for MIG-backed vGPUs, you can delete them before adding the compute instances from within the guest VM. Ensure that the following prerequisites are met:
You have root user privileges on the guest VM.
The GPU instance is not being used by any other processes, such as CUDA applications, monitoring applications, or the
nvidia-smicommand.
List the compute instances that can be created in a guest VM command shell:
nvidia-smi mig -lcip

Create the compute instances that you need within each GPU instance.
nvidia-smi mig -cci -gi <gpu-instance-ids>
Where
<gpu-instance-ids>is a comma-separated list of GPU instance IDs that specifies the GPU instances within which you want to create the compute instances. For example, to create compute instance with profile #2 (3g.20gb).nvidia-smi mig -cci 2 -gi 0
If you want to create multiple compute instances and run apps in parallel, see the user guide for more complex scenarios.
Important
To avoid an inconsistent state between a guest VM and the hypervisor host, do not create compute instances from the hypervisor on a GPU instance on which an active guest VM is running. Instead, create the compute instances from within the guest VM as explained in NVIDIA vGPU Software: Modifying a MIG-Backed vGPUs Configuration.
Optional: Update Containers for a MIG-Enabled vGPU#
To run containers on a MIG-enabled vGPU, you need to update the nvidia-docker2 package. Follow the instructions here.
1curl -s -L https://nvidia.github.io/nvidia-docker/gpgkey | sudo apt-key add - \
2    && distribution=$(. /etc/os-release;echo $ID$VERSION_ID) \
3    && curl -s -L https://nvidia.github.io/nvidia-docker/$distribution/nvidia-docker.list | sudo tee /etc/apt/sources.list.d/nvidia-docker.list \
4    && sudo apt-get update
1sudo apt-get install -y nvidia-docker2 \
2    && sudo systemctl restart docker
To test the installation of the NVIDIA Container Toolkit on the VM, execute the command below:
sudo docker run –runtime=nvidia -e NVIDIA_VISIBLE_DEVICES=MIG-GPU-786035d5-1e85-11b2-9fec-ac9c9a792daf/0/0 nvidia/cuda nvidia-smi
Note
NVIDIA_VISIBLE_DEVICES supports two formats to specify MIG devices:
MIG-<GPU-UUID>/<GPU instance ID>/<compute instance ID>GPUDeviceIndex>:<MIGDeviceIndex>
Destroying GPU Instances#
When a VM is unassigned to a GPU instance, the instance should automatically be destroyed; however, it may be necessary to destroy the GPU instance using nvidia-smi manually.
The following example shows how the CIs and GIs created in the previous examples can be destroyed.
1sudo nvidia-smi mig -dci -ci 0,1,2 -gi 1
2Successfully destroyed compute instance ID  0 from GPU  0 GPU instance ID  1
3Successfully destroyed compute instance ID  1 from GPU  0 GPU instance ID  1
4Successfully destroyed compute instance ID  2 from GPU  0 GPU instance ID  1
It can be verified that the MIG devices have now been torn down.
 1nvidia-smi
 2+-----------------------------------------------------------------------------+
 3| MIG devices:                                                                |
 4+------------------+----------------------+-----------+-----------------------+
 5| GPU  GI  CI  MIG |         Memory-Usage |        Vol|         Shared        |
 6|      ID  ID  Dev |                      | SM     Unc| CE  ENC  DEC  OFA  JPG|
 7|                  |                      |        ECC|                       |
 8|==================+======================+===========+=======================|
 9|  No MIG devices found                                                       |
10+-----------------------------------------------------------------------------+
11
12+-----------------------------------------------------------------------------+
13| Processes:                                                                  |
14|  GPU   GI   CI        PID   Type   Process name                  GPU Memory |
15|        ID   ID                                                   Usage      |
16|=============================================================================|
17|  No running processes found                                                 |
18+-----------------------------------------------------------------------------+
GPU Aggregation for NVIDIA AI Enterprise#
NVIDIA AI Enterprise supports GPU Aggregation where a VM can access more than one GPU, which is required for specific compute-intensive workloads. NVIDIA AI Enterprise supports peer-to-peer computing. The following sections describe both technologies and how to deploy GPU aggregation within VMWare ESXi.
Peer-to-Peer NVIDIA NVLINK#
NVIDIA AI Enterprise supports peer-to-peer computing where multiple GPUs are connected through NVIDIA NVLink. This enables a high-speed, direct GPU-to-GPU interconnect that provides higher bandwidth for multi-GPU system configurations than traditional PCIe-based solutions. The following graphic illustrates peer-to-peer NVLINK:

This peer-to-peer communication allows access to device memory between GPUs from within the CUDA kernels and eliminates the system memory allocation and copy overheads. It also provides more convenient multi-GPU programming.
Peer-to-Peer CUDA Transfers over NVLink are supported for Linux only. Currently, vGPU does not support NVSwitch. Therefore, only direct connections are supported. Peer-to-Peer communication is restricted within a single VM and does not communicate between multiple VMs. There is no SLI support; therefore, graphics are not included in this support, only CUDA. Peer-to-Peer CUDA Transfers over NVLink are supported only on a subset of vGPUs, Hypervisor releases, and guest OS releases. Peer-to-Peer over PCIe is unsupported. Non-MIG and C-series full frame buffer (1:1) vGPU profiles are supported with NVLink Refer to the NVIDIA AI Enterprise latest release notes for a list of GPUs which are supported.
Important
For servers with more than four GPUs, multi-vGPU config will support only GPU passthrough configurations that are manually configured on the recommended NUMA nodes.
Connect to the ESXi host over SSH, for example, using Putty.
Type
nvidia-smiwithin the command window.
Note
The form factor of the V100 graphics card in this example is SXM2.
Detect the topology between the GPUs by typing the following command:
nvidia-smi topo -m

Note
GPU0 and GPU1 are connected by NVLINK, so are GPU1 and GPU2, and GPU0 and GPU2. For example, GPU0 and GPU1 should be assigned to a single VM.
Obtain
hexidfromnvidia-smiusing the method below:1[root@vgpu09:~] nvidia-smi 2Wed August 18 19:20:22 2021 3+-----------------------------------------------------------------------------+ 4| NVIDIA-SMI 470.63 Driver Version: 470.63 CUDA Version: N/A | 5|-------------------------------+----------------------+----------------------+ 6| GPU Name Persistence-M| Bus-Id Disp.A | Volatile Uncorr. ECC | 7| Fan Temp Perf Pwr:Usage/Cap| Memory-Usage | GPU-Util Compute M. | 8| | | MIG M. | 9|===============================+======================+======================| 10| 0 Tesla V100-SXM2... On | 00000000:89:00.0 Off | 0 | 11| N/A 41C P0 41W / 300W | 32627MiB / 32767MiB | 0% Default | 12| | | N/A | 13+-------------------------------+----------------------+----------------------+ 14| 1 Tesla V100-SXM2... On | 00000000:b2:00.0 Off | 0 | 15| N/A 43C P0 41W / 300W | 32627MiB / 32767MiB | 0% Default | 16| | | N/A | 17+-------------------------------+----------------------+----------------------+ 18| 2 Tesla V100-SXM2... On | 00000000:B3:00.0 Off | 0 | 19| N/A 36C P0 42W / 300W | 32627MiB / 32767MiB | 0% Default | 20| | | N/A | 21+-------------------------------+----------------------+----------------------+ 22+-----------------------------------------------------------------------------+
Note
GPU 0 has id of
00000000:89:00.0GPU 1 has id of
00000000:b2:00.0GPU 2 has id of
00000000:B3:00.0
In the VM advanced config, add keys for 3 GPUs:
1pciPassthru0.cfg.gpu-pci-id = "ssss:bb:dd.f"
2pciPassthru0.cfg.gpu-pci-id = "ssss:bb:dd.f"
3pciPassthru0.cfg.gpu-pci-id = "ssss:bb:dd.f"
Note
NVLINK is supported in non-MIG mode only.
Device Groups#
Added in version 3.0.
Device Groups makes Virtual Machines consuming complementary hardware devices simpler in vSphere 8. NIC and GPU devices are supported in vSphere 8 GA.
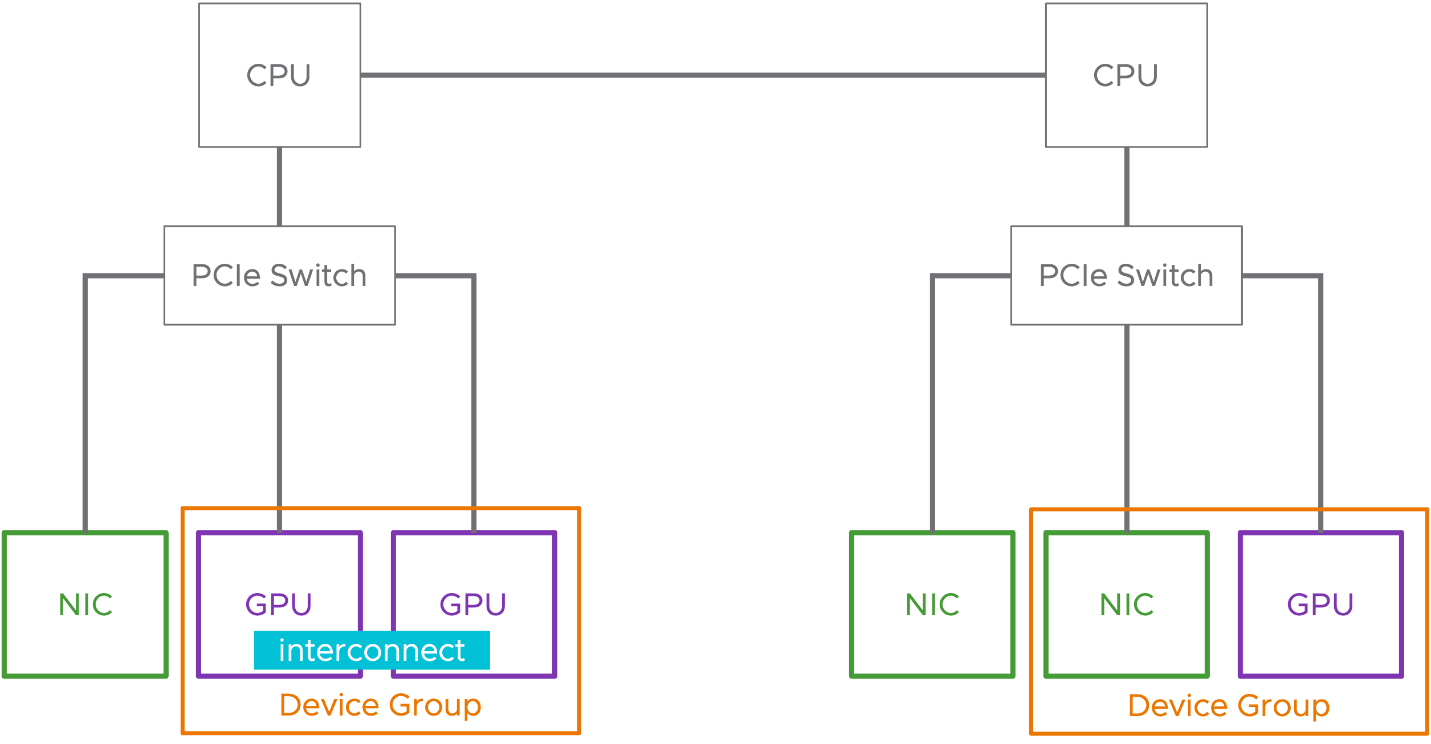
Device groups can be composed of two or more hardware devices that share a common PCIe switch or devices that share a direct interconnect between each other. Device groups are discovered at the hardware layer and presented to vSphere as a single unit that represents the group.
Simplified Hardware Consumption with Device Groups#
Device Groups are added to virtual machines using the existing Add New PCI Device workflows. vSphere DRS and vSphere HA are aware of device groups and will place VMs appropriately to satisfy the device group.
Vendor device groups can be leveraged with the NVIDIA HGX platform for large ML model training and high performance computing by assigning a device group (such as 2, 4, or 8 HGX GPUs) to a single VM. For guidance on when to use virtual device groups on HGX servers, see the following blog.
Page Retirement and ECC#
NVIDIA AI Enterprise supports ECC and dynamic page retirement. This feature will “retire” bad frame buffer memory cells by retiring the page the cell belongs to. Dynamic page retirement is done automatically for cells that are degrading in quality. This feature can improve the longevity of an otherwise good board and is thus a vital resiliency feature on supported products, especially in HPC and enterprise environments. Retiring of pages may only occur when ECC is enabled. However, once a page has been retired, it will permanently be blacklisted, even if ECC is later disabled. Refer to the NVIDIA Developer Zone page retirement documentation for more information.
These page retirement and ECC features are offered on all GPUs that are supported on NVIDIA AI Enterprise.
Disabling and Enabling ECC Memory#
Specific GPUs that support NVIDIA AI Enterprise software support error-correcting code (ECC) memory. ECC memory improves data integrity by detecting and handling double-bit errors. However, not all GPUs, vGPU types, and hypervisor software versions support ECC memory with NVIDIA vGPU.
On GPUs that support ECC memory with NVIDIA vGPU, ECC memory is supported with C-series vGPUs, but not with A-series and B-series vGPUs. On physical GPUs that do not have HBM2 memory, the amount of frame buffer usable by vGPUs is reduced. All types of vGPU are affected, not just vGPUs that support ECC memory.
The effects of enabling ECC memory on a physical GPU are as follows:
ECC memory is exposed as a feature on all supported vGPUs on the physical GPU.
In VMs that support ECC memory, ECC memory is enabled, with the option to disable ECC in the VM.
ECC memory can be enabled or disabled for individual VMs. Enabling or disabling ECC memory in a VM does not affect the amount of frame buffer usable by vGPUs.
This task depends on whether you are changing ECC memory settings for a physical GPU or a vGPU.
For a physical GPU, perform this task from the hypervisor host.
For a vGPU, perform this task from the VM to which the vGPU is assigned.
Note
ECC memory must be enabled on the physical GPU on which the vGPUs reside.
Disabling ECC Memory#
Before you begin, ensure that NVIDIA AI Enterprise Host Software is installed on your hypervisor. If you are changing ECC memory settings for a vGPU, ensure that the NVIDIA AI Enterprise software graphics driver is installed in the VM to which the vGPU is assigned. Please refer to Creating Your First NVIDIA AI Enterprise VM if you do not already have a VM to work with.
Use
nvidia-smito list the status of all physical GPUs or vGPUs and check for ECC noted as enabled.1# nvidia-smi -q 2 3==============NVSMI LOG============== 4 5Timestamp : Mon Jul 13 18:36:45 2020 6Driver Version : 450.55 7 8Attached GPUs : 1 9GPU 0000:02:00.0 10 11[...] 12 13 Ecc Mode 14 Current : Enabled 15 Pending : Enabled 16 17[...]
Change the ECC status to off for each GPU for which ECC is enabled.
If you want to change the ECC status to off for all GPUs on your host machine or vGPUs assigned to the VM, run this command:
# nvidia-smi -e 0If you want to change the ECC status to off for a specific GPU or vGPU, run this command:
# nvidia-smi -i id -e 0
idis the index of the GPU or vGPU as reported bynvidia-smi. This example disables ECC for the GPU with index0000:02:00.0.# nvidia-smi -i 0000:02:00.0 -e 0Reboot the host or restart the VM.
Confirm that ECC is now disabled for the GPU or vGPU.
 1# nvidia—smi —q
 2
 3==============NVSMI LOG==============
 4
 5Timestamp                           : Mon Jul 13 18:37:53 2020
 6Driver Version                      : 450.55
 7
 8Attached GPUs                       : 1
 9GPU 0000:02:00.0
10[...]
11
12    Ecc Mode
13        Current                     : Disabled
14        Pending                     : Disabled
15
16[...]
Enabling ECC Memory#
If ECC memory is suitable for your workloads and is supported by your hypervisor software and GPUs, but is disabled on your GPUs or vGPUs, enable it. This task depends on whether you are changing ECC memory settings for a physical GPU or a vGPU.
For a physical GPU, perform this task from the hypervisor host.
For a vGPU, perform this task from the VM to which the vGPU is assigned.
Note
ECC memory must be enabled on the physical GPU on which the vGPUs reside.
Before you begin, ensure that NVIDIA AI Enterprise Host Software is installed on your hypervisor. If you are changing ECC memory settings for a vGPU, ensure that the NVIDIA vGPU software graphics driver is installed in the VM to which the vGPU is assigned.
Use
nvidia-smito list all physical GPUs’ or vGPUs’ status and check for ECC noted as disabled.1# nvidia-smi -q 2 3==============NVSMI LOG============== 4 5Timestamp : Mon Jul 13 18:36:45 2020 6Driver Version : 450.55 7 8Attached GPUs : 1 9GPU 0000:02:00.0 10 11[...] 12 13 Ecc Mode 14 Current : Disabled 15 Pending : Disabled 16 17[...]
Change the ECC status to on for each GPU or vGPU for which ECC is enabled.
If you want to change the ECC status to on for all GPUs on your host machine or vGPUs assigned to the VM, run this command:
# nvidia-smi -e 1If you want to change the ECC status to on for a specific GPU or vGPU, run this command:
# nvidia-smi -i id -e 1idis the index of the GPU or vGPU as reported bynvidia-smi.This example enables ECC for the GPU with index
0000:02:00.0.# nvidia-smi -i 0000:02:00.0 -e 1
Reboot the host or restart the VM.
Confirm that ECC is now enabled for the GPU or vGPU.
 1# nvidia—smi —q
 2
 3==============NVSMI LOG==============
 4
 5Timestamp                           : Mon Jul 13 18:37:53 2020
 6Driver Version                      : 450.55
 7
 8Attached GPUs                       : 1
 9GPU 0000:02:00.0
10[...]
11
12    Ecc Mode
13        Current                     : Enabled
14        Pending                     : Enabled
15
16[...]