Installing VMware vSphere with VMware Tanzu#
Added in version 1.1.
Prerequisites#
Before you deploy VMware vSphere with VMware Tanzu, you must ensure that the virtual infrastructure you are deploying to meets the prerequisites.
VMware vSphere 7.0 U3c
NVIDIA AI Enterprise 1.1
Ubuntu 20.04 Server ISO
Note
NVIDIA AI Enterprise 1.1 requires access to the NVIDIA AI NGC Catalog on NGC and administrator access to vSphere with Tanzu and management network is required.
Important
You will need two separate routable subnets configured at a minimum with three preferred. One subnet will be for Management Networking (ESXi, vCenter, the Supervisor Cluster, and load balancer). The second subnet will be used for Workload Networking (virtual IPs and TKG cluster) and front-end networking if using only two subnets. The third subnet is used for front-end networking. Please refer to vSphere with Tanzu Quick Start Guide for additional information.
Before proceeding with this guide, vSphere with Tanzu must be installed and configured. The following is an overview of the installation steps.
ESXi is installed on 3 hosts.
ESXi network is configured, each host must have at least 2 NICs configured.
VMware VCSA is installed and on the same network as ESXi hosts. Configured as follows:
Cluster is created with HA and DRS enabled.
Hosts are added to the cluster.
Shared storage or vSAN is created in the datastore.
VDS is configured.
Storage is configured.
HAProxy (load balancer) is installed and configured.
Enable Workload Management.
Namespace is created and configured.
All GPUs are configured with Shared Direct mode in vSphere.
Once vSphere with Tanzu has been successfully installed and configured, the following NVIDIA AI Enterprise software must be installed on each of the 3 ESXi hosts.
Note
NVIDIA AI Enterprise Host (VIB) and Guest Driver Software 1.1 are pulled from the NVIDIA AI NGC Catalog on NGC.
Once the server is configured with vSphere with Tanzu and NVIDIA AI Enterprise. You will need to create and deploy a TKG cluster. This document also assumes that a TKG namespace, TKG cluster content library and TKG cluster are already created and running.
Provisioning a Tanzu Cluster with NVIDIA vGPU Devices#
When vSphere with Tanzu clusters are running in the data center, various tasks are executed by different personas within the enterprise. vSphere IT Administrators will start the initial provisioning of the environment by creating the required components that are associated with NVIDIA vGPU devices. Once this initial provisioning is complete, the DevOps Engineer will set up and interact with kubectl as well as install the required NV AI Enterprise elements such as NVIDIA GPU and NVIDIA Network Operators. The following graphic illustrates the tasks executed by the vSphere IT Administrators and DevOps Engineers, highlighted in green are the steps that will be covered within this guide.
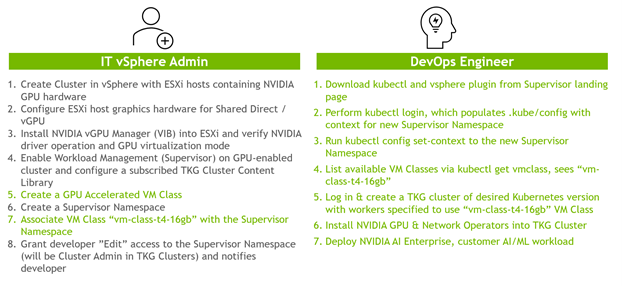
The following sections discuss these workflows by each persona as well as the required steps in detail to provision a vSphere with Tanzu GPU accelerated cluster with NVIDIA AI Enterprise.
IT Administrator#
Step #1: Create VM Classes#
Create GPU Accelerated Classes#
A VM class is a request for resource reservations on the VM for processing power (CPU and GPU). For example, guaranteed-large with 8 vCPU and NVIDIA T4 GPU. To size Tanzu Kubernetes cluster nodes, you specify the virtual machine class. vSphere with Tanzu provides default classes or you can create your own. Use the following instructions for creating a GPU-accelerated VM class.
Log in to vCenter with administrator access.
From vCenter, navigate to Workload Management.

Select Services and Manage under the VM Service card.

Select VM Classes and the Create VM Class card.

Enter a name for the VM class, such as vm-class-t4-16gb.

Important
Users interacting with the VM class via the Kubernetes CLI, will not be able to easily see what kind of GPU is attached to the associated node, nor the GPU memory made available. Therefore, a descriptive name that includes the GPU type and associated GPU memory should be used.
Note
VM Classes can configured to use GPU Partitioning. GPU partitioning is available using either NVIDIA AI Enterprise software partitioning or Multi-Instance GPU (MIG). The steps below illustrate how to create a VM class using NVIDIA AI Enterprise software partitioning. If you would like to create a VM class using MIG, please follow the steps in the Create a VM Class Using MIG section.
Select Next.
Select the ADD PCI DEVICE drop-down and select NVIDIA vGPU.

Select a GPU model from the drop-down.

Note
All GPUs within any host attached to the Tanzu cluster will be available.
Using the information specified in the name of the VM class, populate the available options for the selected GPU type:
GPU Sharing – Time Sharing
GPU Mode – Compute

Note
There are two class reservation types: guaranteed and best effort. Guaranteed class fully reserves its configured resources. Best effort class allows resources to be overcommitted. Within a production environment, typically the guaranteed class type is used.
Click Next.
Review the information on the Review and Confirm Page and click Finish.

You have successfully created a VM class using VM Classes with NVIDIA AI Enterprise software partitioning.
Create a VM Class Using MIG#
The following steps illustrate how to create a VM class using MIG. Not all NVIDIA GPUs support MIG, MIG support is available on a subset of NVIDIA Ampere GPUs such as A100 or A30.
Note
To create a VM class with MIG Partitioning, you first need to configure the GPU to use MIG.
Enter a name for the VM class, such as vm-class-a30-24gb.

Select Next.
Select the ADD PCI DEVICE drop-down and select NVIDIA vGPU.

Select a GPU model from the drop-down.

Note
All GPUs within any host attached to the Tanzu cluster will be available.
When adding PCI Devices, click on Multi-Instance GPU Sharing from the GPU Sharing dropdown.

Using the information specified in the name of the VM class, populate the available options for the selected GPU type.
GPU Sharing – Multi-Instance GPU Sharing
GPU Mode – Compute

Select the amount of GPU Partitioned slices you would like to allocate to the VM.
Note
The values listed in the GPU Memory dropdown are specific to the NVIDIA GPU. For example, NVIDIA A30 which has the following.
4 GPU instances @ 6GB each
2 GPU instances @ 12GB each
1 GPU instance @ 24GB
If you enter a GPU Memory value that does not equal a valid GPU profile, the resulting VM will utilize the next smallest profile. E.g., if you are using an A30 and choose 9GB, the resulting VM will have a 12GB profile.
Click Next.
Review the information on the Review and Confirm page and click Finish.

You have successfully created a VM class using VM Classes with NVIDIA MIG partitioning.
Create a VM Class Using NVIDIA Networking#
VM Classes can also be used with NVIDIA Networking. NVIDIA Networking cards can be added to VM classes as PCI devices. You can use VM classes with NVIDIA networking without GPUs. In the next few steps, we will add an NVIDIA Cx6 Networking card after already configuring an NVIDIA vGPU.
Note
NVIDIA networking cards can be used in SR-IOV mode. This requires additional setup and may not be needed for the average deployment. See How-to: Configure NVIDIA ConnectX-5/6 adapter in SR-IOV mode on VMware ESXi 6.7/7.0 and above for additional information.
Add a Dynamic DirectPath IO device.

In the Select the Hardware drop-down select the available ConnectC-6 DX device, or the NVIDIA networking card available in your hosts.

Click Next and review the Confirmation window.
Click Finish.

Step #2: Associate the VM Class with the Supervisor’s Namespace#
Now that you have created a VM class, we will associate it with the Supervisor Namespace. A VM class can be added to one or more namespaces on a Supervisor Cluster, and a Supervisor Cluster can have one or more VM Classes. For most deployments, the Supervisor Namespace will have multiple VM classes to properly scale Kubernetes clusters.
Note
This document assumes that a Supervisor Namespace and Content Library are already created and running. For demo purposes, we created a Supervisor Namespace called tkg-ns.
From vCenter, navigate to Workload Management.
Expand your Tanzu Cluster and associated namespace.
Select the Namespace and click on Manage VM Class in the VM Service card.

From the Manage VM Classes pop-up, select the check box next to the VM class that you previously created. You can select one or many VM classes, depending on how you choose to architect your deployment.
The VM class, vm-class-t4-16gb (Create GPU Accelerated Classes) is listed below.

The VM class, vm-class-a30-24gb (Create a VM Class Using MIG) is listed below.

The VM class, nvidia-a30-24c-cx6 (Create a VM Class Using NVIDIA Networking) is listed below.

Click OK.
Validate that the content library is associated with the supervisor namespace; click on Add Content Library in the VM Service card.

From the Add Content Library pop-up, select the check box for the Subscribed Content Library, which will contain the VM Template to be used by NVIDIA AI Enterprise.
Note
The VM Template which is used by NVIDIA AI Enterprise is provided by VMware within the subscriber content library.
Important
DevOps Engineer(s) need access to the VM class to deploy a Tanzu Kubernetes cluster in the newly created namespace. vSphere IT Administrators must explicitly associate VM classes to any new namespaces where the Tanzu Kubernetes cluster is deployed.
DevOps Engineer#
Step #1: Install Kubernetes CLI Tools#
The DevOps Engineer will install the Kubernetes CLI Tools on a VM to interact with the Tanzu Kubernetes Grid cluster. This requires network access to the Tanzu cluster. Instruction for downloading and installing the Kubernetes CLI Tools for vSphere can be found here.
Note
TKG Clusters and VMs are created and destroyed via the Kubernetes CLI Tools. Therefore, AI Practitioners may interact with this tool as well.
Once the Kubernetes CLI Tools have been downloaded and installed, execute the following steps to log into the master server and set the context.
Note
The Kubernetes CLI Tools download page can be accessed from your environment via a browser and by navigating to the IP address of a supervisor cluster VM.
Verify that the SHA256 checksum of vsphere*-plugin.zip matches the checksum in the provided file sha256sum.txt by running the command below in Powershell.
Get-FileHash -Algorithm SHA256 -Path vsphere*-plugin.zip
Note
The command above is valid for the Microsoft Windows version of the Kubernetes CLI Tool.
Verify OK in the results.
Put the contents of the .zip file in your OS’s executable search path.
Run the command below to log in to the server.
kubectl vsphere login --server=<IP_or_master_hostname>
Run the command below to view a list of your Namespaces.
kubectl config get-contexts
Run the command below to choose your default context.
kubectl config use-context <context>
Use the commands to see your cluster’s existing nodes and pods.
1kubectl get nodes
2kubectl get pods -A
Step #2: Create a GPU Accelerated TKG Cluster#
We will create a YAML file to create a GPU-accelerated cluster within this document. This file contains the new TKG Cluster Name, the previously specified Supervisor Namespace, and the VM class.
Note
It is recommended to create enough space on the containerd storage for this cluster as containers will be stored.
List all VMclass instances associated with that namespace using the command below.
kubectl get virtualmachineclasses
View GPU resources for a specific class using the command below.
kubectl describe virtualmachineclass <VMclass-name>
Create a YAML file with the appropriate configuration for your VM class.
nano tanzucluster.yamlPopulate the YAML file with the information below.
Warning
The following YAML file can only be used for vSphere 7.0 U3C
 1apiVersion: run.tanzu.vmware.com/v1alpha2
 2kind: TanzuKubernetesCluster
 3metadata:
 4name: tkg-a30-cx6
 5namespace: tkg-ns
 6spec:
 7topology:
 8  controlPlane:
 9        replicas: 3
10        vmClass: guaranteed-medium
11        storageClass: kubernetes-demo-storage
12  nodePools:
13  - name: nodepool-a30-cx6
14       replicas: 2
15       vmClass: nvidia-a30-24c-cx6
16       storageClass: kubernetes-demo-storage
17       volumes:
18       - name: containerd
19         mountPath: /var/lib/containerd
20         capacity:
21            storage: 100Gi
22
23
24  distribution:
25    fullVersion: 1.20.8+vmware.1-tkg.2
26  settings:
27    storage:
28      defaultClass: kubernetes-demo-storage
29  network:
30    cni:
31     name: antrea
32    services:
33     cidrBlocks: ["198.51.100.0/12"]
34    pods:
35    cidrBlocks: ["192.0.2.0/16"]
36    serviceDomain: local
Added in version 3.0.
EXAMPLE YAML FOR VSPHERE 8.0
VMware vSphere 8.0 requires an updated TKR which uses an Ubuntu OS for cluster nodes. To create a cluster for NVIDIA AI Enterprise 3.0 leverage this updated example yaml file as a starting point for cluster creation.
 1 apiVersion: run.tanzu.vmware.com/v1alpha3
 2 kind: TanzuKubernetesCluster
 3 metadata:
 4 name: tme-emo
 5 namespace: tkg-ns
 6 annotations:
 7 run.tanzu.vmware.com/resolve-os-image: os-name=ubuntu
 8
 9
10 spec:
11 topology:
12     controlPlane:
13         replicas: 1
14         vmClass: guaranteed-medium
15         storageClass: kubernetes-demo-storage
16         tkr:
17             reference:
18             name: v1.23.8---vmware.2-tkg.2-zshippable
19     nodePools:
20     - name: nodepool-test
21         replicas: 2
22         vmClass: nvidia-a30-24c
23         storageClass: kubernetes-demo-storage
24         volumes:
25     - name: containerd
26         mountPath: /var/lib/containerd
27         capacity:
28         storage: 200Gi
29         tkr:
30         reference:
31         name: v1.23.8---vmware.2-tkg.2-zshippable
32
33
34 settings:
35 storage:
36     defaultClass: kubernetes-demo-storage
37 network:
38     cni:
39     name: antrea
40     services:
41     cidrBlocks: ["198.51.100.0/12"]
42     pods:
43     cidrBlocks: ["192.0.2.0/16"]
44     serviceDomain: managedcluster.local
Note
Additional details can be found here, v1alpha3 Example: TKC with Ubuntu TKR
Note
The name of the OS image given in the “distribution - fullVersion” section of the YAML must match one of the entries seen when you do a “kubectl get tkr” at the Supervisor Cluster level (tkr is tanzu Kubernetes releases). That entry is placed there when you associate the Content Library with the namespace.
Apply the YAML to create the TKG cluster using the command below.
kubectl apply -f tanzucluster.yaml
Execute the command below to see the status of the cluster.
kubectl get tkc
Wait until the cluster is ready.

When the cluster is ready, the IT Administrator will be able to see the cluster created in the vCenter UI.

Note
If you want to SSH to the Tanzu nodes, please follow the SSH to Tanzu Kubernetes Cluster Nodes as the System User Using a Password.
Step #3: Install NVIDIA Operators#
VMware offers native TKG support for NVIDIA virtual GPUs on NVIDIA GPU Certified Servers with NVIDIA GPU Operator and NVIDIA Network Operator. Node acceleration achieved by these NVIDIA Operators is based on the Operator Framework. We will first install the NVIDIA Network Operator and then the NVIDIA GPU Operator to fully unlock GPU Direct RDMA capabilities.
To install the NVIDIA Operators, the TKG context must be set to the TKG cluster namespace (not the supervisor namespace). This is achieved by running the command below.
kubectl vsphere login --server=<Server-IP> --vsphere-username administrator@vsphere.local --insecure-skip-tls-verify --tanzu-kubernetes-cluster-name tkg-a30-cx6 --tanzu-kubernetes-cluster-namespace tkg-ns
Note
It is essential to install NVIDIA operators to ensure that the MOFED drivers are in place.
Deploy NVIDIA Network Operator#
The default installation via Helm, as described below, will deploy the NVIDIA Network Operator and related CRDs. An additional step is required to create a NicClusterPolicy custom resource with the desired configuration for the cluster. Please refer to the NicClusterPolicy CRD Section for more manual Custom Resource creation information.
The provided Helm chart contains various parameters to facilitate the creation of a NicClusterPolicy custom resource upon deployment. Refer to the NVIDIA Network Operator Helm Chart README for a full list of chart parameters.
Each NVIDIA Operator release has a set of default version values for the various components it deploys. It is recommended that these values will not be changed. Testing and validation were performed with these values, and there is neither guarantee of interoperability nor correctness when different versions are used.
Fetch NVIDIA Network Operator Helm Chart.
helm fetch https://helm.ngc.nvidia.com/nvaie/charts/network-operator-v1.1.0.tgz --username='$oauthtoken' --password=<YOUR API KEY> --untar
Create a YAML file with the appropriate configuration.
nano values.yamlPopulate the YAML file with the information below.
1 deployCR: true
2 ofedDriver:
3  deploy: true
4 rdmaSharedDevicePlugin:
5  deploy: true
6  resources:
7   - name: rdma_shared_device_a
8   vendors: [15b3]
9   devices: [ens192]
Install NVIDIA Network Operator using the command below.
helm install network-operator -f ./values.yaml -n network-operator --create-namespace --wait network-operator/
Deploy NVIDIA GPU Operator#
Create NVIDIA GPU Operator Namespace.
kubectl create namespace gpu-operator
Copy the CLS license token in the file named
client_configuration_token.tok.Create an empty gridd.conf file.
touch gridd.confCreate Configmap for the CLS Licensing.
kubectl create configmap licensing-config -n gpu-operator --from-file=./gridd.conf --from-file=./client_configuration_token.tok
Create K8s Secret to Access the NGC registry.
kubectl create secret docker-registry ngc-secret --docker-server="nvcr.io/nvidia" --docker-username='$oauthtoken' --docker-password='<YOUR API KEY>' --docker-email='<YOUR EMAIL>' -n gpu-operator
Override Label Security
kubectl label --overwrite ns gpu-operator pod-security.kubernetes.io/warn=privileged pod-security.kubernetes.io/enforce=privileged
Add the Helm Repo.
helm repo add nvidia https://helm.ngc.nvidia.com/nvidia --username='$oauthtoken' --password=<YOUR API KEY>
Update the Helm Repo.
helm repo update
Install NVIDIA GPU Operator.
helm install --wait gpu-operator nvidia/gpu-operator -n gpu-operator
Validate NVIDIA GPU Operator Deployment#
Locate the NVIDIA driver daemonset using the command below.
kubectl get pods -n gpu-operator
Locate the pods with the title starting with
nvidia-driver-daemonset-xxxxx.Run nvidia-smi with the pods found above.
 1sysadmin@sn-vm:~$ kubectl exec -ti -n gpu-operator nvidia-driver-daemonset-sdtvt -- nvidia-smi
 2Defaulted container "nvidia-driver-ctr" out of: nvidia-driver-ctr, k8s-driver-manager (init)
 3Thu Jan 27 00:53:35 2022
 4+-----------------------------------------------------------------------------+
 5| NVIDIA-SMI 470.103.01   Driver Version: 470.103.01   CUDA Version: 11.4     |
 6|-------------------------------+----------------------+----------------------+
 7| GPU  Name        Persistence-M| Bus-Id        Disp.A | Volatile Uncorr. ECC |
 8| Fan  Temp  Perf  Pwr:Usage/Cap|         Memory-Usage | GPU-Util  Compute M. |
 9|                               |                      |               MIG M. |
10|===============================+======================+======================|
11|   0  GRID T4-16C         On   | 00000000:02:00.0 Off |                    0 |
12| N/A   N/A    P8    N/A /  N/A |   2220MiB / 16384MiB |      0%      Default |
13|                               |                      |                  N/A |
14+-------------------------------+----------------------+----------------------+
15
16
17+-----------------------------------------------------------------------------+
18| Processes:                                                                  |
19|  GPU   GI   CI        PID   Type   Process name                  GPU Memory |
20|        ID   ID                                                   Usage      |
21|=============================================================================|
22|  No running processes found                                                 |
23+-----------------------------------------------------------------------------+
Installing VMware vSphere with VMware Tanzu (Air-gapped)#
Added in version 1.1.
Prerequisites#
VMware vSphere 7.0 U3c
NVIDIA AI Enterprise 1.1 or newer
Ubuntu 20.04 Server ISO
Note
License Server - For Tanzu hosts and related VMs to attach GPU devices, a Delegated License Server (DLS) is required to serve licenses to clients on a disconnected network
Refer to the License System User Guide for details on installation and configuration of DLS.
Bastion Host - This guide deploys a Linux VM on the vSphere cluster to interact with Tanzu over the private network and hosts tools such as kubectl, helm and docker
OS: Ubuntu 22.04 or 20.04 (recommended)
20.04 is recommended to avoid needing to mirror both versions of the software repos
Storage: min 25G
CPU: 2
Memory: 4
Mirror host - can be the same as the bastion if policy allows for it
OS: Ubuntu 22.04 or 20.04 (recommended)
Storage: min 400G
CPU: 2
Memory: 4
Port: 80
Local Container Registry - this guide uses the Harbor OVA
Storage: min 100G
CPU: 2
Memory: 4
Port: 5000
Before proceeding with this guide, vSphere with Tanzu must be installed and configured. Refer to Create a Local TKR Content Library as a prerequisite for deploying VMware Tanzu in offline environments.
ESXi is installed on 3 hosts.
ESXi network is configured, each host must have at least 2 NICs configured.
VMware VCSA is installed and on the same network as ESXi hosts. Configured as follows:
Cluster is created with HA and DRS enabled.
Hosts are added to the cluster.
Shared storage or vSAN is created in the datastore.
VDS is configured.
Storage is configured.
HAProxy (load balancer) is installed and configured.
Enable Workload Management.
Namespace is created and configured.
All GPUs are configured with Shared Direct mode in vSphere.
Once vSphere with Tanzu has been successfully installed and configured, the following NVIDIA AI Enterprise software must be installed on each of the 3 ESXi hosts.
Note
NVIDIA AI Enterprise Host (VIB) and Guest Driver Software 1.1 are pulled from the NVIDIA AI NGC Catalog on NGC.
Once the server is configured with vSphere with Tanzu and NVIDIA AI Enterprise. You will need to create and deploy a TKG cluster. This document also assumes that a TKG namespace, TKG cluster content library and TKG cluster are already created and running.
Getting Started with Air-gapped Deployments#
This page describes how to deploy the GPU Operator in clusters with restricted internet access. By default, the GPU Operator requires internet access for:
Container images need to be pulled during GPU Operator installation
The driver container needs to download several OS packages before driver installation
To address these requirements, it may be necessary to create a local image registry and/or a local package repository so that the necessary images and packages are available for your cluster. In subsequent sections, we detail how to configure the GPU Operator to use local image registries and local package repositories. Helm chart definitions can be downloaded as a bundle and used locally from a host with access to the Tanzu cluster. A Helm chart only includes the definitions of deployment so the images must be hosted in a container registry accessible to the Tanzu Kubernetes cluster. Currently, Tanzu Kubernetes clusters can use a private docker-compatible container registry such as Harbor, Docker, or Artifactory. Refer to the VMware Tanzu Kubernetes Grid Air-Gapped Reference Design for more information.
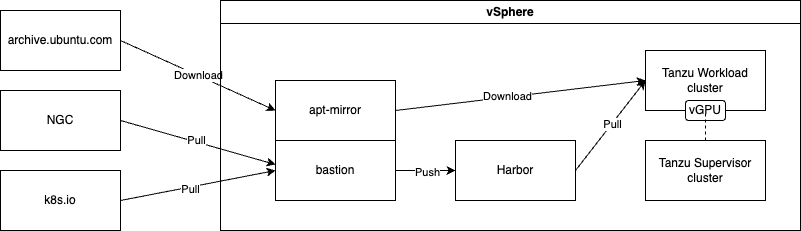
Deploying a Bastion Host#
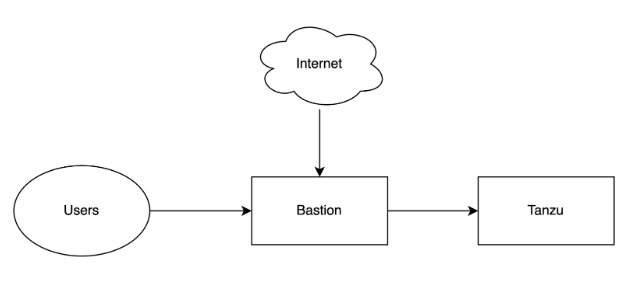
A bastion host, or jump host, is a host that sits on the same private network and has external connectivity. Its purpose in this guide is to hold content from external sources, such as the Helm client, kubectl, and a mirror of Ubuntu, and make them available to systems on private networks. This reduces the overall attack surface of a private network by limiting communication to a known host. A bastion might have the ability to download software directly from the internet to local storage and redistribute it to hosts on the private network. If it does not have internet access, software will need to be downloaded on a separate host and uploaded to the bastion using another method.
The below image is an example of a restricted internet scenario where the bastion has an internet connection.
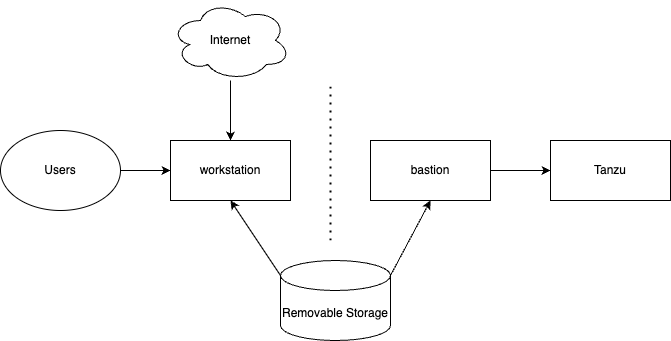
The below image is an example of an air-gapped scenario where software must be stored on removable storage and uploaded to the bastion host.
Setting Up a Local Package Repository#
Multiple software packages are needed to support this installation method. For example, The driver container deployed as part of the GPU Operator requires certain packages to be available as part of the driver installation. In restricted internet access or air-gapped installations, users are required to create a local mirror repository for their OS distribution. For example, the following packages are required:
linux-headers-${KERNEL_VERSION}
linux-image-${KERNEL_VERSION}
linux-modules-${KERNEL_VERSION}
Note
KERNEL_VERSION is the underlying running kernel version on the GPU node.
This guide will deploy the package repository on the bastion host so machines on the network can source packages from there.
If the bastion host has an internet connection (either direct or through a proxy) apt-mirror can be used to create the mirror repository directly on the bastion host and served over the private network through a web server like nginx. ls
If the bastion host does not have an internet connection, apt-mirror can still be used but the mirror contents will need to be copied to a bastion host using some other method. Possible methods could be over private network connection or removable media such as USB storage.
To use apt-mirror to create a mirror of Ubuntu 20.04, run the below steps on an Ubuntu host with access to archive.ubuntu.com to create and enough storage mounted on /var/spool/mirror to meet the requirements described in the prerequisites.
 1### on the internet-connected host ###
 2$ apt install apt-mirror
 3#configure mirror.list
 4vim /etc/apt/mirror.list
 5############# config ##################
 6#
 7# set base_path    /var/spool/apt-mirror
 8#
 9# set mirror_path  $base_path/mirror
10# set skel_path    $base_path/skel
11# set var_path     $base_path/var
12# set cleanscript $var_path/clean.sh
13# set defaultarch  <running host architecture>
14# set postmirror_script $var_path/postmirror.sh
15# set run_postmirror 0
16set nthreads     20
17set _tilde 0
18#
19############# end config ##############
20clean http://archive.ubuntu.com/ubuntu
21deb http://archive.ubuntu.com/ubuntu focal-security main restricted universe multiverse
22deb http://archive.ubuntu.com/ubuntu focal-updates main restricted universe multiverse
23deb http://archive.ubuntu.com/ubuntu focal-proposed main restricted universe multiverse
24deb http://archive.ubuntu.com/ubuntu focal-backports main restricted universe multiverse
25
26
27
28
29$ /usr/bin/apt-mirror
If the mirror needs to be uploaded to a disconnected bastion, copy the resulting contents of the configured base_path (default /var/spool/apt-mirror) to the same path on the bastion host before moving on to the next step of configuring the web server.
Web Server Setup#
This guide will deploy nginx on the bastion host to serve the mirror of Ubuntu 20.04 needed to use GPU Operator v23.6.1.
Note
Check the OS version of the container images used by your version of the GPU Operator. You may need to mirror both 22.04 and 20.04 to support multiple versions of the GPU Operator. You can find the base OS version for the container images by inspecting the tags in NGC. More details can be found in “Setting up a Local Container Registry” described later in this guide.
For a bastion host with an internet connection, nginx can be installed from the default sources on the public internet.
Install nginx
1apt-get update
2apt-get install nginx
For a bastion host without internet connectivity, the host can install the nginx package from the local package mirror created in previous sections by updating the sources.list file to point to the local directory.
Configure apt to use the local mirror:
1vim /etc/apt/sources.list
2###### Ubuntu Main Repos
3deb file:///var/spool/apt-mirror/mirror/archive.ubuntu.com/ubuntu/
4/ubuntu/ focal main restricted universe multiverse
 1systemctl enable nginx
 2systemctl start nginx
 3vim /etc/nginx/conf.d/mirrors.conf
 4server {
 5listen 80;
 6server_name <mirror.domain.com>;
 7root /var/spool/apt-mirror/mirror/archive.ubuntu.com/;
 8
 9
10location / {
11autoindex on;
12  }
13}
14$ systemctl restart nginx
Firewall port TCP/80 needs to be open on each client to get packages from this mirror.
Validate that the packages are available from a host with /etc/apt/sources.list configured to use the mirror repo.
1apt-get update
2apt-cache search linux-headers linux-image linux-modules
Install additional required software on the bastion host. Refer to the installation methods for each software package. All of these packages support an air-gapped installation method if the bastion host lacks internet connectivity.
Setting Up a Local Container Image Registry#
Without internet access, the GPU Operator requires all images to be hosted in a local image registry that is accessible to all nodes in the cluster. To allow the GPU Operator to work with a local registry, users can specify local repository, image, and tag along with pull-secrets in values.yaml.
To pull specific images from the NVIDIA registry, you can leverage the repository, image, and version fields within values.yaml. The general syntax for the container image is <repository>/<image>:<version>.
If the version is not specified, you can retrieve the information from the NVIDIA NGC catalog at https://catalog.ngc.nvidia.com/containers/. Search for an image, such as gpu-operator and then check the available tags for the image.
For images that are included with NVIDIA AI Enterprise, like the GPU Operator, authentication is required via an API Key. Refer to the NGC documentation on generating an API key. If an API key already exists, it can be reused.
Pulling Container Images#
The container images stored in the NGC Catalog require authentication. Login with docker using the reserved username of $oauthtoken and paste the API key in the password field. NGC will recognize the string $oauthtoken as an API login and the password characters will not be visible on the terminal.
1docker login nvcr.io
2Username: $oauthtoken
3Password:
4WARNING! Your password will be stored unencrypted in /root/.docker/config.json.
5Configure a credential helper to remove this warning. See
6https://docs.docker.com/engine/reference/commandline/login/#credentials-store
7Login Succeeded
To pull the gpu-operator-4-0 image version v23.6.1, use the following command:
docker pull nvcr.io/nvaie/gpu-operator-4-0:v23.6.1
Some images are built for specific operating systems. For those images, the version field must be appended by the OS name running on the worker node.
For example, pull the driver image for Ubuntu 20.04:
docker pull nvcr.io/nvidia/driver:535.104.05-ubuntu20.04
To pull the rest of the images GPU Operator 23.6.1, the following command will pull the correct versions of each image.
Note
A list of images is available at the end of this section:
 1docker pull nvcr.io/nvidia/kubevirt-gpu-device-plugin:v1.2.2
 2docker pull nvcr.io/nvidia/cloud-native/k8s-cc-manager:v0.1.0
 3docker pull nvcr.io/nvidia/cloud-native/k8s-kata-manager:v0.1.1
 4docker pull nvcr.io/nvidia/cloud-native/k8s-driver-manager:v0.6.2
 5docker pull nvcr.io/nvidia/cuda:12.2.0-base-ubi8
 6docker pull nvcr.io/nvidia/k8s/container-toolkit:v1.13.4-ubuntu20.04
 7docker pull nvcr.io/nvidia/cloud-native/gpu-operator-validator:v23.6.1
 8docker pull nvcr.io/nvidia/cloud-native/vgpu-device-manager:v0.2.3
 9docker pull nvcr.io/nvidia/k8s/dcgm-exporter:3.1.8-3.1.5-ubuntu20.04
10docker pull nvcr.io/nvidia/cloud-native/dcgm:3.1.8-3.1.5-ubuntu20.04
11docker pull nvcr.io/nvidia/k8s-device-plugin:v0.14.1
12docker pull nvcr.io/nvidia/k8s/container-toolkit:v1.14.1-ubuntu20.04
13docker pull nvcr.io/nvidia/gpu-feature-discovery:v0.8.1
14docker pull nvcr.io/nvaie/gpu-operator-4-0:v23.6.1
15docker pull nvcr.io/nvaie/vgpu-guest-driver-4-0:535.104.05-ubuntu20.04
16docker pull registry.k8s.io/nfd/node-feature-discovery:v0.13.1
Caution
If using a different version of the GPU Operator, the exact tags are likely different.
If using a version different from 23.6.1. Get the exact tags from the images defined in the values.yaml file included in the GPU Operator Helm Chart.
1helm fetch https://helm.ngc.nvidia.com/nvaie/charts/gpu-operator-<version> --username='$oauthtoken' --password=<YOUR API KEY>
2tar xvf gpu-operator-<version>
3cd gpu-operator-<version>
4cat values.yaml
For convenience, here is an easy-to-copy list of images used by the GPU operator
 1nvcr.io/nvidia/kubevirt-gpu-device-plugin:v1.2.2
 2nvcr.io/nvidia/cloud-native/k8s-cc-manager:v0.1.0
 3nvcr.io/nvidia/cloud-native/k8s-kata-manager:v0.1.1
 4nvcr.io/nvidia/cloud-native/k8s-driver-manager:v0.6.2
 5nvcr.io/nvidia/cuda:12.2.0-base-ubi8
 6nvcr.io/nvidia/k8s/container-toolkit:v1.13.4-ubuntu20.04
 7nvcr.io/nvidia/cloud-native/gpu-operator-validator:v23.6.1
 8nvcr.io/nvidia/cloud-native/vgpu-device-manager:v0.2.3
 9nvcr.io/nvidia/k8s/dcgm-exporter:3.1.8-3.1.5-ubuntu20.04
10nvcr.io/nvidia/cloud-native/dcgm:3.1.8-3.1.5-ubuntu20.04
11nvcr.io/nvidia/k8s-device-plugin:v0.14.1
12nvcr.io/nvidia/k8s/container-toolkit:v1.14.1-ubuntu20.04
13nvcr.io/nvidia/gpu-feature-discovery:v0.8.1
14nvcr.io/nvaie/gpu-operator-4-0:v23.6.1
15nvcr.io/nvaie/vgpu-guest-driver-4-0:535.104.05-ubuntu20.04
16registry.k8s.io/nfd/node-feature-discovery:v0.13.1
Preparing the Private Registry#
Container images from NGC can be pushed to any OCI compliant registry such as the docker registry, Harbor, or Artifactory. This guide will include steps for Harbor.
To deploy Harbor, refer to the official documentation.
Create the following projects and make them public: nvaie, nvidia, and nfd
Click into a project to download the registry certificate and save it to /usr/local/share/ca-certificates/ca.crt on the bastion host.
1user@bastion:~$ ls /usr/local/share/ca-certificates/ca.crt
2ca.crt
Update the local trust store on the bastion host so docker can interact with Harbor:
1sudo update-ca-certificates
2systemctl restart docker
Caution
The docker client uses HTTPS by default when pulling and pushing to registries and will fail if an insecure registry is used. Refer to the docker documentation on dealing with insecure registries.
Retag the images to point to the local private registry#
For each image needed for the GPU Operator, run the following commands to create newly tagged images:
1docker tag nvcr.io/nvidia/gpu-operator:v23.6.1
2<harbor.yourdomain.com>/<local-path>/gpu-operator:v23.6.1
3docker tag nvcr.io/nvidia/driver:535.104.05-ubuntu20.04 <harbor.yourdomain.com>/<local-path>/driver:535.104.05-ubuntu20.04
4...
Save the images for offline upload#
If your container registry is not accessible from the host used to pull the images from NGC, the images need to be exported as tar.gz files and copied to a host on the private network with the docker client installed.
Example image save
docker save <harbor.yourdomain.com>/nvidia/kubevirt-gpu-device-plugin:v1.2.2 -o kubevirt-gpu-device-plugin-1.2.2.tar.gz
Example image load
docker load --input kubevirt-gpu-device-plugin-1.2.2.tar.gz
Validate the images loaded
docker images
Push the newly tagged images to Harbor#
For each image needed for the GPU Operator, run the following commands to push to the local registry:
1docker login harbor.yourdomain.com
2docker push <harbor.yourdomain.com>/<local-path>/gpu-operator:v23.3.2
3docker push <harbor.yourdomain.com>/<local-path>/driver:470.82.01-ubuntu20.04
Accessing Tanzu from the Bastion Host#
Provisioning Tanzu within a vSphere cluster is covered in the deployment guide for Tanzu with NVIDIA AI Enterprise and provisioning a Tanzu cluster with NVIDIA vGPU devices and NVIDIA AI Enterprise. Take care to ensure the VIB used to install the host driver on the ESXi hosts matches the NVIDIA driver version deployed by the GPU Operator.
Note
Check the version of the VIB installed on the ESXi hosts by running the nvidia-smi command directly from the host’s shell
Logging into the target Tanzu Kubernetes Cluster#
On the bastion host, ensure Kubernetes CLI tools for vSphere are installed along with the vSphere plugin for kubectl. Refer to the official documentation on installing those tools. Login to the Tanzu cluster with vGPU devices attached (not the supervisor cluster).
1kubectl vsphere login --server=<Server-IP> --vsphere-username administrator@vsphere.local --insecure-skip-tls-verify --tanzu-kubernetes-cluster-name <cluster-name> --tanzu-kubernetes-cluster-namespace <cluster-namespace>
2KUBECTL_VSPHERE_PASSWORD environment variable is not set. Please enter the password below
3Password:
4Logged in successfully.
5You have access to the following contexts:
6<redacted>
7If the context you wish to use is not in this list, you may need to try
8logging in again later, or contact your cluster administrator.
9To change context, use `kubectl config use-context <workload name>`
Add the Harbor certificate to the Cluster#
Kubernetes uses the trust store from the local host to secure communications. If the Harbor certificate is not included in the trust store, images will fail to pull.
Add the CA certificate from Harbor to the Tanzu hosts by updating the TkgsServiceConfiguration on the supervisor cluster. The certificate file must be converted to base64 to be added to the cluster.
 1kubectl config set-context SUPERVISOR_CLUSTER_NAME
 2base64 -i /usr/local/shar/ca-certificates/ca.crt
 3<output>
 4vim tkgs-cert.yaml
 5apiVersion: run.tanzu.vmware.com/v1alpha1
 6kind: TkgServiceConfiguration
 7metadata:
 8name: tkg-service-configuration
 9spec:
10defaultCNI: antrea
11trust:
12    additionalTrustedCAs:
13    - name: harbor-ca-cert
14        data: <output>
15kubectl apply -f tkgs-cert.yaml
Ideally, this configuration is done before provisioning the workload cluster. If the cluster is already provisioned you can propagate the certificate any other global settings with a patch.
Create ConfigMaps for the GPU Operator#
The GPU Operator is configured to use internet resources by default. Configuration maps need to be created to point to our private resources before deployment. These ConfigMaps are Kubernetes objects that are mounted by the pods deployed by the GPU Operator.
First, log in to the target Tanzu Kubernetes cluster:
kubectl vsphere login --server=<Server-IP> --vsphere-username administrator@vsphere.local --insecure-skip-tls-verify --tanzu-kubernetes-cluster-name <cluster-name> --tanzu-kubernetes-cluster-namespace <tanzu-namespace>
Create the GPU Operator Namespace:
kubectl create namespace gpu-operator
Local Package Repository Configuration#
Create a custom-repo.list file that points to our local package repository:
1vim custom-repo.list
2deb [arch=amd64] http://<local pkg repository>/ubuntu/ focal main universe
3deb [arch=amd64] http://<local pkg repository>/ubuntu/ focal-updates main universe
4deb [arch=amd64] http://<local pkg repository>/ubuntu/focal-security main universe
Create a ConfigMap object named repo-config with the custom repository information given in the gpu-operator namespace within custom-repo.list
kubectl create configmap repo-config -n gpu-operator --from-file=./custom-repo.list
NVIDIA AI Enterprise License Configuration#
Create an empty gridd.conf file:
touch gridd.conf
Create a license token. Refer to the NVIDIA License System User Guide on creating license tokens.
Create a Configmap for the license
kubectl create configmap licensing-config -n gpu-operator --from-file=./gridd.conf --from-file=./client_configuration_token.tok
Private Repository Authentication#
If the projects created in Harbor are marked as private, authentication is needed. If the projects are public, this step can be skipped.
Create a Kubernetes Secret for authentication with the local registry. The Helm chart uses the name “ngc-secret” by default. To avoid having to make additional changes to the Helm chart, reuse this name. The secret is created from the cached credentials from the docker client. Login to Harbor with the docker client to validate the credentials before creating the secret.
1docker login <harbor.my.domain>
2kubectl create secret generic ngc-secret --from-file=.dockerconfigjson=~/.docker/config.json --type=kubernetes.io/dockerconfigjson -n gpu-operator
Update GPU Operator Helm Chart Definitions#
The Helm Charts are configured to use public resources by default. Before installing the GPU Operator in an air-gapped environment, the values.yaml file needs to be updated for the air-gapped environment.
Copy the Helm chart from a host with access to NGC. This command will download the Helm chart as a compressed tar file. It can be unpacked and used locally without an internet connection.
Refer to the prerequisites to install the Helm client binary
Refer to the NGC user guide if you need to create an API key
1helm fetch https://helm.ngc.nvidia.com/nvaie/charts/gpu-operator-4-0-v23.6.1.tgz --username='$oauthtoken' --password=<YOUR API KEY>
2tar xvf gpu-operator-4-0-v23.6.1.tgz
3cd gpu-operator-4-0
Add the ConfigMaps to the Helm Chart#
Update values.yaml with the below information to have the GPU Operator mount the private package repo configuration within the driver container to pull required packages. Based on the OS distribution, the GPU Operator automatically mounts this config map into the appropriate directory.
1vim values.yaml
2driver:
3repoConfig:
4    configMapName: repo-config
If self-signed certificates are used for an HTTPS-based internal repository then you must add a config map for those certificates. You then specify the config map during the GPU Operator install. Based on the OS distribution, the GPU Operator automatically mounts this config map into the appropriate directory. Similarly, the certificate file format and suffix, such as .crt or .pem, also depends on the OS distribution.
1kubectl create configmap cert-config -n gpu-operator --from-file=<path-to-cert-file-1> --from-file=<path-to-cert-file-2>
Update the Image Specs to use the Local Registry#
For each image in values.yaml, change the name to point to the private registry. For example, change the kubevirt-gpu-device-plugin from nvcr.io to your value for <harbor.mydomain.com> registry:
1sandboxDevicePlugin:
2    sandboxDevicePlugin:
3    enabled: true
4    repository: <harbor.mydomain.com>/nvidia
5    image: kubevirt-gpu-device-plugin
6    version: v1.2.2
Node Feature Discovery is responsible for adding node labels for nodes with GPU devices. The GPU Operator deploys a community-maintained subchart by default. To override the subchart’s default image, add this stanza to the node-feature-discovery section which points to the private registry.
1node-feature-discovery:
2image:
3    repository:<harbor.mydomain.com>/nfd/node-feature-discovery
Install the GPU Operator#
Install NVIDIA GPU Operator via the Helm chart:
helm install --wait gpu-operator ./gpu-operator -n gpu-operator
Monitor the progress.
watch kubectl get pods -n gpu-operator