Windows Client
The NVIDIA CloudXR SDK includes a sample Windows client that is designed to work with tethered VR headsets. The client decodes and renders content that is streamed from the CloudXR server and collects motion and controller data from the VR headset that is sent to the CloudXR server.
The Windows client is supplied both as source code and as a prebuilt executable binary file.
Installing the Windows Client
Install Steam and SteamVR.
Note
Steam is not required with SteamVR Enterprise version.
To install the NVIDIA CloudXR software, run the
CloudXR-Setup.exefile.Note
Ensure your NVIDIA graphics driver is up to date.
Download and install the CUDA 10.0 SDK
When prompted to select components, complete the following tasks for the client-side installation:
Select the client component.
Select the Redistributables checkbox, which is required only for a first-time install.
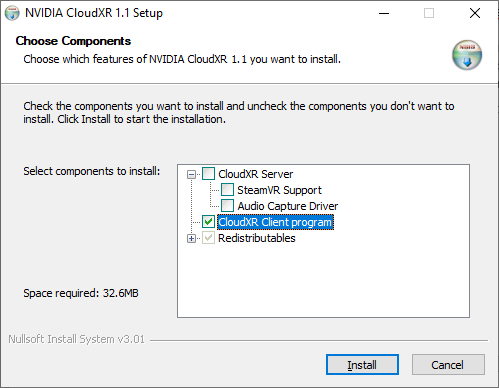
Installing the CloudXR Client Program
Click Install and wait for installation to complete.
Note
The installer checks for the HEVC codec capability, and if the capability is not detected, the installation will fail.
Running the Windows Client
Start SteamVR on the server system.
Connect a supported VR headset to the client system.
Start SteamVR on the client system.
This step is recommended even though the Windows client automatically starts SteamVR. By manually starting SteamVR, you can ensure your headset is connected and functioning correctly before you start the client app.
After SteamVR is started, the SteamVR window is displayed and should indicate that the VR headset is connected.
Start the CloudXR Client app.
Type
cd {program-files}\NVIDIA Corporation\CloudXR\Clientto navigate to the client folder.Launch
CloudXRClient.exeand enter the IP address of the server.Alternatively, add the
-scommand-line argument followed by the IP address of the server as a parameter to the launch.For example,
CloudXRClient.exe -s 192.168.0.3.
The client will then attempt to connect to the server. After the client connects, the Command Prompt window displays the frame rate in frames per second (FPS) and other statistics, which indicates that the connection to the server has been made.
Start the OpenVR application on the server that will be streamed to the client in one of the following ways:
Launch it directly on the server.
Click Menu on the left VIVE controller.
Click B on the left Index controller.
Note
You must wait to launch the OpenVR application until after the client has connected to the server unless the client has been pre-configured on the server.
Otherwise, the application will report that there is no connected headset. When a client first connects, it reports its specifications to the server, such as resolution and refresh rate, and then the server creates a virtual headset device.
Note
Pressing the system button on a controller typically brings up the system menu on the client device and does not forward the command to the server. In the sample applications that are provided with the NVIDIA CloudXR SDK, one of the controller buttons is remapped to invoke the server system menu.
Building the Windows Client
To build the Windows client sample application, use Visual Studio 2017 or later.
In Visual Studio, open the
{sdk-root}\Sample\Windows\receiver.vcxprojfile.Select Build Solution.
To resolve an error because Windows SDK 10.0.17763.0 or later is not installed, complete one of the following tasks:
Download and install Windows SDK 10.0.17763.0.
If a later version is installed on your system, select Project > Properties and set Windows SDK version to the installed version.
The
CloudXRClient.exefile is created in the{sdk-root}\Sample\Windows\x64\Debugdirectory.
After building the application, you can launch it directly from Visual Studio. In the project properties under Debugging, there is a Command Arguments field where you can enter command-line options (like the -s server IP option). To debug modifications to the supplied source code, run the application in debug mode.
When the application is run from Visual Studio, a Command Prompt window is opened. If the CloudXR server has not already been specified, you are prompted for the IP address.
After connecting to the server, the application displays the frame rate in frames per second (FPS) and other statistics, which indicates that the connection to the server has been made. See Running the Windows Client for more information about running the built client outside Visual Studio.