Wave VR Client (Android)
The NVIDIA CloudXR SDK includes a sample Android Wave VR client that is designed to work with VR headsets that support the Wave VR SDK. The client decodes and renders content that is streamed from the CloudXR server, and it collects motion and controller data from the VR headset that is sent to the CloudXR server.
The VR headset must be capable of decoding 4k HEVC video @ 60fps. The provided sample client has been tested with the Focus 3, running OS version 3.0.999.266.
Note
The Android Wave VR client is supplied only as source code.
Wave VR Client Prerequisites
Required
An Android VR headset that supports the Wave VR SDK, for example: - HTC VIVE Focus 3
Android Debug Bridge (ADB) to install the client application without needing full developer tools.
Optional
For developers who want to modify, build, and debug the client application, a complete Android development enviroment is required:
Android Studio 4.0 or later.
Android SDK 7.1.1 ‘Nougat’ (API level 25) or higher.
Android build tools 28.0.3
Android NDK 21.4.7075529
OpenJDK 1.8n
Note
Android Studio can be downloaded from https://developer.android.com/studio.
Installing Android Studio also installs Android Platform Tools, Android SDK, and OpenJDK.
To install Android NDK from the Android Studio menus, click Tools>SDK Manager, select SDK Tools and then NDK, and click OK.
To use the bundled OpenJDK, click File>Project Structure in the menu bar. In the SDK Location page under JDK Location, select the Use embedded JDK checkbox, and then click OK.
The NDK version was selected because it was the LTS release at time of development and is aligned with Android Studio 4.0.x as the default NDK version.
Newer NDK versions, such as 23.x, might cause build issues.
As of the CloudXR 3.1 release, only Android 64-bit builds are supported.
You also need:
Building the Wave VR Client
Copy the WaveVR SDK client package that you downloaded (
wave_4.1.1_native.zip) into{sdk-root-folder}\Sample\Android\WaveVR\app\libsfolder, and rename it towvr_sdk.zip.Copy the Google Oboe SDK .AAR file (
oboe-1.5.0.aar) into{sdk-root-folder}\Sample\Android\WaveVR\app\libsfolder.Copy the CloudXR SDK client package, which is the
CloudXR.aarfile from the{sdk-root-folder}\Client\Lib\Androidfolder to the{sdk-root-folder}\Sample\Android\WaveVR\app\libsfolder.Run Android Studio.
Complete one of the following tasks:
Select Open existing Android Studio project on the Welcome screen.
Select File > Open.
Navigate to
{sdk-root-folder}\Sample\Androidand select theWaveVRfolder.Select Build > Make Project.
Note
You must use NDK version R21 to build the Wave VR sample, because the sample project explicitly uses NDK 21.4.7075529 and BuildTools 28.0.3.
This process generates an .apk file in the {sdk-root-folder}\Sample\Android\WaveVR\app\build\outputs\apk\debug directory that can be used to debug or be used to install the Wave VR client. This file can also be automatically generated by running Android Studio. See Running the Oculus VR Client for more information.
Note
To build from the command line, run gradlew build from the WaveVR folder.
Installing the Wave VR Client
Install the .apk file that was created by building the sample application on the Wave VR headset (for example the HTC VIVE Focus 3) and set up the application.
Use the USB cable to connect the headset to the development system.
In the headset, select the Transfer Files option and, in response to the debug prompt, click OK.
In the headset, select Settings > More Settings > Developer Options > Debug and ensure that USB Debug is enabled.
In a Command Prompt window, navigate to the folder that contains the .apk file that was created by building the sample application.
Use ADB to install the application from the release .apk file.
adb.exe install -r <APK name>.apk
Note
By default, the
ADB.exeprogram is installed by Android Studio inC:\Users\{username}\AppData\Local\Android\Sdk\platform-tools.When the installation is complete, ADB responds with a Success message.
Create a plain-text file named
CloudXRLaunchOptions.txtthat contains-s <IP address NVIDIA CloudXR server>.For example, for a server with IP = 1.1.1.1, the file should contain
-s 1.1.1.1. See Command-Line Options for more information.Complete one of the following tasks:
Copy the
CloudXRLaunchOptions.txtfile to the base device folder as shown in Windows Explorer.If you are using ADB, copy the
CloudXRLaunchOptions.txtfile to the/sdcard/directory of the device using the following command:adb.exe push CloudXRLaunchOptions.txt /sdcard/CloudXRLaunchOptions.txt
Running the Wave VR Client
Start SteamVR on the server system.
Start the CloudXR Client app on the Wave VR device.
This can be completed in one of the following ways:
If installed from ADB with a launch options file, you can launch from VR on the device: bring up the main menu, select Settings > More Settings > Apps, and select the CloudXR Client app.
If building directly in Android Studio, you can deploy/run directly. You can also set launch options inside the Configuration. For more information on how to set launch options from Android Studio, see Command-Line Options.
If prompted, grant the necessary permissions on the device.
Warning
The current sample code uses generic Android permission requests, rather than the WaveVR PermissionManager. (WaveVR PermissionManager will be added in a future release).
Somteimes, the permission dialogs might not display as expected. If they do not show for you, and the application is not working, which is usually caused by not being allowed to read the launch options file, here is the manual workaround on the Focus Plus device:
These steps might need to be modified for other devices.
From the home screen, go to
Settings.Select
More Settings.Scroll to and select
Apps.Select
CloudXR Client for WaveVR(or your application’s title).Select
Permissions.Verify that an
App Permissionslist like the following is displayed: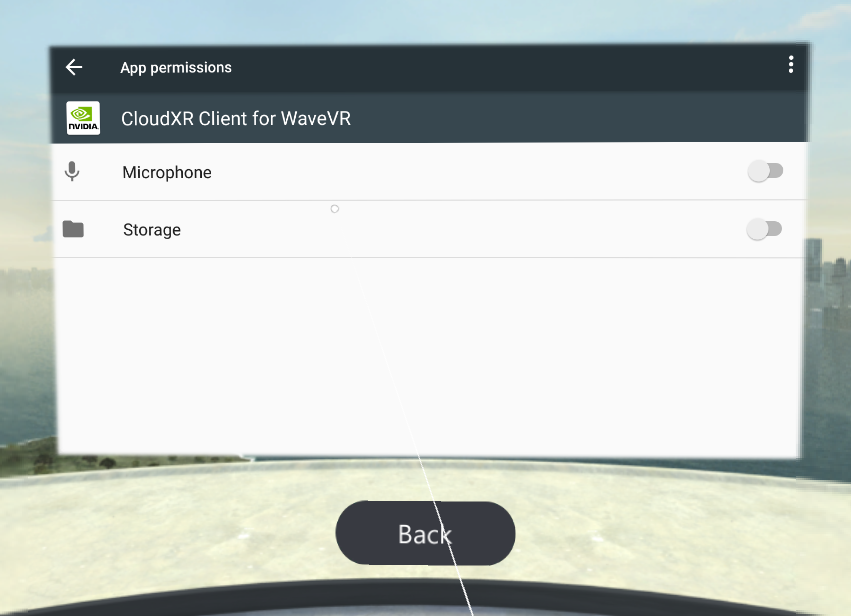
WaveVR Permissions Settings
Toggle on the
Storagepermission.Other permissions, like Microphone are optional, and are needed only if you are using that feature.
Launch the client, and ensure that it is running properly.
Start the OpenVR application on the server that will be streamed to the client in one of the following ways:
Launch it directly on the server.
Click Menu on the left controller.
Note
Launch the OpenVR application only after the client has connected to the server unless the client has been pre-configured on the server.
Otherwise, the application will report that there is no connected headset. When a client first connects, it reports its specifications to the server, such as resolution and refresh rate, and then the server creates a virtual headset device.
If the client app disconnects, to prevent the server from refusing the connection, wait 5-10 seconds before you reconnect.