Configuring and Managing the DGX-1
This chapter describes the following DGX-1 configuration and management tasks:
Using the BMC
The DGX-1 includes a baseboard management controller (BMC) that lets you manage and monitor the DGX-1 independently of the CPU or operating system. You can access the BMC remotely through the Ethernet connection to the IPMI port.
This section describes how to access the BMC, and describes a few common tasks that you can accomplish through the BMC. It is not meant to be a comprehensive description of all the BMC capabilities.
To access the BMC remotely:
- Make sure you have connected the IPMI port on the DGX-1 to your LAN.
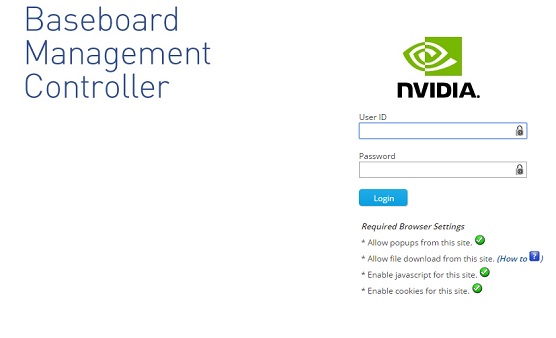
- Open a Java-enabled browser within your LAN and go to http://<IPMI IP Address>/. Use Firefox or Internet Explorer. Google Chrome is not officially supported by the BMC.
- Log in. Your initial log in credentials are based on the ones you created when you first set up the DGX-1. Enter your username for both the User ID as well as the Password. User ID: <your username> Password: <your username>.
- Be sure to change your password immediately to ensure the security of the BMC. See the next section for instructions on how to change your BMC password.
Creating a Unique BMC Password for Remote Access
When you set up the DGX-1 upon powering it on for the first time, you set up a username and password for the system. These credentials are also used to log in to the BMC remotely, except that the BMC password is the username.
It is strongly recommended that you create a unique password as soon as possible.
Create a unique BMC password as follows:
- Open a Java-enabled web browser within your LAN and go to http://<IPMI IP
address>/.
Use Firefox or Internet Explorer. Google Chrome is not officially supported by the BMC.
- Log in with the username that you created when you first set up the DGX-1. Enter your username for both the User ID as well as the password: User ID: <your username> Password: <your username>
- From the top menu, click Configuration and then select User.
- Select your username and then click Modify User.
- In the Modify User dialog, select Change Password, and then enter your new password in the Password and Confirm Password boxes.
- Click Modify when finished.

Submitting BMC Log Files
The BMC provides automatic logging of system activities and status. The NVIDIA Enterprise Support team uses the log files to assist in troubleshooting. Follow these instructions to obtain the log files to send to NVIDIA Enterprise Support.

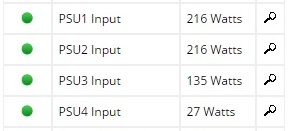
Determining Total Power Consumption
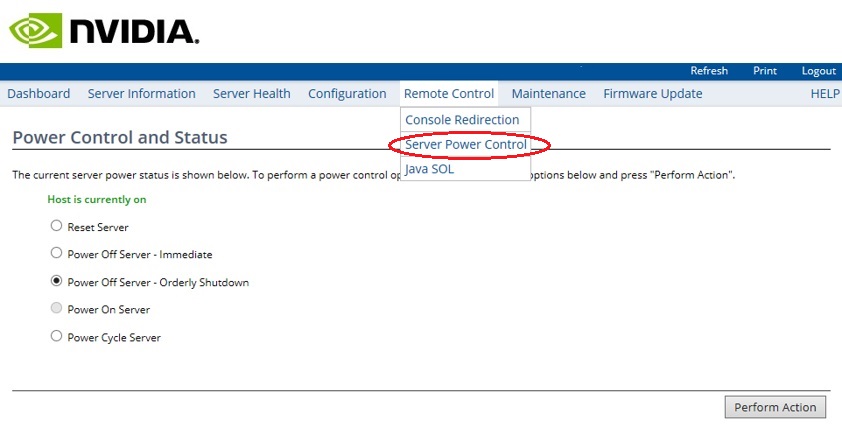
Accessing the DGX-1 Console
- Log into the BMC.
- From the top menu, click Remote Control and then select Console Redirection.
- Click Java Console to open the popup window. The window provides interactive control of the DGX-1 console.
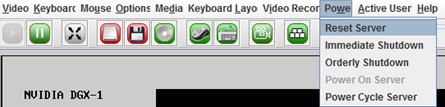
Powering Off / Power Cycling the System Remotely
From the DGX-1 Console Window
Setting Up Active Directory
You can access the NVIDIA DGX-1 system using active directory (AD) authentication for your organization. The simplest method is to use the BMC dashboard.
- Log into the BMC.
- From the top menu, click Configuration and then select Active Directory.
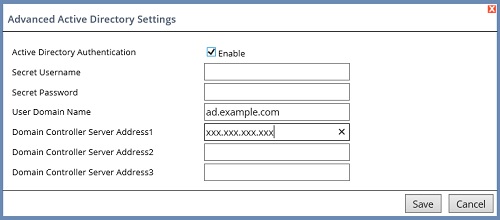
- Click Advanced Settings to open the Advanced
Active Directory Settings pop-up window, then fill out the
information for your network.
- Select the Active Directory Authentication Enable check box.
- Do not fill out the Secret Username and Secret Password boxes.
- Fill out the User Domain Name box and only one of the Domain Controller Server Address boxes.
- Click Save when done.
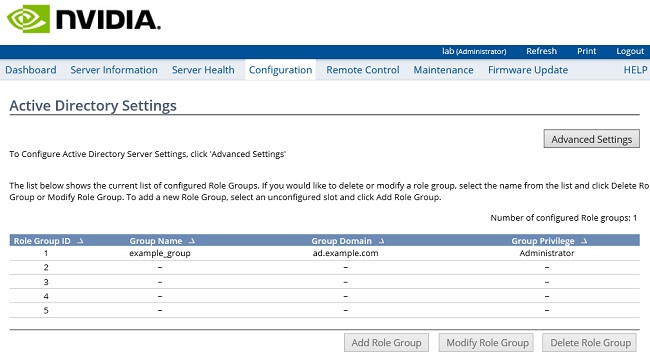
- Add role groups as needed.
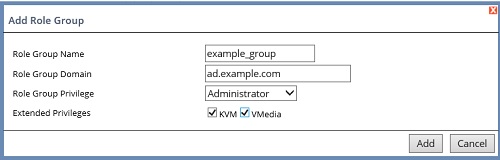
- Click the first empty Role Group line and then click Add Role Group.
- Enter your role group information in the Add Role Group dialog box.
- Be aware that the User role group privilege does
not allow access to the BMC dashboard.
The following are descriptions of each role group privilege option.
Role Group Privilege Description Administrator Access to all BMC dashboard functions Operator Read-only access to BMC dashboard controls User No access to the BMC dashboard; ipmitool supported Callback No access to the BMC dashboard; ipmitool supported OEM Proprietary Read-only access to BMC dashboard controls except for User, DNS, Network, and PEF features - Enable extended privileges as needed.
- Click Add when done.
Configuring a Static IP Address for the BMC
This section explains how to set a static IP address for the BMC. You will need to do this if your network does not support DHCP.
Use one of the methods described in the following sections:
Configuring a BMC Static IP Address Using ipmitool
This section describes how to set a static IP address for the BMC from the Ubuntu command line.
$ sudo ipmitool lan print 1
Set in Progress     : Set Complete
Auth Type Support    : MD5
Auth Type Enable     : Callback : MD5
                     : User  : MD5
                     : Operator : MD5
                     : Admin : MD5
                     : OEM   : MD5
IP Address Source    : DHCP Address
IP Address           : 10.31.241.190
Subnet Mask          : 255.255.255.0
MAC Address          : 54:ab:3a:72:08:a9
SNMP Community String   : Quanta
IP Header            : TTL=0x40 Flags=0x40 Precedence=0x00 TOS=0x10
BMC ARP Control      : ARP Responses Enabled, Gratuitous ARP Disabled
Gratituous ARP Intrvl   : 0.0 seconds
Default Gateway IP   : 10.31.241.1
Default Gateway MAC  : 00:00:00:00:00:00
Backup Gateway IP       : 0.0.0.0
Backup Gateway MAC   : 00:00:00:00:00:00
802.1q VLAN ID       : Disabled
802.1q VLAN Priority : 0RMCP+ Cipher Suites  : 0,1,2,3,6,7,8,11,12,15,16,17
Cipher Suite Priv Max   : XaaaaaaaaaaaXXX
                     :  X=Cipher Suite Unused
                     :  c=CALLBACK
                     :  u=USER
                     :  o=OPERATOR
                     :  a=ADMIN
: O=OEM- Set the IP address source to static.
$ sudo ipmitool lan set 1 ipsrc static
- Set the appropriate address information.
- To set the IP address (“Station IP address” in the BIOS settings), enter
the following and replace the italicized text with your
information.
$ sudo ipmitool lan set 1 ipaddr 10.31.241.190
- To set the subnet mask, enter the following and replace the italicized
text with your information.
$ sudo ipmitool lan set 1 netmask 255.255.255.0
- To set the default gateway IP (“Router IP address” in the BIOS
settings), enter the following and replace the italicized text with your
information.
$ sudo ipmitool lan set 1 defgw ipaddr 10.31.241.1
- To set the IP address (“Station IP address” in the BIOS settings), enter
the following and replace the italicized text with your
information.
Configuring a BMC Static IP Address Using the System BIOS
This section describes how to set a static IP address for the BMC when you cannot access the DGX-1 remotely. This process involves setting the BMC IP address during system boot.
- Connect a keyboard and display (1024x768 or lower resolution) to the DGX-1, then turn on the DGX-1.
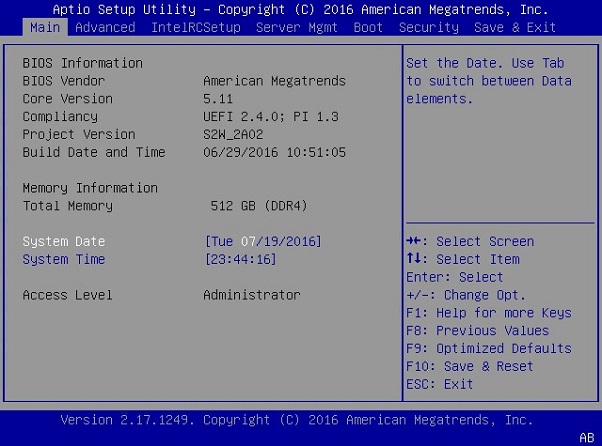
- When you see the NVIDIA logo, press Del to enter the BIOS Utility Setup Screen.
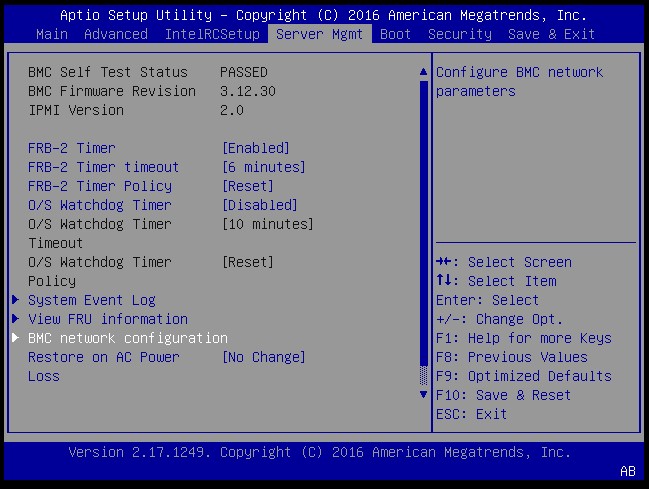
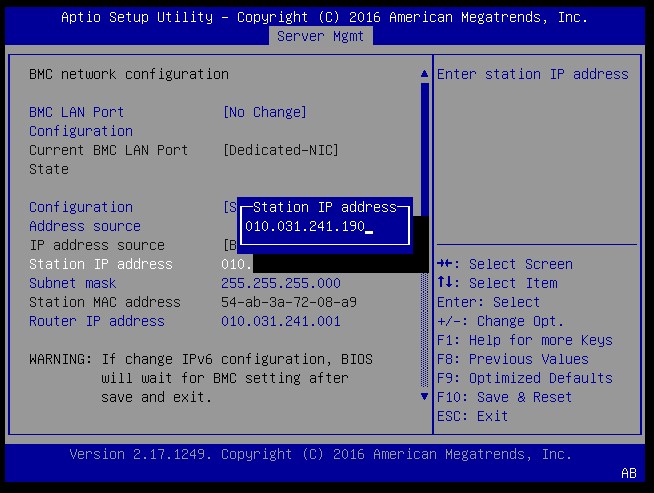
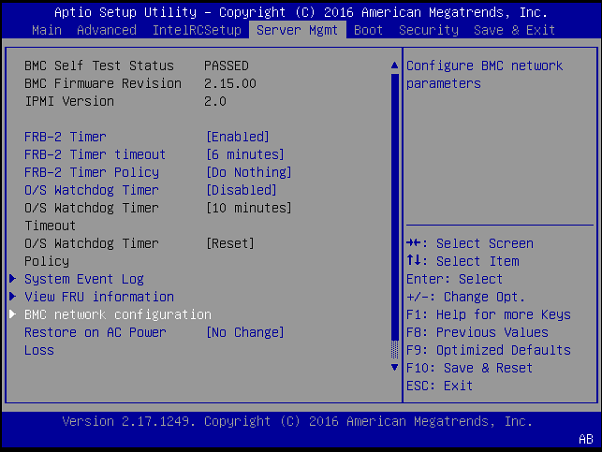
- At the BIOS Setup Utility screen, navigate to the Server Mgmt tab on the top menu, then scroll to BMC network configuration and press Enter.
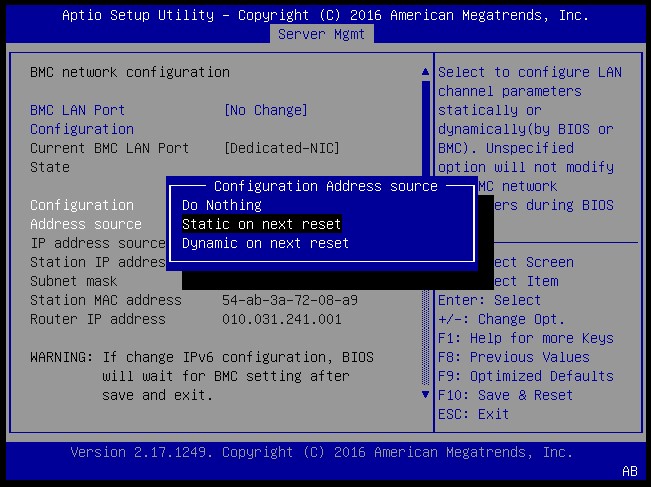
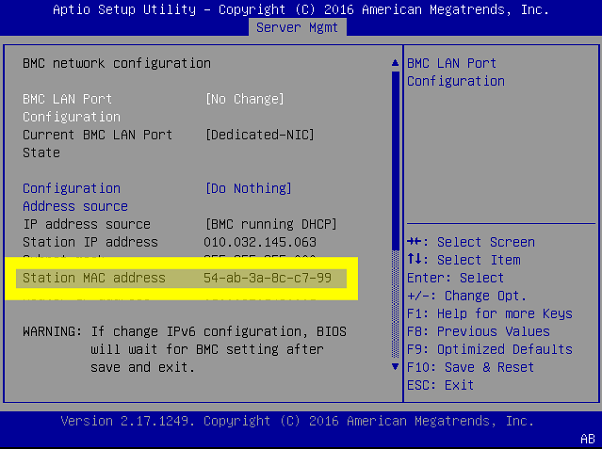
- Scroll to Configuration Address Source and press Enter , then at the Configuration Address source pop-up, select Static on next reset and then press Enter.
- Set the addresses for the Station IP address, Subnet mask, and Router IP
address as needed by performing the following for each:
- Scroll to the specific item and press Enter.
- Enter the appropriate information at the pop-up, then press Enter.
- When finished making all your changes, press F10 to Save
& Reset, then select Yes at the confirmation pop-up
and press Enter.
You can now access the BMC over the network.

Configuring a BMC Static IP Address Using the BMC Dashboard
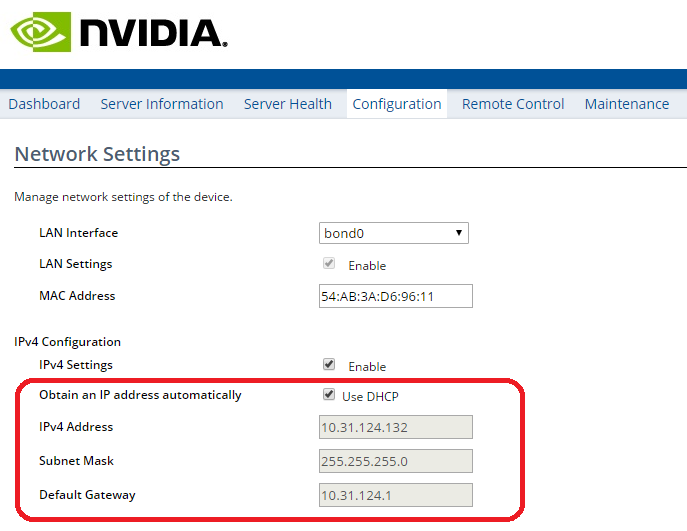
- Log into the BMC, then click Configuration from the top menu and select Network Settings.
- In the IPv4 Configuration section of the Network Settings page, clear the Use DHCP check box, and then enter the appropriate values for the IPv4 Address , Subnet Mask , and Default Gateway fields.
- Click Save when done.
Configuring Static IP Addresses for the Network Ports
During the initial boot setup process for the DGX-1, you had an opportunity to configure static IP addresses for the network ports. If you did not set this up at that time, you can configure the static IP addresses from the Ubuntu command line according to the following instructions.
- Determine the port designation that you want to configure, based on the
physical ethernet port that you have connected to your network.
Use the following port designations according to the DGX-1 Base OS software version installed on the DGX-1:
- Edit the interfaces file.
$ sudo vi /etc/network/interfaces
## Configure a static IP
auto em1
iface em1 inet static
  address 192.168.1.14
  gateway 192.168.1.1
  netmask 255.255.255.0
  network 192.168.1.0
  broadcast 192.168.1.255
Consult your network adiminstrator for the appropriate addresses for your network, and use the port designations that you determined in step 1. - When finished with your edits, press ESC to switch to
command mode, then save the file to the disk and exit the editor.
:wq
- Restart the network services to put the changes into effect.
$ sudo /etc/init.d/networking restart
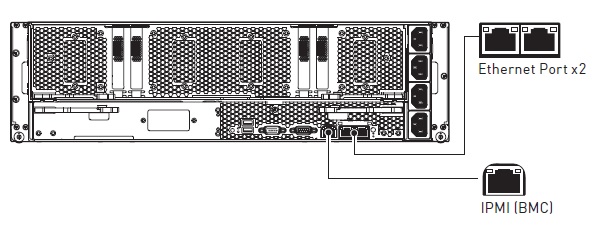
Obtaining MAC Addresses
These instructions explain how to determine the MAC addresses for the IPMI port (BMC) as well as both ethernet ports of the DGX-1.
The ports are, from left to right, IPMI (BMC), em2 (or enp1s0f1), em1 (or enp1s0f0).
- Connect a display (1024x768 or lower resolution) and keyboard to the DGX-1.
- Turn the DGX-1 on or reboot.
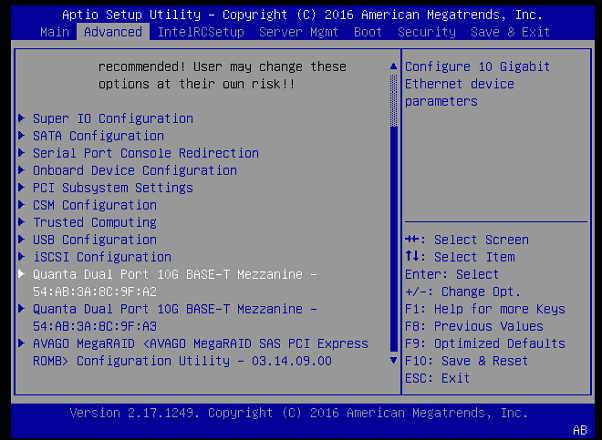
- At the NVIDIA logo boot screen, press [F2] or [Del] to enter the BIOS setup screen.
- Select the Advanced tab from the top menu, then scroll down to view the two Quanta Dual Port 10G BASE-T Mezzanine items. The first item shows the MAC address for ethernet port em1, and the second item shows the MAC address for em2.
- Navigate to and select Server Mgmt from the top menu, then scroll down to and select BMC network configuration.
- Scroll down to view the Station MAC address.
This shows the MAC address for the BMC.
Resetting GPUs in the DGX-1
The NVIDIA® DGX-1™ GPUs may need to be reset during maintenance or repair work. For example, when a GPU presents Double Bit Errors or repeat Single Bit Errors in the same location, pages are retired. For the retired pages to be excluded (unavailable to the user/application), the GPU needs to be reset. In the case of the DGX-1 platforms, individual GPUs cannot be reset because they are linked via NVLink, so all the GPUs must be reset simultaneously.
The only way to reset all the GPUs in the system is to reboot the system.
Changing the Mellanox Card Port Type
Downloading the Mellanox Software Tools
These instructions apply only to DGX-1 servers installed with DGX OS Server release 3.1 or earlier. DGX OS Server release 4.0 and later already include the Mellanox software tools (MST).
Do not install the Mellanox software tools (MST) with DGX OS Server release 4.0 and later; installing the MST will corrupt the included MST installation.
- Download http://www.mellanox.com/downloads/MFT/mft-4.6.0-48-x86_64-deb.tgz .
- Untar the downloaded package.
- Switch to the download directory mft-4.6.0-48-x86_64-deb/ and
then run the installation script.
$ install.sh
Starting the Mellanox Software Tools
- Start the mst driver:
$ sudo mst start
- To verify that the Mellanox Software Tools (MST) services are running, enter the following.
~$ sudo mst status
- The following output indicates the services are not
running.
MST modules:
------------
MST PCI module is not loaded
MST PCI configuration module is not loaded

PCI Devices:
------------
05:00.0
84:00.0
0c:00.0
8b:00.0
- The following output indicates the services are running.
 MST modules:
------------
MST PCI module is not loaded
MST PCI configuration module loaded
MST devices:
------------
/dev/mst/mt4115_pciconf0 - PCI configuration cycles access.
                           domain:bus:dev.fn=0000:05:00.0 addr.reg=88
data.reg=92
                           Chip revision is: 00
/dev/mst/mt4115_pciconf1 - PCI configuration cycles access.
                           domain:bus:dev.fn=0000:0c:00.0 addr.reg=88
data.reg=92
                           Chip revision is: 00
/dev/mst/mt4115_pciconf2 - PCI configuration cycles access.
                           domain:bus:dev.fn=0000:84:00.0 addr.reg=88
data.reg=92
                           Chip revision is: 00
/dev/mst/mt4115_pciconf3 - PCI configuration cycles access.
                           domain:bus:dev.fn=0000:8b:00.0 addr.reg=88
data.reg=92
                           Chip revision is: 00
-1:~$
- The following output indicates the services are not
running.
Determining the Current Port Configuration
To determine the current port configuration, enter the following,
~$ ibv_devinfo | grep -e "hca_id\|link_layer"
- The following output indicates the ports are configured for InfiniBand.
hca_id: mlx5_3  link_layer:  InfiniBand
hca_id: mlx5_2  link_layer:  InfiniBand
hca_id: mlx5_1  link_layer:  InfiniBand
hca_id: mlx5_0  link_layer:  InfiniBand
- The following output indicates the ports are configured for Ethernet.
hca_id: mlx5_3  link_layer:  Ethernet
hca_id: mlx5_2  link_layer:  Ethernet
hca_id: mlx5_1  link_layer:  Ethernet
hca_id: mlx5_0  link_layer:  Ethernet
Switching the Port from InfiniBand to Ethernet
- Change the configuration for all four ports to Ethernet.
~$ sudo mlxconfig -y -d /dev/mst/mt4115_pciconf0 set LINK_TYPE_P1=2
~$ sudo mlxconfig -y -d /dev/mst/mt4115_pciconf1 set LINK_TYPE_P1=2
~$ sudo mlxconfig -y -d /dev/mst/mt4115_pciconf2 set LINK_TYPE_P1=2
~$ sudo mlxconfig -y -d /dev/mst/mt4115_pciconf3 set LINK_TYPE_P1=2
- Verify the configuration changes have been applied.
~$ sudo mlxconfig query |grep -e "LINK_TYPE\|PCI\ device"
PCI device: /dev/mst/mt4115_pciconf3 LINK_TYPE_P1 ETH(2)
PCI device: /dev/mst/mt4115_pciconf2 LINK_TYPE_P1 ETH(2)
PCI device: /dev/mst/mt4115_pciconf1 LINK_TYPE_P1 ETH(2)
PCI device: /dev/mst/mt4115_pciconf0 LINK_TYPE_P1 ETH(2)
Note: These changes will not take place until the server is rebooted. - Reboot the DGX-1.
- After the DGX-1 is back online, make sure that Ethernet is the active link
layer.
~$ ibv_devinfo |grep -e "hca_id\|link_layer"
hca_id: mlx5_3  link_layer:  Ethernet
hca_id: mlx5_2  link_layer:  Ethernet
hca_id: mlx5_1  link_layer:  Ethernet
hca_id: mlx5_0  link_layer:  Ethernet
Switching the Port from Ethernet to InfiniBand
- Change the configuration for all four ports to InfiniBand.
~$ sudo mlxconfig -y -d /dev/mst/mt4115_pciconf3 set LINK_TYPE_P1=1
~$ sudo mlxconfig -y -d /dev/mst/mt4115_pciconf2 set LINK_TYPE_P1=1
~$ sudo mlxconfig -y -d /dev/mst/mt4115_pciconf1 set LINK_TYPE_P1=1
~$ sudo mlxconfig -y -d /dev/mst/mt4115_pciconf0 set LINK_TYPE_P1=1
- Verify the configuration changes have been applied.
~$ sudo mlxconfig query |grep -e "LINK_TYPE\|PCI\ device"
PCI device: /dev/mst/mt4115_pciconf3 LINK_TYPE_P1 IB(1)
PCI device: /dev/mst/mt4115_pciconf2 LINK_TYPE_P1 IB(1)
PCI device: /dev/mst/mt4115_pciconf1 LINK_TYPE_P1 IB(1)
PCI device: /dev/mst/mt4115_pciconf0 LINK_TYPE_P1 IB(1)
Note: These changes will not take place until the server is rebooted. - Reboot the DGX-1.
- After the DGX-1 is back online, make sure that InfiniBand is the active link
layer.
~$ ibv_devinfo |grep -e "hca_id\|link_layer"
hca_id: mlx5_3 link_layer: InfiniBand
hca_id: mlx5_2 link_layer: InfiniBand
hca_id: mlx5_1 link_layer: InfiniBand
hca_id: mlx5_0 link_layer: InfiniBand
Enabling USB 3.0
There are two USB 3.0 ports on the DGX-1. However, they are set up as USB 2.0 by default in the system BIOS. To obtain USB 3.0 performance, you must enable USB 3.0 in the system BIOS as explained in this section.
- Connect a display (1024x768 or lower resolution) and keyboard to the DGX-1.
- Turn the DGX-1 on or reboot.
- At the NVIDIA logo boot screen, press [F2] or [Del] to enter the BIOS setup screen.
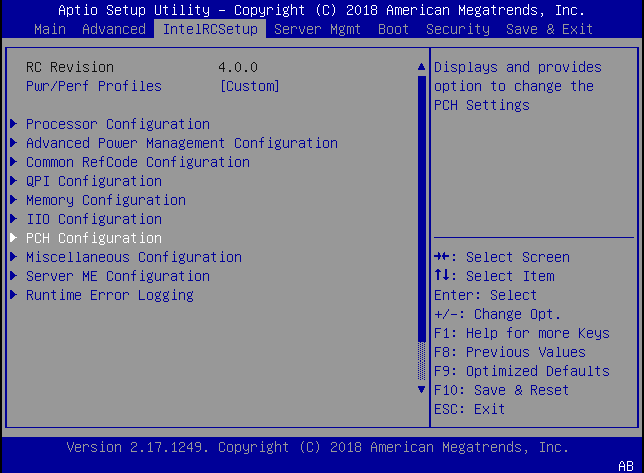
- Select the IntelRCSetup tab from the top menu, then scroll down to USB Configuration and press Enter.
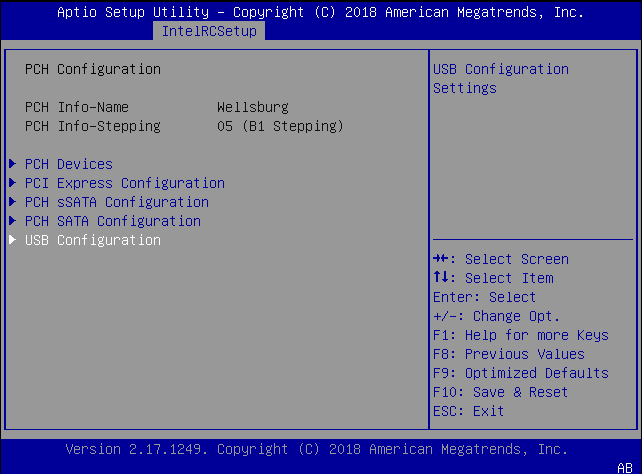
- From the IntelRCSetup screen, scroll down to PCH Configuration and press Enter.
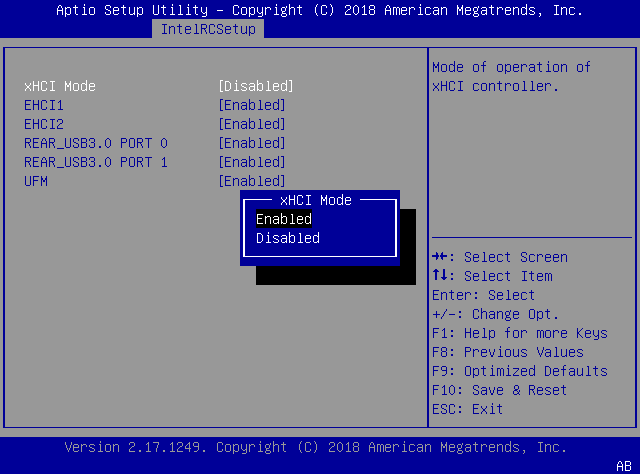
- Scroll to xHCI Mode and press Enter, then select Enabled at the xHCI Mode dialog and press Enter.
- Press F10, then select Yes at the confirmation pop-up and press Enter. USB 3.0 is enabled upon system reboot.