Installation and Setup
This chapter provides the basic instructions for installing and setting up the NVIDIA DGX-1.
Registering Your DGX-1
To obtain support for your DGX-1 system, follow the instructions for registration in the Entitlement Certification email that was sent as part of the purchase.
Registration allows you to access the NVIDIA Enterprise Support Portal, obtain technical support, get software updates, and set up an NGC for DGX systems account. If you did not receive the information, open a case with the NVIDIA Enterprise Support Team at https://www.nvidia.com/en-us/support/enterprise/.
Refer to the Customer Support chapter for customer support contact information.
Choosing a Setup Location / Site Preparation
Decide on a suitable location for setting up and operating the DGX-1. The location should be clean, dust-free, and well ventilated.
General Conditions
- Prepare a sufficiently wide aisle to accommodate the unboxed chassis (chassis dimensions - 5.16”H x 17.5"W x 34.1"D).
- The rack must accommodate a 134 lb, 3U rack mount system (chassis dimensions - 5.16”H x 17.5"W x 34.1"D).
- The rack must have square mounting holes.
- Leave enough clearance in front of the rack (36" (91.4 cm)) to enable you to install the unit into the rack.
- Leave approximately 30" (76.2cm) of clearance in the back of the rack to allow for sufficient airflow and ease in servicing.
- Always make sure the rack is secured and stable before adding or removing the appliance or any other component.
- Prepare adequate sound-proofing: The equipment fans can generate 72-100 dBA.
Environmental Conditions
- Operating environment
- Temperature: 5 ◦ C to 35 ◦ C (41 ◦ F to 95 ◦ F)
- Relative humidity: 20% to 85% noncondensing
- Air flow
- The chassis fans can produce a maximum of 340 CFM of air flow.
- Do not block the ventilation areas at the front and rear of the chassis.
- Minimize any restrictions on air flow around the chassis.
Connections
- Power:
- The DGX-1 is powered through four 1600W power supply units, each rated at 200-240VAC, 8A, 50/60 Hz. Total system power requirement: 3500W
- C13/C14 cables provided for each power supply to connect to a compatible
PDU.
IMPORTANT: Do not use the provided cables with any other product or for any other purpose.
- Network: Dual 10GBASE-T RJ45 connection
Use industry standard CAT6 Ethernet cables for connecting to the network ports. (Cables not included.)
- IPMI: 10/100BASE-T RJ45 connection
Use industry standard CAT6 Ethernet cables for connecting to the network ports. (Cables not included.)
- InfiniBand: Qty 4 - QSFP28 ports, InfiniBand and Ethernet compliant
Use Mellanox-compliant InfiniBand cables for connecting to the InfiniBand ports. (Cables not included.)
The DGX-1 System is not shipped with network cables. For a list of cables compatible with the Mellanox ConnectX-4 or ConnectX-5 VPI cards installed in the DGX-1 system, visit the Mellanox ConnectX-4 or ConnectX-5 Firmware Download page, select the appropriate FW version, OPN (model), and PSID, and then select Release Notes from the Documentation column.
If you have replaced the Dual port, 10GBASE-T, network adapter Mezzanine with the 10GbE SPF+ NIC,- All passive and active limiting direct attach cables that comply with SFF-8431 v4.1 and SFF-8472 v10.4 specifications are supported.
- The following Intel optics and/or direct attach cables are supported:
- The following lists the 3rd party SFP+ modules and direct attach cables that have
received some testing. Not all modules are applicable to all devices.
Supplier Type Part Numbers Finisar SFP+ SR bailed, 10g single rate FTLX8571D3BCL Avago SFP+ SR bailed, 10g single rate AFBR-700SDZ Finisar SFP+ LR bailed, 10g single rate FTLX1471D3BCL Finisar DUAL RATE 1G/10G SFP+ SR (No Bail) FTLX8571D3QCV-IT Avago DUAL RATE 1G/10G SFP+ SR (No Bail) AFBR-703SDZ-IN1 Finisar DUAL RATE 1G/10G SFP+ LR (No Bail) FTLX1471D3QCV-IT Avago DUAL RATE 1G/10G SFP+ LR (No Bail) AFCT-701SDZ-IN1
Preparing for Network Access
- The IPMI port and Ethernet ports can be connected to your local LAN.
These ports are configured for DHCP by default.
- To use DHCP, connect the port to a local DHCP server which should provide an IP address and assign a DNS configuration to the DGX-1.
- If DHCP is not available, then you will need to set up a static IP for each Ethernet port.
- NVIDIA recommends that customers follow best security practices for BMC management (IPMI
port). These include, but are not limited to, such measures as:
- Restricting the DGX-1 IPMI port to an isolated, dedicated, management network
- Using a separate, firewalled subnet
- Configuring a separate VLAN for BMC traffic if a dedicated network is not available
- Make sure your network can connect to the following:
- http://us.archive.ubuntu.com/ubuntu/
- http://security.ubuntu.com/ubuntu
- http://international.download.nvidia.com/dgx1/repos/ (Base OS Software 2.x or earlier; to be accessed using apt-get, not a browser)
- http://international.download.nvidia.com/dgx/repos/ (Base OS Software 3.1 or later; to be accessed using apt-get, not a browser)
- https://apt.dockerproject.org/repo
- https://download.docker.com/linux/ubuntu
- https://nvcr.io
Test using
$ wget https://nvcr.io/v2
The output should include
Connecting to nvcr.io (nvcr.io)|52.8.131.152|:443...connected.
HTTP request sent, awaiting response... 401 Unauthorized
If access to those URLs requires use of a proxy, refer to Setting Up a System Proxy for setup instructions.
Unpacking the DGX-1
- Remove the shrink wrap.
- Collapse the yellow "Do not stack" cone, if included.
- Open the main DGX-1 box, then remove the accessory and rail kit boxes.
CAUTION: At least four people, or a mechanical assist, are required to remove the DGX-1 from the box. To reduce the risk of personal injury or damage to the equipment, always observe local occupational health and safety requirements and guidelines for material handling.
DO NOT use the handles at the front of the DGX-1 to lift the unit. The handles are designed for sliding the unit out of a rack, and not for carrying the full weight of the DGX-1.
- Remove the protective plastic sheet from the top of the DGX-1.
- Preserve and retain packaging.
- Be sure to inspect each piece of equipment shipped in the packing box. If anything is missing or damaged, contact your supplier.

What's In the Box
The NVIDIA DGX-1 shipping box includes the following:
- NVIDIA DGX-1
- Bezel
- Rail hardware kit
- Accessory Box
- AC Power Cables (qty 4 – IEC 60320 C13/14, 3.3-ft./1-meter, compatible with data
center PDUs)
IMPORTANT: Do not use the provided cables with any other product or for any other purpose.
- Hard disk bay screws
- Toxic Substance Notice & Safety Instructions
- Quick Start Guide
- DVD containing source files for open source software
- AC Power Cables (qty 4 – IEC 60320 C13/14, 3.3-ft./1-meter, compatible with data
center PDUs)
Installing the DGX-1 Into a Rack
Installing the Rails
Refer to the instructions in the rail packaging for details on installing the rails onto the rack and chassis. The instructions are also provide in the chapter King Slide - AH61-500 in this document.
The following are supplemental instructions:
- Use a Phillips screwdriver to assist in mounting the rails to the rack.
- If necessary, detach the inner rails from the outer slide rails.
- Follow any designations on the inner rail (or its outer rail mate) to determine
the proper orientation and positioning to connect to the chassis, then secure to
the chassis.Important: Make sure that the reinforced hole at the front end of the rail is positioned on the bottom side of the rail, and that it aligns with the thumbscrew on the front of the DGX-1. If the hole is positioned on the top side, then the rail is on the wrong side of the DGX-1 and the DGX-1 will not fit properly in the rack.
- Follow any designations on the outer slide rail to determine front/back and left-side/right-side positioning against the rack.
- Secure the back of one of the slide rails to the rack, then extend the rail until it fits securely to the front of the rack.
- Secure the slide rail to the front of the rack.
- Repeat steps 4-6 for the other slide rail.
Mounting the DGX-1
- Confirm that the DGX-1 has the inner rails attached and that you have already mounted the outer rails into the rack.
- With the front of the unit facing away from the rack, use an equipment lift to
assist in sliding the unit into the rack as follows:

CAUTION: The DGX-1 weighs approximately 134 lbs, so an equipment lift is required to safely lift the unit and then accurately align the chassis rails with the rack rails.
- Align the inner chassis rails with the front of the outer rack rails.
- Slide the inner rails into the outer rails, keeping the pressure even
on both sides (you may have to depress the locking tabs when
inserting).
When the DGX-1 has been pushed completely into the rack, you should hear the locking tabs "click" into the locked position.
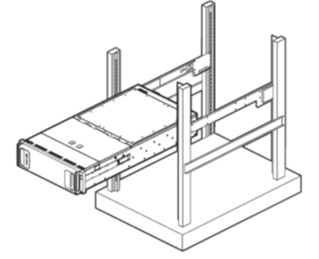
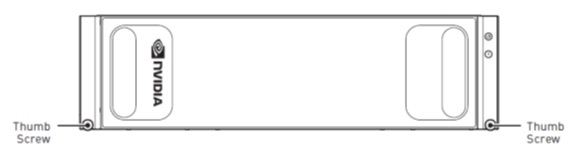
- Lock the unit in place using the thumb screws located on the front of the unit.
Attaching the Bezel
The bezel is designed to attach easily to the front of the DGX-1.
- Prepare the DGX-1 by making sure that the power supply handles (located at the
power supply fans) are flipped up.

- Move any other obstructions, such as cable ties, away from the outer edge of the DGX-1.
- With the bezel positioned so that the NVIDIA logo is visible from the front and
is on the left hand side, line up the pins near the corners of the DGX-1 with
the holes in back of the bezel, then gently press the bezel against the
DGX-1.Note:CAUTION: Be careful not to accidentally press the power button that is on the right edge of the DGX-1 when removing or installing the bezel.
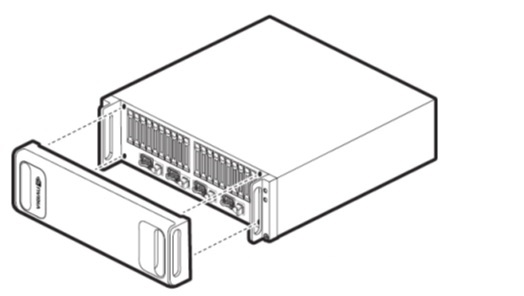
The bezel is held in place magnetically .
Connecting the Power Cables
- Open the accessory box and remove the four C13/C14 power cables.
- Use the cables to connect each of the four plugs at the right-rear of the DGX-1
to a PDU.
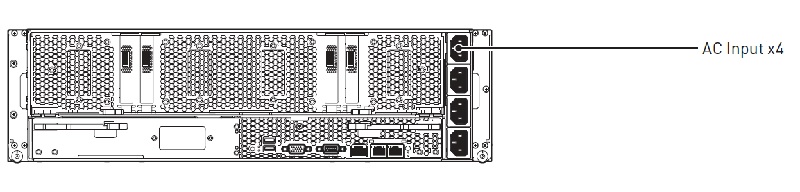 Note: NVIDIA recommends connecting power through a smart PDU which provides the ability to power-cycle the system remotely.
- Secure each cable to the DGX-1, using the power cable retention clips attached to the power plugs.
- Connect each cable to the PDU. Ensure that the cables are distributed over at least two circuits and, if using 3-phase PDUs, they are balanced across all phases as much as possible. Ideally, each cable should connect to a different PDU.
- Verify that each cable is firmly inserted into the PDU. There is usually a click to indicate full insertion.
Connecting the Network Cables
- Using an Ethernet cable, connect one of the dual Ethernet ports (em1 or em2) to
your LAN for internet access to the NVIDIA DGX website, remote access to
launched application containers on the DGX-1, or to connect to the DGX-1 using
SSH.
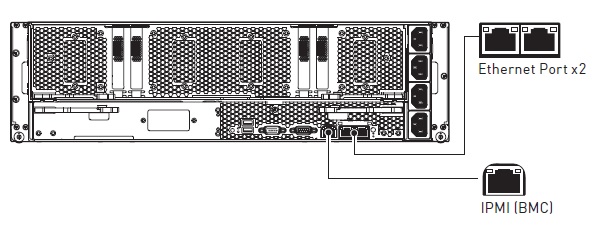
The left-side/right-side ethernet port designation depends on the Base OS software version installed on the DGX-1 as listed in the table below.Ethernet Port Position Port Designation: Base OS Software 2.x and earlier Port Designation: Base OS Software 3.x and later Right Side em1 enp1s0f0 Left Side em2 enp1s0f1 Note: NVIDIA recommends connecting only one of the Ethernet ports to your LAN. If you are connecting both Ethernet ports, they must each be connected to separate networks, The DGX-1 is not configured from the factory to have multiple Ethernet interfaces on the same network. - Using an Ethernet cable, connect the IPMI (BMC) port to your LAN for remote access to the base management controller (BMC). Verify that all network cables are firmly inserted into the DGX-1 and the associated network switch.
Setting Up the DGX-1
These instructions describe the setup process that occurs the first time the DGX-1 is powered on after delivery. Be prepared to accept all EULAs and to set up your username and password.
- Connect a display to the VGA connector, and a keyboard to any of the USB
ports.
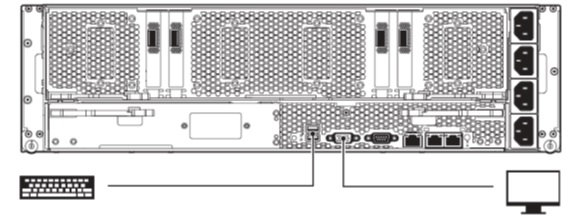
For best display results, use a monitor with a native resolution of 1024x768 or lower. - Power on the DGX-1.
The system will take a few minutes to boot.
You may be presented with end user license agreements (EULAs) for the NVIDIA software at this point in the setup, depending on the DGX-1 software version. Accept all EULAs to proceed with the installation.
You are prompted to configure the DGX-1 software.
- Perform the steps to configure the DGX-1 software.
T
he steps are based on DGX OS 5.0. There are some variations in the process if the DGX system is installed with a previous DGX OS release.
- Select your language and locale preferences.
- Select the country for your keyboard.
- Select your time zone.
- Confirm the UTC clock setting.
- Create an administrative user account with your name, username, and
password.
The administrator username is used also for the BMC login username and GRUB username.
DGX OS 4 and earlier: When logging in to the BMC, enter your username for both the User ID as well as the password. Be sure to create a unique BMC password at the first opportunity.
Note: The BMC software will not accept "sysadmin" for a user name. If you create this user name for the system log in, "sysadmin" will not be available for logging in to the BMC. - Create a BMC admin password.
The BMC password must consist of a minimum of 13 characters.
- (Available starting with DGX OS 5.0) Create a GRUB password.
You can click OK without entering a password which will disable this step, but NVIDIA recommends setting the GRUB password for security hardening.
- (Available starting with DGX OS 5.0) Create a root filesystem
password.
You will need the new passphrase to unlock the root filesystem when the system boots.
This step appears only if you installed the system with an encrypted root filesystem during re-imaging.
- Choose a primary network interface for the DGX-1.
After you select the primary network interface, the system attempts to configure the interface for DHCP and then asks you to enter the name server addresses.Note: After you select the primary network interface, the system attempts to configure the interface for DHCP and then asks you to enter a hostname for the system. If DHCP is not available, you will have the option to configure the network manually. If you need to configure a static IP address on a network interface connected to a DHCP network, select Cancel at the Network configuration – Please enter the hostname for the system screen. The system will then present a screen with the option to configure the network manually.
- If no DHCP is available, then click OK at the Network autoconfiguration failed dialog and configure the network manually.
- If you want to configure a static address, then click Cancel at the dialog after the DHCP configuration completes to restart the network configuration steps.
- If you need to select a different network interface, then click Cancel at the dialog after the DHCP configuration completes to restart the network configuration steps.
- If prompted, fill in the requested networking information such as name server or domain name.
- Choose a host name for the DGX-1.
- Choose to install predefined software.
Press the space bar to select or deselect the software to install.
Note: By default, the DGX-1 installs only minimal software packages necessary to ensure system functionality. You can deselect the OpenSSH package; however, NVIDIA recommends that you keep this package selected, and uninstall it only if required by your IT security policy.
- Select OK to continue.
You may be presented with end user license agreements (EULAs) for the NVIDIA
software at this point in the setup, depending on the DGX OS software version.
Accept all EULAs to complete the installation.
The system completes the installation, reboots automatically, then
presents the system login
prompt:
<hostname> login:
Password:
- Log in.
Post Setup Instructions for DGX OS Server Software Version 2.x and Earlier
These instructions apply if your DGX-1 is installed with software version 2.x or earlier.
$ grep VERSION /etc/dgx-release
DGX_SWBUILD_VERSION="2.0.4"
- If your network is configured for DHCP, then make sure that dynamic DNS updates
are enabled.
Check whether /etc/resolv.conf is a link to
/run/resolvconf/resolv.conf.
$ ls -l /etc/resolv.conf
Expected output:lrwxrwxrwx 1 root root 29 Dec 1 21:19 /etc/resolv.conf -> ../run/resolvconf/resolv.conf
- If the expected output appears, then skip to step 2.
- If this does not appear, then enable dynamic DNS updates as follows:
- Launch the Resolvconf Reconfigure package.
$ sudo dpkg-reconfigure resolvconf
The Configuring resolvconf screen appears. - Select <Yes>when asked whether to prepare /etc/resolv.conf for dynamic updates.
- Select <No> when asked whether to append original file to dynamic file.
- Select <OK> at the Reboot recommended screen. You do not need to reboot. You are returned to the command line.
- Bring down the interface, where <network interface> is em1 or em2,
whichever you have set up as your primary network interface.
$ sudo ifdown <network interface>
Expected output:ifdown: interface <network interface> not configured
- Bring up the interface, where <network interface> is em1 or em2,
whichever you have set up as your primary network interface.
$ sudo ifup <network interface>
Expected output (last line):… bound to <IP address> -- renewal in …
- Repeat step 1 to confirm that /etc/resolv.conf is a link to /run/resolvconf/resolv.conf.
- Make sure that the nvidia-peer-memory module is installed.
$ lsmod | grep nv_peer_mem
If the following output appears, then your DGX-1 setup is complete and you do not need to perform the next steps.nv_peer_mem 16384 0 nvidia 11911168 30 nv_peer_mem,nvidia_modeset,nvidia_uv mib_core 143360 13 rdma_cm,ib_cm,ib_sa,iw_cm,nv_peer_mem,mlx4_ib,mlx5_ib, ib_mad,ib_ucm,ib_umad,ib_uverbs,rdma_ucm,ib_ipoib
- If there is no output to the lsmod command, then build and install the
nvidia-peer-memory module.
- Get and install the module.
 $ sudo apt-get update
 $ sudo apt-get install --reinstall mlnx-ofed-kernel-dkms nvidia-peer-memory-dkms
Expected output.DKMS: install completed. Processing triggers for initramfs-tools (0.103ubuntu4.2) ... update-initramfs: Generating /boot/initrd.img-4.4.0-45-generic
- Add the module to the Linux kernel.
$ sudo modprobe nv_peer_mem
There is no expected output for this command. - Repeat step 2 to confirm that the nvidia-peer-memory module has been added.
- Get and install the module.
Updating the DGX-1 Software
You must register your DGX-1 in order to receive software updates. Once registered, you will receive an email notification whenever a new software update is available.
These instructions explain how to update the DGX-1 software through an internet connection to the NVIDIA public repository. The process updates a DGX-1 system image to the latest QA’d versions of the entire DGX-1 software stack, including the drivers.
The instructions apply to a point update from the latest software release – for example, from 3.1.4 to 3.1.6. To upgrade from DGX OS Server release 1.0, 2.0, or 2.1, refer to the release notes for detailed instructions.
Perform the updates using commands on the DGX-1 console.
- Run the package manager.
$ sudo apt update
- Check to see which software will get updated.
$ sudo apt full-upgrade -s
To prevent an application from being updated, instruct the Ubuntu package manager to keep the current version. See Introduction to Holding Packages.
- Upgrade to the latest version.
$ sudo apt full-upgrade
Answer any questions that appear.
Most questions require a Yes or No response. When asked to select the grub configuration to use, select the current one on the system.
Other questions will depend on what other packages were installed before the update and how those packages interact with the update.
- Reboot the system.
Managing CPU Mitigations
DGX OS Server includes security updates to mitigate CPU speculative side-channel vulnerabilities. These mitigations can decrease the performance of deep learning and machine learning workloads.
If your installation of DGX systems incorporates other measures to mitigate these vulnerabilities, such as measures at the cluster level, you can disable the CPU mitigations for individual DGX nodes and thereby increase performance. This capability is available starting with DGX OS Server release 4.4.0.
Determining the CPU Mitigation State of the DGX System
If you do not know whether CPU mitigations are enabled or disabled, issue the following.
$ cat /sys/devices/system/cpu/vulnerabilities/*
- CPU mitigations are enabled if the output consists of multiple lines
prefixed with Mitigation:.
Example
KVM: Mitigation: Split huge pages
Mitigation: PTE Inversion; VMX: conditional cache flushes, SMT vulnerable
Mitigation: Clear CPU buffers; SMT vulnerable
Mitigation: PTI
Mitigation: Speculative Store Bypass disabled via prctl and seccomp
Mitigation: usercopy/swapgs barriers and __user pointer sanitization
Mitigation: Full generic retpoline, IBPB: conditional, IBRS_FW, STIBP: conditional, RSB filling
Mitigation: Clear CPU buffers; SMT vulnerable
- CPU mitigations are disabled if the output consists of multiple lines
prefixed with Vulnerable.
Example
KVM: Vulnerable
Mitigation: PTE Inversion; VMX: vulnerable
Vulnerable; SMT vulnerable
Vulnerable
Vulnerable
Vulnerable: __user pointer sanitization and usercopy barriers only; no swapgs barriers
Vulnerable, IBPB: disabled, STIBP: disabled
Vulnerable
Disabling CPU Mitigations
- Install the nv-mitigations-off package.
$ sudo apt install nv-mitigations-off -y
- Reboot the system.
- Verify CPU mitigations are disabled.
$ cat /sys/devices/system/cpu/vulnerabilities/*
The output should include several Vulnerable lines. See Determining the CPU Mitigation State of the DGX System for example output.
Re-enabling CPU Mitigations
- Remove the nv-mitigations-off package.
$ sudo apt purge nv-mitigations-off
- Reboot the system.
- Verify CPU mitigations are enabled.
$ cat /sys/devices/system/cpu/vulnerabilities/*
The output should include several Mitigations lines. See Determining the CPU Mitigation State of the DGX System for example output.