Cloud Quickstart - AWS
This guide aims to get you up and running with a cloud quickstart of the Multi-Camera Sim2Deploy workflow, consisting of the Simulation & Synthetic Data Generation (SDG) workflow and the Real-Time Location System (RTLS) workflow.
Prerequisites
Sign up for Developer Preview of Metropolis Microservices. Review here.
Refer to the pre-requisite to obtain the required access and information for using the automated deployment scripts.
For best performance, we recommend using A100/H100 GPUs for RTLS and L40S GPUs for SDG. However, for this guide, we will use AWS A10G-based instances:
For the SDG workflow: 4x A10G instance type -
g5.12xlargeFor the RTLS workflow: 8x A10G instance type -
g5.48xlarge
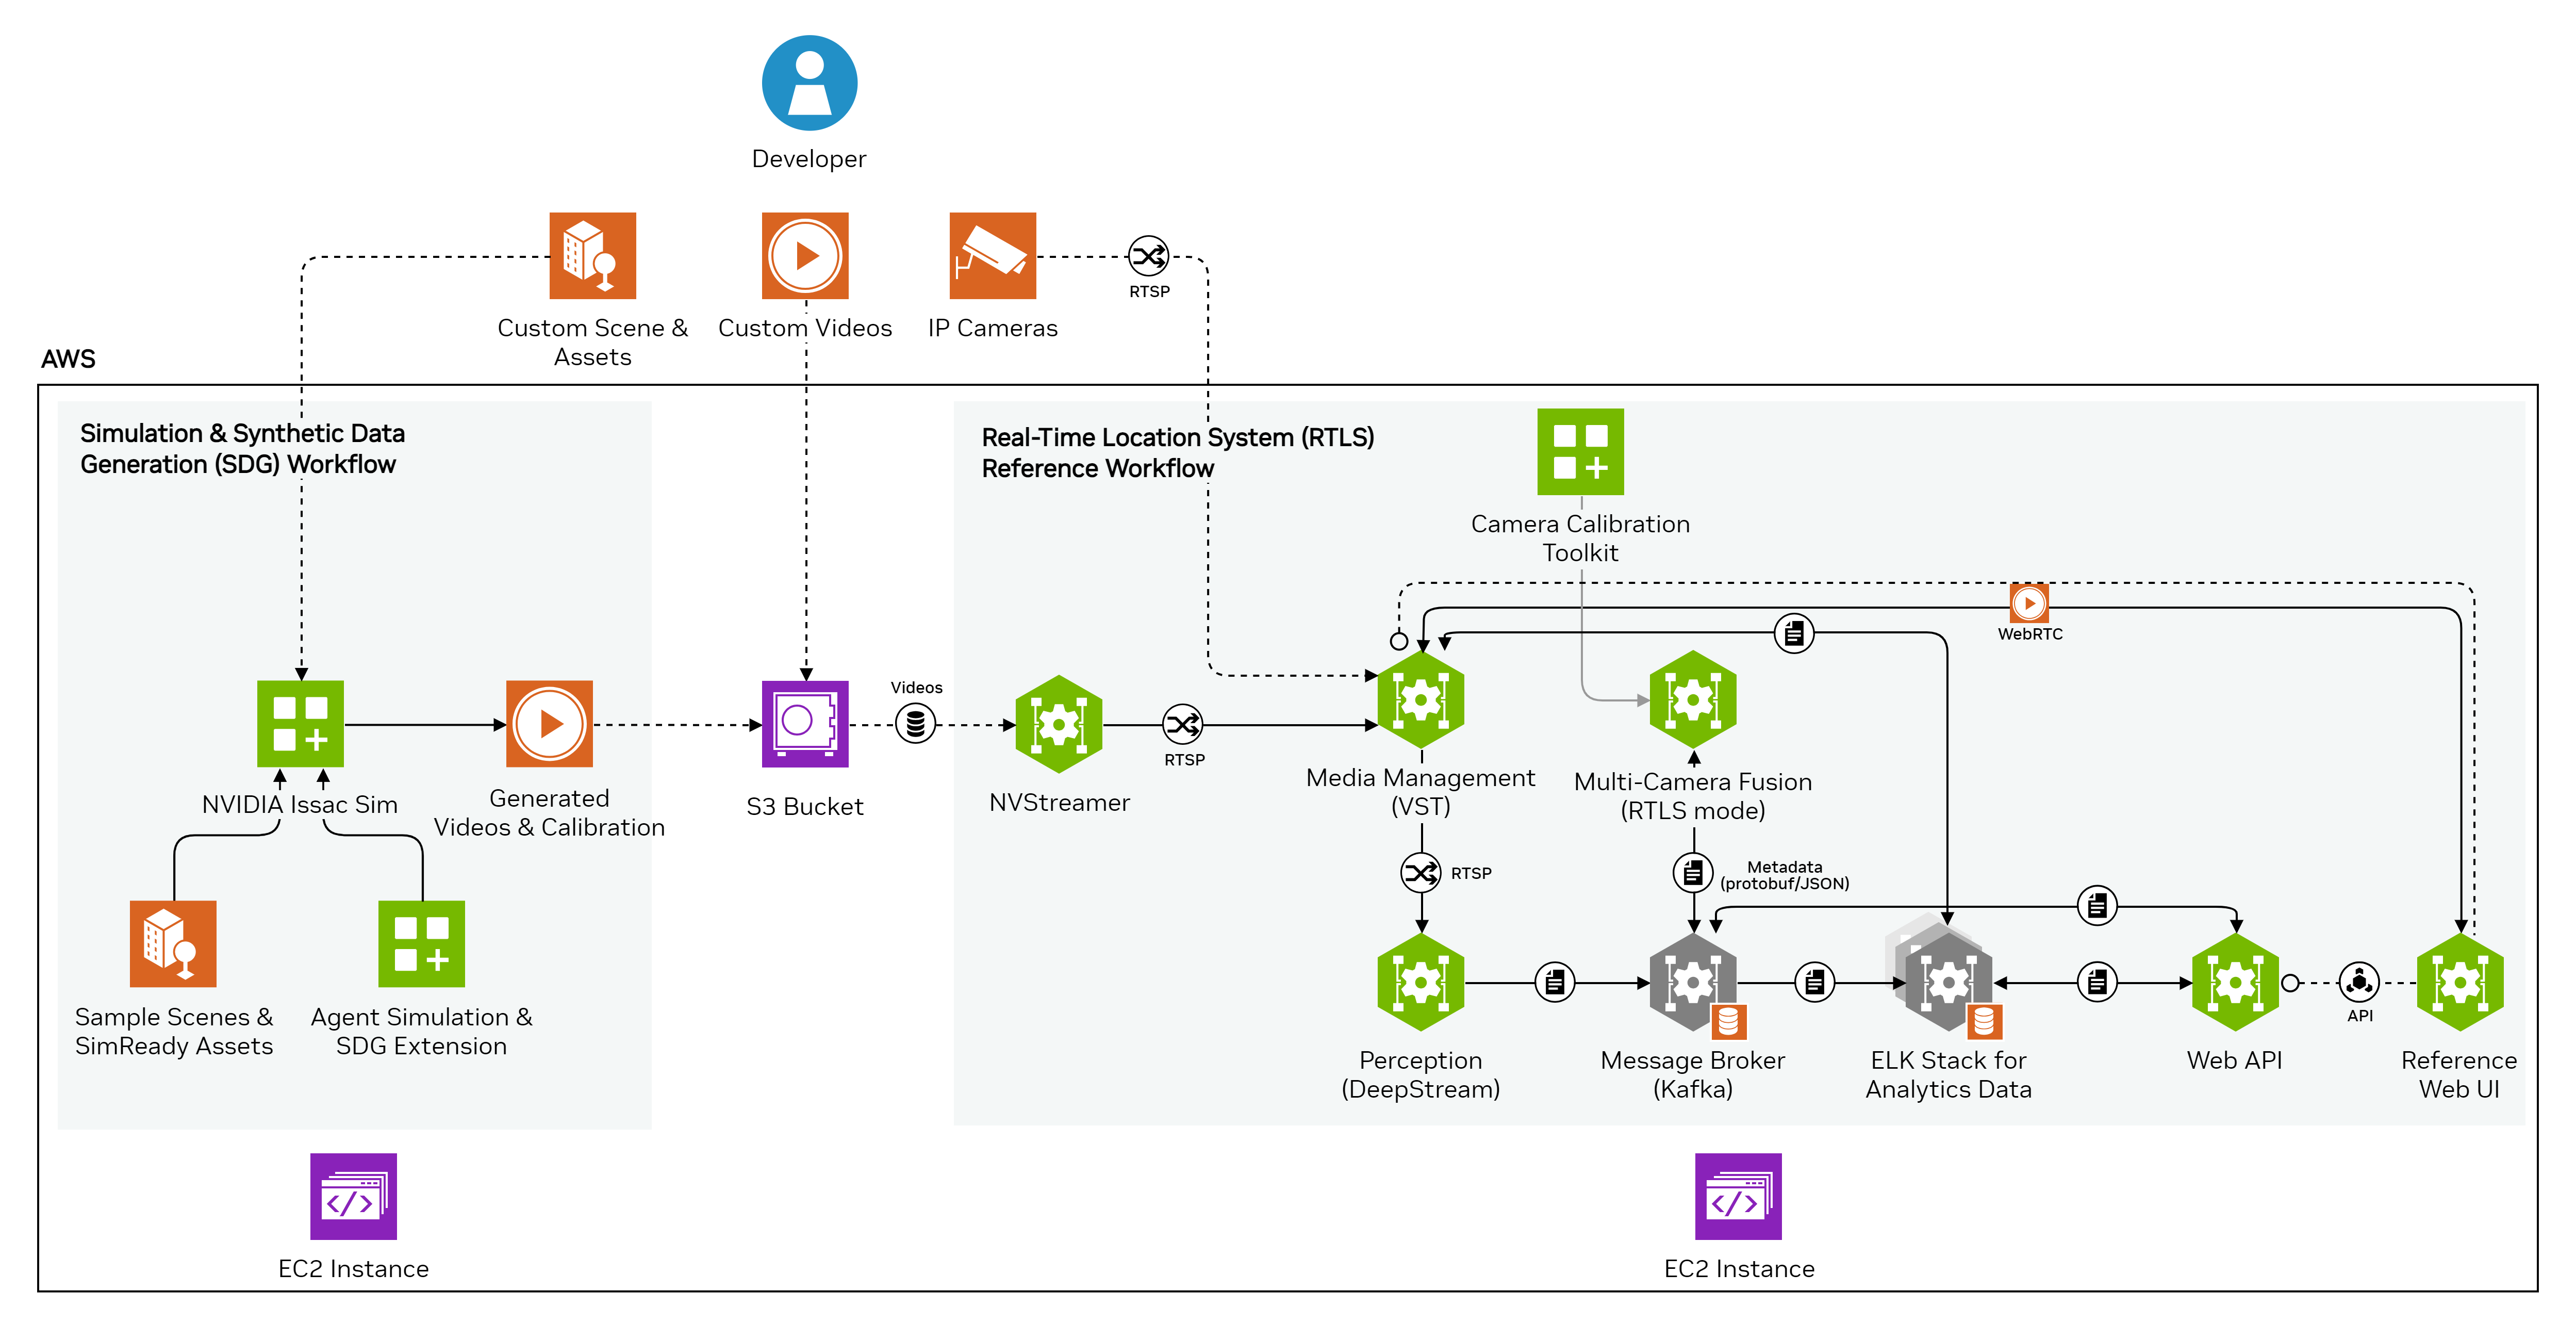
Architecture Overview
Deployment artifacts, via infrastructure as code, provision two cloud instances in separate VPCs in AWS connected via shared storage (S3 bucket).
The SDG instance comes pre-loaded with a simple warehouse digital twin containing:
12 cameras
8 digital human (DH) characters
Shared storage is pre-populated with synthetic videos & calibration data generated from the digital twin:
12 10-minute videos
Calibration data
The RTLS instance comes pre-configured with the videos and calibration data from the shared storage.
Users can explore the UI & API endpoints of the SDG and RTLS workflows.
Users can use the SDG workflow to modify the digital twin, export new synthetic videos to shared storage, and follow instructions to load them in the RTLS instance.
Behind the scenes, the deployment scripts leverage the IsaacSim-Automator to deploy SDG and Amazon Web Services Setup Guide for RTLS. While this guide provides the steps to get up and running, you can check out the above references to get more from your deployment.
The diagram below shows an example deployment architecture with the SDG workflow running on an L40-based instance and the RTLS workflow running on an H100-based instance:
Video Tutorial
A step-by-step video guide for this deployment process is available here:
Get Started with Multi-Camera AI - From Simulation to Deployment on AWS
The video provides a visual walkthrough of the deployment and customization steps outlined in this document.
Set Up the Workflows in the Cloud
RTLS Workflow
Download and un-tar the deployment artifact from NGC and locate the subfolder that was un-tarred.
# download the artifact
$ ngc registry resource download-version "nfgnkvuikvjm/mdx-v2-0/metropolis-aws-one-click-script:0.0.12"

## Go to Artifact directory
$ cd metropolis-aws-one-click-script_v0.0.12/

##untar deploy script tar file
$ tar -xvf metropolis-aws-one-click-script.tar.gz


# verify necessary files required for Installing Infra on AWS CSP
$ ls
deploy-spec  deploy-template.yml  examples  k8s-helm-values  LICENSE.md  modules  mtmc-app-deploy  README.md  secrets.sh
Edit
deploy-template.ymlandsecrets.shfiles (see samples in Appendix).Run the following commands to deploy the Metropolis RTLS app:
# To view available options
bash mtmc-app-deploy

# To preview changes based on deploy-template.yml without actually applying the changes
bash mtmc-app-deploy preview

# To install changes showed in preview option based on deploy-template.yml
bash mtmc-app-deploy install

# To show results/information about the project installed
bash mtmc-app-deploy show-results

# To uninstall the deployed infra and application
bash mtmc-app-deploy uninstall
Note down the S3 bucket name provisioned by the deployment steps above.
The install output will print the AWS resource list including the S3 bucket shared between the SDG and RTLS instances. This information will be needed in future steps.
A sample output for Bucket Name details can be seen here.
SDG Workflow
Follow the steps below to provision the SDG instance.
These steps use the IsaacSimAutomator.
# download the artifact
$ ngc registry resource download-version "nfgnkvuikvjm/mdx-v2-0/metropolis-isaac-sim-sdg-script:v2.1-06132024"

$ cd metropolis-isaac-sim-sdg-script_vv2.1-06132024/

## Untar the downloaded file
$ tar -xvf isaacsim-deployment-script.tar.gz

## verify necessary files required for Installing Infra for SDG
$ ls
build    CONTRUBUTING.md  deploy-aws    deploy-gcp  Dockerfile  LICENSE    repair   run             src    state  upload
connect  deploy-alicloud  deploy-azure  destroy     download    README.md  results  sdg-deploy.txt  start  stop   uploads
$


# Please run below inside the downloaded folder to build the container:
$ ./build

## To start newly build docker from previous step, run below command
$ ./run     ## Once inside the container run below steps.

## Update necessary files – uploads/credentials, sdg-deploy.txt
# Please make sure fill details inside file "sdg-deploy.txt" only values inside “< > “ needs to be updated

## update file under folder "uploads/" "credentials" with aws access and secret key to be passed to IsaacSIM container for the new data upload to S3

## Run the SDG App deploy command
$ cat sdg-deploy.txt | xargs ./deploy-aws
Note
For updating the already existing deployment, please check Appendix section.
Note down the generated output details for access to the SDG VM instance UI, including NoMachine credentials.
Explore RTLS Workflow
The RTLS workflow is pre-configured with sample multi-camera videos & calibration data, generated from the sample warehouse digital twin, to be explored in the next section.
Note
Although we leverage synthetic data as part of the Multi-Camera Sim2Deploy overall workflow, the RTLS workflow is agnostic to whether the input multi-camera data is real or synthetic.
Refer to the Deployment guide verify deployment section to navigate to the RTLS UI. RTLS UI will look as follows:
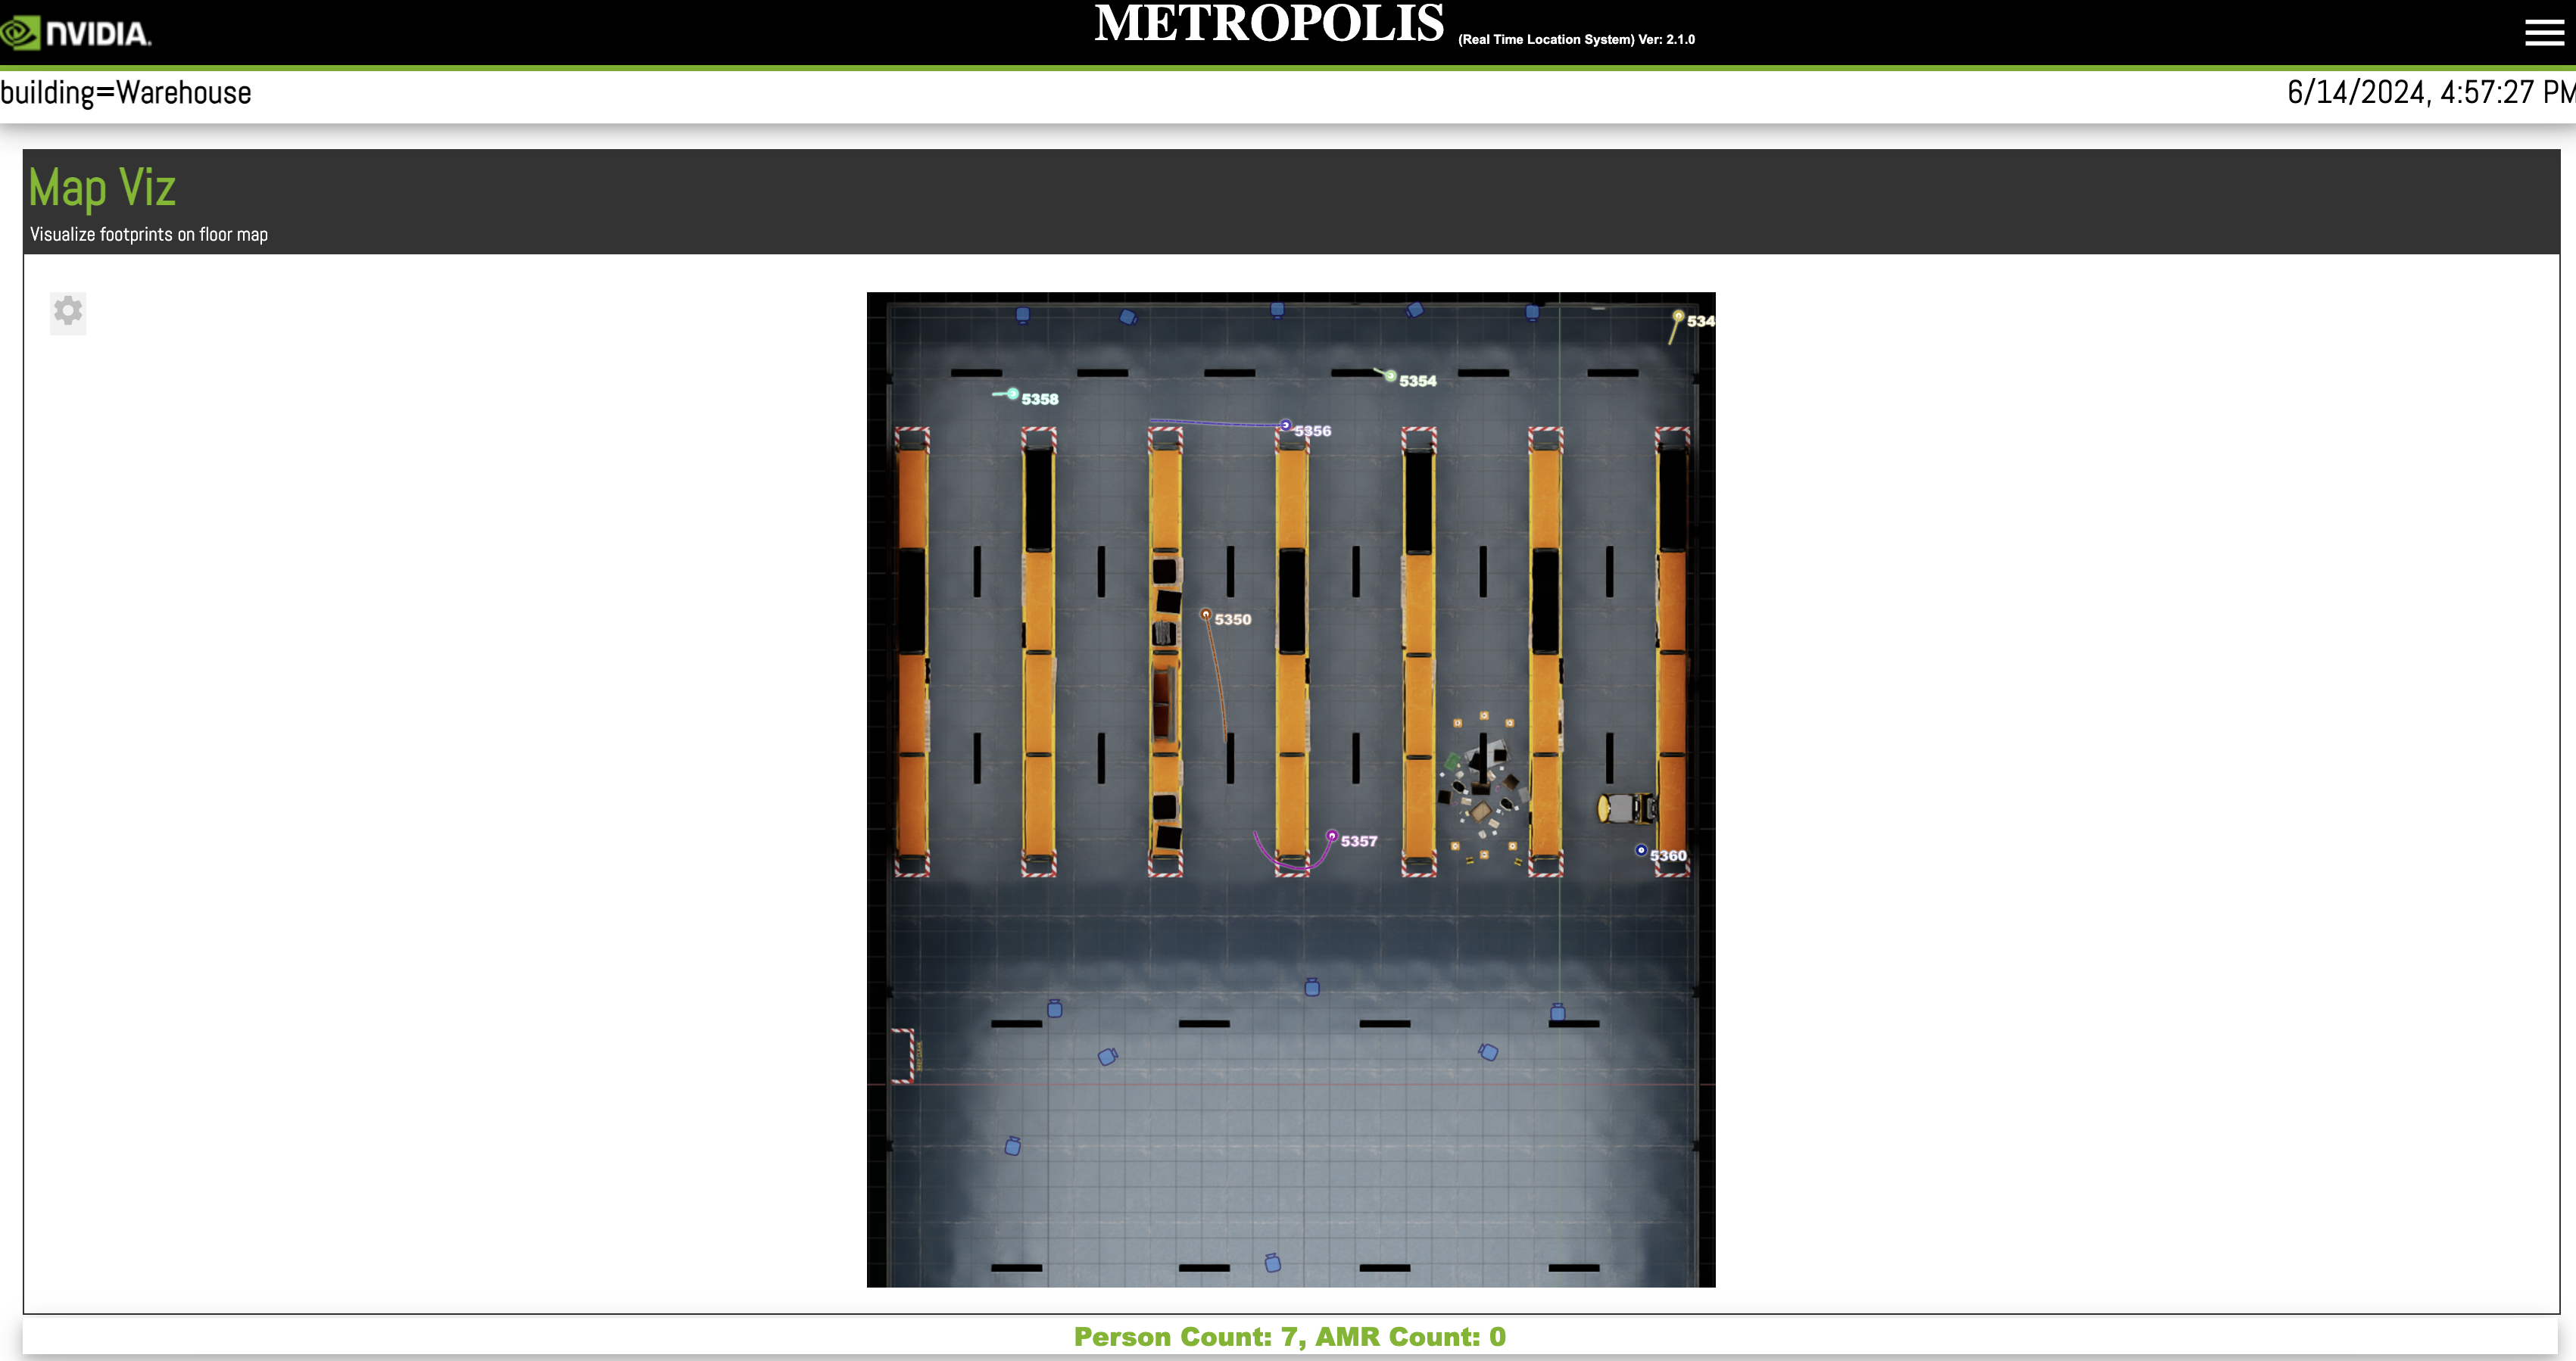
The main window displays the floor plan map of the analyzed space. Each dot moving on the map indicates the location of each globally identified unique object. Each object is labeled with its global id and the live motions are marked with colored trajectories. Camera icons are shown on the map as well to indicate the location and orientation of all the used cameras. The field of view of each camera can be viewed by hovering over the corresponding camera icon. At the bottom of the UI the total number of unique detected objects at the moment will be displayed.
Note
AMR count shown on RTLS UI is 0 since there is no active AMR data flowing in the default synthetic videos.
For in-depth documentation of the UI, refer to the Real Time Location System UI section.
Kibana is also brought up as part of the RTLS app 1-click script. From this sample screen capture, you can view the mdx-rtls data which contains the location info of each globally identified unique object in real-time.
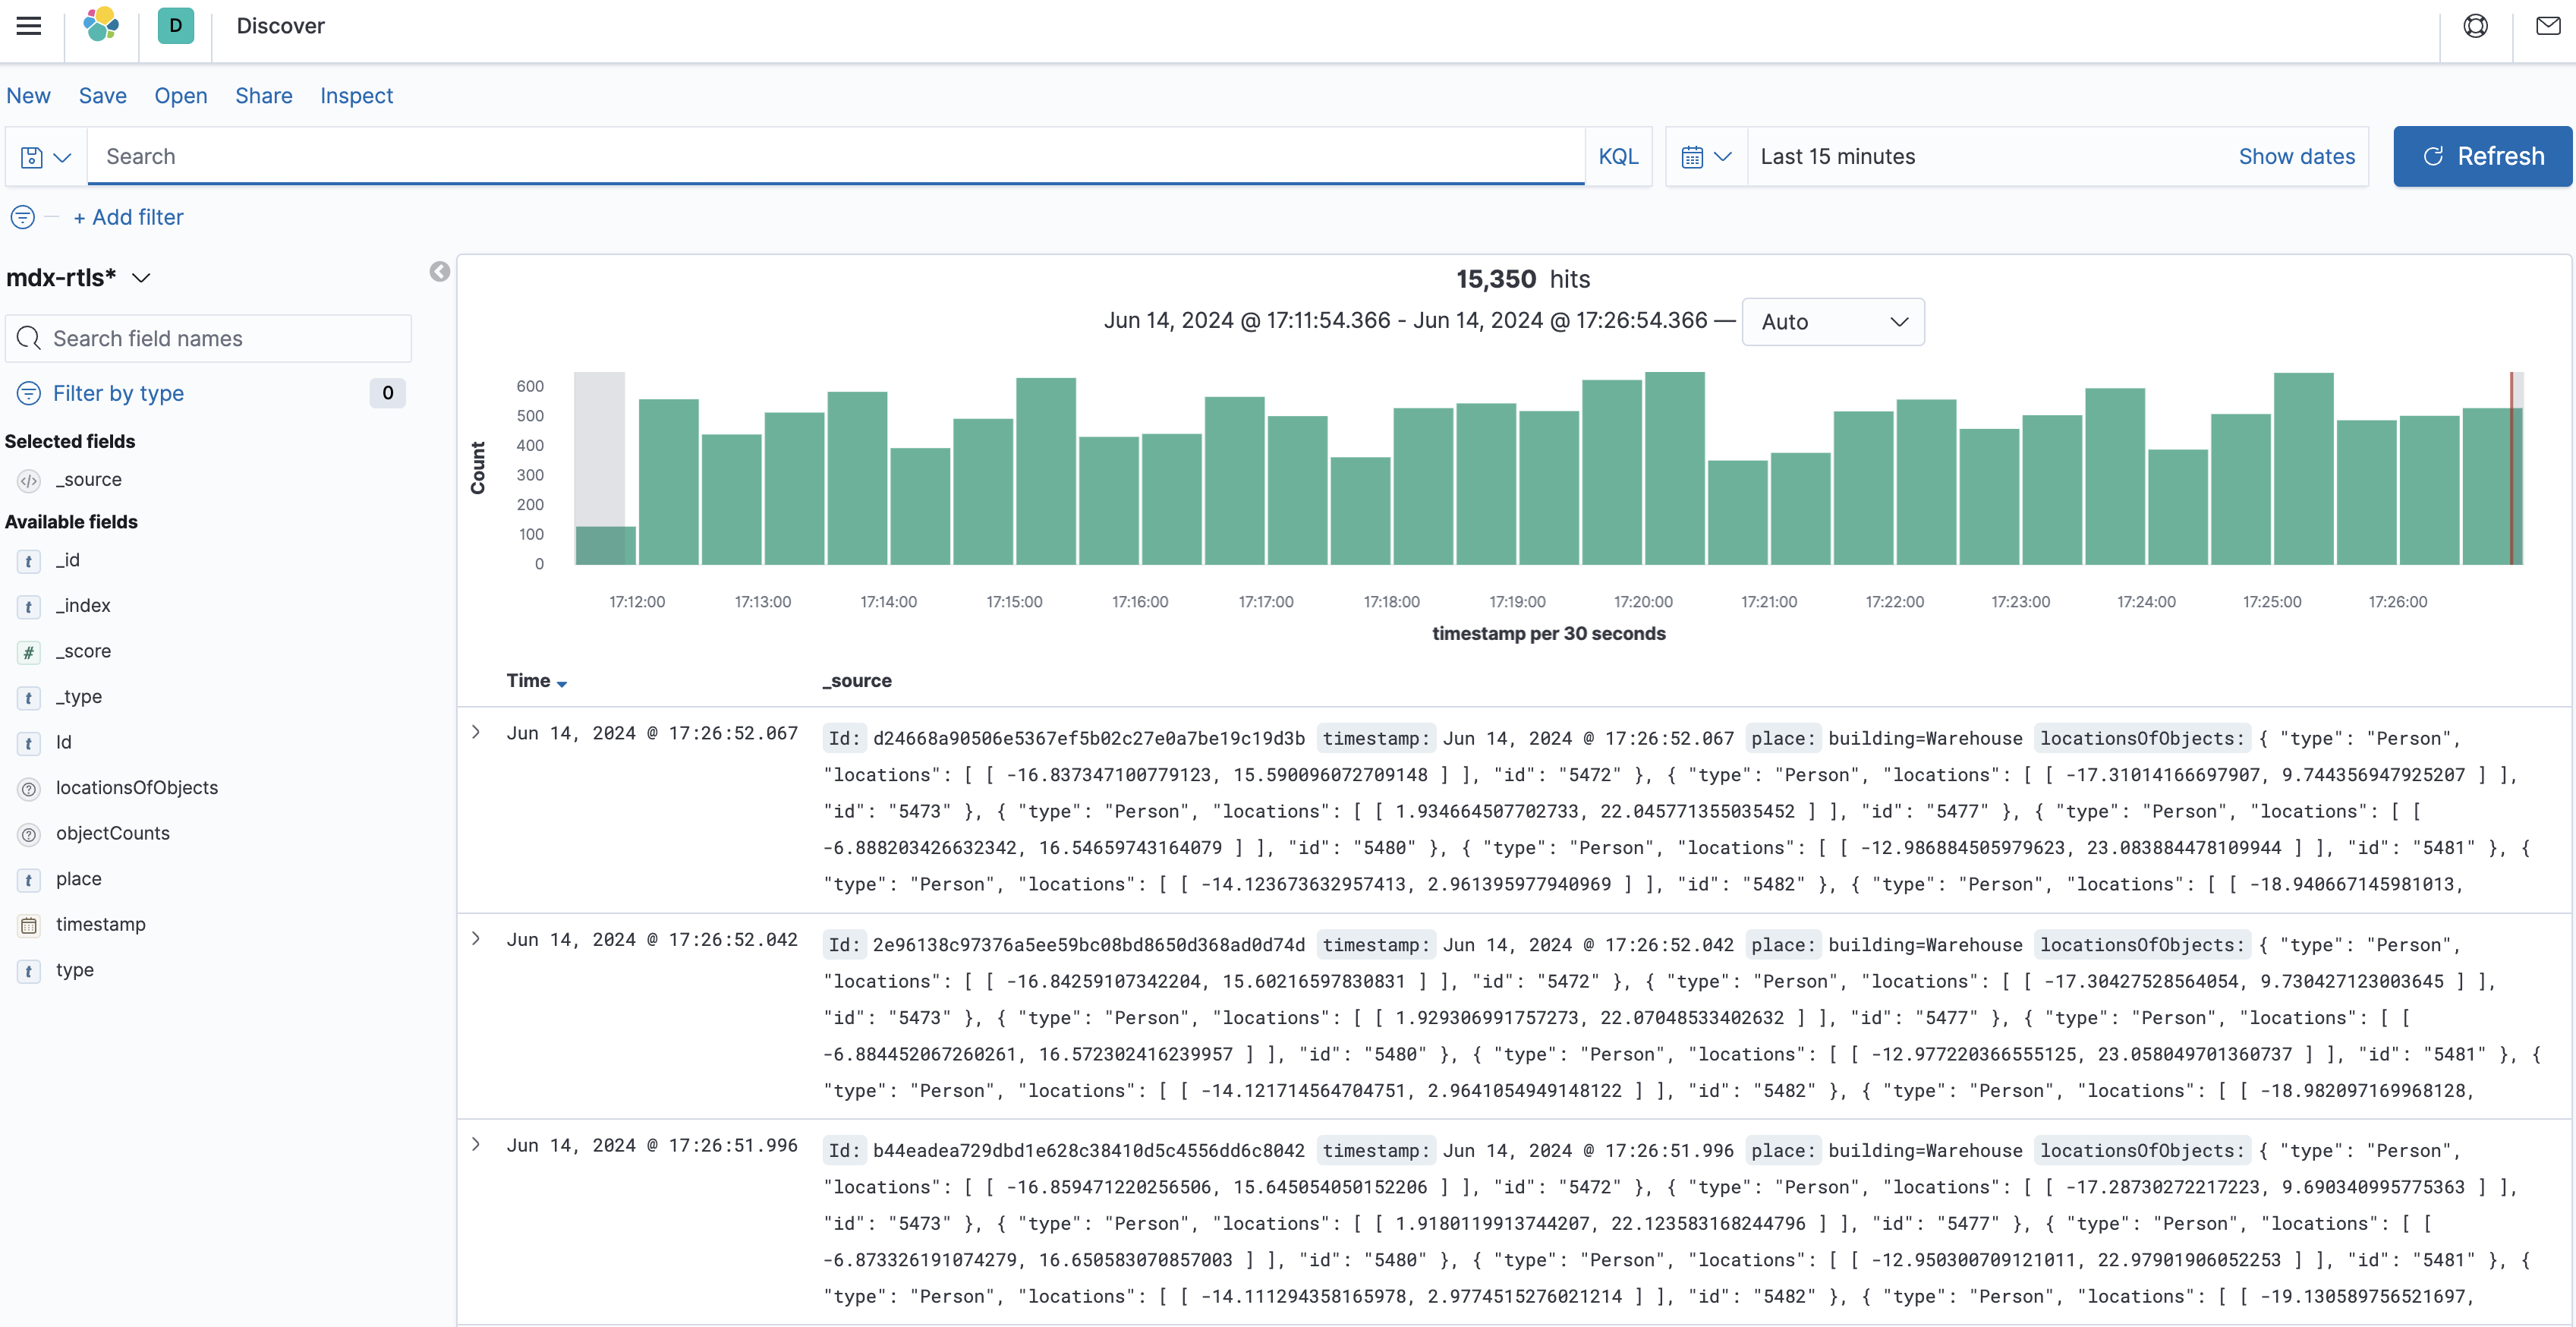
Kibana is a powerful tool to visualize data. You can create other index patterns on existing data, e.g. mdx-raw, or create dashboards. You can read more about Kibana in its official documentation.
Kibana will be available at http://<alb_dns_name>:31560.
Explore SDG Workflow
The Simulation & SDG workflow is pre-loaded with a sample warehouse digital twin, including DH characters & cameras.
Connect to the SDG workflow using NoMachine remote desktop software. The NoMachine private key file should be in the
/state/<deployment directory>/key.pemlocation.Before starting with synthetic data generation, we recommend users familiarize themselves with the Isaac Sim application by going through What is Isaac Sim? and the Isaac Sim Interface Guide.
After getting familiar with Isaac Sim, you can follow the Omni.Replicator.Agent guide to get started with synthetic data generation.
Users can follow the steps at Enable Omni.Replicator.Agent and Getting Started sections to generate custom synthetic data. For this quick start guide, we recommend using the defaults below.
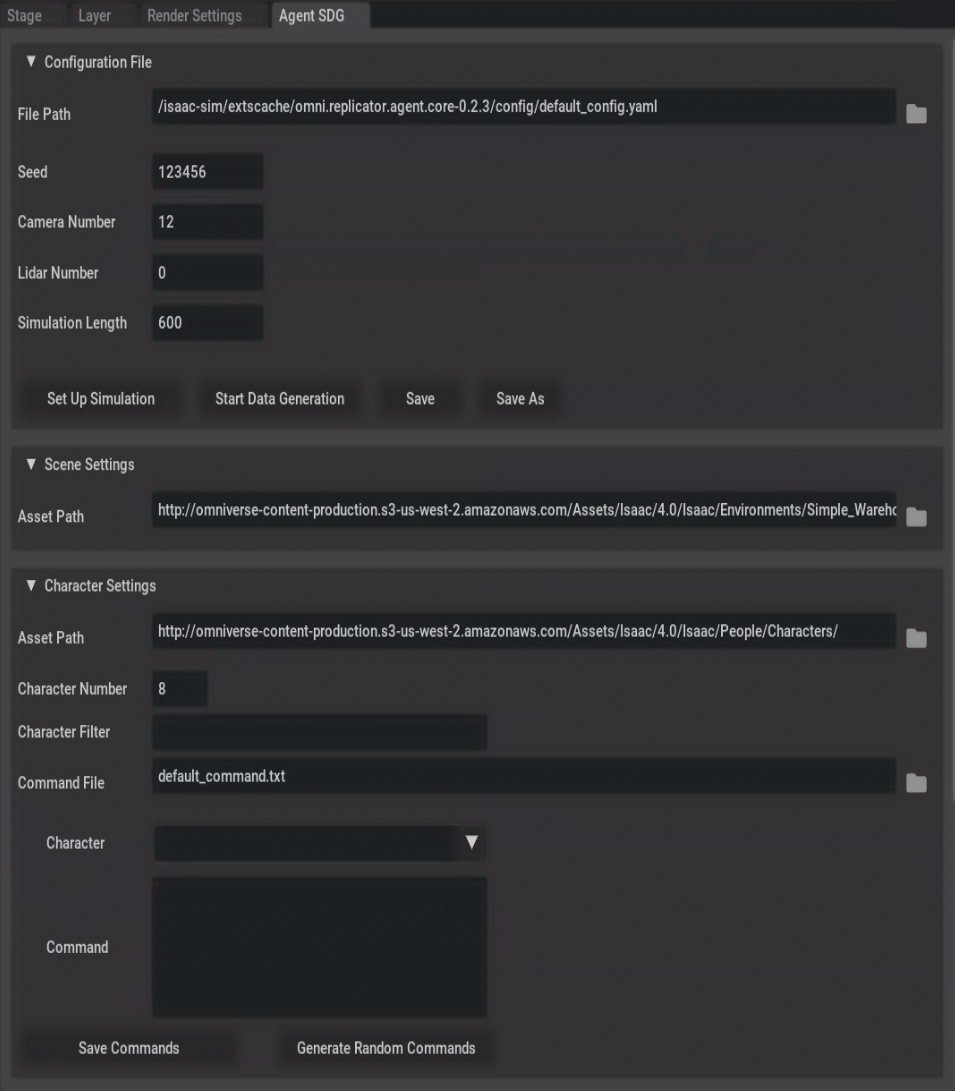
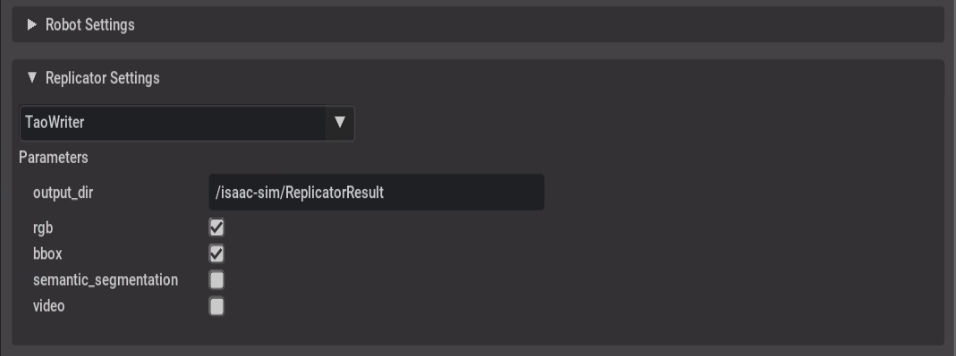
We can create a new simulation by changing the seed in the UI and generating new commands for the characters by clicking Generate Random Commands followed by Save Commands.
Before starting data generation we recommend that the user adjust the camera placement for better coverage. The basics of camera navigation can be found here Viewport Navigation.
Data generation can take upwards of 1 hour to complete. To end the data generation early, click Stop in the editor menu on the left panel of the app. After data generation complete the Stop icon will disappear and the Play button will be visible again. For good results, we do not recommend stopping the data generation prematurely.
We provide a handy post-processing script for uploading the generated data to the S3 bucket. Execute the following steps:
Open a new terminal in the NoMachine UI.
Run the command below to enter the Isaac Sim docker:
docker exec -it isaacsim bashNext, from inside the Isaac Sim container, run the commands below to generate videos from the images:
./python.sh /uploads/post_processing.py -bu -sd /isaac-sim/ReplicatorResult/
Run the
show-resultscommand of the RTLS deployment script to gather the S3 Bucket Name for storing SDG-generated data for RTLS workflow usage:
bash mtmc-app-deploy show-results
Next, upload the videos to the S3 bucket using the command below:
./python.sh /uploads/post_processing.py -sd /isaac-sim/ReplicatorResult/ -f mp4 -b <s3_bucket_name> -dd sdg_data
Note
The path used uploading images to S3 bucket in the above command will be referenced later when loading the app with SDG generated data using script
load-s3-data-to-nvstreamer-vst.shin the section Use Generated Data in RTLS Workflow
Next follow the Camera Calibration Guide to generate the calibration file, top view image, and the image metadata that the RTLS application needs to use the generated data.
In the Calibration toolkit UI enter the values below to generate calibration artifacts for the RTLS app.
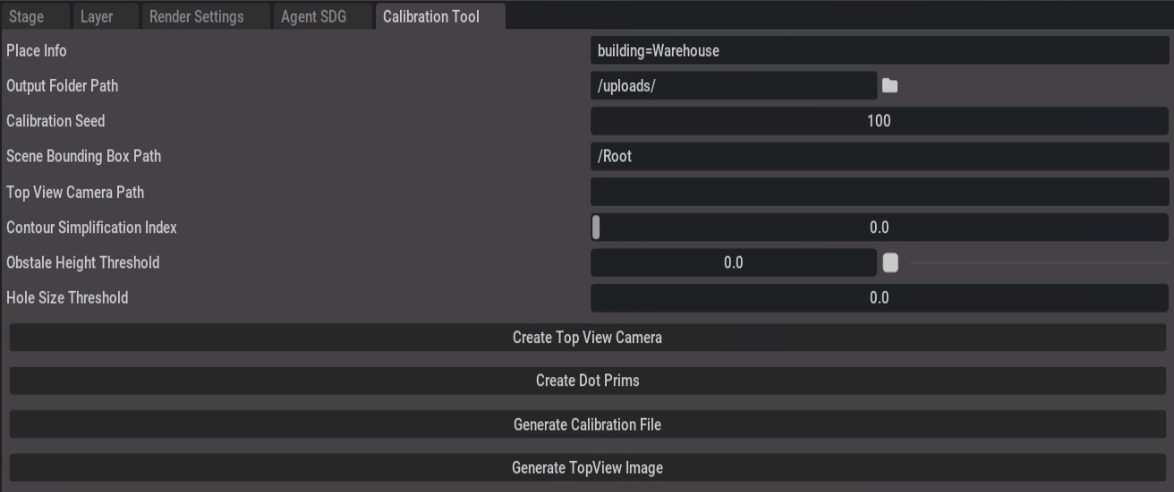
Follow the steps in the Camera Calibration Guide to generate the calibration.json and the top view image.
Next generate the image metadata file by running the script below. This should create a imageMetadata.json file in the uploads directory.
./python.sh /uploads/create_image_metadata.py -c /uploads/calibration.json -d /uploads/
Upload the files to the S3 bucket using the ssh commands below:
./python.sh /uploads/post_processing.py -sf /uploads/calibration.json -df calibration_artifacts/calibration.json -b s3_bucket_name
./python.sh /uploads/post_processing.py -sf /uploads/Top.png -df calibration_artifacts/Top.png -b s3_bucket_name
./python.sh /uploads/post_processing.py -sf /uploads/imageMetadata.json -df calibration_artifacts/imageMetadata.json -b s3_bucket_name
Note
The path used for uploading images to S3 bucket in the above command will be referenced later when loading the app with SDG generated data using script
load-s3-data-to-nvstreamer-vst.shin the section Use Generated Data in RTLS Workflow.
Use Generated Data in RTLS Workflow
Steps to load the newly generated videos into the NVStreamer microservice of the RTLS workflow:
Create a config file on the RTLS Workflow VM for the configs parameters required to run the script
load-s3-data-to-nvstreamer-vst.sh:
$ cat << EOF >> /mnt/backup-files/config.json
{
"NGC_CLI_API_KEY": "<Your_API_KEY>",
"s3_sdg_data_path": "<s3-bucket-name/videos-path-in-s3>",
"s3_sdg_calibration_path": "<s3-bucket-name/calibration-file-path-in-s3>",
"s3_sdg_image_path": "<s3-bucket-name/image-files-path-in-s3>",
"local_data_path": "/home/ubuntu/sdg-s3-downloaded-data",
"nvstreamer_chart_url": "https://helm.ngc.nvidia.com/rxczgrvsg8nx/vst-1-0/charts/nvstreamer-0.2.32.tgz",
"vst_chart_url": "https://helm.ngc.nvidia.com/rxczgrvsg8nx/vst-1-0/charts/vst-1.0.30.tgz",
"ds_chart_url": "https://helm.ngc.nvidia.com/nfgnkvuikvjm/mdx-v2-0/charts/mdx-wdm-ds-app-0.0.33.tgz"
}
EOF
Update the config file
/mnt/backup-files/config.jsoncreated in the above step on the RTLS Workflow VM with the required values.
$ sudo vi /mnt/backup-files/config.json
An explanation of each parameter is provided below for correctly filling in details for loading data using the script in the next step.
NGC_CLI_API_KEY- NGC API key needs to be populated.s3_sdg_data_path- AWS S3 path for new data (e.g.,test-s3-bucket-name/sdg-video-data/).s3_sdg_calibration_path- AWS S3 path for new calibration file (e.g.,test-s3-bucket-name/sdg-calibration-files/calibration.json).s3_sdg_image_path- AWS S3 path for newly SDG generated imageMetadata.json & Top.png file (e.g.,test-s3-bucket-name/sdg-image-files/).local_data_path- Local path is defaulted to/home/ubuntu/sdg-s3-downloaded-datafor downloading data to load new data into nvstreamer and VST services.nvstreamer_chart_url/vst_chart_url- NvStreamer and VST Chart versions are also set to the default supported version for the current Metropolis Microservices release (Deploy NVStreamer and VST Microservices).ds_chart_url- WDM_DS Chart version, defaults to mdx-wdm-ds-app-0.0.33.tgz, Supported version for the current Metropolis Microservices release (Deploy Perception (WDM-DeepStream) Microservice).
Once the parameters are updated, execute the script using the command below:
$ sudo bash /mnt/backup-files/load-s3-data-to-nvstreamer-vst.sh
Steps to upload calibration data (only if you have changed camera locations or added/deleted cameras):
Assets upload for RTLS App UI is done using script
/mnt/backup-files/load-s3-data-to-nvstreamer-vst.shwhich was executed in previous step.
Note
Upload will be required only if a new batch of data is generated from a modified digital twin. After uploading newly generated files from SDG if App UI is still not showing data, please troubleshoot further with steps from Why am I not seeing data on the Kibana/reference application’s UI ?
The default scenario has pre-loaded calibration.json and floorplan & imagesMetadata.json files.
Note
Once application workflow testing is completed, the infrastructure can be shut down by following the teardown steps from here.
Appendix
The appendix can be found here.