IPsec Functionality
BlueField DPU can offload IPsec operations transparently from the host CPU. This means that the host does not need to be aware that network traffic is encrypted before hitting the wire or decrypted after coming off the wire. IPsec operations can be run on the DPU in software on the Arm cores or in the accelerator block.
IPsec hardware crypto offload, also known as IPsec inline offload or IPsec aware offload, enables the user to offload IPsec crypto encryption and decryption operations to the hardware, leaving the encapsulation/decapsulation task to the software.
Please refer to the MLNX_OFED documentation under Features Overview and Configuration > Ethernet Network > IPsec Crypto Offload for more information on enabling and configuring this feature.
Please note that to use IPsec crypto offload with OVS, you must disable hardware offloads.
IPSec packet offload is only supported on Ubuntu BlueField kernel 5.15
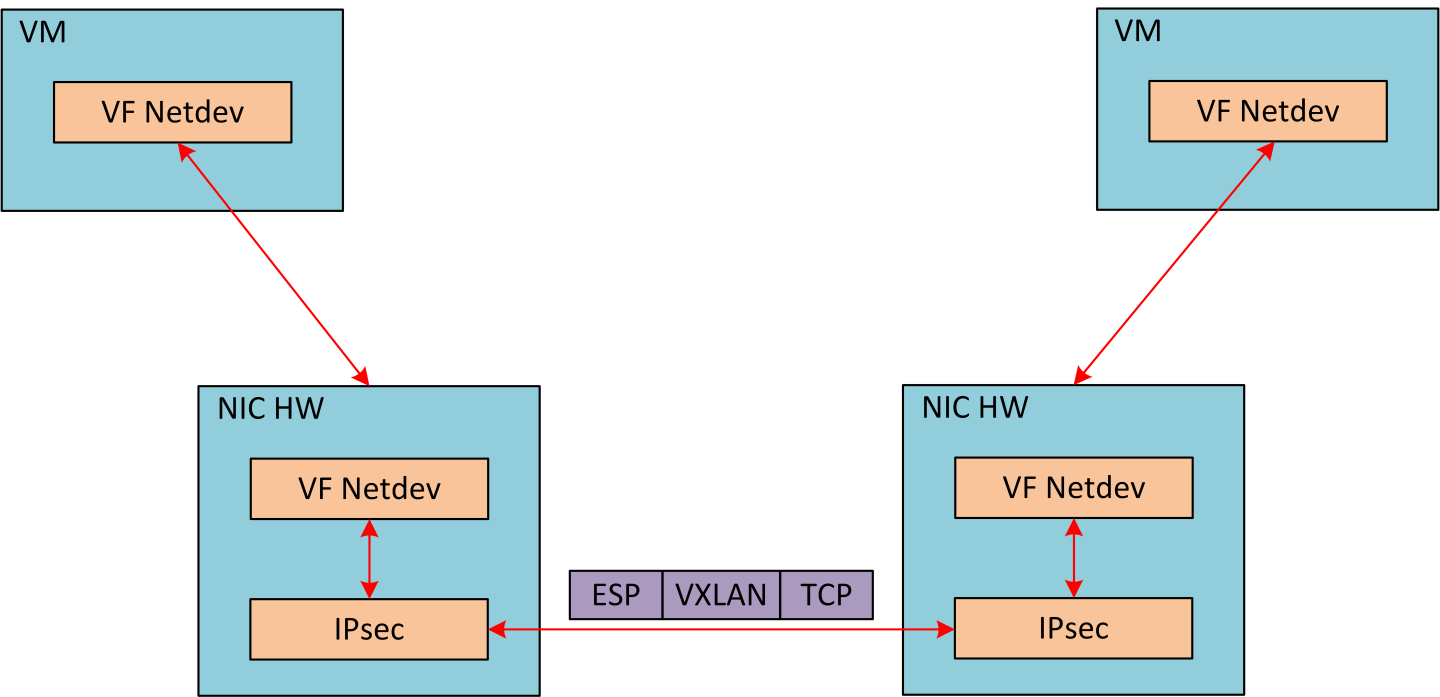
IPsec packet offload offloads both IPsec crypto and IPsec encapsulation to the hardware. IPsec packet offload is configured on the Arm via the uplink netdev. The following figure illustrates IPsec packet offload operation in hardware.

Enabling IPsec Packet Offload
Explicitly enable IPsec packet offload on the Arm cores before setting up offload-aware IPsec tunnels .
If an OVS VXLAN tunnel configuration already exists, stop openvswitch service prior to performing the steps below and restart the service afterwards.
Explicitly enable IPsec full offload on the Arm cores.
Set IPSEC_FULL_OFFLOAD="yes" in /etc/mellanox/mlnx-bf.conf .
Restart IB driver (rebooting also works). Run:
/etc/init.d/openibd restart
WarningIf mlx-regex is running:
Disable mlx-regex:
systemctl stop mlx-regex
Restart IB driver according to the command above.
Re-enable mlx-regex after the restart has finished:
systemctl restart mlx-regex
To revert IPsec full offload mode, redo the procedure from step 1, only difference is to set IPSEC_FULL_OFFLOAD="no" in /etc/mellanox/mlnx-bf.conf.
To use IPsec packet packet with strongSwan, refer to section "IPsec Packet Offload strongSwan Support".
To configure IPsec rules, please follow the instructions in MLNX_OFED documentation under Features Overview and Configuration > Ethernet Network > IPsec Crypto Offload > Configuring Security Associations for IPsec Offloads but, use "offload packet" to achieve IPsec Packet offload.
Configuring IPsec Rules with iproute2
If you are working directly with the ip xfrm tool, you must use the /opt/mellanox/iproute2/sbin/ip to benefit from IPsec packet offload support.
The following example configures IPsec packet offload rules with local address 192.168.1.64 and remote address 192.168.1.65:
            ip xfrm state add src 192.168.1.64/24 dst 192.168.1.65/24 proto esp spi 0x4834535d reqid 0x4834535d mode transport aead 'rfc4106(gcm(aes))' 0xc57f6f084ebf8c6a71dd9a053c2e03b94c658a9bf00dd25780e73948931d10d08058a27c 128 offload packet dev p0 dir out sel src 192.168.1.64 dst 192.168.1.65
ip xfrm state add src 192.168.1.65/24 dst 192.168.1.64/24 proto esp spi 0x2be60844 reqid 0x2be60844 mode transport aead 'rfc4106(gcm(aes))' 0xacca06b66489011d3c1c21f1a36d925cf7449d3aeaa6fe534446c3a8f8bd5f5fdc266589 128 offload packet dev p0 dir in sel src 192.168.1.65 dst 192.168.1.64
sudo ip xfrm policy add src 192.168.1.64 dst 192.168.1.65 dir out tmpl src 192.168.1.64/24 dst 192.168.1.65/24 proto esp reqid 0x4834535d mode transport
sudo ip xfrm policy add src 192.168.1.65 dst 192.168.1.64 dir in tmpl src 192.168.1.65/24 dst 192.168.1.64/24 proto esp reqid 0x2be60844 mode transport
The numbers used by the spi, reqid, or aead algorithms are random. These same numbers are also used in the configuration of peer Arm. Do not confuse these numbers with source and destination IPs. The connection may fail if they are not consistent.
IPsec Packet Offload strongSwan Support
BlueField DPU supports configuring IPsec rules using strongSwan 5.9.10—appears as 5.9.10bf in the BFB which is based on upstream 5.9.10 version—which supports new fields in the swanctl.conf file.
The following figure illustrates an example with two BlueField DPUs , Left and Right, operating with a secured VXLAN channel .
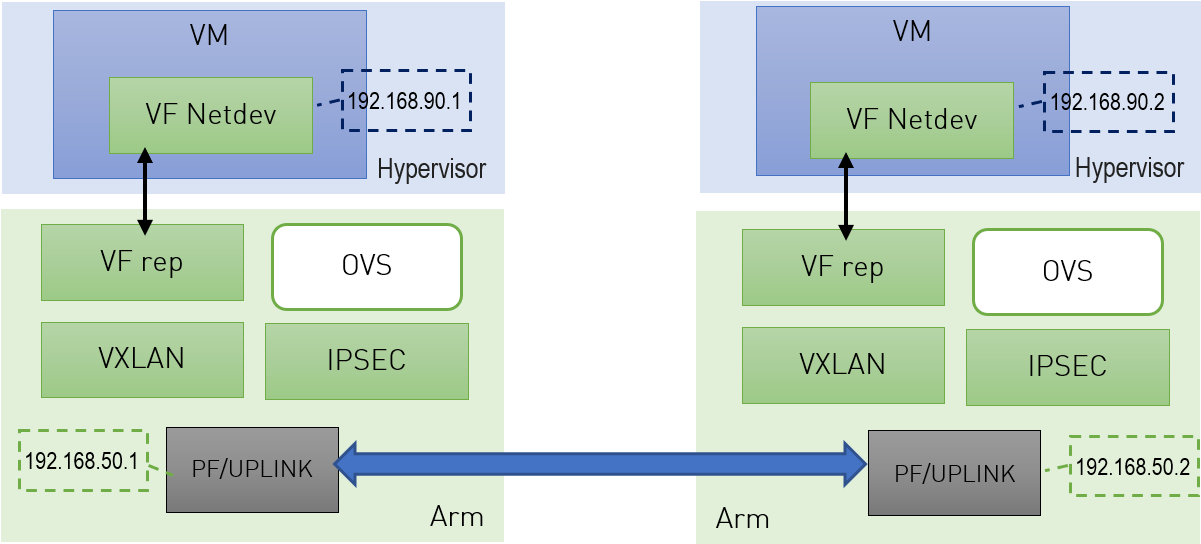
Support for strongSwan IPsec packet HW offload requires using VXLAN together with IPSec as shown here .
Follow the procedure under section "Enabling IPsec Packet Offload".
Follow the procedure under section "VXLAN Tunneling Offload" to configure VXLAN on Arm.
WarningMake sure the MTU of the PF used by VXLAN is at least 50 bytes larger than VXLAN-REP MTU.
Enable tc offloading. Run:
ethtool -K <PF> hw-tc-offload on
WarningDo not add the PF itself using "ovs-vsctl add-port" to the OVS.
Setting IPSec Packet Offload Using strongSwan
strongSwan configures IPSec HW packet offload using a new value added to its configuration file swanctl.conf (as of strongSwan version 5.9.10).
The file should be placed under "sysconfdir" which by default can be found at /etc/swanctl/swanctl.conf.
The terms Left (BFL) and Right (BFR) are used to identify the two nodes that communicate (corresponding with the figure under section "IPsec Packet Offload strongSwan Support").
In this example, 192.168.50.1 is used for the left PF uplink and 192.168.50.2 for the right PF uplink.
            connections {
   BFL-BFR {
      local_addrs  = 192.168.50.1
      remote_addrs = 192.168.50.2

      local {
        auth = psk
        id = host1
      }
      remote {
        auth = psk
        id = host2
      }
		children {
         bf-out {
            local_ts = 192.168.50.1/24 [udp]
            remote_ts = 192.168.50.2/24 [udp/4789]
            esp_proposals = aes128gcm128-x25519-esn
            mode = transport
            policies_fwd_out = yes
            hw_offload = packet
         }
         bf-in {
            local_ts = 192.168.50.1/24 [udp/4789]
            remote_ts = 192.168.50.2/24 [udp]
            esp_proposals = aes128gcm128-x25519-esn
            mode = transport
            policies_fwd_out = yes
            hw_offload = packet
         }
      }
      version = 2
      mobike = no
      reauth_time = 0
      proposals = aes128-sha256-x25519
   }
}

secrets {
   ike-BF {
      id-host1 = host1
      id-host2 = host2
      secret = 0sv+NkxY9LLZvwj4qCC2o/gGrWDF2d21jL
   }
}
BFB installation will place two example swanctl.conf files for both Left and Right nodes (BFL.swanctl.conf and BFR.swanctl.conf respectively) in the strongSwan conf.d directory. Please move one of them manually to the other machine and edit it according to your configuration.
Note that:
"hw_offload = packet" is responsible for configuring IPsec packet offload
Packet offload support has been added to the existing hw_offload field and preserves backward compatibility.
For your reference:
Value
Description
no
Do not configure HW offload
crypto
Configure crypto HW offload if supported by the kernel and hardware, fail if not supported
yes
Same as crypto (considered legacy)
packet
Configure packet HW offload if supported by the kernel and hardware, fail if not supported
auto
Configure packet HW offload if supported by the kernel and hardware, do not fail (perform fallback to crypto or no as necessary)
WarningWhenever the value of hw_offload is changed, strongSwan configuration must be reloaded.
[udp/4789] is crucial for instructing strongSwan to IPSec only VXLAN communication
WarningPacket HW offload can only be done on what is streamed over VXLAN.
Mind the following limitations:
|
Field |
Limitation |
|
reauth_time |
Ignored if set |
|
rekey_time |
Do not use. Ignored if set. |
|
rekey_bytes |
Do not use. Not supported and will fail if it is set. |
|
rekey_packets |
Use for rekeying |
Running strongSwan Example
Notes:
IPsec daemons are started by systemd strongswan.service, users must avoid using strongswan-starter.service as it is a legacy service and using both services at the same time leads to anomalous behavior
Use systemctl [start | stop | restart] to control IPsec daemons through strongswan.service. For example, to restart, the command systemctl restart strongswan.service will effectively do the same thing as ipsec restart.
ImportantDo not use ipsec script to restart/stop/start.
If you are using the ipsec script, then, in order to restart or start the daemons, openssl.cnf.orig must be copied to openssl.cnf before performing ipsec restart or ipsec start. Then openssl.cnf.mlnx can be copied to openssl.cnf after restart or start. Failing to do so can result in errors since openssl.cnf.mlnx allows IPsec PK and RNG hardware offload via the OpenSSL plugin.
On Ubuntu/Debian/Yocto, openssl.cnf* can be found under /etc/ssl/
On CentOS, openssl.cnf* can be found under /etc/pki/tls/
The strongSwan package installs openssl.cnf config files to enable hardware offload of PK and RNG operations via the OpenSSL plugin
The OpenSSL dynamic engine is used to carry out the offload to hardware. OpenSSL dynamic engine ID is "pka".
Procedure:
Perform the following on Left and Right devices (corresponding with the figure under section "IPsec Packet Offload strongSwan Support").
            # systemctl start strongswan.service
# swanctl --load-all
The following should appear.
            Starting strongSwan 5.9.10bf IPsec [starter]...
no files found matching '/etc/ipsec.d/*.conf'
# deprecated keyword 'plutodebug' in config setup
# deprecated keyword 'virtual_private' in config setup
loaded ike secret 'ike-BF'
no authorities found, 0 unloaded
no pools found, 0 unloaded
loaded connection 'BFL-BFR'
successfully loaded 1 connections, 0 unloaded
Perform the actual connection on one side only (client, Left in this case).
# swanctl -i --child bf-in bf-out
The following should appear.
            [IKE] initiating IKE_SA BFL-BFR[1] to 192.168.50.2
[ENC] generating IKE_SA_INIT request 0 [ SA KE No N(NATD_S_IP) N(NATD_D_IP) N(FRAG_SUP) N(HASH_ALG) N(REDIR_SUP) ]
[NET] sending packet: from 192.168.50.1[500] to 192.168.50.2[500] (240 bytes)
[NET] received packet: from 192.168.50.2[500] to 192.168.50.1[500] (273 bytes)
[ENC] parsed IKE_SA_INIT response 0 [ SA KE No N(NATD_S_IP) N(NATD_D_IP) CERTREQ N(FRAG_SUP) N(HASH_ALG) N(CHDLESS_SUP) N(MULT_AUTH) ]
[CFG] selected proposal: IKE:AES_CBC_128/HMAC_SHA2_256_128/PRF_HMAC_SHA2_256/CURVE_25519
[IKE] received 1 cert requests for an unknown ca
[IKE] authentication of 'host1' (myself) with pre-shared key
[IKE] establishing CHILD_SA bf{1}
[ENC] generating IKE_AUTH request 1 [ IDi N(INIT_CONTACT) IDr AUTH N(USE_TRANSP) SA TSi TSr N(MULT_AUTH) N(EAP_ONLY) N(MSG_ID_SYN_SUP) ]
[NET] sending packet: from 192.168.50.1[500] to 192.168.50.2[500] (256 bytes)
[NET] received packet: from 192.168.50.2[500] to 192.168.50.1[500] (224 bytes)
[ENC] parsed IKE_AUTH response 1 [ IDr AUTH N(USE_TRANSP) SA TSi TSr N(AUTH_LFT) ]
[IKE] authentication of 'host2' with pre-shared key successful
[IKE] IKE_SA BFL-BFR[1] established between 192.168.50.1[host1]...192.168.50.2[host2]
[IKE] scheduling reauthentication in 10027s
[IKE] maximum IKE_SA lifetime 11107s
[CFG] selected proposal: ESP:AES_GCM_16_128/NO_EXT_SEQ
[IKE] CHILD_SA bf{1} established with SPIs ce543905_i c60e98a2_o and TS 192.168.50.1/32 === 192.168.50.2/32
initiate completed successfully
You may now send encrypted data over the HOST VF interface (192.168.70.[1|2]) configured for VXLAN.
Building strongSwan
Do this only if you want to build your own BFB and would like to rebuild strongSwan.
Install dependencies mentioned here. libgmp-dev is missing from that list, so make sure to install that as well.
Git clone https://github.com/Mellanox/strongswan.git.
Git checkout BF-5.9.10. This branch is based on the official strongSwan 5.9.10 branch with added packaging and support for DOCA IPsec plugin (check the NVIDIA DOCA IPsec Security Gateway Application Guide for more information regarding the strongSwan DOCA plugin).
Run autogen.sh within the strongSwan repo.
Run the following:
            configure --enable-openssl --disable-random --prefix=/usr/local --sysconfdir=/etc --enable-systemd
make
make install
Note:
--enable-systemd enables the systemd service for strongSwan present inside the GitHub repo (see step 3) at init/systemd-starter/strongswan.service.in.
When building strongSwan on your own, the openssl.cnf.mlnx file, required for PK and RNG HW offload via OpenSSL plugin, is not installed. It must be copied over manually from github repo inside the openssl-conf directory. See section "Running Strongswan Example" for important notes.
WarningThe openssl.cnf.mlnx file references PKA engine shared objects. libpka (version 1.3 or later) and openssl (version 1.1.1) must be installed for this to work.
IPsec Packet Offload and OVS Offload
IPsec packet offload configuration works with and is transparent to OVS offload. This means all packets from OVS offload are encrypted by IPsec rules.
The following figure illustrates the interaction between IPsec packet offload and OVS VXLAN offload.
OVS offload and IPsec IPv6 do not work together.
To start the service, run:
systemctl start openvswitch-ipsec.service
Refer to section "Enabling IPsec Packet Offload" for information to prepare the IPsec packet offload environment.
Configuring IPsec Tunnel
For the sake of example, if you want to build an IPsec tunnel between two hosts with the following external IP addresses:
host1 – 1.1.1.1
host2 – 1.1.1.2
You have to first make sure host1 and host2 can ping each other via these external IPs.
This example will set up some variables on both hosts, set ip1 and ip2:
            # ip1=1.1.1.1
# ip2=1.1.1.2
REP=eth5
PF=p0
Set up OVS bridges in both hosts.
On Arm_1:
            ovs-vsctl add-br ovs-br
ovs-vsctl add-port ovs-br $REP
ovs-vsctl set Open_vSwitch . other_config:hw-offload=true
On Arm_2:
            ovs-vsctl add-br ovs-br
ovs-vsctl add-port ovs-br $REP
ovs-vsctl set Open_vSwitch . other_config:hw-offload=true
WarningConfiguring other_config:hw-offload=true sets IPsec packet offload. Setting it to false sets software IPsec. Make sure that IPsec devlink's mode is set back to none for software IPsec.
Set up IPsec tunnel. Three authentication methods are possible. Follow the steps relevant for the method that works best for your environment.
WarningDo not try to use more than 1 authentication method.
WarningAfter the IPsec tunnel is set up, strongSwan configuration will be automatically done.
Make sure the MTU of the PF used by tunnel is at least 50 bytes larger than VXLAN-REP MTU.
Disable host PF as the port owner from Arm (see section "Zero-trust Mode"). Run:
$ mlxprivhost -d /dev/mst/mt41682_pciconf0 --disable_port_owner r
The MTU of the end points (pf0hpf in the example above) of the tunnel must be smaller than the MTU of the tunnel interfaces (p0) to account for the size of the tunnel headers. For example, you can set the MTU of P0 to 2000.
Authentication Methods
Using Pre-shared Key
The following example uses tun type=gre and dst_port=1723. Depending on your configuration, tun type can be vxlan or geneve with dst_port 4789 or 6081 respectively.
The following example uses ovs-br as the bridge name. However, this value can be any string you have chosen to create the bridge previously.
On Arm_1, run:
            # ovs-vsctl add-port ovs-br tun -- \
            set interface tun type=gre \
                          options:local_ip=$ip1 \
                          options:remote_ip=$ip2 \
                          options:key=100 \
                          options:dst_port=1723 \
                          options:psk=swordfish
On Arm_2, run:
            # ovs-vsctl add-port ovs-br tun -- \
            set interface tun type=gre \
                          options:local_ip=$ip2 \
                          options:remote_ip=$ip1 \
                          options:key=100 \
                          options:dst_port=1723 \
                          options:psk=swordfish
Using Self-signed Certificate
Generate self-signed certificates in both host1 and host2, then copy the certificate of host1 to host2, and the certificate of host2 to host1.
Move both host1-cert.pem and host2-cert.pem to /etc/swanctl/x509/, if on Ubuntu, or /etc/strongswan/swanctl/x509/, if on CentOS.
Move the local private key to /etc/swanctl/private, if on Ubuntu, or /etc/strongswan/swanctl/private, if on CentOS. For example, for host1:
mv host1-privkey.pem /etc/swanctl/private
Set up OVS other_config on both sides.
On Arm_1:
            # ovs-vsctl set Open_vSwitch . other_config:certificate=/etc/swanctl/x509/host1-cert.pem \
  other_config:private_key=/etc/swanctl/private/host1-privkey.pem
On Arm_2:
            # ovs-vsctl set Open_vSwitch . other_config:certificate=/etc/swanctl/x509/host2-cert.pem \
  other_config:private_key=/etc/swanctl/private/host2-privkey.pem
Set up the tunnel.
On Arm_1:
            # ovs-vsctl add-port ovs-br vxlanp0 -- set interface vxlanp0 type=vxlan options:local_ip=$ip1 \
  options:remote_ip=$ip2 options:key=100 options:dst_port=4789 \
  options:remote_cert=/etc/swanctl/x509/host2-cert.pem
# service openvswitch-switch restart
On Arm_2:
            # ovs-vsctl add-port ovs-br vxlanp0 -- set interface vxlanp0 type=vxlan options:local_ip=$ip2 \
  options:remote_ip=$ip1 options:key=100 options:dst_port=4789 \
  options:remote_cert=/etc/swanctl/x509/host1-cert.pem
# service openvswitch-switch restart
Using CA-signed Certificate
For this method, you need all the certificates and the requests to be in the same directory during the certificate generating and signing. This example refers to this directory as certsworkspace.
On Arm_1:
            # ovs-pki init --force
# cp /var/lib/openvswitch/pki/controllerca/cacert.pem <path_to>/certsworkspace
# ovs-pki req -u host1
# ovs-pki sign host1 switch
On Arm_2:
            # ovs-pki init --force
# cp /var/lib/openvswitch/pki/controllerca/cacert.pem <path_to>/certsworkspace
# ovs-pki req -u host2
# ovs-pki sign host2 switch
Move both host1-cert.pem and host2-cert.pem to /etc/ swanctl/x509/, if on Ubuntu, or /etc/strongswan/swanctl/x509/, if on CentOS.
Move the local private key to /etc/swanctl/private, if on Ubuntu, or /etc/strongswan/swanctl/private, if on CentOS. For example, for host1:
mv host1-privkey.pem /etc/swanctl/private
Copy cacert.pem to the x509ca directory under /etc/swanctl/x509ca/, if on Ubuntu, or /etc/strongswan/swanctl/x509ca/, if on CentOS.
Set up OVS other_config on both sides.
On Arm_1:
            # ovs-vsctl set Open_vSwitch . \
        other_config:certificate=/etc/strongswan/swanctl/x509/host1.pem \
        other_config:private_key=/etc/strongswan/swanctl/private/host1-privkey.pem \
        other_config:ca_cert=/etc/strongswan/swanctl/x509ca/cacert.pem
On Arm_2:
            # ovs-vsctl set Open_vSwitch . \
        other_config:certificate=/etc/strongswan/swanctl/x509/host2.pem \
        other_config:private_key=/etc/strongswan/swanctl/private/host2-privkey.pem \
        other_config:ca_cert=/etc/strongswan/swanctl/x509ca/cacert.pem
Set up the tunnel:
On Arm_1:
            # ovs-vsctl add-port ovs-br vxlanp0 -- set interface vxlanp0 type=vxlan options:local_ip=$ip1 \
options:remote_ip=$ip2 options:key=100 options:dst_port=4789 \ options:remote_name=host2
 #service openvswitch-switch restart
On Arm_2:
            # ovs-vsctl add-port ovs-br vxlanp0 -- set interface vxlanp0 type=vxlan options:local_ip=$ip2 \
options:remote_ip=$ip1 options:key=100 options:dst_port=4789 \ options:remote_name=host1
#service openvswitch-switch restart
Ensuring IPsec is Configured
Use /opt/mellanox/iproute2/sbin/ip xfrm state show. You should be able to see IPsec states with the keyword in mode packet.
Troubleshooting
For troubleshooting information, refer to Open vSwitch's official documentation.