UEFI Secure Boot
This feature is available in the NVIDIA® BlueField®-2 and above.
UEFI Secure Boot is a feature of the Unified Extensible Firmware Interface (UEFI) specification. The feature defines a new interface between the operating system and firmware/BIOS.
When enabled and fully configured on the DPU, UEFI Secure Boot helps the Arm=based software running on top of UEFI resist attacks and infection from malware. UEFI Secure Boot detects tampering with boot loaders, key operating system files, and unauthorized option ROMs by validating their digital signatures. Malicious actions are blocked from running before they can attack or infect the system.
UEFI Secure Boot works as a security gate. Code signed with valid keys (whose public key/certificates exist in the DPU) gets through the gate and executes while blocking and rejecting code that has either a bad or no signature.
The DPU enables UEFI secure boot with the Ubuntu OS included in the platform's software.
To verify whether UEFI secure boot is enabled, run the following command from the BlueField console:
            ubuntu@localhost:~$ sudo mokutil --sb-state
SecureBoot enabled
As UEFI secure boot is not specific to BlueField platforms, please refer to the Canonical documentation online for further information on UEFI secure boot:
UEFI secure boot can be used in 2 main cases for the DPU:
|
Method |
Pros |
Cons |
|
Using the default enabled UEFI secure boot (with Ubuntu OS or any Microsoft-signed boot loader) See "Using Default Enabled UEFI Secure Boot" for more. |
Relatively easy |
Limited flexibility; only allows executing NVIDIA binary files |
|
Dependency on Microsoft or NVIDIA as signing entities |
||
|
Enabling UEFI Secure Boot with a custom OS (other than the default Ubuntu) See "Enabling UEFI Secure Boot with Custom OS" for more. |
Autonomy, as you control your own keys (no dependency on Microsoft or NVIDIA as signing entities) |
You must create your own capsule files to enroll and customize UEFI secure boot |
Signing binaries is complex as you must create X.509 certificates and enroll them in UEFI or shim which requires a fair amount of prior knowledge of how secure boot works. For that reason, BlueField secured platforms are shipped with all the needed certificates and signed binaries (which allows working seamlessly with the first use case in the table above).
NVIDIA strongly recommends utilizing UEFI secure boot in any case due the increased security it enables.
Verifying UEFI Secure Boot on DPU
To verify whether UEFI secure boot is enabled, run the following command from the BlueField console:
            ubuntu@localhost:~$ sudo mokutil --sb-state
SecureBoot enabled
As UEFI secure boot is not specific to BlueField platforms, refer to the Canonical documentation online for further information on UEFI secure boot to familiarize yourself with the UEFI secure boot concept:
As part of the default settings of the DPU, UEFI secure boot is enabled and requires no special configuration from the user to use it with the bundled Ubuntu OS.
Disabling UEFI Secure Boot
UEFI secure boot can be disabled per device from the UEFI menu as part of the DPU boot process which requires access to the BlueField console.
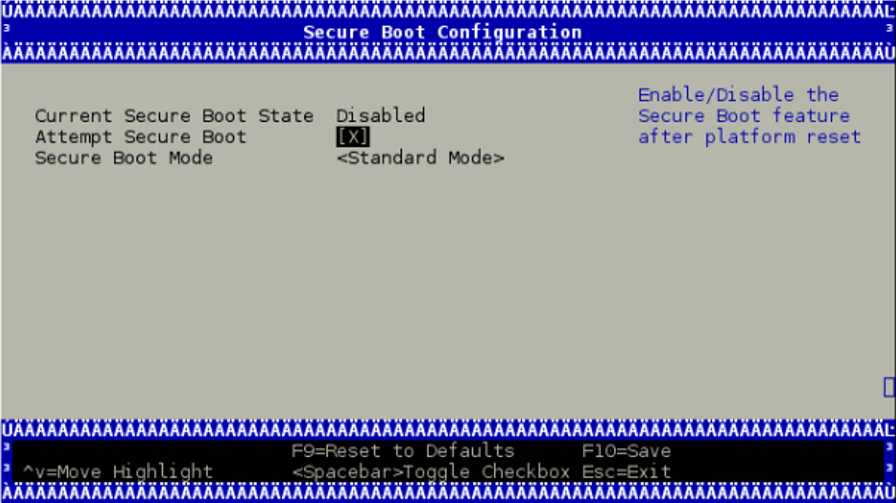
To disable UEFI secure boot, reboot the platform and stop at the UEFI menu.
On BlueField devices with UEFI secure boot enabled, the UEFI menu is password-protected to prevent unwanted changes to the UEFI settings. The default password is bluefield .
From the UEFI menu screen, select "Device Manager" then "Secure Boot Configuration". If "Attempt Secure Boot" is checked, then uncheck it and reboot.
Disabling secure boot permanently is not recommended in production environments.
It is also possible to disable UEFI secure boot using Redfish API for DPUs with an on-board BMC. For more details, please refer to your NVIDIA sales representative to receive the NVIDIA BlueField DPU Initial Deployment Guide.
Existing DPU Certificates
As part of having UEFI secure boot enabled, the UEFI databases are populated with NVIDIA self-signed X.509 certificates. The Microsoft certificate is also installed into the UEFI database to ensure that the Ubuntu distribution can boot while UEFI secure boot is enabled (and generally any suitable OS loader signed by Microsoft).
The pre-installed certificate files are:
NVIDIA PK key certificate
NVIDIA KEK key certificate
NVIDIA db certificate
Microsoft db certificate
This section lists the required steps to enable using UEFI secure boot with a custom OS (other than the default Ubuntu).
All processes described in the following subsections require some level of testing and knowledge in how operating system boot flows and bootloaders work.
Options for Enabling UEFI Secure Boot
There are 3 main ways for signing custom binaries and running them on the DPU with UEFI secure boot enabled:
|
# |
Method |
Pros |
Cons |
|
1 |
Sign OS loader (e.g., Shim) by Microsoft. See "Signing OS Loader by Microsoft" for more. |
Does not require access to the BlueField console |
Dependency on Microsoft as signing entity |
|
2 |
Shim – enroll a machine owner key (MOK) certificate in the shim and use the private part to sign your files. See "Enrolling MOK Key" for more. |
Easy |
|
|
3 |
UEFI – enroll your own key certificate in the UEFI database and use the private part to sign your files. See "Enrolling Your Own Key to UEFI DB" for more. |
Autonomy, as you control your keys (not dependent on Microsoft or NVIDIA as signing entities) |
|
For generation of custom keys and certificates, see section "Generation of Custom Keys and Certificates".
Signing binaries for UEFI secure boot is complex as you must create X.509 certificates and enroll them in UEFI or shim which requires a fair amount of prior knowledge of how secure boot works. See the processes used to enroll keys and to sign UEFI binaries in the rest of this document.
Secure booting binaries for executing a UEFI application, UEFI driver, OS loader, custom kernel, or loading a custom module depends on the certificates and public keys available in the UEFI database and the shim's MOK list.
Signing OS Loader by Microsoft
Custom Kernel Images
One option to boot custom binaries on a DPU is to sign the OS loader (shim) by Microsoft following the Microsoft guidelines which are updated and maintained by Microsoft. The certificates/keys must be embedded within the shim OS loader so it may boot, in addition the custom Kernel binary image and the custom Kernel modules must be signed accordingly.
NVIDIA Kernel Modules
In this option, the NVIDIA db certificates should remain enrolled. This is due to the out-of-tree kernel modules and drivers (e.g., OFED) provided by NVIDIA which are signed by NVIDIA and authenticated by this NVIDIA certificate in the UEFI.
Signing binaries with Microsoft is a process the involves lead time which must be taken into consideration. This course of action requires testing to making sure the complied BFB image including the signed Microsoft bootloader works properly.
Enrolling MOK Key
To boot a custom kernel or load a custom module, you must create a MOK key pair. The newly created MOK key must be an RSA 2048-bit. The private part is used for signing operations and must be kept safe. The public X.509 key certificate in DER format must be enrolled within the shim MOK list.
Once the public key certificate is enrolled within the shim, the MOK key is accepted as a valid signing key.
Note that kernel module signing requires a special configuration. For example, the extendedKeyUsage field must show an OID of 1.3.6.1.4.1.2312.16.1.2. That OID informs shim that this is meant to be a module signing certificate.
The following is an example of OpenSSL configuration file for illustration purposes:
            HOME                    = .
RANDFILE                = $ENV::HOME/.rnd
[ req ]
distinguished_name      = req_distinguished_name
x509_extensions         = v3
string_mask             = utf8only
prompt                  = no

[ req_distinguished_name ]
countryName             = US
stateOrProvinceName     = Westborough
localityName            = Massachusetts
0.organizationName      = CampanyX
commonName              = Secure Boot Signing
emailAddress            = example@example.com

[ v3 ]
subjectKeyIdentifier    = hash
authorityKeyIdentifier  = keyid:always,issuer
basicConstraints        = critical,CA:FALSE
extendedKeyUsage        = codeSigning,1.3.6.1.4.1.311.10.3.6,1.3.6.1.4.1.2312.16.1.2
nsComment               = "OpenSSL Generated Certificate"
To enroll the MOK key certificate, download the associated key certificate to the BlueField file system and run the following command:
            ubuntu@localhost:~$ sudo mokutil --import mok.der
input password:
input password again:
You must follow the prompts to enter a password to be used to make sure you really do want to enroll the key certificate.
Note that the key certificate is not enrolled yet. It will be enrolled by the shim upon the next reboot. To list the imported certificate file to enroll:
ubuntu@localhost:~$ sudo mokutil --list-new
A reboot must be performed.
Just before loading GRUB, shim displays a blue screen which is actually another piece of the shim project called "MokManager". You may ignore the blue screen showing the error message. Press "OK" to enter the "Shim UEFI key management" screen.
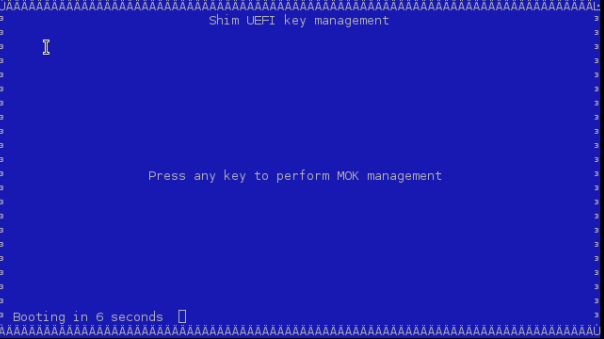
Select "Enroll MOK" and follow the menus to finish the enrolling process.
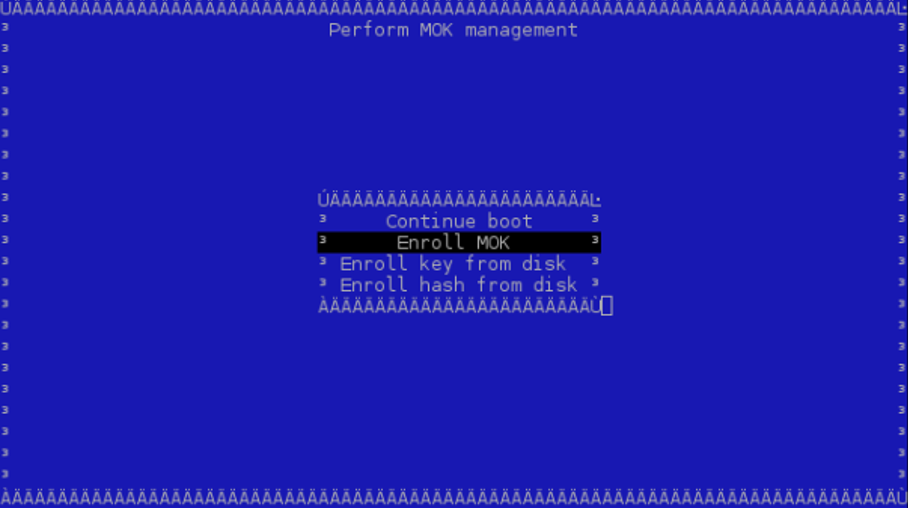
You may look at the properties of the key you are adding to make sure it is indeed correct using "View key". MokManager will ask for the same password you typed in earlier when running mokutil before reboot. MokManager will save the key and you will need to reboot again.
To list the enrolled certificate files, run the following command:
ubuntu@localhost:~$ sudo mokutil --list-enrolled
Generation of Custom Keys and Certificates
To boot binaries not signed with the existing public keys and certificates in the UEFI database (like the Microsoft certificate and key described in "Signing OS Loader by Microsoft"), create an X.509 certificate (which includes the public key part of the public–private key pair) that can be imported either directly though the UEFI or, more easily, via shim.
Creating a certificate and public key for use in the UEFI secure boot is relatively simple. OpenSSL can do it by running the command req.
For illustration purposes only, this example shows how to create a 2048-bit RSA MOK key and its associated certificate file in DER format:
$ openssl req -new -x509 -newkey rsa:2048 -nodes -days 36500 -outform DER -keyout "mok.priv" -out "mok.der"
An OpenSSL configuration file may be used for key generation. It may be specified using --config path/to/openssl.cnf.
Detailed key and certificate generation are beyond the scope of this document. Any organization should choose the proper way to generate keys and certificates based on their security policy.
The following sections refer to the db private key as key.priv and its DER certificate as cert.der. Similarly, the MOK private key is referred to as mok.priv and its DER certificate as mok.der.
Enrolling Your Own Key to UEFI DB
Some users may need to generate their own keys. For convenience, the processes used to enroll keys into UEFI db as well as to sign UEFI binaries are provided in this document.
To execute your binaries while UEFI secure boot is enabled, you need your own pair of private and public key certificates. The supported keys are RSA 2048-bit and ECDSA 384-bit.
The private part is used for signing operations and must be kept safe. The public part X.509 key certificate in DER format must be enrolled within the UEFI db.
A prerequisite for the following steps is having UEFI secure boot temporarily disabled on the DPU. After temporarily disabling UEFI secure boot per device as in section "Existing DPU Certificates", it is possible to override all the key certificate files of the UEFI database. This allows you to enroll your PK key certificate, KEK key certificate, and db certificates.
The following subsections detail how enrolling can be done.
Using a Capsule
To enroll your key certificates, create a capsule file by way of tools and scripts provided along with the BlueField software.
To create the capsule files, execute the mlx-mkcap script. After BlueField software installation, the script can be found under /lib/firmware/mellanox/boot/capsule/scripts. This script generates a capsule file to supply the key certificates to UEFI and enables UEFI secure boot:
$ ./mlx-mkcap --pk-key pk.cer --kek-key kek.cer --db-key db.cer EnrollYourKeysCap
Note that you may specify as many db certificates as needed using the --db-key flag. In this example, only a single db certificate is specified.
To set the UEFI password, you may specify the --uefi-passwd flag. For example, to set the UEFI password to bluefield, run:
$ ./mlx-mkcap --pk-key pk.cer --kek-key kek.cer --db-key db.cer --uefi-passwd "bluefield" EnrollYourKeysCap
The resulting capsule file, EnrollYourKeysCap, can be downloaded to the BlueField file system to initiate the key enrollment process. From the the BlueField console execute the following command then reboot:
ubuntu@localhost:~$ bfrec --capsule EnrollYourKeysCap
On the next reboot, the capsule file is processed and the UEFI database is populated with the keys extracted from the capsule file.
Enrolling the PK key certificate file enables the UEFI secure boot.
Enroll Certificate into UEFI DB
As mentioned, the public part of the X.509 key certificate in DER format must be enrolled within the UEFI db. The X.509 DER certificate file must be installed into the EFI system partition (ESP).
Download the certificate file to BlueField file system and place it into the ESP:
ubuntu@localhost:~$ sudo cp path/to/cert.der /boot/efi/
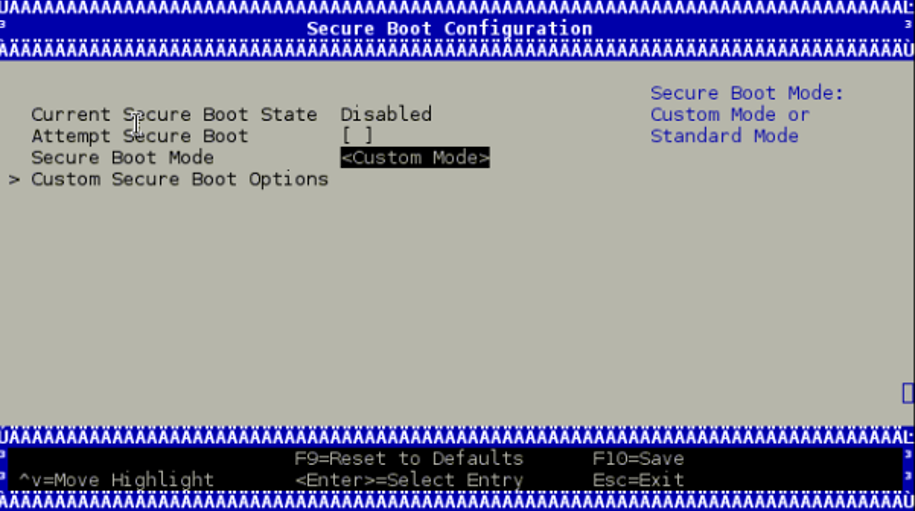
To enroll the certificate into the UEFI db, you must to reboot and log in again into the UEFI menu. From the "UEFI menu", select "Device Manager" entry then "Secure Boot Configuration". Navigate to "Secure Boot Mode" and select "Custom Mode" setup.
The secure boot "Custom Mode" setup feature allows a physically present user to modify the UEFI database.
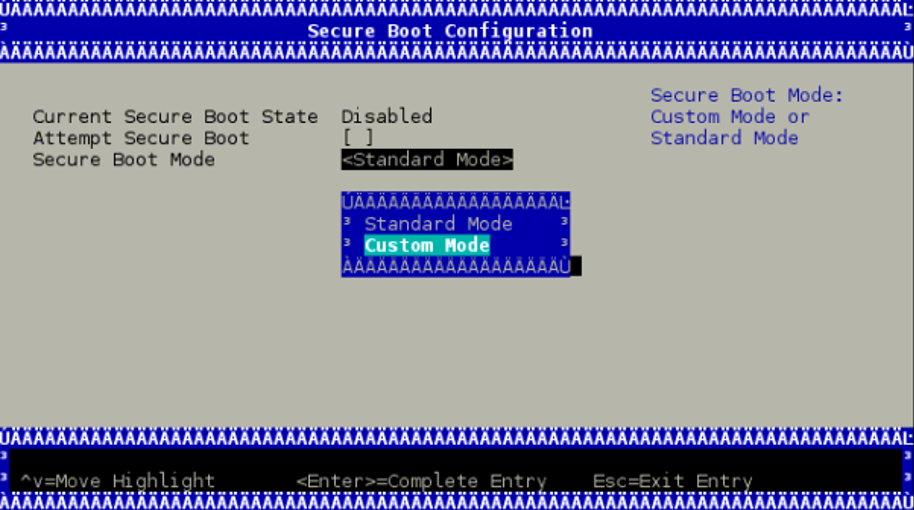
Once the platform is in "Custom Mode", a "Custom Secure Boot Options" menu entry appears which allows you to manipulate the UEFI database keys and certificates.
To enroll your DER certificate file, select "DB Options" and enter the "Enroll Signature" menu. Select "Enroll Signature Using File" and navigate within the EFI System Partition (ESP) to the db DER certificate file.
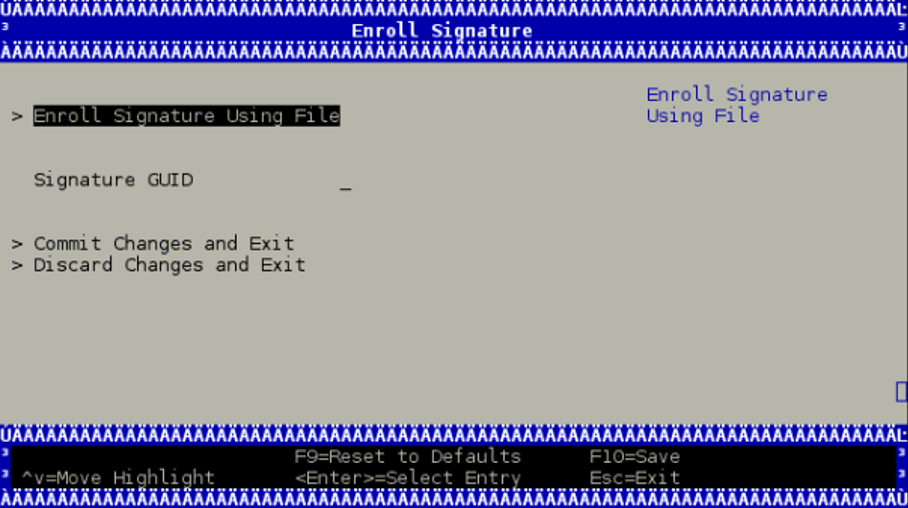
The ESP path is shown below as "system-boot, [VenHw(*)/HD(*)]".
While enrolling the certificate file, you may enter a GUID along with the key certificate file. The GUID is the platform's way of identifying the key. It serves no purpose other than for you to tell which key is which when you delete it (it is not used at all in signature verification).
This value must be in the following format: 11111111-2222-3333-4444-1234567890ab. If nothing is entered, a GUID of 00000000-0000-0000-0000-000000000000 is created.
Finally, commit the changes and exit. You may be asked to reboot.
Signing Custom Kernel and UEFI Binaries
To sign a custom kernel or any other EFI binary (UEFI application, UEFI driver or OS loader) you want to have loaded by shim, you need the private part of the key and the certificate in PEM format.
To convert the certificate into PEM, run:
$ openssl x509 -in mok.der -inform DER -outform PEM -out mok.pem
Now, to sign your EFI binary, run:
$ sbsign --key mok.priv --cert mok.pem binary.efi --output binary.efi.signed
If you are using your db key, use the private part of the key and its associated certificate converted into PEM format for binary signing.
If the X.509 key certificate is enrolled in UEFI db or by way of shim, the binary should be loaded without an issue.
Signing Kernel Modules
The X.509 certificate you added must be visible to the kernel. To verify the keys visible to the kernel, run:
ubuntu@localhost:~$ sudo cat /proc/keys
For a straightforward result, run:
            ubuntu@localhost:~$ dmesg | grep -i "X.509"
[    1.869521] Loading compiled-in X.509 certificates
[    1.875441] Loaded X.509 cert 'Build time autogenerated kernel key: b1a3fbd0178bdb7190387a4187e8e4b0eb476cdc'
[    1.941752] integrity: Loading X.509 certificate: UEFI:db
[    1.947636] integrity: Loaded X.509 cert 'YourSigningDbKey: a109f01707ba6769c4d546530ba1592c7daedc3b'
[    1.958736] integrity: Loading X.509 certificate: UEFI:db
[    1.964170] integrity: Loaded X.509 cert 'Microsoft Corporation UEFI CA 2011: 13adbf4309bd82709c8cd54f316ed522988a1bd4'
[    2.023740] integrity: Loading X.509 certificate: UEFI:MokListRT
[    2.030090] integrity: Loaded X.509 cert 'YourSingingMokKey: 2012e5122669ffc0cc28827c6134329a6bec0b88'
[    2.040796] integrity: Loading X.509 certificate: UEFI:MokListRT
[    2.046830] integrity: Loaded X.509 cert 'SomeOrg: shim: 331c1c8963538e327d6e39346f4f53b200987015'
[    2.055796] integrity: Loading X.509 certificate: UEFI:MokListRT
[    2.062114] integrity: Loaded X.509 cert 'Canonical Ltd. Master Certificate Authority: ad91990bc22ab1f517048c23b6655a268e345a63'
If the X.509 certificate attributes (commonName, etc.) are configured properly, you should see your key certificate information in the result output. In this example, two custom keys are visible to the kernel:
YourSigningMokKey – registered with the shim as a MOK
YourSigningDbKey – registered with UEFI as db
This example is for illustration purposes only. The actual output might differ from the output shown in this example depending on what key was previously enrolled and how it was enrolled.
You may sign kernel modules using either of these approaches:
kmodsign command
Linux kernel script sign-file
Signing Kernel Modules Using kmodsign
If you are using the kmodsign command to sign kernel modules, run:
ubuntu@localhost:~$ sudo cat /proc/keys
The signature is appended to the kernel module by kmodsign.
But if you rather keep the original kernel module unchanged, run:
ubuntu@localhost:~$ kmodsign sha512 mok.priv mok.der module.ko module-signed.ko
Refer to kmosign --help for more information.
Signing Kernel Modules Using Sign File
To sign the kernel module using the Linux kernel script sign-file, please refer to Linux kernel documentation.
If you are using your db key, use the private part of the key and its associated certificate for binary signing.
To validate that the module is signed, check that it includes the string ~Module signature appended~:
            ubuntu@localhost:~$ hexdump -Cv module.ko | tail -n 5
00002c20  10 14 08 cd eb 67 a8 3d  ac 82 e1 1d 46 b5 5c 91  |.....g.=....F.\.|
00002c30  9c cb 47 f7 c9 77 00 00  02 00 00 00 00 00 00 00  |..G..w..........|
00002c40  02 9e 7e 4d 6f 64 75 6c  65 20 73 69 67 6e 61 74  |..~Module signat|
00002c50  75 72 65 20 61 70 70 65  6e 64 65 64 7e 0a        |ure appended~.|
00002c5e
Ongoing Updates
Update Key Certificates
This requires UEFI secure boot to have been enabled using your own keys, which means that you own the signing keys.
While UEFI secure boot is enabled, it is possible to update your keys using a capsule file.
To create a capsule intended to update the UEFI secure boot keys, generate a new set of keys and then run:
$ ./mlx-mkcap --pk-key new_pk.cer --kek-key new_kek.cer --db-key new_db1.cer --db-key new_db2.cer --db-key new_db3.cer --signer-key db.key --signer-cert db.pem EnrollYourNewKeysCap
Note that --signer-key and --signer-cert are set so the capsule is signed. When UEFI secure boot is enabled, the capsule is verified using the key certificates previously enrolled in the UEFI database. It is important to use the old signing keys associated with the certificates in the UEFI database to sign the capsule. The new key certificates are intended to replace the existing key certificates after capsule processing. Once the UEFI database is updated, the new keys must be used to sign the newly created capsule files.
To enroll the new set of keys, download the capsule file to the BlueField console and use bfrec to initiate the capsule update.
Disable UEFI Secure Boot Using a Capsule
This requires UEFI secure boot to have been enabled using your own keys, which means that you own the signing keys.
It is possible to disable UEFI secure boot through a capsule update. This requires an empty PK key when creating the capsule file.
To create a capsule intended to disable UEFI secure boot:
Create a dummy empty PK certificate:
$ touch null_pk.cer
Create the capsule file:
$ ./mlx-mkcap --pk-key null_pk.cer --signer-key db.key --signer-cert db.pem DeletePkCap
--signer-key and --signer-cert must be specified with the appropriate private keys and certificates associated with the actual key certificates in the UEFI database.
To enroll the empty PK certificate, download the capsule file to the BlueField console and use bfrec to initiate the capsule update.
Deleting the PK certificate will result in UEFI secure boot to be disabled which is not recommended in a production environment.