Scalable Functions
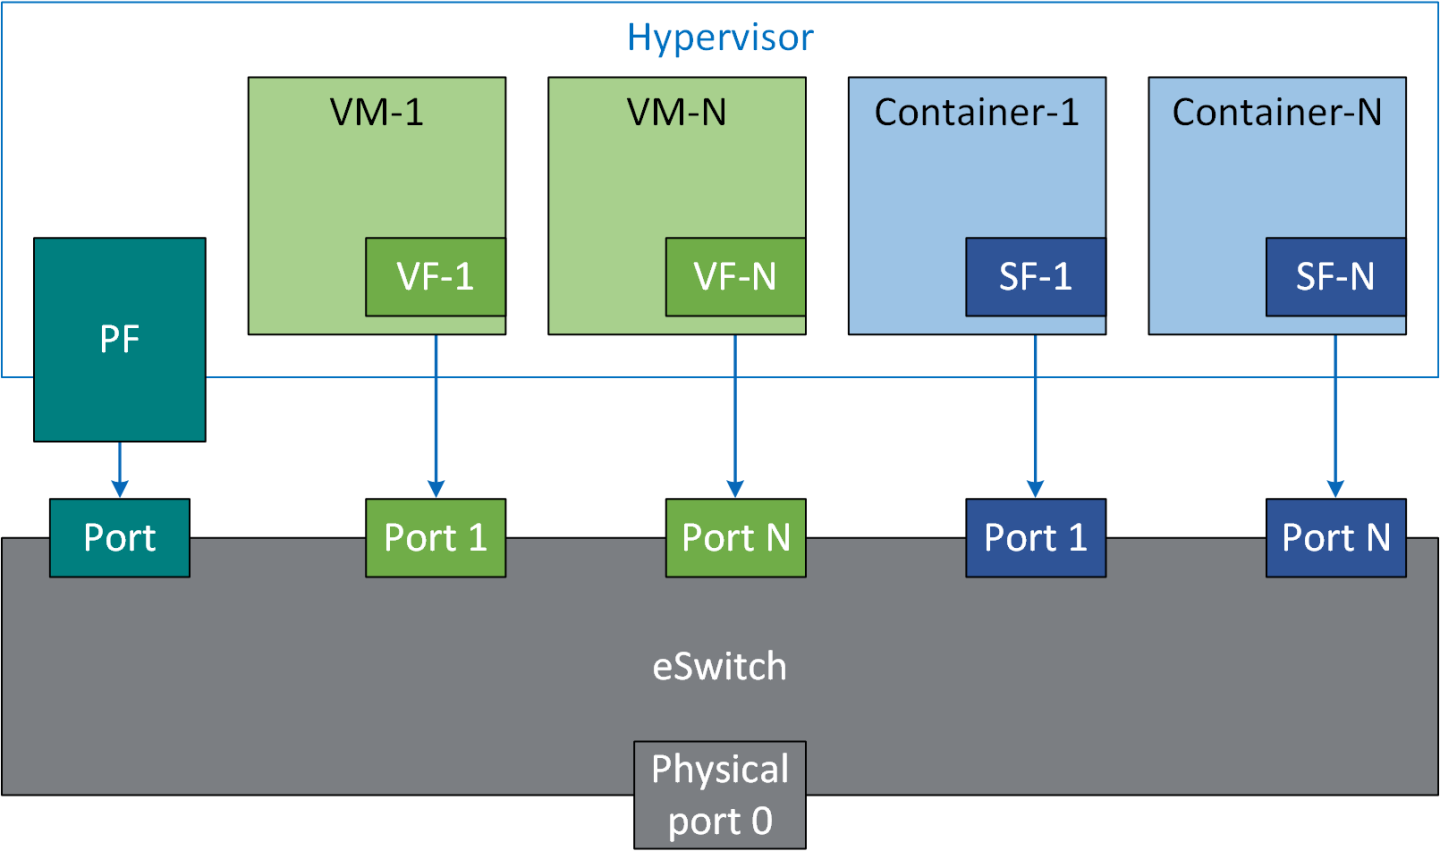
A scalable function (SF) is a lightweight function that has a parent PCIe function on which it is deployed. An mlx5 SF has its own function capabilities and its own resources. This means that an SF has its own dedicated queues (txq, rxq, cq, eq) which are neither shared nor stolen from the parent PCIe function.
No special support is needed from system BIOS to use SFs. SFs co-exist with PCIe SR-IOV virtual functions. SFs do not require enabling PCIe SR-IOV.
The following procedure offers a guide on using scalable functions with upstream Linux kernel.
Device Configuration
Make sure your firmware version supports SFs (20.30.1004 and above).
Enable SF support in device. Run:
$ mlxconfig -d 0000:03:00.0 s PF_BAR2_ENABLE=0 PER_PF_NUM_SF=1 PF_TOTAL_SF=236 PF_SF_BAR_SIZE=10
Cold reboot the system for the configuration to take effect.
Mandatory Kernel Configuration on Host
Support for Linux kernel mlx5 SFs must be enabled as it is disabled by default.
The following two Kconfig flags must be enabled.
MLX5_ESWITCH
MLX5_SF
Software Control and Commands
SFs use a 4-step process as follows:
Create
Configure
Deploy
Use
SFs are managed using mlxdevm tool. It is located under directory /opt/mellanox/iproute2/sbin/mlxdevm.
Display the physical (i.e. uplink) port of the PF. Run:
            $ devlink port show
pci/0000:03:00.0/65535: type eth netdev p0 flavour physical port 0 splittable false
Add an SF. Run:
            $ mlxdevm port add pci/0000:03:00.0 flavour pcisf pfnum 0 sfnum 88
pci/0000:03:00.0/229409: type eth netdev eth0 flavour pcisf controller 0 pfnum 0 sfnum 88
  function:
    hw_addr 00:00:00:00:00:00 state inactive opstate detached trust off
WarningAn added SF is still not usable for the end-user application. It can only be used after configuration and activation.
WarningSF number ≥1 000 is reserved for the virtio-net controller.
When an SF is added on the external controller (e.g. DPU) users must supply the controller number. In a single host DPU case, there is only one controller starting with controller number 1.
Example of adding an SF for PF0 of external controller 1:
            $ mlxdevm port add pci/0000:03:00.0 flavour pcisf pfnum 0 sfnum 88 controller 1
pci/0000:03:00.0/32768: type eth netdev eth6 flavour pcisf controller 1 pfnum 0 sfnum 88 splittable false
  function:
    hw_addr 00:00:00:00:00:00 state inactive opstate detached
Show the newly added devlink port by its port index or its representor device.
            $ mlxdevm port show en3f0pf0sf88
pci/0000:03:00.0/229409: type eth netdev en3f0pf0sf88 flavour pcisf controller 0 pfnum 0 sfnum 88
  function:
    hw_addr 00:00:00:00:00:00 state inactive opstate detached trust off
Or:
            $ mlxdevm port show pci/0000:03:00.0/229409
pci/0000:03:00.0/229409: type eth netdev en3f0pf0sf88 flavour pcisf controller 0 pfnum 0 sfnum 88
  function:
    hw_addr 00:00:00:00:00:00 state inactive opstate detached trust off
Set the MAC address of the SF. Run:
$ mlxdevm port function set pci/0000:03:00.0/229409 hw_addr 00:00:00:00:88:88
Set SF as trusted (optional). Run:
            $ mlxdevm port function set pci/0000:03:00.0/229409 trust on
pci/0000:03:00.0/229409: type eth netdev en3f0pf0sf88 flavour pcisf controller 0 pfnum 0 sfnum 88
  function:
    hw_addr 00:00:00:00:88:88 state inactive opstate detached trust on
WarningA trusted function has additional privileges like the ability to update steering database.
Configure OVS. Run:
            $ systemctl start openvswitch
$ ovs-vsctl add-br network1
$ ovs-vsctl add-port network1 ens3f0npf0sf88
$ ip link set dev ens3f0npf0sf88 up
Activate the SF. Run:
$ mlxdevm port function set pci/0000:03:00.0/229409 state active
Activating the SF results in creating an auxiliary device and initiating driver load sequence for netdevice, RDMA, and VDPA devices. Once the operational state is marked as attached, a driver is attached to this SF and device loading begins.
WarningAn application interested in using the SF netdevice and rdma device must monitor the RDMA and netdevices either through udev monitor or poll the sysfs hierarchy of the SF's auxiliary device.
By default, SF is attached to the configuration driver mlx5_core.sf_cfg. Users must unbind an SF from the configuration and bind it to the mlx5_core.sf driver to make use of it. Run:
             $ echo mlx5_core.sf.4 > /sys/bus/auxiliary/devices/mlx5_core.sf.4/driver/unbind
 $ echo mlx5_core.sf.4 > /sys/bus/auxiliary/drivers/mlx5_core.sf/bind
View the new state of the SF. Run:
            $ mlxdevm port show en3f0pf0sf88 -jp
{
    "port": {
        "pci/0000:03:00.0/229409": {
            "type": "eth",
            "netdev": "en3f0pf0sf88",
            "flavour": "pcisf",
            "controller": 0,
            "pfnum": 0,
            "sfnum": 88,
            "function": {
                "hw_addr": "00:00:00:00:88:88",
                "state": "active",
                "opstate": "detached",
                "trust": "on"
            }
        }
    }
  }
View the auxiliary device of the SF. Run:
            $ cat /sys/bus/auxiliary/devices/mlx5_core.sf.4/sfnum
88
There can be hundreds of auxiliary SF devices on the auxiliary bus. Each SF's auxiliary device contains a unique sfnum and PCI information.
View the parent PCI device of the SF. Run:
            $ readlink /sys/bus/auxiliary/devices/mlx5_core.sf.1
../../../devices/pci0000:00/0000:00:00.0/0000:01:00.0/0000:02:00.0/0000:03:00.0/mlx5_core.sf.1
View the devlink instance of the SF device. Run:
            $ devlink dev show
$ devlink dev show auxiliary/mlx5_core.sf.4
View the port and netdevice associated with the SF. Run:
            $ devlink port show auxiliary/mlx5_core.sf.4/1
auxiliary/mlx5_core.sf.4/1: type eth netdev enp3s0f0s88 flavour virtual port 0 splittable false
View the RDMA device for the SF. Run:
            $ rdma dev show
$ ls /sys/bus/auxiliary/devices/mlx5_core.sf.4/infiniband/
Deactivate SF. Run:
$ mlxdevm port function set pci/0000:03:00.0/229409 state inactive
Deactivating the SF triggers driver unload in the host system. Once SF is deactivated, its operational state changes to "detached". An orchestration system should poll for the operational state to be changed to "detached" before deleting the SF. This ensures a graceful hot-unplug.
Delete SF. Run:
$ mlxdevm port del pci/0000:03:00.0/229409
Finally, once the state is "inactive" and the operational state is "detached" the user can safely delete the SF. For faster provisioning, a user can reconfigure and active the SF again without deletion.