Microsoft Windows Server Installation and vGPU Configuration#
Downloading Microsoft Windows Server#
To install Microsoft Windows Server, use the installation ISO file from the official Microsoft page.
Note
The Datacenter edition is required to enable features such as live migration and failover clustering.
Installing Hyper-V#
Hyper-V is a required role for enabling vGPU in Windows Server. We recommend installing Hyper-V using Server Manager. Follow the instructions provided here.
It is recommended to create a virtual switch to allow your Hyper-V virtual machines to communicate with other devices on the network and access external resources. Follow these instructions to create a virtual switch for your Hyper-V virtual machines.
NVIDIA vGPU Configuration#
NVIDIA vGPU Manager#
You need to install and configure the NVIDIA vGPU Manager. See Installing the NVIDIA Virtual GPU Manager for detailed instructions.
Selecting the Correct vGPU Profiles#
Select the appropriate vGPU profile based on your user’s needs and application requirements. More information can be found in the vGPU Sizing and Selection guides.
Creating GPU Partitions#
To create a GPU partition, start by listing the GPU adapters that support GPU-P by running the following command:
Get-VMHostPartitionableGpu
Then, set the number of partitions the GPU should support using:
Set-VMHostPartitionableGpu -Name "gpu name" -PartitionCount "number of partitions"
Note
After creating GPU partitions, it is recommended to set the vGPU type per GPU.
Creating the Virtual Machine#
Follow these instructions to create a virtual machine (VM) in Hyper-V.
Note
If you select Windows 11 as your operating system, make sure to enable Trusted Platform Module (TPM) support in the virtual machine settings.
Attaching a vGPU to the VM#
Before proceeding, make sure the VM is powered off. On your Microsoft Windows Server host, follow these instructions in Powershell to attach the vGPU partition to the VM.
To add multiple vGPU partitions to the same VM, repeat the step where you add a GPU-P adapter by running the following command:
Add-VMGpuPartitionAdapter -VMName "vm name"
If your system has more than one GPU, you need to specify the instance path of the GPU you want to assign to the VM. The command is:
Add-VMGpuPartitionAdapter -VMName "vm name" -InstancePath "instance path"
Once completed, you can power the VM back on. For additional options and examples, review this Microsoft article on Add-VMGpuPartitionAdapter.
Note
You can also partition and assign vGPUs to a virtual machine using Windows Admin Center. More information is available here.
Removing GPU Partitions#
To remove a GPU partition from a VM:
Remove-VMGpuPartitionAdapter -VMName "vm name"
To check the GPU partition was removed:
Get-VMGpuPartitionAdapter -VMName "vm name"
To remove the GPU partitions from a GPU by name:
Set-VMHostPartitionableGpu -Name "gpu name" -PartitionCount 1
Installing the NVIDIA Graphics Driver#
After the VM is created and assigned a vGPU, install the NVIDIA vGPU Software Graphics Driver inside the VM. Instructions are available here.
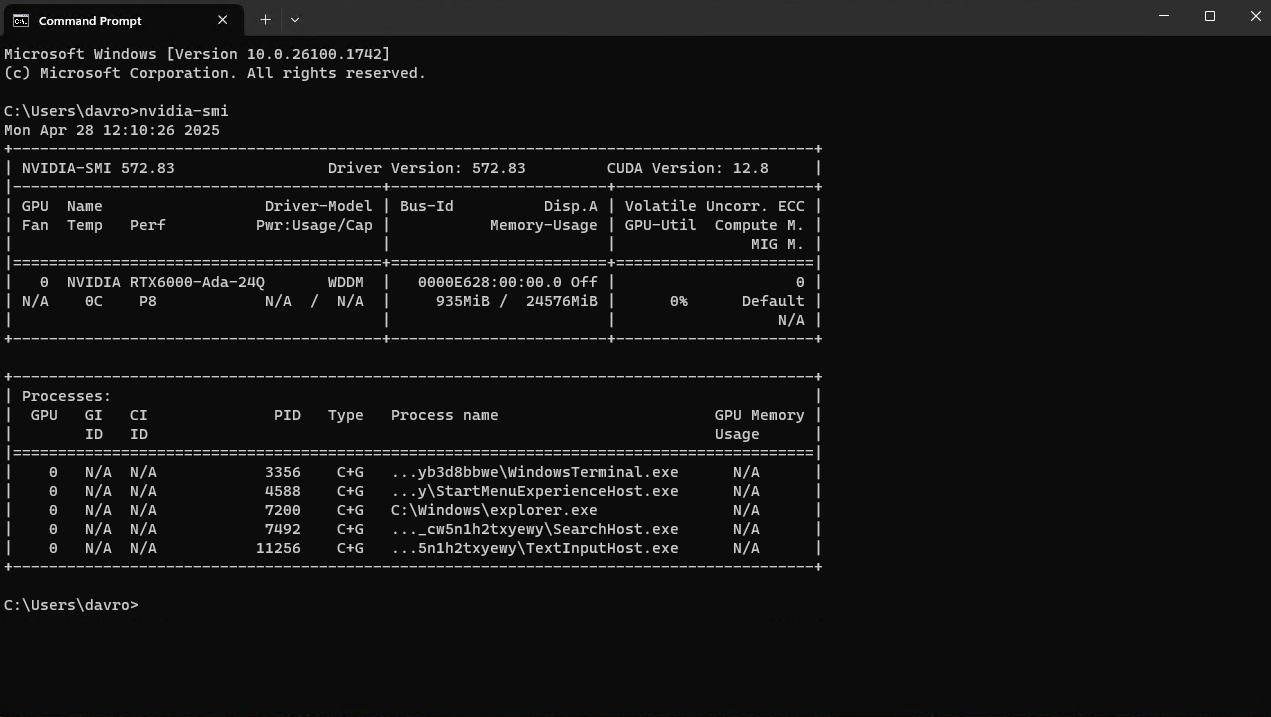
Once completed, you can verify that the vGPU has been successfully added by running nvidia-smi inside PowerShell or the command prompt window in the VM.
Configuring Licensing#
The NVIDIA License System serves licenses to NVIDIA software products. To activate licensed functionalities, a licensed client leases a software license served over the network from an NVIDIA License System service instance. The NVIDIA License System Documentation explains how to install, configure, and manage licenses for virtual GPU software.
To configure a license client of the NVIDIA license system, start by generating a client configuration token, then follow these instructions.
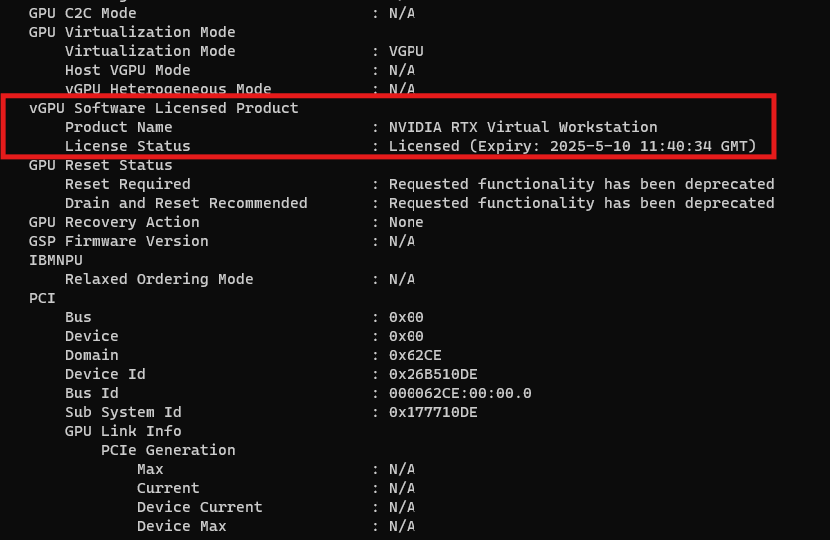
To verify the license status, run nvidia-smi -q from the command line. You should see Licensed under Licensed Status in the vGPU Software Licensed Product.
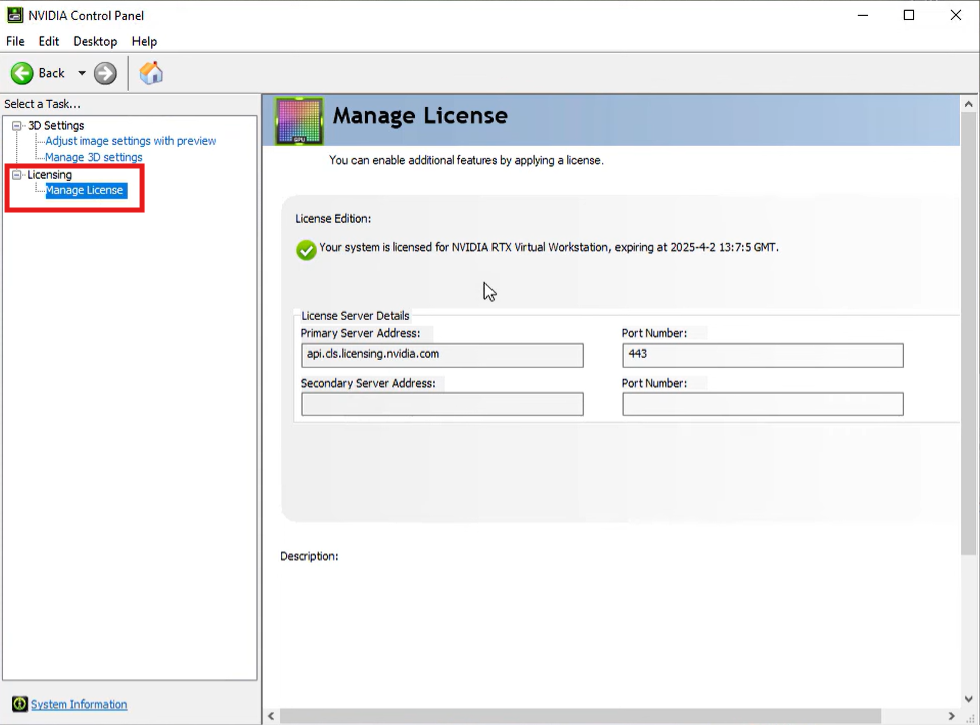
You can also verify the license status through the NVIDIA Control Panel under Licensing → Manage License.
For troubleshooting issues, you can check the log files.
Managing the vGPU-enabled VM#
Migrating a VM Configured with vGPU#
Before migrating a VM configured with vGPU on Microsoft Windows Server, ensure the prerequisites are met.
To perform migration without failover clustering, see:
To perform migration with failover clustering, see Failover Clustering in Windows Server and Azure Local.
Note
Make sure to disable Trusted Platform Module (TPM) support in the virtual machine settings for any VM you want to migrate.
Configuring GPU Passthrough#
If you previously created GPU partitions, make sure to remove them from both the VM and the GPU itself to revert to the initial state.
Before dismounting the GPU, ensure it is disabled. Open Device Manager, right-click the GPU, select Properties, go to the Driver tab, and click Disable Device.
To configure the GPU in passthrough mode, follow these steps.
Windows Subsystems for Linux (WSL)#
Windows Subsystem for Linux (WSL) is supported on Microsoft Windows Server. WSL allows users to run a full Linux terminal-based environment directly on Windows, making it ideal for cross-platform development, automation, and Linux-native tooling. To learn more about WSL and how to deploy it on Windows Server, visit the official Microsoft documentation.
Running WSL in a virtual machine does require some additional steps that will enable nested virtualization or running a hypervisor on top of another hypervisor. This will allow for running AI GPU workloads that require WSL, like NVIDIA AI Workbench. To enable this feature for virtual machines, refer to this guide from Microsoft on Hyper-V and nested virtualization.