Installing Tools on Dell R750
This chapter describes how to install the required kernel, driver, and tools on the host. This is a one-time installation and can be skipped if the system has been configured already.
In the following sequence of steps, the target host is Dell PowerEdge R750.
Depending on the release, tools that are installed in this section may need to be upgraded in the Installing and Upgrading cuBB SDK section.
Once everything is installed and updated, refer to the cuBB Quick Start Guide on how to use the cuBB SDK.
Dual Intel Xeon Gold 6336Y CPU @ 2.4G, 24C/48T (185W)
512GB RDIMM, 3200MT/s
1.92TB, Enterprise NVMe
Riser Config 2, Full Length, 4x16, 2x8 slots (PCIe gen 4)
Dual, Hot-Plug Power Supply Redundant (1+1), 1400W or 2400W
GPU Enablement
NVIDIA Converged Accelerator: A100X or AX800
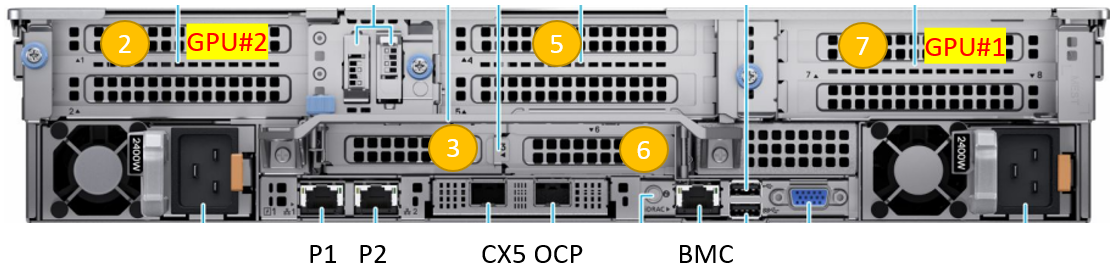
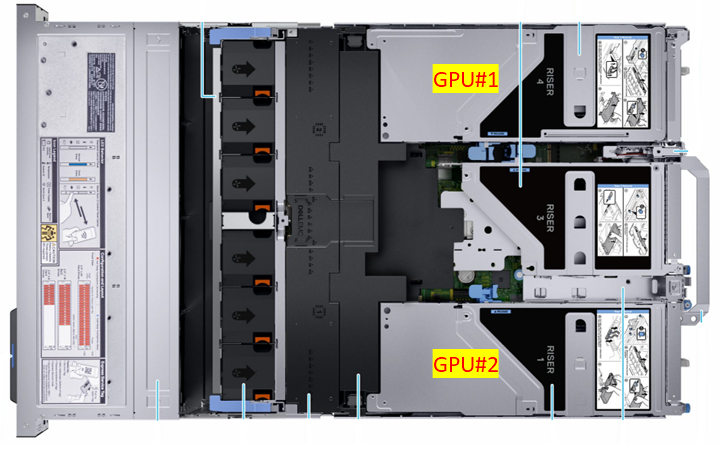
R750 supports PCIe 4.0 x16 at slot 2,3,6,7 and x8 at slot 4,5. Please follow the table below to install single or dual converged accelerator in the assigned slot and ensure the GPU power cable is connected properly. Here are the GPU installation instructions from Dell R750 Installation Manual
NOTE: Only use SIG_PWR_3 and SIG_PWR_4 connectors on the motherboard for GPU power.
GPU |
Slot |
GPU Power |
NUMA |
|---|---|---|---|
| GPU#1 | 7 (Riser 4) | SIG_PWR_3 | 1 |
| GPU#2 | 2 (Riser 1) | SIG_PWR_4 | 0 |
Rear View:
Top View:
To run end-to-end test with O-RU, the converged accelerator port#0 or port#1 should be connected to the fronthaul switch. But please make sure the PTP is configured to use the port connected to the fronthaul switch.
To run cuBB end-to-end test with TestMAC and RU emulator, an Aerial Devkit is required to run RU emulator. The converged accelerator port#1 on R750 should be connected to CX6-DX NIC port#0 on Aerial Devkit (RU emulator server) via Mellanox 100GbE direct attach copper cable.
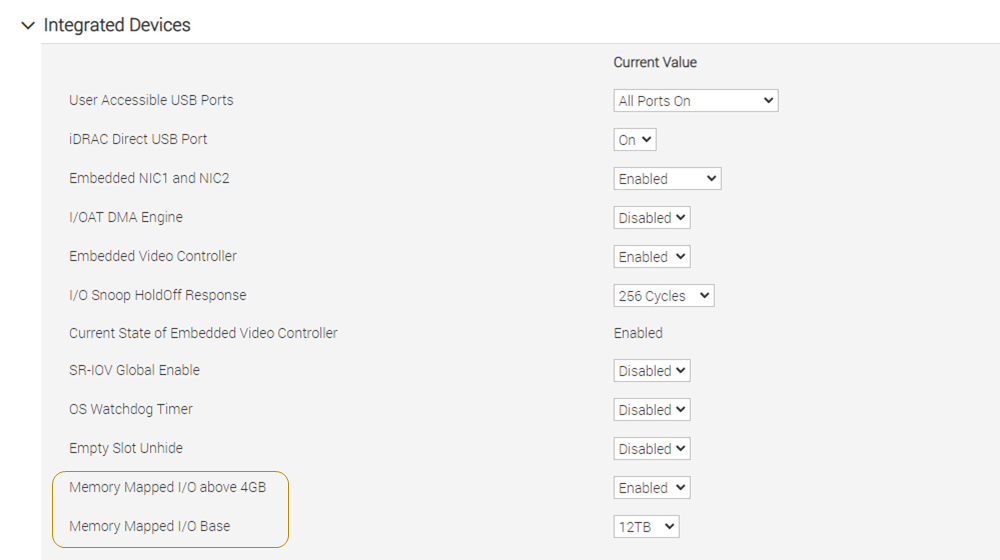
During the first boot, change the BIOS settings in the following order. The same settings can be changed via BMC: Configuration → BIOS Settings.
Integrated Devices: Enable Memory Mapped I/O above 4GB and change Memory Mapped I/O Base to 12TB.
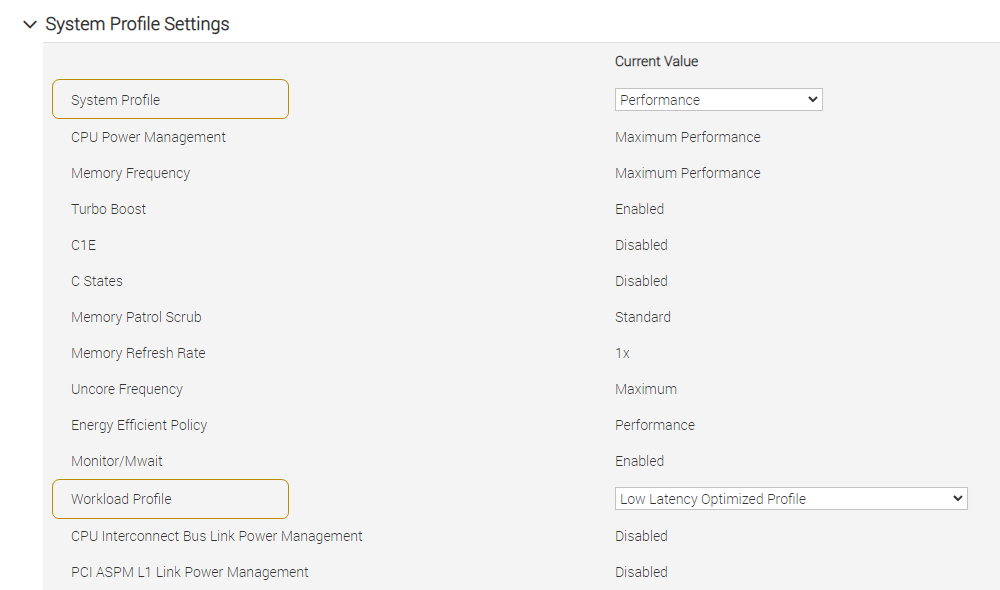
System Profile Settings: Change System Profile to Performance and Workload Profile to Low Latency Optimized Profile.
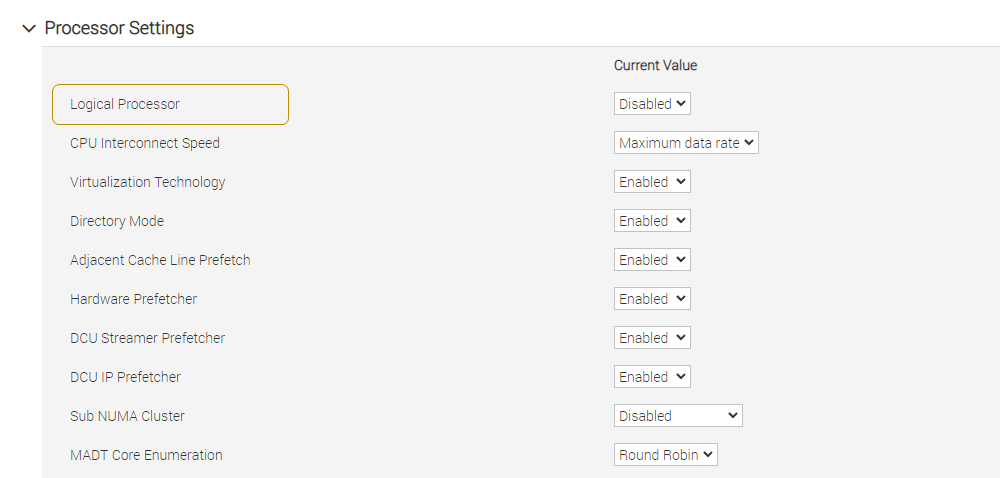
Processor Settings: Aerial SDK supports both HyperThreaded mode (experimental) or non-HyperThreaded mode (default) but make sure the kernel command line and the CPU core affinity in the cuPHYController yaml match the BIOS settings.
To enable HyperThreading, enable the Logical Processor. To disable HyperThreading, disable the Logical Processor.
Save the BIOS settings, then reboot the system.
After installing Ubuntu 22.04 Server, please check the following:
Check if the system time is correct to avoid apt update error. If not, see How to fix system time.
Check if the LVM volume uses the whole disk space. If not, see How to resize LVM volume.
Check if the GPU and NIC are detected by the OS:
Use the following commands to determine whether the GPU and NIC are detected by the OS:
            $ lspci | grep -i nvidia
# If the system has A100X GPU installed
cf:00.0 3D controller: NVIDIA Corporation Device 20b8 (rev a1)
# If the system has AX800 GPU installed
cf:00.0 3D controller: NVIDIA Corporation Device 20fd (rev a1)

$ lspci | grep -i mellanox
# If the system has A100X GPU installed
cc:00.0 Ethernet controller: Mellanox Technologies MT42822 BlueField-2 integrated ConnectX-6 Dx network controller (rev 01)
cc:00.1 Ethernet controller: Mellanox Technologies MT42822 BlueField-2 integrated ConnectX-6 Dx network controller (rev 01)
# If the system has AX800 GPU installed
cc:00.0 Ethernet controller: Mellanox Technologies MT43244 BlueField-3 integrated ConnectX-7 network controller (rev 01)
cc:00.1 Ethernet controller: Mellanox Technologies MT43244 BlueField-3 integrated ConnectX-7 network controller (rev 01)
Edit the /etc/apt/apt.conf.d/20auto-upgrades system file, and change the “1” to “0” for both lines.
This prevents the installed version of the low latency kernel from being accidentally changed with a
subsequent software upgrade.
            $ sudo nano /etc/apt/apt.conf.d/20auto-upgrades
APT::Periodic::Update-Package-Lists "0";
APT::Periodic::Unattended-Upgrade "0";
If the low latency kernel is not installed, you should remove the old kernels and keep only the latest generic kernel. Enter the following command to list the installed kernels:
            $ dpkg --list | grep -i 'linux-image' | awk '/ii/{ print $2}'

# To remove old kernel
$ sudo apt-get purge linux-image-<old kernel version>
$ sudo apt-get autoremove
Next, install the low-latency kernel with the specific version listed in the releasee manifest.
$ sudo apt-get install -y linux-image-5.15.0-72-lowlatency
Then, update the grub to change the default boot kernel:
            # Update grub to change the default boot kernel
$ sudo sed -i 's/^GRUB_DEFAULT=.*/GRUB_DEFAULT="Advanced options for Ubuntu>Ubuntu, with Linux 5.15.0-72-lowlatency"/' /etc/default/grub
To set kernel command-line parameters, edit the GRUB_CMDLINE_LINUX_DEFAULT parameter in the grub
file /etc/default/grub and append/update the parameters described below. The following kernel parameters
are optimized for Xeon Gold 6336Y CPU and 512GB memory.
To automatically append the grub file with these changes, enter this command:
            # When HyperThread is disabled (default)
sudo sed -i 's/^GRUB_CMDLINE_LINUX_DEFAULT="[^"]*/& pci=realloc=off default_hugepagesz=1G hugepagesz=1G hugepages=16 tsc=reliable clocksource=tsc intel_idle.max_cstate=0 mce=ignore_ce processor.max_cstate=0 intel_pstate=disable audit=0 idle=poll rcu_nocb_poll nosoftlockup iommu=off irqaffinity=0-3,44-47 isolcpus=4-43 nohz_full=4-43 rcu_nocbs=4-43 noht/' /etc/default/grub

# When HyperThread is enabled (experimental)
sudo sed -i 's/^GRUB_CMDLINE_LINUX_DEFAULT="[^"]*/& pci=realloc=off default_hugepagesz=1G hugepagesz=1G hugepages=16 tsc=reliable clocksource=tsc intel_idle.max_cstate=0 mce=ignore_ce processor.max_cstate=0 intel_pstate=disable audit=0 idle=poll rcu_nocb_poll nosoftlockup iommu=off irqaffinity=0-3,92-95 isolcpus=4-91 nohz_full=4-91 rcu_nocbs=4-91/' /etc/default/grub
Note that the CPU-cores-related parameters need to be adjusted depending on the number of CPU cores
on the system. In the example above, the “4-43” value represents CPU core numbers 4 to 43; you may
need to adjust this parameter depending on the HW configuration. By default,only one DPDK thread is
used. The isolated CPUs are used by the entire cuBB software stack. Use the nproc --all command
to see how many cores are available. Do not use core numbers that are beyond the number of available
cores.
These instructions are specific to Ubuntu 22.04 with a 5.15.0-72-lowlatency kernel provided by Canonical. Please make sure the kernel commands provided here are suitable for your OS and kernel versions and revise these settings to match your system if necessary.
            $ sudo update-grub
$ sudo reboot
After rebooting, enter the following command to check whether the system has booted into the low-latency kernel:
            $ uname -r
5.15.0-72-lowlatency
Enter this command to check that the kernel command-line parameters are configured properly:
            $ cat /proc/cmdline
BOOT_IMAGE=/vmlinuz-5.15.0-72-lowlatency root=/dev/mapper/ubuntu--vg-ubuntu--lv ro pci=realloc=off default_hugepagesz=1G hugepagesz=1G hugepages=16 tsc=reliable clocksource=tsc intel_idle.max_cstate=0 mce=ignore_ce processor.max_cstate=0 intel_pstate=disable audit=0 idle=poll rcu_nocb_poll nosoftlockup iommu=off irqaffinity=0-3,44-47 isolcpus=4-43 nohz_full=4-43 rcu_nocbs=4-43 noht
Enter this command to check if hugepages are enabled:
            $ grep -i huge /proc/meminfo
AnonHugePages:         0 kB
ShmemHugePages:        0 kB
FileHugePages:         0 kB
HugePages_Total:      16
HugePages_Free:       16
HugePages_Rsvd:        0
HugePages_Surp:        0
Hugepagesize:    1048576 kB
Hugetlb:        16777216 kB
Enter this command to disable nouveau:
            $ cat <<EOF | sudo tee /etc/modprobe.d/blacklist-nouveau.conf
blacklist nouveau
options nouveau modeset=0
EOF
Regenerate the kernel initramfs and reboot the system:
            $ sudo update-initramfs -u
$ sudo reboot
Enter these commands to install prerequisite packages:
            $ sudo apt-get update
$ sudo apt-get install -y build-essential linux-headers-$(uname -r) dkms unzip linuxptp pv
The following instructions also install Mellanox firmware tools and rshim with MOFED.
            # Install MOFED
$ export OFED_VERSION=23.07-0.5.0.0
$ export UBUNTU_VERSION=22.04

$ wget http://www.mellanox.com/downloads/ofed/MLNX_OFED-$OFED_VERSION/MLNX_OFED_LINUX-$OFED_VERSION-ubuntu$UBUNTU_VERSION-x86_64.tgz
$ tar xvf MLNX_OFED_LINUX-$OFED_VERSION-ubuntu$UBUNTU_VERSION-x86_64.tgz
$ cd MLNX_OFED_LINUX-$OFED_VERSION-ubuntu$UBUNTU_VERSION-x86_64
$ sudo ./mlnxofedinstall --dpdk --without-mft --with-rshim --add-kernel-support --force --without-ucx-cuda --without-fw-update

$ sudo rmmod nv_peer_mem nvidia_peermem
$ sudo /etc/init.d/openibd restart

# Verify the installed MOFED version
$ ofed_info -s
MLNX_OFED_LINUX-23.07-0.5.0.0:

# Install Mellanox Firmware Tools
$ export MFT_VERSION=4.25.0-62

$ wget https://www.mellanox.com/downloads/MFT/mft-$MFT_VERSION-x86_64-deb.tgz
$ tar xvf mft-$MFT_VERSION-x86_64-deb.tgz
$ cd mft-$MFT_VERSION-x86_64-deb
$ sudo ./install.sh

# Verify the install Mellanox firmware tool version
$ sudo mst version
mst, mft 4.25.0-62, built on Aug 03 2023, 12:15:13. Git SHA Hash: c14a8d9

$ sudo mst start

# check NIC PCIe bus addresses and network interface names
$ sudo mst status -v

# Here is the result of GPU#1 on slot 7
MST modules:
------------
    MST PCI module is not loaded
    MST PCI configuration module loaded
PCI devices:
------------
DEVICE_TYPE             MST                           PCI       RDMA            NET                                     NUMA
BlueField3(rev:1)       /dev/mst/mt41692_pciconf0.1   cc:00.1   mlx5_1          net-ens5f1                              1

BlueField3(rev:1)       /dev/mst/mt41692_pciconf0     cc:00.0   mlx5_0          net-ens5f0                              1
Enter these commands to check the link status of port 0:
            # Here is an example if port 1 is connected to another server via a 100GbE DAC cable.

$ sudo mlxlink -d cc:00.0
Operational Info
----------------
State                           : Active
Physical state                  : LinkUp
Speed                           : 100G
Width                           : 4x
FEC                             : Standard RS-FEC - RS(528,514)
Loopback Mode                   : No Loopback
Auto Negotiation                : ON

Supported Info
--------------
Enabled Link Speed (Ext.)       : 0x00003ff2 (200G_2X,200G_4X,100G_1X,100G_2X,100G_4X,50G_1X,50G_2X,40G,25G,10G,1G)
Supported Cable Speed (Ext.)    : 0x000002f2 (100G_4X,50G_2X,40G,25G,10G,1G)

Troubleshooting Info
--------------------
Status Opcode                   : 0
Group Opcode                    : N/A
Recommendation                  : No issue was observed

Tool Information
----------------
Firmware Version                : 32.37.1300
amBER Version                   : 2.13
MFT Version                     : mft 4.24.0-72
Run the following commands to install CUDA driver. If the system has older version installed, see Removing Old CUDA Driver to remove the old driver first.
CUDA driver should be installed after MOFED.
            # Install CUDA driver
$ wget https://developer.download.nvidia.com/compute/cuda/12.2.0/local_installers/cuda_12.2.0_535.54.03_linux.run
$ sudo sh cuda_12.2.0_535.54.03_linux.run --driver --silent
The full official instructions for installing Docker CE can be found here: https://docs.docker.com/engine/install/ubuntu/#install-docker-engine. The following instructions is one supported way of installing Docker CE:
The CUDA driver must be installed before the Docker CE and nvidia-container-toolkit installation will work correctly. It is recommended to install the CUDA driver before both Docker CE and the nvidia-container-toolkit.
            $ sudo apt-get update
$ sudo apt-get install -y ca-certificates curl gnupg
$ sudo install -m 0755 -d /etc/apt/keyrings
$ curl -fsSL https://download.docker.com/linux/ubuntu/gpg | sudo gpg --dearmor -o /etc/apt/keyrings/docker.gpg
$ sudo chmod a+r /etc/apt/keyrings/docker.gpg
$ echo \
    "deb [arch="$(dpkg --print-architecture)" signed-by=/etc/apt/keyrings/docker.gpg] https://download.docker.com/linux/ubuntu \
"$(. /etc/os-release && echo "$VERSION_CODENAME")" stable" | \
    sudo tee /etc/apt/sources.list.d/docker.list > /dev/null
$ sudo apt-get update
$ sudo apt-get install -y docker-ce docker-ce-cli containerd.io docker-buildx-plugin docker-compose-plugin
$ sudo docker run hello-world
Locate and follow the nvidia-container-toolkit install instructions.
Or use the following instructions as an alternate way to install the nvidia-container-toolkit. Version 1.14.1-1 is supported.
The CUDA driver must be installed before the Docker CE and nvidia-container-toolkit installation will work correctly. It is recommended to install the CUDA driver before both Docker CE and the nvidia-container-toolkit.
            $ curl -fsSL https://nvidia.github.io/libnvidia-container/gpgkey | sudo gpg --dearmor -o /usr/share/keyrings/nvidia-container-toolkit-keyring.gpg \
  && curl -s -L https://nvidia.github.io/libnvidia-container/stable/deb/nvidia-container-toolkit.list | \
    sed 's#deb https://#deb [signed-by=/usr/share/keyrings/nvidia-container-toolkit-keyring.gpg] https://#g' | \
    sudo tee /etc/apt/sources.list.d/nvidia-container-toolkit.list \
  && \
    sudo apt-get update

$ sudo apt-get install -y nvidia-container-toolkit
$ sudo nvidia-ctk runtime configure --runtime=docker
$ sudo systemctl restart docker
$ sudo docker run --rm --runtime=nvidia --gpus all ubuntu nvidia-smi
Contact NVIDIA CPM to download the AX800 SW from PID.
NOTE: The following instructions are for AX800 board specifically. Because this board uses the July GA release from Mellanox, the NIC FW must be installed before BFB. After the bfb-install shows Installation finished, sleep for 10 minutes to ensure the card initializes properly.
            # Enable MST
$ sudo mst start
$ sudo mst status

MST modules:
------------
    MST PCI module is not loaded
    MST PCI configuration module loaded

MST devices:
------------
/dev/mst/mt41692_pciconf0        - PCI configuration cycles access.
                                domain:bus:dev.fn=0000:cc:00.0 addr.reg=88 data.reg=92 cr_bar.gw_offset=-1
                                Chip revision is: 01

# Update BFB image first
$ sudo bfb-install -r rshim0 -b DOCA_2.2.0_BSP_4.2.0_Ubuntu_22.04-2.23-07.prod.bfb

Pushing bfb
1.20GiB 0:01:06 [18.5MiB/s] [
Collecting BlueField booting status. Press Ctrl+C to stop…
INFO[MISC]: PSC BL1 START
INFO[BL2]: start
INFO[BL2]: DDR POST passed
INFO[BL2]: UEFI loaded
INFO[BL31]: start
INFO[BL31]: lifecycle Production
INFO[BL31]: PTMERROR: Unknown OPN
INFO[BL31]: runtime
INFO[UEFI]: eMMC init
INFO[UEFI]: eMMC probed
INFO[UEFI]: UPVS valid
INFO[UEFI]: PMI: updates started
INFO[UEFI]: PMI: boot image update
INFO[UEFI]: PMI: updates completed, status 0
INFO[UEFI]: PCIe enum start
INFO[UEFI]: PCIe enum end
INFO[UEFI]: exit Boot Service
INFO[MISC]: Ubuntu installation started
INFO[MISC]: Installing OS image
INFO[MISC]: Installation finished

# Wait 10 minutes to ensure the card initializes properly after the BFB installation
sleep 600

# Update NIC FW
$ sudo flint -d /dev/mst/mt41692_pciconf0 -i fw-BlueField-3-rel-32_38_1002-699-21014-0230-EB1_Ax-NVME-20.4.1-UEFI-21.4.10-UEFI-22.4.10-UEFI-14.31.20-FlexBoot-3.7.201.signed.bin -y b

    Current FW version on flash:  32.37.1300
    New FW version:               32.38.1002


FSMST_INITIALIZE -   OK
Writing Boot image component -   OK
Restoring signature                     - OK

# NOTE: need full Power cycle from host with cold boot
Run the following code to switch the AX800 to the BF3-as-CX mode:
            # Setting BF3 port to Ethernet mode (not Infiniband)
$ sudo mlxconfig -d /dev/mst/mt41692_pciconf0 --yes set LINK_TYPE_P1=2
$ sudo mlxconfig -d /dev/mst/mt41692_pciconf0 --yes set LINK_TYPE_P2=2

$ sudo mlxconfig -d /dev/mst/mt41692_pciconf0 --yes set INTERNAL_CPU_MODEL=1
$ sudo mlxconfig -d /dev/mst/mt41692_pciconf0 --yes set INTERNAL_CPU_PAGE_SUPPLIER=EXT_HOST_PF
$ sudo mlxconfig -d /dev/mst/mt41692_pciconf0 --yes set INTERNAL_CPU_ESWITCH_MANAGER=EXT_HOST_PF
$ sudo mlxconfig -d /dev/mst/mt41692_pciconf0 --yes set INTERNAL_CPU_IB_VPORT0=EXT_HOST_PF
$ sudo mlxconfig -d /dev/mst/mt41692_pciconf0 --yes set INTERNAL_CPU_OFFLOAD_ENGINE=DISABLED

$ sudo mlxconfig -d /dev/mst/mt41692_pciconf0 --yes set CQE_COMPRESSION=1
$ sudo mlxconfig -d /dev/mst/mt41692_pciconf0 --yes set PROG_PARSE_GRAPH=1
$ sudo mlxconfig -d /dev/mst/mt41692_pciconf0 --yes set ACCURATE_TX_SCHEDULER=1
$ sudo mlxconfig -d /dev/mst/mt41692_pciconf0 --yes set FLEX_PARSER_PROFILE_ENABLE=4
$ sudo mlxconfig -d /dev/mst/mt41692_pciconf0 --yes set REAL_TIME_CLOCK_ENABLE=1

$ sudo mlxconfig -d /dev/mst/mt41692_pciconf0 --yes set EXP_ROM_VIRTIO_NET_PXE_ENABLE=0
$ sudo mlxconfig -d /dev/mst/mt41692_pciconf0 --yes set EXP_ROM_VIRTIO_NET_UEFI_ARM_ENABLE=0
$ sudo mlxconfig -d /dev/mst/mt41692_pciconf0 --yes set EXP_ROM_VIRTIO_NET_UEFI_x86_ENABLE=0
$ sudo mlxconfig -d /dev/mst/mt41692_pciconf0 --yes set EXP_ROM_VIRTIO_BLK_UEFI_ARM_ENABLE=0
$ sudo mlxconfig -d /dev/mst/mt41692_pciconf0 --yes set EXP_ROM_VIRTIO_BLK_UEFI_x86_ENABLE=0

# NOTE: need full Power cycle from host with cold boot

# Verify that the NIC FW changes have been applied
$ sudo mlxconfig -d /dev/mst/mt41692_pciconf0 q | grep "CQE_COMPRESSION\|PROG_PARSE_GRAPH\|ACCURATE_TX_SCHEDULER\|FLEX_PARSER_PROFILE_ENABLE\|REAL_TIME_CLOCK_ENABLE\|INTERNAL_CPU_MODEL\|LINK_TYPE_P1\|LINK_TYPE_P2\|INTERNAL_CPU_PAGE_SUPPLIER\|INTERNAL_CPU_ESWITCH_MANAGER\|INTERNAL_CPU_IB_VPORT0\|INTERNAL_CPU_OFFLOAD_ENGINE"
        INTERNAL_CPU_MODEL                  EMBEDDED_CPU(1)
        INTERNAL_CPU_PAGE_SUPPLIER          EXT_HOST_PF(1)
        INTERNAL_CPU_ESWITCH_MANAGER        EXT_HOST_PF(1)
        INTERNAL_CPU_IB_VPORT0              EXT_HOST_PF(1)
        INTERNAL_CPU_OFFLOAD_ENGINE         DISABLED(1)
        FLEX_PARSER_PROFILE_ENABLE          4
        PROG_PARSE_GRAPH                    True(1)
        ACCURATE_TX_SCHEDULER               True(1)
        CQE_COMPRESSION                     AGGRESSIVE(1)
        REAL_TIME_CLOCK_ENABLE              True(1)
        LINK_TYPE_P1                        ETH(2)
        LINK_TYPE_P2                        ETH(2)
Contact NVIDIA CPM to download the A100X SW from PID.
NOTE: The following instructions are for A100X board specifically. Because this uses the April GA from Mellanoxm the NIC FW must be installed before BFB.
            # Enable MST
$ sudo mst start
$ sudo mst status

MST modules:
------------
    MST PCI module is not loaded
    MST PCI configuration module loaded

MST devices:
------------
/dev/mst/mt41686_pciconf0        - PCI configuration cycles access.
                                domain:bus:dev.fn=0000:cc:00.0 addr.reg=88 data.reg=92 cr_bar.gw_offset=-1
                                Chip revision is: 01

# Update NIC FW first - because this is the April GA the NIC FW must be loaded first
$ sudo flint -d /dev/mst/mt41686_pciconf0 -i fw-BlueField-2-rel-24_38_1002-699210040230_Ax-NVME-20.4.1-UEFI-21.4.10-UEFI-22.4.10-UEFI-14.31.20-FlexBoot-3.7.201.signed.bin -y b

    Current FW version on flash:  24.37.1300
    New FW version:               24.38.1002

FSMST_INITIALIZE -   OK
Writing Boot image component -   OK
Restoring signature                     - OK

# NOTE: need full Power cycle from host with cold boot

# Update BFB image
$ sudo bfb-install -r rshim0 -b DOCA_2.2.0_BSP_4.2.0_Ubuntu_20.04-2.23-07.prod.bfb

Pushing bfb
920MiB 0:01:51 [8.22MiB/s] [                                                         <=>                                       ]
Collecting BlueField booting status. Press Ctrl+C to stop…
INFO[BL2]: start
INFO[BL2]: DDR POST passed
INFO[BL2]: UEFI loaded
INFO[BL31]: start
INFO[BL31]: lifecycle Secured (development)
INFO[BL31]: runtime
INFO[UEFI]: eMMC init
INFO[UEFI]: UPVS valid
INFO[UEFI]: eMMC probed
INFO[UEFI]: PMI: updates started
INFO[UEFI]: PMI: boot image update
INFO[UEFI]: PMI: updates completed, status 0
INFO[UEFI]: PCIe enum start
INFO[UEFI]: PCIe enum end
INFO[UEFI]: exit Boot Service
INFO[MISC]: Ubuntu installation started
INFO[MISC]: Installing OS image
INFO[MISC]: Installation finished
Run the following code to switch the A100x to the BF2-as-CX mode:
            # Setting BF2 port to Ethernet mode (not Infiniband)
$ sudo mlxconfig -d /dev/mst/mt41686_pciconf0 --yes set LINK_TYPE_P1=2
$ sudo mlxconfig -d /dev/mst/mt41686_pciconf0 --yes set LINK_TYPE_P2=2

# Setting BF2 Embedded CPU mode
$ sudo mlxconfig -d /dev/mst/mt41686_pciconf0 --yes set INTERNAL_CPU_MODEL=1
$ sudo mlxconfig -d /dev/mst/mt41686_pciconf0 --yes set INTERNAL_CPU_PAGE_SUPPLIER=EXT_HOST_PF
$ sudo mlxconfig -d /dev/mst/mt41686_pciconf0 --yes set INTERNAL_CPU_ESWITCH_MANAGER=EXT_HOST_PF
$ sudo mlxconfig -d /dev/mst/mt41686_pciconf0 --yes set INTERNAL_CPU_IB_VPORT0=EXT_HOST_PF
$ sudo mlxconfig -d /dev/mst/mt41686_pciconf0 --yes set INTERNAL_CPU_OFFLOAD_ENGINE=DISABLED

# Accurate scheduling related settings
$ sudo mlxconfig -d /dev/mst/mt41686_pciconf0 --yes set CQE_COMPRESSION=1
$ sudo mlxconfig -d /dev/mst/mt41686_pciconf0 --yes set PROG_PARSE_GRAPH=1
$ sudo mlxconfig -d /dev/mst/mt41686_pciconf0 --yes set ACCURATE_TX_SCHEDULER=1
$ sudo mlxconfig -d /dev/mst/mt41686_pciconf0 --yes set FLEX_PARSER_PROFILE_ENABLE=4
$ sudo mlxconfig -d /dev/mst/mt41686_pciconf0 --yes set REAL_TIME_CLOCK_ENABLE=1

# NOTE: need power cycle the host for those settings to take effect

# Verify that the NIC FW changes have been applied
$ sudo mlxconfig -d /dev/mst/mt41686_pciconf0 q | grep "CQE_COMPRESSION\|PROG_PARSE_GRAPH\|ACCURATE_TX_SCHEDULER\
\|FLEX_PARSER_PROFILE_ENABLE\|REAL_TIME_CLOCK_ENABLE\|INTERNAL_CPU_MODEL\|LINK_TYPE_P1\|LINK_TYPE_P2\
\|INTERNAL_CPU_PAGE_SUPPLIER\|INTERNAL_CPU_ESWITCH_MANAGER\|INTERNAL_CPU_IB_VPORT0\|INTERNAL_CPU_OFFLOAD_ENGINE"
         INTERNAL_CPU_MODEL                  EMBEDDED_CPU(1)
         INTERNAL_CPU_PAGE_SUPPLIER          EXT_HOST_PF(1)
         INTERNAL_CPU_ESWITCH_MANAGER        EXT_HOST_PF(1)
         INTERNAL_CPU_IB_VPORT0              EXT_HOST_PF(1)
         INTERNAL_CPU_OFFLOAD_ENGINE         DISABLED(1)
         FLEX_PARSER_PROFILE_ENABLE          4
         PROG_PARSE_GRAPH                    True(1)
         ACCURATE_TX_SCHEDULER               True(1)
         CQE_COMPRESSION                     AGGRESSIVE(1)
         REAL_TIME_CLOCK_ENABLE              True(1)
         LINK_TYPE_P1                        ETH(2)
         LINK_TYPE_P2                        ETH(2)
Configure the network link files so that the NIC interfaces always come up with the same name.
Run lshw -c network -businfo to find the current interface name on the target bus address then run ip link to find the corresponding MAC address by the interface name.
After identifying the MAC address, create files at /etc/systemd/network/NN-persistent-net.link with the following information:
            [Match]
MACAddress={{item.mac}}

[Link]
Name={{item.name}}
The following network link files set the converged accelerator port#0 to ens5f0 and port#1 to ens5f1:
            $ sudo nano /etc/systemd/network/11-persistent-net.link

# Update the MAC address to match the converged accelerator port 0 MAC address
[Match]
MACAddress=48:b0:2d:xx:xx:xx

[Link]
Name=ens5f0

$ sudo nano /etc/systemd/network/12-persistent-net.link

# Update the MAC address to match the converged accelerator port 1 MAC address
[Match]
MACAddress=48:b0:2d:yy:yy:yy

[Link]
Name=ens5f1
Reboot the system after creating these files.
Enter these commands to configure PTP4L assuming the ens5f0 NIC interface and CPU core 41 are used for PTP:
            cat <<EOF | sudo tee /etc/ptp.conf
[global]
slaveOnly 1
priority1 128
priority2 128
domainNumber 24
tx_timestamp_timeout 30
dscp_event 46
dscp_general 46
logging_level 6
verbose 1
use_syslog 0
logMinDelayReqInterval 1
[ens5f0]
logAnnounceInterval -3
announceReceiptTimeout 3
logSyncInterval -4
logMinDelayReqInterval -4
delay_mechanism E2E
network_transport L2
EOF

cat <<EOF | sudo tee /lib/systemd/system/ptp4l.service
[Unit]
Description=Precision Time Protocol (PTP) service
Documentation=man:ptp4l

[Service]
Restart=always
RestartSec=5s
Type=simple
ExecStart=taskset -c 41 /usr/sbin/ptp4l -f /etc/ptp.conf

[Install]
WantedBy=multi-user.target
EOF

$ sudo systemctl daemon-reload
$ sudo systemctl restart ptp4l.service
$ sudo systemctl enable ptp4l.service
One server will become the master clock, as shown below:
            $ sudo systemctl status ptp4l.service

• ptp4l.service - Precision Time Protocol (PTP) service
     Loaded: loaded (/lib/systemd/system/ptp4l.service; enabled; vendor preset: enabled)
     Active: active (running) since Tue 2023-08-08 19:37:56 UTC; 2 weeks 3 days ago
       Docs: man:ptp4l
   Main PID: 1120 (ptp4l)
      Tasks: 1 (limit: 94533)
     Memory: 460.0K
        CPU: 9min 8.089s
     CGroup: /system.slice/ptp4l.service
             └─1120 /usr/sbin/ptp4l -f /etc/ptp.conf

Aug 09 18:12:35 aerial-devkit taskset[1120]: ptp4l[81287.043]: selected local clock b8cef6.fffe.d333be as best master
Aug 09 18:12:35 aerial-devkit taskset[1120]: ptp4l[81287.043]: port 1: assuming the grand master role
Aug 11 20:44:51 aerial-devkit taskset[1120]: ptp4l[263223.379]: timed out while polling for tx timestamp
Aug 11 20:44:51 aerial-devkit taskset[1120]: ptp4l[263223.379]: increasing tx_timestamp_timeout may correct this issue, but it is likely caused by a driver bug
Aug 11 20:44:51 aerial-devkit taskset[1120]: ptp4l[263223.379]: port 1: send sync failed
Aug 11 20:44:51 aerial-devkit taskset[1120]: ptp4l[263223.379]: port 1: MASTER to FAULTY on FAULT_DETECTED (FT_UNSPECIFIED)
Aug 11 20:45:07 aerial-devkit taskset[1120]: ptp4l[263239.522]: port 1: FAULTY to LISTENING on INIT_COMPLETE
Aug 11 20:45:08 aerial-devkit taskset[1120]: ptp4l[263239.963]: port 1: LISTENING to MASTER on ANNOUNCE_RECEIPT_TIMEOUT_EXPIRES
Aug 11 20:45:08 aerial-devkit taskset[1120]: ptp4l[263239.963]: selected local clock b8cef6.fffe.d333be as best master
Aug 11 20:45:08 aerial-devkit taskset[1120]: ptp4l[263239.963]: port 1: assuming the grand master role
The other will become the secondary, follower clock, as shown below:
            $ sudo systemctl status ptp4l.service

• ptp4l.service - Precision Time Protocol (PTP) service
     Loaded: loaded (/lib/systemd/system/ptp4l.service; enabled; vendor preset: enabled)
     Active: active (running) since Tue 2023-08-22 16:25:41 UTC; 3 days ago
       Docs: man:ptp4l
   Main PID: 3251 (ptp4l)
      Tasks: 1 (limit: 598810)
     Memory: 472.0K
        CPU: 2min 48.984s
     CGroup: /system.slice/ptp4l.service
             └─3251 /usr/sbin/ptp4l -f /etc/ptp.conf

Aug 25 19:58:34 aerial-r750 taskset[3251]: ptp4l[272004.187]: rms    8 max   15 freq -14495 +/-   9 delay    11 +/-   0
Aug 25 19:58:35 aerial-r750 taskset[3251]: ptp4l[272005.187]: rms    6 max   12 freq -14480 +/-   7 delay    11 +/-   1
Aug 25 19:58:36 aerial-r750 taskset[3251]: ptp4l[272006.187]: rms    8 max   12 freq -14465 +/-   5 delay    10 +/-   0
Aug 25 19:58:37 aerial-r750 taskset[3251]: ptp4l[272007.187]: rms   11 max   18 freq -14495 +/-  10 delay    11 +/-   1
Aug 25 19:58:38 aerial-r750 taskset[3251]: ptp4l[272008.187]: rms   12 max   21 freq -14515 +/-   7 delay    12 +/-   1
Aug 25 19:58:39 aerial-r750 taskset[3251]: ptp4l[272009.187]: rms    7 max   12 freq -14488 +/-   7 delay    12 +/-   1
Aug 25 19:58:40 aerial-r750 taskset[3251]: ptp4l[272010.187]: rms    7 max   12 freq -14479 +/-   7 delay    11 +/-   1
Aug 25 19:58:41 aerial-r750 taskset[3251]: ptp4l[272011.187]: rms   10 max   20 freq -14503 +/-  11 delay    11 +/-   1
Aug 25 19:58:42 aerial-r750 taskset[3251]: ptp4l[272012.188]: rms   10 max   20 freq -14520 +/-   7 delay    13 +/-   1
Aug 25 19:58:43 aerial-r750 taskset[3251]: ptp4l[272013.188]: rms    2 max    7 freq -14510 +/-   4 delay    12 +/-   1
Enter the commands to turn off NTP:
            $ sudo timedatectl set-ntp false
$ timedatectl
Local time: Thu 2022-02-03 22:30:58 UTC
           Universal time: Thu 2022-02-03 22:30:58 UTC
                 RTC time: Thu 2022-02-03 22:30:58
                Time zone: Etc/UTC (UTC, +0000)
System clock synchronized: no
              NTP service: inactive
          RTC in local TZ: no
Run PHC2SYS as service:
PHC2SYS is used to synchronize the system clock to the PTP hardware clock (PHC) on the NIC. Here are the two examples of PHC2SYS configurations.
Example 1: Specify the network interface used for PTP and system clock as the slave clock. This is the default mode when the devkit is configured as a gNB or RU emlator to run cuBB test.
            # If more than one instance is already running, kill the existing
# PHC2SYS sessions.

# Command used can be found in /lib/systemd/system/phc2sys.service
# Update the ExecStart line to the following
$ sudo nano /lib/systemd/system/phc2sys.service

[Unit]
Description=Synchronize system clock or PTP hardware clock (PHC)
Documentation=man:phc2sys
After=ntpdate.service
Requires=ptp4l.service
After=ptp4l.service

[Service]
Restart=always
RestartSec=5s
Type=simple
ExecStart=/bin/sh -c "taskset -c 41 /usr/sbin/phc2sys -s /dev/ptp$(ethtool -T ens5f0 | grep PTP | awk '{print $4}')-c CLOCK_REALTIME -n 24 -O 0 -R 256 -u 256"

[Install]
WantedBy=multi-user.target
Example 2: Synchronize time automatically according to the current ptp4l state and synchronize the system clock to the remote master. This configuration is usually performed when the devkit is configured as a gNB to run E2E test in the LLS-C3 topology.
            # If more than one instance is already running, kill the existing
# PHC2SYS sessions.

# Command used can be found in /lib/systemd/system/phc2sys.service
# Update the ExecStart line to the following, the -a option will use the same interface as ptp4l and -r will synchronize the system clock
$ sudo nano /lib/systemd/system/phc2sys.service

[Unit]
Description=Synchronize system clock or PTP hardware clock (PHC)
Documentation=man:phc2sys
After=ntpdate.service
Requires=ptp4l.service
After=ptp4l.service

[Service]
Restart=always
RestartSec=5s
Type=simple
ExecStart=/usr/sbin/phc2sys -a -r -n 24 -R 256 -u 256

[Install]
WantedBy=multi-user.target
Once the PHC2SYS config file is changed, run the following:
            $ sudo systemctl daemon-reload
$ sudo systemctl restart phc2sys.service

# Set to start automatically on reboot
$ sudo systemctl enable phc2sys.service

# check that the service is active and has converged to a low rms value (<30) and that the correct NIC has been selected (ens5f0):
$ sudo systemctl status phc2sys.service
● phc2sys.service - Synchronize system clock or PTP hardware clock (PHC)
     Loaded: loaded (/lib/systemd/system/phc2sys.service; enabled; vendor preset: enabled)
     Active: active (running) since Fri 2023-02-17 17:02:35 UTC; 7s ago
       Docs: man:phc2sys
   Main PID: 2225556 (phc2sys)
      Tasks: 1 (limit: 598864)
     Memory: 372.0K
     CGroup: /system.slice/phc2sys.service
             └─2225556 /usr/sbin/phc2sys -a -r -n 24 -R 256 -u 256

Feb 17 17:02:35 aerial-devkit phc2sys[2225556]: [1992363.445] reconfiguring after port state change
Feb 17 17:02:35 aerial-devkit phc2sys[2225556]: [1992363.445] selecting CLOCK_REALTIME for synchronization
Feb 17 17:02:35 aerial-devkit phc2sys[2225556]: [1992363.445] selecting ens5f0 as the master clock
Feb 17 17:02:36 aerial-devkit phc2sys[2225556]: [1992364.457] CLOCK_REALTIME rms   15 max   37 freq -19885 +/- 116 delay  1944 +/-   6
Feb 17 17:02:37 aerial-devkit phc2sys[2225556]: [1992365.473] CLOCK_REALTIME rms   16 max   42 freq -19951 +/- 103 delay  1944 +/-   7
Feb 17 17:02:38 aerial-devkit phc2sys[2225556]: [1992366.490] CLOCK_REALTIME rms   13 max   31 freq -19909 +/-  81 delay  1944 +/-   6
Feb 17 17:02:39 aerial-devkit phc2sys[2225556]: [1992367.506] CLOCK_REALTIME rms    9 max   27 freq -19918 +/-  40 delay  1945 +/-   6
Feb 17 17:02:40 aerial-devkit phc2sys[2225556]: [1992368.522] CLOCK_REALTIME rms    8 max   24 freq -19925 +/-  11 delay  1945 +/-   9
Feb 17 17:02:41 aerial-devkit phc2sys[2225556]: [1992369.538] CLOCK_REALTIME rms    9 max   23 freq -19915 +/-  36 delay  1943 +/-   8
Verify if the system clock is synchronized:
            $ timedatectl
Local time: Thu 2022-02-03 22:30:58 UTC
           Universal time: Thu 2022-02-03 22:30:58 UTC
                 RTC time: Thu 2022-02-03 22:30:58
                Time zone: Etc/UTC (UTC, +0000)
System clock synchronized: yes
              NTP service: inactive
          RTC in local TZ: no
Create the directory /user/local/bin and create the /usr/local/bin/nvidia.sh file to run the commands with every reboot.
The network interfaces here match those used above - ens5f0 and ens5f1.
Also, the command for “nvidia-smi lgc” expects just one GPU device (-i 0). This needs to be modified if the system uses more than one GPU.
            cat <<EOF | sudo tee /usr/local/bin/nvidia.sh
#!/bin/bash

mst start

ifconfig ens5f0 up
ifconfig ens5f1 up

ethtool --set-priv-flags ens5f0 tx_port_ts on
ethtool --set-priv-flags ens5f1 tx_port_ts on
ethtool -A ens5f0 rx off tx off
ethtool -A ens5f1 rx off tx off

sysctl -w kernel.numa_balancing=0

nvidia-smi -pm 1
nvidia-smi -i 0 -lgc $(nvidia-smi -i 0 --query-supported-clocks=graphics --format=csv,noheader,nounits | sort -h | tail -n 1)
nvidia-smi -mig 0

modprobe nvidia-peermem

echo -1 > /proc/sys/kernel/sched_rt_runtime_us
EOF
Create a system service file to be loaded after network interfaces are up.
            cat <<EOF | sudo tee /lib/systemd/system/nvidia.service
[Unit]
After=network.target

[Service]
ExecStart=/usr/local/bin/nvidia.sh

[Install]
WantedBy=default.target
EOF
Then set the file permissions, reload the systemd daemon, enable the service, restart the service when installing the first time, and check status
            sudo chmod 744 /usr/local/bin/nvidia.sh
sudo chmod 664 /lib/systemd/system/nvidia.service
sudo systemctl daemon-reload
sudo systemctl enable nvidia.service
sudo systemctl restart nvidia.service
systemctl status nvidia.service
The output of the last command should look like this:
            aerial@devkit:~$ systemctl status nvidia.service
○ nvidia.service
     Loaded: loaded (/lib/systemd/system/nvidia.service; enabled; vendor preset: enabled)
          Active: inactive (dead) since Tue 2023-09-19 19:19:23 UTC; 1 week 0 days ago
             Main PID: 1307 (code=exited, status=0/SUCCESS)
                     CPU: 784ms

                  Sep 19 19:19:22 devkit nvidia.sh[713963]: Create devices
                  Sep 19 19:19:22 devkit nvidia.sh[713963]: Unloading MST PCI module (unused) - Success
                  Sep 19 19:19:23 devkit nvidia.sh[714843]: kernel.numa_balancing = 0
                  Sep 19 19:19:23 devkit nvidia.sh[714844]: Persistence mode is already Enabled for GPU 00000000:B6:00.0.
                  Sep 19 19:19:23 devkit nvidia.sh[714844]: All done.
                  Sep 19 19:19:23 devkit nvidia.sh[714849]: GPU clocks set to "(gpuClkMin 1410, gpuClkMax 1410)" for GPU 00000000:B6:00.0
                  Sep 19 19:19:23 devkit nvidia.sh[714849]: All done.
                  Sep 19 19:19:23 devkit nvidia.sh[714850]: Disabled MIG Mode for GPU 00000000:B6:00.0
                  Sep 19 19:19:23 devkit nvidia.sh[714850]: All done.
                  Sep 19 19:19:23 devkit systemd[1]: nvidia.service: Deactivated successfully.