AKS (Azure Kubernetes Service)#
Added in version 4.1.
Overview#
Azure AKS is a managed Kubernetes service to run Kubernetes in the Azure cloud. NVIDIA AI Enterprise, the end-to-end software of the NVIDIA AI platform, is supported to run on AKS. In the cloud, Azure AKS automatically manages the availability and scalability of the Kubernetes control plane nodes responsible for scheduling containers, managing application availability, storing cluster data, and other key tasks. This guide provides details for deploying and running NVIDIA AI Enterprise on AKS clusters with GPU Accelerated nodes.
Note
The NVIDIA Terraform Modules offer an easy way to deploy Managed Kubernetes clusters that can be supported by NVIDIA AI Enterprise when used with supported OS and GPU Operator versions.
Prerequisites#
NVIDIA AI Enterprise License via BYOL or a Private Offer
Azure Owner/Admin access to create AKS resources
Create Azure Kubernetes Service (AKS) Cluster#
Login to Azure CLI:
az login --use-device-code
Navigate to Azure Portal to find the Azure Subscription ID, Go to Subscription and you can find the Subscription ID right next to the Subscription name.
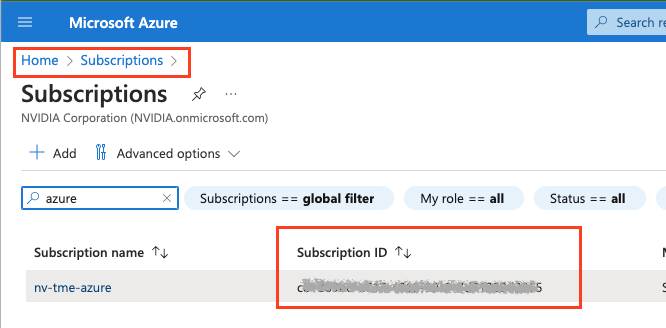
az account set --subscription <Subscription ID>
Install Azure CLI plugins which will install kubectl.
az aks install-cli
Create resource group with location where you planning to create a AKS cluster. https://learn.microsoft.com/en-us/azure/aks/availability-zones
az group create --name nvidia-aks-cluster-rg --location <location>
Example:
az group create --name nvidia-aks-cluster-rg --location westus2
Create AKS Cluster with updated <location> below.
az aks create -g nvidia-aks-cluster-rg -n aks-nvaie -l <location> --enable-node-public-ip --node-count 1 --generate-ssh-keys --node-vm-size Standard_NC4as_T4_v3 --nodepool-tags SkipGPUDriverInstall=true
Note
In Above we choose T4 node as an example, but you choose the any NVIDIA GPU nodes as listed here, https://learn.microsoft.com/en-us/azure/virtual-machines/sizes-gpu
Verify Kubernetes Service has been created on Azure Portal.

Now get the Azure Kubernetes Cluster Credentials, Navigate to Kubernete Services and choose the cluster and you can see Connect button as shown below, when you click on Connect you will see how you can get the credentials as shown below.
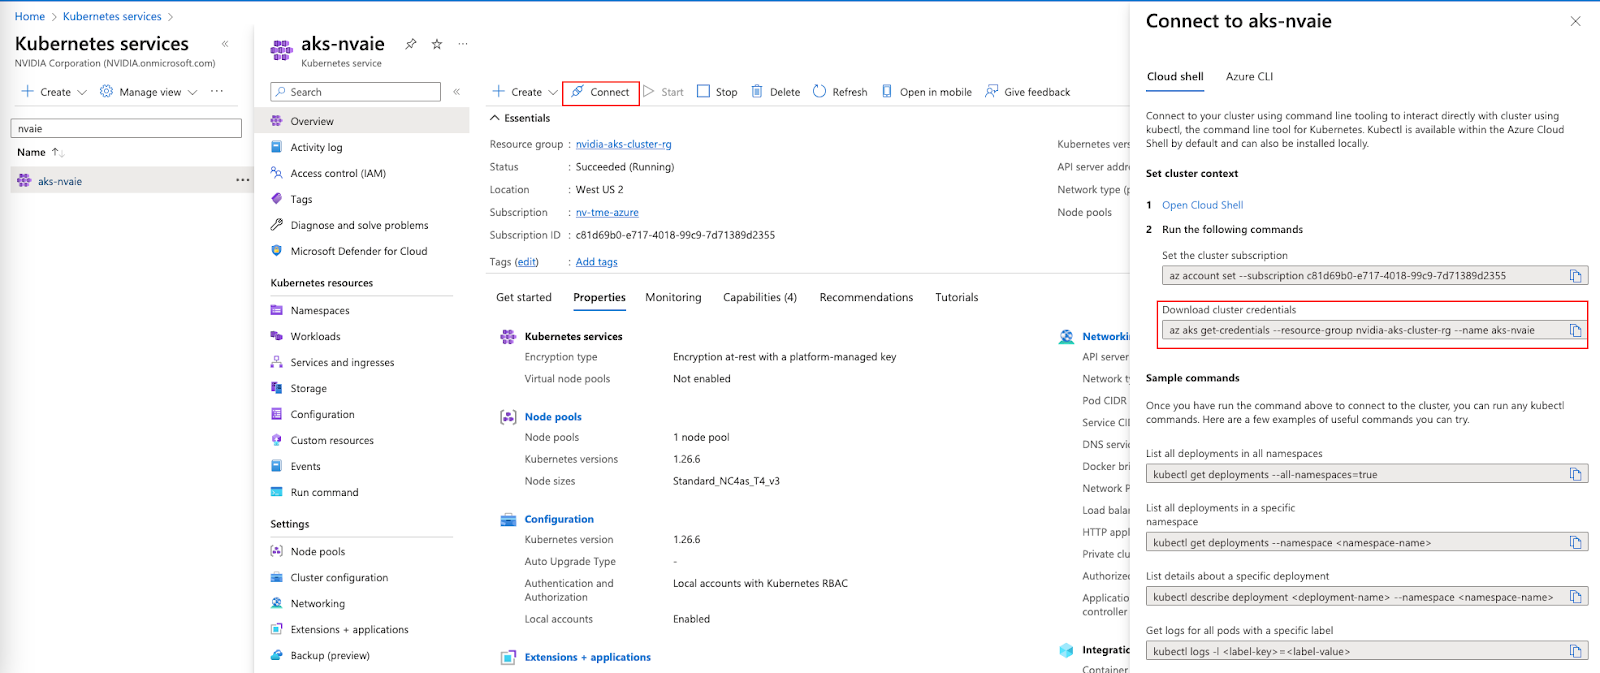
Run the below command to get the kubeconfig credentials to the local system.
az aks get-credentials --resource-group nvidia-aks-cluster-rg --name aks-nvaie
Run the below command to verify the node information.
kubectl get nodes -o wide
Example output result
1NAME                                STATUS   ROLES   AGE     VERSION   INTERNAL-IP   EXTERNAL-IP    OS-IMAGE             KERNEL-VERSION      CONTAINER-RUNTIME
2aks-nodepool1-21142003-vmss000000   Ready    agent   2m50s   v1.26.6   10.224.0.4    20.114.32.13   Ubuntu 22.04.3 LTS   5.15.0-1049-azure   containerd://1.7.5-1
Run the below command to verify the all pods are running:
 1kubectl get pods -A
 2NAMESPACE     NAME                                  READY   STATUS    RESTARTS   AGE
 3kube-system   azure-ip-masq-agent-j4bgl             1/1     Running   0          6m17s
 4kube-system   cloud-node-manager-nfw89              1/1     Running   0          6m17s
 5kube-system   coredns-76b9877f49-bv74d              1/1     Running   0          5m19s
 6kube-system   coredns-76b9877f49-rrlj7              1/1     Running   0          6m36s
 7kube-system   coredns-autoscaler-85f7d6b75d-vt47r   1/1     Running   0          6m36s
 8kube-system   csi-azuredisk-node-bxcd2              3/3     Running   0          6m17s
 9kube-system   csi-azurefile-node-vlnqm              3/3     Running   0          6m17s
10kube-system   konnectivity-agent-75fb8dbd69-5lw87   1/1     Running   0          6m36s
11kube-system   konnectivity-agent-75fb8dbd69-xxgkb   1/1     Running   0          6m36s
12kube-system   kube-proxy-9q55z                      1/1     Running   0          6m17s
13kube-system   metrics-server-c456c67cb-f72kc        2/2     Running   0          5m15s
14kube-system   metrics-server-c456c67cb-lw8pn        2/2     Running   0          5m15s
Deploy the GPU Operator#
Run the below commands to create a namespace on AKS cluster.
kubectl create ns gpu-operator
Add the Helm repo and update with the below commands.
1helm repo add nvidia https://helm.ngc.nvidia.com/nvaie --username='$oauthtoken' --password=<YOUR API KEY>
2helm repo update
Create a NGC Secret with your NGC API key on “gpu-operator” namespace as per below.
kubectl create secret docker-registry ngc-secret --docker-server=nvcr.io/nvaie --docker-username=\$oauthtoken --docker-password=<NGC-API-KEY> --docker-email=<your_email_id> -n gpu-operator
Create an empty gridd.conf file, then create a configmap with NVIDIA vGPU Licence token file as per below.
kubectl create configmap licensing-config -n gpu-operator --from-file=./client_configuration_token.tok --from-file=./gridd.conf
Install the GPU Operator from NGC Catalog with License token and driver repository.
1helm install gpu-operator nvaie/gpu-operator-4-0 --version 23.6.1 --set driver.repository=nvcr.io/nvaie,driver.licensingConfig.configMapName=licensing-config --namespace gpu-operator
Verify the GPU Operator Installation#
Verify the NVIDIA GPU Driver loaded with below command.
kubectl get pods -n gpu-operator
 1NAME                                                          READY   STATUS      RESTARTS   AGE
 2gpu-feature-discovery-tgk44                                   1/1     Running     0          5m11s
 3gpu-operator-74759dfc4b-kk5ks                                 1/1     Running     0          6m13s
 4gpu-operator-node-feature-discovery-gc-7c8b8d65fd-kf4dz       1/1     Running     0          6m13s
 5gpu-operator-node-feature-discovery-master-56874d94b9-7qdmz   1/1     Running     0          6m13s
 6gpu-operator-node-feature-discovery-worker-plcg5              1/1     Running     0          6m13s
 7nvidia-container-toolkit-daemonset-48p26                      1/1     Running     0          5m11s
 8nvidia-cuda-validator-pxbt4                                   0/1     Completed   0          97s
 9nvidia-dcgm-exporter-qrwdp                                    1/1     Running     0          5m11s
10nvidia-device-plugin-daemonset-9grxf                          1/1     Running     0          5m11s
11nvidia-driver-daemonset-696m4                                 1/1     Running     0          5m36s
12nvidia-operator-validator-zqvgh                               1/1     Running     0          5m11s
kubectl exec -it -n gpu-operator nvidia-driver-daemonset-696m4 -- nvidia-smi
 1Wed Oct 25 16:25:42 2023
 2+---------------------------------------------------------------------------------------+
 3| NVIDIA-SMI 535.129.01             Driver Version: 535.129.01   CUDA Version: 12.2     |
 4|-----------------------------------------+----------------------+----------------------+
 5| GPU  Name                 Persistence-M | Bus-Id        Disp.A | Volatile Uncorr. ECC |
 6| Fan  Temp   Perf          Pwr:Usage/Cap |         Memory-Usage | GPU-Util  Compute M. |
 7|                                         |                      |               MIG M. |
 8|=========================================+======================+======================|
 9|   0  Tesla T4                       On  | 00000001:00:00.0 Off |                  Off |
10| N/A   34C    P8              15W /  70W |      0MiB / 16384MiB |      0%      Default |
11|                                         |                      |                  N/A |
12+-----------------------------------------+----------------------+----------------------+
13+---------------------------------------------------------------------------------------+
14| Processes:                                                                            |
15|  GPU   GI   CI        PID   Type   Process name                            GPU Memory |
16|        ID   ID                                                             Usage      |
17|=======================================================================================|
18|  No running processes found                                                           |
19+---------------------------------------------------------------------------------------+
Note
nvidia-driver-daemonset-xxxxx will be different within your own environment for the above command to verify the NVIDIA vGPU Driver.
Run Sample NVIDIA AI Enterprise Container#
Create a docker-registry secret. This will be used in a custom yaml to pull containers from the NGC Catalog.
1kubectl create secret docker-registry regcred --docker-server=nvcr.io/nvaie --docker-username=\$oauthtoken --docker-password=<YOUR_NGC_KEY> --docker-email=<your_email_id> -n default
Create a custom yaml file to deploy an NVIDIA AI Enterprise Container and run sample training code.
nano pytoch-mnist.yaml
Paste the below contents into the file and save.
 1---
 2apiVersion: apps/v1
 3kind: Deployment
 4metadata:
 5  name: pytorch-mnist
 6  labels:
 7    app: pytorch-mnist
 8spec:
 9  replicas: 1
10  selector:
11    matchLabels:
12      app: pytorch-mnist
13  template:
14    metadata:
15      labels:
16        app: pytorch-mnist
17    spec:
18      containers:
19        - name: pytorch-container
20          image: nvcr.io/nvaie/pytorch-2-0:22.02-nvaie-2.0-py3
21          command:
22            - python
23          args:
24            - /workspace/examples/upstream/mnist/main.py
25          resources:
26            requests:
27              nvidia.com/gpu: 1
28            limits:
29              nvidia.com/gpu: 1
30      imagePullSecrets:
31        - name: regcred
Check the status of the pod.
1kubectl get pods
View the output of the sample mnist training job.
1kubectl logs -l app=pytorch-mnist
The output will look similar to this.
 1Train Epoch: 4 [55680/60000 (93%)]  Loss: 0.007223
 2Train Epoch: 4 [56320/60000 (94%)]  Loss: 0.029804
 3Train Epoch: 4 [56960/60000 (95%)]  Loss: 0.018922
 4Train Epoch: 4 [57600/60000 (96%)]  Loss: 0.037932
 5Train Epoch: 4 [58240/60000 (97%)]  Loss: 0.044342
 6Train Epoch: 4 [58880/60000 (98%)]  Loss: 0.046980
 7Train Epoch: 4 [59520/60000 (99%)]  Loss: 0.057098
 8
 9
10Test set: Average loss: 0.0319, Accuracy: 9897/10000 (99%)
Delete the AKS Cluster#
Run the below command to delete the AKS cluster.
az aks delete --resource-group aks-rg --name aks-nvaie --yes