GETTING STARTED
Contents
Answers to most FAQ’s can be found on the developer forum here. If additional support is needed, you can email us following the below instructions:
Customers with paid Parabricks licenses have direct access to support and can contact EnterpriseSupport@nvidia.com.
Users of free evaluation licenses can contact parabricks-eval-support@nvidia.com for troubleshooting any questions regarding these eval licenses
Software Requirements
Nvidia Driver Requirements
nvidia-driver that supports cuda-10.1 or higher
nvidia-driver that supports cuda-11.0 or higher if you want to run on ampere GPU
nvidia-docker2 or singularity version 3.0 or higher (Parabricks will work on singularity 3.0 and above. It has been tested extensively on Singularity v3.7)
Python 3
curl (Most Linux systems will already have this installed)
Hardware Requirements
Access to internet
Any GPU that supports CUDA architecture 60, 61, 70, 75 and has 12GB GPU RAM or more. It has been tested on NVIDIA V100, NVIDIA A100, and NVIDIA T4 GPUs.
System Requirements
2 GPU server should have 100GB CPU RAM, at least 24 CPU threads
4 GPU server should have 196GB CPU RAM, at least 32 CPU threads
8 GPU server should have 392GB CPU RAM, at least 48 CPU threads
License types
There are two types of Parabricks installation licenses:
Node Lock licenses are tied to a specific set of GPUs on a server.
Flexera licenses allow for a set amount of GPUs to be used at once.
Follow the specific steps for the license type you are using.
Getting the license
Request Clara Parabricks trial access from https://developer.nvidia.com/clara-parabricks to get an installation package for your GPU server. If you are trying the trial version there is a license in the package already so you can skip the the rest of this step. The permissions on license.bin should be readable for the user running the software. If you are a paid customer, you need the license file to run Parabricks. You can get that by running the following on your GPU server
$nvidia-smi -L
share the output with us (parabricks-support@nvidia.com). We will send you the license file that you can copy next to the installer.py in the package.
For installation guidelines, please checkout Container Installation Guide.
Setting up a Flexera License Server on Ubuntu Quick Start Guide
For a more detailed and customizable configuration of the Flexera License Server, please refer to this guide: https://docs.nvidia.com/grid/ls/latest/grid-license-server-user-guide/index.html
STEP 1: Access to the software
Request NVIDIA Parabricks access from https://developer.nvidia.com/clara-parabricks to get an installation package for your GPU server.
Before setting up a license server you must register your entitlements by following your welcome guide directions.
STEP 2: Login to portal
Login to the NVIDIA License Portal by going to https://nvid.nvidia.com.
STEP 3: Download the Flexera software
Download the Flexera License Server zip by navigating to the NVIDIA License Portal software downloads tab, click on the ‘additional software’ button, and download the latest version of the linux license server.
STEP 4: Setup the server
Setup the Flexera License Server on your Ubuntu system:
            # Step 1: Update Installation Packages.
$ sudo apt-get update

# Step 2: Install Java Runtime Environment.
$ sudo apt install -y default-jre

# Step 3: Install and Run Apache Tomcat Server.
$ sudo apt install -y tomcat8
$ sudo systemctl enable tomcat8.service
$ sudo systemctl start tomcat8.service

# Step 4: Unzip the NVIDIA License Server.
$ sudo apt install -y unzip
$ unzip NVIDIA-ls-linux-xxxx.xx.x.xxxxxxxx.zip

# Step 5: Run the NVIDIA License Server Setup.
$ cd NVIDIA-ls-linux-xxxx.xx.x.xxxxxxxx
$ chmod +x setup.bin
$ sudo ./setup.bin
After installation, access the Flexera License Server management interface in a web browser by using the format of the base URL:
scheme://hostname:port/licserver
- scheme
- hostname
- port
The URL scheme, which is either http or https.
The hostname of the license server, which can be a fully-qualified domain name such as gridlicense1.example.com, or an IP address such as 10.31.20.45.
The port number through which the license server is accessed. By default, the http scheme has a port of 8080.
Ensure that the license server host’s firewall is configured to allow remote access to server TCP port 8080.
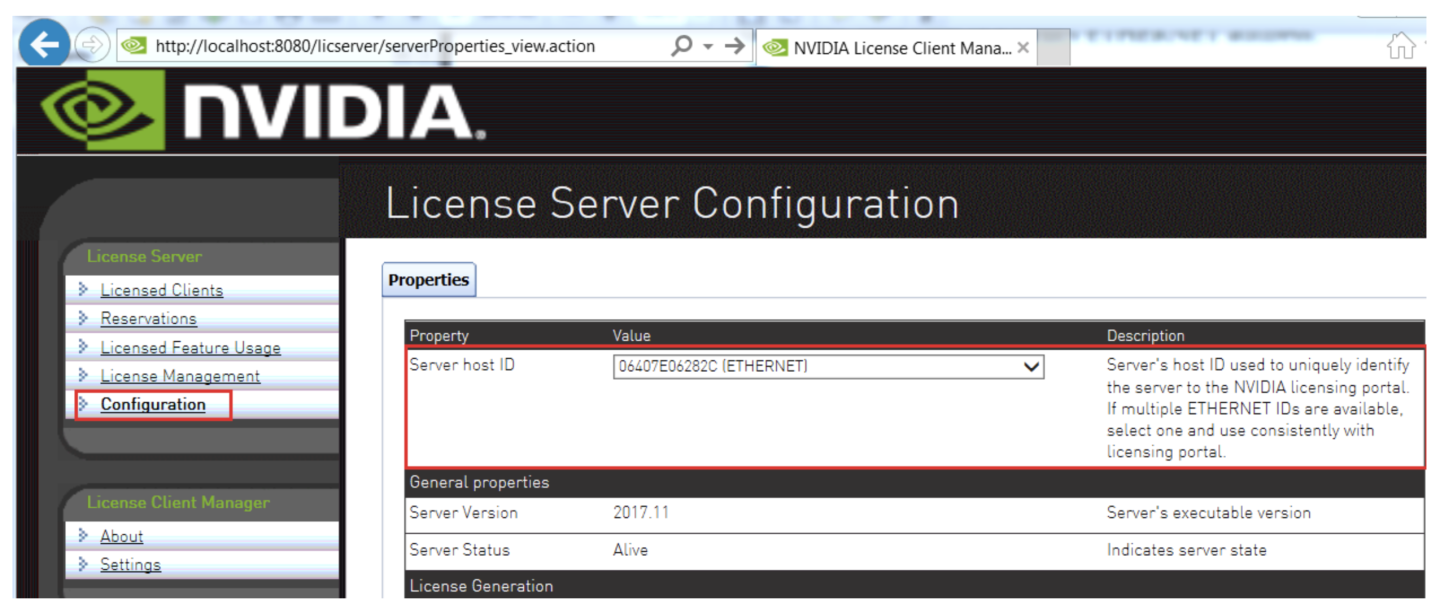
Obtain the MAC address of the machine you’re running the Flexera License Server on by navigating to the Configuration tab in the Flexera web interface.
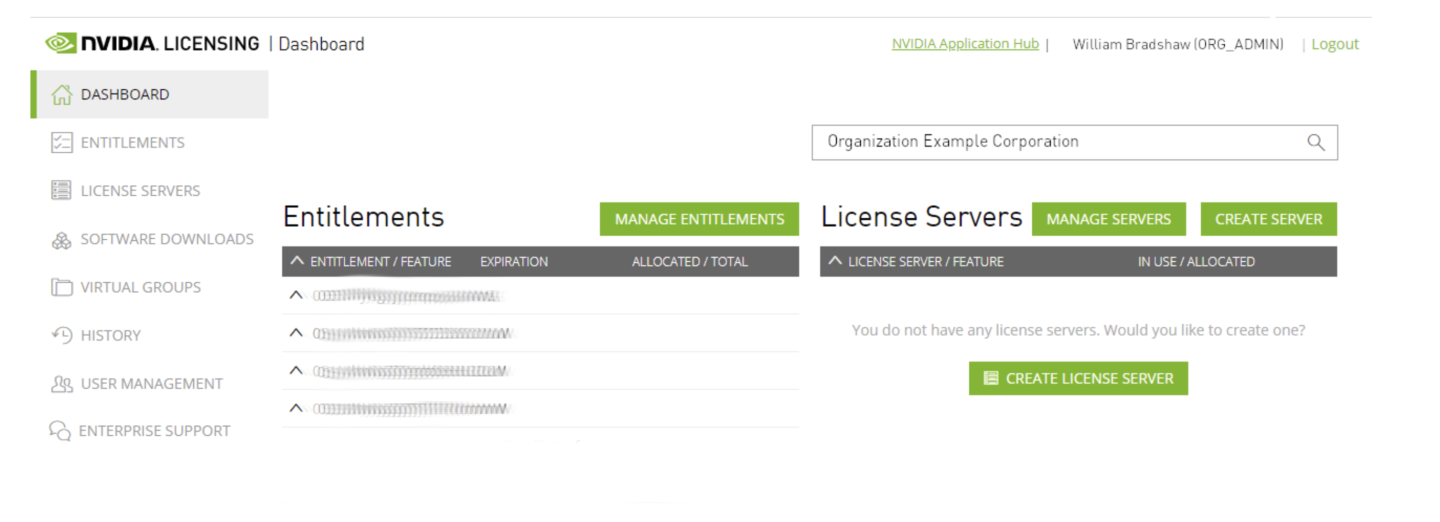
STEP 5: Create a license server
Create a License Server in the NVIDIA License Portal by navigating to License Servers tab and clicking ‘CREATE SERVER’. Make sure to point it to the MAC address of the machine the Flexera LS is running on.

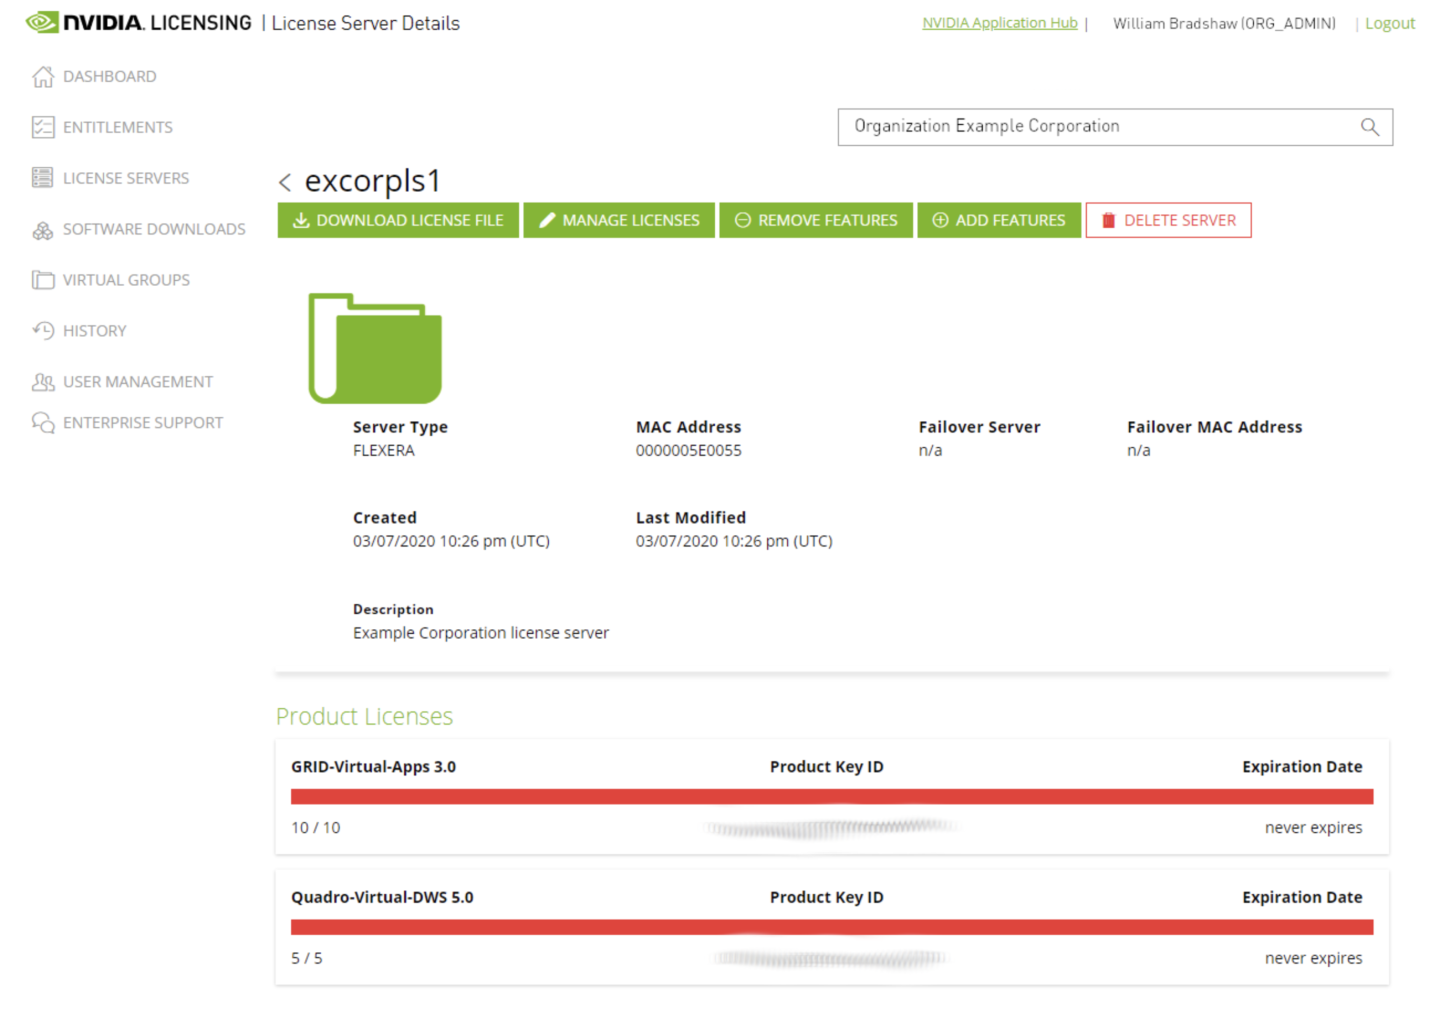
STEP 6: Add entitlements
Add the pipelines entitlements toe the NVIDIA License Portal License Server you have just created by clicking ‘ADD FEATURES’. Select the pipelines entitlements from the dropdown and then add the amount of licenses you want.
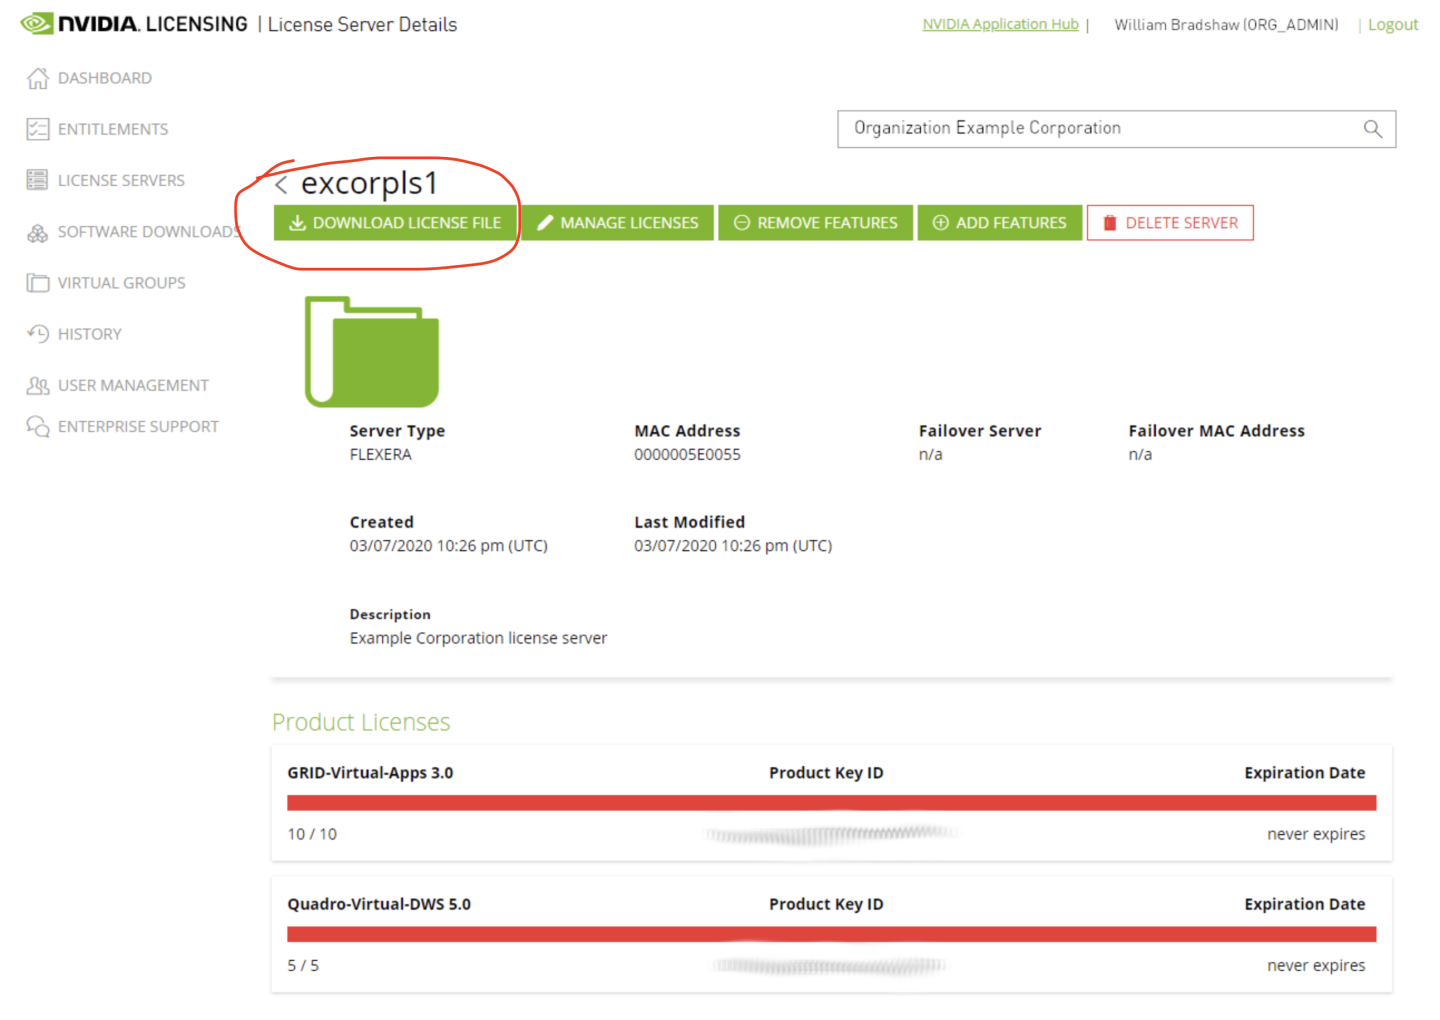
STEP 7: Download the license file
Download the license.bin file from the NVIDIA License Portal License Server by clicking the ‘DOWNLOAD LICENSE FILE’ button.
STEP 8: Upload the license file
Upload the license.bin file to the Flexera License Server by navigating to License Management in the Flexera License Server panel. From here, the license.bin file can be uploaded to the server.
A proper installation will display the message:
Successfully applied license file to license server.
For installation guidelines, please checkout Flexera Container Installation Guide.
Container with node locked license
Install the Parabricks package to your system:
            # Step 1: Unzip the package.
$ tar -xzf parabricks.tar.gz

# Step 2:
$ sudo ./parabricks/installer.py

# Step 3: verify your installation.
# This should display the parabricks version number:
$ pbrun version
After installation the pbrun executable will start any tool in the Parabricks software suite. During installation you can choose to create a link at /usr/bin/pbrun to make it available for system wide access. Otherwise you can access pbrun from your local installation directory (default: /opt/parabricks/pbrun).
If you have A100 GPUs, please make sure to pass –ampere to the step 2 above.
$ sudo ./parabricks/installer.py --ampere
If your machine has more GPUs than you have licenses, you need to specify how many GPUs to use and which GPUs to use. For example, use the following flags:
--gpu-devices 0,1 --num-gpus 2
Container with Flexera license
Install the Parabricks package to your system:
            # Step 1: Unzip the package.
$ tar -xzf parabricks.tar.gz

# Step 2 (Flexera License): Run the installer replacing [hostname] with the hostname of the license server.
$ sudo ./parabricks/installer.py --flexera-server [hostname]:7070

# Step 3: verify your installation.
# This should display the parabricks version number:
$ pbrun version
After installation the pbrun executable will start any tool in the Parabricks software suite. During installation you can choose to create a link at /usr/bin/pbrun to make it available for system wide access. Otherwise you can access pbrun from your local installation directory (default: /opt/parabricks/pbrun).
Please remove http or https from hostname
If you have A100 GPUs, please make sure to pass –ampere to the step 2 above.
$ sudo ./parabricks/installer.py --ampere
If your machine has more GPUs than you have pipelines licenses, you need to specify how many GPUs to use and which GPUs to use. For example, use the following flags:
CUDA_VISIBLE_DEVICES="0,1" pbrun [command and inputs] --num-gpus 2
To return flexera based licenses on unsuccessful runs, run the following command:
$ pbrun licensereturn
Singularity 3.0 without sudo access
            1. Log in to a machine with sudo access and singularity 3.0 or higher.
2. To download the software:
   $ wget -O parabricks.tar.gz " < DOWNLOAD_LINK > "
3. Unzip the package
   $ tar -xvzf parabricks.tar.gz
4. Do a local installation:$ mkdir localdir
   $ sudo ./parabricks/installer.py --install-location localdir --container singularity
5. Everything will be installed in localdir/parabricks folder. Tar this folder.
   $ cd localdir
   $ tar -cvzf parabricks_install.tar.gz parabricks
6. and copy it to the node which will be used for testing and has singularity v3.x.
7. Untar the tar.gz file in some <INSTALL_DIR>$ cd <INSTALL_DIR>
   $ tar -xvzf parabricks_install.tar.gz
Bare metal installation
Prerequisites
Installing Parabricks via the bare metal installer requires a working CUDA installation. You can test whether you have CUDA installed by running the following:
Bare-Metal installation only works on Ubuntu 18.04 for this release. We will support more operating systems in the future releases.
nvidia-smi
If the command is not found, or you do not receive a valid status message for your GPU or your CUDA version is older than the following:
CUDA 10.1 for non-Ampere GPUs
CUDA 11.0 for Ampere GPUs
You will need to install CUDA. Instructions for doing so can be found at https://developer.nvidia.com/cuda-downloads. Once you have installed CUDA, you may proceed to the following steps.
Install Anaconda
            wget https://repo.anaconda.com/miniconda/Miniconda3-latest-Linux-x86_64.sh
chmod +x ./Miniconda3-latest-Linux-x86_64.sh
./Miniconda3-latest-Linux-x86_64.sh
## Add Conda path to your environment path
export PATH="<PATH-TO-CONDA>:$PATH"
## Restart your shell, or log out and back in
conda config --remove channels defaults
Create a basic environment and activate it
            ## Create the conda environment and add the conda-forge repos
conda create -y --name parabricks && \
conda activate parabricks && \
conda config --add channels conda-forge && \
conda config --add channels bioconda

## Install dependencies into the new environment and then deactivate it.
conda install -y Cython matplotlib pysam wheel vcflib && \
conda deactivate
(Optional) Create cnvkit_env
            conda create -y --name cnvkit_env && \
conda activate cnvkit_env && \
conda config --add channels bioconda && \
conda config --add channels conda-forge && \
conda install -y numpy scipy pandas matplotlib reportlab biopython pyfaidx pysam pyvcf networkx==2.5 pomegranate && \
conda deactivate
(Optional) Create vcfqc
            conda create -n vcfqc -y -c conda-forge python=3.7 && \
conda activate vcfqc && pip install pandas==1.0.1 pysam==0.15.4 numpy==1.18.3 pytest jinja2 matplotlib seaborn upsetplot weasyprint bokeh selenium && \
conda deactivate
Install the package using the command
sudo apt install <path to debian file>
Set up the license (node locked)
copy the license.bin to the parabricks path. Make sure the current user have read permission on license.bin.
sudo cp license.bin /usr/local/parabricks/
Set up the license (flexera)
Create an empty license.bin in the installation folder. Make sure the current user have read permission on license.bin.
Edit config.txt in the installation folder and append the following to config.txt:
flexera-server:<HOSTNAME>:7070
Please remove http or https from hostname
Update PATH
export PATH=/usr/local/parabricks${PATH:+:${PATH}}
# Run the fq2bam tool, which aligns, co-ordinate sorts and marks duplicates # in a pair-ended fastq file. Ref.fa is the bwa-indexed reference file
$ pbrun fq2bam --ref Ref.fa --in-fq sample_1.fq.gz sample_2.fq.gz --out-bam output.bam
You can download a sample dataset using the following command:
            $ wget -O parabricks_sample.tar.gz \
"https://s3.amazonaws.com/parabricks.sample/parabricks_sample.tar.gz"
To run the sample dataset:
            $ tar -xvzf parabricks_sample.tar.gz
$ /parabricks/pbrun fq2bam --ref parabricks_sample/Ref/Homo_sapiens_assembly38.fasta --in-fq parabricks_sample/Data/sample_1.fq.gz parabricks_sample/Data/sample_2.fq.gz --out-bam output.bam
The above test should take under 250 seconds on a 4 V100 GPU system
The goal of Parabricks software is to get the highest performance for bioinformatics and genomic analysis. There are a few key system options that a user can tune to achieve maximum performance.
Use a fast local SSD for files
Parabricks software operates with two kinds of files:
Input/output files specified by the user
Temporary files created during execution and deleted at the end
The best performance is achieved when both kinds of files are on a fast local SSD.
If this is not possible the input/output files can be placed on a fast network storage device and the temporary files placed on the local SSD by using the –tmp-dir option.
Empirically we have observed that you can run with up to 4 GPUs and still get good performance with the Lustre network for Input/Output files. If you plan to use more than 4 GPUs, we highly recommend using local SSDs for all kinds of files.
DGX Users
A DGX comes with a SSD, usually mounted on /raid. Please use that disk and use a directory on that disk as –tmp-dir. For initial testing you can even copy the Input files to this disk to eliminate variability in performance.
Specifying GPUs to use
If you installed Parabricks using container (docker or singularity), to select specific GPUs to run on, please use gpu-devices and num-gpus options
$ pbrun fq2bam --ref Ref.fa --in-fq S1_1.fastq.gz --in-fq S1_2.fastq.gz --gpu-devices 0,1 --num-gpus 2
If you installed Parabricks using bare metal, to select specific GPUs to run on, please use CUDA_VISIBLE_DEVICES and num-gpus options
$ CUDA_VISIBLE_DEVICES="0,1" pbrun fq2bam --ref Ref.fa --in-fq S1_1.fastq.gz --in-fq S1_2.fastq.gz --num-gpus 2
Many users want to compare output generated by Parabricks software with other standard tools. We recommend the following way to compare output generated by Parabricks software and the counterpart non-accelerated software.
BAM COMPARISON
GATK4 sorts the SAM files based on QNAME, FLAG, RNAME, POS, MAPQ, MRNM/RNEXT, MPOS/PNEXT, and ISIZE. If all these fields are the same for two different SAMs they are considered equal for sorting purposes. Therefore, the way that we compare two sorted BAMs is by using the BamUtil diff tool to compare these fields, and there should be no difference reported.
$ bam diff --in1 mark_dups_gpu.bam --in2 mark_dups_cpu.bam --noCigar --isize --flag --mate --mapQual
The output of this comparison should result in no differences.
BQSR REPORT COMPARISON
The files generated by Parabricks and GATK4 should be exactly the same. There should be no output of the following command
$ diff -w recal_gpu.txt recal_cpu.txt
VCF COMPARISON
To compare VCF files we use the GATK Concordance tools to get sensitivity and specificity of SNPs and INDELs. When the following command is run, variant accuracy results will be stored in out.txt
$ gatk Concordance --evaluation result_gpu.vcf --truth result_cpu.vcf --summary out.txt
You can uninstall parabricks using the following commands based on your installation method:
            $ sudo ./parabricks/installer.py --uninstall   //docker

$ sudo apt purge parabricks //bare metal
## if get warning **directory not empty so not removed**, remember to remove folders manually