


Build Your First Engine#
Use this guide after you complete the Quick Start Guide to plan how you bundle engines in your application, support portability across RTX GPUs, and persist JIT artifacts for production launches.
If you have not run the minimum ONNX build and inference loop yet, start with the Quick Start Guide. It walks through the same ResNet-50 example in three commands. Return here when you are ready to ship an engine to end users.
Tip
Coming from TensorRT Enterprise? In Enterprise 11.x documentation, Build Your First Engine is the hands-on tutorial and Quick Start is the broader workflow menu. In TensorRT-RTX 1.6, use the Quick Start Guide first to verify install and run commands, then use this page for deployment planning.
Prerequisites#
Complete the Quick Start Guide or equivalent steps so you have:
resnet50/model.onnx(or your own ONNX model)resnet_engine.trtfrom an AOT buildA successful JIT inference run and
resnet.cachefrom--runtimeCacheFile
Use the artifacts checklist at the end of the Quick Start if you are unsure all three outputs are present.
You should also have TensorRT-RTX installed. Refer to Installation Guide Overview, Installing TensorRT-RTX, Prerequisites, and the Support Matrix. To confirm the CLI is available before the walkthrough, run tensorrt_rtx --help (Linux) or tensorrt_rtx.exe --help (Windows). If that command fails, refer to If a Command Fails in the Quick Start Guide.
Deployment Pipeline#
End-user deployment follows the same phases as the quick start, but your application owns when each phase runs:
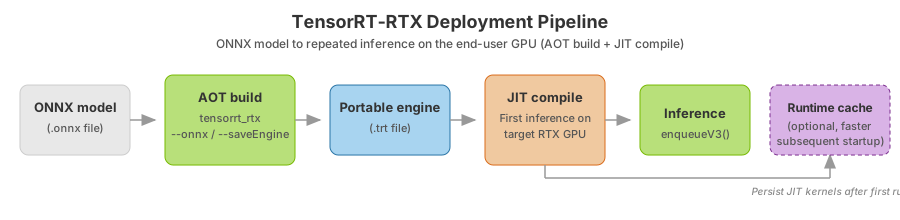
For the offline AOT versus on-device JIT split and typical phase timing, refer to the Architecture Overview.
When to Run Each Phase#
Phase |
Typical timing in your app |
Notes |
|---|---|---|
AOT build ( |
Install time, first launch, or a background update job |
Does not require a GPU on the build machine. For most models, expect roughly 20–30 seconds; complex models can take up to about 60 seconds. |
JIT compile (first |
First inference on the end-user GPU |
Usually under 5 seconds for most models on first run. Kernel choices are specific to the user’s GPU. |
Runtime cache ( |
After first successful JIT run |
Persists compiled kernels so later launches skip JIT. Ship or regenerate alongside the engine when GPUs or TensorRT-RTX versions change. |
Bundle Engines in Your Application#
Treat the serialized engine and runtime cache as application data, not build artifacts you recompile on every launch.
Engine file: Build once per model version and TensorRT-RTX release you support. Store it under your installer payload or download it on first launch if the model updates frequently.
Runtime cache: Write after the first successful inference on the target GPU. On Windows, a common location is the user’s application data directory (for example, %LOCALAPPDATA%). On Linux, use your application’s XDG data directory or an equivalent per-user store. The cache is GPU- and version-specific; regenerate it when the user upgrades their GPU or when you ship a new TensorRT-RTX runtime.
Tip
Run the AOT build during install or first launch so the user sees progress once, not on every application start. Warm up inference (or load an existing cache) before you measure or expose latency-sensitive UI.
Portability and Compute Capability#
By default, an engine built with CPU-only AOT is portable across supported RTX GPUs on Linux and Windows with compute capability 7.5 and later (Turing and later). Engines built without specifying a compute capability target Ampere and later (8.6+) for optimal kernel selection on those architectures.
If you must support Turing explicitly, or you need to lock an engine to a narrower architecture list, set compute capabilities at build time. Refer to CPU-Only AOT and TensorRT-RTX Engines and the Support Matrix for CC-specific precision limits and build flags.
Use Your Own Model#
The quick start uses ResNet-50 from the ONNX Model Zoo. For your own network:
Export to ONNX from your training framework. Refer to the ONNX Conversion Guide.
Confirm every operator is supported. Refer to Operators and the support matrix.
Build with the same
tensorrt_rtx --onnx=... --saveEngine=...flow from the quick start, then apply the deployment notes on this page.
Move Beyond the CLI#
The tensorrt_rtx tool is the fastest way to validate a model. Production applications usually embed the builder or runtime directly:
Using the Native Runtime API: C++ and Python walkthroughs for build, deserialize, and
enqueueV3inferenceUsing TensorRT-RTX via PyTorch:
torch.compile()with the TensorRT-RTX backendWorking with Runtime Cache: Load, save, and version runtime-cache files programmatically
Next Steps#
Quick Start Guide: Minimum three-command verify loop
ONNX Conversion Guide: Export from PyTorch, TensorFlow, and other frameworks
How TensorRT-RTX Works: Object lifetimes, threading, and engine compatibility
Best Practices: Measure and optimize inference performance