Updating and Restoring the Software#
This section provides information about how to update or restore software on your DGX A100 system.
Updating the DGX A100 Software#
You must register your DGX A100 system to receive email notification whenever a new software update is available.
These instructions explain how to update the DGX A100 software through an internet connection to the NVIDIA public repository. The process updates a DGX A100 system image to the latest released versions of the entire DGX A100 software stack, including the drivers, for the latest version within a specific release.
Refer to the DGX OS 5 User Guide for instructions on upgrading from one release to another (for example, from Release 4 to Release 5).
Connectivity Requirements for Software Updates#
Before attempting to perform the update, verify that the DGX A100 system network connection can access the public repositories and that the connection is not blocked by a firewall or proxy.
Enter the following on the DGX A100 system.
$ wget -O f1-changelogs http://changelogs.ubuntu.com/meta-release-lts
$ wget -O f1-changelogs http://changelogs.ubuntu.com/meta-release-lts
$ wget -O f2-archive http://archive.ubuntu.com/ubuntu/dists/bionic/Release
$ wget -O f3-usarchive http://us.archive.ubuntu.com/ubuntu/dists/bionic/Release
$ wget -O f4-security http://security.ubuntu.com/ubuntu/dists/bionic/Release
$ wget -O f5-download http://download.docker.com/linux/ubuntu/dists/bionic/Release
$ wget -O f6-international http://international.download.nvidia.com/dgx/repos/bionic/
dists/bionic/Release
$ wget -O f7-focal-repo https://repo.download.nvidia.com/baseos/ubuntu/focal/x86_64/dists/focal/Release
All the wget commands should be successful and there should be seven files in the directory with non-zero content.
Update Instructions#
Here are the steps to update the software on your DGX A100 system.
Caution
These instructions update all software for which updates are available from your configured software sources, including applications that you installed yourself. If you want to prevent an application from being updated, you can instruct the Ubuntu package manager to keep the current version. Refer to Introduction for more information.
Perform the updates using commands on the DGX A100 console.
Run the package manager.
$ sudo apt update
Check to see which software will get updated.
$ sudo apt full-upgrade -s
To prevent an application from being updated, instruct the Ubuntu package manager to keep the current version. See “Introduction to Holding Packages”.
Upgrade to the latest version.
$ sudo apt full-upgrade
Answer any questions that appear.
Most questions require a Yes or No response. If asked to select the grub configuration to use, select the current one on the system.
Other questions will depend on what other packages were installed before the update and how those packages interact with the update. Typically, you can accept the default option when prompted.
Reboot the system.
Restoring the DGX A100 Software Image#
If the DGX A100 software image becomes corrupted or the OS SSD was replaced after a failure, restore the DGX A100 software image to its original factory condition from a pristine copy of the image.
The process for restoring the DGX A100 software image is as follows:
Obtain an ISO file that contains the image from NVIDIA Enterprise Support as explained in Obtaining the DGX A100 Software ISO Image and Checksum File.
Restore the DGX A100 software image from this file remotely through the BMC or locally from a bootable USB flash drive.
If you are restoring the image remotely, follow the instructions in Re-enabling CPU Mitigations.
If you are restoring the image locally, prepare a bootable USB flash drive and restore the image from the USB flash drive as explained in the following topics:
Note
The DGX OS Server software is restored on one of the two NMVe M.2 drives. When the system is booted after restoring the image, soft- ware RAID begins the process rebuilding the RAID 1 array - creating a mirror of (or resynchronizing) the drive containing the software. System performance may be affected during the RAID 1 rebuild process, which can take an hour to complete.
Obtaining the DGX A100 Software ISO Image and Checksum File#
To ensure that you restore the latest available version of the DGX A100 software image, obtain the current ISO image file from NVIDIA Enterprise Support. A checksum file is provided for the image to enable you to verify the bootable installation medium that you create from the image file.
Log on to the NVIDIA Enterprise Support site.
Click the Announcements tab to locate the download links for the DGX A100 software image.
Download the ISO image and its checksum file and save them to your local disk.
Run a checksum or hash utility on the ISO image and compare the resulting value to the value in the checksum file to validate the ISO file.
The ISO image is also available in an archive file. If you download the archive file, be sure to extract the ISO image before proceeding.
Remotely Reimaging the System#
These instructions describe how to reimage the system remotely through the BMC. For information about how to restore the system locally, see Reimaging the System from a USB Flash Drive.
Before reimaging the system remotely, ensure that the correct DGX A100 software image is saved to your local disk. For more information, see Obtaining the DGX A100 Software ISO Image and Checksum File.
Log in to the BMC.
Click Remote Control and then click Launch KVM.
Set up the ISO image as virtual media.
From the top bar, click Browse File and then locate the re-image ISO file and click Open.
Click Start Media.
Reboot, install the image, and complete the DGX A100 system setup.
From the top menu, click Power and then select Reset Server.
Click OK at the Power Control dialogs, then wait for the system to power down and then come back online.
As the system boots, press [F11] when the NVIDIA logo appears to get to the boot menu.
Browse to locate the Virtual CD that corresponds to the inserted ISO, then boot the system from it.
When the system boots up, select one of the following options from the GRUB menu:
Install DGX OS <version>: Install DGX OS and reformat data RAID
Install DGX OS <version> Without Reformatting Data RAID
Advanced Installation Options: Select if you want to install with an encrypted root filesystem, then select one of the following options:
Install DGX OS <version> With Encrypted Root
Install DGX OS <version> With Encrypted Root and Without Reformatting Data RAID
If you are an advanced user who is not using the RAID disks as cache and want to keep data on the RAID disks, then select one of the “Without Reformatting Data RAID” options. See the section “Retaining the RAID Partition While Installing the OS” for more information.
Press Enter.
The DGX A100 system will reboot from ISO image and proceed to install the image. This can take approximately 15 minutes.
Note
The Mellanox InfiniBand driver installation can take up to 30 minutes, depending on how many cards undergo a firmware update.
After the installation is completed, the system ejects the virtual CD and then reboots into the OS.
Refer to First Boot Setup for the steps to take when booting up the DGX A100 system for the first time after a fresh installation.
Creating a Bootable Installation Medium#
After obtaining an ISO file that contains the DGX OS Server software image from NVIDIA Enterprise Support, create a bootable installation medium, such as a USB flash drive or DVD-ROM, that contains the image.
Note
If you are restoring the software image remotely through the BMC, you do not need a bootable installation medium and you can omit this task.
If you are creating a bootable USB flash drive, follow the instructions for the platform that you are using:
On a Linux distribution, you can refer to Creating a Bootable USB Flash Drive by Using the dd Command.
On Windows, see Creating a Bootable USB Flash Drive by Using Akeo Rufus.
If you are creating a bootable DVD-ROM, you can use any of the methods described in Burning the ISO on to a DVD on the Ubuntu Community Help Wiki.
Note
The ISO file that contains software image for some DGX OS Server releases is greater than the 4.7 GB capacity of a single-layer DVD-ROM. You cannot install these releases from a bootable DVD-ROM because installation of DGX OS Server from a dual-layer DVD-ROM is not supported. Check the size of the ISO file that contains the DGX OS Server software image before creating a bootable DVD-ROM.
Prerequisites#
Ensure that the following prerequisites are met:
The correct DGX OS software image is saved to your local disk.
For more information, see Obtaining the Software ISO Image and Checksum File.
The USB flash drive must meet the following requirements:
The USB flash drive has a capacity of at least 16 GB.
The partition scheme on the USD flash drive is a GPT partition scheme for UEFI.
Creating a Bootable USB Flash Drive by Using the dd Command#
On a Linux system, you can use the dd command to create a bootable USB flash drive that contains the DGX OS software image.
Note
To ensure that the resulting flash drive is bootable, use the dd command to perform a device bit copy of the image. If you use other commands to perform a simple file copy of the image, the resulting flash drive may not be bootable.
Plug the USB flash drive into one of the USB ports of your Linux system.
Obtain the device name of the USB flash drive by running the lsblk command.
$ lsblkYou can identify the USB flash drive from its size, which is much smaller than the size of the SSDs in the DGX software, and from the mount points of any partitions on the drive, which are under
/media.In the following example output, the device name of the USB flash drive is
sde.NAME MAJ:MIN RM SIZE RO TYPE MOUNTPOINT sda 8:0 0 1.8T 0 disk |_sda1 8:1 0 121M 0 part /boot/efi |_sda2 8:2 0 1.8T 0 part / sdb 8:16 0 1.8T 0 disk |_sdb1 8:17 0 1.8T 0 part sdc 8:32 0 1.8T 0 disk sdd 8:48 0 1.8T 0 disk sde 8:64 1 7.6G 0 disk |_sde1 8:65 1 7.6G 0 part /media/deeplearner/DGXSTATION
As root, convert and copy the image to the USB flash drive.
$ sudo dd if=<path-to-software-image> bs=2048 of=<usb-drive-device-name>
Caution
The
ddcommand erases all data on the device that you specify in the of option of the command. To avoid losing data, ensure that you specify the correct path to the USB flash drive.
Creating a Bootable USB Flash Drive by Using Akeo Rufus#
On a Windows system, you can use the Akeo Reliable USB Formatting Utility (Rufus) to create a bootable USB flash drive that contains the DGX OS software image.
Ensure that the Prerequisites are met.
Plug the USB flash drive into one of the USB ports of your Windows system.
Download and launch the Akeo Reliable USB Formatting Utility (Rufus).
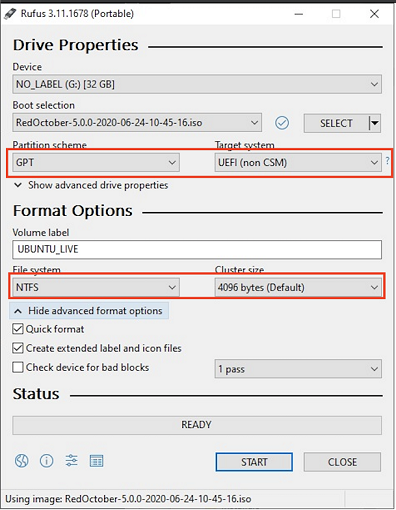
In Drive Properties, select the following options:.
In Boot selection, click SELECT, locate, and select the DGX OS software image.
In Partition scheme, select GPT.
In Target System, select UEFI (non CSM).
In Format Options, select the following options:
In File system, select NTFS.
In Cluster Size, select 4096 bytes (Default).
Click Start.
Because the image is a hybrid ISO file, you are prompted to select whether to write the image in ISO Image (file copy) mode or DD Image (disk image) mode.
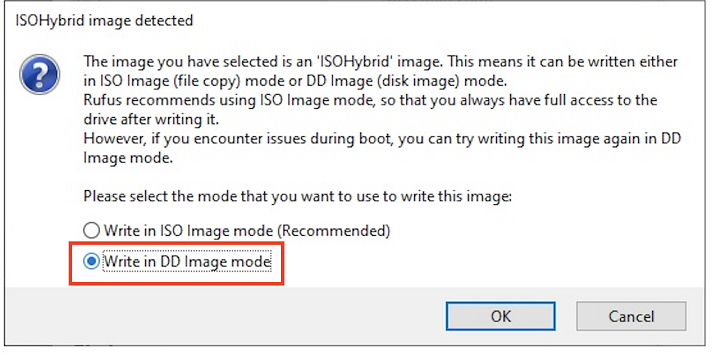
Select Write in ISO Image mode and click OK.
Reimaging the System from a USB Flash Drive#
Before re-imaging the system from a USB flash drive, ensure that you have a bootable USB flash drive that contains the current DGX A100 software image.
Plug the USB flash drive containing the OS image into the DGX A100 system.
Connect a monitor and keyboard directly to the DGX A100 system.
Boot the system and press F11 when the NVIDIA logo appears to get to the boot menu.
Select the USB volume name that corresponds to the inserted USB flash drive and boot the system from it.
When the system boots, select one of the following options from the GRUB menu:
Install DGX OS <version>: Install DGX OS and reformat data RAID
Install DGX OS <version> Without Reformatting Data RAID
Advanced Installation Options: Select if you want to install with an encrypted root filesystem, then select one of the following options.
Install DGX OS <version> With Encrypted Root
Install DGX OS <version> With Encrypted Root and Without Reformatting Data RAID
If you are an advanced user who is not using the RAID disks as cache and want to keep data on the RAID disks, select one of the Without Reformatting Data RAID options. Refer to Retaining the RAID Partition While Installing the OS for more information.
Press Enter.
The DGX A100 system reboots and proceeds to install the image. This can take more than 15 minutes.
The Mellanox InfiniBand driver installation may take approximately 30 minutes, depending on how may cards undergo a firmware update.
After the installation is completed, the system then reboots into the OS.
Refer to First Boot Setup for the steps to take when booting up the DGX A100 system for the first time after a fresh installation.
Installation Options#
Retaining the RAID Partition While Installing the OS#
The reimaging process creates a fresh installation of the DGX OS. During the OS installation or reimage process, you are presented with a boot menu when booting the installer image.
The default selection is Install DGX Software. The installation process then repartitions all the SSDs, including the OS SSD as well as the RAID SSDs, and the RAID array is mounted as /raid. This overwrites any data or file systems that might exist on the OS disk as well as the RAID disks.
Since the RAID array on the DGX A100 system is intended to be used as a cache and not for long- term data storage, this should not be disruptive. However, if you are an advanced user and have set up the disks for a non-cache purpose and want to keep the data on those drives, then select the Install DGX Server without formatting RAID option at the boot menu during the boot installation. This option retains data on the RAID disks and performs the following:
Installs the cache daemon but leaves it disabled by commenting out the
RUN=yesline in/etc/default/cachefilesdentry.Creates a
/raiddirectory, leaves it out of the file system table by commenting out the/raidline in/etc/fstab.Does not format the RAID disks.
When the installation is completed, you can repeat any configurations steps that you had performed to use the RAID disks as other than cache disks.
You can always choose to use the RAID disks as cache disks later by enabling cachefilesd and adding /raid to the file system table as follows:
Uncomment the
#RUN=yesline in/etc/default/cachefiled.Uncomment the
/raidline in/etc/fstab.Run the following:
Mount /raid.
$ sudo mount /raid
Start the cache daemon.
$ systemctl start cachefilesd
These changes are preserved across system reboots.
Advanced Installation Option (Encrypted Root - DGX OS 5 or Later)#
Selecting this menu item provides the ability to encrypt the root filesystem of the DGX. It should normally only be selected if this is desired.
Selecting Encrypted Root instructs the installer to encrypt the root filesystem. The encryption is fully automated, and users will be required to manually unlock the root partition by entering a passphrase at the console (either through a direct keyboard and mouse connection or through the BMC) every time the system boots. During the First Boot process (see First Boot Setup), you are provided the opportunity to create your passphrase for the drive. The passphrase can be changed later if needed.
Boot into Live Environment (DGX OS 5 or Later)#
The DGX OS installer image can also be used as a Live image, which means it boots and runs a minimal DGX OS in system memory and does not overwrite anything on the disks in the system.
While this Live mode does not load drivers, and is essentially a simple Ubuntu Server configuration, it can be used as a tool for debugging a system if the disks on the system are not accessible, or otherwise should not be touched.
When booting into the live environment, log in as root (a password is not needed). In a normal operation, this option should not be selected.
Check Disc for Defects (DGX OS 5 or Later)#
Here is some information about how to check the disc for defects.
If you are experiencing oddities when installing DGX OS, and suspect the installation media has an issue, selecting this item will do an extensive test of the contents of the install media. It is time consuming, and the installation media generally is not the real source of the problem.
In a normal operation, this option should not be selected.