Additional Setup
In addition to the required steps to install the Holoscan SDK, the steps below will help you achieve peak performance:
Learn more about RDMA in the technology overview section.
The GPUDirect drivers must be manually installed to enable the use of GPUDirect RDMA with NVIDIA’s Quadro/workstation GPUs. They are not installed as part of Holopack 1.1 when selecting Rivermax SDK in the SDK Manager at this time.
This is not required for AJA cards support as they use their own driver (NTV2) which implements GPUDirect RDMA. However, this is required for Emergent cameras support, as their SDK (eSDK) uses the NVIDIA GPUDirect drivers.
Download the GPUDirect Drivers for OFED: nvidia-peer-memory_1.1.tar.gz
If the above link does not work, navigate to the Downloads section on the GPUDirect page
Install GPUDirect:
            mv nvidia-peer-memory_1.1.tar.gz nvidia-peer-memory_1.1.orig.tar.gz
tar -xvf nvidia-peer-memory_1.1.orig.tar.gz
cd nvidia-peer-memory-1.1
dpkg-buildpackage -us -uc
sudo dpkg -i ../nvidia-peer-memory_1.1-0_all.deb
sudo dpkg -i ../nvidia-peer-memory-dkms_1.1-0_all.deb
sudo service nv_peer_mem start
Verify the
nv_peer_memservice is running:sudo service nv_peer_mem status
Enable the
nv_peer_memservice at boot time:sudo systemctl enable nv_peer_mem sudo /lib/systemd/systemd-sysv-install enable nv_peer_mem
There’s a known issue that prevents GPU RDMA from being enabled on the NVIDIA IGX Orin Developer Kit without a firmware update or running a manual command. Refer to the instructions in the NVIDIA IGX Orin Developer Kit User Guide for instructions.
Testing with Rivermax
The instructions below describe the steps to test GPUDirect using the
Rivermax SDK. The test applications used by
these instructions, generic_sender and generic_receiver, can
then be used as samples in order to develop custom applications that use the
Rivermax SDK to optimize data transfers.
The Rivermax SDK can be installed onto the Developer Kit via SDK Manager by selecting it as an additional SDK during the HoloPack installation. Access to the Rivermax SDK Developer Program as well as a valid Rivermax software license is required to use the Rivermax SDK.
Running the Rivermax sample applications requires two systems, a sender and a receiver, connected via ConnectX network adapters. If two Developer Kits are used then the onboard ConnectX can be used on each system, but if only one Developer Kit is available then it is expected that another system with an add-in ConnectX network adapter will need to be used. Rivermax supports a wide array of platforms, including both Linux and Windows, but these instructions assume that another Linux based platform will be used as the sender device while the Developer Kit is used as the receiver.
Determine the logical name for the ConnectX devices that are used by each system. This can be done by using the
lshw -class networkcommand, finding theproduct:entry for the ConnectX device, and making note of thelogical name:that corresponds to that device. For example, this output on a Developer Kit shows the onboard ConnectX device using theenp9s0f01logical name (lshwoutput shortened for demonstration purposes).$ sudo lshw -class network *-network:0 description: Ethernet interface product: MT28908 Family [ConnectX-6] vendor: Mellanox Technologies physical id: 0 bus info: pci@0000:09:00.0 <b>logical name: enp9s0f0</b> version: 00 serial: 48:b0:2d:13:9b:6b capacity: 10Gbit/s width: 64 bits clock: 33MHz capabilities: pciexpress vpd msix pm bus_master cap_list ethernet physical 1000bt-fd 10000bt-fd autonegotiation configuration: autonegotiation=on broadcast=yes driver=mlx5_core driverversion=5.4-1.0.3 duplex=full firmware=20.27.4006 (NVD0000000001) ip=10.0.0.2 latency=0 link=yes multicast=yes resources: iomemory:180-17f irq:33 memory:1818000000-1819ffffff
The instructions that follow will use the
enp9s0f0logical name forifconfigcommands, but these names should be replaced with the corresponding logical names as determined by this step.Run the
generic_senderapplication on the sending system.a. Bring up the network:
$ sudo ifconfig enp9s0f0 up 10.0.0.1
b. Build the sample apps:
               $ cd 1.8.21/apps
   $ make
NoteThe
1.8.21path above corresponds to the path where the Rivermax SDK package was installed. If the Rivermax SDK was installed via SDK Manager, this path will be$HOME/Documents/Rivermax/1.8.21.e. Launch the
generic_senderapplication:$ sudo ./generic_sender -l 10.0.0.1 -d 10.0.0.2 -p 5001 -y 1462 -k 8192 -z 500 -v ... +############################################# | Sender index: 0 | Thread ID: 0x7fa1ffb1c0 | CPU core affinity: -1 | Number of streams in this thread: 1 | Memory address: 0x7f986e3010 | Memory length: 59883520[B] | Memory key: 40308 +############################################# | Stream index: 0 | Source IP: 10.0.0.1 | Destination IP: 10.0.0.2 | Destination port: 5001 | Number of flows: 1 | Rate limit bps: 0 | Rate limit max burst in packets: 0 | Memory address: 0x7f986e3010 | Memory length: 59883520[B] | Memory key: 40308 | Number of user requested chunks: 1 | Number of application chunks: 5 | Number of packets in chunk: 8192 | Packet's payload size: 1462 +**********************************************
Run the
generic_receiverapplication on the receiving system.a. Bring up the network:
$ sudo ifconfig enp9s0f0 up 10.0.0.2
b. Build the sample apps with GPUDirect support (
CUDA=y):$ cd 1.8.21/apps $ make CUDA=y
NoteThe
1.8.21path above corresponds to the path where the Rivermax SDK package was installed. If the Rivermax SDK was installed via SDK Manager, this path will be$HOME/Documents/Rivermax/1.8.21.c. Launch the
generic_receiverapplication:$ sudo ./generic_receiver -i 10.0.0.2 -m 10.0.0.2 -s 10.0.0.1 -p 5001 -g 0 ... Attached flow 1 to stream. Running main receive loop... Got 5877704 GPU packets | 68.75 Gbps during 1.00 sec Got 5878240 GPU packets | 68.75 Gbps during 1.00 sec Got 5878240 GPU packets | 68.75 Gbps during 1.00 sec Got 5877704 GPU packets | 68.75 Gbps during 1.00 sec Got 5878240 GPU packets | 68.75 Gbps during 1.00 sec ...
With both the generic_sender and generic_receiver processes
active, the receiver will continue to print out received packet statistics
every second. Both processes can then be terminated with <ctrl-c>.
For better performance and to keep up with the high refresh rate of Holoscan applications, we recommend the use of a G-SYNC display.
Holoscan has been tested with these two G-SYNC displays:
Follow these steps to ensure G-SYNC is enabled on your display:
Open the “NVIDIA Settings” Graphical application (
nvidia-settingsin Terminal).Click on
X Server Display Configurationthen theAdvancedbutton. This will show theAllow G-SYNC on monitor not validated as G-SYNC compatibleoption. Enable the option and clickApply:
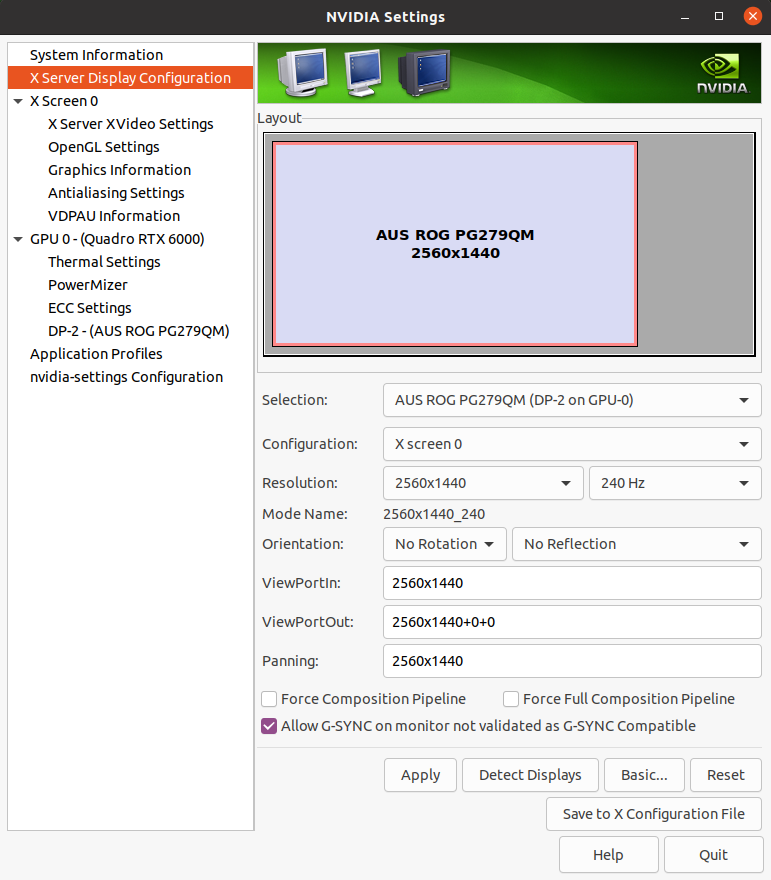
Fig. 1 Enable G-SYNC for the current display
To show the refresh rate and G-SYNC label on the display window, click on
OpenGL Settingsfor the selected display. Now clickAllow G-SYNC/G-SYNC CompatibleandEnable G-SYNC/G-SYNC Compatible Visual Indicatoroptions and clickQuit. This step is shown in below image. TheGsyncindicator will be at the top right screen once the application is running.
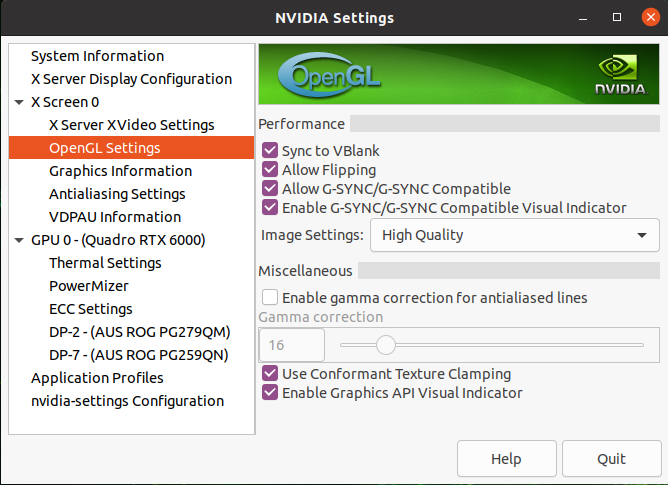
Fig. 2 Enable Visual Indicator for the current display
Various monitors have a Variable Backlight feature. That setting adds a latency of a frame when enabled. Refer to you monitor’s manufacturer instructions to disable it.
To disable variable backlight on the Asus ROG Swift monitors mentioned above, use the joystick button at the back of the display, go to the image tag, select variable backlight, then switch that setting to OFF.
By default, applications use a borderless fullscreen window managed by the window manager. Because the window manager also manages other applications, applications may suffer a performance hit. To improve performance, exclusive display mode can be used with Holoscan’s new visualization module (Holoviz), allowing the application to bypass the window manager and render directly to the display. Refer to the Holoviz documentation for details.