 Documentation
AJA provides a wide range of proven, professional video I/O devices, and thanks to a partnership between NVIDIA and AJA, Holoscan provides ongoing support for the AJA NTV2 SDK and device drivers.
The AJA drivers and SDK offer RDMA support for NVIDIA GPUs. This feature allows video data to be captured directly from the AJA card to GPU memory, which significantly reduces latency and system PCI bandwidth for GPU video processing applications as sysmem to GPU copies are eliminated from the processing pipeline.
The following instructions describe the steps required to setup and use an AJA device with RDMA support on NVIDIA Developer Kits with a PCIe slot. Note that the AJA NTV2 SDK support for Holoscan includes all of the AJA Developer Products, though the following instructions have only been verified for the Corvid 44 12G BNC, KONA XM, and KONA HDMI products, specifically.
The addition of an AJA device to a NVIDIA Developer Kit is optional. The Holoscan SDK has elements that can be run with an AJA device with the additional features mentioned above, but those elements can also run without AJA. For example, there are Holoscan sample applications that have an AJA live input component, however they can also take in video replay as input. Similarly, the latency measurement tool can measure the latency of the video I/O subsystem with or without an AJA device available.
This section describes how to install the AJA hardware on the Clara AGX Developer Kit. Note that the AJA Hardware is also compatible with the NVIDIA IGX Orin Developer Kit.
To install an AJA Video Systems device into the Clara AGX Developer Kit, remove the side access panel by removing two screws on the back of the Clara AGX. This provides access to the two available PCIe slots, labelled 13 and 14 in the Clara AGX Developer Kit User Guide:

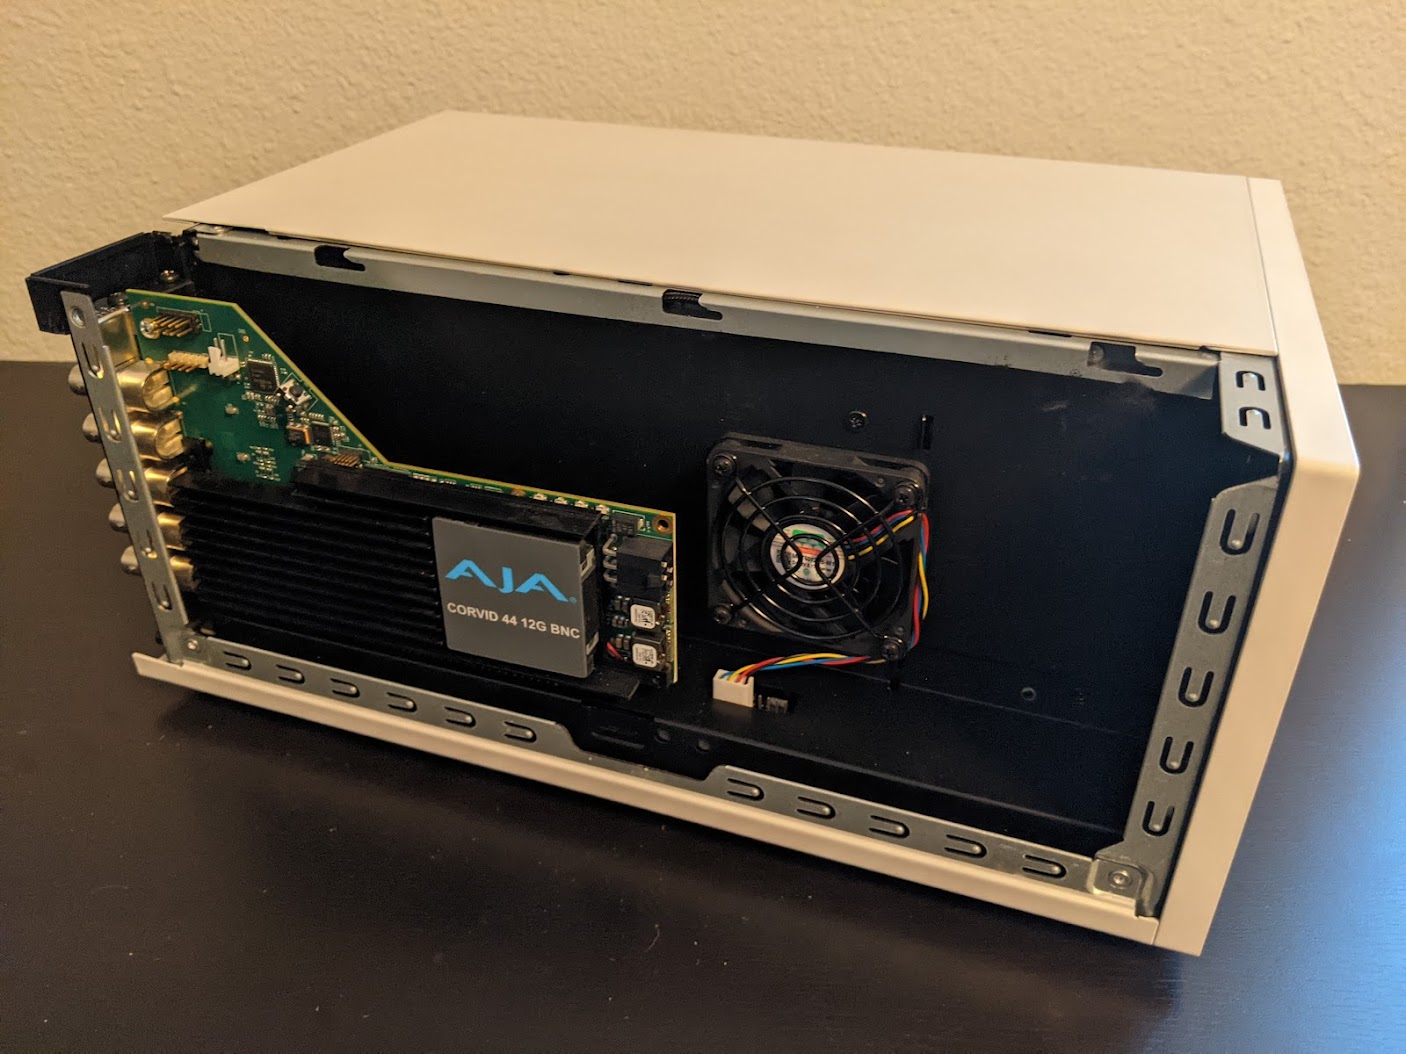
While these slots are physically identical PCIe x16 slots, they are connected to the Clara AGX via different PCIe bridges. Only slot 14 shares the same PCIe bridge as the RTX6000 dGPU, and so the AJA device must be installed into slot 14 for RDMA support to be available. The following image shows a Corvid 44 12G BNC card installed into slot 14 as needed to enable RDMA support.
The AJA NTV2 SDK includes both the drivers (kernel module) that are required in order to enable an AJA device, as well as the SDK (headers and libraries) that are used to access an AJA device from an application.
The drivers must be loaded every time the system is rebooted, and they must be loaded natively on the host system (i.e. not inside a container). The drivers must be loaded regardless of whether applications will be run natively or inside a container (see aja_use_in_containers).
The SDK only needs to be installed on the native host and/or container that will be used to compile applications with AJA support. The Holoscan SDK containers already have the NTV2 SDK installed, and so no additional steps are required to build AJA-enabled applications (such as the reference Holoscan applications) within these containers. However, installing the NTV2 SDK and utilities natively on the host is useful for the initial setup and testing of the AJA device, so the following instructions cover this native installation.
To summarize, the steps in this section must be performed on the native host, outside of a container, with the following steps required once:
The following steps required after every reboot:
And the following steps are optional (but recommended during the initial setup):
Included in the scripts directory is the aja_build.sh script which can be
used to download the AJA NTV2 source, build the drivers and SDK, load the
drivers, and run the ntv2enumerateboards utility to list the AJA boards that
are connected to the system. To download and build the drivers and SDK, simply
run the script:
To optionally have the script load the drivers and list the connected devices
once the build is complete, add the --load-driver flag:
The remainder of the steps in this documentation describe how to manually
build and load the AJA NTV2 drivers and SDK, and are not needed when using
the build script. However, it will still be required to reload the drivers
after rebooting the system by running the load_ajantv2 command as described
in aja_driver_load.
Navigate to a directory where you would like the source code to be downloaded, then perform the following to clone the NTV2 SDK source code.
These instructions use a fork of the official AJA NTV2 Repository that is maintained by NVIDIA and may contain additional changes that are required for Holoscan SDK support. These changes will be pushed to the official AJA NTV2 repository whenever possible with the goal to minimize or eliminate divergence between the two repositories.
If the AJA NTV2 drivers are going to be built with RDMA support, the open-source
NVIDIA kernel modules must be installed instead of the default proprietary drivers.
If the drivers were installed from an NVIDIA driver installer package then follow
the directions on the NVIDIA Open GPU Kernel Module Source GitHub page. If the
NVIDIA drivers were installed using an Ubuntu package via apt, then replace the
installed nvidia-kernel-source package with the corresponding nvidia-kernel-open
package. For example, the following shows that the 545 version drivers are installed:
And the following will replace those with the corresponding nvidia-kernel-open drivers:
The system must then be rebooted to load the new open kernel modules.
The following will build the AJA NTV2 drivers with RDMA support enabled. Once
built, the kernel module (ajantv2.ko) and load/unload scripts
(load_ajantv2 and unload_ajantv2) will be output to the
${NTV2}/driver/bin directory.
Running any application that uses an AJA device requires the AJA kernel drivers to be loaded, even if the application is being run from within a container.
To enable RDMA with AJA, ensure the NVIDIA GPUDirect RDMA kernel module is loaded before the AJA NTV2 drivers.
The AJA drivers must be manually loaded every time the machine is rebooted using the load_ajantv2 script:
The NTV2 environment variable must point to the NTV2 SDK path
where the drivers were previously built as described in
aja_driver_build.
Secure boot must be disabled in order to load unsigned module. If any errors occur while loading the module refer to the aja_troubleshooting section, below.
Since the AJA NTV2 SDK is already loaded into the Holoscan containers, this step is not strictly required in order to build or run any Holoscan applications. However, this builds and installs various tools that can be useful for testing the operation of the AJA hardware outside of Holoscan containers, and is required for the steps provided in aja_testing.
The following steps depend on tools that were built and installed by the previous step, aja_sdk_install. If any errors occur, see the aja_troubleshooting section, below.
ntv2enumerateboards utility can be used:rdmawhacker utility can be used (use
<ctrl-c> to terminate):Accessing an AJA device from a container requires the drivers to be loaded
natively on the host (see aja_driver_load), then the device that is
created by the load_ajantv2 script must be shared with the container using
the --device docker argument, such as --device /dev/ajantv20:/dev/ajantv20.
Problem: The sudo sh ${NTV2}/driver/bin/load_ajantv2 command returns
an error.
Solutions:
a. Make sure the AJA card is properly installed and powered (see 2.a below)
b. Check if SecureBoot validation is disabled:
If SecureBoot validation is enabled, disable it with the following procedure:
Problem: The ntv2enumerateboards command does not find any
devices.
Solutions:
a. Make sure that the AJA device is installed properly and detected by the system (see aja_hardware_install):
b. Make sure that the AJA drivers are loaded properly (see aja_driver_load):
rdmawhacker command outputs the following error:Solution: The AJA drivers need to be compiled with RDMA support enabled.
Follow the instructions in aja_driver_build, making sure not to skip
the export AJA_RDMA=1 when building the drivers.
