

HSB Emulator
- Overview
- Building HSB Emulator
- Examples
- Testing
- Developing with HSB Emulator
- Making your own HSB MCU
- Primary Classes
HSBEmulatorDataPlaneBaseTransmitterI2CPeripheralVb1940Emulator
- Structure of an HSB Emulator application
- Troubleshooting
- Clean-Up
Overview
The holoscan-sensor-bridge (HSB) repository includes a minimally featured emulation of the HSB framework’s IP for use in testing and development within a hosted or embedded environment - the “HSB Emulator”. Though it is called like a single object, it is a collection of objects that can be used to configure a real endpoint and data source for HSB host-side applications. This allows for simulation, testing, or development of a host application when the hardware is not fully developed, in testing, or a full software-in-loop/CI environment.
An outline of the typical communication pipelines between and HSB Host application and
an HSB Emulator application is shown in the diagram below. This graphic is but one
particular topology and user client code may piece together the components so that an
HSB Emulator application may meet the needs of their particular Host application(s)‘s
code. Note also that the two applications may exist either on different device, within
the same device in different processes, or even within different threads of the same
process (through transport options may be limited). The details of the specific objects
in the diagram are described in
Developing with HSB Emulator.
These objects in the header files in src/hololink/emulation comprise the HSB hardware
abstraction layer (“HAL”) API that each target HSB Emulator environment is minimally
expected to implement.
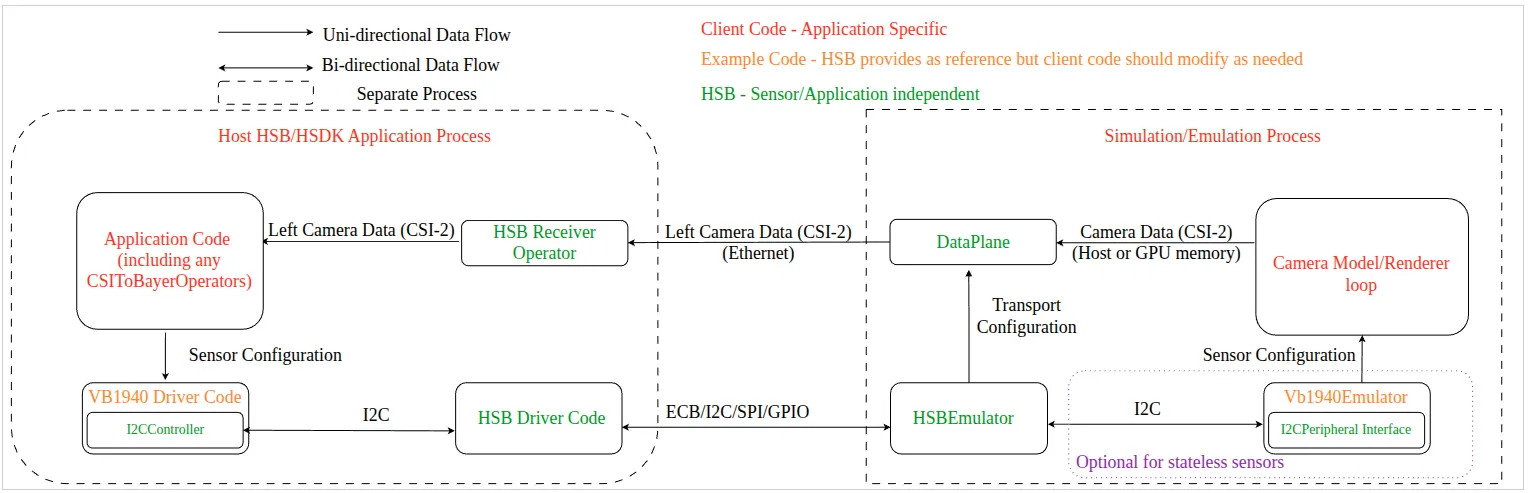
The HSB Emulator as provided is not meant to be a full implementation of the FPGA HSB device nor provide the full performance benefits of those implementations. Many features of the HSB IP are not fully implemented in that the existing emulator will accept and reply to requests, e.g. ptp, but may be “no-ops” internally so that apps that currently depend on that interface being present can proceed but leave the implementation detail to applications or expected behavior. The features that are implemented are only the ones necessary for a host application to configure and accept sensor data through the HSB transport pipelines.
Features
The features that are supported in provided code are
- Sensor agnostic
- HSB Emulator itself has no built-in knowledge of any given sensor.
- Sensors and drivers that do not depend on state change queries, e.g. the HSB example “stateless” imx drivers, are compatible by default
RoCEv2Transmitterfor RoCEv2 UDP-based transport- Name is to be consistent with the rest of HSB where the implementation is via Linux interface access and sockets
COETransmitterfor IEEE 1722B link layer transport (Camera-over-Ethernet, CoE)BaseTransmitterandDataPlaneinterfaces for adding experimental transport protocols- Underlying C++ implementation + Python API
- CUDA buffer support
DLPackarray interface format - compatible with contiguous arrays from any Python package that supportsDLPack- sensor data buffers may be provided on host or CUDA GPU device
- Configuration of “stateful” sensors via an
I2CPeripheralinterface- SPI and GPIO are not fully implemented
- Isolated build from host
- HSB Emulator may be built without linking to either HSB or Holoscan SDK to minimize environmental and package dependencies
- Loopback testing ability
- The HSB Emulator can be used to test both accelerated and unaccelerated transport
on the same device the host is running on though for accelerated transport, e.g.
RoceReceiverOpandSIPLCaptureService / SIPLCameraOutputOp, a physical connection and network isolation would be needed
- The HSB Emulator can be used to test both accelerated and unaccelerated transport
on the same device the host is running on though for accelerated transport, e.g.
Limitations
The HSB Emulator is meant to be as hardware agnostic as possible and may run on the same device as host applications where it cannot change many settings. To that end, it is not fully emulating any particular FPGA or MCU implementation of HSB IP and therefore some features are not or will not be implemented.
- Only one instance of HSBEmulator is likely to work on any single device:
- This is a current limitation in the APIs to be consistent with real HSB IP. While
only one HSBEmulator may run, the number of sensor
DataPlanes that may attach to the instance is limited only by the number of IP addresses that can be assigned and configurable sensor interfaces (SIFs) for the emulated device (<= 32). - Running in isolated network namespaces will free up this restriction for connections other than a SW loopback, but requires application & system maintenance
- This is a current limitation in the APIs to be consistent with real HSB IP. While
only one HSBEmulator may run, the number of sensor
- The HSB Emulator may not be reprogrammed via the host side IP tools like a real HSB:
- set_ip
- p2p
- reset
- any reprogramming
Environment Compatibility
In Linux target environments, Python and C++ APIs are provided. They can be extended to
other operating systems or environments (e.g. 32-bit) by creating a new target in the
src/hololink/emulation/src directory, implementing the HSB “HAL” layer represented by
the headers within the src/hololink/emulation directory, and creating a suitable,
target-specific cmake file in src/hololink/emulation/cmake/targets/ to configure the
build system for that target. Other than OS facilities, requirements have been kept to a
minimum and are described in more detail in the
Building HSB Emulator section. HSB
Emulator has been tested with host applications in the following environments:
- x86 Linux Desktop - Ubuntu 22.04+ - Emulator applications only
- Jetson Orin Nano Developer Kit - Jetpack 6.1+ - Emulator applications only
- AGX Orin Developer Kit - Jetpack 6.1+ - Host or Emulator applications
- IGX Orin Developer Kit - IGX BaseOS 1.0+ - Host or Emulator applications
- AGX Thor Developer Kit - Jetpack 7.1+ - Host or Emulator applications
As an example of extending the environment compatibility, an implementation of the HSB
IP through the HSBEmulator HAL APIs is provided for STM’s STM32f767zi Cortex-M7
processor that is suitable for deployment or development on the
NUCLEO-STM32f767zi
development board. This implementation currently includes only the control plane
communication, but has an extensible callback feature where additional “registers” from
control plane commands can invoke custom callbacks to be defined by the user. To
demonstrate the cross-platform API, a simple example in examples/hsb_control is
provided that may be compiled for both linux and STM32F767ZI targets without any changes
and respond to host control plane commands.
For a Linux target, the Examples provided are
tested mostly with imx274- (where applicable) and the vb1940-based HSB camera
applications. The serve_linux_file and serve_coe_file have been used with the
HSB-provided imx477 and imx715 sensor drivers as well.
Building HSB Emulator
There are 2 ways to build the HSB Emulator
- Full
- This is a normal build of the HSB repository that will build the emulator and include it within the normal hololink Python module
- Emulator-only
- Targets a linux environment or MCU (currently only STM32f767zi Cortex-M7 devices, but extensible)
- Minimal build dependencies. An optional hololink Python module is provided within a virtual environment for the Python API on linux targets
Build instructions
For all build types, make sure the CUDA compiler and libraries are on your PATH
clone and enter the repository
Full
Emulator-only for Linux
Emulator-only for STM32F767ZI
Emulator-only for TEMPLATE
Follow the appropriate HostSetupTarget instructions first.
Configuring the Emulator-only build
Several cmake flags are available to configure the “Emulator-only for Linux” build if
prerequisites are not met or not in expected locations
Note for cmake version < 3.24 (apt default available in Ubuntu 22.04 or earlier),
cmake does not allow setting a native architecture and a default
CMAKE_CUDA_ARCHITECTURES of 80 86 87 compute capability is given to ensure target Orin
platform compatibility. For cmake >= 3.24, native is selected by default.
Examples
To facilitate testing and development of HSB Emulator applications, several examples
applications in both C++ and Python are provided to demonstrate different possible
configurations and implementations. The source code for all the examples are located in
src/hololink/emulation/examples. The C++ applications by default will be built to
<build directory>/examples/.
For all examples, --help will provide invocation and flag details. All current
transport capabilities and therefore the examples will require running as root or
under sudo.
When building as “Emulator-only” with Python bindings, the Python examples should be
invoked with the Python interpreter in the provided virtual environment. For example, to
run the serve_coe_stereo_vb1940_frames example in Python, the full invocation would be
For the *_file examples, it is crucial that image frame sizes are set up
appropriately, especially on Jetson AGX Thor platform. You will need to know the
correct CSI image frame size that needs to be sent. These are based on Host
application driver/operator requirements which are in turn dependent on the camera and
HSB hardware. As examples,
- For imx274 capture in mode 1 (1920X1080 RAW10 - 4 pixels/5 bytes, 175 header bytes, 8
lines of optical black, 8-byte line alignment and 8-byte overall alignment) the CSI
frame size is (175 + (((1920 + 3) / 4 * 5 + 7) / 8 * 8) * (1080 + 8) + 7) / 8 * 8 =
2611376 bytes, so the input file should be at least 2611376 bytes in size and each
slice of that size will be transmitted as one frame from 192.168.0.2 to an
*imx274_playerapplication with the following call:serve_linux_file -s 2611376 192.168.0.2 my_file.dat
- For vb1940 capture in mode 0 (2560X1984 RAW10 - 4 pixels/5 bytes, 1 line of prefix
status, 2 lines of postfix status, 8-byte line alignment and 8-byte overall alignment)
the CSI frame size is ((((2560 + 3) / 4 * 5 + 7) / 8 * 8) * (1984 + 3) + 7) / 8 * 8 =
6458400 bytes, but on Jetson AGX Thor, it additionally goes through a
swizzle/packetizer step to a raw10 format (3 pixels/4 bytes, 64-byte line alignment)
such that the CSI frame size is effectively ((((2560 + 2) / 3 * 4 + 63) / 64 * 64) *
(1984 + 3) + 7) / 8 * 8 = 6867072 bytes. Therefore on Jetson AGX Thor, a similar call
would be:
serve_coe_vb1940_file -s 6867072 192.168.0.2 my_file.dat
For further details on other modes see the provided drivers in
python/hololink/sensors/.
By default the *file examples will assume the whole file is one image frame. To set
the image frame size, the -s flag is available in each of the examples. When the file
size is greater than the value supplied to the -s option, it will assume multiple
frames are in the file and cycle through them, advancing by -s bytes after each image
frame and reset to the start of the file when a full frame can no longer be sent. For
example, if X is provided to the -s option, -s X, and the file size is N * X + Y
bytes where N > 0, and 0 <= Y < X, the examples will send N image frames, reset
to the beginning of the file, and then continue.
Testing
Full-loop testing of the HSB Emulator (on linux platforms) is provided within the pytest framework in the docker container. To run the test, launch the docker container and run:
the same as described in Run tests in the demo container. The default pytest configuration will test vb1940 camera modes with linux sockets in roce and coe packet formats for gpu or cpu inputs as well as linux roce with imx477 camera modes. To run an extended sweep of parameters including also imx715 and imx274 camera mode, run:
to get the more comprehensive testing parameters.
Hardware Loopback
The tests above for vb1940 are all executed by default over software loopback. To run
them over-the-wire using available network interfaces, they may be run in hardware
loopback mode by attaching an Ethernet cable between 2 Ethernet-compatible ports on the
target test device. Note the interfaces IF1 and IF2 (from e.g. ip addr sh) that
correspond to the attached ports. Then run the tests with the following option:
This will run the same tests for the HSB Emulator, but isolate IF1 from IF2 and
launch the relevant the emulator process on IF1 and the test host application process
targeting IF2.
The scripts nsisolate.sh, nsexec.sh, nspid.sh, and nsjoin.sh in the scripts/
directory are provided to facilitate development of additional hardware loopback tests.
The --hw-loopback IF1 IF2 switch in pytest is roughly equivalent to:
The nspid.sh script facilitates finding the relevant pid with which to control a
process within the network namespace created by nsisolate.sh since you cannot simply
control/kill the nsexec.sh command without creating an orphaned process.
Accelerated Networking on Hardware Loopback
On platforms that offer accelerated networking such as Jetson AGX Thor (SIPL CoE over MGBE), IGX Orin (RoCEv2 over CX-7), and DGX Spark (RoCEv2 over CX-7), the network namespace scripts above also provide a simple way to test accelerated networking HSB applications.
Under normal conditions, the Linux operating systems used on those target devices will
route connections between two interfaces through an internal software/loopback
interface. Isolating one of the connected interfaces in a network namespace will prevent
the software loopback rerouting and force use of the accelerating hardware. The HSB
Emulator tests for RoCE will already handle this and on relevant platforms will
automatically configure a network namespace for testing when provided with the
--hw-loopback parameters. On AGX Thor with SIPL, the MGBE interface needs to be
managed independently but the tests will still run over the isolated interface if
provided. As examples:
will run the linux, coe transport examples over standard linux sockets and also run the RoCE examples for vb1940 through the CX-7 ports.
will run the linux, coe transport examples over standard linux sockets and also run the SIPL example for vb1940 through the MGBE port with CoE offloading.
Developing with HSB Emulator
Making your own HSB MCU
The TEMPLATE target is the starting point for porting HSB to a new MCU. It builds, but
every function is a stub — your job is to plug in the platform-specific logic.
-
Source layout — three files under
src/hololink/emulation/src/Template/provide everything you need to extend:HSBTemplate.cpp— control-plane handling, BootP broadcasting, basic networking.HSBTemplate_rocev2.cpp— RoCEv2 transmit path (ConnectX-compatible).HSBTemplate_coe.cpp— IEEE 1722B Camera-over-Ethernet transmit path (SIPL / FuSa on AGX Thor and IGX Thor Mini with mGbE).
-
Find every
TODOin the three files above and fill it in. The functions that actually need platform work are grouped by concern:Networking / control plane
IPAddress_from_string— populate theIPAddressstruct (MAC,if_name, subnet mask, broadcast) from dotted-quad text.control_plane_reply— put a pre-built scatter/gather ECB reply on the wire.HSBEmulator::handle_msgs— receive and dispatch ECB packets tohandle_control_packet; optionally also drive other required networking tasks (ICMP / ARP / BootP) if single-threaded and no networking middleware (see STM32’s implementation).HSBEmulator::add_data_plane— track a DataPlane so it getsstart()/stop()lifecycle calls.HSBEmulator::HSBEmulator— register per-control plane register callbacks withHSBEmulator::register_read_callbackandHSBEmulator::register_write_callback
Transmit paths
send_coe_packet— emit a 1722B frame from a scatter/gather array.send_rocev2_packet— emit a RoCEv2 frame from a scatter/gather array.
DataPlane BootP and task timing
clock_gettime— used to stamp BootPsecsand frame metadata timestamps.DataPlane::broadcast_bootp— put one BootP packet on the wire. Wrap in a thread / RTOS task if your runtime is multi-threaded.DataPlane::DataPlane— register per-DataPlane/Sensor register callbacks withHSBEmulator::register_read_callbackandHSBEmulator::register_write_callback
Main-loop timing helpers (only if you run the bundled
serve_*_msgexamples)msleep(unsigned)— millisecond sleep used byserve_coe_msg/serve_roce_msgto throttle toFRAME_RATE.
-
Functions you can usually leave alone. Anything that exists purely to coordinate concurrency (mutexes, condition variables, atomic flags) can stay as the empty stub when your runtime is single-threaded. Threading hooks are there to accommodate a multi-threaded port, not to require one.
-
Carrying your own state. Each control-plane / data-plane object holds a
*Ctxtstruct (e.g.HSBEmulatorCtxt,DataPlaneCtxt,COECtxt,RoCEv2Ctxt). Extend the appropriate one with whatever per-instance fields your platform needs (DMA descriptors, HAL handles, ring buffers). Lifetime is yours to manage — the framework only holds aCtxt*. -
implement your own target and customize the target build.
- Copy your new implementation files out/rename the folder and the corresponding target
.cmakefile incmake/targets/. - Add the new target name to the
HSB_EMULATOR_EMBEDDED_TARGETSlist in thesrc/hololink/emulation/CMakeLists.txtfile to enable a new target alongsideSTM32F767ZIandTEMPLATE.
- Copy your new implementation files out/rename the folder and the corresponding target
Primary Classes
For all the classes below, the C++ namespace is assumed hololink::emulation and the
Python module is loaded as import hololink.emulation as hemu. Python-equivalent
examples or definitions are given for clarity for non-trivial signatures. For further
details including private and protected members of classes for development purposes, see
the source code in src/hololink/emulation.
For detailed API documentation of the HSB Emulator interface, see the Emulation API reference.
The HSB Emulator class is used for command and control communication between the Emulator device and the Host HSB Application
HSBEmulator <—> Hololink in host HSB application
Callback type used by register_read_callback and register_write_callback:
I2CController is a component in HSBEmulator that is only needed to develop a sensor
emulator/driver bridge for I2C sensors.
DataPlanes are the object with which client applications of the HSB Emulator send data
to the Host application and how receivers identify unique sensor sources
DataPlane —> appropriate subclass of BaseReceiverOp in host HSB Application
The IPAddress and the utility function IPAddress_from_string are provided to
encapsulate and simplify construction of the network interface properties required for
the DataPlane object in the hosted environment
Two implementations of the DataPlane interface provided are RoCEv2DataPlane and
COEDataPlane. The COEDataPlane is currently only available on linux target
platforms.
RoCEv2 UDP-based transport implementation.
Transmitters represent the actual transport implementation that is used by the DataPlane to send the data.
For development of new/modified transport only. HSBEmulator applications currently do not interact directly with these objects
Two implementations of the BaseTransmitter interface provided are RoCEv2Transmitter
and COETransmitter
For development of new sensor bridge drivers (bridge HSBEmulator to a real device) or emulating a sensor. This will only be available on linux target platforms.
The primary example of implementing an I2CPeripheral for an HSB Emulator application is the STM VB1940 sensor for emulating the Leopard Eagle HSB from Leopard Imaging.
Structure of an HSB Emulator application
The Examples in the next section and the main
functions in their source code show typical workflows for starting up an HSBEmulator
instance, but the general outline in C++ and Python is given below for the case of
RoCEv2 transmission over Linux sockets.
C++
Python
For stereo/dual sensor setups, see the *stereo_vb1940_frames examples. The specific
loops used to stream the files or test frames across all the examples can be found in
the emulator_utils files.
Troubleshooting
Clean-up
rm -rf build