Cloud customization
Using TURN server
The cloud infrastructure deploys an optional TURN server to facilitate remote streaming. To enable the TURN server, add the following configuration to the tfvar file:
enable_coturn = true
If TURN server is enabled as part of the deployment, the TURN server endpoint including username and password is printed to the console after a successful deployment.
Using custom IdP
The cloud infrastructure deploys AWS Cognito as the default IdP, but you are able to integrate with your own OpenID connect compliant IdP that implements the Authorization Code Flow. The custom IdP needs to include email in the user profile attributes as a mandatory field.
To configure the cloud backend to use a custom IdP, add the following configuration to the tfvar file:
enable_security = true
cognito = {
    enabled = false
    domain_prefix = ""
    redirect_uris = ""
}
custom_idp = {
    client_id    = "xxxxx"  (IdP client id, e.g., "643u6ieb38me7ic89sa5jqsdvq")
    jwk_endpoint =  "xxxxx" (IdP endpoint for hosting the public key, e.g., "https://cognito-idp.us-east-1.amazonaws.com/us-east-1_YEDgadkoq")
}
When using a custom IdP, the default Cognito user pool will not be created, and hence all sign in/up process needs to go through the custom IdP. Once a id token is created to captures the user profile, the same API calls can be initiated against the cloud gateway endpoint the same way as the default Cogntio use case.
Note that even the cloud backend out-sources user identity authentication to the custom IdP, it still manages the user authorization, which keeps track of device ownership and access permission.
Using custom security
Overview
For power users who wish to leverage their own security measures may choose to opt out of the default security configurations. This setup will only deploy the following components:
Cloud Proxy Server
Device Proxy
TCPMux Server
The cloud infrastructure will provide the following features:
Device connectivity
Secured communication between device and cloud
User authorization
Without the rest of the stack deployed, it is assumed that the user will build alternatives for the following features:
Device provision & certificating
Device enrollment
User identity and permission management
User authentication
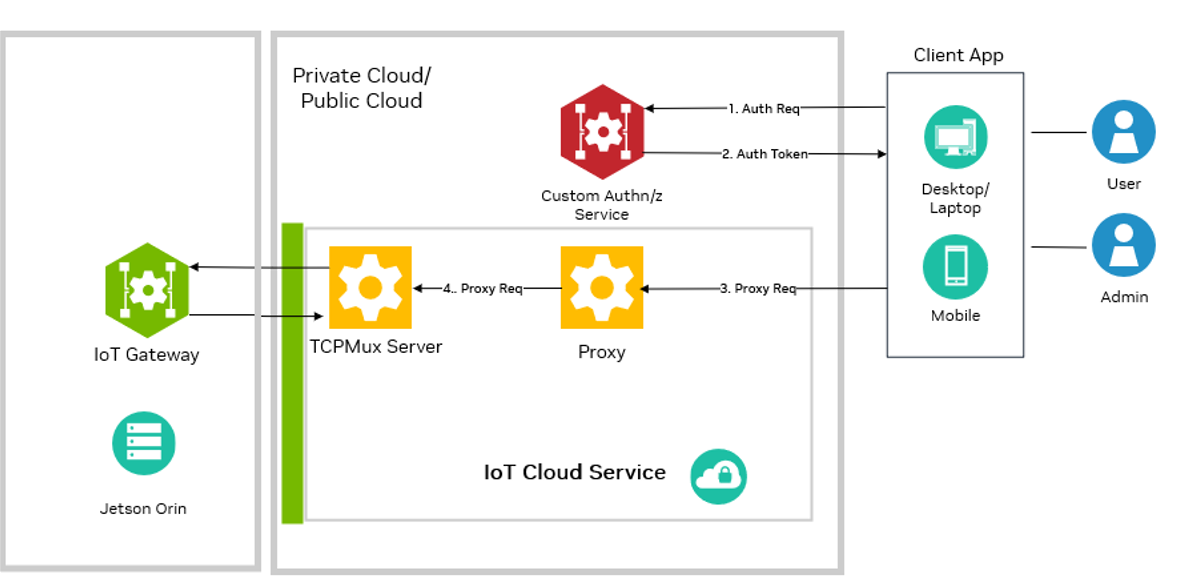
As shown in the diagram below, the custom security module will create the authorization token, of which the cloud proxy validates the authenticity and grant or reject requests based on permission.
Configuration
To configure the cloud backend to disable the default security feature, add the following configuration to the tfvar file:
enable_security = false
cognito = {
    enabled = false
    domain_prefix = ""
    redirect_uris = ""
}
jwk_endpoint =  "xxxxx" (Custom endpoint for hosting the public key, e.g., "https://my-authz-pubkey-endpoint.com")
Specification
The authorization token returned my the custom security module needs to confirm to the following specification for the cloud proxy to properly validate it.
The token must be in the JSON Web Token format, which includes header, payload, and signature fields. The header and the payload field must confirm to the following specification.
##### Header #####
{
   "alg": "RS256",  # signing algorithm
   "kid": "xxxxxxxxx"  # id of signing key
}

##### Payload #####
{
   "iss": "xxxxxxxx",  # e.g.,https://cognito-idp.us-east-2.amazonaws.com
   "user_id": "xxxxxxxx",  # e.g., 90c70288-a6ba-4bc6-a591-389331c9a1cc
   "sub": "xxxxxxxx",  # partner id provided by Nvidia
   "exp": "xxxxxxxx",  # e.g,.1627062893 expiration timestamp
   "iat": "xxxxxxxx",  # e.g,.1627062493 authentication timestamp
   "scope": ["<device_id>:<function_group>:<operation>"], e.g., [“93854716:vst:RW”],  # See section below for details
}
Both the header and the payload are then Base64Url encoded.
To create the signature part, users have to take the encoded header, the encoded payload, a secret, the algorithm specified in the header, and sign that. Take the header and payload above for an example. Users first need to generate a RSA private and public key pair with 2048 bits or higher. Currently, only RS256 is supported as the signing algorithm.
We define the scope of a user on 3 dimensions:
Devices that user has access to
Functionality groups that user has permission to invoke
Operations that user is authorized to perform
The scope of the user will be modeled as a list of scope definitions in the following format:
["<device_id>:<function_group>:<operation>", …]
Device id is the unique identifier a physical edge device possesses, which is pre-assigned to each device during the provisioning process. To find the device id, you may inspect the device file system at:
/var/persist/serial
A function group is a subset of the entire API domain that edge device exposes, which includes the following components: vst, emdx Users can perform either read (R), write (W) or read & write (RW) operations on any of the function group. The requested path will be checked against the user’s scope definition at the cloud proxy before granting access to the requested device. Only when the requested path matches the allowed function groups and operations, the request shall be routed, rejected otherwise.
All scope definitions will be applied in sequence, and if more than one scope definition is found for a specific device id, then all scope definitions are applied collectively. E.g., [“1234567:vst:R”, “1234567:vst:R”] grants read and write access to VST function groups at device 1234567
Public key
For cloud proxy to validate the authenticity of the JWT token, cloud proxy needs to retrieve the public key from a publicly available endpoint exposed by the custom security module. The endpoint should returns a JSON object, that captures the list of public keys generated in the previous section in the following format. You may have more than one public key defined in the case of key rotation while keeping the old key temporarily, but ideally you should keep the list short.
{
    “keys”: [
        {
            "alg": "RS256,
            "kid": "go6QinM/zHihwf/g15jAsUAumNbIuooAJBlKN9gWHM0=",
            "use": "sig",
            "n": “MIGeMA0GCSqGSIb3DQEBAQUAA4GMADCBiAKBgF2lEc1b+u7v5pzPjrTgN4Yl0AegIIkdNtpUX421z
            pG2VKHQ9ydN3TTOk7eiFdk3GTO3LQCi1+ZdNKmX1w+euNED/LCo4PS5tTdfoOWnWZLnuEhJEuS+T7/8Ck+T
            c0tXazWdwVFa0ojTO1ZwRwEQntNaXV725pF1udOd567pUMdBAgMBAAE=”
        }
    ]
}
Security
The public key should be rotated regularly to ensure security. The recommended frequency is once every 90 days. When rotating the public key, the key id exposed at the public key endpoint needs to be updated accordingly because cloud proxy relies on the key id to identify whether a public key has been updated.
Cloud proxy validates the expiration date of the JWT token on top of the signature and rejects all requests with a stale token. This behavior is put in place to ensure the freshness of the user identity and scope. In cases where the user’s profile is updated during the communication between the client and cloud proxy, the old user profile will only be valid for the remaining time of the JWT token. It is up to the application to decide the expiration time on the JWT token. The most important consideration here is that how soon does the client application expect the user’s access to be updated when a change has been made. For example, a malicious attacker has been identified by the system and we want to revoke all access from a specific user. If we set the token expiration to be an hour, it is going to take an hour for that change to be propagated and picked up by the cloud proxy. Therefore, it is recommended to have a short-lived expiry for the JWT token, ideally less than 20 mins.