Quick Start Guide#
The ‘Quick Start’ is meant to provide an introduction to using foundation services and the reference application in a short amount of time with minimal hardware. Refer to AI NVR for a description of extending the ‘Quick Start’ deployment to build a performant, mature AI application in the form of a Network Video Recorder.
Prerequisites#
Before you get started, go through following to acquire the necessary hardware components and get access to the software.
Preparation
Required Hardware
Jetson Orin AGX devkit or
Jetson Orin NX 16GB or 8GB devkit (self built) with 128GB(min) NVMe drive or
Jetson Orin Nano 8GB devkit with 128GB(min) NVMe drive or
Partner (ODM) device with one of above
Ubuntu 20.04 or 22.04 Desktop/Laptop
USB-C flashing cable
Monitor, Keyboard, Mouse
Verifying Signed Container Images
The container images hosted on public NGC catalog are signed by Nvidia and you can choose to verify the signature by using the provided public key. See the steps outlined in the NGC User Guide
Hardware Setup#
Jetson devkits#
Connect monitor, keyboard & mouse to Jetson
Connect the monitor to the DP port, or using a DP-TO-HDMI dongle to connect using HDMI. Attach the keyboard and mouse to any free USB ports on the device.
Connect Jetson to Host
Connect the host (Ubuntu Desktop/Laptop) to the Jetson devkit USB-C flashing port using the USB cable. It is recommended to use a compatible cable with the host port (USB 3.0/2.0)
Partner (ODM) devices#
Follow the instructions provided by the ODM to setup their device
Software Setup#
For the Jetson devkits, the first step is to flash it with BSP (Jetson Linux OS) Release 36.4.3, followed by installation of the Foundation Services. This can be done by downloading the image and flashing the device manually using the flashing scripts, or via the SDK Manager graphical interface. Both options are described below.
Note
If you are using a partner (ODM) device, it should already be pre-flashed with the Jetpack image. Ensure that it is running JP 6.1 GA (BSP R36.4.0) or JP 6.2 (BSP R36.4.3). Check /etc/nv_tegra_release on device for BSP version. If not, you will need to contact the Partner / ODM for their JP 6.1 GA or JP 6.2 image and flashing instructions, if they provide those. Once that is done, continue with “Install Foundation Services” section in the manual setup.
Installation#
SDK Manager
Install and Launch SDKM
Download the latest version from SDK Manager and install on your host (Ubuntu Desktop/Laptop). Then launch it with the command:
sdkmanager
Install BSP and Jetson Platform Services
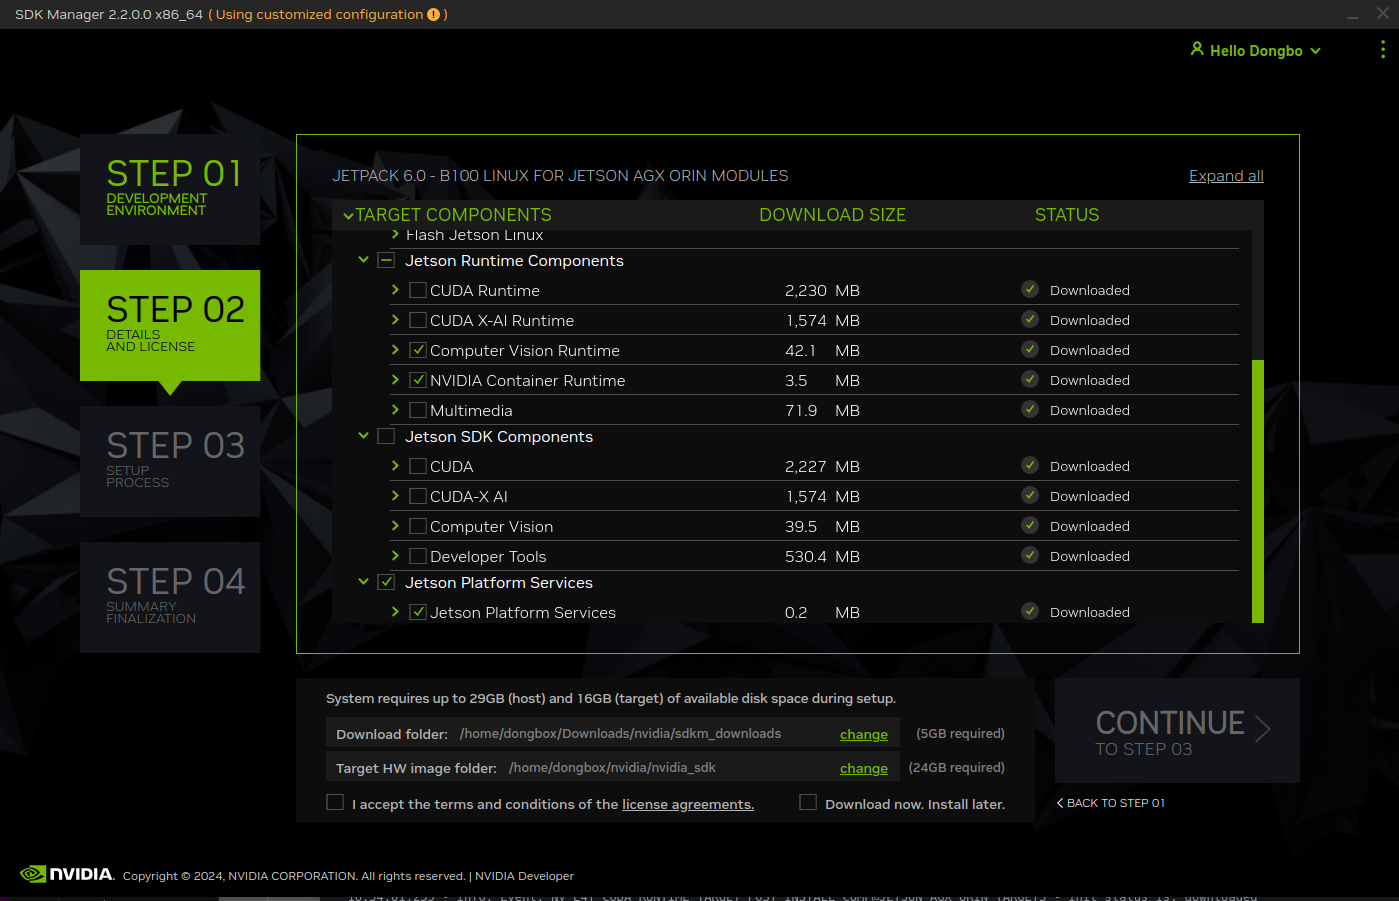
Follow the instructions by selecting “Jetpack 6.2” in Step 01 and “Jetson Linux” (BSP) and “Jetson Platform Services” (which includes Foundation services and Reference workflows) in Step 02. Note that the Jetson Platform Services is unselected by default, so need to check that. This will auto select any other required Jetpack components for installation.
All the Foundation services will be installed in the directory /opt/nvidia/jetson/services. The AI-NVR and other reference workflows will be downloaded to ~/jps directory.
Manual
Install BSP R36.4.3
Detailed flashing instructions are available in the Jetson Linux Developer Guide. The steps are summarized below for quick reference.
1. Download BSP image
Download the following two packages from the Jetson Linux repository:
Jetson_Linux_R36.4.3_aarch64.tbz2.
Tegra_Linux_Sample-Root-Filesystem_R36.4.3_aarch64.tbz2.
2. Extract the Jetson-Linux BSP and root file-system
Note: Based on the download method, the file names may be all lower case, so check before running following commands.
tar xf Jetson_Linux_R36.4.3_aarch64.tbz2
sudo tar xpf Tegra_Linux_Sample-Root-Filesystem_R36.4.3_aarch64.tbz2 -C Linux_for_Tegra/rootfs/
3.Execute the apply_binaries.sh script
cd Linux_for_Tegra
sudo ./apply_binaries.sh
4.Install necessary packages on host
sudo ./tools/l4t_flash_prerequisites.sh
5.Configure username & password for device login
sudo ./tools/l4t_create_default_user.sh -u <username> -p <password> -a
In the popup window accept the license agreement using the tab & enter keys. It will setup the user (per provided values) that you can use to login after flashing and booting up the Jetson device.
6.Put device into recovery mode
Orin AGX: Follow instructions provided on this AGX page.
Orin NX / Orin Nano: Follow instructions provided on this NX/Nano page.
Confirm device is in recovery mode as outlined here.
7.Flash Image
Orin AGX:
sudo ./flash.sh jetson-agx-orin-devkit internal
Orin NX / Orin Nano:
sudo ./tools/kernel_flash/l4t_initrd_flash.sh --external-device nvme0n1p1 -p "-c ./bootloader/generic/cfg/flash_t234_qspi.xml" -c ./tools/kernel_flash/flash_l4t_t234_nvme.xml --showlogs --network usb0 jetson-orin-nano-devkit internal
Orin Nano Super:
sudo ./tools/kernel_flash/l4t_initrd_flash.sh --external-device nvme0n1p1 -p "-c ./bootloader/generic/cfg/flash_t234_qspi.xml" -c ./tools/kernel_flash/flash_l4t_t234_nvme.xml --showlogs --network usb0 jetson-orin-nano-devkit-super internal
Install Jetson Platform Services
Foundation Services package
Apt install the latest foundation services Debian package from the Jetson apt repository. This will install all foundation services including any dependencies.
sudo apt update
sudo apt install nvidia-jetson-services
All the foundation services will be installed in the directory /opt/nvidia/jetson/services. For info about each of these services refer to Overview.
AI_NVR bundle
Download the AI_NVR application bundle from NGC to your Jetson using this NGC link. On the page, use one of the options available in the Download menu (top right).
Extract the files on your Jetson using the following commands:
unzip files.zip [if used direct download option]
tar -xvf ai_nvr-2.0.1.tar.gz
Note the location of the extracted ai_nvr directory.
System Configuration#
Copy config files#
From the directory where ai_nvr reference workflow is downloaded (~/jps via SDKM, or ~/Downloads via manual), run the following command:
sudo cp ai_nvr/config/ai-nvr-nginx.conf /opt/nvidia/jetson/services/ingress/config/
Update settings for performance#
If you would like to get best performance from your device, you can optionally set it for max power and clock speed as follows:
sudo nvpmodel -m 0 (reboot required)
sudo jetson_clocks
If you would like to maximize the number of video streams processed by the system, specially for AI NVR application, run the following commands. This tweaks kernel parameters setting sizes of receive buffers used by network sockets receiving video data over RTSP.
sudo sysctl -w net.core.rmem_default=2129920
sudo sysctl -w net.core.rmem_max=10000000
Set video storage size#
Set the value for parameter “total_video_storage_size_MB” in the file /opt/nvidia/jetson/services/vst/config/vst_storage.json to a suitable size based on available space in your drive (you can use the command df -h to check how much space is available in your root file system). For example, use a value of 10000 to set a 10GB limit. For details about VST configuration, refer to the Storage Config.
Install NVStreamer App#
NVStreamer is an NVIDIA developer software that enables storing and serving of video files that can be streamed using the RTSP protocol. It can serve as an alternative means to cameras for creating video sources as inputs for the Video Storage Toolkit (VST) service. Setup NVStreamer on your Jetson using instructions in NVStreamer on Jetson Orin.
Download a sample video file to be streamed with NVStreamer from NGC resource available at this link. On the page, use one of the options available in the Download menu (top right).
Follow instructions in the Uploading Videos to NVStreamer section to upload the sample video into NVStreamer.
Running Hello World#
Run IVA Application#
To run a sample Intelligent Video Analytics (IVA) application, follow below steps.
Start Services
For this sample, we only need the Redis, Ingress and VST services, which can be started with:
sudo systemctl start jetson-redis
sudo systemctl start jetson-ingress
sudo systemctl start jetson-vst
Note
The first time may take little while to complete since the container images need to be downloaded to the device. You can monitor the messages from a service as it is starting up by running the command journalctl -fe -u <service-name>.service on another terminal.
The services may be stopped using the commands:
sudo systemctl stop jetson-redis
sudo systemctl stop jetson-ingress
sudo systemctl stop jetson-vst
Start Application
Launch the application from within the downloaded bundle (in ~/jps via SDKM, or ~/Downloads via manual). Note that docker compose launch command depends on the device it is running on:
cd ai_nvr
Orin AGX:
sudo docker compose -f compose_agx.yaml up -d --force-recreate
Orin NX16:
sudo docker compose -f compose_nx16.yaml up -d --force-recreate
Orin NX8:
sudo docker compose -f compose_nx8.yaml up -d --force-recreate
Orin Nano:
sudo docker compose -f compose_nano.yaml up -d --force-recreate
Ensure that containers are running as expected by running the sudo docker ps command. Sample output shown below:
CONTAINER ID   IMAGE                                                       COMMAND                  CREATED          STATUS              PORTS     NAMES
6d6a957df18f   nvcr.io/nvidia/jps/sdr:2.2-8-14-v1                          "sh -c '/wdm/dist/sd…"   2 minutes ago    Up 11 seconds                 sdr-emdx
2dc2840ccf67   nvcr.io/nvidia/jps/sdr:2.2-8-14-v1                          "sh -c '/wdm/dist/sd…"   2 minutes ago    Up 47 seconds                 sdr
36dac91b2e5b   nvcr.io/nvidia/jps/deepstream:7.1-public-v1                 "sh -c '/opt/nvidia/…"   2 minutes ago    Up About a minute             deepstream
1f2e8412e073   nvcr.io/nvidia/jps/emdx-analytics:jps_v1.2.9                "python3 gunicorn --…"   2 minutes ago    Up 34 seconds                 emdx-analytics-01
05e915e18a24   nvcr.io/nvidia/jps/emdx-analytics:jps_v1.2.9                "python3 gunicorn --…"   2 minutes ago    Up 34 seconds                 emdx-analytics-02
eb002baae110   nvcr.io/nvidia/jps/sdr-reprovision-controller:2.2-8-14-v1   "/bin/sh -c ./entryp…"   2 minutes ago    Up 2 minutes                  sdr-reprovision-controller
d4ad544c3f30   nvcr.io/nvidia/jps/sdr-alertmanager-controller:2.3.1        "/bin/sh -c ./entryp…"   2 minutes ago    Up 2 minutes                  sdr-alertmanager-controller
c9b0827df768   nvcr.io/nvidia/jps/sdr-proxy-controller:2.2-8-14-v1         "/bin/sh -c ./entryp…"   2 minutes ago    Up 2 minutes                  sdr-proxy-controller
91fe3402c601   nvcr.io/nvidia/jps/emdx-analytics-web-api:jps_v1.2.9        "python3 gunicorn --…"   2 minutes ago    Up 2 minutes                  emdx-webapi
e0d36b930796   redisfab/redistimeseries:master-arm64v8-jammy               "docker-entrypoint.s…"   8 minutes ago    Up 7 minutes                  redis
6d105f6613a8   nvcr.io/nvidia/jps/vst:1.3.0-24.07.1-aarch64                "sh -c '/opt/vst_rel…"   5 minutes ago    Up 3 minutes                  vst
23a2b8b3f92e   nvcr.io/nvidia/jps/vst:1.3.0-24.08.1-aarch64                "sh -c '/opt/vst_rel…"   10 minutes ago   Up 8 minutes                  nvstreamer
4b9b02b5947f   nvcr.io/nvidia/jps/ialpha-ingress-arm64v8:0.12              "sh -c '/nginx.sh 2>…"   7 minutes ago    Up 6 minutes                  ingress
The services pertaining to the application (as listed in its compose file) may be stopped using the command:
cd ai_nvr
Orin AGX:
sudo docker compose -f compose_agx.yaml down --remove-orphans
Orin NX16:
sudo docker compose -f compose_nx16.yaml down --remove-orphans
Orin NX8:
sudo docker compose -f compose_nx8.yaml down --remove-orphans
Orin Nano:
sudo docker compose -f compose_nano.yaml down --remove-orphans
Add NVStreamer RTSP stream to VST#
Follow instructions in the NVStreamer to add the stream to VST. See Adding RTSP Stream to VST section in Overview for the details.
Ensure that the stream can be viewed from the VST Reference Web App through the Live Streams tab.
See Reference Web App for more details.
Also make sure that these streams were correctly added to DeepStream and that they are being processed. To do so, view the DeepStream logs and make sure the streams that were added are visible there with an fps value of greater than 0. Ideally this will be near 30fps, but may be lower depending on the input video fps. See Logs for more details.
View video overlay & analytics#
The VST webUI offers capability to draw, view and delete the Region of Interests (ROI) and Tripwires (TW) on video streams as part of its Analytics feature. These can then be viewed as overlays on the video stream, along with live statistics from Analytics microservice.
See Reference Web App for more information on how to configure and use this feature.