Installation and Setup
Prerequisites
This guide assumes that you have executed the following prerequisite steps and have the required details ready before getting started with the cloud installation.
AWS account and Initial setup
Create AWS access Keys for IAM user
This credential will be used to access your AWS account during deployment
On your AWS account, procure access key ID and secret access key for programmatic access to your AWS resources.
Prefer to obtain a non root IAM user with administrator access.
Refer to the AWS documentation to create access key https://aws.amazon.com/premiumsupport/knowledge-center/create-access-key/.
Register a Domain for your reference cloud and configure Route53 hosted zone to deploy applications under. You may choose to register a new domain within the same AWS account used for the installation, or connect the cloud infrastructure to an externally registered domain.
Option A: Register a new domain
reference-Cloud deployment needs a Domain and Route53 hosted zone to support HTTPS endpoints.
Request domain name through AWS Route53.
Refer to the AWS documentation guide https://docs.aws.amazon.com/Route53/latest/DeveloperGuide/domain-register.html.
Under the deployment variable file, set domain.external to false.
Fill in domain.name with the newly registered domain name. e.g., dev.my-domain.com.
Follow the installation guide to run the script to set up the infrastructure.
Option B: Connect to an existing domain as a subdomain
Under the deployment variable file, set domain.external to true.
Fill in domain.name with a subdomain of a pre-registered domain name . e.g., dev.my-domain.com.
Follow the installation guide to run the script to set up the infrastructure.
The installation should be in pending state while trying to create a certificate with the provided domain as it is unable to verify the ownership of the domain.
While the installation is pending:
In the Route 53 console, get the name servers for your Route 53 hosted zone:
Sign in to the AWS Management Console and open the Route 53 console at https://console.aws.amazon.com/route53/.
In the navigation pane, click Hosted zones.
On the Hosted zones page, choose the radio button (not the name) for the hosted zone, then choose View details.
On the details page for the hosted zone, choose Hosted zone details.
Make note of the four servers listed for Name Servers.
Using the method provided by the DNS service of the parent domain, add NS records for the subdomain to the zone file for the parent domain. In these NS records, specify the four Route 53 name servers that are associated with the hosted zone.
The script times out in a short period of time. If you can’t finish the aforementioned steps within the time limit, simply run the installation script again once the name servers are populated in the parent domain, and the certificate will be able to get verified.
Note:Installation of JPS Cloud includes utilization of various AWS managed services such as AWS Private CA, AWS Secret Manager, AWS ElasticCache, and AWS RDS, among others. Please be advised that this may incur AWS infrastructure costs exceeding $100 USD per day, depending on your usage.
Prepare Installation laptop
Follow through the instructions in this section and install the software and tools in your laptop/Desktop from where you are planning to trigger cloud installations.
Setup the OS
Use any linux based distribution(Ubuntu, Centos… ) with openssl version >= 3.0.0
Install Terraform
Use the following guidance in the following link and install terraform https://developer.hashicorp.com/terraform/tutorials/aws-get-started/install-cli
Always use the latest version. Current version tested on: terraform v1.4.6
Install AWS CLI:
Refer to the official documentation and install AWS cli https://docs.aws.amazon.com/cli/latest/userguide/getting-started-install.html
Always use the latest version. Current version tested on: aws-cli/1.19.38 Python/3.8.2 Darwin/19.6.0 botocore/1.20.38
Update openssl if needed
Openssl is needed to create PKI
Make sure your OS has the latest version of openssl. The minimum versioning required is 3.0.0
Refer to this documentation. As of today the latest version used for setting up pki is OpenSSL 3.1.3 19 Sep 2023 (Library: OpenSSL 3.1.3 19 Sep 2023)
https://webhostinggeeks.com/howto/install-update-openssl-centos/
Download & Extract installation Artifacts
Download the Jetson Platform Services resource file.
Navigate to resources on the left panel. Should see “Jetson Platform Services Reference Workflow & Resources” as one of the listed items.
Then go to tab File Browser -> Version -> select the latest version -> Click on three dots or ellipsis under Actions -> Then Download File.
Download jps-cloud-scripts-1.1.0.tar.gz and jps-cloud-terraform-1.1.0.tar.gz
Untar and extract
Copy the script from the downloaded location to the installation location before proceeding
tar -xvzf jps-cloud-scripts-1.1.0.tar.gz
Untar and extract installation script
Copy the script from the downloaded location to the installation location before proceeding
tar -xvzf jps-cloud-terraform-1.1.0.tar.gz
Pre-Installation steps
Configure AWS CLI
Run the following command to configure your cli. You will be asked to enter the AWS_ACCESS_KEY_ID, AWS_SECRET_ACCESS_KEY and region.
Use the credential you downloaded in previous steps. The credential has both AWS_ACCESS_KEY_ID and AWS_SECRET_ACCESS_KEY.
As for the region, enter the region you want to deploy your reference Cloud at. Leave the default format to None.
Remember the region that you have configured, it will be used throughout this process. For the complete list of available region, check out https://docs.aws.amazon.com/AmazonRDS/latest/UserGuide/Concepts.RegionsAndAvailabilityZones.html.
aws configure
This is how they will respectively look on the screen as you run the above command. Make sure you enter the value for each of them as discussed above:
AWS Access Key ID [****************LG5P]:
AWS Secret Access Key [****************xZVi]:
Default region name [us-east-1]:
Default output format [None]:
This will create a default profile in your AWS home config file at ~/.aws/config.
You can preview as follow
cat ~/.aws/config
The credential is located at ~/.aws/credentials.
You can preview as follow
cat ~/.aws/credentials
Configure pki assets
Running the cloud script will create a general-purpose private CA in your AWS account. Be aware of the pricing for AWS private CA before running the script. https://aws.amazon.com/private-ca/pricing/
You should use the CLOUD SCRIPTS you just untar-ed in the previous section
Change directory to the installation folder from whereyou untar-ed the script
$ cd jps-cloud-scripts
Update config files if needed:
configuration/openssl.cnf: This file contains config value for a Private CA to be created. You should not update this file
configuration/tcpmux-subordinate-ca.json: This file contains configuration value that will be used to create a subordinate CA in AWS. Update the Subject section with your organization information.
configuration/openssl_v3_tcpmux_server.cfg: This file contains configuration value for iotgateway server certificate. Update the req_distinguished_name with your organization information. Very important is the commonName_default. It has to match your domain name you will be using. You should set commonName_default to your-domain-name.com. Make sure you start with a star sign as shown in in *.your-domain-name.com. That will help support subdomains that will be crated. This is critical otherwise your device will fail the verification process during the provisioning stage. Here is the list of attributes to update
- countryName_default
- stateOrProvinceName_default
- localityName_default
- organizationName_default
- organizationalUnitName_default
- commonName_default
- emailAddress_default

For more information about this, visit https://www.ibm.com/docs/en/i/7.1?topic=concepts-distinguished-name
Its purpose is simply to identify your organization.
Execution steps:
At the beginning of the script execution, you will be given the option to create AWS private CA. Type YES and confirm. This will create the pki assets. You will have another chance to update the subject names for the tcpmux-server-cert. If you already configured configuration/openssl_v3_tcpmux_server.cfg as shown in the previous steps, you can simply confirm the value that will be used and hit Enter. But if you wish to update the value, type in the value and confirm. In the sample below, only the email address is updated while others are left unchanged
You are about to be asked to enter information that will be incorporated
into your certificate request.
What you are about to enter is what is called a Distinguished Name or a DN.
There are quite a few fields but you can leave some blank
For some fields there will be a default value,
If you enter ., the field will be left blank.
-----
State or Province Name (full name) [CA]:
Locality Name (eg, city) [SANTA CLARA]:
Organization Name (eg, company) [NVIDIA INC]:
Organizational Unit Name (eg, section) [Engineering]:
Domain Name [*.your-domain.com]:
Email Address [it@nvidia.com]:test@nvidia.com
If you chose NO when asking to create an AWS private CA, the assumtion is that you will use a preexisting pki assets you own locatated at assets/jps/. If nothing is there it will create empty files and you will be left to manually fill them out before deploying your stack.
The script can take up to a minute to execute. Remember to respond to prompt when question is asked or confirmation is needed as we describe above. Run the following command to create the pki assets.
$ chmod u+x ./ca-manager.sh
$ ./ca-manager.sh
Make sure the script complete the creation successfully.
PKI assets used by JPS cloud are the following files:
assets/jps/tcpmux-server-cert.pem: used for iotgateway mutual auth
assets/jps/tcpmux-server-key.pem: used for iotgateway mutual auth
assets/jps/tcpmux-subordinate-ca.pem: intermediate certificate
assets/jps/tcpmux-root-ca.pem: root certificate
assets/jps/authorizer-pri-key.pem: authorizer private key used to sign JWT token
assets/jps/authorizer-pub-key.pem: authorizer public key used to sign JWT token
assets/jps/tcpmux_subordinate_arn.txt: tcpmux subordinate arn value. Will be used by the provisioning server to issue certificate
Copy the pki folder from its source jps-cloud-scripts/pki to the jps-cloud-terraform script at location jps-cloud-terraform/. Assuming you are in the jps-cloud-scripts/ folder from where you ran the script, run this copy command:
$ cp -r pki FULLPATH-OF-jps-cloud-terraform/
Other files of interest: These should be kept in a safe place and not be shared. Will need it when creating a new subordinate CA assets/private/root_ca_password.txt this is the password for your root CA. assets/private/root_rosie_ca_private_key.pem this is your root private key assets/private/tcpmux-root-ca.pem this does not have to be kept secret but you will need it every time to use the the root ca
You should also securely save a copy of pki.tar.gz somewhere for future use. This will prevent you from re-running the pki cloud script.
NB: The script creates a general-purpose private CA in the region configured in STEP 1.
Configure reference-cloud infrastructure
Following changes are specific to your setup. You are free to configure them however you want. See the list of variable definitions and sample values from the file below:
$ cd jps-cloud-terraform
$ cat variables.tf
Some default value are set to simplify your deployment, but there are mandatory field that will need to be filled out depending on your deployment environment. Create an override file my-env.tfvars to override default variables and provide values for mandatory variables. For example,
region = "us-east-1"
vpc_cidr_block = "10.0.0.0/16"
public_subnets_cidr = ["10.0.1.0/24", "10.0.2.0/24"]
private_subnets_cidr = ["10.0.3.0/24", "10.0.4.0/24"]
...
tfvars files are terrafrom variable definition files that are used to manage variable assignments systematically. It is the recommended way to set variables in terraform. Do update any field to your convenience and use it during the deployment.
Configure Terraform to use your AWS Account
There are few options to configure Terraform to access your AWS account where reference-cloud needs to be set up. Below is one of the simpler options. Export your_aws_access_key_id and your_aws_secret_access_key as an environment variable.
export AWS_ACCESS_KEY_ID=your_aws_access_key
export AWS_SECRET_ACCESS_KEY=your_aws_secret_access_key
Setup for Terraform Deployment State
The terraform deployment state and lock keep track of the infrastructure, and are used as a reference for update and deprovision in the future. Use the same deployment state and lock for the lifetime of your infrastructure and avoid deleting the resources from AWS.
Step 1: Update the state s3 bucket name. S3 bucket name must be unique across AWS Regions. It is possible that the default Bucket name(jetson-platform-services-terraform-state) is already taken. Update the bucket name in jps-cloud-terraform/state/s3.tf from jetson-platform-services-terraform-state to a new name. Here is a snippet script section
resource "aws_s3_bucket" "jps-terraform-state" {
    bucket = "jetson-platform-services-terraform-state"
}
Step 2: Create the state with your new s3 bucket name
$ cd state
$ terraform init
$ terraform plan
$ terraform apply
terraform init is for creating the state of your current infrastructure to be deployed.
terraform plan is a testing process to see if your configuration is correct. You may be asked to provide the region. If so, do enter the same region as in previous steps and hit Enter
terraform apply is for actually deploying the infrastructure. You will be asked to confirm the deployment. Do confirm the deployment with a yes then hit Enter or Return depending on your keyboard.
If you Encounter any error saying the bucket already exists, update the bucket name and rerun the previous command until it is successful. Sample error:
operation error S3 creating S3 Bucket (jetson-platform-services-terraform-state) operation error S3 CreateBucket, https response error StatusCode 409, RequestID REDACTED, HostID: REDACTED, BucketAlreadyExists`
Step 3: update the main.tf with the s3 bucket: Open the file jps-cloud-terraform/main.tf, and update the s3 bucket section from jetson-platform-services-terraform-state to the new bucket name. Here is a snippet script section
backend "s3" {
    region         = "us-west-1"
    bucket         = "jetson-platform-services-terraform-state"
    key            = "stg/s3/terraform.tfstate"
    dynamodb_table = "jps-terraform-locks"
    encrypt        = true
}
The previous steps created the infrastructure resources states. At the end of this process, you will have an S3 bucket and a dynamodb table for saving you deployment state.
IDP region configuration
You can update the region where your cognito-idp will be created in jps-cloud-terraform/main.tf if you wish to. In this snippet code, the value is set to us-east-1. We recommend to use the same region that you have been using so far.
provider "aws" {
    alias  = "us-east-1"
    region = "us-east-1"
}

module "idp" {
    dns_root_record = module.dns.dns_root_record
    dns_zone        = module.dns.zone
    domain_name     = var.domain.name
    domain_prefix   = var.cognito.enabled && var.enable_security ? var.cognito.domain_prefix : ""
    enable_cognito  = var.cognito.enabled
    enable_security = var.enable_security
    env             = var.env
providers = {
    aws.us-east-1 = aws.us-east-1
}
    redirect_uris   = var.cognito.enabled && var.enable_security ? var.cognito.redirect_uris : []
    source          = "./module/idp"
}
Enabling Remote Push Notifications
If you want to enable and use remote push notifications for sending Jetson device events/alerts to the mobile clients, follow these steps:
Select a Push Notification Platform: - Choose a push notification platform that suits your needs. Ensure you have the necessary service account credentials required to post notifications. - For a list of supported push notification platforms, refer to Supported Push Notifications Platforms.
Create an AWS SNS Platform Application: - Follow the steps documented here to create an AWS SNS platform application. This step will facilitate the delivery of messages and alerts to your chosen push notification platform. - Remember to create it in the same region as discussed before
Record the AWS ARN: - After creating your AWS SNS platform application, make a note of the AWS ARN for the platform application. You will need this information during reference cloud deployment.
Ensure you complete these steps before proceeding with the integration and configuration of push notifications for Jetson devices.
Cloud Installation
Configure the ARN: If you have opted to use push notification support and have completed the prerequisites outlined in the previous section, retrieve the AWS ARN for the platform application you noted earlier and populate the
aws_sns_platform_application_arnfield in your configuration file(jps-cloud-terraform/my-env.tfvars) with this ARN value.Final Review: Do review your my-env.tfvars file to make sure all variables are set correctly. Your final root project structur should have the following files and folders.
$ LICENCE, LICENCE_3RD_PARTY, main.tf, module, pki, state, variables.tf, my-env.tfvars
From the state folder, go back to the root project directory and deploy the infrastructure as following
$ cd ..
$ terraform init
$ terraform plan --var-file my-env.tfvars
$ terraform apply --var-file my-env.tfvars
It will take a while for the above step to complete. Ensure above steps are executed to its completeness. You will again be asked to confirm the deployment, do enter yes then hit Enter or Return. During deployment, the script might error out due to failure during certificate provision. This is caused by delay in DNS propagation in AWS infrastructure, simply re-run the terraform apply –var-file my-env.tfvars step which should solve the issue.
operation error Elastic Load Balancing v2: CreateListener, https response error StatusCode: 400,
RequestID: xxxxxxx, api error UnsupportedCertificate: The certificate xxxxxxxx must have a fully-qualified domain name, a supported signature, and a supported key size.
Post Installation validation
Once the deployment is finished, you can view all the service status under ECS in AWS console.
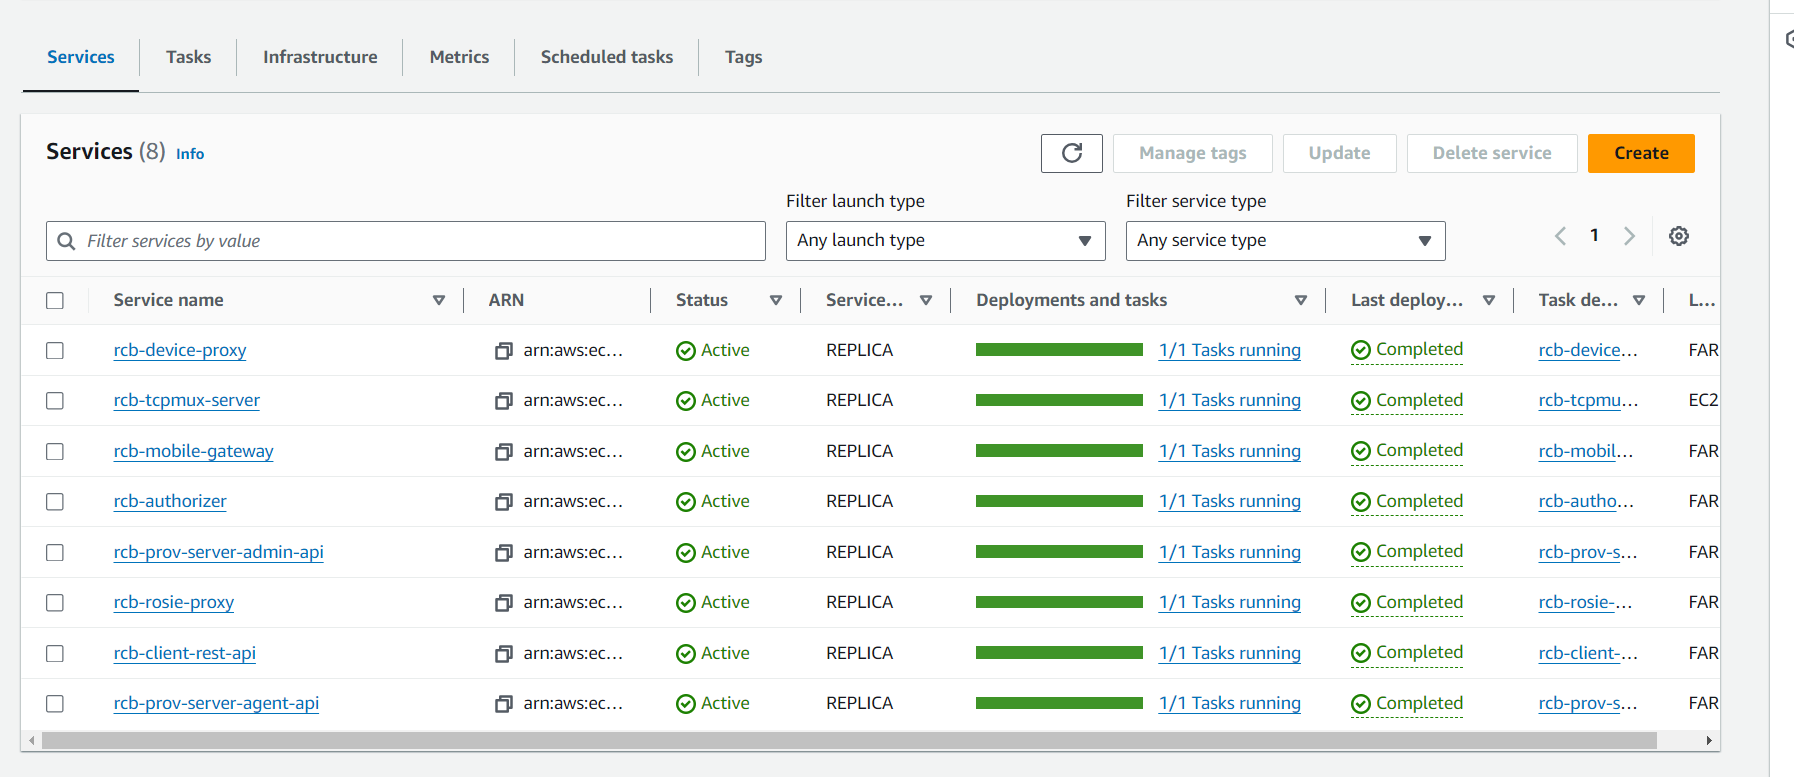
As shown in the above sample, status of all the JPS cloud microservices should be Active and healthy.
If everything looks healthy, you can access your endpoints. All endpoints URL are printed to the console once your installation finishes.
https://cloud-gateway.<domain-name>
https://cloud-proxy.<domain-name>
cloud_gateway_endpoint = "https://cloud-gateway.<domain-name>"
cloud_proxy_endpoint = "https://cloud-proxy.<domain-name>"
cognito_jwk_endpoint = "https://cognito-idp.us-east-1.amazonaws.com/<region>_<user-pool-id>/.well-known/jwks.json"
cognito_login_endpoint = "https://cognito.<domain-name>/login?redirect_uri=<redirect uri>&client_id=<client id>&response_type=code"
cognito_token_endpoint = "https://cognito.<domain-name>/oauth2/token?redirect_uri=<redirect uri>&client_id=<client id>&grant_type=authorization_code&code=xxxxxxxxxx"
Check to see if all the DNS records are resolvable before moving onto the device onboarding.
nslookup cloud-gateway.<domain-name>
nslookup cloud-proxy.<domain-name>
nslookup cognito.<domain-name>
Please be noted that the DNS record can take up to 48 hours (usually happen within a couple hours) to get propagate globally after a successful deployment, this is because DNS resolvers across the internet typically request the name servers only once every two days and cache the answer. You might need to wait for the propagation to finish if the endpoints above do not resolve.
With cloud installation successful above a continue with device onboarding, claim ownership of the device in cloud and connect to the device via REST APIs after successful authentication and authorization. You may re-run terraform apply after a successful installation, all the endpoints will be printed again.
Uninstallation
To destroy the infrastructure. run the following command
$ cd jps-cloud-terraform
$ terraform destroy --var-file my-env.tfvars
Remove the private CA from your account
Deleting resources in your infrastructure will not remove the AWS Private CA. You will need to manually delete it to prevent incurring cost for the following month. To delete it using aws cli run the following command. You will need to copy the content of assets/jps/tcpmux_subordinate_arn.txt and replace in XXX-CERT-ARN.
$ aws acm-pca delete-certificate-authority --certificate-authority-arn XXX-CERT-ARN --permanent-deletion-time-in-days 7
for more information about the deletion process, follow the official documentation at https://docs.aws.amazon.com/privateca/latest/userguide/PCADeleteCA.html