Designer #1
As a landscape designer, you will use Omniverse Create to place trees and plants in designated foliage areas. You will also adjust surface materials throughout the park. While you are creating these items, Designer #2 will add furniture around the fountain area and Designer #3 park will add additional furniture, planters.
The following skills with be used during your lab: Layers, Asset Browser, Paint Tool, Prop Placement, Materials, Dynamic Sky
If you are familiar with 3D CAD or digital content creation applications, you should quickly get the hang of it!
We have provided a quick navigation video in the appendix but here are the shortcuts:
Remember that you can pick an object in the Stage (next to layer manager) and press F to center your view on it. This makes orbiting and resetting your view much simpler.
Zoom (scroll) and Pan (click + drag) |
Orbit |
|---|---|

|
|
Look Around |
Walk (While looking around) |
|---|---|
|

|
If necessary, launch Omniverse Create and then Connect to Nucleus Server.
Load the file setup above:
your-nucleus-server/Projects/Outdoor_Scene/Outdoor_Collab.usd.NoteThe collaborative power of Omniverse fully shines when you enable real-time Live Editing via Live Sync. This can be done on a per-layer basis, or for an entire project file. For this lab, multiple Designers will open the same project file concurrently, therefore you should toggle on Live Sync for the entire project. This will allow you to see changes that were made on different VM by the other Designer in real-time! Toggling on Live Sync is as easy as changing the Live Sync.
If you will be collaborating with others during this lab you’ll need to join a Live session for each layer. Follow the steps below to join collaborative Live sessions!
NoteWorking with Layers
The order of the layers determines precedence, if you have a white object in the bottom layer and you make it green in the plants layer, then you make it blue in the Props layer and finally red in the Materials layer, it will be red due to the stack order.
Also keep in mind that changes in the upper layers block changes to that parameter in the lower layers. If you change an object color in the Props layer it will be locked from changes in the Plants layer but not in the Materials layer.
Knowing this, if you try to make changes and seem to be blocked, look in layers above to see if changes were made there that locked it. If those changes are wrong, delete the deltas to free it up and or change the order of the layers to put your preferred design option on top.
You can also move deltas from one layer to another, if someone forgot to change layers and made a plant placement on the material layer, you can simply drag that delta from one layer to another.
Prior to placing trees and plants in designated foliage areas, you will first add a sky to the scene.
AttentionMake sure the Root layer is active (Double click on it, it turns green and says Authoring Layer).

- Turn off the grid if you don’t need it by pressing “G” key.
Next you will paint the serviceberry trees in the seating area by trying to place trees in the grass circles (Plant Layer)
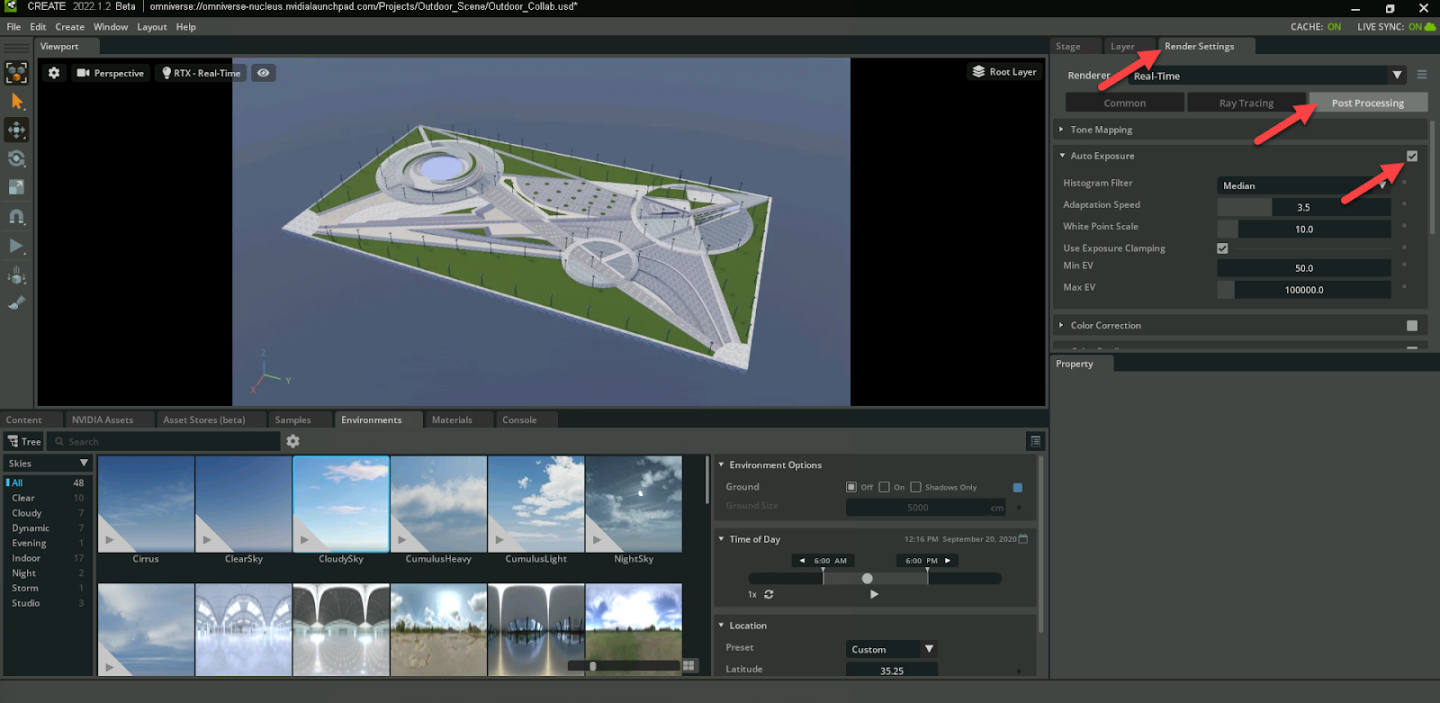
We can adjust the exposure in the viewport by turning on “Auto Exposure” in the Post Processing section of the Render Settings Tabs.
Next you will add trees in the seating area by placing trees in the grass circles (Plant Layer).
NoteYou can watch the Prop Placement skill videos in the appendix for help with this task.
AttentionMake sure the AEC_Plants_Options01 layer is active (double click on it, it turns green and says Authoring Layer).
Navigate to the area marked in red in the image below.

Locate the Service_Berry tree (or choose a substitute) in the Nvidia Assets Browser and simply drag it into the scene onto a grass circle.
NoteYou can type Service_Berry to search within All Assets.

Place additional trees, one in each grass circle to fill out the area. Feel free to alter the type of trees.
 Note
NoteYou can watch the Prop Placement and Paint Tool skill videos in the appendix for help with this task.
AttentionMake sure the AEC_Plants_Options01 layer is active (Double click on it, it turns green and says Authoring Layer).
Navigate to an area marked in red in the image below.

Use the paint tool to add trees to the larger areas around the perimeter (Plant Layer). Click on the paint tool in the left-hand toolbar, then add assets into the paint tool by dragging them from the Asset Browser as shown below.

Paint vegetation in the grassy area by clicking and dragging across a grassy portion of the scene.

You can use CTRL+Z on your keyboard to undo, adjust your paint settings and try again until you get the desired results.

Next you will add grass to some areas.
NoteYou will need to switch selection mode from Model to Prim (Refer to the Model vs Prim (Selection Modes) video in the Appendix for more information).
While in Prim Mode, select a grass patch.

Use the Paint Tool to add grass to the selected mesh. This is a great time to try the Flood paint mode (to the right of the brush and eraser icons).
Again, don’t hesitate to use CTRL+Z to undo, adjust paint parameters and try again until you get the right effect.


Now that you have placed grass, you will Apply materials (Material Layer).
NoteWatch the Changing Materials skill videos in the appendix for help with this task
AttentionMake sure the AEC_Materials_Options01 layer is active (Double click on it, it turns green and says Authoring Layer).
Use Prim Selection Mode to select a grass area around the trees.

Drag the Mulch-Wet onto the selected Prim and adjust the shader SubIdentifier to change the look
 Note
NoteIDENTIFYING AN APPLIED MATERIAL
To trace down which material is applied to a surface, select the surface in Prim mode, scroll to the “Materials on selected model” section of the properties tab and click on the sphere thumbnail or the “open” icon on the end of the material file path.
REPLACING A MATERIAL
To replace a material in the scene by selecting the look in the stage or layer tabs, right click on it and choose “select bound objects”, this will select all the prims in the scene with that material applied. To replace this materials simply find a new material, right click on it and choose “Apply to Selected”.
Experiment with materials from the Base and vMaterials libraries.

Feel free to continue experimenting with assets and materials as you improve the design of your park scene!