Indoor Scene
In this scenario we start with a model from Autodesk Revit that was imported using the Omniverse Connector. This scene will allow you to experiment with lighting, materials, and object placement.
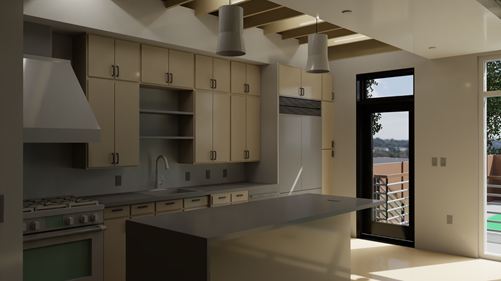
Fig 1. Before |
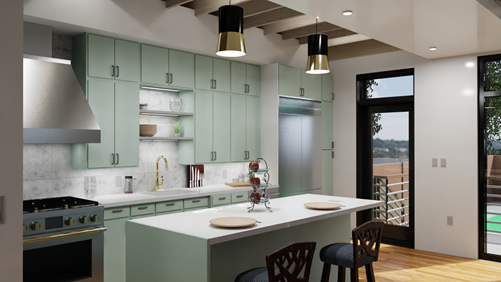
Fig 2. After |
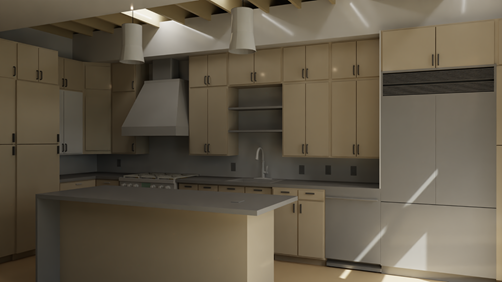
Fig 3. Before |
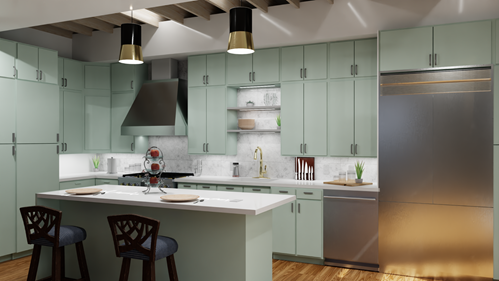
Fig 4. After |
The video below is a recorded example of this Launchpad lab with three designers collaborating on the kitchen scene. In this recording you can see them progressing through the lab as they apply materials, add lights and position props on the counters and shelves. Apply what you have learned in the outdoor scenario and expand your knowledge with the addition of lights and prop placement tricks like using snap and zero gravity placement.
Full resolution file downloads: Accelerated (14 min) and Real-Time (50min)
Apply what you learned in Scenario 1 to an interior scene and expand on your skill set by experimenting with lights and render settings.
To set up the project for collaboration, designate one person to act as the project manager. This person will set up a shared project on the Nucleus server which will be used in this lab for collaboration. The project manager will execute the steps below.
Open Omniverse Create
Within the content tab, browse to
/Projectsfolder within your Nucleus server.Right click in the Browser pane, select New Folder and name it Indoor_Scene.

Double click on the new folder to open it.
Now let’s create a new project file, just to make sure we have a new blank file.
From the file pulldown, click on File > New.
Let’s get rid of the default scene light since we will be creating new lighting on a different layer in this project.
Click on the + next to the World (defaultPrim) then select defaultLight and press the Delete key on your keyboard.

Now let’s set up this project to be Z-up as our incoming file is from Rhino which defaults to Z-up. In general CAD applications use XY for the plan and Z for elevation (or Z-up) and content creation applications use XY for the screen and Z for depth (or Y-up).
Click the Layer tab and select the Root Layer.
Within the Property tab, change the World Axis to Z.

Click on File pulldown and select Save, then navigate to
/Projectsfolder within your Nucleus server. Double click the Indoor_Scene folder and save your scene as Indoor_Scene.usd.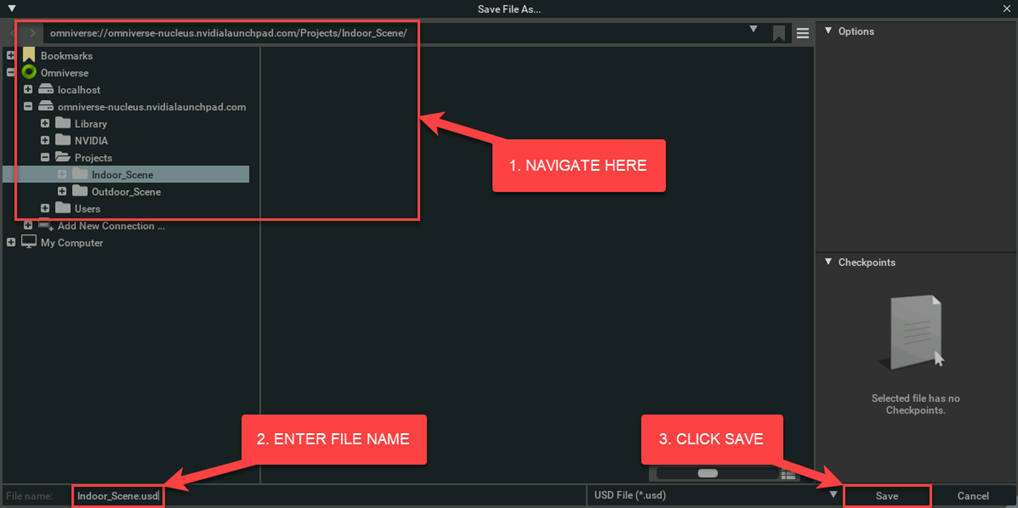
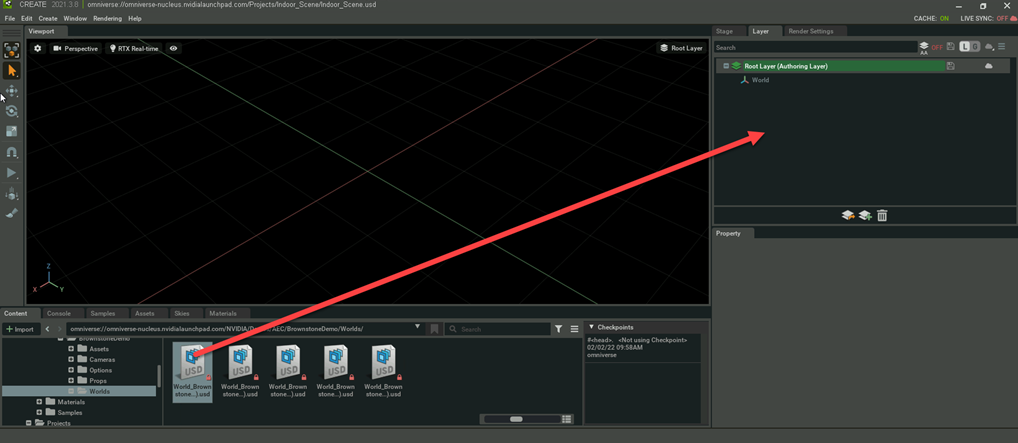
Now that we have a project file set up with the right World Axis, we will bring in a previously exported scene as a reference.
Make sure the Layer Tab is active in the upper right of Create.
NoteThe Root Layer will be marked as Authoring Layer.
In the content browser (bottom left) navigate to the folder located at
/NVIDIA/Demos/AEC/BrownstoneDemo/Worlds/in your Nucleus server.Click the file named World_BrownstoneDemopack_Brownstone(8Gb).usd and drag it into the Layers tab of your USD.
NoteThe import may take several minutes during which Create may appear unresponsive. A blue progress bar will eventually appear in the bottom right corner of the Create window display to track loading progress.
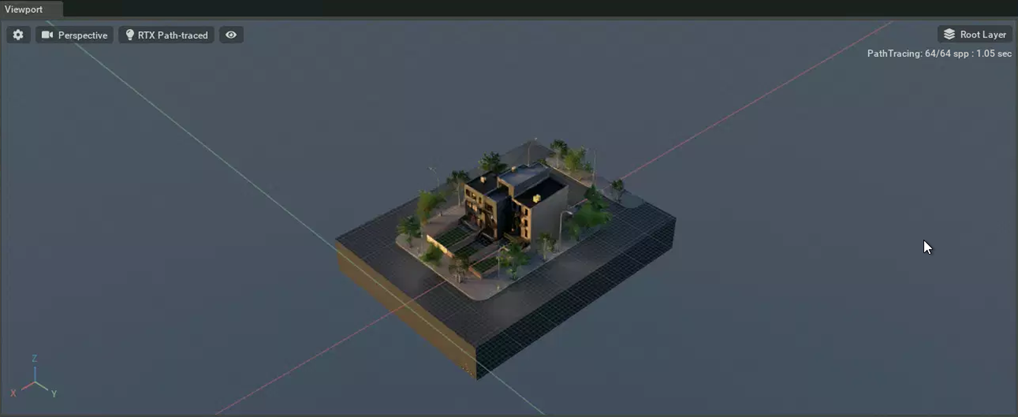
Press F to frame the scene.
Press Shift+C and Shift+L to toggle camera and light objects off.
Now we will set the project up for better collaboration.
In the layer manager, right-click and choose Create Sublayer or click Add Sublayer Button.

Navigate back to your project folder
/Projects/Indoor_Sceneand enter the new Layer/USD File name in the bottom left, let’s go with AEC_Lighting_Option01.usd for this one, then click Save.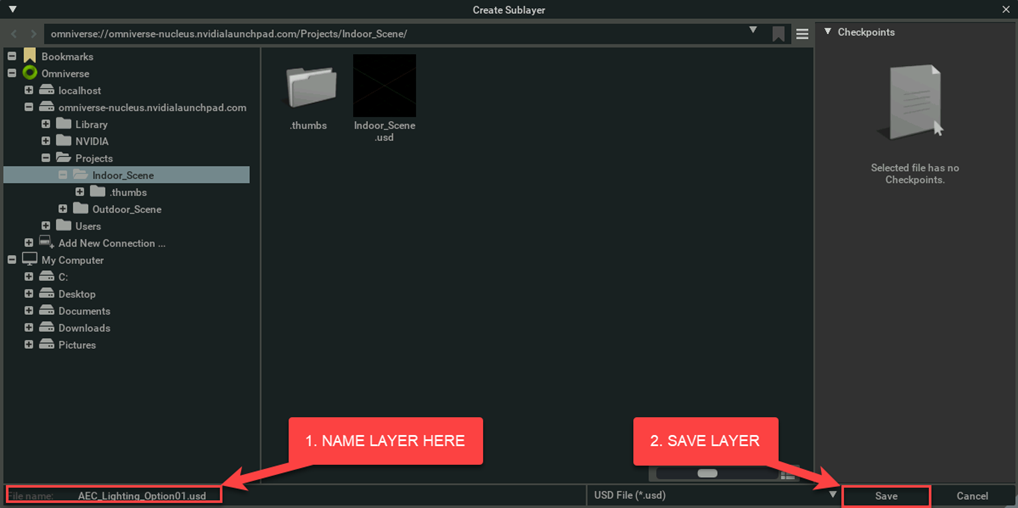
Create a few more layers using the same process.
AEC_Props_Option01.usd
AEC_Materials_Option01.usd

From the File pulldown select Save to save your Indoor_Collab.usd with these new work layers, these will make collaboration easier by keeping your edits to the design option layers organized.
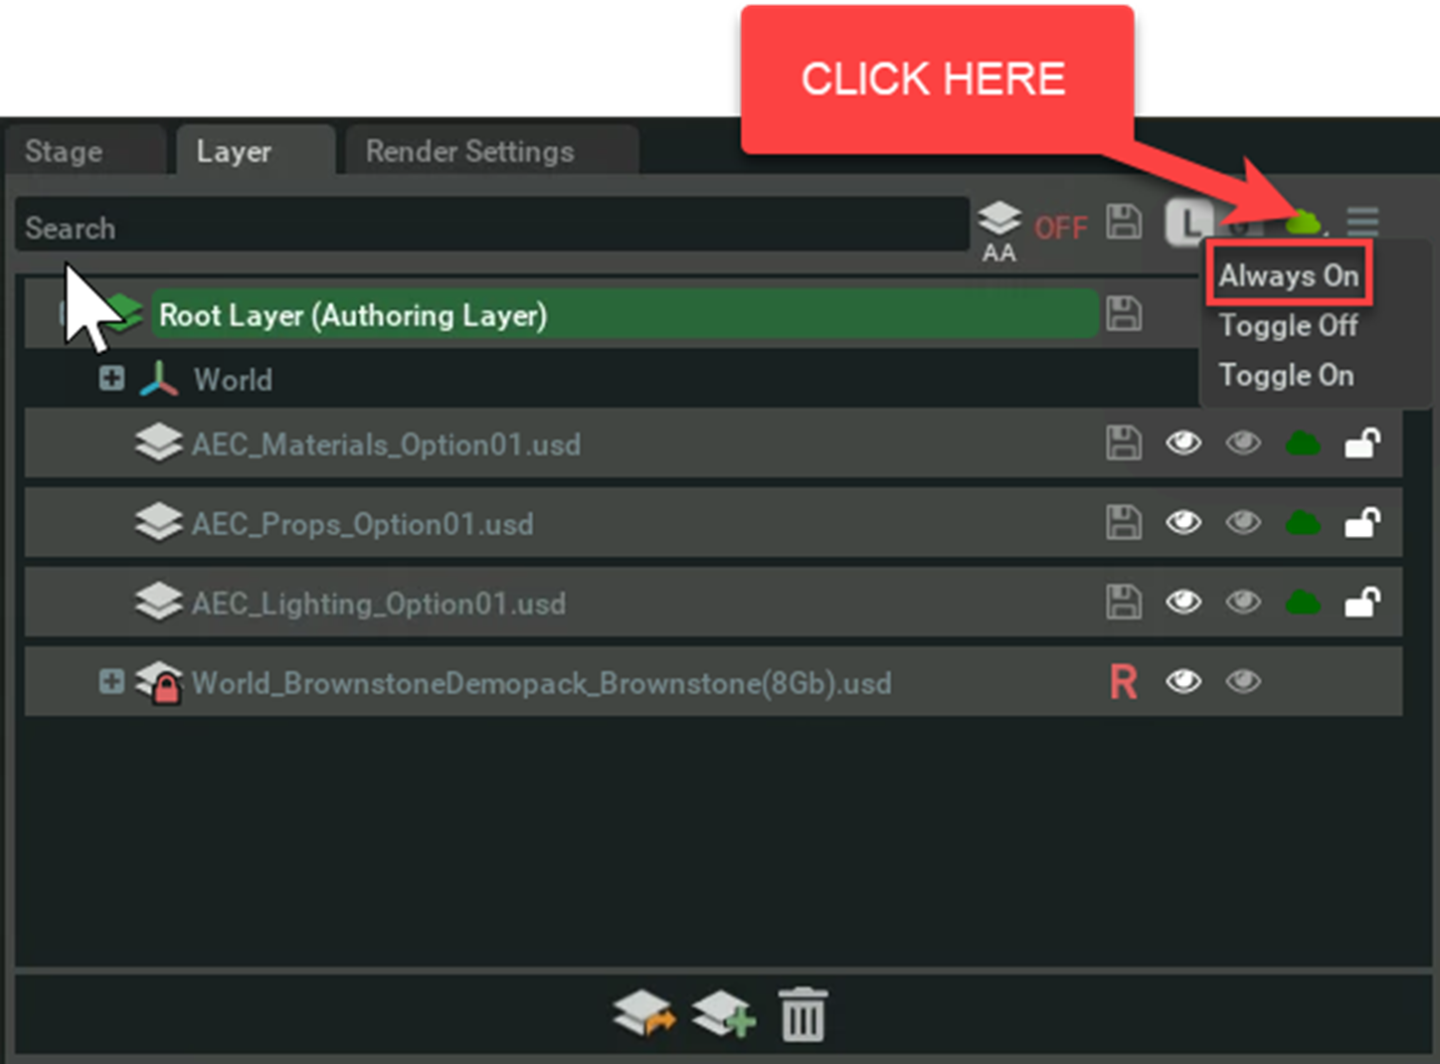
The collaborative power of Omniverse fully shines when you enable Real Time Live Editing via Live Sync. This can be done on a per-layer basis, or for an entire project file. For this lab, when multiple collaborators open a project file at the same time, you should toggle on Live Sync for the entire project. This will allow you to see changes made on different VMs by your fellow collaborators in real time! Toggling on Live Sync is as easy as changing the Live Sync.
Within the layers tab, click on the live sync button.
Select Always On.
Congratulations, as a Project Manager you have successfully set up your second project for collaboration with Designers and Reviewers.
Designer 1
Objective: Use Omniverse Create to add main downlights, add props to the kitchen, and replace scene materials.
Skills: Layers, Asset Browser, Prop Placement, Materials, Zero-g Placement, Snapping
Steps:
Launch Omniverse Create
Load the file created during project setup at
/Projects/Indoor_Scene/Indoor_Scene.usdon your Nucleus server.Add material to the cabinets (Materials Layer)
Add spatula bowl and Zero-G Placement spatchulas (Props Layer)
Add props to right counter area (Props Layer)
Add props to area above the stove (Props Layer)
Designer 2
Objective: Use Omniverse Create to add under cabinet lights, adjust appliance materials, cabinet handles and props.
Skills: Layers, Asset Browser, Prop Placement, Materials, Lights, Snapping
Steps:
Launch Omniverse Create
Load the file created during project setup at
/Projects/Indoor_Scene/Indoor_Scene.usdon your Nucleus server.Add rect lighting under the cabinets (Lighting Layer)
Add materials to the appliances and adjust scale (Materials Layer)
Add materials to all cabinet handles (Materials Layer)
Add bowls and props to left counter (Props Layer)
Add cameras for reviewer (Main Layer)
Designer 3
Objective: Set up the environment sky and adjust windows. The reviewer will do the major finish decisions like the flooring, couch and faucet materials and finally, create cameras and set up renders.
Skills: Layers, Dynamic Sky, Render Settings, Asset Browser, Prop Placement, Movie Maker, Sun Study
Steps:
Launch Omniverse Create
Load the file created during project setup at
/Projects/Indoor_Scene/Indoor_Scene.usdon your Nucleus server.Add glass to the exterior windows
Add materials to the pendent lighting
Add flooring material
Add sofa
Add stool to island seating
Add materials to faucet
Add dynamic Sky
Set the location of the site
Use the sun study and render sun study