NVIDIA Mission Control Upgrade From 1.2 to 2.0 for GB200 NVL72 Systems#
Overview#
NVIDIA Mission Control (NMC) 2.0 has a new Control-Plane architecture, which requires a destructive upgrade.
On NMC 1.2 only had a single Admin Kubernetes cluster (NMC Mgmt Nodes) and a separate set of 3 nodes used to run NMX-M Virtual Machines (NMX-M Nodes):
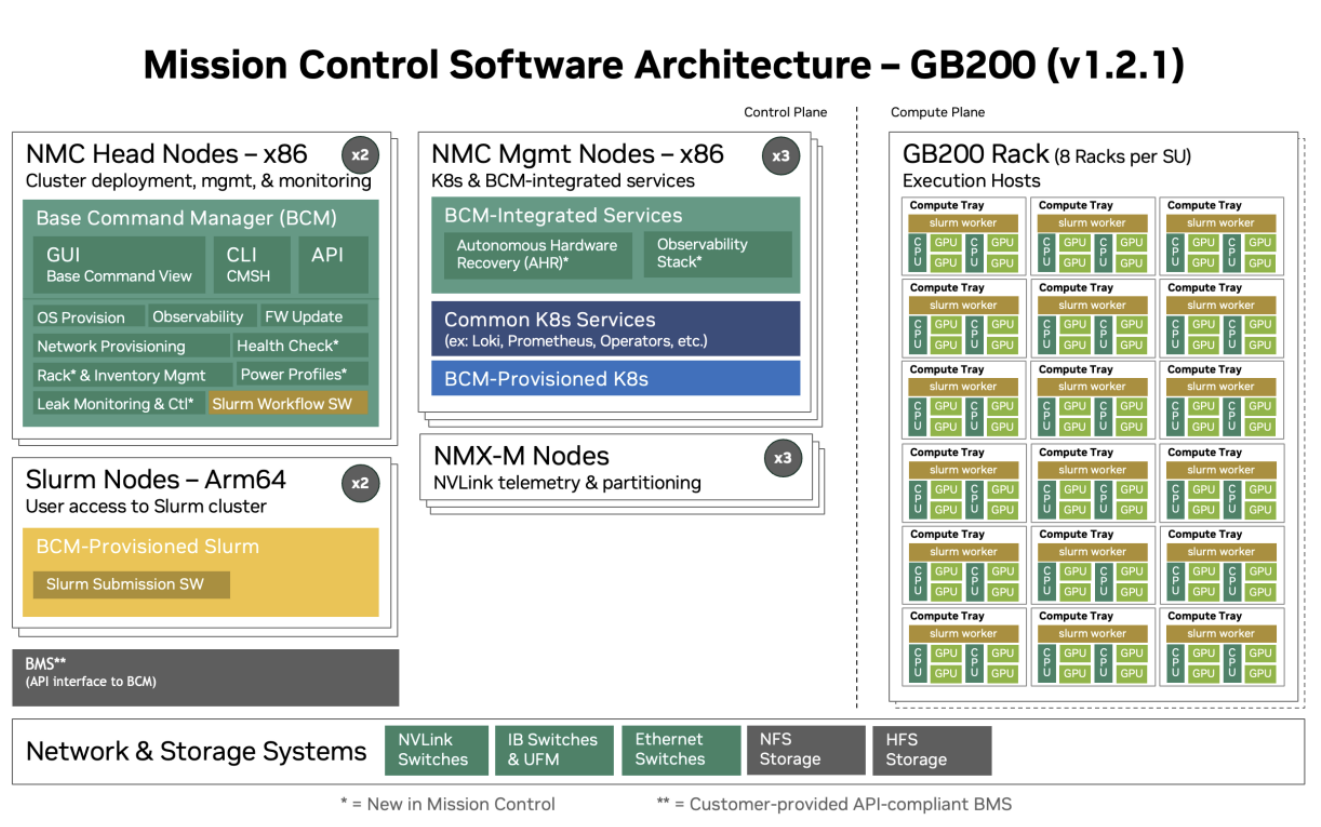
Figure 3 Version 1.2 Architecture#
On NMC 2.0, we integrate NMX-M into the Admin Kubernetes Cluster (NMC Mgmt Nodes), but also introduce a User Kubernetes Cluster (User Mgmt Nodes):
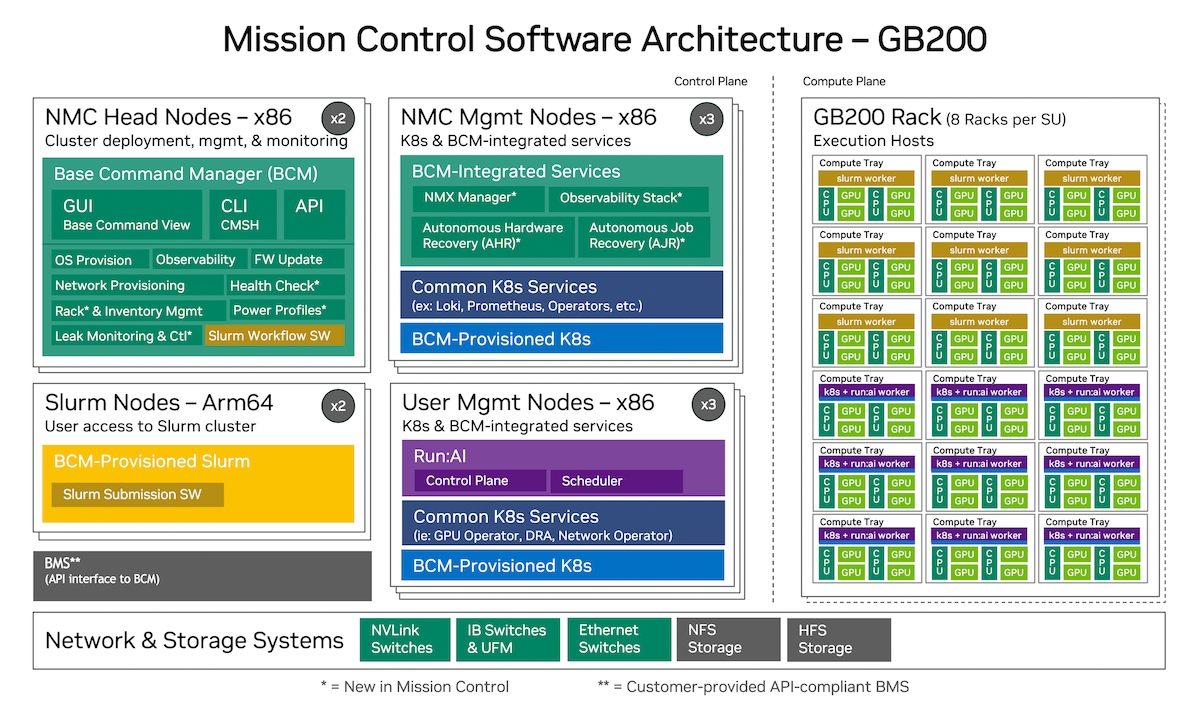
Figure 4 Version 2.0 Architecture#
For this reason, there’s no clean upgrade path between those version. In order to “upgrade”, a simplified version of the steps would be:
Back up necessary data and configuration files, if necessary.
Reset the current cluster (i.e., remove the Admin Cluster and NMX-M Virtual Machines)
Finally, follow the NVIDIA Mission Control Software Installation Guide
2.0.
Backing up necessary data and configuration files#
Before doing a destructive operation on the cluster ensure that you back up any important data and configuration files from your NVIDIA Mission Control cluster. Examples of information you might be interested in backing up are:
Prometheus data for the metrics
Any custom AHR playbooks
Any data that might be on kubernetes volumes (e.g., the local storage path on your BCM installation)
Resetting The Current Cluster#
When first creating a NMC cluster, during the Rack Bring-Up Guide you create BCM Node Categories and associate them with nodes. On BCM, categories ultimately translate to the host image/OS and configuration installed on a node.
Resetting the current cluster ultimately means removing the old category associated with the nodes on NMC 1.2, adding the newly created categories for NMC 2.0, updating some configuration, and reimaging the nodes.
For NMC 1.2 the categories were:
slogin(for Slurm Login nodes)k8s-ctrl-node(for the Kubernetes Admin Cluster)nmx-m(for the NMX-M virtual machines)dgx-gb200(for the Compute nodes)
For NMC 2.0 the categories are:
slogin(for Slurm Login nodes)k8s-system-user(for the User Kubernetes Cluster)k8s-system-admin(for the Kubernetes Admin Cluster)dgx-gb200(for the Slurm Compute nodes)runai-compute(for Run:ai Compute nodes)
To reset the current cluster, follow the steps below:
Note
Some of the steps defined here can follow BCM’s “golden node” pattern (as used in the Rack Bring-Up Install Guide), where you first work on one node and later copy its configuration using the foreach command.
Uninstall Admin Kubernetes Cluster#
Let’s start by gracefully removing the NMC 1.2 Admin Kubernetes Cluster configuration:
$ cm-kubernetes-setup --remove --yes-i-really-mean-it
Rack Bring-Up Install Guide#
Follow the steps described in the Rack Bring-Up Install Guide. More specifically, the sections under Configuration for Node Provisioning. In this section, we are specially interested in the sub-sections:
Software Image Setup
Category Creation
Control Plane Node Entries
The next steps should detail what is different or any extra steps not described in the guide.
Create New Software Images and Node Categories#
When following the Rack Bring-Up Install Guide, you will create all the new Software Images and Node Categories needed by NMC 2.0. On clusters being upgraded, you should end up with a mix of 1.2 and 2.0 categories.
The old categories will be removed at the end of these steps. You can check your currently available categories with the command:
$ cmsh -c "category;list"

Name (key)               Software image           Nodes

------------------------ ------------------------ --------

slogin                   slogin-image             2
k8s-ctrl-node            k8s-ctrl-node-image      3
nmx-m                    nmx-m-image              3
dgx-gb200                dgx-gb200-image          40
k8s-system-admin         k8s-system-admin-image   0
k8s-system-user          k8s-system-user-image    0
runai-compute            runai-compute-image      0
Assign Nodes to Categories#
Later on, following the Rack Bring-Up Installation Guide, on the Control Plane Node Entries section, you will associate your new categories to the nodes.
First let’s check the current node-category association:
$ cmsh -c "device/list"

Type             Hostname (key)          MAC                Category         IP               Network          Status
---------------- ----------------------- ------------------ ---------------- ---------------- ---------------- ----------------

HeadNode         head-b110-u2204-08-14   FA:16:3E:B1:AF:1B                   10.141.255.254   internalnet      [   UP   ]
PhysicalNode     node001                 FA:16:3E:AE:F6:DE  slogin           10.141.0.1       internalnet      [   UP   ]
PhysicalNode     node002                 FA:16:3E:29:6E:D4  slogin           10.141.0.2       internalnet      [   UP   ]
PhysicalNode     node003                 FA:16:3E:48:59:1D  nmx-m            10.141.0.3       internalnet      [   UP   ]

...
Since the nodes are already added to your cluster, some commands may be slightly different from the guide. For example, you won’t need to call the add physicalnode command and most of the network configuration. To associate each node with their new categories, use the following command:
$ cmsh -c "device;use <hostname>;set category <new_category>; commit"
Remember to repurpose the old nodes for their new functions:
2x slogin nodes (unchanged, same as the old ones)
3x k8s-system-user nodes (use the old k8s-ctrl-nodes)
3x k8s-system-admin nodes (use the old nmx-m nodes)
NMX-M Network Configuration#
Specifically for the old nmx-m nodes, you will change the network configuration. We need to remove the bridge interface (br0), since this was only used by the NMX-M Virtual Machines:
$ cmsh -c "device;use <nmx_node_name>; interfaces; remove br0; commit"
Run:AI Compute Nodes#
For version 1.2 we used the dgx-gb200 node category for Slurm Compute/Worker nodes on all GPU nodes. For version 2.0, if you also want to support Run:ai workloads, some of those nodes will need to be reassigned to a new category: runai-compute.
The command is similar to the command used to change categories for the control-plane nodes:
#List the current node categories
$ cmsh -c "device;list"

# Change the category of some dgx-gb200 nodes to runai-compute
$ cmsh -c "device;use <hostname>;set category runai-compute; commit"
Finish and Clean-Up#
You can now proceed with the rest of the Rack Bring-Up Installation Guide and re-image the nodes.
Finally, after all nodes are re-imaged, you can optionally delete the old categories and images:
$ cmsh -c "category;remove k8s-ctrl-node; remove nmx-m; commit"
$ cmsh -c "softwareimages; remove nmx-m-image; remove k8s-ctrl-node-image; commit"
NVIDIA Mission Control Software Installation Guide 2.0#
With the nodes associated with their new categories and re-imaged, the next steps should be to just follow the NVIDIA Mission Control Software Installation Guide as usual.
On the Workload Manages (WLM) and Kubernetes setup, the wizards might complain about previously installed versions, but you can request to start a new installation.