Interfaces
The system supports the following interfaces:
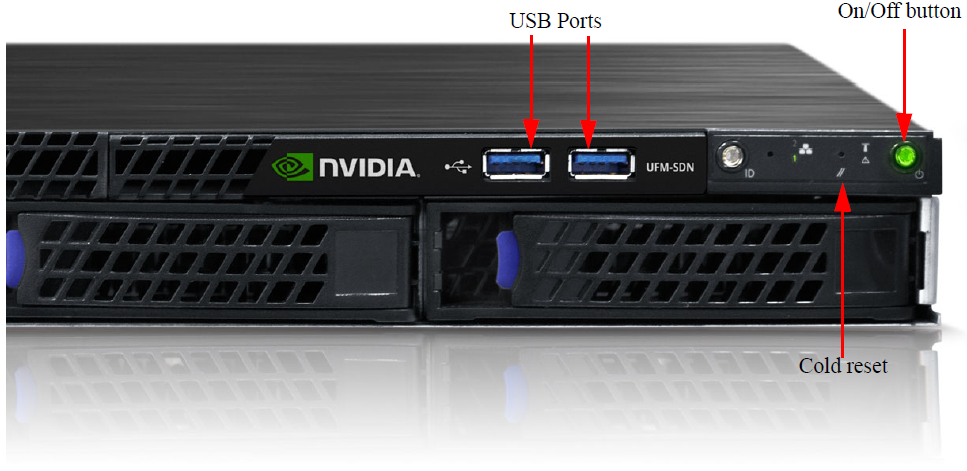
1 on/off button with an integral LED
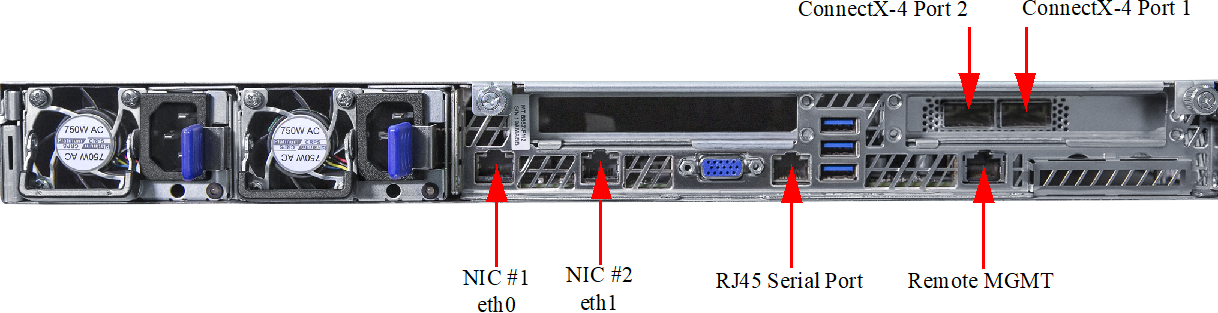
1 RJ-45 serial port
2 100M/1Gb Ethernet connectors
2 EDR ports
1 remote management port
5 USB ports
System Cold reset button
Rear Side Interfaces
The on/off button is located on the front side of the appliance (see Figure 6), and is used to turn the appliance on and off. For a graceful shutdown of the system, use the relevant CLI command. To force shutdown of the appliance, hold the button down until the appliance turns off. The LED of the button displays the system’s power status.
This RJ-45 port is found on the rear side of the appliance (see the figure above). This is a serial console RS-232 connector. This interface can be connected directly to a laptop via USB-to-serial cable for first-time configuration or to a Serial-to-Ethernet device. It should be configured to 115200 Bps similar to switches.
These 2 RJ-45 ports are found on the rear side of the appliance (see the figure above). The eth0-eth1 and remote management interfaces are pre-configured as DHCP and the initial host name is ufm- appliance-[MAC ADDRESS] (MAC appears on a sticker on the pull-tab), so their IP addresses can be obtained from the DHCP server. In case no DHCP server is available, you have to use a serial cable to connect and configure eth0 and remote-management IP addresses with a static IP address.
Configuring the appliance via the serial port is required only in the case where out-of- the-box DHCP configuration for eth0 cannot be used. (There is no DHCP server in the management network). The user is then required to use the serial port to configure a static IP on eth0.
NIC#1 Ethernet connector gets connected to Ethernet switches. This switch must be configured to 100M/1G auto-negotiation.
These 2 QSFP ports are found on the rear side of the appliance. See the figure above. They should be connected to an IB switch in the fabric, it is recommended to connect to two different switches for redundancy. The appliance can be connected only to a single IB fabric.
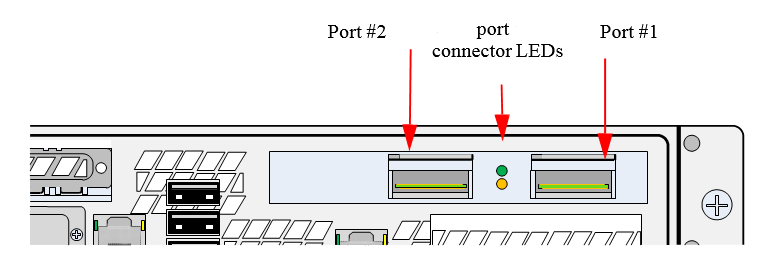
QSFP Port Interfaces
There is one I/O LED per port. See Table 10 below for LED functionality in InfiniBand mode.
|
Physical and Logical Link Indication |
|
|
LED |
Function |
|
Off |
Physical link has not been established. |
|
Solid Yellow |
Indicates an active physical link. |
|
Blinking Yellow |
Indicates a problem with the physical link. |
|
Solid Green |
Indicates a valid logical (data activity) link with no active traffic. |
|
Blinking Green |
Indicates a valid logical link with active traffic. |
Illustration of InfiniBand Port Connector Interfaces
The appliance has multiple Ethernet management interfaces. The primary management interface is eth0. An additional interface exists, for connecting to a remote management controller (It usu- ally connects to the same management network as eth0). For using out-of-the-box DHCP set- tings: Default hostname for the appliance (over eth0) is "ufm-appliance-[MAC ADDRESS]". The MAC address for eth0 is available on the pull-tab and can be configured in the DHCP server. To use the remote management controller with DHCP, the free-range IP allocation must be enabled on the DHCP server. A static IP address for remote management interface can be config- ured via the CLI ("chassis remote-management ip" command).
Configuration via a serial port is only required if you want to use a static IP address and not the out-of-the-box DHCP setting for eth0. Otherwise, an IP is assigned by the DHCP server and you can login to the CLI over LAN.
NIC#1 Ethernet connector gets connected to Ethernet switches. This switch must be configured to 100M/1G auto-negotiation.
The USB interface can be used to update the UFM.
USB Interface
There are five USB connectors. These connectors can be used to install software and / or firmware upgrades using a memory device that has a USB connector. This connector is USB 2.0 compliant. Various upload/download operations are also support through the USB using the CLI such as:
UFM configuration fetching/uploading
UFM license fetching
UFM upgrade
All USB connectors can be used for performing SW update or various upload/download operations using the CLI.
When pressed this button will do a forced reboot and re-initialize the appliance. In general, for a graceful shutdown of the system (stopping all services, closing all files, flushing all caches etc.) use the CLI.