Mechanical Installation
Before installing your new appliance, please make sure to read and adhere to the safety warnings listed in the "Installation Safety Warnings" appendix.
The UFM-SDN Appliance accepts input voltages of 100-127 VAC and 200-240 VAC for all possible PS units. The UFM-SDN Appliance can be rack mounted and is designed for installation in a standard 19" rack. The power (rear) side of the appliance includes two hot-swap power supply modules.
The installer should use a rack capable of supporting the mechanical and environmental characteristics of a fully populated rack.
The rack mounting holes conform to the EIA-310 standard for 19-inch racks. Take precautions to guarantee proper ventilation in order to maintain good airflow at ambient temperature. Cable routing in particular should not impede the air exhaust from the chassis.
unpack the system and check to make sure that all the parts have been sent. Check this against the parts list below. Check the parts for visible damage that may have occurred during shipping.
The appliance comes packed with the following items:
1 X – appliance
2 X – installation rails, one right hand and one left hand
2 X – power cables one for each PS unit – Type C13-C14
Place the ESD mat on the floor where you will be working and put on the ESD strap. Make sure the ESD strap is touching your skin and that the other end is connected to a verified ground.
- Install the two rails into the rack. Make sure they are at the same level. Make sure they have the correct side to the top. The blue pins go into the rack holes. Left-hand Rail Outside View Collapsed images/networking/download/attachments/39277101/image2020-11-22_21-19-34.pngLeft-hand Rail Outside View Extended images/networking/download/attachments/39277101/fig17.png
- Slide the appliance into the rails as shown in the diagrams in the installation guide packed in the box. Left-hand Rail Inside View images/networking/download/attachments/39277101/fig18.png
Ground the appliance (see "Grounding the Appliance").
Plug in the power cables (see "Power Connections and Initial Power On").
Push the ON/OFF button to start.

Check the Status LEDs and confirm that all of the LEDs show status lights consistent with normal operation.

Any amber status LEDs are a cause for concern and must be dealt with immediately. It can take up to 5 minutes to boot up, during which time the status LED may indicate red.
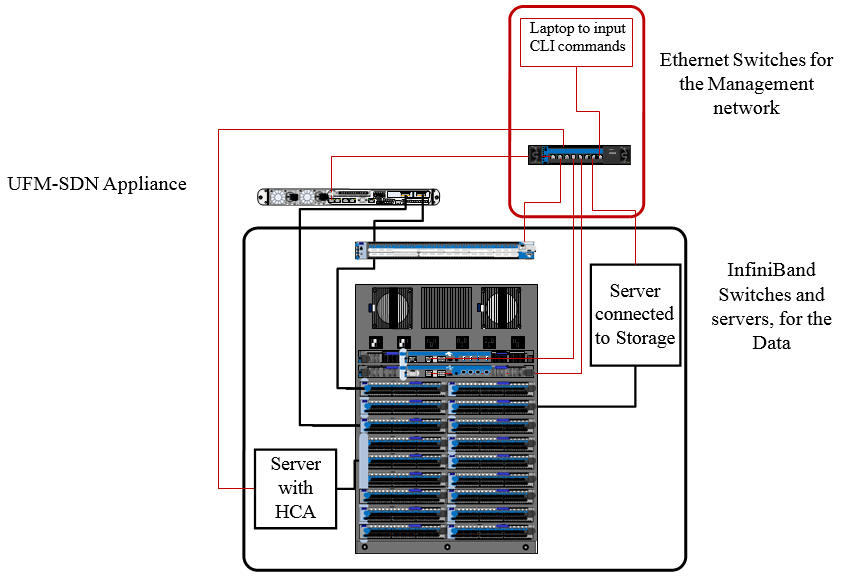
UFM requires both InfiniBand and Ethernet (out-of band management) connectivity where eth0 should be connected to a management network switch and both InfiniBand ports should be connected to InfiniBand switches. They can be connected to the same switch, but Mellanox recommends connecting to two separate switches, to ensure SM connectivity to the fabric.
Check to determine if your local or national electrical codes require an external ground to all IT components. If so, connect a ground wire to one of the casing screws and connect the other end to a valid ground. If you choose not to use the ground screw, make sure that the rack is properly grounded and that there is a valid ground connection between the chassis of the appliance and the rack. Test the ground using an Ohm meter.
Some national and/or local codes may require IT components to be bonded and externally grounded (not including the power cord ground). You must follow all national and local codes when installing this equipment.
The UFM-SDN Appliance ships two power supply units. Each supply has a separate AC receptacle. The UFM-SDN Appliance accepts input voltages of 100 - 127 VAC and 200 - 240 VAC for all possible PS units. The power cords should be standard 3-wire AC power cords including a safety ground and rated for 15A or higher. The power supplies deliver 750W AC.
After inserting a power cable and turning the appliance on, confirm that the green system status LED light is on.
Do not hot swap the power supply if your appliance has only one power supply. You must power down the system to replace the power supply unit there is only one PS unit in the appliance.
Extracting and Inserting the Power Supply UnitTwo Power Inlets - Electric Caution Notifications
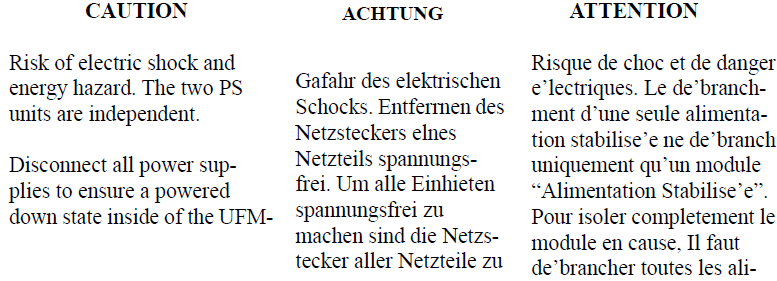
The power supply is only hot-swappable if you have a redundant system with two power supplies installed. If you only have one power supply installed, before removing or replacing the power supply, you must first take the appliance out of service, turn off all peripheral devices connected to the system, turn off the system by pressing the power button, and unplug the AC power cord from the system or wall outlet.
The power supply can be replaced in case it fails. To replace the power supply, follow these steps:
If a filler panel is installed, remove the filler panel.

If a power supply is installed, grab the handle with your thumb pointing toward the latch. Push the latch with your thumb towards the handle while you pull the power supply out of the appliance.

Insert the power supply module into the power supply cage and push all the way until it clicks into place.
Do not run the appliance with openings due to missing parts. This may cause overheating due to improper air flow.

Never pull out a working hard drive while the appliance is turned on. You can safely pull out a faulty hard drive indicated by a solid amber light.
If one HDD physically fails, the appliance keeps working thanks to RAID mirroring. You can pull out and replace a faulty drive with a new blank HDD, the blank HDD will get synchronized with the other HDD, this takes up to 48 hours but does not interrupt with appliance operation.
Power down the appliance before removing the HDD
Remove the HDD by pressing the latch button and opening the lever.
Slide the HDD with its carrier drawer out.
Remove the HDD from its carrier drawer.
Slide the replacement HDD into the carrier drawer slot.
Slide the replacement HDD with the drawer into the slot. Continue to push in the HDD in until the latch starts to close. This replacement drive is a blank HDD.
Close the latch.
Power on the appliance.

Close the latch.
The SW RAID mechanism will identify that a new HDD was inserted and synchronize the data with the second HDD, this process might take up to 48 hours to complete.
Mellanox Technologies does not support battery replacement. Customer removal of the UFM cover will void the warranty. Only remove the cover to comply with WEEE directives or to disassemble for environmentally approved disposal.
For a list of approved cables for this appliance, please refer to this document.
To shut down the appliance, run the following command:
reload halt [noconfirm]
The appliance cannot be restarted remotely!
To restart the appliance, you must physically go to the appliance and unplug and plug in the power cord.
You can also shut down or cold reset the appliance remotely by using the remote management.
To disassemble the appliance from the rack:
Shut down the appliance.
Unplug and remove all connectors.
Unplug all power cords.
Remove the ground wire.
Unscrew the 2 center bolts from inside the handles.
Slide the appliance from the rack.
Remove the rail slides from the rack.
This procedure is only to be used when you will be disassembling this appliance before discarding, to comply with regulations regarding disposal of batteries.
Remove the cover.
Remove the battery and dispose of according to local and state and federal regulations.
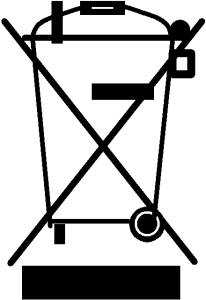
According to the WEEE Directive 2002/96/EC, all waste electrical and electronic equipment (EEE) should be collected separately and not disposed of with regular household waste. Dispose of this product and all of its parts in a responsible and environmentally friendly way.