Configuring Quality of Service (QoS)
Operating Systems: Windows Server 2012, Windows Server 2012 R2 and Windows Server 2016.
Prior to configuring Quality of Service, you must install Data Center Bridging using one of the following methods:
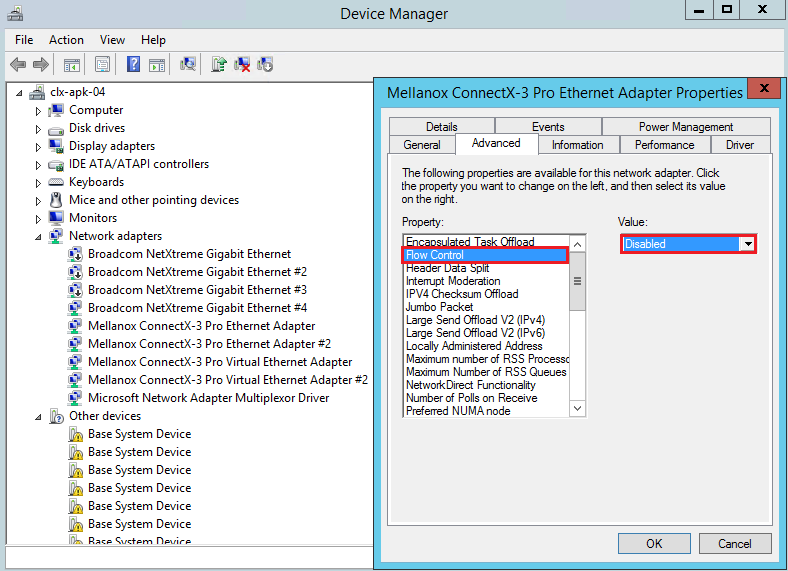
To Disable Flow Control Configuration
Device manager → Network adapters → Mellanox ConnectX-3 Ethernet Adapter → Properties→ Advanced tab
To Install the Data Center Bridging using the Server Manager
Open the 'Server Manager'.
Select 'Add Roles and Features'.
Click Next.
Select 'Features' on the left panel.
Check the 'Data Center Bridging' checkbox.
Click 'Install'.
To Install the Data Center Bridging using PowerShell
Enable Data Center Bridging (DCB).
PS $ Install-WindowsFeature Data-Center-Bridging
To Configure QoS on the Host
The procedure below is not saved after you reboot your system. Hence, we recommend you create a script using the steps below and run it on the startup of the local machine. Please see the procedure below on how to add the script to the local machine startup scripts.
Change the Windows PowerShell execution policy. To change the execution policy, please refer to Step 1 in PowerShell Configuration.
Remove the entire previous QoS configuration.
            PS $ Remove-NetQosTrafficClass
PS $ Remove-NetQosPolicy -Confirm:$False
Set the DCBX Willing parameter to false as Mellanox drivers do not support this feature.
PS $ set-NetQosDcbxSetting -Willing
0Create a Quality of Service (QoS) policy and tag each type of traffic with the relevant priority. In this example, TCP/UDP use priority 1, SMB over TCP use priority 3.
PS $ New-NetQosPolicy
"DEFAULT"-store Activestore -Default -PriorityValue8021Action3PS $ New-NetQosPolicy"TCP"-store Activestore -IPProtocolMatchCondition TCP -Priority-Value8021Action1PS $ New-NetQosPolicy"UDP"-store Activestore -IPProtocolMatchCondition UDP -Priority-Value8021Action1New-NetQosPolicy “SMB” –SMB –PriorityValue8021Action3Create a QoS policy for SMB over SMB Direct traffic on Network Direct port 445.
PS $ New-NetQosPolicy
"SMBDirect"-store Activestore -NetDirectPortMatchCondition445-PriorityValue8021Action3[Optional] If VLANs are used, mark the egress traffic with the relevant VlanID. The NIC is referred as "Ethernet 4” in the examples below.
PS $ Set-NetAdapterAdvancedProperty -Name
"Ethernet 4"-RegistryKeyword"VlanID"-RegistryValue"55"[Optional] Configure the IP address for the NIC. If DHCP is used, the IP address will be assigned automatically.
PS $ Set-NetIPInterface -InterfaceAlias “Ethernet
4” -DHCP Disabled PS $ Remove-NetIPAddress -InterfaceAlias “Ethernet4” -AddressFamily IPv4 -Confirm:$falsePS $ New-NetIPAddress -InterfaceAlias “Ethernet4” -IPAddress192.168.1.10-Prefix-Length24-Type UnicastSet the DNS server (assuming its IP address is 192.168.1.2).
PS $ Set-DnsClientServerAddress -InterfaceAlias “Ethernet
4” -ServerAddresses192.168.1.2WarningAfter establishing the priorities of ND/NDK traffic, the priorities must have PFC enabled on them.
Disable Priority Flow Control (PFC) for all other priorities except for 3.
PS $ Disable-NetQosFlowControl
0,1,2,4,5,6,7Enable QoS on the relevant interface.
PS $ Enable-NetAdapterQos -InterfaceAlias
"Ethernet 4"Enable PFC on priority 3.
PS $ Enable-NetQosFlowControl -Priority
3PS $ New-NetQosPolicy -name"SMB class"-Priority3Configure Priority 3 to use ETS.
PS $ New-NetQosTrafficClass -name
"SMB class"-priority3-bandwidthPercentage50-Algorithm ETS
To Add the Script to the Local Machine Startup Scripts
From the PowerShell invoke.
In the pop-up window, under the 'Computer Configuration' section, perform the following:
Select Windows Settings
Select Scripts (Startup/Shutdown)
Double click Startup to open the Startup Properties
Move to “PowerShell Scripts” tab

Click Add.
The script should include only the following commands:PS $ Remove-NetQosTrafficClass PS $ Remove-NetQosPolicy -Confirm:$False PS $ set-NetQosDcbxSetting -Willing
0PS $ New-NetQosPolicy"SMB"-Policystore Activestore -NetDirectPortMatchCondition445-PriorityValue8021Action3PS $ New-NetQosPolicy"DEFAULT"-Policystore Activestore -Default -PriorityValue8021Action3PS $ New-NetQosPolicy"TCP"-Policystore Activestore -IPProtocolMatchCondition TCP -PriorityValue8021Action1PS $ New-NetQosPolicy"UDP"-Policystore Activestore -IPProtocolMatchCondition UDP -PriorityValue8021Action1PS $ Disable-NetQosFlowControl0,1,2,4,5,6,7PS $ Enable-NetAdapterQos -InterfaceAlias"port1"PS $ Enable-NetAdapterQos -InterfaceAlias"port2"PS $ Enable-NetQosFlowControl -Priority3PS $ New-NetQosTrafficClass -name"SMB class"-priority3-bandwidthPercentage50-Algorithm ETSBrowse for the script's location.
Click OK
To confirm the settings applied after boot run:
PS $ get-netqospolicy -policystore activestore
Enhanced Transmission Selection (ETS) provides a common management framework for assignment of bandwidth to frame priorities as described in the IEEE 802.1Qaz specification:
http://www.ieee802.org/1/files/public/docs2008/az-wadekar-ets-proposal-0608-v1.01.pdf
For further details on configuring ETS on Windows™ Server, please refer to:
http://technet.microsoft.com/en-us/library/hh967440.aspx