Single Root I/O Virtualization (SR-IOV)
SR-IOV is not on a GA level in Windows 2012. It is recommended to use Windows 2012 R2 or a newer version, when SR-IOV is configured.
Single Root I/O Virtualization (SR-IOV) is a technology that allows a physical PCIe device to present itself multiple times through the PCIe bus. This technology enables multiple virtual instances of the device with separate resources. Mellanox adapters are capable of exposing in ConnectX®-3/ConnectX®-3 Pro adapter cards, up to 126 virtual instances called Virtual Functions (VFs). These virtual functions can then be provisioned separately. Each VF can be seen as an addition device connected to the Physical Function. It also shares resources with the Physical Function.
SR-IOV is commonly used in conjunction with an SR-IOV enabled hypervisor to provide virtual machines direct hardware access to network resources hence increasing its performance.
This guide demonstrates the setup and configuration of SR-IOV, using Mellanox ConnectX® VPI adapter cards family. SR-IOV VF is a single port device.
Mellanox device is a dual-port single-PCI function. Virtual Functions' pool belongs to both ports. To define how the pool is divided between the two ports use the PowerShell SriovPort1NumVFs” command (see Step 5 in Enabling SR-IOV in Mellanox WinOF Package (Ethernet SR-IOV Only).
System Requirements
A server and BIOS with SR-IOV support. BIOS settings might need to be updated to enable virtualization support and SR-IOV support.
Hypervisor OS: Windows Server 2012 R2 and above
Virtual Machine (VM) OS:
The VM OS can be either Windows Server 2012 and above
Mellanox ConnectX®-3/ ConnectX®-3 Pro VPI Adapter Card family with SR-IOV capability
Mellanox WinOF 5.22 or higher
It is recommended to use the same driver version in the hypervisor and the virtual machine
Firmware version: 2.30.8000 or higher
Feature Limitations
SR-IOV is supported only in Ethernet ports and can be enabled if all ports are set as Ethernet.
RDMA (i.e RoCE) capability is available in SR-IOV mode only in Windows Server 2016 and above
System Requirements
A server and BIOS with SR-IOV support. BIOS settings might need to be updated to enable virtualization support and SR-IOV support.
Hypervisor OS: Linux KVM using SR-IOV enabled drivers
Virtual Machine (VM) OS:
The VM OS can be Windows Server 2012, 2012 R2 and 2016
For further details about assigning a VF to the Windows VM, please refer to steps 1-5 in the section titled “Assigning the SR-IOV Virtual Function to the Red Hat KVM VM Server” in Mellanox OFED for Linux User Manual.
Mellanox ConnectX®-3/ ConnectX®-3 Pro VPI Adapter Card family with SR-IOV capability
Mellanox WinOF 4.80 or higher
Firmware version: 2.30.8000 or higher
Feature Limitations (Compared to Native InfiniBand)
OpenSM and Infiniband Fabric Diagnostic Utilities listed in Table 51, “Diagnostic Utilities,” on page 184 are not supported in guest OS.
For a UD QP, only SGID index 0 is supported.
The allocation of the GIDs (per port) in the VFs are accordingly:
16 GIDs are allocated to the PF
2 GIDs are allocated to every VF
The remaining GIDs (if such exist), will be assigned to the VFs, one GID to every VF - starting from the lower VF.
Currently, Mellanox IB Adapter Diagnostic Counters and Mellanox IB Adapter Traffic Counters are not supported.
Only Administrator assigned GUIDs are supported, please refer to the MLNX_OFED User Manual for instructions on how to configure Administrator assigned GUIDs.
The following are the necessary steps for configuring host machines.
Enabling SR-IOV in BIOS
Depending on your system, perform the steps below to set up your BIOS. The figures used in this section are for illustration purposes only. For further information, please refer to the appropriate BIOS User Manual.
To enable SR-IOV in BIOS:
Make sure the machine’s BIOS supports SR-IOV.
Please, consult BIOS vendor website for SR-IOV supported BIOS versions list. Update the BIOS version if necessary.Follow BIOS vendor guidelines to enable SR-IOV according to BIOS User Manual. For example,
Enable SR-IOV.

Enable “Intel Virtualization Technology” Support.

For further details, please refer to the vendor's website.
Installing Hypervisor Operating System (SR-IOV Ethernet Only)
To install Hypervisor Operating System:
Install Windows Server 2012 R2 and above.
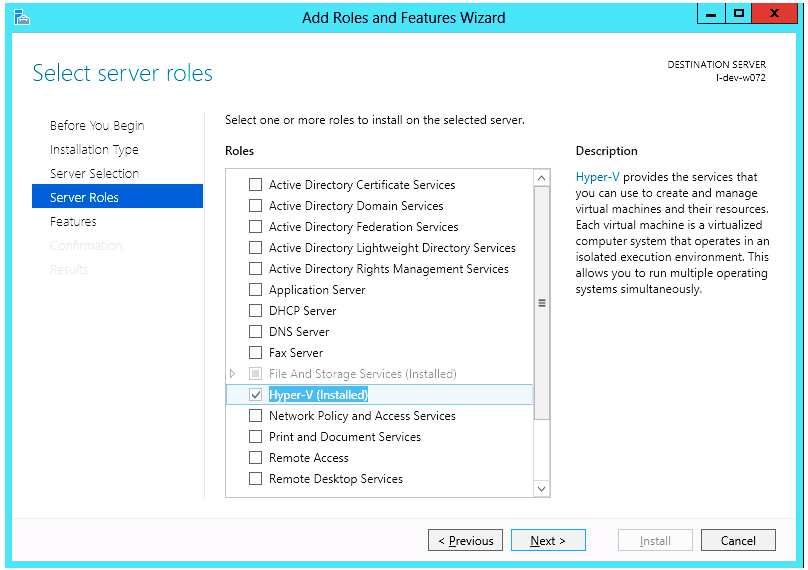
Install Hyper-V role:
Go to: Server Manager → Manage → Add Roles and Features and set the following:
Installation Type → Role-based or Feature-based Installation
Server Selection → Select a server fro the server pool
Server Roles → Hyper-V (see figures below)
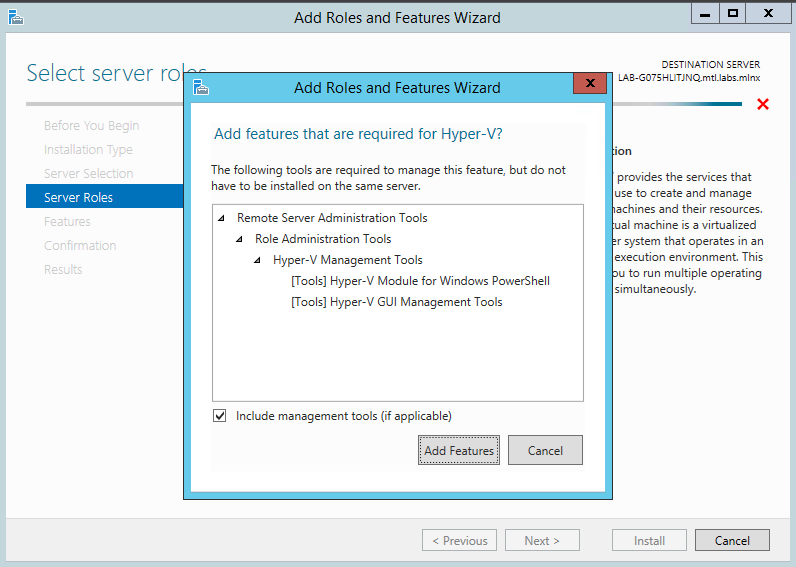
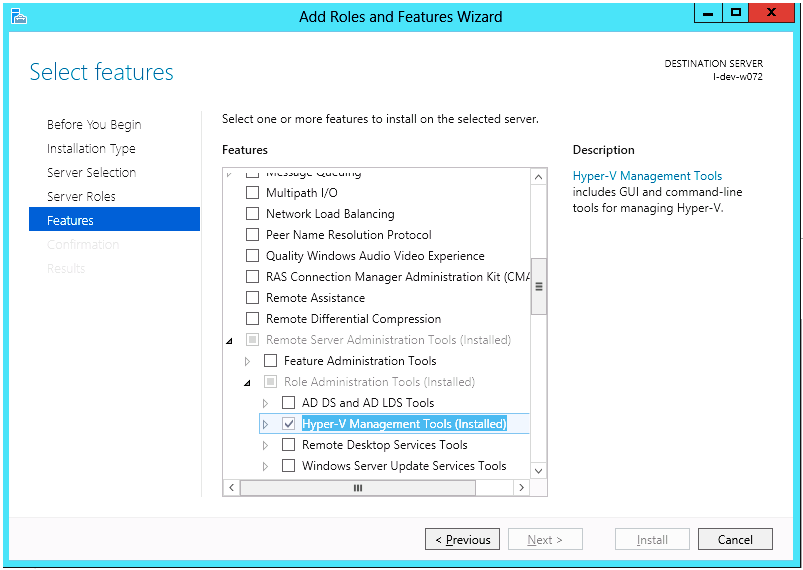
Install Hyper-V Management Tools. Features → Remote Server Administration Tools → Role Administration Tools →Hyper-V Administration Tool
Confirm the Installation.
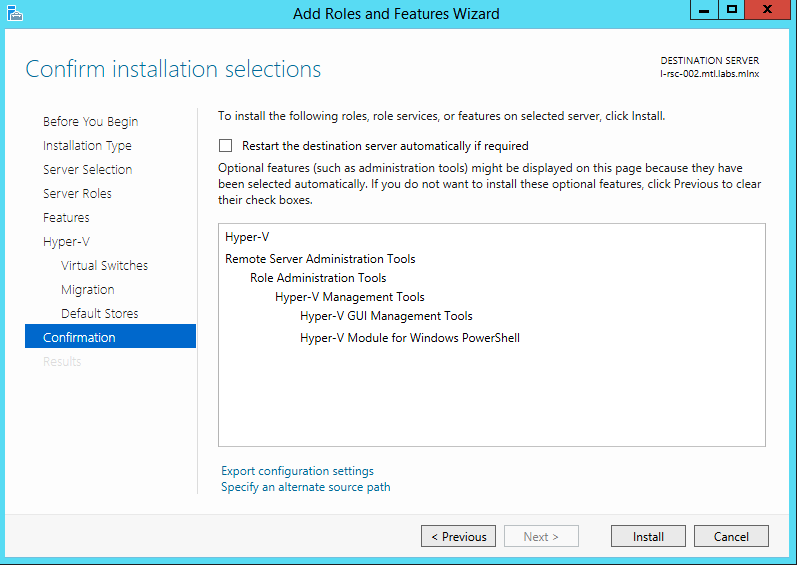
Click Install.

Reboot the system.
Verifying SR-IOV Support within the Host Operating System (SR-IOV Ethernet Only)
To verify that the system is properly configured for SR-IOV:
Go to: Start → Windows Powershell.
Run the following PowerShell commands.
            PS $ (Get-VmHost).IovSupport
PS $ (Get-VmHost).IovSupportReasons
In case that SR-IOV is supported by the OS, the output in the PowerShell is as in the figure below.
Operating System Supports SR-IOV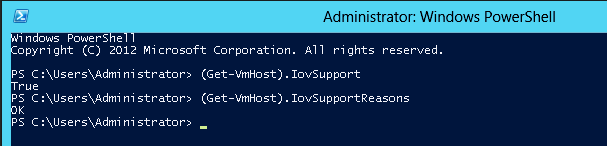
Note: If BIOS was updated according to BIOS vendor instructions and you see the message displayed in the figure below, update the registry configuration as described in the (Get-VmHost). IovSupportReasons message.
SR-IOV Support
Reboot
Verify the system is configured correctly for SR-IOV as described in Steps 1/2.
Creating a Virtual Machine (SR-IOV Ethernet Only)
To create a virtual machine
Go to: Server Manager → Tools → Hyper-V Manager.
Go to: New → Virtual Machine and set the following:
• Name: <name>
• Startup memory: 4096 MB
• Connection: Not Connected
Hyper-V Manager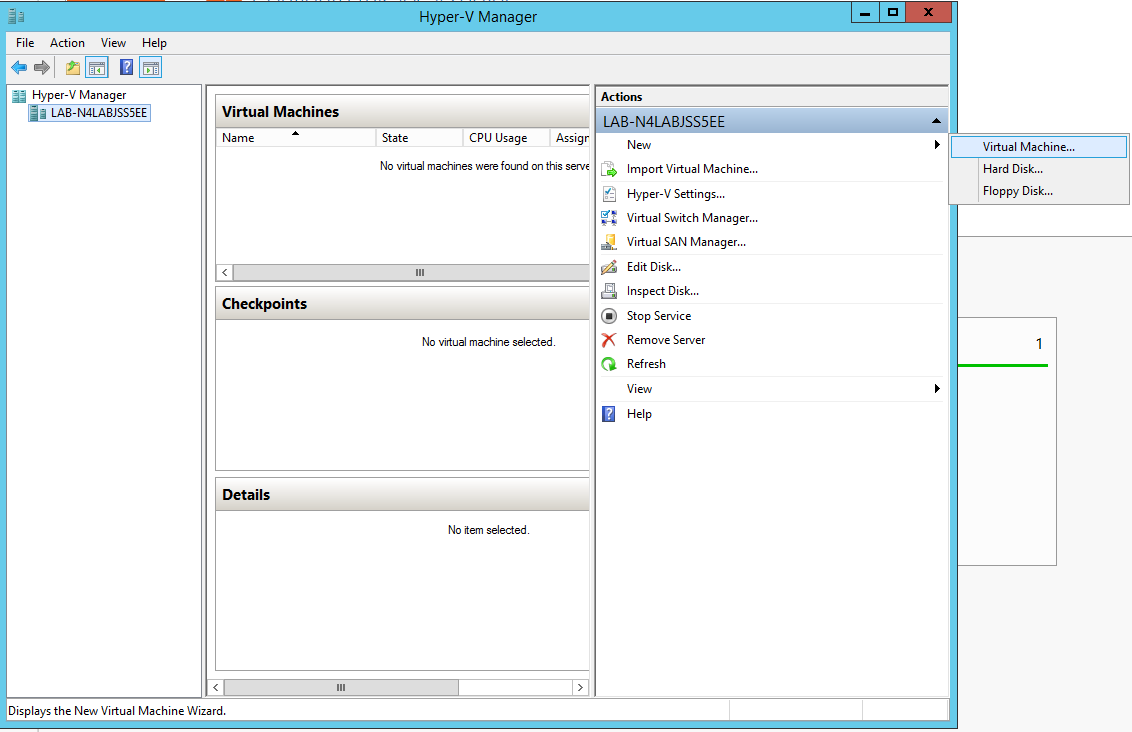
Connect the virtual hard disk in the New Virtual Machine Wizard.
Go to Connect Virtual Hard Disk → Use an existing virtual hard disk.
Select the location of the vhd file.
Connect Virtual Hard Disk
The following are the steps for configuring Mellanox Network Adapter for SR-IOV:
Enabling SR-IOV in Firmware
For non-Mellanox (OEM) branded cards you may need to download and install the new firmware. For the latest OEM firmware, please go to: http://www.mellanox.com/page/oem_firmware_download
As of firmware version 2.31.5000, SR-IOV can be enabled and managed by using the mlxconfig too. For older firmware versions, use the flint tool.
To enable SR-IOV using mlxconfig:
mlxconfig is part of MFT tools used to simplify firmware configuration. The tool is available with MFT tools 3.6.0 or higher.
Download MFT for Windows. www.mellanox.com → Products → Software → Firmware Tools.
Get the device ID (look for the “_pciconf” string in the output).
> mst status
Example:
            MST devices:
------------
mt4103_pci_cr0
mt4103_pciconf0
Check the current SR-IOV configuration.
> mlxconfig -d mt4103_pciconf0 q
Example:
Device #
1: ---------- Device type: ConnectX3Pro PCI device: mt4103_pciconf0 Configurations: Current SRIOV_EN N/A NUM_OF_VFS N/A LINK_TYPE_P1 N/A LINK_TYPE_P2 N/AEnable SR-IOV with 16 VFs.
> mlxconfig -d mt4103_pciconf0 s SRIOV_EN=
1NUM_OF_VFS=16ImportantWarning: Care should be taken in increasing the number of VFs. All servers are guaranteed to support 16 VFs. More VFs can lead to exceeding the BIOS limit of MMIO available address space.
Example:
Device #
1: ---------- Device type: ConnectX3Pro PCI device: mt4103_pciconf0 Configurations: Current New SRIOV_EN N/A1NUM_OF_VFS N/A16LINK_TYPE_P1 N/A N/A LINK_TYPE_P2 N/A N/A ApplynewConfiguration? ? (y/n) [n] : y Applying... Done! -I- Please reboot machine to loadnewconfigurations.Reboot the machine. (After the reboot, continue to Enabling SR-IOV in Mellanox WinOF Package (Ethernet SR-IOV Only).)
To enable SR-IOV using flint:
Step 1. Download MFT for Windows. www.mellanox.com → Products → Software → Firmware Tools.
Step 2. Get the device ID (look for the “_pciconf” string in the output).
> mst status
Example:
            MST devices:
------------
mt4103_pci_cr0
mt4103_pciconf0
Step 3. Verify that HCA is configured for SR-IOV by dumping the device configuration file to user-chosen location <ini device file>.ini.
> flint -d <device> dc > <ini device file>.ini
Step 4. Verify in the [HCA] section of the .ini that the following fields appear:
            [HCA]
num_pfs = 1
total_vfs = 16
sriov_en = true
Warning: Care should be taken in increasing the number of VFs. All servers are guaranteed to support 16 VFs. More VFs can lead to exceeding the BIOS limit of MMIO available address space.
Step 5. If the fields do not appear, edit the .ini file and add them manually.
Recommended Values
Parameter | Recommended Values |
num_pfs | 1 |
total_vfs | <0-126> (The chosen value should be within BIOS limit of MMIO available address space) |
sriov_en | true |
Step 6. Create a binary image using the modified ini file.
> mlxburn -fw <fw name>.mlx -conf <ini device file>.ini -wrimage <file name>.bin
Step 7. Burn the firmware. The file <file name>.bin is a firmware binary file with SR-IOV enabled that has 16 VFs.
> flint -dev <PCI device> -image <file name>.bin b
Step 8. Reboot the system for changes to take effect. For more information, please, contact Mellanox Support.
Enabling SR-IOV in Mellanox WinOF Package (Ethernet SR-IOV Only)
To enable SR-IOV in Mellanox WinOF Package:
Step 1. Install Mellanox WinOF package that supports SR-IOV.
Step 2. Configure HCA ports' type to Ethernet. For further information, please refer to Port Configuration.
Note: SR-IOV cannot be enabled if one of the ports is InfiniBand.
Step 3. Set the Execution Policy specified in PowerShell Configuration.
Step 4. Query SR-IOV configuration with Powershell.
PS $ Get-MlnxPCIDeviceSriovSetting
Example:
            Caption          : MLNX_PCIDeviceSriovSettingData 'Mellanox ConnectX-3 PRO VPI (MT04103) Network Adapter'
Description      : Mellanox ConnectX-3 PRO VPI (MT04103) Network Adapter
ElementName      : HCA 0
InstanceID       : PCI\VEN_15B3&DEV_1007&SUBSYS_22F5103C&REV_00\24BE05FFFFB9E2E000
Name             : HCA 0
Source           : 3
SystemName       : LAB-N4LABJSS5EE
SriovPort1NumVFs : 16
SriovPort2NumVFs : 0
SriovPortMode    : 0
PSComputerName   :
Step 5. Enable SR-IOV through Powershell on both ports.
PS $ Set-MlnxPCIDeviceSriovSetting -Name "HCA 0" -SriovPortMode 2 -SriovPort1NumVFs 8 -SriovPort2NumVFs 8
Note: "SriovPortMode 2" enables SR-IOV on both ports. "SriovPort1NumVFs 8" & "SriovPort2NumVFs 8" enable 8 Virtual Functions for each port when working in manual mode. By default, there are assigned 16 virtual functions on the first port.
Example:
            Confirm
Are you sure you want to perform this action?
Performing the operation "SetValue" on target "MLNX_PCIDeviceSriovSettingData: MLNX_PCIDeviceSriovSettingData
'Mellanox ConnectX-3 PRO VPI (MT04103) Network Adapter' (InstanceID = "PCI\VEN_15B3&DEV_1007&SUBSYS_22F5103C&R...)".
[Y] Yes [A] Yes to All [N] No [L] No to All [S] Suspend [?] Help (default is "Y"):
y
Mellanox device is a dual-port single-PCI function. Virtual Functions' pool belongs to both ports. To define how the pool is divided between the two ports use the Powershell “SriovPort1NumVFs” command.
SR-IOV mode configuration parameters:
Parameter Name | Values | Descriptions |
SriovPortMode | 0 = auto_port1 | Configures the number of VFs to be enabled by the bus driver to each port. |
SriovPort1NumVFs | 16=(default) | SriovPort<i>NumVFs specifies the number of VFs that are allowed per port. This is the number of VFs the bus driver will open when working in manual mode on SRI-OV mode. |
Step 6. Verify the new values were set correctly.
PS $ Get-MlnxPCIDeviceSriovSetting
Example:
            Caption          : MLNX_PCIDeviceSriovSettingData 'Mellanox ConnectX-3 PRO VPI (MT04103) Network Adapter'
Description      : Mellanox ConnectX-3 PRO VPI (MT04103) Network Adapter
ElementName      : HCA 0
InstanceID       : PCI\VEN_15B3&DEV_1007&SUBSYS_22F5103C&REV_00\24BE05FFFFB9E2E000
Name             : HCA 0
Source           : 3
SystemName       : LAB-N4LABJSS5EE
SriovPort1NumVFs : 8
SriovPort2NumVFs : 8
SriovPortMode    : 2
PSComputerName   :
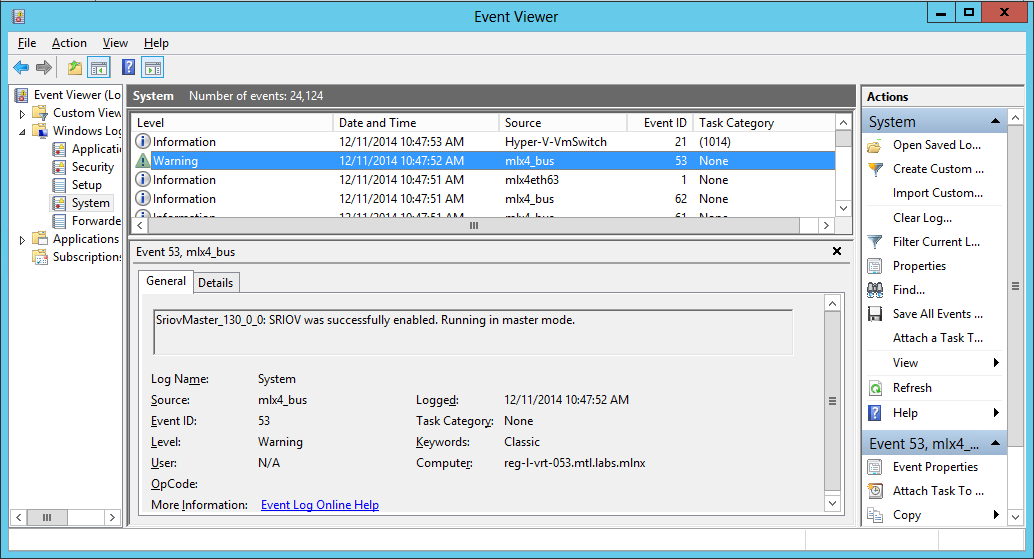
Step 7. Check in the System Event Log that SR-IOV is enabled.
Step a. Open the View Event Logs/Event Viewer. Go to: Start → Control Panel → System and Security → Administrative Tools → View Event Logs/Event Viewer.
Step b. Open the System logs. Event Viewer (Local) → Windows Logs → System.
System Event Log