6. How to Run a Reference Pipeline
Clara Deploy SDK comes bundled with a set of reference pipelines. This section provides general guidelines on how to execute them on your local development machine. For information specific to a reference pipeline, please view the documentation of that pipeline.
Change directory into a directory where pipelines will be stored, e.g.
            mkdir -p ~/.clara/pipelines
cd ~/.clara/pipelines
Use
clara pull pipelineto download a pipeline definition:clara pull pipeline <NGC ID for the pipeline> cd <NGC ID for the pipeline>
For Example:
            clara pull pipeline clara_ai_livertumor_pipeline
cd clara_ai_livertumor_pipeline
Available pipelines are listed in the table below.
Pipeline Name |
NGC ID |
|---|---|
CT Reconstruction |
|
AI Spleen |
|
AI Pancreas Tumor |
|
AI Chest X-Ray |
|
AI Brain Tumor |
|
AI Lung Tumor |
|
AI vNet / CT Organ Segmentation |
|
AI Malaria |
|
AI Hippocampus |
|
AI Colon Tumor |
|
AI Liver Tumor |
|
AI Breast |
|
AI Prostate |
|
Denovo Assembly |
|
3D Image Processing using FastIO |
|
DeepStream Batch |
|
Multi AI Segmentation |
|
Digital Pathology Image Processing |
|
COVID-19 Classification |
|
DICOM Series Selection |
|
Digital Pathology Nuclei Segmentation |
Unzip test data - if test data is bundled with the pipeline, run:
unzip <test-data-filename>.zip -d input
Unzip and Install model - if the model is bundled with the pipeline, run:
sudo unzip <model-filename>.zip -d /clara/common/models/
Many reference pipelines are triggered by Clara DICOM Adaptor after it has received DICOM instances from external sender to one of its mapped AE Titles. This section explains the process with an example pipeline Liver Segmentation Pipeline.
Navigate to the pipeline directory mentioned above. The YAML file defines the reference pipeline. The pipeline definition can be customized to suit a specific deployment environment.
6.2.1. External DICOM Sender and DICOM Receiver
You need an external DICOM Service Class User (SCU) application to send images to the Clara DICOM Adapter (acting as a DICOM SCP). Similarly, when your pipeline finishes executing, you may want to send the output to an external DICOM receiver.
For this example, we will use the open-source DICOM toolkit DCMTK to provide the external DICOM sender and DICOM receiver functionality.
6.2.1.1. Install DCMTK
Install DCMTK utilities by issuing the following command:
sudo apt-get install dcmtk
6.2.1.2. Setup an External DICOM Receiver
You can use the storescp utility as an external DICOM receiver. Open a terminal and run the following command to set up a DICOM Receiver. Create a directory in your machine where DICOM images produced by Clara Deploy SDK will be stored. We will refer to that directory as “dicom-destination-directory”
            mkdir dicom-destination-directory
cd dicom-destination-directory
sudo storescp -v --fork -aet MYPACS 1004
MYPACS is the Application Entity (AE) title of the external DICOM Receiver.
1004 is the port number where storescp would be listening for any incoming DICOM traffic. Please note that the IP address will be the same as the local system.
6.2.1.3. Setup an External DICOM Sender
You can use the storescu utility from DCMTK as a DICOM sender.
6.2.2. Customize the Pipeline
Before publishing a pipeline, default settings in the pipeline definition YAML file can be modified to configure the resource request and orchestration mode. We will use the liver-tumor-pipeline.yaml to show the steps.
6.2.2.1. Customize GPU request
The number of GPU’s requested for an operator and/or a pipeline dependent service e.g. TensorRT Inference Server, can be customized if multiple GPU’s are available.
The GPU request for TensorRT Inference Server is set at 1 by default shown below,
            - name: trtis
  # TensorRT Inference Server, required by this AI application.
    container:
      image: nvcr.io/nvidia/tensorrtserver
      tag: 19.08-py3
      command: ["trtserver", "--model-store=$(NVIDIA_CLARA_SERVICE_DATA_PATH)/models"]
    requests:
      gpu: 1
With this setting, the TensorRT Inference Server can only access one GPU. When more GPU’s are available and intended to be used to increase the inference performance, the GPU request number must be customized to match desired number, e.g. 4, as shown below,
            - name: trtis
  # TensorRT Inference Server, required by this AI application.
    container:
      image: nvcr.io/nvidia/tensorrtserver
      tag: 19.08-py3
      command: ["trtserver", "--model-store=$(NVIDIA_CLARA_SERVICE_DATA_PATH)/models"]
    requests:
      gpu: 4
If another pipeline with a lesser number of GPU’s for TensorRT Inference Server has been published and triggered, the changes made here will not affect the running instance of TensorRT Inference Server.
6.2.2.2. Customize the Orchestration Mode
In this release of the Clara Deploy Platform, Clara Pipeline Driver [cpd] orchestration is supported, in addition to the Argo based orchestration mode.
This mode can be customized with the api-version attribute in the pipeline definition YAML file, setting the api-version to 0.3.0 makes the pipeline run in Argo mode, whereas setting this attribute to 0.4.0 Clara Pipeline Driver mode. The following example from the liver-tumor-pipeline.yaml specifies Argo mode.
            api-version: 0.3.0
name: liver-tumor-pipeline
6.2.3. Create the Pipeline
Creating a pipeline registers it with the platform. Once a pipeline is registered, it is represented with an ID. Follow the steps below:
Open a terminal and navigate to the directory
clara_ai_livertumor_pipelinewhich contains the reference pipeline
cd ~/.clara/pipelines/clara_ai_livertumor_pipeline
Create the pipeline by issuing the following command
clara create pipeline -p liver-tumor-pipeline.yaml
Clara CLI should successfully submit the pipeline and in return should print a pipeline ID.
Note down this pipeline ID as it would be used in a later section to define a new pipeline mapping in the DICOM adapter. The command clara list pipelines can be also used to list available pipelines.
Verify that the pipeline is correctly stored by issuing the following command
clara list pipelines
In the list of pipeline IDs, you should see the pipeline ID created in the previous step.
6.2.4. Configure the Clara DICOM Adapter
When you send images to the Clara Deploy SDK, the DICOM Adapter component acts as the internal DICOM Service Class Provider or a receiving agent.
Please refer to Clara DICOM Adapter for setup instructions.
6.2.5. Trigger Pipeline
A pipeline is triggered when a DICOM series is sent to the specific AE title of the Clara DICOM Adapter which is associated with that pipeline. To trigger this pipeline, you will need to have a set of relevant DICOM images that can be used as source input data.
For this pipeline, a sample test dataset in dicom format is available within the package in input/dcm.
Open a terminal and go to the directory which contains all your DICOM images.
cd ~/.clara/pipelines/clara_ai_livertumor_pipeline/input/dcm
Trigger the pipeline (push DICOM data to the proper ae title)
storescu -v +sd +r -xb -aet "DCM4CHEE" -aec "LiverSeg" AA.BBB.CC.DD 104 ./
Replace “AA.BBB.CC.DD” with the IP of your local machine.
When the above step is completed, you should see the following result in the terminal
            I: Received Store Response (Success) <br>
I: Releasing Association
6.2.6. Check Job Status and Download/View Payloads in Clara Console/Dashboard
With Clara Orchestrator (API version >= 0.4.0)
Go to the Clara Management Console using a web browser: The URL is:
<IP of the machine>:32002Go to the
JOBSview. You should see a job with a name that includes the name of the job you specifiedYou can inspect the status of each operator inside that job
Please check Clara Management Console to see the web application in detail.
With Argo Orchestrator (API version <= 0.3.0)
Go to the Clara dashboard UI using a web browser: The URL is <machine-ip>:8000.
You should see a job with a name that includes the name of the pipeline you created.
You can inspect the status of each operator inside that job
See: orchestrator
6.2.7. Verify That the External DICOM Receiver Received Your Images
If your pipeline outputs DICOM images and sends them to an external DICOM
receiver, you may want to verify that the images were indeed received. If you
used the storescp utility from DCMTK as mentioned earlier, please use a terminal
to navigate to the “dicom-destination-directory” and verify whether the expected
images are stored there. Also, you may want to use a third-party DICOM
viewer to view those images.
Some reference pipelines such as Malaria Microscopy or Chest X-ray Classification Pipeline are triggered via Clara CLI.
Here we explain with Chest X-ray Classification Pipeline.
Use
clara_ai_chestxray_pipelinefor<NGC ID for the pipeline>in the pipeline setup command:mkdir -p ~/.clara/pipelines cd ~/.clara/pipelines clara pull pipeline clara_ai_chestxray_pipeline cd clara_ai_chestxray_pipeline unzip app_chestxray-input_*.zip -d input sudo unzip app_chestxray-model_*.zip -d /clara/common/models
6.3.1. Publish the Pipeline
Publishing a pipeline registers it with the platform. Once a pipeline is registered, it is represented with an ID. Follow the steps below:
Open a terminal and navigate to the directory
clara_ai_chestxray_pipelinewhich contains the reference pipelinecd ~/.clara/pipelines/clara_ai_chestxray_pipeline
Create the pipeline by issuing the following command
clara create pipeline -p chestxray-pipeline.yaml
Clara CLI should successfully submit the pipeline and in return should print a pipeline ID.
NoteNote down the pipeline ID as it would be used in a later section to trigger a job with input files.
Verify that the pipeline is correctly stored by issuing the following command
            kubectl get pipeline
# or
clara list pipelines
In the list of pipeline IDs, you should be able to see the pipeline ID created in the previous step.
6.3.2. Trigger Pipeline
A pipeline can be triggered via Clara CLI. To trigger this pipeline, you will need to have a set of relevant images that can be used as source input data.
For this created pipeline, a sample chest x-ray file in 16-bit png format is available within the SDK in
~/.clara/pipelines/clara_ai_chestxray_pipeline/input/png.
Open a terminal and go to the directory which contains the reference pipeline.
cd ~/.clara/pipelines/clara_ai_chestxray_pipeline
Trigger the pipeline (push an input png file to Clara API Server) with the pipeline ID in the previous section.
clara create jobs -n chestxray-test -p <pipeline ID> -f input/png/
When the above step is completed, you should see the result in the terminal similar to the following (For example only and the UUID of Job and Payload will be different).
            JOB_ID:f3170b457f5c41879951e6da8f37341e
PAYLOAD_ID:12bb398cb54844d5958d51e66e10713a
Note down this job ID and payload ID as they would be used in a later section to access output files.
Then, start the job:
clara start job -j <JOB ID>
6.3.3. Check Job Status and Download/View Payloads in Clara Console/Dashboard
With Clara Orchestrator (API version >= 0.4.0)
Go to the Clara Management Console using a web browser: The URL is:
<IP of the machine>:32002Go to the
JOBSview. You should see a job with a name that includes the name of the job you specifiedYou can inspect the status of each operator inside that job
Please check Clara Management Console to see the web application in detail.
With Argo Orchestrator (API version <= 0.3.0)
Go to the Clara dashboard UI using a web browser: The URL is <machine-ip>:8000.
You should see a job with a name that includes the name of the pipeline you created.
You can inspect the status of each operator inside that job
See: orchestrator
6.3.4. Download and Verify the Outputs
Once the job has completed successfully, we can download output payload by using clara download command.
Output payload files are located under /operators/<operator name defined in the pipeline definition>/ folder.
Since we triggered Chest X-ray Pipeline whose AI operator’s name is ai-app-chestxray, we can use the following command to download output files:
clara download <Job ID>:/operators/ai-app-chestxray/*
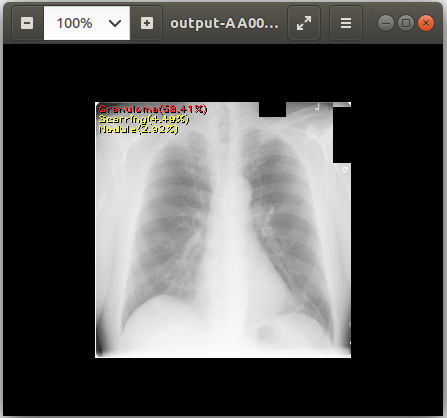
Then, you can see the output files using the following command:
            cat output-AA0007572607123433_v2.csv # View text output
eog output-AA0007572607123433_v2.png # View image output using `eog` which is an image viewer available in Ubuntu
If you are working with the server machine, the payload folder is directly accessible at the default payload folder /clara/payloads/<Payload ID>/.